:max_bytes(150000):strip_icc()/Pen-Signing-Paper-Tetra-Images-Getty-140193384-56a1c2d15f9b58b7d0c2595a.jpg)
"YouTube Thumbnails Reimagined - 3 Neon Border Techniques"

YouTube Thumbnails Reimagined - 3 Neon Border Techniques
Your YouTube video, or any other clip published on any forum, gets a larger number of hits if it has an attractive thumbnail. And, the fact is, a thumbnail becomes 10x more attractive when the main character that the image has have a neon border around it.
With that said, in the following sections, you will learn a couple of methods on how to add a YouTube thumbnail border around the main characters and/or objects that are significant to the clip.
In this article
01 Add Glowing Neon Border to YouTube Thumbnail with Filmora
02 Add a Glowing Neon Border in YouTube Thumbnail with Canva
03 Outline a Person in a YouTube Thumbnail with Photoshop
Part 1: How to Add Neon Border to YouTube Thumbnail for Free with Filmora
Being one of the most versatile and intuitive post-production tools available in the market today, Wondershare Filmora X allows you to add a neon border to a YouTube thumbnail quite conveniently. You can learn how to get this done on Windows or Mac by following the steps given below.
For Win 7 or later (64-bit)
For macOS 10.12 or later
Step 1: Define Project Settings and Add Image to the Timeline
Launch Wondershare Filmora X on your PC (a MacBook Pro M1 is used here), ensure that the project aspect ratio is set to 16:9 (Widescreen) on the splash screen, and click New Project. On the main interface, click the Preview quality and display settings icon from the upper-right area of the Timeline, click Change Project Aspect Ratio, click to select 1280 x 720 (HD) from the Resolution menu of the Project Settings box, and click OK to save the custom project settings.

Then select My Media from the menu bar if not already selected, click Project Media from the navigation pane, and click Import from the Media box to select and import the image of the main character or object that you want to use in the thumbnail.

Now, drag the image from the Media box to the Timeline at the bottom.

Step 2: Clear Image Background, Add Border, and Add Custom Background
Go to Effects from the menu bar, click to select the Default tab and then AI Portrait from the navigation pane, and click and drag the Human Segmentation preset from the right box, and place it over the image track in the Timeline.

Double-click the image layer, scroll down the upper-left box to the Video Effects section, and use the Edge Thickness and Edge Feather sliders to adjust the character’s edges to make them as realistic as possible. Click OK when done.

Next, click and drag the Human Border preset over the image track in the Timeline, and follow the same procedure to customize the border. This will give the character a neon border effect.

Now, use the method explained earlier to import a custom image for the background, and drag and place it under the previous track in the Timeline.

If you are running the latest version of Filmora, you will find there are some neon light effects available under AI Portrait as well.

Step 3: Add Titles to Thumbnail
Go to Titles from the menu bar, click to select the Default tab and then Lower 3rds from the navigation pane, and click and drag your preferred lower-third preset from the right window to a separate layer in the Timeline. Double-click the lower-third layer, and use the available options in the upper-left window to change the text, its color, etc., and drag the textbox to place it to your preferred position on the image as well. Click OK to save the changes.
Next, click to select Titles from the navigation pane, and drag your preferred title from the right window to the upper-most track in the Timeline. Now use the method explained earlier to edit the text, its color, position, etc. to make it look professional.

For more tips and tricks for creating YouTube thumbnail, you can check this You Tube thumbnail creating guide.
Step 4: Get the Neon Border Thumbnail
Click the Snapshot (Camera) icon from the upper-right area of the Timeline, go to My Media from the menu bar, right-click the thumbnail of the screenshot you captured, and click Reveal in Finder (on Mac) or Reveal in Explorer (on Windows) to get to the folder the YouTube thumbnail border is saved in.

Part 2: How to Add a Glowing Neon Border in Your YouTube Thumbnail with Canva
Canva is another intuitive editing program that works on the web interface rather than having you download and install an app on your PC. You can add a neon border for YouTube thumbnails using Canva by following the instructions given below:
Step 1: Define Project Settings and Add a Background
After signing in to your Canva account, click Create a design from the top-right corner of the page, click Custom size from the bottom, define 1280 and 720 in the Width and Height fields on the box that appears respectively, and click Create new design.

Now, click to select Background from the navigation bar on the left (if the Background tool is not visible, click More and then choose Background from the expanded list), and click to select a background from the images available in the center pane.

Step 2: Upload an Image and Add Effects
Click Uploads from the navigation bar, click the More icon from the right of the Upload media button present at the top of the center pane, choose your preferred method to upload the image (with the transparent background) that you want to use, upload the image, and drag it from the center pane to the Canvas.
Note: You can use any of the tools available online to remove the background from your image for free.

To add a YouTube thumbnail border, make sure that the image that you added to the Canvas is selected, click the Duplicate icon from the upper-right area, and use the scaling handles of the copy of the image to increase its size a bit. Reposition the image back to its original location as well.
Then, click Edit image from the upper-left corner of the Canvas, click Duotone from the Edit image pane at the center, if need be, click See all, choose your preferred duotone effect to apply on the image, choose your preferred highlight and shadow colors from the box that appears next, and click Back from the top of the pane.

Next, click See all next to the Adjust section from the center pane, and drag the Blur slider to the right to increase the blur effect on the image.

Step 3: Position the Layers
While keeping the duplicate image selected, click the Position button from the upper-right area of the Canvas, and click Background to send the second image behind the first one to get the neon border effect for the photo.

Part 3: How to Outline a Person in a YouTube Thumbnail with Photoshop
Because YouTube thumbnails are nothing but static images, creating YouTube thumbnail border with Adobe Photoshop is comparatively easier. The process of doing this is given below:
Step 1: Define Document Preferences and Import an Image
Launch Adobe Photoshop on your PC, click Create new, and on the New Document customization box, define the width and height values to 1280 and 720 pixels respectively. Select Transparent from the Background Contents menu as well if not already selected. Click Create from the bottom to create a new Photoshop document with the specified document settings. Next, open the folder that contains the source image, drag the photo to Photoshop, and press Enter to place the photo.

Step 2: Remove Background from the Image
Make sure that the image layer is selected in the Layers panel on the right, go to Select from the menu bar at the top, and click Subject. From the bottom of the Layers panel, click the Add a mask icon to get rid of the background, leaving only the human on the Canvas.

Step 3: Add a Custom Background and an Outline Around the Subject
Use the method explained earlier to import a background image of your choice to Photoshop. Drag the background image layer to the bottom in the Layers panel. Double-click the masked layer, click to select Stroke from the left pane of the Layer Style box, and use the options available on the right to manage the size, color, position, etc. of the stroke that has been added around the human subject. Click OK when done, and then export the image normally to use it as a YouTube thumbnail border.

Summary
It is important to know that the default resolution of a YouTube thumbnail is 1280 x 720 pixels that is usually written and referred to as 720p. While adding a YouTube thumbnail border, it is also imperative to have a good sense of color combination and fonts. Furthermore, a decent tool like Wondershare Filmora X must be used to add an appealing neon border around the main subject in the thumbnail image easily and quickly.
02 Add a Glowing Neon Border in YouTube Thumbnail with Canva
03 Outline a Person in a YouTube Thumbnail with Photoshop
Part 1: How to Add Neon Border to YouTube Thumbnail for Free with Filmora
Being one of the most versatile and intuitive post-production tools available in the market today, Wondershare Filmora X allows you to add a neon border to a YouTube thumbnail quite conveniently. You can learn how to get this done on Windows or Mac by following the steps given below.
For Win 7 or later (64-bit)
For macOS 10.12 or later
Step 1: Define Project Settings and Add Image to the Timeline
Launch Wondershare Filmora X on your PC (a MacBook Pro M1 is used here), ensure that the project aspect ratio is set to 16:9 (Widescreen) on the splash screen, and click New Project. On the main interface, click the Preview quality and display settings icon from the upper-right area of the Timeline, click Change Project Aspect Ratio, click to select 1280 x 720 (HD) from the Resolution menu of the Project Settings box, and click OK to save the custom project settings.

Then select My Media from the menu bar if not already selected, click Project Media from the navigation pane, and click Import from the Media box to select and import the image of the main character or object that you want to use in the thumbnail.

Now, drag the image from the Media box to the Timeline at the bottom.

Step 2: Clear Image Background, Add Border, and Add Custom Background
Go to Effects from the menu bar, click to select the Default tab and then AI Portrait from the navigation pane, and click and drag the Human Segmentation preset from the right box, and place it over the image track in the Timeline.

Double-click the image layer, scroll down the upper-left box to the Video Effects section, and use the Edge Thickness and Edge Feather sliders to adjust the character’s edges to make them as realistic as possible. Click OK when done.

Next, click and drag the Human Border preset over the image track in the Timeline, and follow the same procedure to customize the border. This will give the character a neon border effect.

Now, use the method explained earlier to import a custom image for the background, and drag and place it under the previous track in the Timeline.

If you are running the latest version of Filmora, you will find there are some neon light effects available under AI Portrait as well.

Step 3: Add Titles to Thumbnail
Go to Titles from the menu bar, click to select the Default tab and then Lower 3rds from the navigation pane, and click and drag your preferred lower-third preset from the right window to a separate layer in the Timeline. Double-click the lower-third layer, and use the available options in the upper-left window to change the text, its color, etc., and drag the textbox to place it to your preferred position on the image as well. Click OK to save the changes.
Next, click to select Titles from the navigation pane, and drag your preferred title from the right window to the upper-most track in the Timeline. Now use the method explained earlier to edit the text, its color, position, etc. to make it look professional.

For more tips and tricks for creating YouTube thumbnail, you can check this You Tube thumbnail creating guide.
Step 4: Get the Neon Border Thumbnail
Click the Snapshot (Camera) icon from the upper-right area of the Timeline, go to My Media from the menu bar, right-click the thumbnail of the screenshot you captured, and click Reveal in Finder (on Mac) or Reveal in Explorer (on Windows) to get to the folder the YouTube thumbnail border is saved in.

Part 2: How to Add a Glowing Neon Border in Your YouTube Thumbnail with Canva
Canva is another intuitive editing program that works on the web interface rather than having you download and install an app on your PC. You can add a neon border for YouTube thumbnails using Canva by following the instructions given below:
Step 1: Define Project Settings and Add a Background
After signing in to your Canva account, click Create a design from the top-right corner of the page, click Custom size from the bottom, define 1280 and 720 in the Width and Height fields on the box that appears respectively, and click Create new design.

Now, click to select Background from the navigation bar on the left (if the Background tool is not visible, click More and then choose Background from the expanded list), and click to select a background from the images available in the center pane.

Step 2: Upload an Image and Add Effects
Click Uploads from the navigation bar, click the More icon from the right of the Upload media button present at the top of the center pane, choose your preferred method to upload the image (with the transparent background) that you want to use, upload the image, and drag it from the center pane to the Canvas.
Note: You can use any of the tools available online to remove the background from your image for free.

To add a YouTube thumbnail border, make sure that the image that you added to the Canvas is selected, click the Duplicate icon from the upper-right area, and use the scaling handles of the copy of the image to increase its size a bit. Reposition the image back to its original location as well.
Then, click Edit image from the upper-left corner of the Canvas, click Duotone from the Edit image pane at the center, if need be, click See all, choose your preferred duotone effect to apply on the image, choose your preferred highlight and shadow colors from the box that appears next, and click Back from the top of the pane.

Next, click See all next to the Adjust section from the center pane, and drag the Blur slider to the right to increase the blur effect on the image.

Step 3: Position the Layers
While keeping the duplicate image selected, click the Position button from the upper-right area of the Canvas, and click Background to send the second image behind the first one to get the neon border effect for the photo.

Part 3: How to Outline a Person in a YouTube Thumbnail with Photoshop
Because YouTube thumbnails are nothing but static images, creating YouTube thumbnail border with Adobe Photoshop is comparatively easier. The process of doing this is given below:
Step 1: Define Document Preferences and Import an Image
Launch Adobe Photoshop on your PC, click Create new, and on the New Document customization box, define the width and height values to 1280 and 720 pixels respectively. Select Transparent from the Background Contents menu as well if not already selected. Click Create from the bottom to create a new Photoshop document with the specified document settings. Next, open the folder that contains the source image, drag the photo to Photoshop, and press Enter to place the photo.

Step 2: Remove Background from the Image
Make sure that the image layer is selected in the Layers panel on the right, go to Select from the menu bar at the top, and click Subject. From the bottom of the Layers panel, click the Add a mask icon to get rid of the background, leaving only the human on the Canvas.

Step 3: Add a Custom Background and an Outline Around the Subject
Use the method explained earlier to import a background image of your choice to Photoshop. Drag the background image layer to the bottom in the Layers panel. Double-click the masked layer, click to select Stroke from the left pane of the Layer Style box, and use the options available on the right to manage the size, color, position, etc. of the stroke that has been added around the human subject. Click OK when done, and then export the image normally to use it as a YouTube thumbnail border.

Summary
It is important to know that the default resolution of a YouTube thumbnail is 1280 x 720 pixels that is usually written and referred to as 720p. While adding a YouTube thumbnail border, it is also imperative to have a good sense of color combination and fonts. Furthermore, a decent tool like Wondershare Filmora X must be used to add an appealing neon border around the main subject in the thumbnail image easily and quickly.
02 Add a Glowing Neon Border in YouTube Thumbnail with Canva
03 Outline a Person in a YouTube Thumbnail with Photoshop
Part 1: How to Add Neon Border to YouTube Thumbnail for Free with Filmora
Being one of the most versatile and intuitive post-production tools available in the market today, Wondershare Filmora X allows you to add a neon border to a YouTube thumbnail quite conveniently. You can learn how to get this done on Windows or Mac by following the steps given below.
For Win 7 or later (64-bit)
For macOS 10.12 or later
Step 1: Define Project Settings and Add Image to the Timeline
Launch Wondershare Filmora X on your PC (a MacBook Pro M1 is used here), ensure that the project aspect ratio is set to 16:9 (Widescreen) on the splash screen, and click New Project. On the main interface, click the Preview quality and display settings icon from the upper-right area of the Timeline, click Change Project Aspect Ratio, click to select 1280 x 720 (HD) from the Resolution menu of the Project Settings box, and click OK to save the custom project settings.

Then select My Media from the menu bar if not already selected, click Project Media from the navigation pane, and click Import from the Media box to select and import the image of the main character or object that you want to use in the thumbnail.

Now, drag the image from the Media box to the Timeline at the bottom.

Step 2: Clear Image Background, Add Border, and Add Custom Background
Go to Effects from the menu bar, click to select the Default tab and then AI Portrait from the navigation pane, and click and drag the Human Segmentation preset from the right box, and place it over the image track in the Timeline.

Double-click the image layer, scroll down the upper-left box to the Video Effects section, and use the Edge Thickness and Edge Feather sliders to adjust the character’s edges to make them as realistic as possible. Click OK when done.

Next, click and drag the Human Border preset over the image track in the Timeline, and follow the same procedure to customize the border. This will give the character a neon border effect.

Now, use the method explained earlier to import a custom image for the background, and drag and place it under the previous track in the Timeline.

If you are running the latest version of Filmora, you will find there are some neon light effects available under AI Portrait as well.

Step 3: Add Titles to Thumbnail
Go to Titles from the menu bar, click to select the Default tab and then Lower 3rds from the navigation pane, and click and drag your preferred lower-third preset from the right window to a separate layer in the Timeline. Double-click the lower-third layer, and use the available options in the upper-left window to change the text, its color, etc., and drag the textbox to place it to your preferred position on the image as well. Click OK to save the changes.
Next, click to select Titles from the navigation pane, and drag your preferred title from the right window to the upper-most track in the Timeline. Now use the method explained earlier to edit the text, its color, position, etc. to make it look professional.

For more tips and tricks for creating YouTube thumbnail, you can check this You Tube thumbnail creating guide.
Step 4: Get the Neon Border Thumbnail
Click the Snapshot (Camera) icon from the upper-right area of the Timeline, go to My Media from the menu bar, right-click the thumbnail of the screenshot you captured, and click Reveal in Finder (on Mac) or Reveal in Explorer (on Windows) to get to the folder the YouTube thumbnail border is saved in.

Part 2: How to Add a Glowing Neon Border in Your YouTube Thumbnail with Canva
Canva is another intuitive editing program that works on the web interface rather than having you download and install an app on your PC. You can add a neon border for YouTube thumbnails using Canva by following the instructions given below:
Step 1: Define Project Settings and Add a Background
After signing in to your Canva account, click Create a design from the top-right corner of the page, click Custom size from the bottom, define 1280 and 720 in the Width and Height fields on the box that appears respectively, and click Create new design.

Now, click to select Background from the navigation bar on the left (if the Background tool is not visible, click More and then choose Background from the expanded list), and click to select a background from the images available in the center pane.

Step 2: Upload an Image and Add Effects
Click Uploads from the navigation bar, click the More icon from the right of the Upload media button present at the top of the center pane, choose your preferred method to upload the image (with the transparent background) that you want to use, upload the image, and drag it from the center pane to the Canvas.
Note: You can use any of the tools available online to remove the background from your image for free.

To add a YouTube thumbnail border, make sure that the image that you added to the Canvas is selected, click the Duplicate icon from the upper-right area, and use the scaling handles of the copy of the image to increase its size a bit. Reposition the image back to its original location as well.
Then, click Edit image from the upper-left corner of the Canvas, click Duotone from the Edit image pane at the center, if need be, click See all, choose your preferred duotone effect to apply on the image, choose your preferred highlight and shadow colors from the box that appears next, and click Back from the top of the pane.

Next, click See all next to the Adjust section from the center pane, and drag the Blur slider to the right to increase the blur effect on the image.

Step 3: Position the Layers
While keeping the duplicate image selected, click the Position button from the upper-right area of the Canvas, and click Background to send the second image behind the first one to get the neon border effect for the photo.

Part 3: How to Outline a Person in a YouTube Thumbnail with Photoshop
Because YouTube thumbnails are nothing but static images, creating YouTube thumbnail border with Adobe Photoshop is comparatively easier. The process of doing this is given below:
Step 1: Define Document Preferences and Import an Image
Launch Adobe Photoshop on your PC, click Create new, and on the New Document customization box, define the width and height values to 1280 and 720 pixels respectively. Select Transparent from the Background Contents menu as well if not already selected. Click Create from the bottom to create a new Photoshop document with the specified document settings. Next, open the folder that contains the source image, drag the photo to Photoshop, and press Enter to place the photo.

Step 2: Remove Background from the Image
Make sure that the image layer is selected in the Layers panel on the right, go to Select from the menu bar at the top, and click Subject. From the bottom of the Layers panel, click the Add a mask icon to get rid of the background, leaving only the human on the Canvas.

Step 3: Add a Custom Background and an Outline Around the Subject
Use the method explained earlier to import a background image of your choice to Photoshop. Drag the background image layer to the bottom in the Layers panel. Double-click the masked layer, click to select Stroke from the left pane of the Layer Style box, and use the options available on the right to manage the size, color, position, etc. of the stroke that has been added around the human subject. Click OK when done, and then export the image normally to use it as a YouTube thumbnail border.

Summary
It is important to know that the default resolution of a YouTube thumbnail is 1280 x 720 pixels that is usually written and referred to as 720p. While adding a YouTube thumbnail border, it is also imperative to have a good sense of color combination and fonts. Furthermore, a decent tool like Wondershare Filmora X must be used to add an appealing neon border around the main subject in the thumbnail image easily and quickly.
02 Add a Glowing Neon Border in YouTube Thumbnail with Canva
03 Outline a Person in a YouTube Thumbnail with Photoshop
Part 1: How to Add Neon Border to YouTube Thumbnail for Free with Filmora
Being one of the most versatile and intuitive post-production tools available in the market today, Wondershare Filmora X allows you to add a neon border to a YouTube thumbnail quite conveniently. You can learn how to get this done on Windows or Mac by following the steps given below.
For Win 7 or later (64-bit)
For macOS 10.12 or later
Step 1: Define Project Settings and Add Image to the Timeline
Launch Wondershare Filmora X on your PC (a MacBook Pro M1 is used here), ensure that the project aspect ratio is set to 16:9 (Widescreen) on the splash screen, and click New Project. On the main interface, click the Preview quality and display settings icon from the upper-right area of the Timeline, click Change Project Aspect Ratio, click to select 1280 x 720 (HD) from the Resolution menu of the Project Settings box, and click OK to save the custom project settings.

Then select My Media from the menu bar if not already selected, click Project Media from the navigation pane, and click Import from the Media box to select and import the image of the main character or object that you want to use in the thumbnail.

Now, drag the image from the Media box to the Timeline at the bottom.

Step 2: Clear Image Background, Add Border, and Add Custom Background
Go to Effects from the menu bar, click to select the Default tab and then AI Portrait from the navigation pane, and click and drag the Human Segmentation preset from the right box, and place it over the image track in the Timeline.

Double-click the image layer, scroll down the upper-left box to the Video Effects section, and use the Edge Thickness and Edge Feather sliders to adjust the character’s edges to make them as realistic as possible. Click OK when done.

Next, click and drag the Human Border preset over the image track in the Timeline, and follow the same procedure to customize the border. This will give the character a neon border effect.

Now, use the method explained earlier to import a custom image for the background, and drag and place it under the previous track in the Timeline.

If you are running the latest version of Filmora, you will find there are some neon light effects available under AI Portrait as well.

Step 3: Add Titles to Thumbnail
Go to Titles from the menu bar, click to select the Default tab and then Lower 3rds from the navigation pane, and click and drag your preferred lower-third preset from the right window to a separate layer in the Timeline. Double-click the lower-third layer, and use the available options in the upper-left window to change the text, its color, etc., and drag the textbox to place it to your preferred position on the image as well. Click OK to save the changes.
Next, click to select Titles from the navigation pane, and drag your preferred title from the right window to the upper-most track in the Timeline. Now use the method explained earlier to edit the text, its color, position, etc. to make it look professional.

For more tips and tricks for creating YouTube thumbnail, you can check this You Tube thumbnail creating guide.
Step 4: Get the Neon Border Thumbnail
Click the Snapshot (Camera) icon from the upper-right area of the Timeline, go to My Media from the menu bar, right-click the thumbnail of the screenshot you captured, and click Reveal in Finder (on Mac) or Reveal in Explorer (on Windows) to get to the folder the YouTube thumbnail border is saved in.

Part 2: How to Add a Glowing Neon Border in Your YouTube Thumbnail with Canva
Canva is another intuitive editing program that works on the web interface rather than having you download and install an app on your PC. You can add a neon border for YouTube thumbnails using Canva by following the instructions given below:
Step 1: Define Project Settings and Add a Background
After signing in to your Canva account, click Create a design from the top-right corner of the page, click Custom size from the bottom, define 1280 and 720 in the Width and Height fields on the box that appears respectively, and click Create new design.

Now, click to select Background from the navigation bar on the left (if the Background tool is not visible, click More and then choose Background from the expanded list), and click to select a background from the images available in the center pane.

Step 2: Upload an Image and Add Effects
Click Uploads from the navigation bar, click the More icon from the right of the Upload media button present at the top of the center pane, choose your preferred method to upload the image (with the transparent background) that you want to use, upload the image, and drag it from the center pane to the Canvas.
Note: You can use any of the tools available online to remove the background from your image for free.

To add a YouTube thumbnail border, make sure that the image that you added to the Canvas is selected, click the Duplicate icon from the upper-right area, and use the scaling handles of the copy of the image to increase its size a bit. Reposition the image back to its original location as well.
Then, click Edit image from the upper-left corner of the Canvas, click Duotone from the Edit image pane at the center, if need be, click See all, choose your preferred duotone effect to apply on the image, choose your preferred highlight and shadow colors from the box that appears next, and click Back from the top of the pane.

Next, click See all next to the Adjust section from the center pane, and drag the Blur slider to the right to increase the blur effect on the image.

Step 3: Position the Layers
While keeping the duplicate image selected, click the Position button from the upper-right area of the Canvas, and click Background to send the second image behind the first one to get the neon border effect for the photo.

Part 3: How to Outline a Person in a YouTube Thumbnail with Photoshop
Because YouTube thumbnails are nothing but static images, creating YouTube thumbnail border with Adobe Photoshop is comparatively easier. The process of doing this is given below:
Step 1: Define Document Preferences and Import an Image
Launch Adobe Photoshop on your PC, click Create new, and on the New Document customization box, define the width and height values to 1280 and 720 pixels respectively. Select Transparent from the Background Contents menu as well if not already selected. Click Create from the bottom to create a new Photoshop document with the specified document settings. Next, open the folder that contains the source image, drag the photo to Photoshop, and press Enter to place the photo.

Step 2: Remove Background from the Image
Make sure that the image layer is selected in the Layers panel on the right, go to Select from the menu bar at the top, and click Subject. From the bottom of the Layers panel, click the Add a mask icon to get rid of the background, leaving only the human on the Canvas.

Step 3: Add a Custom Background and an Outline Around the Subject
Use the method explained earlier to import a background image of your choice to Photoshop. Drag the background image layer to the bottom in the Layers panel. Double-click the masked layer, click to select Stroke from the left pane of the Layer Style box, and use the options available on the right to manage the size, color, position, etc. of the stroke that has been added around the human subject. Click OK when done, and then export the image normally to use it as a YouTube thumbnail border.

Summary
It is important to know that the default resolution of a YouTube thumbnail is 1280 x 720 pixels that is usually written and referred to as 720p. While adding a YouTube thumbnail border, it is also imperative to have a good sense of color combination and fonts. Furthermore, a decent tool like Wondershare Filmora X must be used to add an appealing neon border around the main subject in the thumbnail image easily and quickly.
From YouTube to IGTV: Top Methods Unveiled
How to Convert YouTube to IGTV Videos? [3 Ways]

Shanoon Cox
Mar 27, 2024• Proven solutions
Publishing video content on social media platforms like Instagram or IGTV can help influencers and brands reach new customers. The only trouble is that both Instagram and IGTV have very precise video upload requirements, so each video you want to share on your IGTV channel must be saved in MP4 file format and in a 9:16 aspect ratio.
YouTube videos, on the other hand, are mostly horizontally oriented. If you attempt to upload a YouTube video to IGTV and wondering how to achieve it, just keep reading. Because in this article, we are going to show you how you can convert a horizontal YouTube video into IGTV vertical one in 3 different ways.
- Part 1: Re-post YouTube Video to IGTV with Filmora
- Part 2: Use YouTube to IGTV Online Converter
- Part 3: Convert YouTube Video to IGTV with FXP
Part 1: Convert YouTube Videos to IGTV Vertical Videos with Filmora
If you don’t already have the original file of the video you’d like to upload to your IGTV channel, you can download a video from YouTube , but keep in mind that you can’t use any content without permission from its owner.
Once you have the file, you can create a new project in Filmora and then after the project loads you should click on the File menu and select the Project Settings option. Pick one of the 9:16 video resolution options provided by the editor and click OK to confirm the changes.

Click on the Import button to add a YouTube video to your project and then place it on the timeline. Your video will be displayed in the Preview Panel, and you’ll be able to see that the video is positioned at the center of the panel and that its top and bottom are black.
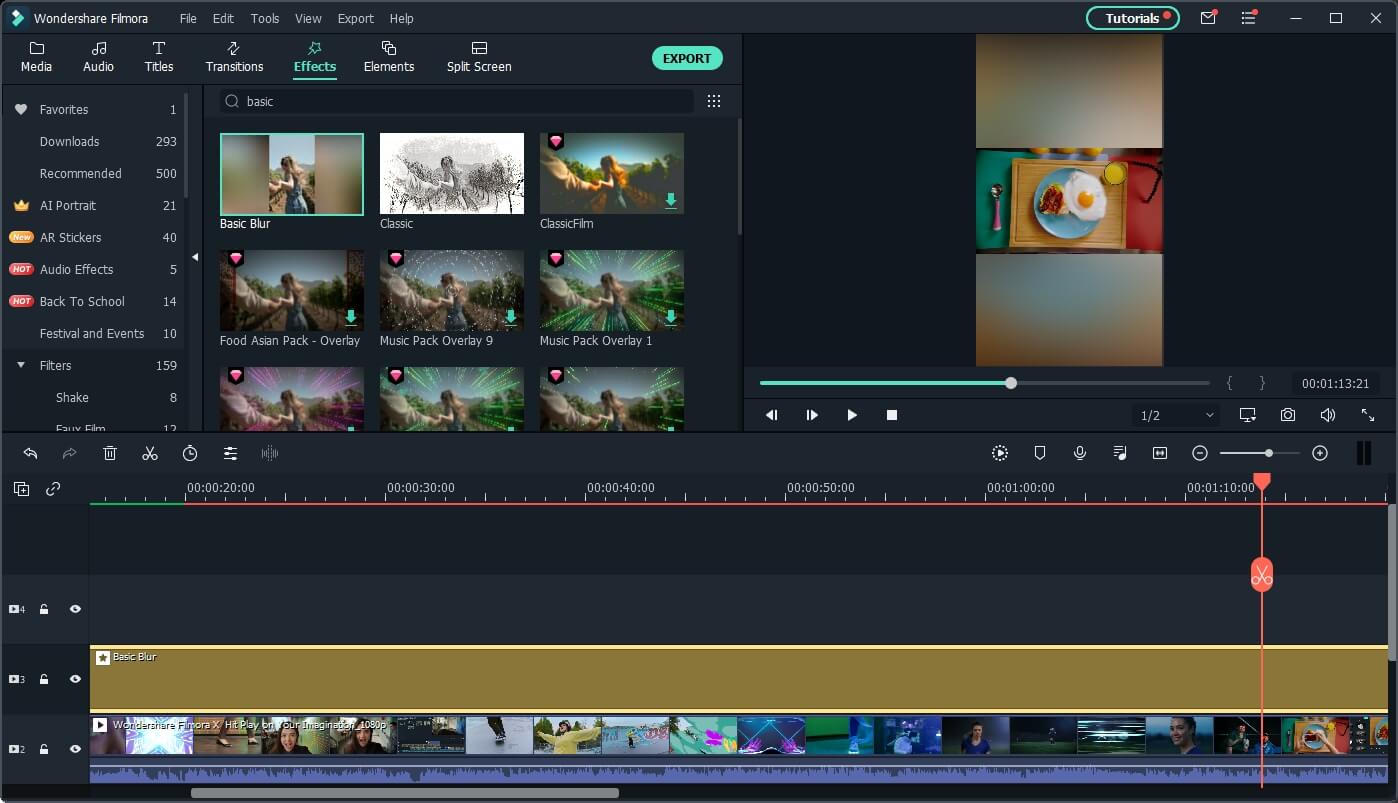
Go to the Effects tab and click on the Background Blur submenu if you want to blur the empty areas of the frame. Add the Basic Blur effect to the timeline and drag one of its sides to position it over the entire video.
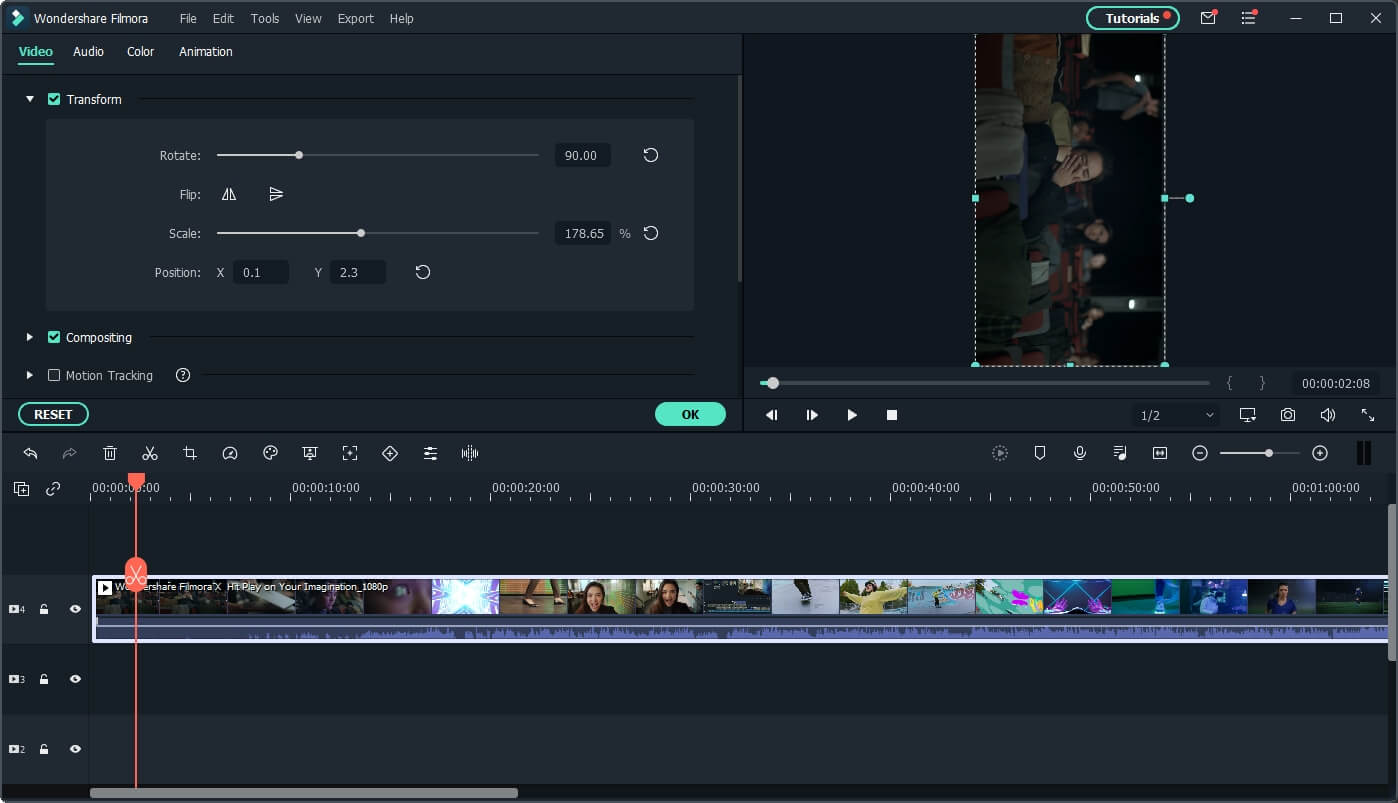
In case you are working with a video that already has a 16:9 aspect ratio, you can create a project that has the same aspect ratio, and then just use the Rotate slider in the Transform menu, to change turn a landscape video into a portrait video. The scaling tool is helpful to enlarge the frames in a vertical aspect ratio.
Filmora lets you create vertical videos in just a few quick steps, which makes it a perfect choice for influencers and marketers who want to share video content on YouTube and IGTV.
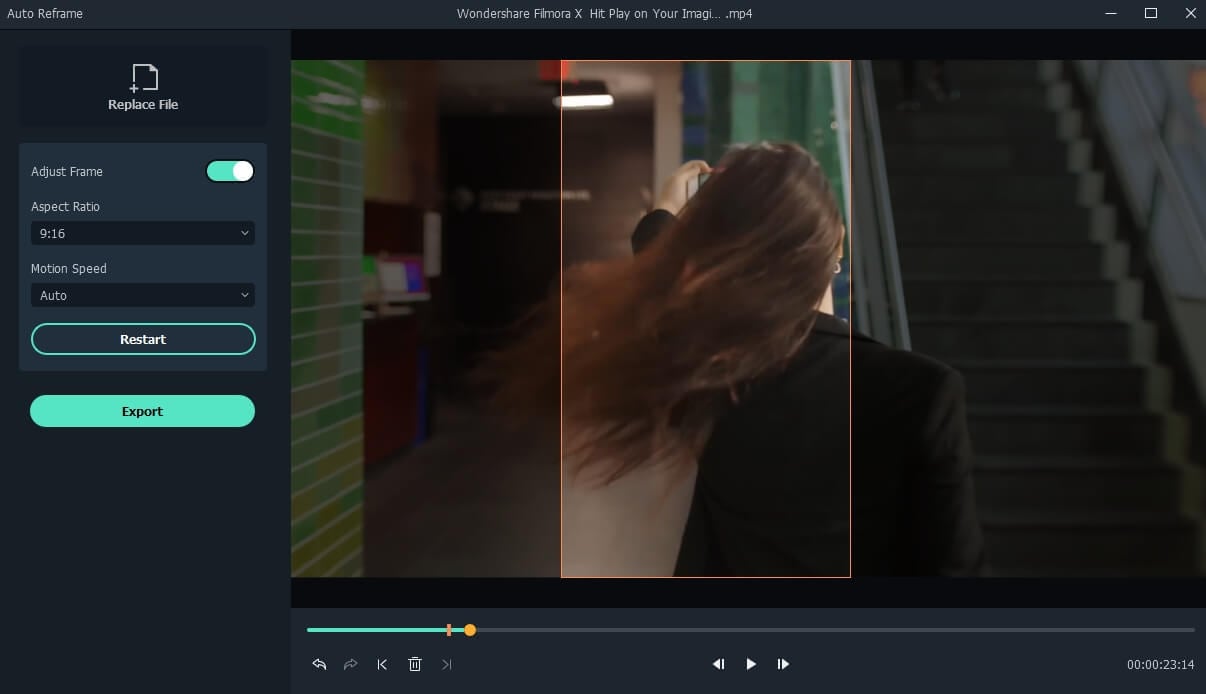
Latest News: In Filmora V10.5 and later versions, there is a new feature called Auto-Reframe. This feature allows users to convert one video for different social media platforms based on the aspect ratio changing, and its features of detecting the moving object. Click the Analyze button, and Filmora will convert this 16:9 YouTube video to vertical 9:16 IGTV video automatically. And I can adjust frames to follow Yasmine’s movement to fine-tune the result.
You can watch the video below to find out more information about the Auto-Reframe tool.
Part 2: Use Kapwing to Convert YouTube to IGTV Online
YouTubers who already have lots of videos on their channel can use online video editing platforms, like Kapwing to edit the content they want to post on IGTV. This online video editor offers a number of video editing tools that let you polish your videos before posting them on social media.
Click on the Resize tool and simply copy and paste the URL of a YouTube into the appropriate bar and the platform will automatically import a video and display it on the screen once the content is finally fetched.
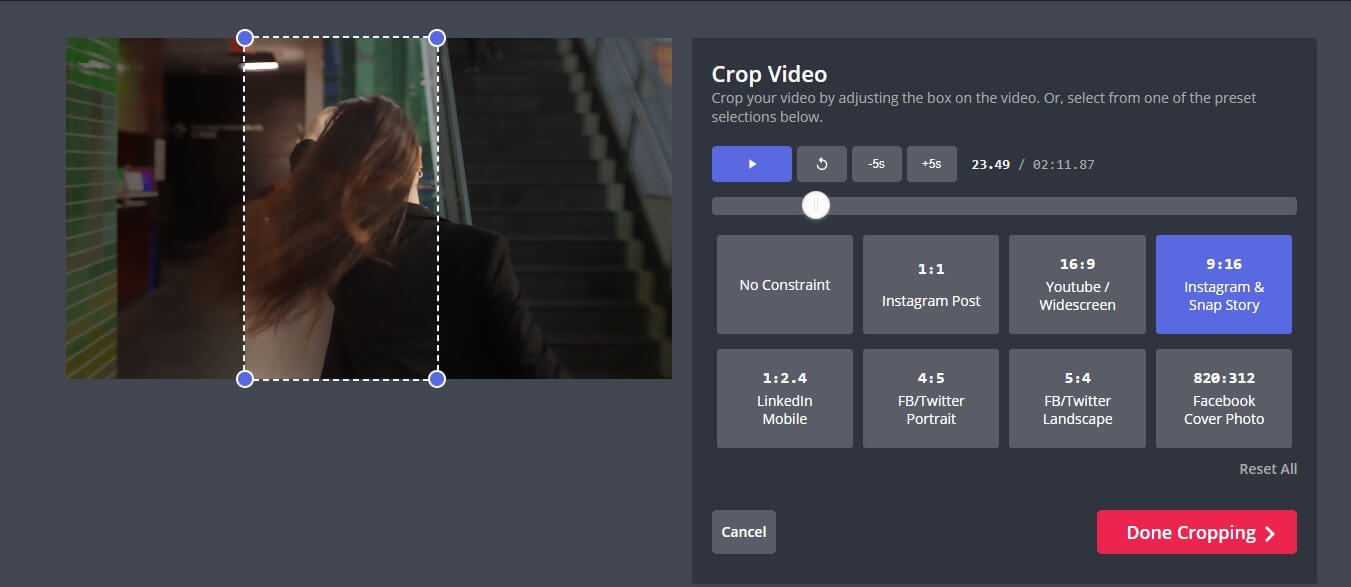
Pick the Story (Snap/Insta) or IGTV 9:16 option and then proceed to choose the background color for your IGTV video, increase or decrease the zoom level or change the position of the video. Click on the Create button when ready and wait for Kapwing to process your video. All videos you create with the free version of this online video editor are going to be watermarked and you have to pay a six-dollar fee for each watermark-free video you edit with Kapwing or you can opt for a $20 monthly subscription fee that enables you to export an unlimited amount of videos without watermarks each month.
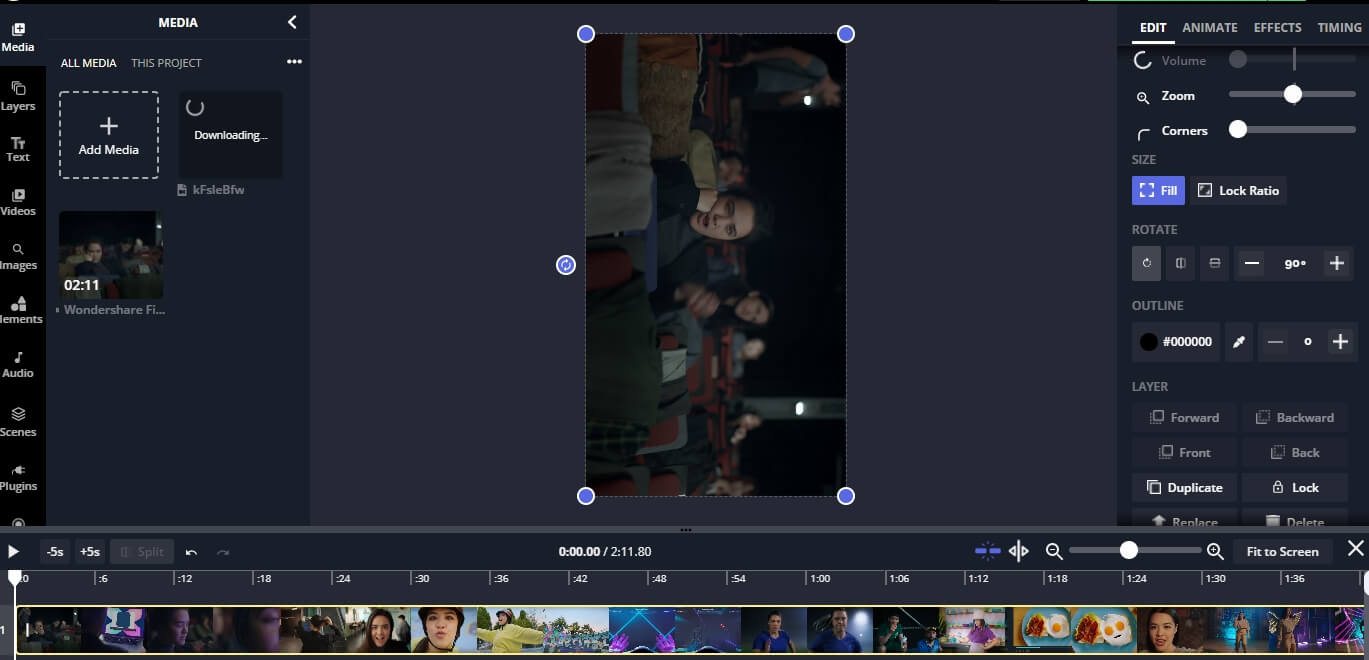
A growing number of IGTV users choose to rotate their videos, instead of resizing them, so if you already have a YouTube video with a 16:9 aspect ratio you can just rotate it and get a video with a 9:16 aspect ratio. Click on the Rotate option and then rotate it 90 degrees clockwise or counterclockwise and click on the Create button. If you opt for this method of creating a vertical video for IGTV, your video will remain the same size, but the viewers will have to hold their phones horizontally in order to view it properly.
You may also like: How to Convert MKV to MP4 without Losing Quality [Free Converters Provided] >>
Part 3: Changing the Aspect Ratio of a YouTube Video with Final Cut Pro
Editing videos with professional video editing software products like Final Cut Pro or Premiere Pro requires a certain amount of skill. There is more than just one way to change the aspect ratio of a video in Final Cut Pro, but probably the best one is to set the project resolution to 2160X3840 or any other lower resolution that matches the 9:16 aspect ratio. During the video editing process, you will have to resize all of the footage you want to include in the final version of the video. Planning your shots and composing them differently than you would compose horizontally oriented shots can potentially save you a little time on resizing and repositioning the video clips you’re working with.
If you’ve already exported a video and uploaded it to your YouTube channel, you can open that video in Final Cut Pro and just rotate it using the Transform tools. However, the viewers will have to hold their phones in a horizontal position while watching the video if you choose this method of creating a 9:16 aspect ratio in Final Cut Pro.
Conclusion
Posting YouTube videos on your IGTV channel is still a somewhat complicated process because you can’t share posts directly from one platform to the other. Moreover, you can’t upload videos that last more than ten minutes to IGTV, unless you have a verified account. Even so, the IGTV platform can help you extend the reach of your videos and increase the revenue you’re generating from the content you’re sharing on social media. Do you know another way of changing a YouTube video’s aspect ratio before re-posting it on IGTV? Leave a comment and let us know.
You may also like: YouTube to WAV File: 4 Best Free Convert Solutions >>

Shanoon Cox
Shanoon Cox is a writer and a lover of all things video.
Follow @Shanoon Cox
Shanoon Cox
Mar 27, 2024• Proven solutions
Publishing video content on social media platforms like Instagram or IGTV can help influencers and brands reach new customers. The only trouble is that both Instagram and IGTV have very precise video upload requirements, so each video you want to share on your IGTV channel must be saved in MP4 file format and in a 9:16 aspect ratio.
YouTube videos, on the other hand, are mostly horizontally oriented. If you attempt to upload a YouTube video to IGTV and wondering how to achieve it, just keep reading. Because in this article, we are going to show you how you can convert a horizontal YouTube video into IGTV vertical one in 3 different ways.
- Part 1: Re-post YouTube Video to IGTV with Filmora
- Part 2: Use YouTube to IGTV Online Converter
- Part 3: Convert YouTube Video to IGTV with FXP
Part 1: Convert YouTube Videos to IGTV Vertical Videos with Filmora
If you don’t already have the original file of the video you’d like to upload to your IGTV channel, you can download a video from YouTube , but keep in mind that you can’t use any content without permission from its owner.
Once you have the file, you can create a new project in Filmora and then after the project loads you should click on the File menu and select the Project Settings option. Pick one of the 9:16 video resolution options provided by the editor and click OK to confirm the changes.

Click on the Import button to add a YouTube video to your project and then place it on the timeline. Your video will be displayed in the Preview Panel, and you’ll be able to see that the video is positioned at the center of the panel and that its top and bottom are black.
Go to the Effects tab and click on the Background Blur submenu if you want to blur the empty areas of the frame. Add the Basic Blur effect to the timeline and drag one of its sides to position it over the entire video.

In case you are working with a video that already has a 16:9 aspect ratio, you can create a project that has the same aspect ratio, and then just use the Rotate slider in the Transform menu, to change turn a landscape video into a portrait video. The scaling tool is helpful to enlarge the frames in a vertical aspect ratio.

Filmora lets you create vertical videos in just a few quick steps, which makes it a perfect choice for influencers and marketers who want to share video content on YouTube and IGTV.
Latest News: In Filmora V10.5 and later versions, there is a new feature called Auto-Reframe. This feature allows users to convert one video for different social media platforms based on the aspect ratio changing, and its features of detecting the moving object. Click the Analyze button, and Filmora will convert this 16:9 YouTube video to vertical 9:16 IGTV video automatically. And I can adjust frames to follow Yasmine’s movement to fine-tune the result.

You can watch the video below to find out more information about the Auto-Reframe tool.
Part 2: Use Kapwing to Convert YouTube to IGTV Online
YouTubers who already have lots of videos on their channel can use online video editing platforms, like Kapwing to edit the content they want to post on IGTV. This online video editor offers a number of video editing tools that let you polish your videos before posting them on social media.
Click on the Resize tool and simply copy and paste the URL of a YouTube into the appropriate bar and the platform will automatically import a video and display it on the screen once the content is finally fetched.

Pick the Story (Snap/Insta) or IGTV 9:16 option and then proceed to choose the background color for your IGTV video, increase or decrease the zoom level or change the position of the video. Click on the Create button when ready and wait for Kapwing to process your video. All videos you create with the free version of this online video editor are going to be watermarked and you have to pay a six-dollar fee for each watermark-free video you edit with Kapwing or you can opt for a $20 monthly subscription fee that enables you to export an unlimited amount of videos without watermarks each month.

A growing number of IGTV users choose to rotate their videos, instead of resizing them, so if you already have a YouTube video with a 16:9 aspect ratio you can just rotate it and get a video with a 9:16 aspect ratio. Click on the Rotate option and then rotate it 90 degrees clockwise or counterclockwise and click on the Create button. If you opt for this method of creating a vertical video for IGTV, your video will remain the same size, but the viewers will have to hold their phones horizontally in order to view it properly.
You may also like: How to Convert MKV to MP4 without Losing Quality [Free Converters Provided] >>
Part 3: Changing the Aspect Ratio of a YouTube Video with Final Cut Pro
Editing videos with professional video editing software products like Final Cut Pro or Premiere Pro requires a certain amount of skill. There is more than just one way to change the aspect ratio of a video in Final Cut Pro, but probably the best one is to set the project resolution to 2160X3840 or any other lower resolution that matches the 9:16 aspect ratio. During the video editing process, you will have to resize all of the footage you want to include in the final version of the video. Planning your shots and composing them differently than you would compose horizontally oriented shots can potentially save you a little time on resizing and repositioning the video clips you’re working with.
If you’ve already exported a video and uploaded it to your YouTube channel, you can open that video in Final Cut Pro and just rotate it using the Transform tools. However, the viewers will have to hold their phones in a horizontal position while watching the video if you choose this method of creating a 9:16 aspect ratio in Final Cut Pro.
Conclusion
Posting YouTube videos on your IGTV channel is still a somewhat complicated process because you can’t share posts directly from one platform to the other. Moreover, you can’t upload videos that last more than ten minutes to IGTV, unless you have a verified account. Even so, the IGTV platform can help you extend the reach of your videos and increase the revenue you’re generating from the content you’re sharing on social media. Do you know another way of changing a YouTube video’s aspect ratio before re-posting it on IGTV? Leave a comment and let us know.
You may also like: YouTube to WAV File: 4 Best Free Convert Solutions >>

Shanoon Cox
Shanoon Cox is a writer and a lover of all things video.
Follow @Shanoon Cox
Shanoon Cox
Mar 27, 2024• Proven solutions
Publishing video content on social media platforms like Instagram or IGTV can help influencers and brands reach new customers. The only trouble is that both Instagram and IGTV have very precise video upload requirements, so each video you want to share on your IGTV channel must be saved in MP4 file format and in a 9:16 aspect ratio.
YouTube videos, on the other hand, are mostly horizontally oriented. If you attempt to upload a YouTube video to IGTV and wondering how to achieve it, just keep reading. Because in this article, we are going to show you how you can convert a horizontal YouTube video into IGTV vertical one in 3 different ways.
- Part 1: Re-post YouTube Video to IGTV with Filmora
- Part 2: Use YouTube to IGTV Online Converter
- Part 3: Convert YouTube Video to IGTV with FXP
Part 1: Convert YouTube Videos to IGTV Vertical Videos with Filmora
If you don’t already have the original file of the video you’d like to upload to your IGTV channel, you can download a video from YouTube , but keep in mind that you can’t use any content without permission from its owner.
Once you have the file, you can create a new project in Filmora and then after the project loads you should click on the File menu and select the Project Settings option. Pick one of the 9:16 video resolution options provided by the editor and click OK to confirm the changes.

Click on the Import button to add a YouTube video to your project and then place it on the timeline. Your video will be displayed in the Preview Panel, and you’ll be able to see that the video is positioned at the center of the panel and that its top and bottom are black.
Go to the Effects tab and click on the Background Blur submenu if you want to blur the empty areas of the frame. Add the Basic Blur effect to the timeline and drag one of its sides to position it over the entire video.

In case you are working with a video that already has a 16:9 aspect ratio, you can create a project that has the same aspect ratio, and then just use the Rotate slider in the Transform menu, to change turn a landscape video into a portrait video. The scaling tool is helpful to enlarge the frames in a vertical aspect ratio.

Filmora lets you create vertical videos in just a few quick steps, which makes it a perfect choice for influencers and marketers who want to share video content on YouTube and IGTV.
Latest News: In Filmora V10.5 and later versions, there is a new feature called Auto-Reframe. This feature allows users to convert one video for different social media platforms based on the aspect ratio changing, and its features of detecting the moving object. Click the Analyze button, and Filmora will convert this 16:9 YouTube video to vertical 9:16 IGTV video automatically. And I can adjust frames to follow Yasmine’s movement to fine-tune the result.

You can watch the video below to find out more information about the Auto-Reframe tool.
Part 2: Use Kapwing to Convert YouTube to IGTV Online
YouTubers who already have lots of videos on their channel can use online video editing platforms, like Kapwing to edit the content they want to post on IGTV. This online video editor offers a number of video editing tools that let you polish your videos before posting them on social media.
Click on the Resize tool and simply copy and paste the URL of a YouTube into the appropriate bar and the platform will automatically import a video and display it on the screen once the content is finally fetched.

Pick the Story (Snap/Insta) or IGTV 9:16 option and then proceed to choose the background color for your IGTV video, increase or decrease the zoom level or change the position of the video. Click on the Create button when ready and wait for Kapwing to process your video. All videos you create with the free version of this online video editor are going to be watermarked and you have to pay a six-dollar fee for each watermark-free video you edit with Kapwing or you can opt for a $20 monthly subscription fee that enables you to export an unlimited amount of videos without watermarks each month.

A growing number of IGTV users choose to rotate their videos, instead of resizing them, so if you already have a YouTube video with a 16:9 aspect ratio you can just rotate it and get a video with a 9:16 aspect ratio. Click on the Rotate option and then rotate it 90 degrees clockwise or counterclockwise and click on the Create button. If you opt for this method of creating a vertical video for IGTV, your video will remain the same size, but the viewers will have to hold their phones horizontally in order to view it properly.
You may also like: How to Convert MKV to MP4 without Losing Quality [Free Converters Provided] >>
Part 3: Changing the Aspect Ratio of a YouTube Video with Final Cut Pro
Editing videos with professional video editing software products like Final Cut Pro or Premiere Pro requires a certain amount of skill. There is more than just one way to change the aspect ratio of a video in Final Cut Pro, but probably the best one is to set the project resolution to 2160X3840 or any other lower resolution that matches the 9:16 aspect ratio. During the video editing process, you will have to resize all of the footage you want to include in the final version of the video. Planning your shots and composing them differently than you would compose horizontally oriented shots can potentially save you a little time on resizing and repositioning the video clips you’re working with.
If you’ve already exported a video and uploaded it to your YouTube channel, you can open that video in Final Cut Pro and just rotate it using the Transform tools. However, the viewers will have to hold their phones in a horizontal position while watching the video if you choose this method of creating a 9:16 aspect ratio in Final Cut Pro.
Conclusion
Posting YouTube videos on your IGTV channel is still a somewhat complicated process because you can’t share posts directly from one platform to the other. Moreover, you can’t upload videos that last more than ten minutes to IGTV, unless you have a verified account. Even so, the IGTV platform can help you extend the reach of your videos and increase the revenue you’re generating from the content you’re sharing on social media. Do you know another way of changing a YouTube video’s aspect ratio before re-posting it on IGTV? Leave a comment and let us know.
You may also like: YouTube to WAV File: 4 Best Free Convert Solutions >>

Shanoon Cox
Shanoon Cox is a writer and a lover of all things video.
Follow @Shanoon Cox
Shanoon Cox
Mar 27, 2024• Proven solutions
Publishing video content on social media platforms like Instagram or IGTV can help influencers and brands reach new customers. The only trouble is that both Instagram and IGTV have very precise video upload requirements, so each video you want to share on your IGTV channel must be saved in MP4 file format and in a 9:16 aspect ratio.
YouTube videos, on the other hand, are mostly horizontally oriented. If you attempt to upload a YouTube video to IGTV and wondering how to achieve it, just keep reading. Because in this article, we are going to show you how you can convert a horizontal YouTube video into IGTV vertical one in 3 different ways.
- Part 1: Re-post YouTube Video to IGTV with Filmora
- Part 2: Use YouTube to IGTV Online Converter
- Part 3: Convert YouTube Video to IGTV with FXP
Part 1: Convert YouTube Videos to IGTV Vertical Videos with Filmora
If you don’t already have the original file of the video you’d like to upload to your IGTV channel, you can download a video from YouTube , but keep in mind that you can’t use any content without permission from its owner.
Once you have the file, you can create a new project in Filmora and then after the project loads you should click on the File menu and select the Project Settings option. Pick one of the 9:16 video resolution options provided by the editor and click OK to confirm the changes.

Click on the Import button to add a YouTube video to your project and then place it on the timeline. Your video will be displayed in the Preview Panel, and you’ll be able to see that the video is positioned at the center of the panel and that its top and bottom are black.
Go to the Effects tab and click on the Background Blur submenu if you want to blur the empty areas of the frame. Add the Basic Blur effect to the timeline and drag one of its sides to position it over the entire video.

In case you are working with a video that already has a 16:9 aspect ratio, you can create a project that has the same aspect ratio, and then just use the Rotate slider in the Transform menu, to change turn a landscape video into a portrait video. The scaling tool is helpful to enlarge the frames in a vertical aspect ratio.

Filmora lets you create vertical videos in just a few quick steps, which makes it a perfect choice for influencers and marketers who want to share video content on YouTube and IGTV.
Latest News: In Filmora V10.5 and later versions, there is a new feature called Auto-Reframe. This feature allows users to convert one video for different social media platforms based on the aspect ratio changing, and its features of detecting the moving object. Click the Analyze button, and Filmora will convert this 16:9 YouTube video to vertical 9:16 IGTV video automatically. And I can adjust frames to follow Yasmine’s movement to fine-tune the result.

You can watch the video below to find out more information about the Auto-Reframe tool.
Part 2: Use Kapwing to Convert YouTube to IGTV Online
YouTubers who already have lots of videos on their channel can use online video editing platforms, like Kapwing to edit the content they want to post on IGTV. This online video editor offers a number of video editing tools that let you polish your videos before posting them on social media.
Click on the Resize tool and simply copy and paste the URL of a YouTube into the appropriate bar and the platform will automatically import a video and display it on the screen once the content is finally fetched.

Pick the Story (Snap/Insta) or IGTV 9:16 option and then proceed to choose the background color for your IGTV video, increase or decrease the zoom level or change the position of the video. Click on the Create button when ready and wait for Kapwing to process your video. All videos you create with the free version of this online video editor are going to be watermarked and you have to pay a six-dollar fee for each watermark-free video you edit with Kapwing or you can opt for a $20 monthly subscription fee that enables you to export an unlimited amount of videos without watermarks each month.

A growing number of IGTV users choose to rotate their videos, instead of resizing them, so if you already have a YouTube video with a 16:9 aspect ratio you can just rotate it and get a video with a 9:16 aspect ratio. Click on the Rotate option and then rotate it 90 degrees clockwise or counterclockwise and click on the Create button. If you opt for this method of creating a vertical video for IGTV, your video will remain the same size, but the viewers will have to hold their phones horizontally in order to view it properly.
You may also like: How to Convert MKV to MP4 without Losing Quality [Free Converters Provided] >>
Part 3: Changing the Aspect Ratio of a YouTube Video with Final Cut Pro
Editing videos with professional video editing software products like Final Cut Pro or Premiere Pro requires a certain amount of skill. There is more than just one way to change the aspect ratio of a video in Final Cut Pro, but probably the best one is to set the project resolution to 2160X3840 or any other lower resolution that matches the 9:16 aspect ratio. During the video editing process, you will have to resize all of the footage you want to include in the final version of the video. Planning your shots and composing them differently than you would compose horizontally oriented shots can potentially save you a little time on resizing and repositioning the video clips you’re working with.
If you’ve already exported a video and uploaded it to your YouTube channel, you can open that video in Final Cut Pro and just rotate it using the Transform tools. However, the viewers will have to hold their phones in a horizontal position while watching the video if you choose this method of creating a 9:16 aspect ratio in Final Cut Pro.
Conclusion
Posting YouTube videos on your IGTV channel is still a somewhat complicated process because you can’t share posts directly from one platform to the other. Moreover, you can’t upload videos that last more than ten minutes to IGTV, unless you have a verified account. Even so, the IGTV platform can help you extend the reach of your videos and increase the revenue you’re generating from the content you’re sharing on social media. Do you know another way of changing a YouTube video’s aspect ratio before re-posting it on IGTV? Leave a comment and let us know.
You may also like: YouTube to WAV File: 4 Best Free Convert Solutions >>

Shanoon Cox
Shanoon Cox is a writer and a lover of all things video.
Follow @Shanoon Cox
Also read:
- Finding Free Music A Producer's Handbook
- [New] Crafting a Striking Online Presence with Perfect YT Dimensions
- MCB Template Pack Download Now
- Harnessing YouTube's True Potential in Studio
- Precision in Sound 10 Tips for Professional Audio Quality
- [New] Building a Cross-Platform Social Media Presence
- In-Depth How Vimeo Stacks Up Against YouTube
- Novice Networking Affordable Channel Buy Options
- In 2024, Digital Divas Top Ten Gamers on YouTube
- Effortless Offline Access Best YouTube Playlist Downloaders for 2024
- In 2024, Cultivate 1,000 Fanbase Followers Quickly
- [Updated] A Deep-Dive Into Digital Platform Wealth Dailymotion & YouTube Comparison
- In 2024, Crafting Standout YouTube Thumbnails with Ease
- [Updated] Discover 8 Trustworthy Online Content Promoters
- Harnessing Online Platforms Beyond YouTube to 30+ Communities
- Access Tons of Free Vocal Textures
- Elevate Your Video Presentation with These 7 Free Makers for 2024
- In 2024, Essential Tips on Acquiring Profitable YT Channels
- Navigate the Vlogiverse 6 Curated Questionnaires for Discerning Viewers
- Inspiring the Future of YouTube with Best Ad Artistry
- In 2024, Lock Your Samsung Galaxy A23 5G Phone in Style The Top 5 Gesture Lock Screen Apps
- Updated In 2024, Top VHS Sound Effect That You Can Use in Video Making
- How to sign a PDF v1.6 document with electronic signature service
- New Step-by-Step Guide | How to Edit A Time Lapse Video on iPhone for 2024
- In 2024, How to Fix when Apple Account Locked From Apple iPhone 12 mini?
- How to Listen to Podcasts on Your iPhone
- What Legendaries Are In Pokemon Platinum On Huawei P60? | Dr.fone
- How to Soft Reset Samsung Galaxy F04 phone? | Dr.fone
- In 2024, Unveil the Secrets of Exceptional TikTok Intro Videos (Mac)
- 2024 Approved Fix Blurry Facebook Videos in Smartphones & Chromebooks
- In 2024, How to Unlock iPhone 7 without Passcode or Face ID
- The Easiest Methods to Hard Reset Tecno Spark 10 5G | Dr.fone
- 2024 Approved How to Add a Pop of Japanese Style with Snapchat's Anime Filter
- Simple ways to get lost files back from Honor Magic 6
- Title: "YouTube Thumbnails Reimagined - 3 Neon Border Techniques"
- Author: Steven
- Created at : 2024-05-25 21:04:53
- Updated at : 2024-05-26 21:04:53
- Link: https://youtube-clips.techidaily.com/youtube-thumbnails-reimagined-3-neon-border-techniques/
- License: This work is licensed under CC BY-NC-SA 4.0.


