
:max_bytes(150000):strip_icc()/GettyImages-97096677-56e308935f9b5854a9f8c07e.jpg)
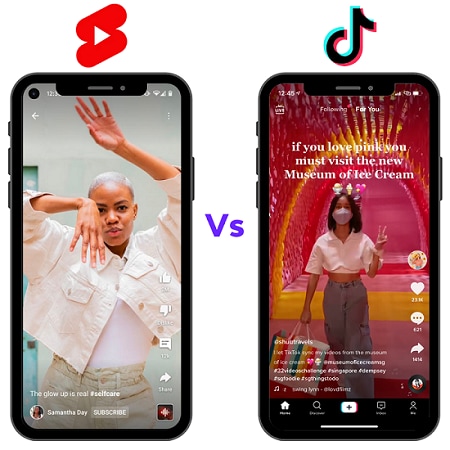
"YouTube Shorts & Tiktok - Choose the One for Your Need"
YouTube Shorts & Tiktok - Choose the One for Your Need
Create Your YouTube Shorts with Wondershare Filmora
An easy and powerful YouTube Shorts editor
Numerous video and audio effects to choose from
Detailed tutorials provided by the official channel
Social media platform is a solace to many users. You get entertained and also have a chance to share your videos with the world. Among the popular apps are TikTok and Shorts. TikTok got to the market earlier but has so far found a new competitor in the field. Shorts video has now fully emerged from YouTube and has almost the same playing ground. But it is still unclear whether YouTube Shorts and TikTok are comparable. While TikTok has over 2 billion downloads, YouTube, on the other hand, already has a massive audience for the tough tussle.
Both TikTok and Shorts give both creators and viewers the chance to share short videos for entertainment and promotional purposes. However, they are different in various aspects. Both the apps have their disadvantages and advantages, depending on a user’s preference. Dive into the next section to discover whether TikTok’s impact is about to be threatened by YouTube Shorts.
In this article
01 Are YouTube Shorts and Tiktok the same thing?
02 YouTube Shorts & TikTok: Which one Should You Choose for Personal Usage?
03 How to make quality videos for the apps you choose?
Are YouTube Shorts and Tiktok the same thing?
Shorts and TikTok are not the same in various ways. TikTok first emerged in the market way before Shorts. TikTok was initially known as musically; and later revamped fully as TikTok in 2016. It immediately gained a massive audience worldwide. This is what brought about competition from other apps, trying to replicate TikTok. Apps like Instagram and Facebook added some functionality to their platform to no match. Finally, YouTube pulled it off in 2020, rolling its version of Short videos but in beta version. These two apps have adequate similarities and differences.
They are both for short-form videos and allow creators to add music from audio libraries. You can also earn some good bucks with these two apps. However, they differ in some aspects. As Shorts can only be 15-seconds long, TikTok can go as long as three minutes. You can also view TikTok directly from its app while for Shorts, you need a separate app, YouTube.
YouTube Shorts & TikTok: Which one Should You Choose for Personal Usage?
Let’s focus on the TikTok and Shorts video by perusing the similarities and differences deeply.
- Similiarity
Check out in which aspects TikTok and Shorts are similar to each other.
1) Monetization
Both platforms provide creators with tools to earn money from their content. TikTok’s first move was to pay selected influencers about $500 for joining the app and creating content. Creators make money from TikTok by promoting products and services of their audience as well as launching their careers through the app. Likewise, brands also get to creators through the “TikTok Creator Marketplace” platform for promotions.
You can also earn on YouTube Shorts from Google AdSense. This is an in-built video monetization that creators use for showing ads on their videos. Earnings will accumulate every month-end for withdrawal.
2) Analytics
Both YouTube and Shorts offer analytics like adding comments, likes, shares, and many more. Likewise, you can view your videos on either desktop or mobile platforms. With both platforms, you get an endless number of videos to watch and discover by scrolling. Also, both apps focus on short videos to entertain viewers.
3) Subscribe directly to creators
You can directly get in touch with both YouTube shorts and TikTok creators. This gives an open leeway to discover new creators to follow and subscribe to. All you need to do is go to the creators’ videos in both feeds and hit the “Follow” or “Subscribe” button. Henceforth, you’ll start seeing what they post and keep in touch with their signs of progress.
4) Privacy
Both apps have taken consideration into privacy issues. They allow creators to set their videos to either private or public. By this, your audience will only view what is set as “Public”. You can deter this by setting your content to “Private” or choosing who can view your content. This is a good aspect to let only those who wish to view certain clips as per your wish.
5) Edit video
There’s much that your video can portray. In both apps, you choose what to give to your audience. Both platforms enable you edit your video before posting. You can alter the speed by increasing or decreasing it for slow motion. Also, you can set timers to help with the filming process among other functionalities.
- Difference
1) Instant messaging app
Generally, YouTube is not a traditional social media platform. Even though YouTube Shorts allows users to create videos, it is not a platform that users can engage in communication via instant messaging app. On the other hand, TikTok lets you directly message other users as you share experiences. This makes TikTok a one-stop social media exchange point where you easily interact with your peers and get instant feedback. You can also create group chats and keep the fun going.
2) In dependability
TikTok Shorts videos also differ from the concept of stand along and built-in features. TikTok is a standalone app that doesn’t depend on another app for its normal operations. Users can independently create content directly from the app. On the contrary, Shorts is a built-in app on YouTube and users have to access it via the YouTube platform. This may be a plus for YouTube but it could eventually turn away those who want to work independently from the app.
3) Interface
With TikTok, users can add video captions from the bottom left of the screen. It also comprises a large library of editing precepts like filters, greenscreen effects, among others. YouTube Shorts, on the other hand, is rich in a library of music. Users can access popular songs and directly switch to YouTube for trending videos as well.
- What More Should You Consider When Choosing - Your Personal Need
Settling on YouTube Shorts and TikTok largely depends on your preferences. But being that TikTok has been in the limelight for a longer time, it has mastered users’ and creators’ preferences, bringing more to the table than YouTube Shorts.
Both TikTok and Shorts have an immense user base. But being a standalone app, TikTok still has a chance of scaling the heights. Remember that Shorts is still in the “Beta” version and has not fully exploded even though it’s a built-in app on YouTube.
TikTok stands a chance of being chosen by many users as it is an independent platform. Users can connect with friends through news feed content or messaging. When it comes to editing tools, the app’s extensive library lets you add presets to your taste. It constantly keeps creators at bay, rolling new filters and effects for the unique creation of content. Additionally, TikTok engages users via its “Q&A” feature where users can pose any hot questions to creators for answers. And beauty is that creators can respond to such comments with a video. More so, you can use the “Discovery” tab to view trending hashtags and sounds, which YouTube Shorts lack.
With TikTok, users can add video captions from the bottom left of the screen. It also comprises a large library of editing precepts like filters, greenscreen effects, among others. YouTube Shorts, on the other hand, is rich in a library of music. Users can access popular songs and directly switch to YouTube for trending videos as well.
How to make quality videos for the apps you choose?
Even though TikTok and YouTube Shorts both let you edit your videos, you can stile up your game with other editing apps like Filmora. This app will save your time and effort while giving you compelling video outcomes. Filmora comprises advanced features such as social import to let you import video clips and photos from social media platforms. Filmora is available on both Windows and Mac, widely accessible on a vast array of devices.
- Video effects: Easily discover creative filters, transitions, and other motion elements.
- Split Screen: This feature lets you uniquely create fun videos by multiplying or splitting the screen.
- Color match: Apply color correction settings on various clips at once.
- Remove noise: Filmora lets you remove background noise, giving you quality video output.
For Win 7 or later (64-bit)
For macOS 10.12 or later
Conclusion
Settling on Shorts or Tiktok will largely depend on your preferences and personal needs. If you are looking for short video promotion on YouTube Shorts and Tiktok , you may need to consider different things. Yes, Shorts has some upper hand over TikTok like the ability to edit your videos after being published, a dislike button, and a scheduling tool that lets you schedule when your video goes live. TikTok is still above the cut being that it has been here long before Shorts. More so, it offers advanced editing features for quality video output. Above all, it works independently, a feature that most users adore as compared to the encasing of Shorts within YouTube.
Premiere Masterclass: Making Your Videos Shine on YouTube
How Do I Use Adobe Premiere To Upload YouTube Videos?

Benjamin Arango
Mar 27, 2024• Proven solutions
Whilst getting the editing and post work just right on any project is what we all aim for, the ultimate aim is for other people to see our creations, and the most popular way to achieve that is YouTube . Chances are, if you are producing video, you will be putting some of it on YouTube at some point, so let’s have a look at the most efficient way to get your work from Premiere to YouTube.
Check if your computer meet the Premiere System Requirements >>
This is a basic tutorial about Adobe Premiere, professional video editing software. However, if video editing is new to you, consider Wondershare Filmora , which is a powerful but easy-to-use tool for users just starting out. Download the free trial version below.
 Download Mac Version ](https://tools.techidaily.com/wondershare/filmora/download/ )
How Do I Use Adobe Premiere To Upload YouTube Videos
1. Master Copy
Before exporting your work, it is important to first create a master copy of your project that is ‘as is’, in that it reflects the settings and codecs used in the original footage.
To do this you simply select the sequence within the Timeline or in the Project Panel, and go through the menu tree via File > Export > Media to bring up the export dialogue.

To create your Master Copy, simply select the first option of ‘Match Sequence Settings’, this exports a file that is of the same quality as your original footage, essentially producing a digital copy of the work for archiving before anything else is done.
With you work safe and secure it is now time to look at ensuring the project is suitable for YouTube. With our sequence selected in the Timeline or Project Panel again, we go through the same File > Export > Media path to bring up the media export dialogue as before.
2. Container
The first option we have to consider is the file format that our finished video needs to be in. Here you should refer to YouTube for its guidelines, whilst they do accept a number of file formats, digging through the YouTube help system to find the settings for highest quality we find that they recommend MPEG4 as the container, using the codec.

We can also see further recommended settings in this screenshot that will be covered later.
The good news is that Premiere automatically selects the appropriate container for us when we select our codec, however it is worth knowing the file type YouTube is expecting just to check yourself.
3. Video Codec
So having established that YouTube recommends the MPEG4 container using the codec, the first option we need to look for in the media export dialogue is to select the appropriate Format.
This is the first drop down in the dialogue box, and in this case we simply select from the list.

Once you select you can check the ‘output name’ field and see that premiere is automatically set the output file to .mp4 which is exactly what we need.
4. Preset
The next field we come to is the ‘Preset’ dropdown menu. This is a major help to most people, as Adobe have very kindly included large numbers of presets to quickly adapt video settings to suit specific uses. They vary depending on the exact version of Premiere you are using, and each format type does have its own list of presets, as we can see has a large number for YouTube, but also has many presets for specific devices (presets for iPad, Kindle, Nook, various other tablets and phones, Vimeo and a host of others) to make getting the right settings that bit easier for us.

It is important here to select the correct preset from the various YouTube options. You want to select the resolution and frame rate that match your source file, for the best results. So, if your source file is 1080p with a frame rate of 29.97 fps then that is the YouTube setting you would select.
Once a preset is selected a summary of the settings is displayed below, normally these will be well suited to your project, however you can fine tune anything you wish by selecting the video or audio tabs at the bottom which give you the chance to adjust each parameter individually. If you do this, you can save these changes as a custom preset by clicking the button at the side of the Preset dropdown menu and simply use it on later projects by selecting it from the list the same as any other, a great time saving tool.

5. Rendering
Once you are satisfied with the settings, either from the Preset alone or if you have adjusted anything yourself, you are nearly ready to render the file and export it.
For YouTube it is recommended you select the ‘Use Maximum Render Quality’ option to maintain the best output you can, it does add time to the render process but if you value the quality of your work it is worthwhile.
Finally you can choose a suitable filename and the destination of the file by clicking on the ‘Output Name’ field.
I normally use a filename that includes the destination medium so I can differentiate between different versions of a project and know which one to upload where, in this case I include ‘youtube’, but if I were planning on uploading clips of the project to vimeo as well for instance there may be a cut of the project with ‘vimeo’ in the name too. The destination is personal preference, because I do use filenames to differentiate versions I can put the various iterations into a single project file, others have folder structures for each type of file , so all YouTube output goes into a single folder and so on, how you organize is entirely dependent on how you work.

Once those are selected clicking ‘Export’ starts the rendering process, and eventually (how long depends on the speed of your computer and the size and type of file involved), you will end up with your YouTube optimized video in the location you chose.
Here I created 4 key frames that let the ‘Animation’ object move around the ‘Demo Text’ Object and finally come to rest below it. Whilst this type of effect does look very effective on screen, such is the ease of use of After Effects it really is just a few minutes work to achieve.
Learn more details about How to add text in Premiere >>
6. Uploading
Now you have your file, the next step is to go to your YouTube account and log in if you need to.
On the top of your homepage on the right is the upload button, selecting that brings up the select file menu as below.

You can either drag your file into the window or click on it to open a standard file browser to locate the desired file, click and the upload will begin. The dropdown underneath allows you to set the video as Public, Unlisted or Private. You can change this at any time once the video is uploaded as well.
This opens the upload progress window, where you can add in a name, description and tags as well as add the video to a playlist or adjust the privacy settings as the video is uploading.

Once the upload as finished, you can do final adjustments to settings and choose a thumbnail for the video. The final step is to click the ‘Publish’ button and your video will be processed and go live.

Benjamin Arango
Benjamin Arango is a writer and a lover of all things video.
Follow @Benjamin Arango
Benjamin Arango
Mar 27, 2024• Proven solutions
Whilst getting the editing and post work just right on any project is what we all aim for, the ultimate aim is for other people to see our creations, and the most popular way to achieve that is YouTube . Chances are, if you are producing video, you will be putting some of it on YouTube at some point, so let’s have a look at the most efficient way to get your work from Premiere to YouTube.
Check if your computer meet the Premiere System Requirements >>
This is a basic tutorial about Adobe Premiere, professional video editing software. However, if video editing is new to you, consider Wondershare Filmora , which is a powerful but easy-to-use tool for users just starting out. Download the free trial version below.
Download Mac Version ](https://tools.techidaily.com/wondershare/filmora/download/ )
How Do I Use Adobe Premiere To Upload YouTube Videos
1. Master Copy
Before exporting your work, it is important to first create a master copy of your project that is ‘as is’, in that it reflects the settings and codecs used in the original footage.
To do this you simply select the sequence within the Timeline or in the Project Panel, and go through the menu tree via File > Export > Media to bring up the export dialogue.
To create your Master Copy, simply select the first option of ‘Match Sequence Settings’, this exports a file that is of the same quality as your original footage, essentially producing a digital copy of the work for archiving before anything else is done.
With you work safe and secure it is now time to look at ensuring the project is suitable for YouTube. With our sequence selected in the Timeline or Project Panel again, we go through the same File > Export > Media path to bring up the media export dialogue as before.
2. Container
The first option we have to consider is the file format that our finished video needs to be in. Here you should refer to YouTube for its guidelines, whilst they do accept a number of file formats, digging through the YouTube help system to find the settings for highest quality we find that they recommend MPEG4 as the container, using the codec.
We can also see further recommended settings in this screenshot that will be covered later.
The good news is that Premiere automatically selects the appropriate container for us when we select our codec, however it is worth knowing the file type YouTube is expecting just to check yourself.
3. Video Codec
So having established that YouTube recommends the MPEG4 container using the codec, the first option we need to look for in the media export dialogue is to select the appropriate Format.
This is the first drop down in the dialogue box, and in this case we simply select from the list.
Once you select you can check the ‘output name’ field and see that premiere is automatically set the output file to .mp4 which is exactly what we need.
4. Preset
The next field we come to is the ‘Preset’ dropdown menu. This is a major help to most people, as Adobe have very kindly included large numbers of presets to quickly adapt video settings to suit specific uses. They vary depending on the exact version of Premiere you are using, and each format type does have its own list of presets, as we can see has a large number for YouTube, but also has many presets for specific devices (presets for iPad, Kindle, Nook, various other tablets and phones, Vimeo and a host of others) to make getting the right settings that bit easier for us.
It is important here to select the correct preset from the various YouTube options. You want to select the resolution and frame rate that match your source file, for the best results. So, if your source file is 1080p with a frame rate of 29.97 fps then that is the YouTube setting you would select.
Once a preset is selected a summary of the settings is displayed below, normally these will be well suited to your project, however you can fine tune anything you wish by selecting the video or audio tabs at the bottom which give you the chance to adjust each parameter individually. If you do this, you can save these changes as a custom preset by clicking the button at the side of the Preset dropdown menu and simply use it on later projects by selecting it from the list the same as any other, a great time saving tool.
5. Rendering
Once you are satisfied with the settings, either from the Preset alone or if you have adjusted anything yourself, you are nearly ready to render the file and export it.
For YouTube it is recommended you select the ‘Use Maximum Render Quality’ option to maintain the best output you can, it does add time to the render process but if you value the quality of your work it is worthwhile.
Finally you can choose a suitable filename and the destination of the file by clicking on the ‘Output Name’ field.
I normally use a filename that includes the destination medium so I can differentiate between different versions of a project and know which one to upload where, in this case I include ‘youtube’, but if I were planning on uploading clips of the project to vimeo as well for instance there may be a cut of the project with ‘vimeo’ in the name too. The destination is personal preference, because I do use filenames to differentiate versions I can put the various iterations into a single project file, others have folder structures for each type of file , so all YouTube output goes into a single folder and so on, how you organize is entirely dependent on how you work.
Once those are selected clicking ‘Export’ starts the rendering process, and eventually (how long depends on the speed of your computer and the size and type of file involved), you will end up with your YouTube optimized video in the location you chose.
Here I created 4 key frames that let the ‘Animation’ object move around the ‘Demo Text’ Object and finally come to rest below it. Whilst this type of effect does look very effective on screen, such is the ease of use of After Effects it really is just a few minutes work to achieve.
Learn more details about How to add text in Premiere >>
6. Uploading
Now you have your file, the next step is to go to your YouTube account and log in if you need to.
On the top of your homepage on the right is the upload button, selecting that brings up the select file menu as below.
You can either drag your file into the window or click on it to open a standard file browser to locate the desired file, click and the upload will begin. The dropdown underneath allows you to set the video as Public, Unlisted or Private. You can change this at any time once the video is uploaded as well.
This opens the upload progress window, where you can add in a name, description and tags as well as add the video to a playlist or adjust the privacy settings as the video is uploading.
Once the upload as finished, you can do final adjustments to settings and choose a thumbnail for the video. The final step is to click the ‘Publish’ button and your video will be processed and go live.
Benjamin Arango
Benjamin Arango is a writer and a lover of all things video.
Follow @Benjamin Arango
Also read:
- The Filmmaker's Ally Unlocking YouTube Studio Editor Secrets
- [Updated] A Compreehensive Guide to YouTube Thumbnail Creation (Mac)
- Cultivating Commitment Gentle Subscription Strategies for 2024
- [Updated] Elevated Engagement Awards on Video Realms
- Elevate Your Content Selecting Top Thumbnail Fonts
- Exclusive Access Top 8 Platforms for Free Green Screen Scenery Files
- 2024 Approved Essential Anime Youtube Channels for Daily Happiness
- Puns & Plots Developing 7 Funny Video Storylines
- [New] Charting Your Course in the World of YouTube Tracking Success & Monetary Value
- Permanent Lockout of the Brief Content on YouTube
- Stand Out on YouTube Innovative Title Brainstroms
- From Capture to Screen The Complete Process of Uploading 360 Vids on YouTube
- Mastering Personal Content Management Building a Structured 'Watch Later' List
- Revenue War Diary Dailymotion vs YouTube Monetization Strategies
- Unlock Cross-Platform Content Sharing Convert and Upload with These Tools
- In 2024, Amplify Video Impact Leading Trackers for YouTube Ranks
- [New] All About YouTube TV Your Comprehensive Resource
- Maximizing YouTube Income Universal Studio Insights
- Maximize Visibility and Views on YouTube
- The Ultimate Cheat Sheet for Inserting Songs Into YouTube Clips
- 2024 Approved Essential Tips for YouTube Thumbnail Size
- 2024 Approved Can You Receive a Monthly Check From YouTube?
- [New] A Beginner's Guide to Elevating Auditory Experiences on YouTube
- Effortless Watching Pleasures Your Ultimate YouTube Movie List
- Boosting YouTube Ad Revenue Keeping CC Active for 2024
- Embellish Your YT Previews with Sparkly Borders for 2024
- Enhancing Engagement with Solutions to Common Shorts Challenges
- The Essentials for Seamless System Evolutions
- How to Change Realme 12+ 5G Location on Skout | Dr.fone
- In 2024, Fake Android Location without Rooting For Your Oppo Reno 11F 5G | Dr.fone
- In 2024, Tune Tracker Prodigies The Finest Song Identification Apps Enhancing Your Android Musical Experience
- In 2024, Which Pokémon can Evolve with a Moon Stone For Samsung Galaxy F15 5G? | Dr.fone
- [Updated] 2024 Approved Mastering Your Movements The Complete Guide to Slow Mo in TikTok
- How to Create a Video Slideshow in iMovie for 2024
- [New] 2024 Approved Scrutinized Screen Recording Tools Top 8 Picks
- Updated MP3 Editor for Mac Free & Cheap for 2024
- Updated What Is an AI Artist?
- [New] Expressive Authenticity Learning to Alter Voice on IG
- [Updated] The Instagram Strategist’s Toolkit Understanding Metrics, Trends & User Insights
- [Updated] OBS Studio vs Fraps – Which Is A Better
- In 2024, Breaking Barriers Making Your Post a Sensation on FB
- 2024 Approved Step-by-Step Approach to Saving Instagram Stories
- [New] Expert Hashtag Analyzers for Social Media Giants (FB/Tweet/IG)
- Title: "YouTube Shorts & Tiktok - Choose the One for Your Need"
- Author: Steven
- Created at : 2024-05-25 21:04:36
- Updated at : 2024-05-26 21:04:36
- Link: https://youtube-clips.techidaily.com/youtube-shorts-and-tiktok-choose-the-one-for-your-need/
- License: This work is licensed under CC BY-NC-SA 4.0.
