
:max_bytes(150000):strip_icc()/streamhallmarkchannel-fbbd67185b124b4d8187dd8d015ad7cc.jpg)
"YouTube Editing Tips and Tricks for Shorter Videos"
YouTube Editing: Tips and Tricks for Shorter Videos
How to Trim YouTube Videos?

Richard Bennett
Mar 27, 2024• Proven solutions
The world’s largest video sharing platform currently has nearly two billion active monthly users who upload over 400 hours of video content to their channels each minute. It is to see from these statistics why every video aspiring YouTubers post on their channels has to be perfect in every way in order to reach a wide audience. Fortunately, trimming a video even after you’ve uploaded it to YouTube is a quick and easy process, and in this article, we are going to show you a few different methods you can use to trim the videos you upload to YouTube. So, let’s get started.
In this article
- How to Trim a Video After You Upload it to Your YouTube Channel?
- Trimming a Video Before Posting On YouTube with Filmora Video Editor [4 Ways]
- Using Online Video Editing Platforms to Trim YouTube Videos
How to Trim a Video After You Upload it to Your YouTube Channel?
The YouTube Studio is no longer in beta phase, which means that the feature is here to stay. This is good news for all video creators who frequently update their YouTube videos after they upload them, as they no longer have to go through the endless uploads just because they wanted to trim a video.
Make sure that you’re signed into your YouTube channel, then click on your profile picture and select the YouTube Studio (Beta) option. On the left side of the screen, you’ll be able to see a menu that contains different subcategories like Analytics, Dashboard or Videos, so just click on the Videos option and proceed to select a video you’d like to trim. After the Videos submenu appears on the screen you should click on the Editor option and the video you selected will open in the YouTube’s video editor.

Click on the Trim button to start trimming the video and drag the blue bars located at the start and the end of the file to designate the portion of the video you’d like to remove. Preview the changes and confirm what you’ve made by clicking on the Save button located in the upper right corner of the screen and the new shortened version of the video will become available within a couple of hours.

In this way, you don’t need to take down the original video, edit it and re-upload. One of the benefits of trimming YouTube videos with the Trim feature in YouTube Editor is that this will keep your video URL and views and ranks etc.
Trimming a Video Before Posting On YouTube with Filmora Video Editor [4 Ways]


Method 1: Trim on Timeline
YouTubers who don’t want to rely on YouTube’s video editing capabilities can trim their footage with Filmora (to be honest, the Editor in YouTube platform has limited features). Filmora video editing software for PC and Mac computers offers a few different tools for trimming videos. After you’ve created a new project in Filmora, you should import a video clip into the editor by clicking on the Import drop-down menu and select the Import Media Files option. Each file you add to a project will be displayed in the Media tab, and you can just drag and drop it to a video track on the timeline.
All you have to do in order to trim a video after you’ve placed it on the timeline is drag one of its ends to the left or to the right. As you drag one of the clip’s edges the editor will only display the remaining footage while rendering the rest invisible. If at any point you want to access a portion of the video you’ve trimmed you just have to extend the file by dragging it until you’re able to see the segment you’re searching for.

Method 2: Using Filmora Split Tool
Filmora’s Split tool can help you separate the portion of the clip you want to remove from the segment you’d like to keep. Simply place the playhead at the exact location in the video clip where you want to make a cut, and click on the Split icon that looks like a pair of scissors. After the video is split, you should click on the clip you no longer need in order to select it and then hit the Delete button on your keyboard to remove it from the timeline.
Method 3: Using Scene Detection
Wondershare’s video editor also offers an automatic way to split a video clip into a number of separate scenes. Right-click on the video file located in the Filmora’s Media tab, and select the Scene Detection option from the menu and proceed to click on the Detect button, after the Scene Detection window pops up on the screen. The software will then automatically analyze the footage and divide it into separate scenes. Simply click on the Add to Timeline button once the process is completed to continue editing the video clip you’ve just split.

Method 4: Using Instant Cutter Tool
The Instant Cutter Tool enables you to quickly trim or merge high-resolution files recorded on action cameras as soon as you import them into a project in Filmora. Select the Import with Instant Cutter Tool option from the Import drop-down menu and wait for the Filmora Instant Cutter window to appear on the screen. In the upper left corner of this window, you will be able to see Trim and Merge tabs. Make sure that the Trim tab is selected and then click on the Open File button to import a video clip you’d like to trim. You can then use the trimming sliders to designate the parts of the video you’d like to remove or the set the In and Out points by clicking on the Set In Point or Set Out Point icons. Click on the Export button to save the new version of the video clip and click OK to complete the process.

Using Online Video Editing Platforms to Trim YouTube Videos
In case you’re looking for a tool that lets you save extracts of scenes from YouTube to your computer free of charge YT Cutter may be one of your best options.

This online video editing platform is remarkably easy to use since you just have to copy the link to the YouTube video you’d like to trim into YT Cutter’s URL box and then select how long the new video should be. Click on the Start and End buttons to set the duration of the video and click on the Download button to choose if you want to create a video, GIF or an audio file. The trimmed YouTube video will be available for download as soon as the platform processes it, and you just need to specify a folder on your hard drive before clicking on the Save button.
There’re many online video trimmers available on the market, some of them are totally free to use, check our guide about How to Trim Videos for Free Online .
Read More to Get : How to Download YouTube Videos without Any Software Easily >>
Conclusion
Trimming a video online or with a video editing software like Filmora is an effortless task that can be completed in just a couple of minutes. However, it is better to complete the entire video editing process before you upload a video to your YouTube channel because YouTube Studio and other online video editing platforms still offer only a limited amount of video editing tools. Which method of trimming YouTube videos do you like using the most? Leave a comment and share your opinions with us.
Richard Bennett
Richard Bennett is a writer and a lover of all things video.
Follow @Richard Bennett
Richard Bennett
Mar 27, 2024• Proven solutions
The world’s largest video sharing platform currently has nearly two billion active monthly users who upload over 400 hours of video content to their channels each minute. It is to see from these statistics why every video aspiring YouTubers post on their channels has to be perfect in every way in order to reach a wide audience. Fortunately, trimming a video even after you’ve uploaded it to YouTube is a quick and easy process, and in this article, we are going to show you a few different methods you can use to trim the videos you upload to YouTube. So, let’s get started.
In this article
- How to Trim a Video After You Upload it to Your YouTube Channel?
- Trimming a Video Before Posting On YouTube with Filmora Video Editor [4 Ways]
- Using Online Video Editing Platforms to Trim YouTube Videos
How to Trim a Video After You Upload it to Your YouTube Channel?
The YouTube Studio is no longer in beta phase, which means that the feature is here to stay. This is good news for all video creators who frequently update their YouTube videos after they upload them, as they no longer have to go through the endless uploads just because they wanted to trim a video.
Make sure that you’re signed into your YouTube channel, then click on your profile picture and select the YouTube Studio (Beta) option. On the left side of the screen, you’ll be able to see a menu that contains different subcategories like Analytics, Dashboard or Videos, so just click on the Videos option and proceed to select a video you’d like to trim. After the Videos submenu appears on the screen you should click on the Editor option and the video you selected will open in the YouTube’s video editor.
Click on the Trim button to start trimming the video and drag the blue bars located at the start and the end of the file to designate the portion of the video you’d like to remove. Preview the changes and confirm what you’ve made by clicking on the Save button located in the upper right corner of the screen and the new shortened version of the video will become available within a couple of hours.
In this way, you don’t need to take down the original video, edit it and re-upload. One of the benefits of trimming YouTube videos with the Trim feature in YouTube Editor is that this will keep your video URL and views and ranks etc.
Trimming a Video Before Posting On YouTube with Filmora Video Editor [4 Ways]
Method 1: Trim on Timeline
YouTubers who don’t want to rely on YouTube’s video editing capabilities can trim their footage with Filmora (to be honest, the Editor in YouTube platform has limited features). Filmora video editing software for PC and Mac computers offers a few different tools for trimming videos. After you’ve created a new project in Filmora, you should import a video clip into the editor by clicking on the Import drop-down menu and select the Import Media Files option. Each file you add to a project will be displayed in the Media tab, and you can just drag and drop it to a video track on the timeline.
All you have to do in order to trim a video after you’ve placed it on the timeline is drag one of its ends to the left or to the right. As you drag one of the clip’s edges the editor will only display the remaining footage while rendering the rest invisible. If at any point you want to access a portion of the video you’ve trimmed you just have to extend the file by dragging it until you’re able to see the segment you’re searching for.
Method 2: Using Filmora Split Tool
Filmora’s Split tool can help you separate the portion of the clip you want to remove from the segment you’d like to keep. Simply place the playhead at the exact location in the video clip where you want to make a cut, and click on the Split icon that looks like a pair of scissors. After the video is split, you should click on the clip you no longer need in order to select it and then hit the Delete button on your keyboard to remove it from the timeline.
Method 3: Using Scene Detection
Wondershare’s video editor also offers an automatic way to split a video clip into a number of separate scenes. Right-click on the video file located in the Filmora’s Media tab, and select the Scene Detection option from the menu and proceed to click on the Detect button, after the Scene Detection window pops up on the screen. The software will then automatically analyze the footage and divide it into separate scenes. Simply click on the Add to Timeline button once the process is completed to continue editing the video clip you’ve just split.
Method 4: Using Instant Cutter Tool
The Instant Cutter Tool enables you to quickly trim or merge high-resolution files recorded on action cameras as soon as you import them into a project in Filmora. Select the Import with Instant Cutter Tool option from the Import drop-down menu and wait for the Filmora Instant Cutter window to appear on the screen. In the upper left corner of this window, you will be able to see Trim and Merge tabs. Make sure that the Trim tab is selected and then click on the Open File button to import a video clip you’d like to trim. You can then use the trimming sliders to designate the parts of the video you’d like to remove or the set the In and Out points by clicking on the Set In Point or Set Out Point icons. Click on the Export button to save the new version of the video clip and click OK to complete the process.
Using Online Video Editing Platforms to Trim YouTube Videos
In case you’re looking for a tool that lets you save extracts of scenes from YouTube to your computer free of charge YT Cutter may be one of your best options.
This online video editing platform is remarkably easy to use since you just have to copy the link to the YouTube video you’d like to trim into YT Cutter’s URL box and then select how long the new video should be. Click on the Start and End buttons to set the duration of the video and click on the Download button to choose if you want to create a video, GIF or an audio file. The trimmed YouTube video will be available for download as soon as the platform processes it, and you just need to specify a folder on your hard drive before clicking on the Save button.
There’re many online video trimmers available on the market, some of them are totally free to use, check our guide about How to Trim Videos for Free Online .
Read More to Get : How to Download YouTube Videos without Any Software Easily >>
Conclusion
Trimming a video online or with a video editing software like Filmora is an effortless task that can be completed in just a couple of minutes. However, it is better to complete the entire video editing process before you upload a video to your YouTube channel because YouTube Studio and other online video editing platforms still offer only a limited amount of video editing tools. Which method of trimming YouTube videos do you like using the most? Leave a comment and share your opinions with us.
Richard Bennett
Richard Bennett is a writer and a lover of all things video.
Follow @Richard Bennett
Streamlining Problems in Creating Effective YouTube Shorts
Create High Quality YouTube Video - Wondershare Filmora
An easy and powerful YouTube video editor
Numerous video and audio effects to choose from
Detailed tutorials provided by the official channel
YouTube streaming service has kept online users glued to their screens. You can access and share videos and music from any part of the world. Users resolve to YouTube for personal and business affairs. You can use it for a tutorial, promotional event, or just share the fun with other users. Several avenues are available for users to post and share their minds worldwide. So far, it has rolled out a short-form video service, Shorts, which was initially inspired by TikTok.
With Shorts, you can shoot videos, edit, and upload them for your audience. However, YouTube shorts not showing is a common issue for those wishing to share their videos in regular channel feed. You might be wondering how to solve such issues when pushed to the wall. Check out possible solutions in the next section. But first, let’s find out what really are YouTube Shorts.
In this article
02 Where can I find YouTube Shorts?
03 Here are the solutions for YouTube Common Issues
What is YouTube Shorts?
YouTube Shorts is an app that you can use to shoot and share short-form videos using your mobile phone. Furthermore, you can record and edit your videos as well as music overlays and video segmenting abilities. Viewers will access the videos for 60 seconds or less but will remain on your channel, unlike Stories that disappear after a short while. It was first released in September 2020, having started in the US and India. It has so far encroached many countries and is currently accessed by 6 billion users in over 100 countries.
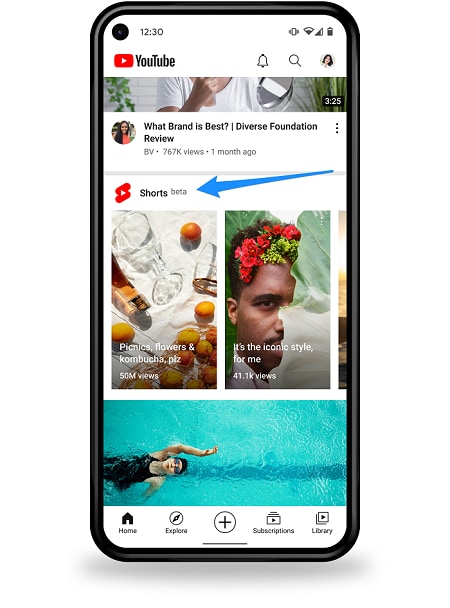
Where can I find YouTube Shorts?
Many users are curious about how to make full use of YouTube Shorts. You can get the Short at the bottom of the YouTube app on either the homepage or on their channel page.
Is YouTube Shorts available on Google Play or App Store?
No. Unlike other streaming apps, you can’t find YouTube app on Google Play or App Store as it is not a standalone service. YouTube Shorts are found within the service’s main mobile app. It is, therefore, accessible from the YouTube app on your computer or phone at the bottom of the screen.
How to access YouTube Shorts on YouTube app
- First, go to the YouTube app at the bottom of the screen to find the “Shorts” button.
- You’ll then see a selection of thumbnails that harbors popular Shorts.
- Choose any video then click on it to bring you into the vertical video player.
- You can then watch the clip and like or dislike the video as it plays. Just use the “thumbs up” or “down” icon. Likewise, you can share and subscribe to the “Short creator’s” channel.
How to create YouTube Shorts
Do you wish to create YouTube Shorts but you don’t know how to? Here’s the kicker!
Step 1. You first need to install the YouTube app on your device then sign in to your account.
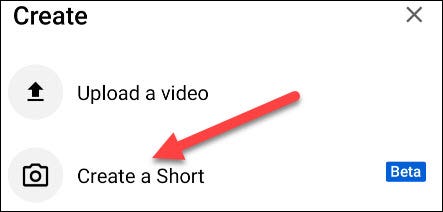
Step 2. Now, tap on the “Create” button. The icon is a “+” symbol in the bottom center of the screen.
Step 3. A pop-up window will open. Tap the “Create a Short” tab. If prompted, allow YouTube to use your phone’s camera and microphone.
Step 4. You’ll then land on the “YouTube Shorts” recording page.
Step 5. Set the length to 60 seconds and bellow. You have the option to slow down or speed up the recording by tapping the “Speed” icon on the right.
Step 6. Likewise, set a time for the camera to start recording automatically. Check below the “Speed” for the “Timer” for setting.
Step 7. Go ahead to edit your Short before posting. You can use “Filters” to apply visual effects.
Step 8. When your camera is set, hit the “Record” button. You can stop the recording by tapping on the Record button, then resume as you wish.

Step 9. Tap on the “Checkmark” when you are done recording. You can add some music and text as well. Then tap on the “Next” button to finish the recording.
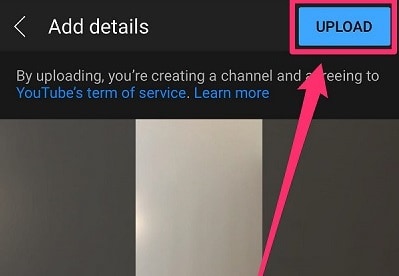
Step 10. Then add a title and adjust “Sharing” settings. Also, add the “#shorts” to the title to make it promotional together with other Shorts videos.
Step 11. Finally, tap the “Upload” tab to add your “Shorts” to YouTube.
Here are the solutions for YouTube Common Issues
Since YouTube Shorts is still in the “Beta” mode, users are likely to experience issues while using it. Below are some fixes for YouTube shorts common issues like YouTube Shorts not showing up, unable to post video to YouTube Shorts and etc.
Solution 1. Update YouTube app
Remember apps are ever on the upgrade mode. You are likely to face some connection issues if you are operating on an older version. Here’s is how to update the YouTube app on your Android or iPhone device.
On Android device
- Launch Google Play Store.
- Next, tap on the “three diagonal lines” at the top section of your screen.
- Then select the “My Apps & Games” option.
- Search for YouTube app and tap on the “Update” button.
On iOS device
- Open the “App Store”
- Tap on your “Profile” icon.
- Then tap on the “Update” tab to fix the issue.
On your computer
- Search for YouTube streaming app from the Google Play Store.
- Here, you’ll see an update button in case your app needs an update.
- Next, click on the “Update” button and wait for the update to complete.
- Launch YouTube once more and see whether the YouTube Shorts not showing issue is resolved.
Solution 2. Clear Cache
A corrupt system may also cause issues with the normal operation of your application.
- Go to the “Settings” button on your phone.
- Then go to the “Apps” section and tap on “All Apps”
- Select the “YouTube” app from the list.
- Next, go to the “App Settings” and click on the “Storage” section.
- Tap on the “Clear cache and data” option.
- Finally, relaunch the YouTube app and check whether the issue is resolved.
Solution 3. Check if Shorts is available in your country
Remember that “Shorts” isn’t available in all the countries yet. So, you can confirm whether it is already in your country. If not, you can bypass GEO restrictions by using free VPNs.
- First, download and install a VPN app.
- Next, select the USA or India server location to fake a GPS location.
- Then clear the cache from the YouTube app and click it open.
- You should now find the option to view and even upload Shorts from your device.
Solution 4. Ensure your video is set as YouTube Shorts
Your video should be set as YouTube Shorts before posting.
- Identify the video that you wish to post.
- Add the “#shorts” in your title and description.
- See that each video is up to 60 seconds only.
- Post the video and see whether the issue isn’t reoccurring.
Conclusion
It’s a nice feeling to learn how to upload YouTube Shorts and share the fun with others worldwide. However, you may experience YouTube Shorts not showing due to restrictions in your country or other issues. We have tackled adequate solutions to solve such scenarios and make your Shorts go online. Nonetheless, check out the steps to access and create YouTube Shorts in just a few steps.
YouTube streaming service has kept online users glued to their screens. You can access and share videos and music from any part of the world. Users resolve to YouTube for personal and business affairs. You can use it for a tutorial, promotional event, or just share the fun with other users. Several avenues are available for users to post and share their minds worldwide. So far, it has rolled out a short-form video service, Shorts, which was initially inspired by TikTok.
With Shorts, you can shoot videos, edit, and upload them for your audience. However, YouTube shorts not showing is a common issue for those wishing to share their videos in regular channel feed. You might be wondering how to solve such issues when pushed to the wall. Check out possible solutions in the next section. But first, let’s find out what really are YouTube Shorts.
In this article
02 Where can I find YouTube Shorts?
03 Here are the solutions for YouTube Common Issues
What is YouTube Shorts?
YouTube Shorts is an app that you can use to shoot and share short-form videos using your mobile phone. Furthermore, you can record and edit your videos as well as music overlays and video segmenting abilities. Viewers will access the videos for 60 seconds or less but will remain on your channel, unlike Stories that disappear after a short while. It was first released in September 2020, having started in the US and India. It has so far encroached many countries and is currently accessed by 6 billion users in over 100 countries.
Where can I find YouTube Shorts?
Many users are curious about how to make full use of YouTube Shorts. You can get the Short at the bottom of the YouTube app on either the homepage or on their channel page.
Is YouTube Shorts available on Google Play or App Store?
No. Unlike other streaming apps, you can’t find YouTube app on Google Play or App Store as it is not a standalone service. YouTube Shorts are found within the service’s main mobile app. It is, therefore, accessible from the YouTube app on your computer or phone at the bottom of the screen.
How to access YouTube Shorts on YouTube app
- First, go to the YouTube app at the bottom of the screen to find the “Shorts” button.
- You’ll then see a selection of thumbnails that harbors popular Shorts.
- Choose any video then click on it to bring you into the vertical video player.
- You can then watch the clip and like or dislike the video as it plays. Just use the “thumbs up” or “down” icon. Likewise, you can share and subscribe to the “Short creator’s” channel.
How to create YouTube Shorts
Do you wish to create YouTube Shorts but you don’t know how to? Here’s the kicker!
Step 1. You first need to install the YouTube app on your device then sign in to your account.
Step 2. Now, tap on the “Create” button. The icon is a “+” symbol in the bottom center of the screen.
Step 3. A pop-up window will open. Tap the “Create a Short” tab. If prompted, allow YouTube to use your phone’s camera and microphone.
Step 4. You’ll then land on the “YouTube Shorts” recording page.
Step 5. Set the length to 60 seconds and bellow. You have the option to slow down or speed up the recording by tapping the “Speed” icon on the right.
Step 6. Likewise, set a time for the camera to start recording automatically. Check below the “Speed” for the “Timer” for setting.
Step 7. Go ahead to edit your Short before posting. You can use “Filters” to apply visual effects.
Step 8. When your camera is set, hit the “Record” button. You can stop the recording by tapping on the Record button, then resume as you wish.
Step 9. Tap on the “Checkmark” when you are done recording. You can add some music and text as well. Then tap on the “Next” button to finish the recording.
Step 10. Then add a title and adjust “Sharing” settings. Also, add the “#shorts” to the title to make it promotional together with other Shorts videos.
Step 11. Finally, tap the “Upload” tab to add your “Shorts” to YouTube.
Here are the solutions for YouTube Common Issues
Since YouTube Shorts is still in the “Beta” mode, users are likely to experience issues while using it. Below are some fixes for YouTube shorts common issues like YouTube Shorts not showing up, unable to post video to YouTube Shorts and etc.
Solution 1. Update YouTube app
Remember apps are ever on the upgrade mode. You are likely to face some connection issues if you are operating on an older version. Here’s is how to update the YouTube app on your Android or iPhone device.
On Android device
- Launch Google Play Store.
- Next, tap on the “three diagonal lines” at the top section of your screen.
- Then select the “My Apps & Games” option.
- Search for YouTube app and tap on the “Update” button.
On iOS device
- Open the “App Store”
- Tap on your “Profile” icon.
- Then tap on the “Update” tab to fix the issue.
On your computer
- Search for YouTube streaming app from the Google Play Store.
- Here, you’ll see an update button in case your app needs an update.
- Next, click on the “Update” button and wait for the update to complete.
- Launch YouTube once more and see whether the YouTube Shorts not showing issue is resolved.
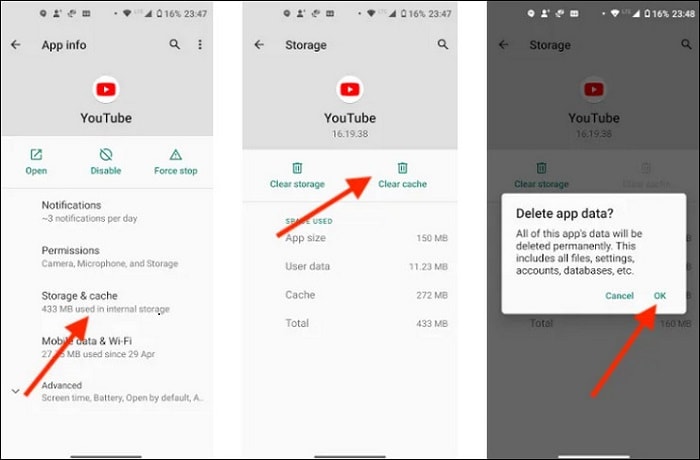
Solution 2. Clear Cache
A corrupt system may also cause issues with the normal operation of your application.
- Go to the “Settings” button on your phone.
- Then go to the “Apps” section and tap on “All Apps”
- Select the “YouTube” app from the list.
- Next, go to the “App Settings” and click on the “Storage” section.
- Tap on the “Clear cache and data” option.
- Finally, relaunch the YouTube app and check whether the issue is resolved.
Solution 3. Check if Shorts is available in your country
Remember that “Shorts” isn’t available in all the countries yet. So, you can confirm whether it is already in your country. If not, you can bypass GEO restrictions by using free VPNs.
- First, download and install a VPN app.
- Next, select the USA or India server location to fake a GPS location.
- Then clear the cache from the YouTube app and click it open.
- You should now find the option to view and even upload Shorts from your device.
Solution 4. Ensure your video is set as YouTube Shorts
Your video should be set as YouTube Shorts before posting.
- Identify the video that you wish to post.
- Add the “#shorts” in your title and description.
- See that each video is up to 60 seconds only.
- Post the video and see whether the issue isn’t reoccurring.
Conclusion
It’s a nice feeling to learn how to upload YouTube Shorts and share the fun with others worldwide. However, you may experience YouTube Shorts not showing due to restrictions in your country or other issues. We have tackled adequate solutions to solve such scenarios and make your Shorts go online. Nonetheless, check out the steps to access and create YouTube Shorts in just a few steps.
Also read:
- In 2024, Clip Weaver Workshop
- Dance Directives Finding Ideal DJ Templates
- What Financial Gain Stems From One Million YouTube Eyeballs?
- Crafting Unique Content to Differentiate Your Channel for 2024
- Dissecting Purchased Engagement Assessing Its Role in Channel Development
- Avoiding Invisibility Strategies for Effective Use of Youtube's Featured Channels for 2024
- Easily Alter Video Velocity YouTube's Playback Speed Mastery
- Youtubers Unite with These 17 Top-Tier Lights
- Pro Video Editing Selections for Social Media
- Exploring Sourav Joshi’s Success on YouTube for a Profitable 2024
- Does Spending on YouTube Followers Really Amplify Your Presence, In 2024
- Channel Boost Achieve YouTube Affiliate Milestone with 10K Vistas
- 2024 Approved Edu-Favorites Best Learning YT Channels
- Access Creative Banners for Video Makers at Zero Price
- In 2024, Crafting a Powerful Content Strategy Uncover the Best 5 YouTube Marketing Tactics
- [Updated] Bite-Sized Video Knowledge Now
- 2024 Approved Deletion Methods for YouTube's Backlogged Video Collection
- [Updated] DIY Tips to Cut Unwanted Sounds From Your Videos
- [New] Easy YouTube File Transfer Techniques
- Maximizing YouTube Income Universal Studio Insights
- Travel Blogging Essentials Step-by-Step Path to Success
- Copyright Rules for Screenshotting and Archiving YouTube Videos for 2024
- 2024 Approved Enhancing Content Quality with Advanced Video Editing
- In 2024, Effortlessly Post Videos on YouTube with Our Expert Guide
- [Updated] Dissecting Video Platform Distinctions YouTube Vs. DailyMention
- In 2024, Designing a Memorable YouTube Sign-Off
- Social Media Live War FB LIVE & YT Live Vs. Twitter Spaces
- Enhancing Your YouTube Content with Right Camera Gear
- [Updated] Choreographing Newscast Endings
- [Updated] Effortless Media Transfer Chrome to TikTok Across All Platforms for 2024
- Learn How to Produce Musical Videos at No Expense with These Techniques
- Secret Techniques in PS for First-Timers
- My Videos Arent Playing on Sony Xperia 5 V – What Can I Do? | Dr.fone
- [New] In 2024, Capture Kings List The Ultimate Screen Recorder Showdown
- New Get Your Favorite Soundcloud Tracks in MP3 Format A Simple Guide for 2024
- Best 10 Mock Location Apps Worth Trying On Realme V30 | Dr.fone
- [New] 2024 Approved Stay Ahead The Crème De La Liste of TikTok Font Generators
- Troubleshooting Why Aren't Your Recommended FB Videos Displayed?
- [Updated] 2024 Approved Clear Vision in Gaming Captures Overcoming OBS Black Screens
- [Updated] Social Media Snippet Seizers, 2023 for 2024
- Fixes for Apps Keep Crashing on Tecno Camon 30 Pro 5G | Dr.fone
- [Updated] Delight in Facebook's Forgotten Meme Kingdoms
- [New] Transform Your TikTok Experience From Basic Recording to Professional Filming
- [New] Decoding Instagram's Verification System
- [New] Unveiling the Trouble Solving FB Messenger's Video Not Sending Flaw for 2024
- Title: "YouTube Editing Tips and Tricks for Shorter Videos"
- Author: Steven
- Created at : 2024-05-25 21:04:05
- Updated at : 2024-05-26 21:04:05
- Link: https://youtube-clips.techidaily.com/youtube-editing-tips-and-tricks-for-shorter-videos/
- License: This work is licensed under CC BY-NC-SA 4.0.
