
:max_bytes(150000):strip_icc()/001-apple-watch-gps-vs-cellular-apple-watch-4774783-760199d53cce4ed2a5849a6104b87c07.jpg)
Vloggers’ Guide to Top 5 Game Microphones
Vloggers’ Guide to Top 5 Game Microphones
Top 5 Gaming Headsets for YouTube in 2024

Richard Bennett
Feb 20, 2024• Proven solutions
Need a gaming headset? The number of gamers is growing every day, and that means more and more people are looking for content from experienced gamers on YouTube and Twitch. To produce great YouTube gaming videos, you’ll need a lot of gaming knowledge and a few pieces of high-quality equipment, including a good headset. Without a headset, it might be hard to keep track of in-game audio cues while entertaining your audience.
Most hardware manufacturers are actively targeting the gaming market, releasing specialized headset models for 2024. Here is a quick overview of the five best candidates for the title of the best gaming headset for 2024:
2. Audio Technica ATH-ADG1 Open Air High Fidelity Headset
3. Logitec Surround Sound Gaming Headset G430
4. Razer Kraken 7.1 Chroma Gaming Headset
5. HyperX Cloud II Gaming Headset
1. Razer Man O’ War 7.1
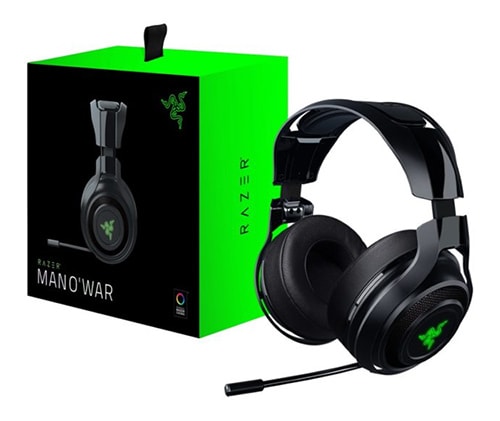
Price: $222.48
Compatible with: PC, Mac (with USB), PlayStation, Xbox
This wireless headset has an impressive surround sound engine that allows for an immersive gaming experience and convincing positional audio. The headset features a modern ergonomic design with earcups that fit very tightly and completely seal off the outside world. Razer Man O’War looks bulky, but it weighs just over 330 grams and uses an analog 3.5 mm connector.
The microphone boom extends from the left ear cup and can be easily adjusted or retracted. Most importantly, microphone controls are very sophisticated allowing for in-game switching between channels without disruption. When used for talking, the microphone will ensure absolute clarity, which comes handy for those who broadcast their games on YouTube.
Pros:
- Wireless setup for maximum freedom
- Minimizes ambient noise with cushion-like ear cups
- Lightweight and comfortable to wear
- Fully retractable, high-quality MEMS microphone
- Long-lasting batteries – up to 14 hours
Cons:
- Occasional loss of connectivity
- Slightly expensive for a plastic build
2. Audio Technica ATH-ADG1 Open Air High Fidelity Headset
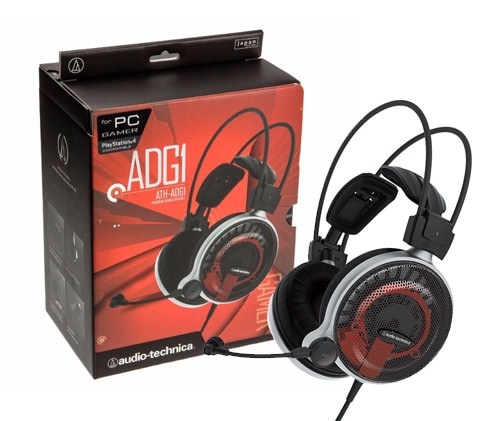
Price: $299
Compatible with: PC, PS4, iPad, iPhone, Xbox (with adapter)
For a gaming headset, this model boasts a really impressive audio quality. This characteristic is a huge strength, especially when coupled with its broad compatibility and innovative design. The structure of this headset is unique, with an open-air setup that allows for the circulation of air under the set, which is useful during long gaming sessions. This comes at a price since the isolation against ambient noise is less than perfect and the feeling might be a bit awkward until you get used to it.
As for the microphone, it is permanently attached to the left side of the headset with a flexible stem, so it can be easily adjusted to the desired position. This implies that ATH-ADG1 was made specifically for those who need to communicate while receiving the high-quality audio feed, such as gaming streamers.
Pros:
- Extremely light and uniquely built for comfort
- Top-notch audio quality above its class
- Innovative, self-adjusting frame
- Comfortable ear cups
Cons:
- Analog headset, so the quality depends on the connected device
- Specialized product with a narrow range of applications
- Fragile build that can easily be damaged
- Very expensive
3. Logitec Surround Sound Gaming Headset G430
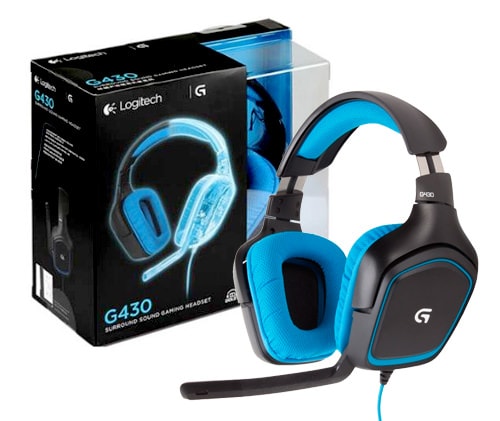
Price: $79.99
Compatible with: PC, PS4
Logitec is well known for producing high-quality peripherals, and this model lives up to that standard despite its affordable price. Its most touted feature is the surround sound system, which is not common in this price range. This allows for very realistic in-game audio, particularly because the headset has an excellent bass channel. In addition to solid audio performance, the Logitec gaming headset is characterized by low weight rotating ear cups with a protective cloth and vibrant coloring.
A standard 3.5 mm connector is used for the microphone, which is conveniently positioned and capable of clearly capturing speech while blocking out other sounds. Unfortunately, the microphone can’t be easily manipulated and doesn’t offer the option to be muted automatically, although a manual switch is available to turn it off. For a budget gaming headset, that’s a fair compromise.
Pros:
- Realistic, immersive sound
- Smart design optimized to decrease weight
- The Durable cloth covering the ear cups
- Surround effect on a cheap gaming headset
- Excellent price-to-quality ratio
Cons:
- Lack of programmable commands
- Poor protection against ambient noise
- Less than impressive visually
4. Razer Kraken 7.1 Chroma Gaming Headset
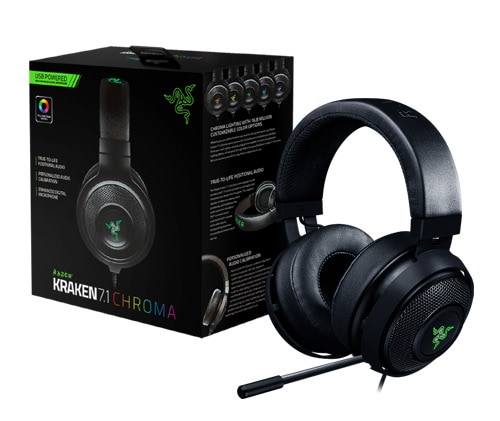
Price: $96.77
Compatible with : PC, PS4
If you are looking for the best gaming headset with a microphone, this is a very b candidate. It is pretty affordable compared to the other Razer headset on this list (the Man O’ War), but it is equally robust when it comes to performance, including high-quality surround audio. This is a rather large headset with thick ear cups decorated with a glowing logo of the brand, but its size is not a problem since Kraken is very comfortable even when worn continually for hours.
Kraken’s fully retractable and flexible microphone can be hidden under the left cup when not in use, giving this model a bit of versatility. It picks up your voice even when it’s bent sideways, so YouTube professionals won’t have to worry about the exact positioning while engaged in a fierce battle. It’s also possible to use a toggle switch to mute the microphone quickly.
Pros:
- Excellent audio for its price range
- Surround audio contributes to the more complete gaming experience
- Completely isolates any ambient sounds
- Flexible mic that can be moved out of the way
- Access to Synapse 2.0 software
Cons:
- USB only, no 3.5 mm jacks
- Lack of preset settings for gaming
- A sensitive microphone that sometimes picks up unwanted sounds
5. HyperX Cloud II Gaming Headset
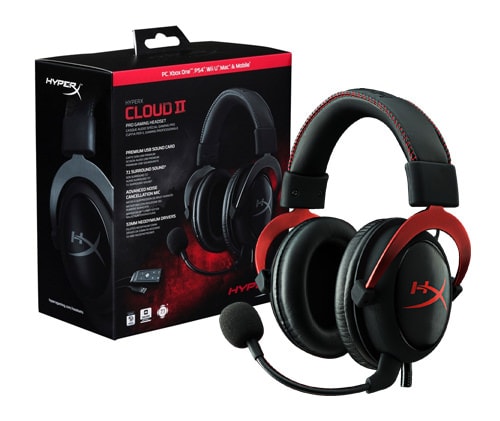
Price: $99.88
Compatible with: PC, Mac, Xbox, PS4, Mobile
Well designed, packed with advanced features and moderately priced, this gaming headset offers a lot of value to the YouTube crowd. It comes with optional surround audio that can be plugged in via sound card, or disconnected when this effect is not needed. The headset was originally designed to work perfectly on the Xbox, but it retains compatibility with most desktops, laptops, and consoles.
The detachable microphone is very solid and particularly effective in filtering noise and eliminating echo. It can be easily moved into any position or removed altogether when the headset is used for any purpose other than game streaming.
Pros:
- b and elegant aluminum frame
- Advanced audio control box
- Virtual 7.1 surround audio
- Interchangeable ear pads
- Premium look and feel at an affordable price
Cons:
- Inconveniently positioned mute switch
- Relatively short cord limiting movement
Best Video Editing Software for Gamers- Wondershare Filmora9
No doubt gamers would need a lot of effects and overlays to edit a live stream video to show the best effects on the game screen. High bass music syncing with the scene is very important for a game video. The sky is the limit to add effects and background to the game videos with Wondershare Filmora9 as it’s the best video editor for professionals and newcomers who are interested in gaming and pursuing a YouTube channel. Filmora9 provides you with a green screen, PIP, scene detection, play video in reverse, add voice over, royalty-free music, overlays, and transitions that you can use to make a gaming video like a pro.


Richard Bennett
Richard Bennett is a writer and a lover of all things video.
Follow @Richard Bennett
Richard Bennett
Feb 20, 2024• Proven solutions
Need a gaming headset? The number of gamers is growing every day, and that means more and more people are looking for content from experienced gamers on YouTube and Twitch. To produce great YouTube gaming videos, you’ll need a lot of gaming knowledge and a few pieces of high-quality equipment, including a good headset. Without a headset, it might be hard to keep track of in-game audio cues while entertaining your audience.
Most hardware manufacturers are actively targeting the gaming market, releasing specialized headset models for 2024. Here is a quick overview of the five best candidates for the title of the best gaming headset for 2024:
2. Audio Technica ATH-ADG1 Open Air High Fidelity Headset
3. Logitec Surround Sound Gaming Headset G430
4. Razer Kraken 7.1 Chroma Gaming Headset
5. HyperX Cloud II Gaming Headset
1. Razer Man O’ War 7.1
Price: $222.48
Compatible with: PC, Mac (with USB), PlayStation, Xbox
This wireless headset has an impressive surround sound engine that allows for an immersive gaming experience and convincing positional audio. The headset features a modern ergonomic design with earcups that fit very tightly and completely seal off the outside world. Razer Man O’War looks bulky, but it weighs just over 330 grams and uses an analog 3.5 mm connector.
The microphone boom extends from the left ear cup and can be easily adjusted or retracted. Most importantly, microphone controls are very sophisticated allowing for in-game switching between channels without disruption. When used for talking, the microphone will ensure absolute clarity, which comes handy for those who broadcast their games on YouTube.
Pros:
- Wireless setup for maximum freedom
- Minimizes ambient noise with cushion-like ear cups
- Lightweight and comfortable to wear
- Fully retractable, high-quality MEMS microphone
- Long-lasting batteries – up to 14 hours
Cons:
- Occasional loss of connectivity
- Slightly expensive for a plastic build
2. Audio Technica ATH-ADG1 Open Air High Fidelity Headset
Price: $299
Compatible with: PC, PS4, iPad, iPhone, Xbox (with adapter)
For a gaming headset, this model boasts a really impressive audio quality. This characteristic is a huge strength, especially when coupled with its broad compatibility and innovative design. The structure of this headset is unique, with an open-air setup that allows for the circulation of air under the set, which is useful during long gaming sessions. This comes at a price since the isolation against ambient noise is less than perfect and the feeling might be a bit awkward until you get used to it.
As for the microphone, it is permanently attached to the left side of the headset with a flexible stem, so it can be easily adjusted to the desired position. This implies that ATH-ADG1 was made specifically for those who need to communicate while receiving the high-quality audio feed, such as gaming streamers.
Pros:
- Extremely light and uniquely built for comfort
- Top-notch audio quality above its class
- Innovative, self-adjusting frame
- Comfortable ear cups
Cons:
- Analog headset, so the quality depends on the connected device
- Specialized product with a narrow range of applications
- Fragile build that can easily be damaged
- Very expensive
3. Logitec Surround Sound Gaming Headset G430
Price: $79.99
Compatible with: PC, PS4
Logitec is well known for producing high-quality peripherals, and this model lives up to that standard despite its affordable price. Its most touted feature is the surround sound system, which is not common in this price range. This allows for very realistic in-game audio, particularly because the headset has an excellent bass channel. In addition to solid audio performance, the Logitec gaming headset is characterized by low weight rotating ear cups with a protective cloth and vibrant coloring.
A standard 3.5 mm connector is used for the microphone, which is conveniently positioned and capable of clearly capturing speech while blocking out other sounds. Unfortunately, the microphone can’t be easily manipulated and doesn’t offer the option to be muted automatically, although a manual switch is available to turn it off. For a budget gaming headset, that’s a fair compromise.
Pros:
- Realistic, immersive sound
- Smart design optimized to decrease weight
- The Durable cloth covering the ear cups
- Surround effect on a cheap gaming headset
- Excellent price-to-quality ratio
Cons:
- Lack of programmable commands
- Poor protection against ambient noise
- Less than impressive visually
4. Razer Kraken 7.1 Chroma Gaming Headset
Price: $96.77
Compatible with : PC, PS4
If you are looking for the best gaming headset with a microphone, this is a very b candidate. It is pretty affordable compared to the other Razer headset on this list (the Man O’ War), but it is equally robust when it comes to performance, including high-quality surround audio. This is a rather large headset with thick ear cups decorated with a glowing logo of the brand, but its size is not a problem since Kraken is very comfortable even when worn continually for hours.
Kraken’s fully retractable and flexible microphone can be hidden under the left cup when not in use, giving this model a bit of versatility. It picks up your voice even when it’s bent sideways, so YouTube professionals won’t have to worry about the exact positioning while engaged in a fierce battle. It’s also possible to use a toggle switch to mute the microphone quickly.
Pros:
- Excellent audio for its price range
- Surround audio contributes to the more complete gaming experience
- Completely isolates any ambient sounds
- Flexible mic that can be moved out of the way
- Access to Synapse 2.0 software
Cons:
- USB only, no 3.5 mm jacks
- Lack of preset settings for gaming
- A sensitive microphone that sometimes picks up unwanted sounds
5. HyperX Cloud II Gaming Headset
Price: $99.88
Compatible with: PC, Mac, Xbox, PS4, Mobile
Well designed, packed with advanced features and moderately priced, this gaming headset offers a lot of value to the YouTube crowd. It comes with optional surround audio that can be plugged in via sound card, or disconnected when this effect is not needed. The headset was originally designed to work perfectly on the Xbox, but it retains compatibility with most desktops, laptops, and consoles.
The detachable microphone is very solid and particularly effective in filtering noise and eliminating echo. It can be easily moved into any position or removed altogether when the headset is used for any purpose other than game streaming.
Pros:
- b and elegant aluminum frame
- Advanced audio control box
- Virtual 7.1 surround audio
- Interchangeable ear pads
- Premium look and feel at an affordable price
Cons:
- Inconveniently positioned mute switch
- Relatively short cord limiting movement
Best Video Editing Software for Gamers- Wondershare Filmora9
No doubt gamers would need a lot of effects and overlays to edit a live stream video to show the best effects on the game screen. High bass music syncing with the scene is very important for a game video. The sky is the limit to add effects and background to the game videos with Wondershare Filmora9 as it’s the best video editor for professionals and newcomers who are interested in gaming and pursuing a YouTube channel. Filmora9 provides you with a green screen, PIP, scene detection, play video in reverse, add voice over, royalty-free music, overlays, and transitions that you can use to make a gaming video like a pro.
Richard Bennett
Richard Bennett is a writer and a lover of all things video.
Follow @Richard Bennett
Crafting Clearer Communication: The Art of Adding Text to Video Media
How to Add Text to YouTube Video Before or After Uploading
Richard Bennett
Mar 27, 2024• Proven solutions
A great way to emphasize something you say in your vlog is to have your words appear next to you as you say them . Adding text to YouTube videos can look really professional. You might put a title at the beginning of your video, use bullet points to help people keep track of your monologue, or to highlight an important point by writing it on your screen. When you use text in your videos there are a few things you need to keep in mind. In this article, I will share with you 2 ways to add text/subtitles/captions to YouTube videos, whether you need to add text to the video during editing and upload it to YouTube later, or you have uploaded the video to YouTube already and want to add some captions and subtitles to complement it.
- Part 1: Add text to video before uploading YouTube
- Part 2: Add Text to YouTube video after uploading
- Part 3: Top 3 YouTube Video Text Tips
How to Add Text to YouTube Video Before Uploading
Before uploading the video to YouTube, it is recommended to add text to the video first. You can add simple texts and captions to videos with the free video editing software. To add more text effects to the video, you can use Filmora, Sony Vegas Movie Studio and Adobe Premiere CC based on your video editing skills and needs. These software programs are great video editors, which can help you input text easily.
1. Use Filmora to Add text to Videos
There are plenty of Text effects built in Filmora, you can apply motions and animation to texts, titles, subtitles, end credits and openers as well. Each title preset will present different effects. You can add multiple text boxes and place the text to any position in need. Besides writing texts to video, you can select the target font, size and color and customize the text effect in detail as well. To add text to a video in Filmora is easy, just follow the steps below:

- Open up Filmora and drag a clip into your timeline. Then, go to Text/Credit.
- Find a style that you like and drag it into your timeline where you want your text to appear. Make sure your text is selected in your timeline and click the Advanced Text Editing icon, which looks like a pen and paper.
- Insert your own words and drag your text to where you want it on the screen. Adjust the size by dragging the blue squares which surround your text.
- To change the color of your text, go into the Customize menu. You will find it near the top left of your screen. While you are in Customize there will be a section called Fill. This is where you select the color of your text. You can even change the fill type to ‘gradient fill’ and have your text transition between two colors.
- All of Filmora’s text options are animated – they fade, move around the screen, or perform some other type of action as they appear and disappear. To change the animation of your text select Animation next to Customize. A selection of different animations will appear. Double click on the one you want to apply to your text.
Download Mac Version ](https://tools.techidaily.com/wondershare/filmora/download/ )
Check the detailed steps of how to add text to video in Filmora.
2. Use Windows Movie Maker
As a simple video editing software, Windows Movie Maker also allows you to add text to videos. It provides 3 different options for you to add Title, Caption and Credits to the YouTube videos. You can follow the steps below to add text to the video in WMM.

- To start, launch the Windows Movie Maker.
- After, select import video to insert the video that you want to add text with.
- Select edit movie then click make credits or titles.
- Then add the text that you want to include.
For the step by step tutorial of adding text to YouTube video, check How to Add Text to Video with Windows Movie Maker . Besides adding text to video, you can use Windows Movie Maker to edit YouTube video further. Learn How to trim, cut, combine, split video and add transitions and upload video to YouTube in Windows Movie Maker?
3. Use Sony Vegas Movie Studio
Adding text to YouTube videos in Sony Vegas is not so complicated if you are new to this software. You can adjust the color, size, font and duration of the text effect and add fade in and fade out effects. Follow the steps below to add texts to video in Vegas:

- Launch Sony Vegas Movie Studio.
- Click the View Menu then select Media Generators.
- Choose the generator that you want to use.
- After, drag the generator you have chosen on the timeline.
- Then, the video event FX dialogue box will appear.
- Enter the text that you want and modify it by changing the font, size and style.
4. Use Adobe Premiere CC
For professionals who are looking for a professional way to adding text to video and also have a sufficient budget, Adobe Premiere CC is always recommended. You can check the video and the steps below to add text to video in Premiere:
- Click open or create a project.
- Click the file menu then choose new and title.
- After, the text window will appear then utilize the text tool to add text.
- You can also edit your text using the commands that are provided in the Title Menu.
- Save the text that you have made by clicking the file menu then choose Save As.
How to Add Text to video in YouTube after uploading
Sometimes, we have uploaded a video to YouTube and then want to add subtitles/cc to the video later. The good news is that YouTube is not only a site for videos but is also the place where you can edit your videos in an instant. As you have read, adding text and captions to the uploaded YouTube videos is just a breeze.
Of course, you can only add and edit texts and captions to the video under your YouTube account. Here are the steps on how you can add text to your videos with YouTube Video Editor after the video is uploaded.
- Go to youtube.com then sign in to your account. After sign in your YouTube account, click your avatar and select Creator Studio to enter the creator studio interface.
- Click the Video Manager tab and in Videos section you will see all your videos uploaded to YouTube. Select the video that you want to add captions to and then select Subtitles/CC after clicking Edit button.
- Add Captions/Subtitles

While YouTube may have already created the subtitles automatically for your video with its speech recognition technology. If it does, you will see something like Published: English (Automatic) to the right of your video. If the automatically generated subtitles is not correct, you can edit it to improve the accuracy. Select the line that needs modification to make the edits.
If there is no auto-subtitles, you can choose from 3 ways to add subtitles and closed captions to the video: Upload a file, Transcribe and auto-sync and create new subtitles or CC.

Upload a file: upload a text transcript or timed subtitles file.
Transcribe and auto-sync: Type or paste in a full transcript of the video and subtitle timings will be set automatically.
Create new subtitles or CC: Create subtitles and closed captions by typing them in as you watch the video.
If you already have a caption file which contains both text and time codes, just click Upload a file and upload the text to the video.
- Once everything is okay, you can change the name of the video and you can do it in the box beside Project.
Cons of Using YouTube Video Editor
When you make use of this editor, you cannot shorten the clips for music. Moreover, since it is an online editor, you need to refresh the page in order to do the changes. Aside from YouTube Video Editor, you can use Adobe Premier Pro, MAGIX Vegas Pro, OpenShot and Avidemux.
From 20th September 2017 users will no longer be able to use the complementary editing suite. Check the best YouTube video editor alternatives from this complete guide to find out more YouTube video editor alternatives if you want to add text to video with more features and customization.
Top 3 Tips for Adding Text to YouTube Videos
1. Leave Room
If you know you are going to add text to your video then make sure you leave room for it in your frame. Consider standing off to one side instead of directly in front of your camera. You do not want to have to choose between not using text, making your text really small, or placing it over your face.
While planning out your frame and leaving room for your text, consider what color you are going to make the words and whether it will stand out and look good against your background.
2. Bigger is Better
People should be able to read your text without putting in any extra effort, such as straining their eyes to make out small words. If it takes effort to read your text then a lot of people will just ignore it. Your text should be big enough that somebody watching your video on their smartphone screen – where everything is shrunk down – can read it easily.
It is easier to make your text larger when you stick to titles, keywords, and short sentences.
3. Do Not Overuse
Text is a great tool for making something stand out. However, if you try to use text to emphasize too much of what you say it will lose its effect. Text does not stand out anymore once viewers get too used to seeing it. Too much text can even get annoying and cause people to click away from your videos.
Try to use text to emphasize only the most important things you say.
Richard Bennett
Richard Bennett is a writer and a lover of all things video.
Follow @Richard Bennett
Richard Bennett
Mar 27, 2024• Proven solutions
A great way to emphasize something you say in your vlog is to have your words appear next to you as you say them . Adding text to YouTube videos can look really professional. You might put a title at the beginning of your video, use bullet points to help people keep track of your monologue, or to highlight an important point by writing it on your screen. When you use text in your videos there are a few things you need to keep in mind. In this article, I will share with you 2 ways to add text/subtitles/captions to YouTube videos, whether you need to add text to the video during editing and upload it to YouTube later, or you have uploaded the video to YouTube already and want to add some captions and subtitles to complement it.
- Part 1: Add text to video before uploading YouTube
- Part 2: Add Text to YouTube video after uploading
- Part 3: Top 3 YouTube Video Text Tips
How to Add Text to YouTube Video Before Uploading
Before uploading the video to YouTube, it is recommended to add text to the video first. You can add simple texts and captions to videos with the free video editing software. To add more text effects to the video, you can use Filmora, Sony Vegas Movie Studio and Adobe Premiere CC based on your video editing skills and needs. These software programs are great video editors, which can help you input text easily.
1. Use Filmora to Add text to Videos
There are plenty of Text effects built in Filmora, you can apply motions and animation to texts, titles, subtitles, end credits and openers as well. Each title preset will present different effects. You can add multiple text boxes and place the text to any position in need. Besides writing texts to video, you can select the target font, size and color and customize the text effect in detail as well. To add text to a video in Filmora is easy, just follow the steps below:
- Open up Filmora and drag a clip into your timeline. Then, go to Text/Credit.
- Find a style that you like and drag it into your timeline where you want your text to appear. Make sure your text is selected in your timeline and click the Advanced Text Editing icon, which looks like a pen and paper.
- Insert your own words and drag your text to where you want it on the screen. Adjust the size by dragging the blue squares which surround your text.
- To change the color of your text, go into the Customize menu. You will find it near the top left of your screen. While you are in Customize there will be a section called Fill. This is where you select the color of your text. You can even change the fill type to ‘gradient fill’ and have your text transition between two colors.
- All of Filmora’s text options are animated – they fade, move around the screen, or perform some other type of action as they appear and disappear. To change the animation of your text select Animation next to Customize. A selection of different animations will appear. Double click on the one you want to apply to your text.
Download Mac Version ](https://tools.techidaily.com/wondershare/filmora/download/ )
Check the detailed steps of how to add text to video in Filmora.
2. Use Windows Movie Maker
As a simple video editing software, Windows Movie Maker also allows you to add text to videos. It provides 3 different options for you to add Title, Caption and Credits to the YouTube videos. You can follow the steps below to add text to the video in WMM.
- To start, launch the Windows Movie Maker.
- After, select import video to insert the video that you want to add text with.
- Select edit movie then click make credits or titles.
- Then add the text that you want to include.
For the step by step tutorial of adding text to YouTube video, check How to Add Text to Video with Windows Movie Maker . Besides adding text to video, you can use Windows Movie Maker to edit YouTube video further. Learn How to trim, cut, combine, split video and add transitions and upload video to YouTube in Windows Movie Maker?
3. Use Sony Vegas Movie Studio
Adding text to YouTube videos in Sony Vegas is not so complicated if you are new to this software. You can adjust the color, size, font and duration of the text effect and add fade in and fade out effects. Follow the steps below to add texts to video in Vegas:
- Launch Sony Vegas Movie Studio.
- Click the View Menu then select Media Generators.
- Choose the generator that you want to use.
- After, drag the generator you have chosen on the timeline.
- Then, the video event FX dialogue box will appear.
- Enter the text that you want and modify it by changing the font, size and style.
4. Use Adobe Premiere CC
For professionals who are looking for a professional way to adding text to video and also have a sufficient budget, Adobe Premiere CC is always recommended. You can check the video and the steps below to add text to video in Premiere:
- Click open or create a project.
- Click the file menu then choose new and title.
- After, the text window will appear then utilize the text tool to add text.
- You can also edit your text using the commands that are provided in the Title Menu.
- Save the text that you have made by clicking the file menu then choose Save As.
How to Add Text to video in YouTube after uploading
Sometimes, we have uploaded a video to YouTube and then want to add subtitles/cc to the video later. The good news is that YouTube is not only a site for videos but is also the place where you can edit your videos in an instant. As you have read, adding text and captions to the uploaded YouTube videos is just a breeze.
Of course, you can only add and edit texts and captions to the video under your YouTube account. Here are the steps on how you can add text to your videos with YouTube Video Editor after the video is uploaded.
- Go to youtube.com then sign in to your account. After sign in your YouTube account, click your avatar and select Creator Studio to enter the creator studio interface.
- Click the Video Manager tab and in Videos section you will see all your videos uploaded to YouTube. Select the video that you want to add captions to and then select Subtitles/CC after clicking Edit button.
- Add Captions/Subtitles
While YouTube may have already created the subtitles automatically for your video with its speech recognition technology. If it does, you will see something like Published: English (Automatic) to the right of your video. If the automatically generated subtitles is not correct, you can edit it to improve the accuracy. Select the line that needs modification to make the edits.
If there is no auto-subtitles, you can choose from 3 ways to add subtitles and closed captions to the video: Upload a file, Transcribe and auto-sync and create new subtitles or CC.
Upload a file: upload a text transcript or timed subtitles file.
Transcribe and auto-sync: Type or paste in a full transcript of the video and subtitle timings will be set automatically.
Create new subtitles or CC: Create subtitles and closed captions by typing them in as you watch the video.
If you already have a caption file which contains both text and time codes, just click Upload a file and upload the text to the video.
- Once everything is okay, you can change the name of the video and you can do it in the box beside Project.
Cons of Using YouTube Video Editor
When you make use of this editor, you cannot shorten the clips for music. Moreover, since it is an online editor, you need to refresh the page in order to do the changes. Aside from YouTube Video Editor, you can use Adobe Premier Pro, MAGIX Vegas Pro, OpenShot and Avidemux.
From 20th September 2017 users will no longer be able to use the complementary editing suite. Check the best YouTube video editor alternatives from this complete guide to find out more YouTube video editor alternatives if you want to add text to video with more features and customization.
Top 3 Tips for Adding Text to YouTube Videos
1. Leave Room
If you know you are going to add text to your video then make sure you leave room for it in your frame. Consider standing off to one side instead of directly in front of your camera. You do not want to have to choose between not using text, making your text really small, or placing it over your face.
While planning out your frame and leaving room for your text, consider what color you are going to make the words and whether it will stand out and look good against your background.
2. Bigger is Better
People should be able to read your text without putting in any extra effort, such as straining their eyes to make out small words. If it takes effort to read your text then a lot of people will just ignore it. Your text should be big enough that somebody watching your video on their smartphone screen – where everything is shrunk down – can read it easily.
It is easier to make your text larger when you stick to titles, keywords, and short sentences.
3. Do Not Overuse
Text is a great tool for making something stand out. However, if you try to use text to emphasize too much of what you say it will lose its effect. Text does not stand out anymore once viewers get too used to seeing it. Too much text can even get annoying and cause people to click away from your videos.
Try to use text to emphasize only the most important things you say.
Richard Bennett
Richard Bennett is a writer and a lover of all things video.
Follow @Richard Bennett
Also read:
- In 2024, A New Era of Streaming Leading Voices of Female Creators
- [New] Channel Prominence Mastery A Comprehensive YouTube Guide
- In 2024, Capture YouTube's Subtitles on No-Cost Platforms
- [New] Effortless Online Audio Accessibility Ideal Tools for iPhone & YouTube
- Essential YouTube Thumbnails Capture Your Top Views for 2024
- 2024 Approved Boosting Buzz & Views Masterful Strategies for YouTube Success
- Where Are My YouTube Comments? Desktop/iOS/Android Strategies
- Elevate Video Playback with YouTube's Latest Feature - AV1 for 2024
- [New] Achieving Prominence in Online Gaming Content
- [Updated] Best Video Format for YouTube Uploading
- Thumbnail Theories Selecting the Most Effective YouTube Fonts
- Reliable Methods to Elevate Your YouTube Presence Without Breaking Trust
- Eye-Catching Thumbnails The Top 20 YouTube Fonts Unveiled
- Digital Identity Building Crafting Perfect Channel Images
- Shield From AI-Crafted YouTube Video Selections
- Direct Route Uploading From YouTube to Dailymotion for 2024
- Access Creative Banners for Video Makers at Zero Price
- 15 Best Free YouTube Introduction Tools
- [New] Driving Engagement and Growth The Role of Brand in YouTube Success
- Maximize YouTube Exposure in 156 Characters or Less
- Streamlining Creative Journey Uploading iMovie Videos to YouTube
- Brighten Up Your Videos Implementing Neons on Thumbnails for 2024
- [Updated] Comparing Digital Platform Profits DailyMovement to YouTube Revenue
- [Updated] Best 10 Echo Augmentation Apps Desktop/Mobile
- Amplify Your Shorts' Impact with Bespoke Thumbnails for 2024
- Your Key to Creative Advertising Access All 50 FREE YouTube Banner Designs!
- Create Standout Videos with These Top 7 Free Thumbnail Builders
- Accelerated Conversion of YT Content for MAC Screens for 2024
- Digital Decibels The Leading YouTube Voices
- [Updated] Discover the Top 7 Free YouTube Tag Extractor Vendors
- Reduce Buffering & Lag - Turn On AV1 in YouTube Settings
- Maximize Your Earnings with Youtube Short Tips
- 2024 Approved Boosting Your Channel Strategies for Skyrocketing View Counts
- 2024 Approved Best Practices for Secure YouTube MP4 Conversion
- Learn to Craft Eye-Catching YouTube Thumbnails Using Your Phone
- Evaluating Whether Your Video Consumption Needs a Subscription Boost for 2024
- In 2024, DJ Delight Choosing Ultimate Event Videos
- How to Fix Apple iPhone 12 Pro Max Find My Friends No Location Found? | Dr.fone
- Premium Portfolio Cutting-Edge Cardboard VR Game Listings
- In 2024, A Quick Guide to Oppo A56s 5G FRP Bypass Instantly
- In 2024, Pokemon Go No GPS Signal? Heres Every Possible Solution On Tecno Pop 7 Pro | Dr.fone
- In 2024, Tips And Tricks To Tell if Your Apple iPhone 6 Is Unlocked
- [Updated] Unlocking IGTV Videos Secure Downloading Techniques for Computers
- Updated Your Companion Guide Top 10 Audio-Transcription Software For All Budgets for 2024
- [Updated] 2024 Approved The Ultimate Blueprint for a Thriving TikTok Advertisement
- [Updated] In 2024, Unraveling the Best Solo Play Strategies for Apex Legends
- [New] Digital Drama #VideoViral Sagas Unfold Online for 2024
- Updated 2024 Approved Advanced Web Tools for Optimizing Audio Fidelity
- New 2024 Approved 10 Essential Tools for Resizing Videos
- Can You Unlock iPhone X After Forgetting the Passcode?
- Streamline Photobook Creation - The Picshot Promise
- [New] Ultimate Simplicity Guide to iPhone Screen Recordings for 2024
- Updated Transform Your Vocal Presence with Av Voice Changer Technology An Overview
- [New] 2024 Approved SplitCam Probe - In Video Tech's Top Spot?
- How To Restore Missing Pictures Files from Itel A60s.
- Updated Revolutionize Your Editing 10 Free FCPX Plugin Must-Haves for 2024
- CaptureCrafted Expert Reviews on the Best Screen Recorders
- 8 Solutions to Solve YouTube App Crashing on Infinix Hot 30 5G | Dr.fone
- In 2024, Adding Pizzazz to Your Footage with Moving Text
- [Updated] Leading Brand Banners Animation Masterpieces for 2024
- How to Fix It Realme Narzo N53 Wont Turn On | Dr.fone
- Title: Vloggers’ Guide to Top 5 Game Microphones
- Author: Steven
- Created at : 2024-05-25 21:02:26
- Updated at : 2024-05-26 21:02:26
- Link: https://youtube-clips.techidaily.com/vloggers-guide-to-top-5-game-microphones/
- License: This work is licensed under CC BY-NC-SA 4.0.
