![[Updated] Ensuring Visibility Fixing Missing Shorts Thumbnails](https://thmb.techidaily.com/318f85e5a53d5f60469d32582133c5ee92bbc0ceb979fd63de287576e36507bb.jpg)
"[Updated] Ensuring Visibility Fixing Missing Shorts Thumbnails"
Ensuring Visibility: Fixing Missing Shorts Thumbnails
Video thumbnails are important since they encourage people to click and watch the video. But what if your set YouTube Shorts thumbnail is not showing? YouTube will use a random part of the video as the thumbnail. It may be an unflattering or uninteresting shot. Then, your Shorts video is doomed.
That said, it is a problem you want to solve. Here are 7 FAQs about YouTube Shorts thumbnails. They may help you with fixing this issue.
Q1. Can I Customize YouTube Shorts Thumbnails?
Yes, you can. YouTube did allow short-form video creators to upload custom thumbnails for their Shorts. However, they aren’t that optimized. For instance, some people may not see them on the Shorts shelf. Also, if you share a link to the video somewhere else, the old video thumbnail may show instead of the new one.
Adding a custom thumbnail for YouTube Shorts is the same as adding one for long-form videos on the platform. Follow these steps:
- Open the YouTube mobile app. Click the “Plus” icon at the bottom center > “Create Short.” Upload, edit, and post your video.
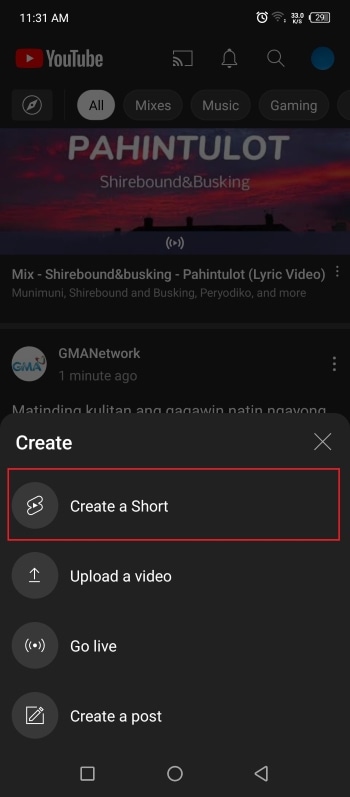
- Get to your desktop computer or laptop. Open your channel’s YouTube Studio.

- On the left navigation menu, click “Content.”

- Click the “pencil” icon next to the Shorts you just uploaded. This video should be at the top of the list.
- Navigate to the Thumbnail section. Click “Create Thumbnail.”

Q2. Why Are YouTube Shorts Thumbnails Not Showing?
It’s not you who’s the only one with Shorts thumbnails not showing. Many short-form content creators on the platform are also facing this issue. A YouTuber took to Reddit to complain about how he uploaded custom thumbnails for all his videos. The thumbnails are correct in the editor. However, YouTube still displays a random frame as the thumbnail on the Shorts shelf.
“They ALL have randomly selected different parts of each video I have uploaded & somehow generated a new/unknown thumbnail that was neither what I uploaded as the custom option nor 1 of the 3 that YouTube auto populated.”
The reason behind this is the difference in the thumbnail size. Regular YouTube video thumbnails are in the ratio of 16:9. Meanwhile, Shorts uses a ratio of 9:16. The thing is that YouTube does not yet allow you to upload 9:16 thumbnails. Thus, the thumbnail for Shorts may show correctly on the video section but not on the Shorts shelf.
Q3. How to Fix YouTube Shorts Thumbnail Problem?
Unfortunately, there is no reliable fix to this problem yet. YouTubers have tried different things in hopes that YouTube will display the correct thumbnail for their Shorts.
Some YouTubers have tried using different images. Others have experimented with changing the aspect ratio of the thumbnail or using Adobe editor for ratios. Clearing histories and cache, using different browsers, resizing, and changing the images’ resolution have also been done. Sadly, these are all failed attempts.
Q4. How To Boost Views When I Have no Control Over YouTube Shorts Thumbnails?
Attracting viewers on Shorts is the same as attracting viewers on the main YouTube. You use interesting thumbnails and video titles. Since thumbnails are out of the options, selecting great video titles has become even more important.
Here are some pointers. Your title should be at most 40 characters. Also, it should be concise and irresistible. And forget about SEO since no one is searching for YouTube Shorts anyway. People consume what they see in their feeds. So instead, the title should be “snappy.” It should intrigue, entertain, or enlighten the viewers. That will net you some views for your Shorts content.
Q5. How To Get More Views on YouTube Shorts?
Forgoing the intro is the way to go. An intro will just prolong the video when people are in Shorts to find bite-sized videos. So jump right into the video content. You can also start the video with a still frame instead. Using hashtags, captions, and text effects are also recommended. And interacting with your audience through comments and pinned comments will keep them coming back to your Shorts channel.
Of course, ensuring that the video quality is high is key to getting more views. For that, you need a good video editor. You can try Wondershare Filmora , a powerful and easy-to-use video editor.
Free Download For Win 7 or later(64-bit)
Free Download For macOS 10.14 or later
The best thing is that you don’t need to transfer the video from your phone to your computer and back. Wondershare Filmora is available on mobile. And it’s one of the best tools for enhancing a short-form video.
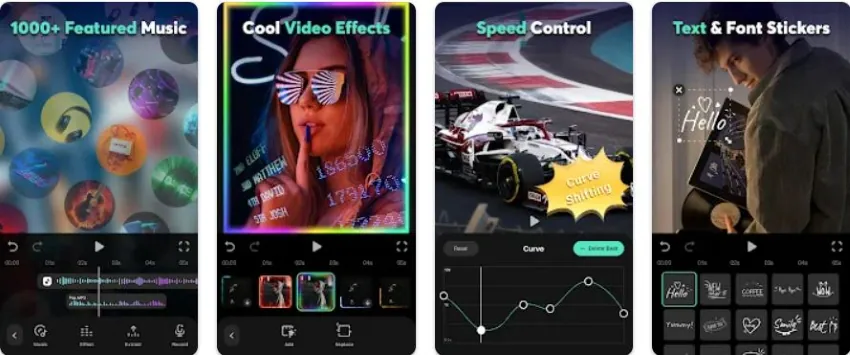
Short-form video watchers love filters, transitions, and effects. And Filmora gives you access to all of that. It provides you with fun and amazing filters, effects, transitions, and stamps that can add a wow factor to your short-form video.
Q6. Do YouTube Shorts Make Money?
Making money from YouTube Shorts was challenging. The platform pays content creators who are doing well through the Creator Fund. However, as Shorts grew, the payout became smaller.
Luckily, that’s going to change. Starting this year, Shorts will be a part of the YouTube Partner Program. This means that you can make money from the ads that people watch on Shorts. According to YouTube, creators will keep 45% of the revenue. It will be distributed based on your share of total Shorts views.
YouTube also adjusted the requirements to qualify for the YPP. They made it easier for Shorts content creators to get into the program.
Q7. How Do You Make YouTube Shorts Play Normal?
You can watch Shorts like normal YouTube videos where you can rewind when you want to. Follow these steps.
On a Desktop Computer
- Open a Shorts video on YouTube.

- Pause the video.

- Click “Library” on the left panel.

- Select the Shorts you just watched. It should be on the top and first on the list.

On a Mobile Phone
- Open the YouTube app. Watch a Shorts video.
- Like the Shorts video.

- Tap “Library”

- Scroll down to find “Liked Videos.” Click on it.

- Select the Shorts video you just watched. It should be at the top of the list.

Conclusion
Unfortunately, custom thumbnails not showing on Shorts does not have a fix yet. So to attract viewers, you must leverage the things in your control. You must title your videos in a way that will make users click the video. Also, adding effects and filters on the video using an editor like Wondershare Filmora can help.
Users can subscribe to Shorts channels. And if they see that your videos are well-edited and high-quality, they’ll be more likely to do so. Once they are subscribed, they will see and watch your videos more often.
Free Download For macOS 10.14 or later
The best thing is that you don’t need to transfer the video from your phone to your computer and back. Wondershare Filmora is available on mobile. And it’s one of the best tools for enhancing a short-form video.
Short-form video watchers love filters, transitions, and effects. And Filmora gives you access to all of that. It provides you with fun and amazing filters, effects, transitions, and stamps that can add a wow factor to your short-form video.
Q6. Do YouTube Shorts Make Money?
Making money from YouTube Shorts was challenging. The platform pays content creators who are doing well through the Creator Fund. However, as Shorts grew, the payout became smaller.
Luckily, that’s going to change. Starting this year, Shorts will be a part of the YouTube Partner Program. This means that you can make money from the ads that people watch on Shorts. According to YouTube, creators will keep 45% of the revenue. It will be distributed based on your share of total Shorts views.
YouTube also adjusted the requirements to qualify for the YPP. They made it easier for Shorts content creators to get into the program.
Q7. How Do You Make YouTube Shorts Play Normal?
You can watch Shorts like normal YouTube videos where you can rewind when you want to. Follow these steps.
On a Desktop Computer
- Open a Shorts video on YouTube.
- Pause the video.
- Click “Library” on the left panel.
- Select the Shorts you just watched. It should be on the top and first on the list.
On a Mobile Phone
- Open the YouTube app. Watch a Shorts video.
- Like the Shorts video.
- Tap “Library”
- Scroll down to find “Liked Videos.” Click on it.
- Select the Shorts video you just watched. It should be at the top of the list.

Conclusion
Unfortunately, custom thumbnails not showing on Shorts does not have a fix yet. So to attract viewers, you must leverage the things in your control. You must title your videos in a way that will make users click the video. Also, adding effects and filters on the video using an editor like Wondershare Filmora can help.
Users can subscribe to Shorts channels. And if they see that your videos are well-edited and high-quality, they’ll be more likely to do so. Once they are subscribed, they will see and watch your videos more often.
How to Edit YouTube Videos in iMovie?
Easy Way to Edit YouTube Videos in iMovie

Richard Bennett
Mar 27, 2024• Proven solutions
iMovie is the built-in video editor that allows you to combine several video clips. It is available for both Mac and iOS devices. This app was first released in 1999 when it came with the iMac DV model.
With the use of the iMovie, you are able to create movies that include sound effects, menus, transitions, titles, themes, and music, just to name a few. The resulting movie can be saved onto physical media or as a file on the hard drive.
If you are a Mac user, then you can easily edit YouTube videos in iMovie. All you need to do is to follow the simple steps below. In this article, you will learn how to import videos, organize videos, add YouTube titles and add transitions.
Part 1. Steps on Editing YouTube Videos Using iMovie
To edit a video for YouTube with iMovie, you can follow these steps.
Step 1: Import Video Clips into iMovie
If you have recorded the video clips with the use of a videocam, then connect the camera to the Mac and open the app. You can import the videos by manually selecting the clips that will be part of the YouTube video.
Note: If you want to import videos that you have already published on your YouTube channel, then you can download them from the channel, and save them as MP4. However, if the videos were uploaded by other users, then you need to use a video converter, this article will let you know the 8 best video converters to convert video to MP4.
Step 2: Edit the Video Clips
Once you have all the clips that you need, the next step is to edit YouTube videos in iMovie. When you import the clips, you have created an Event in the app. If you want to include a clip in your final video, just drag the file to the project browser, where you can edit the video.

You can also add videos from other Events into the current project. You can select the parts of the video by dragging across the video from the chosen start to stop points. Edit the video until you are satisfied with the results.
Step 3: Enhance the Video
Once you have edited the video, you can then add background music, themes, sound effects, onscreen text, transitions between clips, and photos. The best thing about iMovie is that it comes with a sound effects library. It also allows you to upload audio from your iTunes library, iLife, and GarageBand.
iMovie allows you to add text to any part of the video, whether it is a title screen at the start, credits at the end, and everything in between. Try to enhance the video until you think it is ready to be uploaded to YouTube.
- Add YouTube title : If you want to add a title for YouTube Video, all you need to do is click Title in the toolbar, and then highlight My Movie on the left. From here, enter the title you like.
- Organize videos : You also can rearrange video clips in the timeline. Just drag the video on the timeline to wherever you want.
- Add transitions : If you have more than one video clip, you definitely need transitions between them. Click the Transitions tab, and then select one transition you like. In the end, drag it to stop between two clips.
Step 4: Export and Upload the Video to YouTube

When you edit YouTube videos in iMovie, you have the option to export the video straight to the video streaming website. All you need to do is to click on the Share button found at the top of the screen. Then select YouTube. Add your YouTube account in iMovie by entering your username and password. Then you choose a title, description, and tags for the video.
You can choose the resolution and size of the video that includes HD 720p and HD 1080p, mobile, medium, and large. Click on Publish to upload the video to YouTube. Uploading the video will take several minutes to a couple of hours, depending on the resolution and size of the video.
Part 2. A Better Choice to Edit YouTube Videos
There’s a better way to edit YouTube videos. It involves the use of Wondershare Filmora . It is user-friendly and allows beginners to make videos professional-looking videos.


This software has more than 300 video effects for family, weddings, love, and travel, etc. You can also add animated captions to photos that will help tell the story. It comes with an array of intro and credit templates that will enhance your video.
Lastly, you can easily share the resulting movie on YouTube, DVD, other devices, and a lot more.
Richard Bennett
Richard Bennett is a writer and a lover of all things video.
Follow @Richard Bennett
Richard Bennett
Mar 27, 2024• Proven solutions
iMovie is the built-in video editor that allows you to combine several video clips. It is available for both Mac and iOS devices. This app was first released in 1999 when it came with the iMac DV model.
With the use of the iMovie, you are able to create movies that include sound effects, menus, transitions, titles, themes, and music, just to name a few. The resulting movie can be saved onto physical media or as a file on the hard drive.
If you are a Mac user, then you can easily edit YouTube videos in iMovie. All you need to do is to follow the simple steps below. In this article, you will learn how to import videos, organize videos, add YouTube titles and add transitions.
Part 1. Steps on Editing YouTube Videos Using iMovie
To edit a video for YouTube with iMovie, you can follow these steps.
Step 1: Import Video Clips into iMovie
If you have recorded the video clips with the use of a videocam, then connect the camera to the Mac and open the app. You can import the videos by manually selecting the clips that will be part of the YouTube video.
Note: If you want to import videos that you have already published on your YouTube channel, then you can download them from the channel, and save them as MP4. However, if the videos were uploaded by other users, then you need to use a video converter, this article will let you know the 8 best video converters to convert video to MP4.
Step 2: Edit the Video Clips
Once you have all the clips that you need, the next step is to edit YouTube videos in iMovie. When you import the clips, you have created an Event in the app. If you want to include a clip in your final video, just drag the file to the project browser, where you can edit the video.
You can also add videos from other Events into the current project. You can select the parts of the video by dragging across the video from the chosen start to stop points. Edit the video until you are satisfied with the results.
Step 3: Enhance the Video
Once you have edited the video, you can then add background music, themes, sound effects, onscreen text, transitions between clips, and photos. The best thing about iMovie is that it comes with a sound effects library. It also allows you to upload audio from your iTunes library, iLife, and GarageBand.
iMovie allows you to add text to any part of the video, whether it is a title screen at the start, credits at the end, and everything in between. Try to enhance the video until you think it is ready to be uploaded to YouTube.
- Add YouTube title : If you want to add a title for YouTube Video, all you need to do is click Title in the toolbar, and then highlight My Movie on the left. From here, enter the title you like.
- Organize videos : You also can rearrange video clips in the timeline. Just drag the video on the timeline to wherever you want.
- Add transitions : If you have more than one video clip, you definitely need transitions between them. Click the Transitions tab, and then select one transition you like. In the end, drag it to stop between two clips.
Step 4: Export and Upload the Video to YouTube
When you edit YouTube videos in iMovie, you have the option to export the video straight to the video streaming website. All you need to do is to click on the Share button found at the top of the screen. Then select YouTube. Add your YouTube account in iMovie by entering your username and password. Then you choose a title, description, and tags for the video.
You can choose the resolution and size of the video that includes HD 720p and HD 1080p, mobile, medium, and large. Click on Publish to upload the video to YouTube. Uploading the video will take several minutes to a couple of hours, depending on the resolution and size of the video.
Part 2. A Better Choice to Edit YouTube Videos
There’s a better way to edit YouTube videos. It involves the use of Wondershare Filmora . It is user-friendly and allows beginners to make videos professional-looking videos.
This software has more than 300 video effects for family, weddings, love, and travel, etc. You can also add animated captions to photos that will help tell the story. It comes with an array of intro and credit templates that will enhance your video.
Lastly, you can easily share the resulting movie on YouTube, DVD, other devices, and a lot more.
Richard Bennett
Richard Bennett is a writer and a lover of all things video.
Follow @Richard Bennett
Also read:
- [New] Capturing Coziness Ideal Winter Scenes for YT Video
- [Updated] Whimsical Video Downloader Score
- 2024 Approved Creating Compelling Youtube Live Content with WireCast
- 2024 Approved Cutting Edge Techniques Pushing Boundaries in YouTube Cinematography
- 2024 Approved Top EasyTime Timer Solutions at Zero Cost
- 8 Best Mirrorless Cameras for Vlogging
- Comprehensive Guide to YouTube's Subscription Advantages for 2024
- Fast Track Accessories Setup: Finding & Downloading Keyboard Drivers on Windows 7
- Haste in Video Supercharge Facebook Videos with Proxies and Tools
- In 2024, Accessing Your Curated Music Lists on Youtube
- In 2024, Brighter Days with Five Winter-Themed Backgrounds
- In 2024, Designing Custom YouTube Music Sequences
- In 2024, Exploring New Horizons in Health & Wellness Facebook Campaigns
- In 2024, How To Remove Screen Lock PIN On Honor 70 Lite 5G Like A Pro 5 Easy Ways
- In 2024, ProGoPro Sessions Four Meets Five
- Quick Fixes for Smooth MKV Video Playback in Windows 11
- Update Your Windows 11 System with New Intel Integrated Graphics Drivers
- Title: [Updated] Ensuring Visibility Fixing Missing Shorts Thumbnails
- Author: Steven
- Created at : 2024-10-31 06:50:01
- Updated at : 2024-11-05 05:26:20
- Link: https://youtube-clips.techidaily.com/updated-ensuring-visibility-fixing-missing-shorts-thumbnails/
- License: This work is licensed under CC BY-NC-SA 4.0.