![[Updated] Enhancing Online Privacy YouTube's Access Controls](https://thmb.techidaily.com/95e300018e980291f8509be45c3e360fa38c440741dbce7d87b862e7e88474bb.jpg)
"[Updated] Enhancing Online Privacy YouTube's Access Controls"
Enhancing Online Privacy: YouTube’s Access Controls
How to Change the Privacy Setting on Your YouTube Videos

Richard Bennett
Mar 27, 2024• Proven solutions
Privacy settings on YouTube allow you to control who can see your videos. There are three settings — Public, unlisted, and private. This article will give you a brief introduction of what those three settings mean, and how to use them.
- Part1: Public VS Unlisted VS Private
- Part2: How to Change Privacy Settings
- Part2: Sharing Private Videos
Want to make your YouTube videos more beautiful within minutes? Here we recommend an easy-to-use video editing software for beginner for your reference - Wondershare Filmora .
 Download Mac Version ](https://tools.techidaily.com/wondershare/filmora/download/ )
Part 1: Public VS Unlisted VS Private
Let’s figure out some terms before runing into the how-to part.
Public Videos
These are videos that everyone can view. This is the majority of YouTube videos, and just about every one you’ve ever watched will have been public. You’ll want this if you want lots of people to watch your video.
Unlisted
Unlisted videos are ones that anybody can view so long as they have the link. The video won’t show up on search results or in “related” or “suggested” videos.
This is a great setting for sharing a video amongst small groups. You might have a rough edit you want to show a few people, or you might have a show reel that you only want certain people to see.
Private
Completely private videos cannot be watched by anyone who doesn’t have permission. You grant people permission by allowing their Google accounts to access the video. Nobody else can see the video, regardless of whether they have the link.
It won’t show up on searches, as related or suggested videos, or even when imbedded in other sites. This is the best setting for a video you need to share with only very specific people, if anyone. Below is a comparison table to know more about privacy settings .

Part 2: How to Change Privacy Settings
There are two ways to change the privacy settings: firstly, when you upload the video, and secondly through Creator Studio.
Method 1:
When you upload a video to YouTube you’ll see on the right hand side an option that says “privacy”. This is defaulted to “public”, but you can use the drop-down menu on the button to change the setting. This will apply your privacy setting the second the video finishes uploading and processing.

Method 2:
To change the privacy setting later, go to Creator Studio, then Video Manager. On the right-hand side you’ll see one of three icons: a world, a chain, and a lock. The world means “public”, the chain means “unlisted”, and the lock is for “private”.

To change the privacy, click the icon. You’ll be taken to the video’s info and settings page. Down below where you see the thumbnails you’ll see the selected privacy setting. Click this to open a drop down menu, and select your desired privacy level.
Part 3: Sharing Private Videos
If a video is set to “private’, you’ll have the option to share it with specific people. Below where it says “private” on the info and settings page you’ll see a button labeled “share”. Click this and type in the email addresses of the people you want to be able to watch the video. You’ll also have the option of notifying the people via email that you’ve shared the video with them.

Conclusion
And that’s all there is to it! Changing the privacy setting on YouTube videos is a simple, helpful tool to allow you to control the audience of you work. Enjoy!

Richard Bennett
Richard Bennett is a writer and a lover of all things video.
Follow @Richard Bennett
Richard Bennett
Mar 27, 2024• Proven solutions
Privacy settings on YouTube allow you to control who can see your videos. There are three settings — Public, unlisted, and private. This article will give you a brief introduction of what those three settings mean, and how to use them.
- Part1: Public VS Unlisted VS Private
- Part2: How to Change Privacy Settings
- Part2: Sharing Private Videos
Want to make your YouTube videos more beautiful within minutes? Here we recommend an easy-to-use video editing software for beginner for your reference - Wondershare Filmora .
Download Mac Version ](https://tools.techidaily.com/wondershare/filmora/download/ )
Part 1: Public VS Unlisted VS Private
Let’s figure out some terms before runing into the how-to part.
Public Videos
These are videos that everyone can view. This is the majority of YouTube videos, and just about every one you’ve ever watched will have been public. You’ll want this if you want lots of people to watch your video.
Unlisted
Unlisted videos are ones that anybody can view so long as they have the link. The video won’t show up on search results or in “related” or “suggested” videos.
This is a great setting for sharing a video amongst small groups. You might have a rough edit you want to show a few people, or you might have a show reel that you only want certain people to see.
Private
Completely private videos cannot be watched by anyone who doesn’t have permission. You grant people permission by allowing their Google accounts to access the video. Nobody else can see the video, regardless of whether they have the link.
It won’t show up on searches, as related or suggested videos, or even when imbedded in other sites. This is the best setting for a video you need to share with only very specific people, if anyone. Below is a comparison table to know more about privacy settings .
Part 2: How to Change Privacy Settings
There are two ways to change the privacy settings: firstly, when you upload the video, and secondly through Creator Studio.
Method 1:
When you upload a video to YouTube you’ll see on the right hand side an option that says “privacy”. This is defaulted to “public”, but you can use the drop-down menu on the button to change the setting. This will apply your privacy setting the second the video finishes uploading and processing.
Method 2:
To change the privacy setting later, go to Creator Studio, then Video Manager. On the right-hand side you’ll see one of three icons: a world, a chain, and a lock. The world means “public”, the chain means “unlisted”, and the lock is for “private”.
To change the privacy, click the icon. You’ll be taken to the video’s info and settings page. Down below where you see the thumbnails you’ll see the selected privacy setting. Click this to open a drop down menu, and select your desired privacy level.
Part 3: Sharing Private Videos
If a video is set to “private’, you’ll have the option to share it with specific people. Below where it says “private” on the info and settings page you’ll see a button labeled “share”. Click this and type in the email addresses of the people you want to be able to watch the video. You’ll also have the option of notifying the people via email that you’ve shared the video with them.
Conclusion
And that’s all there is to it! Changing the privacy setting on YouTube videos is a simple, helpful tool to allow you to control the audience of you work. Enjoy!
Richard Bennett
Richard Bennett is a writer and a lover of all things video.
Follow @Richard Bennett
Richard Bennett
Mar 27, 2024• Proven solutions
Privacy settings on YouTube allow you to control who can see your videos. There are three settings — Public, unlisted, and private. This article will give you a brief introduction of what those three settings mean, and how to use them.
- Part1: Public VS Unlisted VS Private
- Part2: How to Change Privacy Settings
- Part2: Sharing Private Videos
Want to make your YouTube videos more beautiful within minutes? Here we recommend an easy-to-use video editing software for beginner for your reference - Wondershare Filmora .
Download Mac Version ](https://tools.techidaily.com/wondershare/filmora/download/ )
Part 1: Public VS Unlisted VS Private
Let’s figure out some terms before runing into the how-to part.
Public Videos
These are videos that everyone can view. This is the majority of YouTube videos, and just about every one you’ve ever watched will have been public. You’ll want this if you want lots of people to watch your video.
Unlisted
Unlisted videos are ones that anybody can view so long as they have the link. The video won’t show up on search results or in “related” or “suggested” videos.
This is a great setting for sharing a video amongst small groups. You might have a rough edit you want to show a few people, or you might have a show reel that you only want certain people to see.
Private
Completely private videos cannot be watched by anyone who doesn’t have permission. You grant people permission by allowing their Google accounts to access the video. Nobody else can see the video, regardless of whether they have the link.
It won’t show up on searches, as related or suggested videos, or even when imbedded in other sites. This is the best setting for a video you need to share with only very specific people, if anyone. Below is a comparison table to know more about privacy settings .
Part 2: How to Change Privacy Settings
There are two ways to change the privacy settings: firstly, when you upload the video, and secondly through Creator Studio.
Method 1:
When you upload a video to YouTube you’ll see on the right hand side an option that says “privacy”. This is defaulted to “public”, but you can use the drop-down menu on the button to change the setting. This will apply your privacy setting the second the video finishes uploading and processing.
Method 2:
To change the privacy setting later, go to Creator Studio, then Video Manager. On the right-hand side you’ll see one of three icons: a world, a chain, and a lock. The world means “public”, the chain means “unlisted”, and the lock is for “private”.

To change the privacy, click the icon. You’ll be taken to the video’s info and settings page. Down below where you see the thumbnails you’ll see the selected privacy setting. Click this to open a drop down menu, and select your desired privacy level.
Part 3: Sharing Private Videos
If a video is set to “private’, you’ll have the option to share it with specific people. Below where it says “private” on the info and settings page you’ll see a button labeled “share”. Click this and type in the email addresses of the people you want to be able to watch the video. You’ll also have the option of notifying the people via email that you’ve shared the video with them.
Conclusion
And that’s all there is to it! Changing the privacy setting on YouTube videos is a simple, helpful tool to allow you to control the audience of you work. Enjoy!
Richard Bennett
Richard Bennett is a writer and a lover of all things video.
Follow @Richard Bennett
Master Class in Live Streaming: Your Pathway to Successful Youtube Channels via WireCast
How to live stream to youtube with wirecast?
Richard Bennett
Mar 27, 2024• Proven solutions
Are you trying to use wirecast to stream to youtube? You are in the right place, here is our step by step guide to go live on youtube with wirecast.
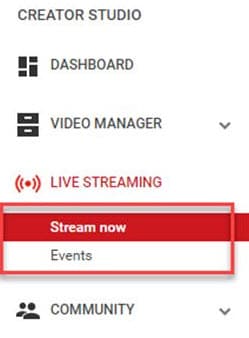
Step 1: First of all you need to login to your YouTube Creator Studio and then select Live Streaming option from available options on your screen.
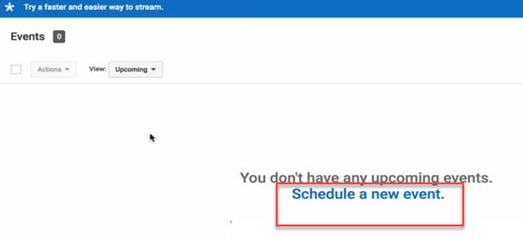
Step 2: Once you enter into the live streaming option then your application will ask you to schedule a new event; follow this option.
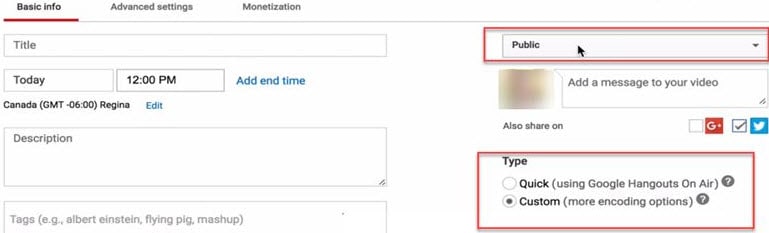
Step 3: Now you need to enter few basic details about your video that you are going to live stream. Do not forget to choose custom option under the Type category available on bottom right side of screen.
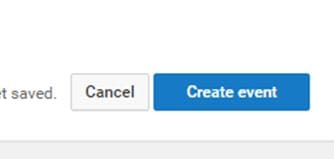
Step 4: It is time to hit the create event option.
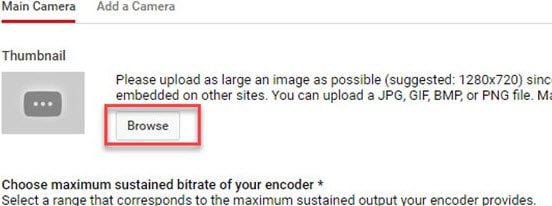
Step 5: Your system will now take you to the camera settings; here you need to enter your thumbnail. It can be done directly by using browse option.
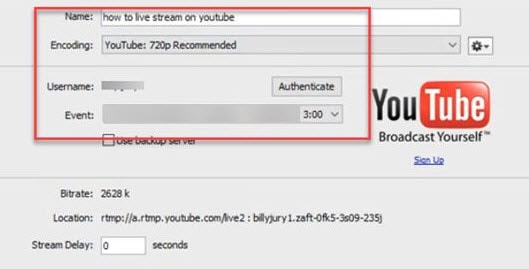
Step 6: Now you need to select ‘basic ingestion’ option and secondly select ‘other encoders’ option from second set of information.

Step 7: Once you have completed above settings then you need to save all the changes and then move to the live control room on your screen.
Step 8: Open the wirecast software tool on your device and then simply move to the output settings. Hit the authenticate option, it will soon ask you to enter the YouTube login detail.
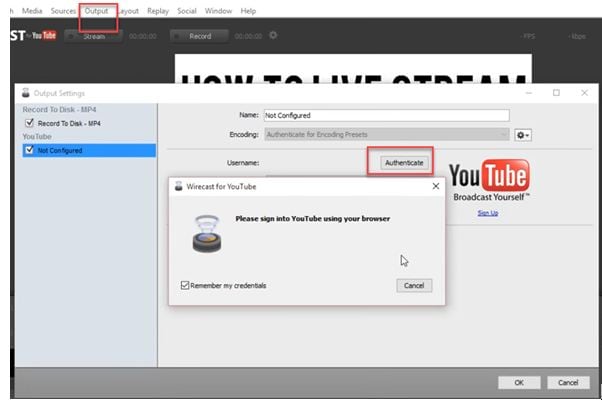
Step 9: As soon as you sign in with your account using browser, then your settings will be ready on screen. Simply hit Ok.
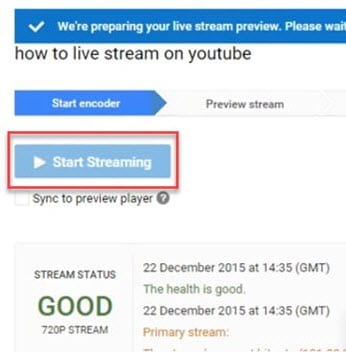
Step 10: It is time to make your video source or content ready for streaming. You need to hit on the stream button that is available on top portion of screen.

Step 11: Now simply move to the YouTube event page and start streaming your content.
Step 12: Once you content for streaming is finished then click the stop streaming button that appears in red color on screen. You will also get information about duration of your video that is going live.
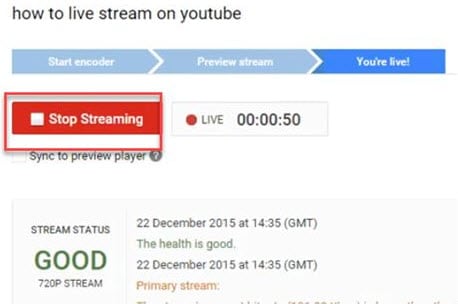
Step 13: When your streaming process ends then video will be saved to video manager. You can view it easily at later stage.
Richard Bennett
Richard Bennett is a writer and a lover of all things video.
Follow @Richard Bennett
Richard Bennett
Mar 27, 2024• Proven solutions
Are you trying to use wirecast to stream to youtube? You are in the right place, here is our step by step guide to go live on youtube with wirecast.
Step 1: First of all you need to login to your YouTube Creator Studio and then select Live Streaming option from available options on your screen.
Step 2: Once you enter into the live streaming option then your application will ask you to schedule a new event; follow this option.
Step 3: Now you need to enter few basic details about your video that you are going to live stream. Do not forget to choose custom option under the Type category available on bottom right side of screen.
Step 4: It is time to hit the create event option.
Step 5: Your system will now take you to the camera settings; here you need to enter your thumbnail. It can be done directly by using browse option.
Step 6: Now you need to select ‘basic ingestion’ option and secondly select ‘other encoders’ option from second set of information.
Step 7: Once you have completed above settings then you need to save all the changes and then move to the live control room on your screen.
Step 8: Open the wirecast software tool on your device and then simply move to the output settings. Hit the authenticate option, it will soon ask you to enter the YouTube login detail.
Step 9: As soon as you sign in with your account using browser, then your settings will be ready on screen. Simply hit Ok.
Step 10: It is time to make your video source or content ready for streaming. You need to hit on the stream button that is available on top portion of screen.
Step 11: Now simply move to the YouTube event page and start streaming your content.
Step 12: Once you content for streaming is finished then click the stop streaming button that appears in red color on screen. You will also get information about duration of your video that is going live.
Step 13: When your streaming process ends then video will be saved to video manager. You can view it easily at later stage.
Richard Bennett
Richard Bennett is a writer and a lover of all things video.
Follow @Richard Bennett
Also read:
- [New] Rise to the Top on Instagram Essential Tips & Influencer Examples for 2024
- [New] The Essentials of Choosing Between an Independent or Major Company Status on YouTube
- [Updated] Audiovisual Authority The Finest Computers for Professional Edits
- [Updated] Efficient Time Markers in YouTube Videos (Desktop/Mobile Edition)
- A Step-by-Step Guide to Edit YouTube Videos in FinalCut for 2024
- Code 28 on Windows Explained: Diagnosis & Repair Tactics That Work
- How to Remove a Previously Synced Google Account from Your Motorola Edge 2023
- Improving Windows Graphics via Basic Driver Tweaks
- Legal Implications of YouTube Video Savings
- Navigating the Seas of Success Utilizing Social Blade for YouTube Data
- Perfecting Your Footage YouTube Shorts, Now Mp4
- The Ultimate Guide to the Linksys EA9500 – Advanced Features for Seamless Connectivity
- Ultimate Step-by-Step Instructions: How to Recover Data From Your ADATA Memory Card
- Title: [Updated] Enhancing Online Privacy YouTube's Access Controls
- Author: Steven
- Created at : 2024-11-02 18:31:49
- Updated at : 2024-11-04 17:04:25
- Link: https://youtube-clips.techidaily.com/updated-enhancing-online-privacy-youtubes-access-controls/
- License: This work is licensed under CC BY-NC-SA 4.0.