
!["[Updated] Engage and Captivate Viewers Ultimate Tips for Cutting-Edge Youtube Edits"](https://www.lifewire.com/thmb/jhGXgyCjWSFdhfPa2Q6YATjpP3E=/400x300/filters:no_upscale():max_bytes(150000):strip_icc()/Familyplayingvideogames-b0cc2d7f9abe42db8cc4fcc05af223bc.jpg)
"[Updated] Engage and Captivate Viewers Ultimate Tips for Cutting-Edge Youtube Edits"
Engage and Captivate Viewers: Ultimate Tips for Cutting-Edge Youtube Edits
How To Edit YouTube Videos

Richard Bennett
Oct 26, 2023• Proven solutions
YouTube videos have a certain look and feel that many viewers have come to expect and enjoy. Much of the aesthetics of YouTube videos developed as a result of the biggest YouTubers having to quickly and efficiently edit videos together on a daily basis. Below is our list of some of the most common video editing techniques used by famous YouTubers.
Part 1: Introduction
1. Start Big
“I’m doing something really exciting… within the first ten seconds of this video. That way you stay here.” – Liza Koshy (How To Be A YouTuber 101!! | Lizzza)
In the same way that a teaser or trailer builds anticipation for a full film, many YouTubers start with a preview of the most high-energy part of their video.
In Jake Paul’s prank vlog (above), Jake shows his brother, Logan, chasing and beating him up as Jake screams for help at the top of his lungs. The already high-energy scene is even more intensified by the epic music playing in the background. This seven-second clip, which resurfaces halfway through the video, is enough to entice many viewers to continue watching. It very effectively leaves enough room for viewers to wonder, “How did Logan’s room actually look in the end?” “What was Logan’s initial reaction before he started chasing Jake?” By creating curiosity gaps like these, you can incentivize your viewers to close these gaps by watching longer.
2. Opening Title Introduction
Just as TV episodes begin with opening credits and theme music, quite similarly, some YouTubers start their YouTube videos with an intro.
Greg from “How To Drink” has an effective twenty-second intro (above). In this video, he shows you who he is and what his videos are generally about. Since these two things don’t change so much for him from video to video, he can start many of his videos off with this same intro.
Below is a video tutorial about how to add text and titles to video in Filmora, hope that helps you in creating your own YouTube video texts and titles.


For more information on intros, check out our post on How to Make a YouTube Intro?
Part 2: Cuts
1. Jump Cut
A jump cut is a simple and straightforward type of video editing cutting technique that “jumps” from one section of a clip to a later section of a clip, cutting out whatever happened in the middle. Some of the middle parts you might want to remove may include mistakes, long silent pauses, and filler words (umm, like, etc.).
Although the use of jump cuts to remove these parts had been discouraged for a long time in the film world, its extensive use by so many YouTubers has established it as its own style that many viewers have come to expect and enjoy. The jumpiness that comes from jump cuts can be effective in keeping your audience’s attention in a shock-inducing manner.
Jump cuts can also be used to show a passage of time in a creative way or make objects magically appear on-screen.
Zack King (above) makes a toy taxi magically appear in his hands using this video editing technique. Filmora allows you to do jump cut easily, you can watch the tutorial below and learn more jump cut tips and tricks .
2. Associative Cut
Not everyone in your audience may recognize the cultural or historical references you make in your videos. It can, therefore, be helpful (and also quite enjoyable) to show the original clip of the reference you are making.
In the same vlog that Jake Paul gets chased down by his brother (above), twenty-eight seconds into the video, Jake expresses his desire to go fast in his car. Right after he says “I want to go fast,” Jake cuts into a scene from the movie Talladega Nights. In that scene, Ricky Bobby, Will Ferrell’s character, also says that he wants to go fast.

Part 3: Transform
1. Zoom
Many YouTubers digitally adjust the zoom of their talking head shots in order to create additional emphasis or suspense. When zoom is used very slowly and smoothly, this technique can be effective in building up suspense and drawing a viewer deeper into the speaker’s message. When a drastic zoom is used suddenly, it can be effective in emphasizing a particular spoken line.
RiceGum is one YouTuber who uses zoom video editing effects extensively in his talking head videos. Want to pan and zoom your video footage too? Check our guide to getting Ken Burns Effect on Videos .
2. Camera Shake
Camera shake is a video effect that makes the original clip appear like it was filmed during a violent earthquake. Many YouTubers use this effect to emphasize their voice when they are talking about something erratic or out of control.
3. Color/Level Adjustment
A lot of comedy YouTubers change the color and levels of their videos in order to emphasize different moods. One common thing YouTubers do when they talk about anything slightly sad is to gradually fade out the colors in their talking head shots. In a cheesy way, the black and white look can emphasize a feeling of emptiness. For his “sad” reactions, PewDiePie often jump cuts into a black and white, slowed down clip of his sad face while playing some sad music in the background. To emphasize a darker message, some YouTubers increase the amount of shadows in their video. In the video below, while his daughter is delivering a darker message from 0:32 to 0:50, La Guardia Cross gradually adds more shadows around his daughter’s face through what appears to be a vignette effect.
Part 4: Transitions
1. Wipe
Many YouTubers transition from one scene into the next using a wipe transition. In a wipe transition, the next clip that you want to transition into slides into the frame horizontally or vertically until it completely covers the first clip. For additional wiping effect, many YouTubers also use a fast, high pitched “woosh” sound effect with this transition.
2. Zoom
The zoom transition is quite similar to the wipe transition, except it uses a zoom effect. Many of the top YouTubers combine this transition with a lower-pitched “woosh” sound effect.
Part 5: Visual Elements
In other genres of film, the only appropriate visual elements filmmakers can tastefully add to their footage seem to be clean looking, seamlessly integrated text and motion graphics. YouTube, on the other hand, is another world with much more room to get outrageous. Many of the top YouTubers add a lot of visual elements (emojis , images, filters, explosions) to their videos to emphasize their jokes, play-on-words, historical or cultural references, and mood.
1. Call-To-Action Visuals
Whether they’re prompting you to subscribe, like, comment, or check out their purchasable merchandise, many YouTubers include visuals to strengthen their calls-to-action.
Part 6: Time Manipulation
1. Timelapse
“The staple of any Casey Neistat vlog is the timelapse, which he uses both to further the narrative or set the time of day.” -@omgurheadsgone
A lot of cameras now come with a timelapse/hyperlapse function, requiring no further video editing. To achieve the kind of timelapses that Casey Neistat makes, though, you’ll have to film real-time footage and then manipulate the speed of it in post. Since sped up ambient sound is hardly ever pleasing to the ear, a lot of YouTubers replace the audio with music that enhances the mood of the timelapse.
2. Slow Motion
Slowing down footage is another way YouTubers like to manipulate the passage of time. This technique can draw the audience’s attention into the intricacies of a movement captured on film. But if you stretch your video clip digitally in order to achieve this look, your video may not look so smooth – your software will need to create extra frames of footage based on your existing footage. The solution around this problem is to make sure to record your video at a very high frame rate.

Part 7: Audio
1. Censor
The traditional practice for censoring out explicit language in television has been to replace profanity with a high pitched “bleep” sound effect . YouTubers, however, have popularized the use of animal sound effects to censor out explicit language. Epic Meal Time frequently uses the “caw” of a crow for this purpose.
2. Sound Effects
Whether it is pouring water into a cup or drinking a glass of water, adding louder sound effects can enhance your viewer’s experience of the action that is taking place on camera.
3. Background Music
Music is very effective in helping people feel all kinds of emotions. It is no wonder so many of the top YouTubers make gratuitous use of music in their videos. Some even add background music to every single clip of their entire YouTube video and only drop the music when the following technique (below) is used.
4. Muting Background Music
A lot of YouTubers who talk over background music abruptly mute the music when they want their audience to focus their attention on whatever it is that they have to say at that very moment. Isolating one’s speech in this way can be a very effective way to emphasize something serious or emphasize a punchline to a joke.
5. Voice-Over
Adding additional recorded verbal commentary is another technique used by many of the top YouTubers. This technique can be helpful when the visuals of your footage do not sufficiently communicate the full message you want to get across to your audience.
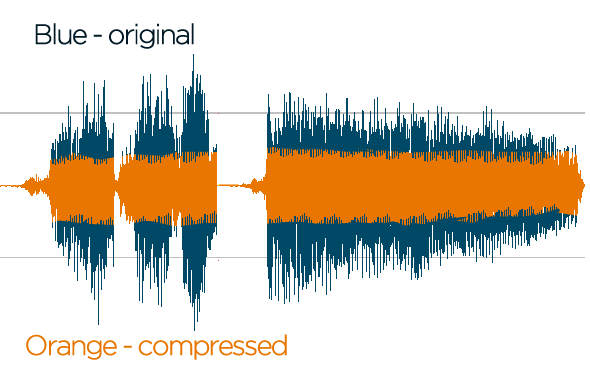
6. Compressor
A lot of video editing software programs give you the option to add compression to your video’s audio. Compression lessens the dynamic range between the softest and loudest parts of your audio. This technique can help your speech sound more uniform in volume.
For those who want to make their YouTube videos better, I recommend Wondershare Filmora for editing YouTube videos . Filmora video editor allows you to create and edit a YouTube video easily with plentiful templates and effects pre-programmed.
Richard Bennett
Richard Bennett is a writer and a lover of all things video.
Follow @Richard Bennett
Richard Bennett
Oct 26, 2023• Proven solutions
YouTube videos have a certain look and feel that many viewers have come to expect and enjoy. Much of the aesthetics of YouTube videos developed as a result of the biggest YouTubers having to quickly and efficiently edit videos together on a daily basis. Below is our list of some of the most common video editing techniques used by famous YouTubers.
Part 1: Introduction
1. Start Big
“I’m doing something really exciting… within the first ten seconds of this video. That way you stay here.” – Liza Koshy (How To Be A YouTuber 101!! | Lizzza)
In the same way that a teaser or trailer builds anticipation for a full film, many YouTubers start with a preview of the most high-energy part of their video.
In Jake Paul’s prank vlog (above), Jake shows his brother, Logan, chasing and beating him up as Jake screams for help at the top of his lungs. The already high-energy scene is even more intensified by the epic music playing in the background. This seven-second clip, which resurfaces halfway through the video, is enough to entice many viewers to continue watching. It very effectively leaves enough room for viewers to wonder, “How did Logan’s room actually look in the end?” “What was Logan’s initial reaction before he started chasing Jake?” By creating curiosity gaps like these, you can incentivize your viewers to close these gaps by watching longer.
2. Opening Title Introduction
Just as TV episodes begin with opening credits and theme music, quite similarly, some YouTubers start their YouTube videos with an intro.
Greg from “How To Drink” has an effective twenty-second intro (above). In this video, he shows you who he is and what his videos are generally about. Since these two things don’t change so much for him from video to video, he can start many of his videos off with this same intro.
Below is a video tutorial about how to add text and titles to video in Filmora, hope that helps you in creating your own YouTube video texts and titles.
For more information on intros, check out our post on How to Make a YouTube Intro?
Part 2: Cuts
1. Jump Cut
A jump cut is a simple and straightforward type of video editing cutting technique that “jumps” from one section of a clip to a later section of a clip, cutting out whatever happened in the middle. Some of the middle parts you might want to remove may include mistakes, long silent pauses, and filler words (umm, like, etc.).
Although the use of jump cuts to remove these parts had been discouraged for a long time in the film world, its extensive use by so many YouTubers has established it as its own style that many viewers have come to expect and enjoy. The jumpiness that comes from jump cuts can be effective in keeping your audience’s attention in a shock-inducing manner.
Jump cuts can also be used to show a passage of time in a creative way or make objects magically appear on-screen.
Zack King (above) makes a toy taxi magically appear in his hands using this video editing technique. Filmora allows you to do jump cut easily, you can watch the tutorial below and learn more jump cut tips and tricks .
2. Associative Cut
Not everyone in your audience may recognize the cultural or historical references you make in your videos. It can, therefore, be helpful (and also quite enjoyable) to show the original clip of the reference you are making.
In the same vlog that Jake Paul gets chased down by his brother (above), twenty-eight seconds into the video, Jake expresses his desire to go fast in his car. Right after he says “I want to go fast,” Jake cuts into a scene from the movie Talladega Nights. In that scene, Ricky Bobby, Will Ferrell’s character, also says that he wants to go fast.
Part 3: Transform
1. Zoom
Many YouTubers digitally adjust the zoom of their talking head shots in order to create additional emphasis or suspense. When zoom is used very slowly and smoothly, this technique can be effective in building up suspense and drawing a viewer deeper into the speaker’s message. When a drastic zoom is used suddenly, it can be effective in emphasizing a particular spoken line.
RiceGum is one YouTuber who uses zoom video editing effects extensively in his talking head videos. Want to pan and zoom your video footage too? Check our guide to getting Ken Burns Effect on Videos .
2. Camera Shake
Camera shake is a video effect that makes the original clip appear like it was filmed during a violent earthquake. Many YouTubers use this effect to emphasize their voice when they are talking about something erratic or out of control.
3. Color/Level Adjustment
A lot of comedy YouTubers change the color and levels of their videos in order to emphasize different moods. One common thing YouTubers do when they talk about anything slightly sad is to gradually fade out the colors in their talking head shots. In a cheesy way, the black and white look can emphasize a feeling of emptiness. For his “sad” reactions, PewDiePie often jump cuts into a black and white, slowed down clip of his sad face while playing some sad music in the background. To emphasize a darker message, some YouTubers increase the amount of shadows in their video. In the video below, while his daughter is delivering a darker message from 0:32 to 0:50, La Guardia Cross gradually adds more shadows around his daughter’s face through what appears to be a vignette effect.
Part 4: Transitions
1. Wipe
Many YouTubers transition from one scene into the next using a wipe transition. In a wipe transition, the next clip that you want to transition into slides into the frame horizontally or vertically until it completely covers the first clip. For additional wiping effect, many YouTubers also use a fast, high pitched “woosh” sound effect with this transition.
2. Zoom
The zoom transition is quite similar to the wipe transition, except it uses a zoom effect. Many of the top YouTubers combine this transition with a lower-pitched “woosh” sound effect.
Part 5: Visual Elements
In other genres of film, the only appropriate visual elements filmmakers can tastefully add to their footage seem to be clean looking, seamlessly integrated text and motion graphics. YouTube, on the other hand, is another world with much more room to get outrageous. Many of the top YouTubers add a lot of visual elements (emojis , images, filters, explosions) to their videos to emphasize their jokes, play-on-words, historical or cultural references, and mood.
1. Call-To-Action Visuals
Whether they’re prompting you to subscribe, like, comment, or check out their purchasable merchandise, many YouTubers include visuals to strengthen their calls-to-action.
Part 6: Time Manipulation
1. Timelapse
“The staple of any Casey Neistat vlog is the timelapse, which he uses both to further the narrative or set the time of day.” -@omgurheadsgone
A lot of cameras now come with a timelapse/hyperlapse function, requiring no further video editing. To achieve the kind of timelapses that Casey Neistat makes, though, you’ll have to film real-time footage and then manipulate the speed of it in post. Since sped up ambient sound is hardly ever pleasing to the ear, a lot of YouTubers replace the audio with music that enhances the mood of the timelapse.
2. Slow Motion
Slowing down footage is another way YouTubers like to manipulate the passage of time. This technique can draw the audience’s attention into the intricacies of a movement captured on film. But if you stretch your video clip digitally in order to achieve this look, your video may not look so smooth – your software will need to create extra frames of footage based on your existing footage. The solution around this problem is to make sure to record your video at a very high frame rate.
Part 7: Audio
1. Censor
The traditional practice for censoring out explicit language in television has been to replace profanity with a high pitched “bleep” sound effect . YouTubers, however, have popularized the use of animal sound effects to censor out explicit language. Epic Meal Time frequently uses the “caw” of a crow for this purpose.
2. Sound Effects
Whether it is pouring water into a cup or drinking a glass of water, adding louder sound effects can enhance your viewer’s experience of the action that is taking place on camera.
3. Background Music
Music is very effective in helping people feel all kinds of emotions. It is no wonder so many of the top YouTubers make gratuitous use of music in their videos. Some even add background music to every single clip of their entire YouTube video and only drop the music when the following technique (below) is used.
4. Muting Background Music
A lot of YouTubers who talk over background music abruptly mute the music when they want their audience to focus their attention on whatever it is that they have to say at that very moment. Isolating one’s speech in this way can be a very effective way to emphasize something serious or emphasize a punchline to a joke.
5. Voice-Over
Adding additional recorded verbal commentary is another technique used by many of the top YouTubers. This technique can be helpful when the visuals of your footage do not sufficiently communicate the full message you want to get across to your audience.
6. Compressor
A lot of video editing software programs give you the option to add compression to your video’s audio. Compression lessens the dynamic range between the softest and loudest parts of your audio. This technique can help your speech sound more uniform in volume.
For those who want to make their YouTube videos better, I recommend Wondershare Filmora for editing YouTube videos . Filmora video editor allows you to create and edit a YouTube video easily with plentiful templates and effects pre-programmed.
Richard Bennett
Richard Bennett is a writer and a lover of all things video.
Follow @Richard Bennett
Efficiently Broadcasting Twitch Streams to YouTube Audiences
Create High-Quality Video - Wondershare Filmora
An easy and powerful YouTube video editor
Numerous video and audio effects to choose from
Detailed tutorials provided by the official channel
Amidst many online applications is Twitch. This live streaming platform takes your experience to another level. You can use it to make crafts, play games, attract broadcasters, and many more. Twitch was launched in 2011, and since then, it has attracted millions of users, managing a database of about 4 million broadcasters by early 2020. With it, users can stream their activities as others watch in real-time. Just browse a category to find a stream.
You can also follow streamers that you like on the platform and get updates and notifications immediately after they are posted. But how do you start a career on a platform like Twitch? You need to broadcast and gather a large following. You can use built-in audiences from other platforms like Facebook. Let’s dive into the core of the matter and look at how to upload Twitch streams to YouTube and build your platform.

In this article
02 What is the benefit of uploading your Twitch Streams to YouTube
03 How to upload your Twitch Streams to YouTube
What is Twitch VOD?
Twitch Video on Demand (VOD) is a recording of previously streamed content. It provides briefings if you missed catching the Twitch live stream. Just watch the VOD from your favorite streamer and be engaged the best way possible. However, VODs don’t last forever. They are removed after two weeks of broadcast. But streamers with Partner Status can have their VODs last up to 60 days.
- How to enable Twitch VOD?
VODs are the best form to archive streams that your fans missed. Even though they are not enabled by default, you can manually enable them and not let your fans miss any important event from your channel. They’ll find it under the “Videos” tab on any Twitch channel. Follow these steps to enable VOD on your channel.
Step 1. Go to your profile icon in the top right corner of Twitch
Check in the “Channel & Video” section and locate the “Stream Key & Preferences” menu.

Step 2. Click on “Creator Dashboard”
Remember, you can enable VODs from your creator dashboard. Just go under the “Settings” tab and click on the “Stream section” of the creator dashboard. Check under the subtitle “VOD Settings” and get the option to store past broadcasts. You can also toggle the slider to store your past broadcasts.

Step 3 Click on the “Settings” tab on the left-hand side and go to Stream
You’ll get various drop-down menu options. Click on the “Settings” tab and choose the “Stream” option. The system will navigate to a new page, thus setting your preferences for VODs and clips.
Step 4. Go to “VOD Settings” and toggle on the “Store Past Broadcast.”
Ensure you have the toggle option turned ON under the “VOD Settings.” If it’s “ON,” you’ll realize the toggle will be purple, with a checkmark in it. Twitch will be confirmed to be enabled if it’s purple.

- Frequently Asked Question about Twitch VOD
These are some questions frequently asked by Twitch users.
1. How long will Twitch store my VOD
Your Twitch can either be stored for 14 or 60 days, depending on your level. For Twitch Prime, Twitch Partner or a Twitch Turbo user has their past broadcasts automatically saved for 60 days before deletion. But if you are not connected to these three options, your past broadcasts will be saved for only 14 days before deletion.
Since your past broadcasts cannot be live for more than 60 days, you have the option to download the video to your computer before the validity days expire and Twitch deletes it. You can use an External Hard drive to save the past broadcast content. Likewise, it is possible to turn your past broadcast content into Highlight and, in turn, permanently store them on Twitch.
2. What is the difference between Twitch VOD, Highlights, and Clips
Twitch VOD is a previously saved video of your live stream content. You choose to save either part or the entire content of your previously streamed content. More so, you don’t need any additional requirements to use VOD.
Highlights are short videos that have been edited from your past broadcast content. You can save them on Twitch permanently. Streamers majorly use highlights to save video game achievements. Unlike VOD Twitch that can be saved up to 60 days, Highlights usually lasts no more than 3 minutes.
- To make Highlights on Twitch, first, navigate to your Dashboard.
- Then scroll down and click on “Content” > “Video Producer.
- Next, press on “All Videos” to change them to “Past Broadcasts.”
- Now press the “Highlight” button, and Twitch will immediately open a new tab for “Twitch Highlighter Tool.”
- Then select the video part to include as “Highlight” and press the “Create Highlights” button.
- Wait a while for the process to be completed, and Voila! You have your Highlights created.
When it comes to Twitch Clip, you can capture special moments in a stream you are currently watching. On the same note, you can share clips with friends and other users on social media platforms. Such shared clips contain a link where others view the source or video from.
The clips you create will automatically be saved on the streamer’s channel on the “Clips” page, where other viewers can see them too. Nonetheless, you can download “clips” to your computer and, in turn, upload them whenever you want to. And note that you can help your stream grow via “Clips” by letting your viewers clip and share your stream moments.
- To create “Clips” on Twitch, identify which Streamers channel you wish to create a clip from.
- Then click on the “Clapper board” icon. Next, edit your clip between 5 and 60 seconds long.
- Finally, create a title and publish your Clip. You’ll also enjoy the privilege to share your clip’s link to other social media networks.
What is the benefit of uploading your Twitch Streams to YouTube
You stand to gain a lot when you upload your Twitch Streams to YouTube.
1) To enlighten your followers
Your followers will see your streams and make the best decisions. Viewers can check out your recordings and other highlights from past streams. It will help them decide whether they like what they see and probably join your live streams.
2) Twitch provides content for you to share and monetize on YouTube
Since Twitch streaming is more popular nowadays, many people throng it for content. It is not wise to rely entirely on Twitch to discover as a Twitch Streamer. Posting to YouTube will make it known within a short time. You would have announced your streams most nobly and kept your followers up to date, attracting new ones as well.
3) To keep your followers engaged even when you are offline
Even though live streaming is important, some viewers may not attend the live sessions due to different time zones or other commitments. In this regard, when uploaded to YouTube, Twitch will give them a chance to watch your content just whenever they log in. They, therefore, have the option to watch a Twitch VOD of the live stream they missed.
How to upload your Twitch Streams to YouTube
Check how to upload Twitch streams to YouTube from the Twitch website.
Step 1. Identify the little arrow next to your name on the Twitch website and click on it. Then click on the “Video Producer” to take you to a list of your Twitch videos.

Step 2. Check out and click on the “three-dots” on the video you wish to upload to YouTube. Click on the “Export” tab.
Step 3. A menu will then pop up. Here, you can fill in the description, title, and tags that you would like to appear on the YouTube video. There is an option for Twitch to split your video automatically. If you wish so, then tick the “Checkbox” to enable it. Then click on the “Start Export” option to export your Twitch streams to YouTube.

Bouns! Edit Your Twitch Video with Filmora
The quality of your video matters when it comes to uploading Twitch Streams to YouTube. Using a third-party tool to edit your video is the first step in ensuring your videos communicate meaningful content. Filmora comes in handy to bring your imaginations to life. Use it for simple creation without limits, even for beginners.
- Use it to track moving objects in video clips
- Easily match any image of the selected clip
- Its powerful tools let you edit your video by cropping, splitting, adjusting speed, etc
- The video keyframe easily indicates the beginning and end of the parameters
For Win 7 or later (64-bit)
For macOS 10.12 or later
Conclusion
● Don’t just focus on how to upload Twitch streams to YouTube but also consider the quality of video you are posting to YouTube. Remember, your video quality will speak much more of you than any other description. So, strive to produce quality videos using the best tool, Filmora. The app is easy to use and will elevate your views and imaginations through your video in the most impactful way.
Amidst many online applications is Twitch. This live streaming platform takes your experience to another level. You can use it to make crafts, play games, attract broadcasters, and many more. Twitch was launched in 2011, and since then, it has attracted millions of users, managing a database of about 4 million broadcasters by early 2020. With it, users can stream their activities as others watch in real-time. Just browse a category to find a stream.
You can also follow streamers that you like on the platform and get updates and notifications immediately after they are posted. But how do you start a career on a platform like Twitch? You need to broadcast and gather a large following. You can use built-in audiences from other platforms like Facebook. Let’s dive into the core of the matter and look at how to upload Twitch streams to YouTube and build your platform.
In this article
02 What is the benefit of uploading your Twitch Streams to YouTube
03 How to upload your Twitch Streams to YouTube
What is Twitch VOD?
Twitch Video on Demand (VOD) is a recording of previously streamed content. It provides briefings if you missed catching the Twitch live stream. Just watch the VOD from your favorite streamer and be engaged the best way possible. However, VODs don’t last forever. They are removed after two weeks of broadcast. But streamers with Partner Status can have their VODs last up to 60 days.
- How to enable Twitch VOD?
VODs are the best form to archive streams that your fans missed. Even though they are not enabled by default, you can manually enable them and not let your fans miss any important event from your channel. They’ll find it under the “Videos” tab on any Twitch channel. Follow these steps to enable VOD on your channel.
Step 1. Go to your profile icon in the top right corner of Twitch
Check in the “Channel & Video” section and locate the “Stream Key & Preferences” menu.
Step 2. Click on “Creator Dashboard”
Remember, you can enable VODs from your creator dashboard. Just go under the “Settings” tab and click on the “Stream section” of the creator dashboard. Check under the subtitle “VOD Settings” and get the option to store past broadcasts. You can also toggle the slider to store your past broadcasts.
Step 3 Click on the “Settings” tab on the left-hand side and go to Stream
You’ll get various drop-down menu options. Click on the “Settings” tab and choose the “Stream” option. The system will navigate to a new page, thus setting your preferences for VODs and clips.
Step 4. Go to “VOD Settings” and toggle on the “Store Past Broadcast.”
Ensure you have the toggle option turned ON under the “VOD Settings.” If it’s “ON,” you’ll realize the toggle will be purple, with a checkmark in it. Twitch will be confirmed to be enabled if it’s purple.
- Frequently Asked Question about Twitch VOD
These are some questions frequently asked by Twitch users.
1. How long will Twitch store my VOD
Your Twitch can either be stored for 14 or 60 days, depending on your level. For Twitch Prime, Twitch Partner or a Twitch Turbo user has their past broadcasts automatically saved for 60 days before deletion. But if you are not connected to these three options, your past broadcasts will be saved for only 14 days before deletion.
Since your past broadcasts cannot be live for more than 60 days, you have the option to download the video to your computer before the validity days expire and Twitch deletes it. You can use an External Hard drive to save the past broadcast content. Likewise, it is possible to turn your past broadcast content into Highlight and, in turn, permanently store them on Twitch.
2. What is the difference between Twitch VOD, Highlights, and Clips
Twitch VOD is a previously saved video of your live stream content. You choose to save either part or the entire content of your previously streamed content. More so, you don’t need any additional requirements to use VOD.
Highlights are short videos that have been edited from your past broadcast content. You can save them on Twitch permanently. Streamers majorly use highlights to save video game achievements. Unlike VOD Twitch that can be saved up to 60 days, Highlights usually lasts no more than 3 minutes.
- To make Highlights on Twitch, first, navigate to your Dashboard.
- Then scroll down and click on “Content” > “Video Producer.
- Next, press on “All Videos” to change them to “Past Broadcasts.”
- Now press the “Highlight” button, and Twitch will immediately open a new tab for “Twitch Highlighter Tool.”
- Then select the video part to include as “Highlight” and press the “Create Highlights” button.
- Wait a while for the process to be completed, and Voila! You have your Highlights created.
When it comes to Twitch Clip, you can capture special moments in a stream you are currently watching. On the same note, you can share clips with friends and other users on social media platforms. Such shared clips contain a link where others view the source or video from.
The clips you create will automatically be saved on the streamer’s channel on the “Clips” page, where other viewers can see them too. Nonetheless, you can download “clips” to your computer and, in turn, upload them whenever you want to. And note that you can help your stream grow via “Clips” by letting your viewers clip and share your stream moments.
- To create “Clips” on Twitch, identify which Streamers channel you wish to create a clip from.
- Then click on the “Clapper board” icon. Next, edit your clip between 5 and 60 seconds long.
- Finally, create a title and publish your Clip. You’ll also enjoy the privilege to share your clip’s link to other social media networks.
What is the benefit of uploading your Twitch Streams to YouTube
You stand to gain a lot when you upload your Twitch Streams to YouTube.
1) To enlighten your followers
Your followers will see your streams and make the best decisions. Viewers can check out your recordings and other highlights from past streams. It will help them decide whether they like what they see and probably join your live streams.
2) Twitch provides content for you to share and monetize on YouTube
Since Twitch streaming is more popular nowadays, many people throng it for content. It is not wise to rely entirely on Twitch to discover as a Twitch Streamer. Posting to YouTube will make it known within a short time. You would have announced your streams most nobly and kept your followers up to date, attracting new ones as well.
3) To keep your followers engaged even when you are offline
Even though live streaming is important, some viewers may not attend the live sessions due to different time zones or other commitments. In this regard, when uploaded to YouTube, Twitch will give them a chance to watch your content just whenever they log in. They, therefore, have the option to watch a Twitch VOD of the live stream they missed.
How to upload your Twitch Streams to YouTube
Check how to upload Twitch streams to YouTube from the Twitch website.
Step 1. Identify the little arrow next to your name on the Twitch website and click on it. Then click on the “Video Producer” to take you to a list of your Twitch videos.
Step 2. Check out and click on the “three-dots” on the video you wish to upload to YouTube. Click on the “Export” tab.
Step 3. A menu will then pop up. Here, you can fill in the description, title, and tags that you would like to appear on the YouTube video. There is an option for Twitch to split your video automatically. If you wish so, then tick the “Checkbox” to enable it. Then click on the “Start Export” option to export your Twitch streams to YouTube.
Bouns! Edit Your Twitch Video with Filmora
The quality of your video matters when it comes to uploading Twitch Streams to YouTube. Using a third-party tool to edit your video is the first step in ensuring your videos communicate meaningful content. Filmora comes in handy to bring your imaginations to life. Use it for simple creation without limits, even for beginners.
- Use it to track moving objects in video clips
- Easily match any image of the selected clip
- Its powerful tools let you edit your video by cropping, splitting, adjusting speed, etc
- The video keyframe easily indicates the beginning and end of the parameters
For Win 7 or later (64-bit)
For macOS 10.12 or later
Conclusion
● Don’t just focus on how to upload Twitch streams to YouTube but also consider the quality of video you are posting to YouTube. Remember, your video quality will speak much more of you than any other description. So, strive to produce quality videos using the best tool, Filmora. The app is easy to use and will elevate your views and imaginations through your video in the most impactful way.
Also read:
- The Art of Digital Makeup on Video Platforms
- In 2024, Discover the Most Reliable Royalty-Free Audio Libraries
- 2024 Approved Enhance Branding The Ultimate Guide to Custom URLs for YouTube
- [Updated] Efficiency in Action Rapid Removal of YouTube Discussions
- In 2024, Beginner's Guide Capturing YouTube Videos as Screencasts Without Payment
- [Updated] Download Custom MCB Banner Packs
- Mobile Mastery in Thumbnail Creation for Engaging YouTube Videos
- Audience Attraction in a Minute Comparing YouTubes Shorts and TikToks
- Unraveling YouTube's Viewer Metrics A Deeper Look
- [New] Crafting Illusions with Video Edits
- Craft and Share 360 Videos to YouTube An Essential Guide for Creators for 2024
- Crafting the Perfect Schedule for Jobs & YouTube
- [New] Clear Cinematic Vision - Top Camera Stabilizers Reviewed
- In 2024, Enjoy Every Frame Best Free Download Apps for Mobile Devices
- [New] Discover the Leading Online Video Cutter for YouTube
- [New] Beyond Tubes The Ultimate Video Share Sites
- Leveraging FameBit's Expertise for Maximum YouTube Affiliate Gains
- In 2024, Top 15 Apps To Hack WiFi Password On Vivo Y100
- 3 Ways to Track Honor Magic Vs 2 without Them Knowing | Dr.fone
- In 2024, The Most Useful Tips for Pokemon Go Ultra League On Honor Magic V2 | Dr.fone
- [New] Complete Screencast Process Methodical Instructional Video
- How to Fix Pokemon Go Route Not Working On Apple iPhone 8 Plus? | Dr.fone
- In 2024, Top Picks for Traditional Japanese Huts in MC Worlds
- 7 Ways to Lock Apps on Apple iPhone 8 Plus and iPad Securely
- Flawless Image Reader with Quick Access
- [New] The Best of the Best in Open World Gaming
- New In 2024, The Ultimate Compilation Top 10 Audio Processing Mobile Apps (iOS and Android)
- Craft Excellence Top 10 Free Drawing Tools for Mac
- Solutions to Spy on Samsung Galaxy M34 with and without jailbreak | Dr.fone
- Unleash Your Inner Tech Wizard Xbox One Snapshot Secrets Revealed for 2024
- In 2024, What Legendaries Are In Pokemon Platinum On Sony Xperia 10 V? | Dr.fone
- HTC U23 Pro Stuck on Screen – Finding Solutions For Stuck on Boot | Dr.fone
- Title: "[Updated] Engage and Captivate Viewers Ultimate Tips for Cutting-Edge Youtube Edits"
- Author: Steven
- Created at : 2024-05-25 20:59:15
- Updated at : 2024-05-26 20:59:15
- Link: https://youtube-clips.techidaily.com/updated-engage-and-captivate-viewers-ultimate-tips-for-cutting-edge-youtube-edits/
- License: This work is licensed under CC BY-NC-SA 4.0.
