
!["[Updated] Elite Recommendations Top 10 High-End Video Card Models"](https://www.lifewire.com/thmb/W9EYDIfcyUpGHrg7FnINkiSse0U=/400x300/filters:no_upscale():max_bytes(150000):strip_icc()/dts-play-fi-lifestyle-aaa-5a4c211daad52b00366a3575.jpg)
"[Updated] Elite Recommendations Top 10 High-End Video Card Models"
Elite Recommendations: Top 10 High-End Video Card Models
The Top 10 Capture Cards for YouTube

Richard Bennett
Nov 04, 2022• Proven solutions
If you are like to share gameplay videos, it’s very important that you have a high-quality capture card. With the help of a capture card, you can easily get all of the in-game footage that you need to make amazing videos and grow a healthy YouTube channel . In this article we will break down the top 10 capture cards for gaming YouTubers in 2018:
- Elgato Game Capture HD 60 Pro
- Elgato Game Capture HD 60 S
- Star Tech 4 Port PCI Firewire Adaptor Card with Digital Video Editing
- Hauppage Colossus 2 PCI Express Internal 1080P HD-PVR
- Elgato Game Capture HD
- Imillet HDMI Video Capture with USB 3.0/2.0 Dongle
- HDML Cloner Box Pro
- Pyle PVRC43 Standalone Digital Video Recorder
- HDML Cloner Box Evolve
- AVerMedia AVerCapture HD
Click here for more tips on being a YouTube gamer .
1. Elgato Game Capture HD 60 Pro
Price: $204
Compatibility: Windows, Switch, 360, Xbox One, PS4
Specs: Internal PCI 4k 30fps
Highlights: Made for streaming. Improved benchmark speeds.
This capture card works with an HDMI interface as well as the ability to be plugged into any type of PC game device. The process for setting it up and recording is extremely simple and the casing has been designed for improving the performance of the system and making it easier to integrate with many different devices. With an up to 16 MB per second capture bitrate, this is a pro tool.
2. Elgato Game Capture HD 60 S
Price: $160
Compatibility: Xbox one, switch, ps4
Specs: This device does 1080p at 60 fps
Highlights: This is one of very few game capture devices that come with USB 3.0 compatibility for easy access to almost any type of gaming device.
The card itself is mind-blowingly easy to set up with its external USB. It’s made for live streaming to YouTube, Twitch, and other platforms. There’s very low latency available on this card and it is one of the highest quality tools for console players.
3. Star Tech 4 Port PCI Firewire Adaptor Card with Digital Video Editing
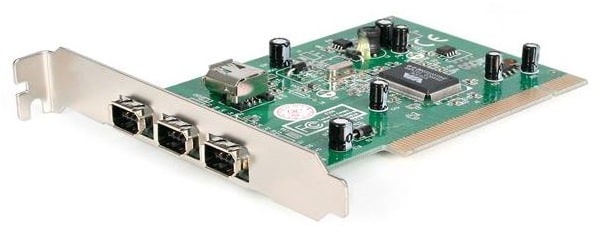
Price: $80
Compatibility: PC, Xbox, PS4
Specs: 1080p, 60 fps
Highlights: This USB 3.0 capture card can be quite easily installed almost anywhere and captures up to 60 frames per second for live streams.
This card comes with a wide range of ports including DVI, Component, HDMI, VGA, and USB. It’s tough to find a capture card that has so many different ports available and this can ensure that it’s possible to capture on almost any type of gaming system or device. A helpful tutorial is also included with this capture card to ensure that you can get the best video format from every console.
4. Hauppauge Colossus 2 PCI Express Internal Card
Price: $135
Compatibility: TV, DVR, Satellite, Xbox, PC, PlayStation
Specs: 1080p, 60 fps
Highlights: This card is an internal PCI card allowing it to remain as a consistent capture device inside a PC.
This card is perfect for recording live programs from a TV to your computer, offloading programs off of your DVR, as well as recording live game footage from PlayStation, Xbox, or your PC. Included alongside this card is the chance to use Stream EEZ for live streaming directly to platforms like Upstream, Twitch, and YouTube.
5. Elgato Game Capture HD
Price: $159
Compatibility: Xbox, PlayStation, Nintendo, PC, Mac
Specs: 1080p at 60fps
Highlights: The game capture HD offers a one-click sharing system to YouTube as well as flashback recording where you can turn back 10 or 15 minutes to record content that just happened.
Overall this is one of the easiest capture cards to set up because it comes with USB 3.0 and HDMI connections. For most modern gaming consoles, it offers the same type of features including the flashback recording solution to record retroactively. The device includes unlimited game capture at a fairly reasonable price and a creation suite so that you can do multitrack recording from your webcam. Editing footage from the card makes it very easy to quickly export clips for all of your content and publish them on social media. This game capture device is also known for its extremely compact design. It is only around the size of a mobile phone, meaning it can be quite easily carried in your pocket.
6. Imillet HDMI Capture Card with USB 3.0 Dongle
Price: $148
Compatibility: Plug and play with no drivers needed. PC, Mac, Linux, any iOS
Specs: 1080p 60 fps
Highlights: Doesn’t require any type of driver installation. This will work on any operating system or computer for quick recording.
The card itself is known for its USB 3.0 support as well as USB 2.0, and for not needing drivers. There is no more compatible card on the market right now. If you have had issues with other cards in the past or you regularly run Linux, you should consider this device to be prepared for all your recording needs. The device will detect the input and adjust output automatically to ensure a crystal-clear picture based on the type of device that you’re recording from. Imillet also offers a great warranty of six months free replacement as well as 12 months free repair on the card for anyone that is ordering it. The software that comes with the card is extremely simple but it does the job quite effectively, allowing for quick recording from multiple devices and simple detection for a video signal and output. Input formats can range from 480p to 1080p and frame rates can go as high as 60 frames per second. The device has great stats for its live capture but many people have experienced problems when trying to record from DVR specifically.
7. HDML Cloner Box Pro
Price: $135
Compatibility: Compatible with game consoles, windows, mac.
Specs: 1080p video at 60fps max
Highlights: The HDML Cloner Box comes with its own remote and the option to record using VGA, AV, YPbPr, and HDMI.
With so many different inputs available on this card it’s possible to record from almost any type of gaming device. With the hardware encoder which is on board, you can save videos as MP4 files and then instantly transfer them over to a flash drive on the device. You can get all of your saved files available without even having access to a PC. The box works as a standalone and it doesn’t have to be plugged into a computer to work. Free editing and converter software are included but with a storage memory card placed in the device and you can record a huge amount of footage and then edit it on your PC later on. With the quick connect feature, it is easy to set up recording and then perform all the functions you need for recording, stopping, and pausing on the remote as you use it. This remains one of the only cards available where it works as a standalone and allows for the chance to save videos to a flash drive or storage device without having to have a computer plugged in. The free converter software and video editing that comes with this device add extra value as well. An optional two-year warranty can make sure that you are ready for anything concerning this card.
8. Pyle PVRC43 Standalone Digital Video Recorder
Price: $80
Compatibility: TV, VCR, DVD, Digital camcorder, Laptop, PC, Mac, Game console
Specs: 480p
Highlights: This works as a standalone recorder with up to 32 GB of onboard memory. There’s no need to plug it into a computer for it to work and with the help of the memory card, you can record a wide range of output videos in AVI.
This card is designed as a standalone option and it’s extremely small with a USB 2.0 interface. Overall the quality of this card is not quite as technically advanced as some of the others on our list but it can record a video that is perfectly appropriate for the web or sharing over platforms like YouTube. The device can be set up quite easily with the help of an RCA connection cable, USB power cable, or other options. Generally, you may need access to an RCA to HDMI adapter if you want to record video off of a more modern laptop or camera. Where this device takes over on its competitors is the idea of just how simple it is to use. It weighs less than a pound and has a ‘one-button operation’ to start and pause recording. As of the completely standalone option, it doesn’t require any type of connection to a computer to record video. If you are looking for one of the simplest capture cards on the market that outputs to AVI in web quality, this is it.
9. HDML Cloner Box Evolve
Price: $121
Compatibility: HDMI input standalone mass compatibility
Specs: 4k video input, 1080p 60fps output
Highlights: This is a standalone USB capture device that comes with its remote. It also features dual HDMI slots allowing for up to two sources of video during recording (so you can also record from a facecam).
The card itself features a stream and capture function so that you can stream gameplay to any type of USB storage device. By plugging in a hard drive you can just press one button to record gaming videos and then handle the process of live streaming, editing, and more. Through two HDMI inputs supported and a very powerful remote control, you record on any device with fantastic image quality and without even having to plug it into any type of computer. While many of these standalone style capture boxes only support the use of minimal storage, this is a device that is capable of getting hooked up to any type of USB external hard drive for a chance to capture nearly unlimited video on your Cloner Box. As a bonus, the MP4 video editing software that is included will make the process of trimming, copying, and converting easier than ever. This has incredible value to the overall product. As an additional bonus, this Cloner Box also features a quick heat dissipation capability which can help to prevent lagging and other common problems that occur with many types of capture boxes when they overheat. A free microphone slot in addition to the HDMI slots makes recording professional voiceovers for any gameplay videos as easy as possible!
10. Avermedia Avercapture HD
Price: $99
Compatibility: Any console, PC, Mac
Specs: This device is capable of capture in full 1080p/60fps as well as the style encoding for quick streaming and easy video capture.
Highlights: The timeshift feature available on this device makes it simple to record retroactively as well as offer ultralow streaming and recording over time. The device makes it easy to capture and stream and it comes with a competitive two-year warranty.
This card works as a USB capture card from most any type of device, it captures through a component input or HDMI input and it has some of the lowest latency for any type of team capture. With one slot for video input as well as an audio input slot, it’s possible to record quick gameplay and voiceovers at any time with very minimal setup. Streaming and recording in full 1080p are done quite easily on this device and it’s designed to use less processing power than some of the competitors to ensure minimal game lag. RECental is included as part of this device so that you can set up live streaming to many of the top platforms available online. The timeshift function comes with a one-hour buffer ensuring if a great gameplay moment happens, you can shift back and begin recording from that time. Commentary and sharing are made easy with the software that’s included with this device. It makes sharing and recording an easy process for any avid video recorder.
Let us know what capture card you use and if you’re happy with it!
Richard Bennett
Richard Bennett is a writer and a lover of all things video.
Follow @Richard Bennett
Richard Bennett
Nov 04, 2022• Proven solutions
If you are like to share gameplay videos, it’s very important that you have a high-quality capture card. With the help of a capture card, you can easily get all of the in-game footage that you need to make amazing videos and grow a healthy YouTube channel . In this article we will break down the top 10 capture cards for gaming YouTubers in 2018:
- Elgato Game Capture HD 60 Pro
- Elgato Game Capture HD 60 S
- Star Tech 4 Port PCI Firewire Adaptor Card with Digital Video Editing
- Hauppage Colossus 2 PCI Express Internal 1080P HD-PVR
- Elgato Game Capture HD
- Imillet HDMI Video Capture with USB 3.0/2.0 Dongle
- HDML Cloner Box Pro
- Pyle PVRC43 Standalone Digital Video Recorder
- HDML Cloner Box Evolve
- AVerMedia AVerCapture HD
Click here for more tips on being a YouTube gamer .
1. Elgato Game Capture HD 60 Pro
Price: $204
Compatibility: Windows, Switch, 360, Xbox One, PS4
Specs: Internal PCI 4k 30fps
Highlights: Made for streaming. Improved benchmark speeds.
This capture card works with an HDMI interface as well as the ability to be plugged into any type of PC game device. The process for setting it up and recording is extremely simple and the casing has been designed for improving the performance of the system and making it easier to integrate with many different devices. With an up to 16 MB per second capture bitrate, this is a pro tool.
2. Elgato Game Capture HD 60 S
Price: $160
Compatibility: Xbox one, switch, ps4
Specs: This device does 1080p at 60 fps
Highlights: This is one of very few game capture devices that come with USB 3.0 compatibility for easy access to almost any type of gaming device.
The card itself is mind-blowingly easy to set up with its external USB. It’s made for live streaming to YouTube, Twitch, and other platforms. There’s very low latency available on this card and it is one of the highest quality tools for console players.
3. Star Tech 4 Port PCI Firewire Adaptor Card with Digital Video Editing
Price: $80
Compatibility: PC, Xbox, PS4
Specs: 1080p, 60 fps
Highlights: This USB 3.0 capture card can be quite easily installed almost anywhere and captures up to 60 frames per second for live streams.
This card comes with a wide range of ports including DVI, Component, HDMI, VGA, and USB. It’s tough to find a capture card that has so many different ports available and this can ensure that it’s possible to capture on almost any type of gaming system or device. A helpful tutorial is also included with this capture card to ensure that you can get the best video format from every console.
4. Hauppauge Colossus 2 PCI Express Internal Card
Price: $135
Compatibility: TV, DVR, Satellite, Xbox, PC, PlayStation
Specs: 1080p, 60 fps
Highlights: This card is an internal PCI card allowing it to remain as a consistent capture device inside a PC.
This card is perfect for recording live programs from a TV to your computer, offloading programs off of your DVR, as well as recording live game footage from PlayStation, Xbox, or your PC. Included alongside this card is the chance to use Stream EEZ for live streaming directly to platforms like Upstream, Twitch, and YouTube.
5. Elgato Game Capture HD
Price: $159
Compatibility: Xbox, PlayStation, Nintendo, PC, Mac
Specs: 1080p at 60fps
Highlights: The game capture HD offers a one-click sharing system to YouTube as well as flashback recording where you can turn back 10 or 15 minutes to record content that just happened.
Overall this is one of the easiest capture cards to set up because it comes with USB 3.0 and HDMI connections. For most modern gaming consoles, it offers the same type of features including the flashback recording solution to record retroactively. The device includes unlimited game capture at a fairly reasonable price and a creation suite so that you can do multitrack recording from your webcam. Editing footage from the card makes it very easy to quickly export clips for all of your content and publish them on social media. This game capture device is also known for its extremely compact design. It is only around the size of a mobile phone, meaning it can be quite easily carried in your pocket.
6. Imillet HDMI Capture Card with USB 3.0 Dongle
Price: $148
Compatibility: Plug and play with no drivers needed. PC, Mac, Linux, any iOS
Specs: 1080p 60 fps
Highlights: Doesn’t require any type of driver installation. This will work on any operating system or computer for quick recording.
The card itself is known for its USB 3.0 support as well as USB 2.0, and for not needing drivers. There is no more compatible card on the market right now. If you have had issues with other cards in the past or you regularly run Linux, you should consider this device to be prepared for all your recording needs. The device will detect the input and adjust output automatically to ensure a crystal-clear picture based on the type of device that you’re recording from. Imillet also offers a great warranty of six months free replacement as well as 12 months free repair on the card for anyone that is ordering it. The software that comes with the card is extremely simple but it does the job quite effectively, allowing for quick recording from multiple devices and simple detection for a video signal and output. Input formats can range from 480p to 1080p and frame rates can go as high as 60 frames per second. The device has great stats for its live capture but many people have experienced problems when trying to record from DVR specifically.
7. HDML Cloner Box Pro
Price: $135
Compatibility: Compatible with game consoles, windows, mac.
Specs: 1080p video at 60fps max
Highlights: The HDML Cloner Box comes with its own remote and the option to record using VGA, AV, YPbPr, and HDMI.
With so many different inputs available on this card it’s possible to record from almost any type of gaming device. With the hardware encoder which is on board, you can save videos as MP4 files and then instantly transfer them over to a flash drive on the device. You can get all of your saved files available without even having access to a PC. The box works as a standalone and it doesn’t have to be plugged into a computer to work. Free editing and converter software are included but with a storage memory card placed in the device and you can record a huge amount of footage and then edit it on your PC later on. With the quick connect feature, it is easy to set up recording and then perform all the functions you need for recording, stopping, and pausing on the remote as you use it. This remains one of the only cards available where it works as a standalone and allows for the chance to save videos to a flash drive or storage device without having to have a computer plugged in. The free converter software and video editing that comes with this device add extra value as well. An optional two-year warranty can make sure that you are ready for anything concerning this card.
8. Pyle PVRC43 Standalone Digital Video Recorder
Price: $80
Compatibility: TV, VCR, DVD, Digital camcorder, Laptop, PC, Mac, Game console
Specs: 480p
Highlights: This works as a standalone recorder with up to 32 GB of onboard memory. There’s no need to plug it into a computer for it to work and with the help of the memory card, you can record a wide range of output videos in AVI.
This card is designed as a standalone option and it’s extremely small with a USB 2.0 interface. Overall the quality of this card is not quite as technically advanced as some of the others on our list but it can record a video that is perfectly appropriate for the web or sharing over platforms like YouTube. The device can be set up quite easily with the help of an RCA connection cable, USB power cable, or other options. Generally, you may need access to an RCA to HDMI adapter if you want to record video off of a more modern laptop or camera. Where this device takes over on its competitors is the idea of just how simple it is to use. It weighs less than a pound and has a ‘one-button operation’ to start and pause recording. As of the completely standalone option, it doesn’t require any type of connection to a computer to record video. If you are looking for one of the simplest capture cards on the market that outputs to AVI in web quality, this is it.
9. HDML Cloner Box Evolve
Price: $121
Compatibility: HDMI input standalone mass compatibility
Specs: 4k video input, 1080p 60fps output
Highlights: This is a standalone USB capture device that comes with its remote. It also features dual HDMI slots allowing for up to two sources of video during recording (so you can also record from a facecam).
The card itself features a stream and capture function so that you can stream gameplay to any type of USB storage device. By plugging in a hard drive you can just press one button to record gaming videos and then handle the process of live streaming, editing, and more. Through two HDMI inputs supported and a very powerful remote control, you record on any device with fantastic image quality and without even having to plug it into any type of computer. While many of these standalone style capture boxes only support the use of minimal storage, this is a device that is capable of getting hooked up to any type of USB external hard drive for a chance to capture nearly unlimited video on your Cloner Box. As a bonus, the MP4 video editing software that is included will make the process of trimming, copying, and converting easier than ever. This has incredible value to the overall product. As an additional bonus, this Cloner Box also features a quick heat dissipation capability which can help to prevent lagging and other common problems that occur with many types of capture boxes when they overheat. A free microphone slot in addition to the HDMI slots makes recording professional voiceovers for any gameplay videos as easy as possible!
10. Avermedia Avercapture HD
Price: $99
Compatibility: Any console, PC, Mac
Specs: This device is capable of capture in full 1080p/60fps as well as the style encoding for quick streaming and easy video capture.
Highlights: The timeshift feature available on this device makes it simple to record retroactively as well as offer ultralow streaming and recording over time. The device makes it easy to capture and stream and it comes with a competitive two-year warranty.
This card works as a USB capture card from most any type of device, it captures through a component input or HDMI input and it has some of the lowest latency for any type of team capture. With one slot for video input as well as an audio input slot, it’s possible to record quick gameplay and voiceovers at any time with very minimal setup. Streaming and recording in full 1080p are done quite easily on this device and it’s designed to use less processing power than some of the competitors to ensure minimal game lag. RECental is included as part of this device so that you can set up live streaming to many of the top platforms available online. The timeshift function comes with a one-hour buffer ensuring if a great gameplay moment happens, you can shift back and begin recording from that time. Commentary and sharing are made easy with the software that’s included with this device. It makes sharing and recording an easy process for any avid video recorder.
Let us know what capture card you use and if you’re happy with it!
Richard Bennett
Richard Bennett is a writer and a lover of all things video.
Follow @Richard Bennett
The Pathway to Creating High-Quality YouTube Ads on a Dime
How to Create Video Ads for Free in YouTube Video Builder
Richard Bennett
Mar 27, 2024• Proven solutions
Many people find it challenging to create compelling video advertisements for their brand promotions. While some of the creative tools might be expensive, the easy ones have a steep learning curve, and engaging a professional designer wouldn’t be something you might be ready for. YouTube Video Builder is a great solution for any such situation.
With that being said, the following sections talk about what YouTube Video Builder is, how is it useful, what advantages does it offer, and how can you create professional video adverts using the tool.
- Part 1: What Is YouTube Video Builder?
- Part 2: How Does YouTube Video Builder Work?
- Part 3: How to Get YouTube Video Builder?
- Part 4: How to Make Video Ads for Free with YouTube Video Builder?
- Part 5: Tips for Making Good Video Ads with YouTube Video Builder
Part 1: What Is YouTube Video Builder?
YouTube recently came up with an online tool, YouTube Video Builder, that, as the name suggests, enables you as an organization to prepare videos for free. These videos could be anywhere from 6 to 15 seconds long and are most appropriate for advertisements. Once created, the films can be used in the campaigns to promote your brand and/or products online.
However, you must keep the following few things handy before starting with YouTube Video Builder to prepare a video advertisement:
- Logo
You must have a good-quality photo of your brand logo that you want to add to the video as a watermark. This gives your organization online recognition.
- HD Images
At the time of this writing, YouTube Video Builder only allows you to add still images. The tool compiles these photos using a theme that you select, and enables you to add background music to make the advert more engaging. Therefore, it is imperative to have high-definition images of your product(s) that you want to create a promotional video for.
- Google Chrome Browser
You must have the latest version of the Google Chrome web browser installed on your computer.
- YouTube Channel
Because YouTube Video Builder will publish your video advertisements on YouTube itself, you must have your own YouTube Channel created , configured, and properly functioning so the posting process remains smooth and seamless.
- Availability of the Tool and Features
YouTube Video Builder is still in the Beta phase, and therefore you may not have access to all the features that the tool has to offer. However, this majorly depends on the region of your residence. As of now, the utility is not even available in some countries of the world.
Part 2: How Does YouTube Video Builder Work?
As explained earlier, YouTube Video Builder is an online tool that works on the latest version of the Google Chrome browser. The web interface of the utility has separate blocks (or placeholders if you want to call them) for different types of images. For instance, there is a placeholder for your logo, and a couple of other blank slots where you can import the photos from your computer.
There are some text input fields that you can populate with the relevant information such as the name of the video, the product’s name that you wish to promote, and many other things. There is a storyboard at the bottom of the interface that helps give your video a theme and the alignment of the ingredients that you have imported from your computer.
Finally, you can add background music to the video from the royalty-free tracks that can be accessed from the built-in library, and you are all set to go.
Part 3: How Can I Get YouTube Video Builder?
Because YouTube Video Builder is in its Beta phase, at the time of this writing you are required to send an access request to Google using your account that you want to use to create the videos from. You can send your requests to: https://services.google.com/fb/forms/videobuilderbeta/ .
Once your request is approved, you can then use the same Google account to sign in to the YouTube Video Builder portal, and start preparing your video advertisements. Here, it is important to understand that the Google account that you use to send an access request and prepare the videos must be the same ID that has your active and functional YouTube Channel.
Part 4: How to Make Video Ads for Free with YouTube Video Builder?
Once you have access to the Beta version of YouTube Video Builder, you can start creating the video ads for free. You can learn the process of how this can be done by following the simple instructions given below:
Step 1: Prepare a Console
After signing in to your YouTube Video Builder account, on the main interface, click Select Layout from the navigation bar at the right if not already selected, pick a layout that best suits your needs, and click Use Layout.

Next, from the Color & Logo section, choose the base (background) and text colors using their corresponding tools from under the Brand colors section.
![]()
After this, insert an image of your brand logo in the block under the Logos category.
![]()
Step 2: Add the Ingredients
When you are on the Images & Text section of the navigation bar, pick the high-definition photos from the Storyboard at the bottom, and add them to the Image 1, Image 2, and Image 3 boxes accordingly.

Now, scroll down to the Text section, and add the relevant content in the available text input fields. Make sure to add a compelling Call to action text to give the viewers a free passage to connect with you.

Step 3: Make Cosmetic Manipulations
From the Pick a Font section of the navigation bar, click the Google Fonts catalog link to search for a unique font, and once found, type its name in the available field to use that font.

Alternatively, you can leave the default one selected. When on the Select Music section, choose your preferred background music from the drop-down list that is present under the section.

Finally, click Create video, and wait while YouTube Video Builder takes you to the Preview, Save, Share section, and generates your video.

Step 4: Save the Video and Begin Promotion
After the video is generated, play to preview the film. If everything looks good, click Save video.

On the next page, click Copy to copy the video link, and share it with your friends, colleagues, and family members for their feedback.

Next, scroll down to get to the Create Campaign section of the navigation bar, and from the left screen, click Create campaign to begin a campaign to promote your brand and/or product(s).

Part 5: Tips for Making Good Video Ads with YouTube Video Builder
The whole point here is to prepare your video adverts with the least investment and almost no effort. The following few tips would help you achieve this with ease:
- Make sure to gather all the ingredients such as the photos of the products, brand logo, etc. before starting with the video creation process
- Set a layout, font, theme color, and background music that compliments the product(s) you wish to promote
- Remain consistent with the theme color, fonts, etc. throughout the video
- Make sure to include a catchy ‘Call for action’ text in your video ad
- Make as many modifications as you want before publishing the ad on your YouTube Channel. Avoid doing any amendments after the ad has been posted
- Share the link of your video with as many people as you possibly can to make your product(s) and brand visible and popular
- Make sure to use the ad in your campaigns to make people aware of your brand/product(s)
Conclusion
The bitter truth is, producing videos, especially for brand promotions requires expert creators, expensive tools, and a good amount of work experience. Although all these can be managed if you have some spare funds, YouTube Video Builder helps you create advertising videos of up to 15 seconds with ease and for free. All you need is access to YouTube Video Builder, your own YouTube Channel, your brand logo, and high-definition photos of your product(s).
Richard Bennett
Richard Bennett is a writer and a lover of all things video.
Follow @Richard Bennett
Richard Bennett
Mar 27, 2024• Proven solutions
Many people find it challenging to create compelling video advertisements for their brand promotions. While some of the creative tools might be expensive, the easy ones have a steep learning curve, and engaging a professional designer wouldn’t be something you might be ready for. YouTube Video Builder is a great solution for any such situation.
With that being said, the following sections talk about what YouTube Video Builder is, how is it useful, what advantages does it offer, and how can you create professional video adverts using the tool.
- Part 1: What Is YouTube Video Builder?
- Part 2: How Does YouTube Video Builder Work?
- Part 3: How to Get YouTube Video Builder?
- Part 4: How to Make Video Ads for Free with YouTube Video Builder?
- Part 5: Tips for Making Good Video Ads with YouTube Video Builder
Part 1: What Is YouTube Video Builder?
YouTube recently came up with an online tool, YouTube Video Builder, that, as the name suggests, enables you as an organization to prepare videos for free. These videos could be anywhere from 6 to 15 seconds long and are most appropriate for advertisements. Once created, the films can be used in the campaigns to promote your brand and/or products online.
However, you must keep the following few things handy before starting with YouTube Video Builder to prepare a video advertisement:
- Logo
You must have a good-quality photo of your brand logo that you want to add to the video as a watermark. This gives your organization online recognition.
- HD Images
At the time of this writing, YouTube Video Builder only allows you to add still images. The tool compiles these photos using a theme that you select, and enables you to add background music to make the advert more engaging. Therefore, it is imperative to have high-definition images of your product(s) that you want to create a promotional video for.
- Google Chrome Browser
You must have the latest version of the Google Chrome web browser installed on your computer.
- YouTube Channel
Because YouTube Video Builder will publish your video advertisements on YouTube itself, you must have your own YouTube Channel created , configured, and properly functioning so the posting process remains smooth and seamless.
- Availability of the Tool and Features
YouTube Video Builder is still in the Beta phase, and therefore you may not have access to all the features that the tool has to offer. However, this majorly depends on the region of your residence. As of now, the utility is not even available in some countries of the world.
Part 2: How Does YouTube Video Builder Work?
As explained earlier, YouTube Video Builder is an online tool that works on the latest version of the Google Chrome browser. The web interface of the utility has separate blocks (or placeholders if you want to call them) for different types of images. For instance, there is a placeholder for your logo, and a couple of other blank slots where you can import the photos from your computer.
There are some text input fields that you can populate with the relevant information such as the name of the video, the product’s name that you wish to promote, and many other things. There is a storyboard at the bottom of the interface that helps give your video a theme and the alignment of the ingredients that you have imported from your computer.
Finally, you can add background music to the video from the royalty-free tracks that can be accessed from the built-in library, and you are all set to go.
Part 3: How Can I Get YouTube Video Builder?
Because YouTube Video Builder is in its Beta phase, at the time of this writing you are required to send an access request to Google using your account that you want to use to create the videos from. You can send your requests to: https://services.google.com/fb/forms/videobuilderbeta/ .
Once your request is approved, you can then use the same Google account to sign in to the YouTube Video Builder portal, and start preparing your video advertisements. Here, it is important to understand that the Google account that you use to send an access request and prepare the videos must be the same ID that has your active and functional YouTube Channel.
Part 4: How to Make Video Ads for Free with YouTube Video Builder?
Once you have access to the Beta version of YouTube Video Builder, you can start creating the video ads for free. You can learn the process of how this can be done by following the simple instructions given below:
Step 1: Prepare a Console
After signing in to your YouTube Video Builder account, on the main interface, click Select Layout from the navigation bar at the right if not already selected, pick a layout that best suits your needs, and click Use Layout.
Next, from the Color & Logo section, choose the base (background) and text colors using their corresponding tools from under the Brand colors section.
![]()
After this, insert an image of your brand logo in the block under the Logos category.
![]()
Step 2: Add the Ingredients
When you are on the Images & Text section of the navigation bar, pick the high-definition photos from the Storyboard at the bottom, and add them to the Image 1, Image 2, and Image 3 boxes accordingly.
Now, scroll down to the Text section, and add the relevant content in the available text input fields. Make sure to add a compelling Call to action text to give the viewers a free passage to connect with you.
Step 3: Make Cosmetic Manipulations
From the Pick a Font section of the navigation bar, click the Google Fonts catalog link to search for a unique font, and once found, type its name in the available field to use that font.
Alternatively, you can leave the default one selected. When on the Select Music section, choose your preferred background music from the drop-down list that is present under the section.
Finally, click Create video, and wait while YouTube Video Builder takes you to the Preview, Save, Share section, and generates your video.
Step 4: Save the Video and Begin Promotion
After the video is generated, play to preview the film. If everything looks good, click Save video.
On the next page, click Copy to copy the video link, and share it with your friends, colleagues, and family members for their feedback.
Next, scroll down to get to the Create Campaign section of the navigation bar, and from the left screen, click Create campaign to begin a campaign to promote your brand and/or product(s).
Part 5: Tips for Making Good Video Ads with YouTube Video Builder
The whole point here is to prepare your video adverts with the least investment and almost no effort. The following few tips would help you achieve this with ease:
- Make sure to gather all the ingredients such as the photos of the products, brand logo, etc. before starting with the video creation process
- Set a layout, font, theme color, and background music that compliments the product(s) you wish to promote
- Remain consistent with the theme color, fonts, etc. throughout the video
- Make sure to include a catchy ‘Call for action’ text in your video ad
- Make as many modifications as you want before publishing the ad on your YouTube Channel. Avoid doing any amendments after the ad has been posted
- Share the link of your video with as many people as you possibly can to make your product(s) and brand visible and popular
- Make sure to use the ad in your campaigns to make people aware of your brand/product(s)
Conclusion
The bitter truth is, producing videos, especially for brand promotions requires expert creators, expensive tools, and a good amount of work experience. Although all these can be managed if you have some spare funds, YouTube Video Builder helps you create advertising videos of up to 15 seconds with ease and for free. All you need is access to YouTube Video Builder, your own YouTube Channel, your brand logo, and high-definition photos of your product(s).
Richard Bennett
Richard Bennett is a writer and a lover of all things video.
Follow @Richard Bennett
Also read:
- [Updated] A Step-by-Step Guide to Amplify Your Content Through Spotlighting
- Unlock the Potential of YouTube Videos with These Simple GIF Creation Steps (PC/Mobile)
- 2024 Approved Choosing the Right Format – Boosting Your YouTube Videos’ Performance
- Transform Your YouTube Venture From Free to Earnings at the 500 Mark
- [New] Demystifying the Process of Writing YouTube Video Content
- Editing Essentials Your Go-To Guide for Beginner Vloggers for 2024
- [Updated] Elevate Video Engagement by Inserting Captions
- Mastering Quick Video Pace Adjustments on YouTube
- In 2024, Critical ASMR Video Elements to Note
- Unlocking Online Potential - Top 5 Strategic Approaches to YouTube Marketing
- 2024 Approved Boosting Video Quality Utilizing YouTube Studio's Features
- 2024 Approved 12 Unparalleled YouTube Gamers' Intros Revealed Free or Fee?
- Exploring Mobile YouTube Usage on Different OSes
- Unveiling the Shadows A Systematic Guide to Hidden YouTube Content
- [Updated] Code Commanders Elite Females on YT
- [New] Enhancing Video Reach Convert YT to IGTV
- The Year's Predictions Rendered in Infographics
- Turning Videos Into Dollars The Ultimate Mobile-Focused YouTuber's Manual for 2E24
- [New] Engaging Listeners Respectfully for Increased Sign-Ups
- How To Create News Style Outro
- Audio Anomaly Top Disruptive Music Apps for iOS/Android for 2024
- Unveiling the Secrets to Filmora’s FCC Status
- Crafting Captivating Edu-Vids on YouTube A Step-by-Step Guide for 2024
- Premier's 8 Most Booming Online Influencers
- Directing Content Flow Uploading IMovie Films to YouTube
- The Ultimate Viewer Count Challenge Worldwide YouTuber Leaders
- 2024 Approved Budget-Friendly Methods for YouTube Card Creation
- Final Flourishes Crafting Memorable Video Closures
- 2024 Approved Epic YouTube Playback Stories
- Comprehensive Guide to YouTube Video Editing Tools for 2024
- The Art of Conveying Excitement Perfecting Your Valorant Video Thumbnails
- Motorola Edge+ (2023) Stuck on Screen – Finding Solutions For Stuck on Boot | Dr.fone
- In 2024, Delete Gmail Account With/Without Password On Xiaomi Redmi Note 12 5G
- [New] 2024 Approved Clear Video Soundtracks Free Vs. Licensed Software Guide
- In 2024, Crafting a Harmonic Narrative Adding YouTube Music to Vids
- Updated Top 10 Free Video Compression Tools for Windows 10 for 2024
- Updated Podcast Editing 101 How to Edit a Podcasta Beginners Guide
- [New] Prime Steps in Digital Archiving Saving Computer-Hosted TV Shows for 2024
- [Updated] 2024 Approved Elevate Your Social Feed with Superior Twit HD Vids
- [Updated] In 2024, Copyright Woes Instant Video Ban
- New 2024 Approved Review The Full Spectrum of Features in Adobe Audio Editor (Adobe Audition)
- In 2024, Eliminating FB Live Ads A Step-by-Step Guide
- New VN Video Editor Pro Apk - Is It A Worthy Video Editing App for 2024
- Title: "[Updated] Elite Recommendations Top 10 High-End Video Card Models"
- Author: Steven
- Created at : 2024-05-25 20:59:01
- Updated at : 2024-05-26 20:59:01
- Link: https://youtube-clips.techidaily.com/updated-elite-recommendations-top-10-high-end-video-card-models/
- License: This work is licensed under CC BY-NC-SA 4.0.
