
![[Updated] Elevate Your Vlogging Game with Tripod Mastery](https://www.lifewire.com/thmb/sx5hd7He1vcpR0KajATX8cwq3zM=/400x300/filters:no_upscale():max_bytes(150000):strip_icc():format(webp)/Twitter-and-X-4c4103f6bc3c42e0b7197b60a50317ca.jpg)
[Updated] Elevate Your Vlogging Game with Tripod Mastery
Elevate Your Vlogging Game with Tripod Mastery
How To Use a Tripod for Vlogging

Richard Bennett
Mar 27, 2024• Proven solutions
As you grow into a serious vlogger, a tripod will become an essential piece of equipment. You can get by for a long time setting your camera up on a stack of books, or an upside-down laundry hamper, but not forever. While these setups are great for a beginner, an intermediate vlogger will start to find them limiting. Even if you are an amazingly creative person who can create any camera setup without a tripod there will come a point where you will decide your creative energy is better spent on your video content.
This article will explain how to use a tripod and then introduce you to four different types.
Part 1: How To Set a Tripod for Vlogging
1. Setting Up Your Tripod
Step 1 – Pull out all three legs of your tripod and make sure it is standing stably. There will be tensioners on the legs which you can release in order to adjust your height. Once your legs are extended to the height you want continue adjusting them until your tripod is level. Some tripods have a built in bubble level, but if yours does not you can use a separate bubble level or make a guestimate.
Make sure when you are setting up your tripod that you point one of its legs towards your subject. This will give you room to stand behind your camera, in-between the other two legs. If you have one leg pointed directly behind your camera then you may trip over it. Or, you may knock over and damage your camera.
Step 2 – On the top of your tripod there will be a plate with a small hole and a screw. Remove this plate using either a clip or lever, depending on your tripod. Once your plate is detached screw it into the bottom of your camera. It should be tight, but not too tight or you risk damaging your camera.
Step 3 – Attach your plate, which now has your camera mounted to it, back onto your tripod.
Your tripod comes with a ‘head’. Your tripod’s head is what your camera is mounted on top of. There are several different types of tripod heads and mounts which are all useful for different things.
Ball Heads and Pan/Tilt Heads are the two most common types of tripod heads. Ball Heads allow you to adjust your camera’s position quite a bit before you start shooting. They are not good for adding in camera movements while you are filming, however, because you need to lock them in place. Pan/Tilt heads are great for creating camera movement. Most Pan/Tilt heads have a handle which you can use to make a smooth panning motion.
Part 2: Why Do You Need a Tripod: Benefits of Using Tripod
Why can’t you just hold a camera in your hand while shooting vlog entries for your YouTube channel? Honestly, you can, but the camera may shake a lot and your footage might end up being unusable. Putting a camera on a tripod reduces the probability of camera shake to the minimum and that is just the tip of the iceberg.
A huge amount of vlogs can be described as sit down videos, in which the host of the video sits in front of a camera and talks to the audience. Holding a camera while talking or trying to present a product to the viewers is next to impossible, so in order to avoid having to deal with a camera, you can simply put it on a tripod, find the best angle, and push the record button.
On the go videos, are recorded at exterior locations, and a lot of YouTubers choose to shoot these types of videos handheld, but this approach makes it difficult to maintain the same shot composition for long. A Monopod, Gorillapod or just a simple selfie stick can make your job much easier because they stabilize the camera. In addition, shooting smooth panning shots without a tripod is as difficult as it sounds.
Part 3: A Few Things You’ll Need to Consider Before You Buy a Tripod
There are thousands of different tripod models you can use for vlogging, but which model you’re going to choose depends mostly on the type of vlog you want to make. If you are planning on shooting all of your videos in the studio-like conditions, then portability isn’t such an important feature, while quite the opposite is true if you intend on filming all of your footage on outdoor locations.
However, there are certain traits you have to consider when choosing a tripod you’re going to use while recording your vlog entries.
Sturdiness: There is absolutely no point in spending money on a tripod that breaks easily. Although if your plan is to shoot vlogs at home or in a studio, then buying a cheaper plastic tripod isn’t such a bad option, since the clamps and joints won’t have to endure a lot of wear and tear. Consider buying a more durable tripod if you are going to be traveling a lot while working on your vlogs.
The Type of Camera: A number of factors can contribute to the weight of a camera, including battery grips or lenses, so before you buy a tripod make sure that it can support the weight of the camera you want to use to record your videos.
The Maximum Height: Most vloggers don’t really have to worry about how tall their tripod is, because they are not on their feet in any of the shots featured in the video. Vloggers working on DIY videos, cooking tutorials or any other type of vlog that involves movement and action should pay attention to this trait.
Photo or Video Tripods: Do you want to take beautiful panning shots? If the answer is yes then you should get a video tripod that enables you to move the camera smoothly in any direction. Photo tripods are a great option for static shots that don’t involve a lot of camera movement.
Mobility: The heavier a tripod is, the more stability it can provide, but carrying a tripod that weighs over 10 pounds to shoot sports or adventure vlogs can be a tiring endeavor. Although portability is a factor, it shouldn’t prevent you from buying a high-quality tripod that will ensure your footage is perfectly smooth and stable.
Part 4: 4 Types of Tripods
Full-Sized Tripods: are very sturdy, and as a result can be fairly heavy. Although you can take them a lot of places they are not convenient to carry for extended periods of time. They are the most reliable way to ensure you have absolutely no camera shake.
Compact Tripods: appear to be the same size as Full-Sized tripods, but they are actually much lighter. You can get the same height with a Compact Tripod as a Full-Sized tripod and it will be much easier to travel with. However, Compact Tripods are not as stable. If you are shooting for an extended period of time you may need to weigh your Compact Tripod down with sandbags to keep it steady.
Gorillapods: have flexible legs which can be wrapped around posts, fences, or anything else you may want to mount your camera on. They are also lightweight enough that you can carry them around while you shoot. If you bend it right you can essentially use your Gorillapod as a heavy-duty selfie-stick for your camera.
Table-Top Tripods: are very small and easy to travel with. You can leave one in your camera bag or your glove box. Table-Top Tripods are meant to be set up on top of desks or other stable surfaces and may not be ideal for heavier cameras.
Part 5: The 5 Best Tripods For YouTube Vlogging
Even if you know everything there is to know about tripods, the selection process can be daunting. That’s why we’ve shortlisted the top 5 tripods on the market, in an effort to make finding the right tripod for your vlog videos as quick an easy as it can possibly be. Let’s have a look.
1. CamRah Smartphone Tripod
Price: $24.99

An increasing number of Smartphones features powerful cameras that can record videos at high resolutions. Unfortunately, most iPhones and Android devices are lightweight, which makes it difficult to hold them perfectly still while shooting a video. CamRah Smartphone Tripod offers a perfect solution to this problem because it is easy to pack and you can carry it wherever you go, without needing the extra space.
It weighs just 0.6lbs and it is 10.8 inches tall. The tripod has a maximum load of 11lbs which means that besides Smartphones, you can also mount action cameras, webcams, or even smaller DSLR cameras onto it. The flexible legs made from high-density foam offer stability even when the CamRah Tripod is placed on an uneven surface.
Pros:
- Easily portable
- Affordable
- Jaws technology provides an extra strong grip of the camera
Cons:
- The tripod’s legs can’t be extended
- Can’t be used with professional cameras
2. Manfrotto Mini Travel Tripod
Price: $34.99

Yet another great option for shooting vlogs with a Smartphone. The Manfrotto Mini Travel Tripod kit is also an excellent choice for all vloggers who shoot their videos with compact cameras. The tripod weighs just 0.51lbs and it is 5.31 inches tall, which makes it a perfect travel companion. However, it can’t support cameras heavier than 2.2lbs, so you have to carefully choose the camera you want to put on this tripod.
The tripod’s rotatable head features a lock button that enables you to fix the camera at a certain position and to shoot a video from an angle you selected. You can’t extend the legs on this tripod so shooting high angle shots is not an option.
Pros:
- Small and durable
- Allows you to mount almost any Smartphone model
- Compatible with compact cameras
Cons:
- Limits your shot selection
- Tripod’s legs can’t be extended
3. Joby Gorilla Pod
Price: $22.50

This tripod is a superstar in the vlogging community because it is flexible, easy to set up and it fits into a pocket. Joby Gorilla Pod’s legs are segmented, so you can freely choose an angle from which you want to shoot, without having to worry about the camera’s stability. You can use this tripod on flat and uneven surfaces equally effectively.
Joby Gorilla weighs just 1lbs and its maximum height 11.6 inches, which makes it perfectly suited for talking heads videos. Using this tripod while you are on the go is also an option if you have a camera that weighs less than 3lbs.
Pros:
- Highly adjustable
- Sturdy and Lightweight
- Made from stainless steel
Cons:
- Can’t be used for panning shots
- Legs can be extended for just one inch
4. Manfrotto Compact Action Tripod
Price: $64.49
If you love shooting your vlogs at night or if you simply want a tripod you can use in the studio an outdoor conditions, then Manfrotto’s Compact Action Tripod is one the best options you have at your disposal. The ergonomic head features a mounting plate that is easy to use and which provides a perfect grip of a camera.
This tripod is designed to be used with consumer-level DSLR cameras, but you can use it to shoot videos with almost all types of cameras. The Compact Action Tripod has a maximum height of 51.57 inches, and it can’t hold cameras heavier than 3.30lbs.
Pros:
- Suitable for both photography and video
- Great for outdoor use
- Allows you to take a wide variety of shots
Cons:
- Can’t support a lot of weight
- Not perfectly suited for professional-level cameras
5. Magnus VT-4000 Fluid Head Tripod
Price: $159.95
Experienced vloggers who record their videos with professional cameras, will enjoy using the Magnus VT-4000 Fluid Head Tripod. The 59-inch tall tripod can support as much as 8.8lbs of weight, and it is designed to help you create perfectly stable shots. The superb panning and tilting option enable you to move your camera freely while recording smooth shots, free of camera shakes.
The quick release mounting plate is compatible with a wide range of cameras, so you can experiment and work with several different cameras while using the same tripod. You can hardly make a mistake if you choose to buy this tripod because you’ll be able to use it to record vlogs at interior and exterior locations.
Pros:
- Easily adjustable to any surface
- Perfect for high angle shots
- Heavy-duty locks
Cons:
- Weighs 7.9lbs
- Not the best choice for action and adventure vlogs
Richard Bennett
Richard Bennett is a writer and a lover of all things video.
Follow @Richard Bennett
Richard Bennett
Mar 27, 2024• Proven solutions
As you grow into a serious vlogger, a tripod will become an essential piece of equipment. You can get by for a long time setting your camera up on a stack of books, or an upside-down laundry hamper, but not forever. While these setups are great for a beginner, an intermediate vlogger will start to find them limiting. Even if you are an amazingly creative person who can create any camera setup without a tripod there will come a point where you will decide your creative energy is better spent on your video content.
This article will explain how to use a tripod and then introduce you to four different types.
Part 1: How To Set a Tripod for Vlogging
1. Setting Up Your Tripod
Step 1 – Pull out all three legs of your tripod and make sure it is standing stably. There will be tensioners on the legs which you can release in order to adjust your height. Once your legs are extended to the height you want continue adjusting them until your tripod is level. Some tripods have a built in bubble level, but if yours does not you can use a separate bubble level or make a guestimate.
Make sure when you are setting up your tripod that you point one of its legs towards your subject. This will give you room to stand behind your camera, in-between the other two legs. If you have one leg pointed directly behind your camera then you may trip over it. Or, you may knock over and damage your camera.
Step 2 – On the top of your tripod there will be a plate with a small hole and a screw. Remove this plate using either a clip or lever, depending on your tripod. Once your plate is detached screw it into the bottom of your camera. It should be tight, but not too tight or you risk damaging your camera.
Step 3 – Attach your plate, which now has your camera mounted to it, back onto your tripod.
Your tripod comes with a ‘head’. Your tripod’s head is what your camera is mounted on top of. There are several different types of tripod heads and mounts which are all useful for different things.
Ball Heads and Pan/Tilt Heads are the two most common types of tripod heads. Ball Heads allow you to adjust your camera’s position quite a bit before you start shooting. They are not good for adding in camera movements while you are filming, however, because you need to lock them in place. Pan/Tilt heads are great for creating camera movement. Most Pan/Tilt heads have a handle which you can use to make a smooth panning motion.
Part 2: Why Do You Need a Tripod: Benefits of Using Tripod
Why can’t you just hold a camera in your hand while shooting vlog entries for your YouTube channel? Honestly, you can, but the camera may shake a lot and your footage might end up being unusable. Putting a camera on a tripod reduces the probability of camera shake to the minimum and that is just the tip of the iceberg.
A huge amount of vlogs can be described as sit down videos, in which the host of the video sits in front of a camera and talks to the audience. Holding a camera while talking or trying to present a product to the viewers is next to impossible, so in order to avoid having to deal with a camera, you can simply put it on a tripod, find the best angle, and push the record button.
On the go videos, are recorded at exterior locations, and a lot of YouTubers choose to shoot these types of videos handheld, but this approach makes it difficult to maintain the same shot composition for long. A Monopod, Gorillapod or just a simple selfie stick can make your job much easier because they stabilize the camera. In addition, shooting smooth panning shots without a tripod is as difficult as it sounds.
Part 3: A Few Things You’ll Need to Consider Before You Buy a Tripod
There are thousands of different tripod models you can use for vlogging, but which model you’re going to choose depends mostly on the type of vlog you want to make. If you are planning on shooting all of your videos in the studio-like conditions, then portability isn’t such an important feature, while quite the opposite is true if you intend on filming all of your footage on outdoor locations.
However, there are certain traits you have to consider when choosing a tripod you’re going to use while recording your vlog entries.
Sturdiness: There is absolutely no point in spending money on a tripod that breaks easily. Although if your plan is to shoot vlogs at home or in a studio, then buying a cheaper plastic tripod isn’t such a bad option, since the clamps and joints won’t have to endure a lot of wear and tear. Consider buying a more durable tripod if you are going to be traveling a lot while working on your vlogs.
The Type of Camera: A number of factors can contribute to the weight of a camera, including battery grips or lenses, so before you buy a tripod make sure that it can support the weight of the camera you want to use to record your videos.
The Maximum Height: Most vloggers don’t really have to worry about how tall their tripod is, because they are not on their feet in any of the shots featured in the video. Vloggers working on DIY videos, cooking tutorials or any other type of vlog that involves movement and action should pay attention to this trait.
Photo or Video Tripods: Do you want to take beautiful panning shots? If the answer is yes then you should get a video tripod that enables you to move the camera smoothly in any direction. Photo tripods are a great option for static shots that don’t involve a lot of camera movement.
Mobility: The heavier a tripod is, the more stability it can provide, but carrying a tripod that weighs over 10 pounds to shoot sports or adventure vlogs can be a tiring endeavor. Although portability is a factor, it shouldn’t prevent you from buying a high-quality tripod that will ensure your footage is perfectly smooth and stable.
Part 4: 4 Types of Tripods
Full-Sized Tripods: are very sturdy, and as a result can be fairly heavy. Although you can take them a lot of places they are not convenient to carry for extended periods of time. They are the most reliable way to ensure you have absolutely no camera shake.
Compact Tripods: appear to be the same size as Full-Sized tripods, but they are actually much lighter. You can get the same height with a Compact Tripod as a Full-Sized tripod and it will be much easier to travel with. However, Compact Tripods are not as stable. If you are shooting for an extended period of time you may need to weigh your Compact Tripod down with sandbags to keep it steady.
Gorillapods: have flexible legs which can be wrapped around posts, fences, or anything else you may want to mount your camera on. They are also lightweight enough that you can carry them around while you shoot. If you bend it right you can essentially use your Gorillapod as a heavy-duty selfie-stick for your camera.
Table-Top Tripods: are very small and easy to travel with. You can leave one in your camera bag or your glove box. Table-Top Tripods are meant to be set up on top of desks or other stable surfaces and may not be ideal for heavier cameras.
Part 5: The 5 Best Tripods For YouTube Vlogging
Even if you know everything there is to know about tripods, the selection process can be daunting. That’s why we’ve shortlisted the top 5 tripods on the market, in an effort to make finding the right tripod for your vlog videos as quick an easy as it can possibly be. Let’s have a look.
1. CamRah Smartphone Tripod
Price: $24.99
An increasing number of Smartphones features powerful cameras that can record videos at high resolutions. Unfortunately, most iPhones and Android devices are lightweight, which makes it difficult to hold them perfectly still while shooting a video. CamRah Smartphone Tripod offers a perfect solution to this problem because it is easy to pack and you can carry it wherever you go, without needing the extra space.
It weighs just 0.6lbs and it is 10.8 inches tall. The tripod has a maximum load of 11lbs which means that besides Smartphones, you can also mount action cameras, webcams, or even smaller DSLR cameras onto it. The flexible legs made from high-density foam offer stability even when the CamRah Tripod is placed on an uneven surface.
Pros:
- Easily portable
- Affordable
- Jaws technology provides an extra strong grip of the camera
Cons:
- The tripod’s legs can’t be extended
- Can’t be used with professional cameras
2. Manfrotto Mini Travel Tripod
Price: $34.99
Yet another great option for shooting vlogs with a Smartphone. The Manfrotto Mini Travel Tripod kit is also an excellent choice for all vloggers who shoot their videos with compact cameras. The tripod weighs just 0.51lbs and it is 5.31 inches tall, which makes it a perfect travel companion. However, it can’t support cameras heavier than 2.2lbs, so you have to carefully choose the camera you want to put on this tripod.
The tripod’s rotatable head features a lock button that enables you to fix the camera at a certain position and to shoot a video from an angle you selected. You can’t extend the legs on this tripod so shooting high angle shots is not an option.
Pros:
- Small and durable
- Allows you to mount almost any Smartphone model
- Compatible with compact cameras
Cons:
- Limits your shot selection
- Tripod’s legs can’t be extended
3. Joby Gorilla Pod
Price: $22.50
This tripod is a superstar in the vlogging community because it is flexible, easy to set up and it fits into a pocket. Joby Gorilla Pod’s legs are segmented, so you can freely choose an angle from which you want to shoot, without having to worry about the camera’s stability. You can use this tripod on flat and uneven surfaces equally effectively.
Joby Gorilla weighs just 1lbs and its maximum height 11.6 inches, which makes it perfectly suited for talking heads videos. Using this tripod while you are on the go is also an option if you have a camera that weighs less than 3lbs.
Pros:
- Highly adjustable
- Sturdy and Lightweight
- Made from stainless steel
Cons:
- Can’t be used for panning shots
- Legs can be extended for just one inch
4. Manfrotto Compact Action Tripod
Price: $64.49
If you love shooting your vlogs at night or if you simply want a tripod you can use in the studio an outdoor conditions, then Manfrotto’s Compact Action Tripod is one the best options you have at your disposal. The ergonomic head features a mounting plate that is easy to use and which provides a perfect grip of a camera.
This tripod is designed to be used with consumer-level DSLR cameras, but you can use it to shoot videos with almost all types of cameras. The Compact Action Tripod has a maximum height of 51.57 inches, and it can’t hold cameras heavier than 3.30lbs.
Pros:
- Suitable for both photography and video
- Great for outdoor use
- Allows you to take a wide variety of shots
Cons:
- Can’t support a lot of weight
- Not perfectly suited for professional-level cameras
5. Magnus VT-4000 Fluid Head Tripod
Price: $159.95
Experienced vloggers who record their videos with professional cameras, will enjoy using the Magnus VT-4000 Fluid Head Tripod. The 59-inch tall tripod can support as much as 8.8lbs of weight, and it is designed to help you create perfectly stable shots. The superb panning and tilting option enable you to move your camera freely while recording smooth shots, free of camera shakes.
The quick release mounting plate is compatible with a wide range of cameras, so you can experiment and work with several different cameras while using the same tripod. You can hardly make a mistake if you choose to buy this tripod because you’ll be able to use it to record vlogs at interior and exterior locations.
Pros:
- Easily adjustable to any surface
- Perfect for high angle shots
- Heavy-duty locks
Cons:
- Weighs 7.9lbs
- Not the best choice for action and adventure vlogs
Richard Bennett
Richard Bennett is a writer and a lover of all things video.
Follow @Richard Bennett
Building a Brand, Building Income: YouTube Edition
How To Make Money on YouTube
Richard Bennett
Mar 27, 2024• Proven solutions
Not many YouTubers begin making videos with the aim to get rich. For most, it’s a way to scratch a creative itch, to enjoy being in front of an audience and as an outlet for their talents and opinions. However, the potential to make money on YouTube is huge, and eventually any busy channel is going to start asking itself, how do YouTubers make money?
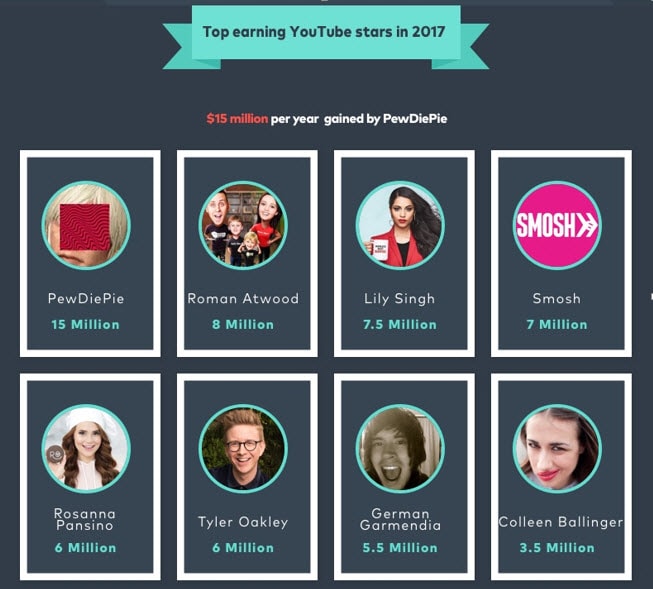
This subject is less about ‘if’ you can make money and more about how to make money on YouTube. It’s been proven time and again that the potential is there, with popular stars like Lily Singh and Roman Atwood generating around $8 million a year. And, of course, everyone’s heard of PewDiePie and his whopping $15 million income.
You don’t need to have a following of millions to earn money on YouTube though; even small channels have a variety of methods available to them to start making their hard work pay. If you’d like to learn how to make money on YouTube, we’re going to look at eight ways of generating an income via your videos. Let’s get started.
How to make money on YouTube
We’ve discovered that making money on YouTube can be split into two main categories; making money through advertising or making money without ads involved. We’ve split our article into these two categories to make it easier for you to see what your options are.
Make money on YouTube with ads
By far the easiest way to start earning money on YouTube is to monetize your channel using ads. Until relatively recently, anyone could enable monetization on their YouTube channel and start earning for every watch of their video. But that all changed in January this year, when Google announced they would be raising the standards required to have ads shown on your channel.
Now, you need to be part of the YouTube Partner Program (YPP), which means you need to have met certain minimum criteria before you can start benefitting from ads. These include:
- Having 4,000 or more watch hours
- Securing 1,000 or more subscribers in the last 12 months
This means that, before you can even consider being a part of the YPP, you’ll need to knuckle down and grow your subscribers. There’s lots of helpful tips out there on increasing subscriber numbers, but it all boils down to creating excellent content. As they say, ‘if you build it, they will come’, so work on creating new and exciting content for your channel to get where you need to be.
Should you join YouTube partner or not?
Meeting the minimum requirements of the YPP is crucial to starting to host ads, but even when you’ve hit the 1k subscribers and 4k hours viewed, should you be monetizing your channel right away? Put it this way; in order to make any money from ads, you’re going to need a lot of views and loyal subscribers, which means your focus needs to be firmly on creating content rather than complying with advertising rules.
Sometimes it’s actually better to hold off for a while when you’re early on in your YouTube journey. This will mean that, rather than being distracted by the question of how to earn money from YouTube, your energy is targeted at what matters most, which is building up a library of awesome videos instead.
How to Join the YouTube Partner Platform?
1. Go to your Account Settings and, under Channel, select Status and features.
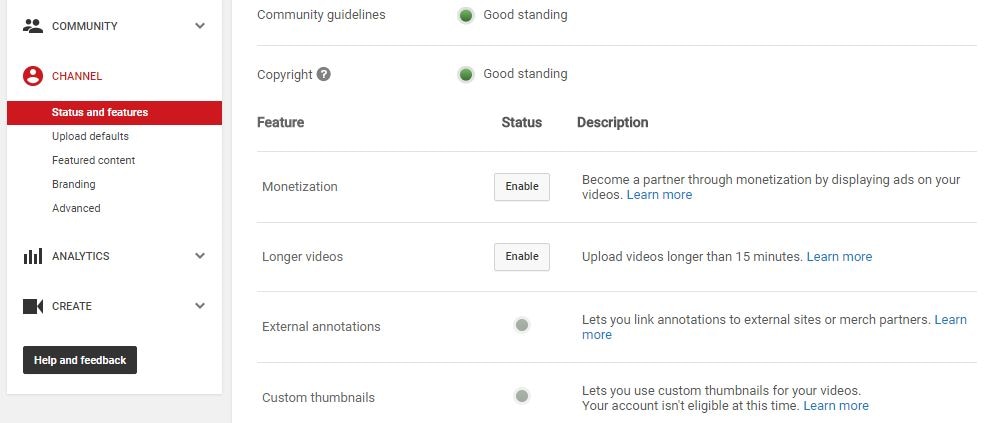
2. Click on Enable next to Monetization.
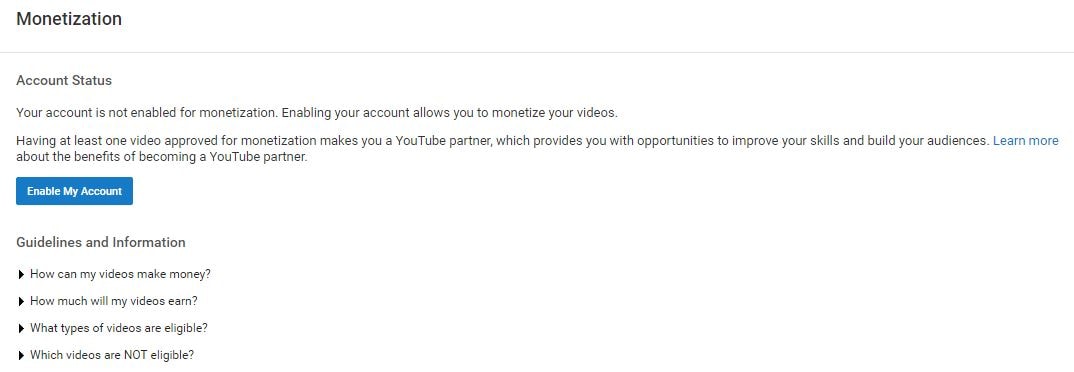
3. In the next screen, click the blue Enable my Account button.
4. The YouTube Partner Program Terms will pop up. Compared to a lot of the “Terms” you are asked to read and agree to when signing up for things online the Partner Terms are fairly short and readable.
5. After reading the terms there are three boxes you will need to check to proceed. The first is to confirm that you read the Terms. The second box is a promise not to click on the ads in your own videos to try to create profits artificially.
The third box requires you to promise not monetize content that you do not own. The most extreme version of this would be stealing somebody else’s video and trying to monetize it on your channel. However, using a song or sound effect in your video you do not have the rights to also counts. There are a lot of places you can get free music to use in your monetized videos, and YouTube’s own Audio Library is one of them.
6. After you have checked all the boxes and moved on you will see a pop up explaining how to monetize your individual videos.
Your channel is now monetized, but you will not be able to earn money until you have linked your channel to your AdSense account.
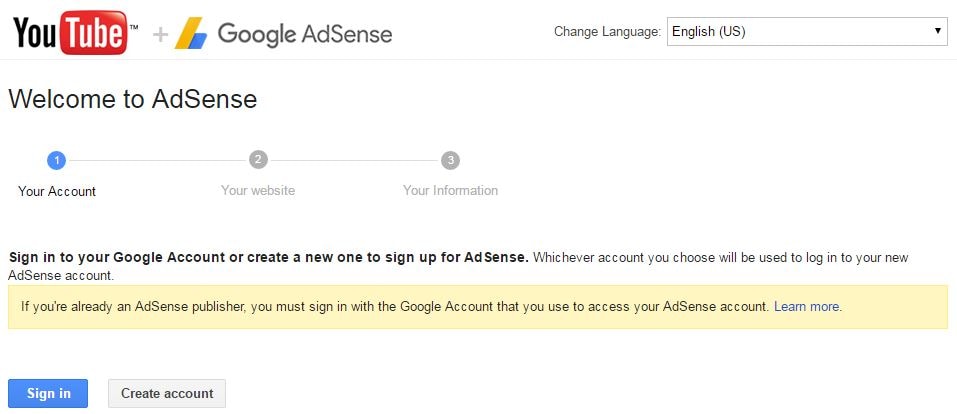
7. There will be a reminder to link your channel and your AdSense account in the next screen. Click on the Link my account button. Or, go to Google.com/adsense and click Sign Up Now. Either method will take you to the Welcome to AdSense page.
8. Click Sign In to sign in to your Google account, which is the same as your YouTube account.
9. After you have signed in it will show you your channel url next to My website and give you a chance to change your language. Click Continue.
10. The last step is to fill out all your contact information before you submit your application. Your approval should come within two days.
11. Go to your Video Manager and check the boxes next to all the videos you want to enable ads for.
12. Click on Actions and then select Monetize.
13. In the window that pops up you will be given a chance to choose what kinds of ads you want to allow in your videos. You must also specify here if you have included paid product placement in your video.
14. Wait for the review process to finish and ads to start appearing in your videos. If you are using any licensed, royalty free, content (like a music track) then YouTube may ask you to prove you have the rights to it.
How much you can get from Ads
The ad revenue generated on YouTube is split between Google and you. You’ll get 55 per cent and Google / YouTube will take the remaining 45 per cent. This means that, if an advertiser spends $200 on your channel, you could be earning $110 directly. You’ll earn both for ‘impressions’, which is the number of views the ad received, and ‘click throughs’, which is when someone clicks on the ad for more information.
Be aware that, in order to get paid, your audience will need to have viewed at least 30 seconds of the ad, or to have clicked through to the advertiser. As a rule, around 15 per cent of viewers will convert into ad revenue, so you can start to calculate just how much your video could be worth.
To give you an example, if you enjoy daily video views in the region of 3,000 views per day and achieve click through / view rates of the average 15 per cent, you’d be earning $0.85 - $1.40 per day or $25 - $43 a month for that one video. If you could increase your views to 5,000 per day, your monthly earnings would rise to $41 - $70 per month.
When working out how to make money on YouTube, keep in mind that every single video has the potential to earn you money. Although one video might only make a dollar a day, imagine when you’ve got 10 videos performing to the same standard, or 100. As you build up your library of content, you have the potential to earn exponentially more as time goes on.
Want to know how much you can get from Ads? Check this YouTube Money Calculator
How to optimize your video to attract advertisers
There is, understandably, a good deal of competition for hosting advertisements on YouTube. In order to get more and better brands advertising in your space, you’ll need to make sure you’ve done all that you can to make your channel attractive to them.
- Target a specific demographic
Your advertisers want to place their products in front of a very specific audience, so the more embedded in your niche your videos are, the more likely you are to attract investment. If you try to be all things to all people, advertisers are going to see that you’re a risky prospect and will move on to a channel that’s more targeted.
To check demographics, YouTube has everything already there for you. In the YouTube Studio, you’ll find the exact demographics of your audience profile, including age, country of origin and gender. You can see how appealing your videos are to the people you are targeting by checking the spread of representation here.
- Pay attention to your video metadata
YouTube metadata is an often-overlooked element of content that is actually incredibly important, both for advertising revenue and for views in general. What we mean when we talk about metadata is your tags, title and description of your video, all of which should make use of high traffic keywords that you’ve researched as being relevant.
YouTube’s own keyword suggestion tool can be a great place to start finding those golden keywords that will get you noticed. Advertisers often use your metadata to locate videos that their customers are watching, so SEO is crucial here. Not only that, but when viewers are looking for new videos to watch, the SEO of your metadata will define where in the search results you fall, so putting some time and energy into this can get you more views too.
- Avoid dodgy video content
There are some types of content which are just not a good idea for YouTube. In fact, the platform could exclude you from advertising altogether if your content is found to contain any of the following:
- Sexually suggestive content: This includes making jokes based around sexual topics, as well as partial nudity of anyone in the video.
- Violence: This ranges from topics of extremism to videos of people sustaining serious injuries, as well as threats and suggestions of violence.
- Inappropriate language: Even the most popular YouTubers have started bleeping out their profanities, so avoid vulgar language or anything that could be construed as being threatening.
- Drugs: Promotion of the use, sale or abuse of drugs and other controlled substances is forbidden.
- Sensitive subjects: This includes references to wars, race crimes, natural disasters, political conflicts, even if you don’t show images of the situation itself.
When you’re considering how do YouTubers make money, you should recognize that those who make the most money avoid creating content that breaches any of these rules. YouTube does notify you if it feels your video is in breach of ‘advertiser friendly’ policies, and you’ll have the chance to contest the ban, but if you steer clear of dodgy content in the first place you shouldn’t run into any issues.
Make money on YouTube without ads
Of course, life is not all about ads, and with YouTube continuing to tighten its criteria around advertising it can be a good idea not to have all your eggs in one basket. Add to this the huge viewership you’re going to need in order to make serious money, it’s worth investigating other methods of making money on YouTube. Here are some of the best ideas.
- Work with brands
Influencer marketing is big business right now, and brands all over the world are investing in individuals who have secured the loyalty and trust of their target demographic. Sponsored videos might feature product placement, promoting a product from your sponsor, or you may be asked to produce a particular piece of content to support their campaign. Check out influencer marketplaces like Famebit, Grapevine Logic and Crowdtap to see what’s available to you. If you want to make work with brands, you can check out InflueNex , a powerful influencer marketing platform, which will help you to build good relationship with brands.
- Selling products or merchandise
Selling ‘merch’ is a great way to discover how to earn money from YouTube. T-shirts, tote bags, mugs, hats…whatever fits with you and your brand can become an amazing source of revenue for your business. Not only does this increase your exposure as a brand by putting it out there into the non-YouTube world, it also gives your fans a way to literally buy into what you’re doing.
- Affiliate marketing
Affiliate marketing doesn’t have to be hard work or complicated. Registering with big sales platforms such as Amazon is often as simple as filling out a couple of forms. Once registered, you can use your own special links to hook your viewers up with a product that you would recommend, and you’ll get a proportion of the final sale value. It’s not only Amazon who offer affiliate programs; most major brands will offer some kind of sales commission, so if you’re in a niche that calls for specialist products to promote, do contact brands directly to find out what they can offer.
- Crowdfund
If you’ve got an amazingly creative idea but lack of funds is stopping you from putting it into action, crowdfunding could be the way to go. Crowdfunded projects can use the money they make to buy better production equipment, hire people to work on the project, pay for props, anything really. A good way to get started with crowdfunding a particular idea is to create a ‘trailer’ or sneak peek that gives people a better idea of what you want to do. Make sure it gets them so excited that they can’t help but donate to your cause!
- Renting out your video
You have the ability to rent out individual videos for cold, hard cash, just like a pay per view service. The options for this are in the Creator Studio, where you can set the amount you want to rent it out for as well as creating an enticing trailer to encourage people to buy. Choose to either sell your video permanently, letting the person view it whenever they like, or rent for a limited time, usually 24 to 72 hours.
- License your content to the media
If you’re lucky enough to make a video that goes viral, you can make serious bucks by licensing it to the wider media. From online news sites to TV shows, there are loads of other content creators out there willing to pay good money to use your amazing clip, and may will reach out to you directly with offers. You can also proactively offer your content for sale via sites like Juken Media, where others can find it and purchase it directly.
Now you know how to earn money from YouTube, what are you going to try? Let us know how you get on and which ways make money for you!
Richard Bennett
Richard Bennett is a writer and a lover of all things video.
Follow @Richard Bennett
Richard Bennett
Mar 27, 2024• Proven solutions
Not many YouTubers begin making videos with the aim to get rich. For most, it’s a way to scratch a creative itch, to enjoy being in front of an audience and as an outlet for their talents and opinions. However, the potential to make money on YouTube is huge, and eventually any busy channel is going to start asking itself, how do YouTubers make money?
This subject is less about ‘if’ you can make money and more about how to make money on YouTube. It’s been proven time and again that the potential is there, with popular stars like Lily Singh and Roman Atwood generating around $8 million a year. And, of course, everyone’s heard of PewDiePie and his whopping $15 million income.
You don’t need to have a following of millions to earn money on YouTube though; even small channels have a variety of methods available to them to start making their hard work pay. If you’d like to learn how to make money on YouTube, we’re going to look at eight ways of generating an income via your videos. Let’s get started.
How to make money on YouTube
We’ve discovered that making money on YouTube can be split into two main categories; making money through advertising or making money without ads involved. We’ve split our article into these two categories to make it easier for you to see what your options are.
Make money on YouTube with ads
By far the easiest way to start earning money on YouTube is to monetize your channel using ads. Until relatively recently, anyone could enable monetization on their YouTube channel and start earning for every watch of their video. But that all changed in January this year, when Google announced they would be raising the standards required to have ads shown on your channel.
Now, you need to be part of the YouTube Partner Program (YPP), which means you need to have met certain minimum criteria before you can start benefitting from ads. These include:
- Having 4,000 or more watch hours
- Securing 1,000 or more subscribers in the last 12 months
This means that, before you can even consider being a part of the YPP, you’ll need to knuckle down and grow your subscribers. There’s lots of helpful tips out there on increasing subscriber numbers, but it all boils down to creating excellent content. As they say, ‘if you build it, they will come’, so work on creating new and exciting content for your channel to get where you need to be.
Should you join YouTube partner or not?
Meeting the minimum requirements of the YPP is crucial to starting to host ads, but even when you’ve hit the 1k subscribers and 4k hours viewed, should you be monetizing your channel right away? Put it this way; in order to make any money from ads, you’re going to need a lot of views and loyal subscribers, which means your focus needs to be firmly on creating content rather than complying with advertising rules.
Sometimes it’s actually better to hold off for a while when you’re early on in your YouTube journey. This will mean that, rather than being distracted by the question of how to earn money from YouTube, your energy is targeted at what matters most, which is building up a library of awesome videos instead.
How to Join the YouTube Partner Platform?
1. Go to your Account Settings and, under Channel, select Status and features.
2. Click on Enable next to Monetization.
3. In the next screen, click the blue Enable my Account button.
4. The YouTube Partner Program Terms will pop up. Compared to a lot of the “Terms” you are asked to read and agree to when signing up for things online the Partner Terms are fairly short and readable.
5. After reading the terms there are three boxes you will need to check to proceed. The first is to confirm that you read the Terms. The second box is a promise not to click on the ads in your own videos to try to create profits artificially.
The third box requires you to promise not monetize content that you do not own. The most extreme version of this would be stealing somebody else’s video and trying to monetize it on your channel. However, using a song or sound effect in your video you do not have the rights to also counts. There are a lot of places you can get free music to use in your monetized videos, and YouTube’s own Audio Library is one of them.
6. After you have checked all the boxes and moved on you will see a pop up explaining how to monetize your individual videos.
Your channel is now monetized, but you will not be able to earn money until you have linked your channel to your AdSense account.
7. There will be a reminder to link your channel and your AdSense account in the next screen. Click on the Link my account button. Or, go to Google.com/adsense and click Sign Up Now. Either method will take you to the Welcome to AdSense page.
8. Click Sign In to sign in to your Google account, which is the same as your YouTube account.
9. After you have signed in it will show you your channel url next to My website and give you a chance to change your language. Click Continue.
10. The last step is to fill out all your contact information before you submit your application. Your approval should come within two days.
11. Go to your Video Manager and check the boxes next to all the videos you want to enable ads for.
12. Click on Actions and then select Monetize.
13. In the window that pops up you will be given a chance to choose what kinds of ads you want to allow in your videos. You must also specify here if you have included paid product placement in your video.
14. Wait for the review process to finish and ads to start appearing in your videos. If you are using any licensed, royalty free, content (like a music track) then YouTube may ask you to prove you have the rights to it.
How much you can get from Ads
The ad revenue generated on YouTube is split between Google and you. You’ll get 55 per cent and Google / YouTube will take the remaining 45 per cent. This means that, if an advertiser spends $200 on your channel, you could be earning $110 directly. You’ll earn both for ‘impressions’, which is the number of views the ad received, and ‘click throughs’, which is when someone clicks on the ad for more information.
Be aware that, in order to get paid, your audience will need to have viewed at least 30 seconds of the ad, or to have clicked through to the advertiser. As a rule, around 15 per cent of viewers will convert into ad revenue, so you can start to calculate just how much your video could be worth.
To give you an example, if you enjoy daily video views in the region of 3,000 views per day and achieve click through / view rates of the average 15 per cent, you’d be earning $0.85 - $1.40 per day or $25 - $43 a month for that one video. If you could increase your views to 5,000 per day, your monthly earnings would rise to $41 - $70 per month.
When working out how to make money on YouTube, keep in mind that every single video has the potential to earn you money. Although one video might only make a dollar a day, imagine when you’ve got 10 videos performing to the same standard, or 100. As you build up your library of content, you have the potential to earn exponentially more as time goes on.
Want to know how much you can get from Ads? Check this YouTube Money Calculator
How to optimize your video to attract advertisers
There is, understandably, a good deal of competition for hosting advertisements on YouTube. In order to get more and better brands advertising in your space, you’ll need to make sure you’ve done all that you can to make your channel attractive to them.
- Target a specific demographic
Your advertisers want to place their products in front of a very specific audience, so the more embedded in your niche your videos are, the more likely you are to attract investment. If you try to be all things to all people, advertisers are going to see that you’re a risky prospect and will move on to a channel that’s more targeted.
To check demographics, YouTube has everything already there for you. In the YouTube Studio, you’ll find the exact demographics of your audience profile, including age, country of origin and gender. You can see how appealing your videos are to the people you are targeting by checking the spread of representation here.
- Pay attention to your video metadata
YouTube metadata is an often-overlooked element of content that is actually incredibly important, both for advertising revenue and for views in general. What we mean when we talk about metadata is your tags, title and description of your video, all of which should make use of high traffic keywords that you’ve researched as being relevant.
YouTube’s own keyword suggestion tool can be a great place to start finding those golden keywords that will get you noticed. Advertisers often use your metadata to locate videos that their customers are watching, so SEO is crucial here. Not only that, but when viewers are looking for new videos to watch, the SEO of your metadata will define where in the search results you fall, so putting some time and energy into this can get you more views too.
- Avoid dodgy video content
There are some types of content which are just not a good idea for YouTube. In fact, the platform could exclude you from advertising altogether if your content is found to contain any of the following:
- Sexually suggestive content: This includes making jokes based around sexual topics, as well as partial nudity of anyone in the video.
- Violence: This ranges from topics of extremism to videos of people sustaining serious injuries, as well as threats and suggestions of violence.
- Inappropriate language: Even the most popular YouTubers have started bleeping out their profanities, so avoid vulgar language or anything that could be construed as being threatening.
- Drugs: Promotion of the use, sale or abuse of drugs and other controlled substances is forbidden.
- Sensitive subjects: This includes references to wars, race crimes, natural disasters, political conflicts, even if you don’t show images of the situation itself.
When you’re considering how do YouTubers make money, you should recognize that those who make the most money avoid creating content that breaches any of these rules. YouTube does notify you if it feels your video is in breach of ‘advertiser friendly’ policies, and you’ll have the chance to contest the ban, but if you steer clear of dodgy content in the first place you shouldn’t run into any issues.
Make money on YouTube without ads
Of course, life is not all about ads, and with YouTube continuing to tighten its criteria around advertising it can be a good idea not to have all your eggs in one basket. Add to this the huge viewership you’re going to need in order to make serious money, it’s worth investigating other methods of making money on YouTube. Here are some of the best ideas.
- Work with brands
Influencer marketing is big business right now, and brands all over the world are investing in individuals who have secured the loyalty and trust of their target demographic. Sponsored videos might feature product placement, promoting a product from your sponsor, or you may be asked to produce a particular piece of content to support their campaign. Check out influencer marketplaces like Famebit, Grapevine Logic and Crowdtap to see what’s available to you. If you want to make work with brands, you can check out InflueNex , a powerful influencer marketing platform, which will help you to build good relationship with brands.
- Selling products or merchandise
Selling ‘merch’ is a great way to discover how to earn money from YouTube. T-shirts, tote bags, mugs, hats…whatever fits with you and your brand can become an amazing source of revenue for your business. Not only does this increase your exposure as a brand by putting it out there into the non-YouTube world, it also gives your fans a way to literally buy into what you’re doing.
- Affiliate marketing
Affiliate marketing doesn’t have to be hard work or complicated. Registering with big sales platforms such as Amazon is often as simple as filling out a couple of forms. Once registered, you can use your own special links to hook your viewers up with a product that you would recommend, and you’ll get a proportion of the final sale value. It’s not only Amazon who offer affiliate programs; most major brands will offer some kind of sales commission, so if you’re in a niche that calls for specialist products to promote, do contact brands directly to find out what they can offer.
- Crowdfund
If you’ve got an amazingly creative idea but lack of funds is stopping you from putting it into action, crowdfunding could be the way to go. Crowdfunded projects can use the money they make to buy better production equipment, hire people to work on the project, pay for props, anything really. A good way to get started with crowdfunding a particular idea is to create a ‘trailer’ or sneak peek that gives people a better idea of what you want to do. Make sure it gets them so excited that they can’t help but donate to your cause!
- Renting out your video
You have the ability to rent out individual videos for cold, hard cash, just like a pay per view service. The options for this are in the Creator Studio, where you can set the amount you want to rent it out for as well as creating an enticing trailer to encourage people to buy. Choose to either sell your video permanently, letting the person view it whenever they like, or rent for a limited time, usually 24 to 72 hours.
- License your content to the media
If you’re lucky enough to make a video that goes viral, you can make serious bucks by licensing it to the wider media. From online news sites to TV shows, there are loads of other content creators out there willing to pay good money to use your amazing clip, and may will reach out to you directly with offers. You can also proactively offer your content for sale via sites like Juken Media, where others can find it and purchase it directly.
Now you know how to earn money from YouTube, what are you going to try? Let us know how you get on and which ways make money for you!
Richard Bennett
Richard Bennett is a writer and a lover of all things video.
Follow @Richard Bennett
Also read:
- 2024 Approved Accelerated Sizing YouTube Content for MACs
- Discovering Potential YouTube's Role in Modern Education Strategies for 2024
- Harness the Power of YT Green Screens for Imaginative Projects
- [Updated] End Game for YouTube Content Pros' Secrets & Templates
- 2024 Approved A Taste of Film Home Cook's Visual Journey
- In 2024, Charting a Course to Riches YouTube's Monetary Milestones
- Fresh Vlog Discussion Ideas Each Day
- [Updated] Epicurean Education Recipe Film-Making
- Boost Your Channel's Income Understanding Critical View Thresholds
- How to Verify Your YouTube Account?
- From Smartphone Stories to YouTube Success A Step-by-Step Mobile Guide
- Unearthing Unique Content for Youtube's Spotlight
- Decoding the Mysteries of Effective YouTube Keywords for 2024
- Discover the Best 11 No-Fee Name Crafting for Channels
- [Updated] Blueprint Producing Purposeful Life Exploration Broadcasts
- Elite Tech for Saving Your On-Camera Video Memories for 2024
- [New] Convenient Cornerstone Building Your Online Channel, Anywhere & Everytime
- Earth's Highest-Paid Online Video Personality for 2024
- [Updated] Balancing Consistency & Quality A Key to Increasing YouTube Viewership
- In 2024, Effortless Techniques Crafting YouTube Shorts Images on the Fly
- [New] Binge-Free Bliss YouTube's Ultimate Guide to No-Cost Movies
- Propel Views Up Top Hashtag Combinations for YouTube Profit
- Thumbnails as a Key Player in Video Marketing Strategies
- Elevating Your YouTube Presence with Ideal Video Formats
- Distinctive Digital Monikers for Video Creators for 2024
- [Updated] Channel Conversion Secrets YT Vs IGTV
- [Updated] Building an Auto-Subscribe Direct Link for Youtube
- Unraveling the Mysteries of Digital Content Optimization on YouTube
- YouTube Income 101 From Ideas to Earnings in Action
- [New] Elevate Your YouTube Presence The Art of SEO Optimization
- 10 Steps to Perfect YouTube Reactions – A Trio Guide for 2024
- Steady and True Keeping It All Together in Your YouTube Shoots
- The Mobile Marketer's Blueprint Simple Pathway to YouTube Success
- Elevate Your Video Game with These 5 YouTube Thumbnail Builders
- In 2024, A Convenient Compilation Finding Your YT Comments
- Banner Bliss Get a Peek at Our Library of 50 Free YouTube Banners
- [Updated] Elevate Streams Using YouTube's AV1 Settings
- How to Add Your Digital Signature to a .rtf file Document
- Mastering InstaClips Crafting Effective Video Promotions
- [Updated] Crafting Consumer Engagement The Art of Marketing on TikTok
- Why is iPogo not working On Honor Play 8T? Fixed | Dr.fone
- 5 Hassle-Free Solutions to Fake Location on Find My Friends Of Motorola Moto G34 5G | Dr.fone
- New Best Zero-Cost 4K Video Editing Tools for Beginners
- How to Easily Hard reset my Poco F5 5G | Dr.fone
- [Updated] Top 10 Best Webcam Covers & Stickers
- In 2024, 3 Ways to Change Location on Facebook Marketplace for Vivo V27 | Dr.fone
- In 2024, The Complete Guide to Recording Flawless Zoom-Based Podcasts
- [New] How to Turn Off Suggested Posts on Instagram for 2024
- In 2024, Video to Picture The Ultimate List of 10 Conversion Tools
- 8 Best Professional Audio Editing Software for Powerful Editing
- 2024 Approved Expert's Guide to Achieving Screencasting Perfection with Mobizen
- In 2024, How to Change Your Realme 11X 5G Location on life360 Without Anyone Knowing? | Dr.fone
- Title: [Updated] Elevate Your Vlogging Game with Tripod Mastery
- Author: Steven
- Created at : 2024-05-25 20:58:30
- Updated at : 2024-05-26 20:58:30
- Link: https://youtube-clips.techidaily.com/updated-elevate-your-vlogging-game-with-tripod-mastery/
- License: This work is licensed under CC BY-NC-SA 4.0.
