
!["[Updated] Elevate Your Video Impact 20 Essential Thumbnail Fonts"](https://www.lifewire.com/thmb/5sZ2IYbS1Vq7ZwEoK_PsppTsHS4=/400x300/filters:no_upscale():max_bytes(150000):strip_icc()/unnamed1-e3445b89ed8d4c268efdc8be28e16417.png)
"[Updated] Elevate Your Video Impact 20 Essential Thumbnail Fonts"
Elevate Your Video Impact: 20 Essential Thumbnail Fonts
YouTube has grown in popularity since it was developed and launched. You can watch YouTube videos for educational purposes, entertainment, or catch up with your favorite content creators. Thumbnails are a massive element of what makes a YouTube video successful. You can incorporate numerous fonts into your thumbnails, leaving you feeling stuck on which is the best option.
This article will discuss the 20 best YouTube thumbnail fonts to make your videos amazing.

- Bebas Neue - Popular YouTube Thumbnail Font
- Impact - YouTube Thumbnail Font for Strong Sense
- Montserrat - Good Font for YouTube Thumbnail
- Alfa Slab - YouTube Thumbnail Text Font With a Futuristic Vibe
- Againts - Best Font for YouTube Thumbnail
- Dancing Script - YouTube Thumbnail Font With a Sweat Vibe
- Oswald
- Arial Negrata - Print Font for YouTube Thumbnails
- BlackOpsOne - Best YouTube Thumbnail Font for Gaming Videos
- Beauty and the Beast
- Chucklesome
- Caribold
- Bernhard - Serious YouTube Thumbnail Font
- Dustin Font Quartet
- The Tide - Chunky-Letter Font for YouTube Thumbnails
- Badaboom BB
- River Drive
- Traveler Note
- Free Love Script
- Config Rounded
20 Best Fonts for YouTube Thumbnails To Bring Traffic to Your Videos
Your thumbnail is the first thing your audience will see as they browse on YouTube. Since you only have a few seconds to make a good first impression, it would be wise to make the most out of it.
YouTube thumbnails capture the viewer’s attention and spark their interest. The more eye-catching your thumbnail is, the more likely they will click on your video. If you take your time to make good thumbnails for your YouTube videos, you will undoubtedly increase your channel’s traffic and expand your reach.
Recent research reveals that YouTube thumbnails with text and numbers get more clicks than thumbnails with plain images. Therefore, choosing a great font to accompany your thumbnail would be wise and make it more visually appealing. Stick around for the fun part of the article, where we discuss twenty best fonts for your YouTube thumbnails.
1. Bebas Neue - Popular YouTube Thumbnail Font
The first YouTube thumbnail font on our list is a popular one known as Bebas Neue. You can use this font for your videos and thumbnails regardless of what content you post. The elegant yet sublime design makes it a perfect choice for you if you are just starting out or have yet to explore other options.

2. Impact - YouTube Thumbnail Font for Strong Sense
If you want a straightforward font for your thumbnail, look no further than Impact. Its strong sense makes it the best font for YouTube thumbnails. Even though it is versatile for any content, it is most frequently used on reaction videos, pranks, or reviews.

3. Montserrat - Good Font for YouTube Thumbnail
The letters in the Montserrat video are very simple, with the slightest shadowing and outline. This font is pretty versatile, and you can use it to make thumbnails for laid-back content or more serious and factual videos.

4. Alfa Slab - YouTube Thumbnail Text Font With a Futuristic Vibe
The Alfa slab font has a futuristic vibe to it, making it the perfect choice for content about new innovations or the future of technology. The blocky yet simple letters are easy to read and don’t take away from the main message or the background.

5. Againts - Best Font for YouTube Thumbnail
Suppose you post lots of travel content, share videos of you lounging on the best, or sample a new restaurant. The Againts font has a unique outdoor vibe that makes your videos pop and makes your audience anticipate where you will travel next.
6. Dancing Script - YouTube Thumbnail Font With a Sweat Vibe
The Dancing Script font is a must-have in your arsenal if you wouldn’t want your videos to be too serious. The slanted letters also give your thumbnail a feminine touch, making it great for fashion vlogs or videos about life hacks for ladies.

7. Oswald
The letters in this Oswald font are encapsulated in a dark grey rectangle, making them stand out and easy to read. You could use this font with other backgrounds in your thumbnail to highlight keywords you wouldn’t want your audience to miss as they scroll through YouTube.

8. Arial Negrata - Print Font for YouTube Thumbnails
We couldn’t forget to mention Arial Negrata, which has a beautiful print font and complementary sub-fonts. You can easily vary the fonts’ sizes for emphasis and to capture the interest of your audience.

9. BlackOpsOne - Best YouTube Thumbnail Font for Gaming Videos
Are you tired of the boring print fonts and girly cursive text? If you answer yes, you should check out the BlackOpsOne font, which is unlike anything you have ever seen. This font is perfect for gaming videos or content that involves long streams.

10. Beauty and the Beast
If you are a streamer, gamer, or like to post life hack videos on YouTube, you are probably looking for some good fonts for YouTube thumbnails to make your video less serious. The Beauty and the Beast font is very whimsical, giving your thumbnail a playful feel.

11. Chucklesome
You will immediately recognize this font if you grew up watching many cartoons and reading comic books. Chucklesome is another font with the best font color for YouTube thumbnails, making it an excellent choice if your YouTube channel is about games, movies, or comic books. The artsy typeface, bold letters, and bright colors can capture your audience’s attention from a mile away.

12. Caribold
As the name suggests, the Caribold font for YouTube thumbnails is very bold, and the letters almost jump out of the screen at you. The borders, outline, and shadows emphasize the font, making it hard to miss. You can use this font to create thumbnails for “How To” videos.

13. Bernhard - Serious YouTube Thumbnail Font
Depending on the content you post, you might want to discard the whimsical feel and give your thumbnail a more serious vibe. The Bernhard font is technically an enlarged script font that makes your videos and thumbnails look fresh and elegant. You can use this font for historical or factual videos.

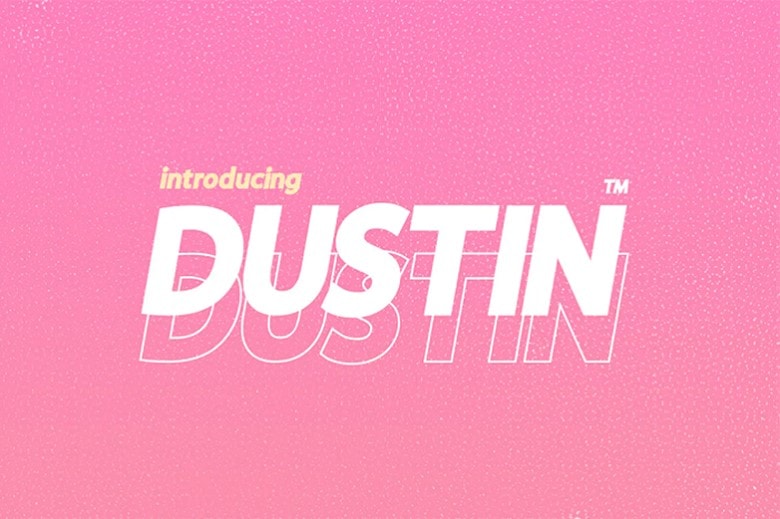
14. Dustin Font Quartet
It is not uncommon for thumbnails to draw inspiration from other brands. The Dustin font is an excellent example of such a font, which is similar to the Supreme brand logo. This font is pretty versatile as it comes in a pack of four fonts, making you spoilt for choice!
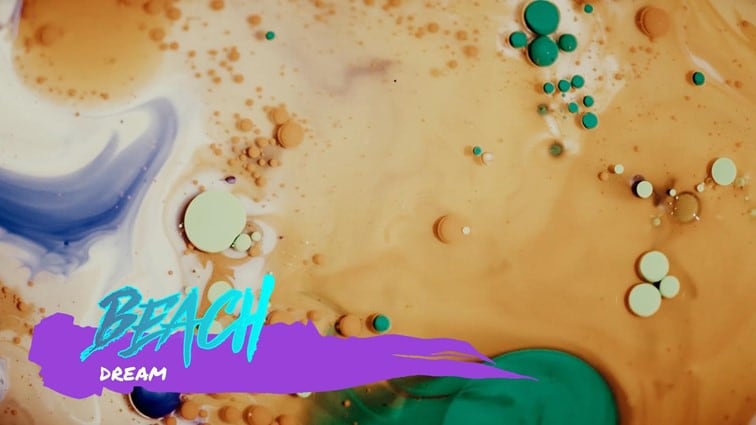
15. The Tide - Chunky-Letter Font for YouTube Thumbnails
The Tide thumbnail font gives a relaxing beach vibe that would be great if you love posting laid-back content. This font also comes with chunky letters, which are easy to read and grab the attention of anyone scrolling through the platform.

16. Badaboom BB
The best font for YouTube thumbnail is Badaboom BB font, which has vibrant colors and unique letters. The red and yellow colors are an absolute showstopper and a must-have if you want your audience to notice you. This font style is excellent for gaming and streaming YouTube videos, where you just want your audience to have a good time.

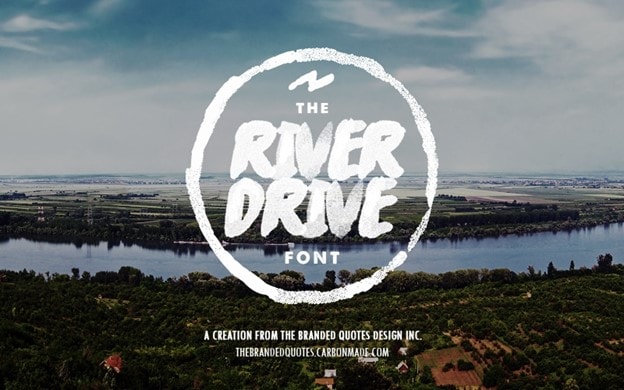
17. River Drive
When inserting text into a thumbnail, you must balance the visual elements to ensure the letters don’t overshadow the image. The River Drive font allows you to create bold yet legible text without removing the stunning photo in the background.
18. Traveler Note
Adventure and travel channels help us know what it’s like to visit a place, even though we haven’t left our couches. The Traveler Note font brings life and cheer to your travel vlogs as you continue introducing us to different parts of the world.

19. Free Love Script
Perhaps your YouTube is missing that feminine touch to tie everything together. The curvy lettering in the Free Love Script is perfect for lifestyle videos or fashion vlogs, which could use a bit of femininity to drive the message home.

20. Config Rounded
If your channel is professional or you post informative content about finances, business, and other important topics, the best YouTube thumbnail font for you is the Config rounded font. It looks pretty modern and works well with any background.

Generate Cool YouTube Thumbnail Texts With Wondershare Filmora
If you have been making YouTube videos for a while now, then you must be familiar with Wondershare Filmora , a top-tier video editing tool. If not, we will discuss some of the features that make it a great editing tool in a short while. You can also use this platform to create and design the perfect thumbnail for your YouTube video.
Free Download For Win 7 or later(64-bit)
Free Download For macOS 10.14 or later

The title editing feature on this platform allows you to add creative text to your video and customize it as you see fit. You can also use Wondershare Filmora to make a title with customizable parameters. For instance, you can edit the text titles using three different fill types: color fill, gradient fill, and image fill.
Wondershare Filmora is an excellent tool to help bring your thumbnails alive and reel the masses in to view more videos from your channel. You cannot possibly exhaust the 107 animation styles, 12 types of shadow effects, and more than ten borders that make your text stand out from the rest. If you are unhappy with your current font, you can choose from over 30 categories of titles till you find one that tickles your fancy.
We couldn’t forget to mention the 3D titles feature with Wondershare Filmora. Gone are the days when creators would use 2D titles to introduce their videos to their audience. Even though not many content creators use 3D titles, you can be among the few that do and gain a competitive advantage. Ensure you peruse through the various categories and find one that speaks to you and fits the kind of content you create.
Below is a step-by-step guide on how to edit YouTube thumbnail text fonts.
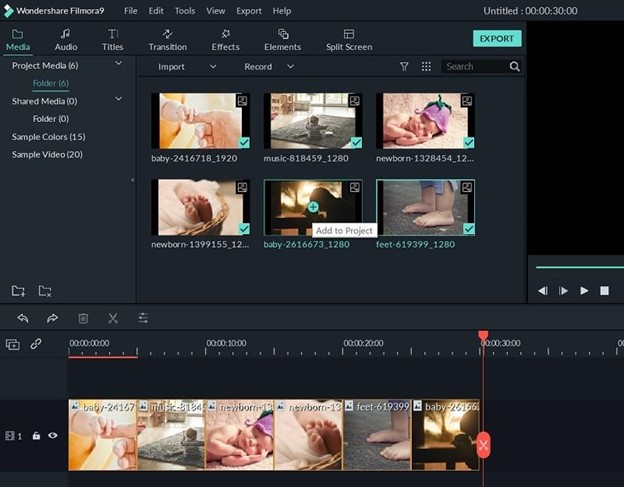
Step1 Launch Wondershare Filmora on your device and select “New Project.”

Step2 Click on the icon shown below to import media from your device.

Step3 Drag and drop your photos as shown below to create your YouTube Thumbnail on the platform.
Step4 Add titles to customize the texts in your Thumbnail.

Step5 In the Titles panel, you can customize the font. Filmora offers hundreds of fonts for your choosing.

Step6 Select a still frame to be your thumbnail. Click the camera icon on the right side to take a snapshot.

Step7 The snapshot will appear on the Media panel. Right click the snapshot, and select “Reveal in Explorer” to locate it in your local drive. Then you can use it as your YouTube Thumbnail.

You don’t need to search for fonts on the Internet when Wondershare Filmora offers downloadable fonts. If you are interested in installing fonts in Filmora, watch this video to learn how.
Conclusion
As you generate thumbnails for your YouTube videos, it would be wise to ensure you make them full-sized. The ideal dimension for a YouTube thumbnail should be 1280*720. Since most of your viewers use their mobile phones to watch YouTube videos, it would help to ensure the thumbnail looks the same on your laptop and your mobile device.
A hazy or pixelated thumbnail could discourage the viewer from clicking on your video. We hope you have found a font you like and will incorporate it into your next YouTube video.
20 Best Fonts for YouTube Thumbnails To Bring Traffic to Your Videos
Your thumbnail is the first thing your audience will see as they browse on YouTube. Since you only have a few seconds to make a good first impression, it would be wise to make the most out of it.
YouTube thumbnails capture the viewer’s attention and spark their interest. The more eye-catching your thumbnail is, the more likely they will click on your video. If you take your time to make good thumbnails for your YouTube videos, you will undoubtedly increase your channel’s traffic and expand your reach.
Recent research reveals that YouTube thumbnails with text and numbers get more clicks than thumbnails with plain images. Therefore, choosing a great font to accompany your thumbnail would be wise and make it more visually appealing. Stick around for the fun part of the article, where we discuss twenty best fonts for your YouTube thumbnails.
1. Bebas Neue - Popular YouTube Thumbnail Font
The first YouTube thumbnail font on our list is a popular one known as Bebas Neue. You can use this font for your videos and thumbnails regardless of what content you post. The elegant yet sublime design makes it a perfect choice for you if you are just starting out or have yet to explore other options.
2. Impact - YouTube Thumbnail Font for Strong Sense
If you want a straightforward font for your thumbnail, look no further than Impact. Its strong sense makes it the best font for YouTube thumbnails. Even though it is versatile for any content, it is most frequently used on reaction videos, pranks, or reviews.
3. Montserrat - Good Font for YouTube Thumbnail
The letters in the Montserrat video are very simple, with the slightest shadowing and outline. This font is pretty versatile, and you can use it to make thumbnails for laid-back content or more serious and factual videos.
4. Alfa Slab - YouTube Thumbnail Text Font With a Futuristic Vibe
The Alfa slab font has a futuristic vibe to it, making it the perfect choice for content about new innovations or the future of technology. The blocky yet simple letters are easy to read and don’t take away from the main message or the background.
5. Againts - Best Font for YouTube Thumbnail
Suppose you post lots of travel content, share videos of you lounging on the best, or sample a new restaurant. The Againts font has a unique outdoor vibe that makes your videos pop and makes your audience anticipate where you will travel next.
6. Dancing Script - YouTube Thumbnail Font With a Sweat Vibe
The Dancing Script font is a must-have in your arsenal if you wouldn’t want your videos to be too serious. The slanted letters also give your thumbnail a feminine touch, making it great for fashion vlogs or videos about life hacks for ladies.
7. Oswald
The letters in this Oswald font are encapsulated in a dark grey rectangle, making them stand out and easy to read. You could use this font with other backgrounds in your thumbnail to highlight keywords you wouldn’t want your audience to miss as they scroll through YouTube.
8. Arial Negrata - Print Font for YouTube Thumbnails
We couldn’t forget to mention Arial Negrata, which has a beautiful print font and complementary sub-fonts. You can easily vary the fonts’ sizes for emphasis and to capture the interest of your audience.
9. BlackOpsOne - Best YouTube Thumbnail Font for Gaming Videos
Are you tired of the boring print fonts and girly cursive text? If you answer yes, you should check out the BlackOpsOne font, which is unlike anything you have ever seen. This font is perfect for gaming videos or content that involves long streams.
10. Beauty and the Beast
If you are a streamer, gamer, or like to post life hack videos on YouTube, you are probably looking for some good fonts for YouTube thumbnails to make your video less serious. The Beauty and the Beast font is very whimsical, giving your thumbnail a playful feel.
11. Chucklesome
You will immediately recognize this font if you grew up watching many cartoons and reading comic books. Chucklesome is another font with the best font color for YouTube thumbnails, making it an excellent choice if your YouTube channel is about games, movies, or comic books. The artsy typeface, bold letters, and bright colors can capture your audience’s attention from a mile away.
12. Caribold
As the name suggests, the Caribold font for YouTube thumbnails is very bold, and the letters almost jump out of the screen at you. The borders, outline, and shadows emphasize the font, making it hard to miss. You can use this font to create thumbnails for “How To” videos.
13. Bernhard - Serious YouTube Thumbnail Font
Depending on the content you post, you might want to discard the whimsical feel and give your thumbnail a more serious vibe. The Bernhard font is technically an enlarged script font that makes your videos and thumbnails look fresh and elegant. You can use this font for historical or factual videos.
14. Dustin Font Quartet
It is not uncommon for thumbnails to draw inspiration from other brands. The Dustin font is an excellent example of such a font, which is similar to the Supreme brand logo. This font is pretty versatile as it comes in a pack of four fonts, making you spoilt for choice!
15. The Tide - Chunky-Letter Font for YouTube Thumbnails
The Tide thumbnail font gives a relaxing beach vibe that would be great if you love posting laid-back content. This font also comes with chunky letters, which are easy to read and grab the attention of anyone scrolling through the platform.
16. Badaboom BB
The best font for YouTube thumbnail is Badaboom BB font, which has vibrant colors and unique letters. The red and yellow colors are an absolute showstopper and a must-have if you want your audience to notice you. This font style is excellent for gaming and streaming YouTube videos, where you just want your audience to have a good time.
17. River Drive
When inserting text into a thumbnail, you must balance the visual elements to ensure the letters don’t overshadow the image. The River Drive font allows you to create bold yet legible text without removing the stunning photo in the background.
18. Traveler Note
Adventure and travel channels help us know what it’s like to visit a place, even though we haven’t left our couches. The Traveler Note font brings life and cheer to your travel vlogs as you continue introducing us to different parts of the world.
19. Free Love Script
Perhaps your YouTube is missing that feminine touch to tie everything together. The curvy lettering in the Free Love Script is perfect for lifestyle videos or fashion vlogs, which could use a bit of femininity to drive the message home.
20. Config Rounded
If your channel is professional or you post informative content about finances, business, and other important topics, the best YouTube thumbnail font for you is the Config rounded font. It looks pretty modern and works well with any background.
Generate Cool YouTube Thumbnail Texts With Wondershare Filmora
If you have been making YouTube videos for a while now, then you must be familiar with Wondershare Filmora , a top-tier video editing tool. If not, we will discuss some of the features that make it a great editing tool in a short while. You can also use this platform to create and design the perfect thumbnail for your YouTube video.
Free Download For Win 7 or later(64-bit)
Free Download For macOS 10.14 or later
The title editing feature on this platform allows you to add creative text to your video and customize it as you see fit. You can also use Wondershare Filmora to make a title with customizable parameters. For instance, you can edit the text titles using three different fill types: color fill, gradient fill, and image fill.
Wondershare Filmora is an excellent tool to help bring your thumbnails alive and reel the masses in to view more videos from your channel. You cannot possibly exhaust the 107 animation styles, 12 types of shadow effects, and more than ten borders that make your text stand out from the rest. If you are unhappy with your current font, you can choose from over 30 categories of titles till you find one that tickles your fancy.
We couldn’t forget to mention the 3D titles feature with Wondershare Filmora. Gone are the days when creators would use 2D titles to introduce their videos to their audience. Even though not many content creators use 3D titles, you can be among the few that do and gain a competitive advantage. Ensure you peruse through the various categories and find one that speaks to you and fits the kind of content you create.
Below is a step-by-step guide on how to edit YouTube thumbnail text fonts.
Step1 Launch Wondershare Filmora on your device and select “New Project.”
Step2 Click on the icon shown below to import media from your device.
Step3 Drag and drop your photos as shown below to create your YouTube Thumbnail on the platform.
Step4 Add titles to customize the texts in your Thumbnail.
Step5 In the Titles panel, you can customize the font. Filmora offers hundreds of fonts for your choosing.
Step6 Select a still frame to be your thumbnail. Click the camera icon on the right side to take a snapshot.
Step7 The snapshot will appear on the Media panel. Right click the snapshot, and select “Reveal in Explorer” to locate it in your local drive. Then you can use it as your YouTube Thumbnail.
You don’t need to search for fonts on the Internet when Wondershare Filmora offers downloadable fonts. If you are interested in installing fonts in Filmora, watch this video to learn how.
Conclusion
As you generate thumbnails for your YouTube videos, it would be wise to ensure you make them full-sized. The ideal dimension for a YouTube thumbnail should be 1280*720. Since most of your viewers use their mobile phones to watch YouTube videos, it would help to ensure the thumbnail looks the same on your laptop and your mobile device.
A hazy or pixelated thumbnail could discourage the viewer from clicking on your video. We hope you have found a font you like and will incorporate it into your next YouTube video.
Converting iMovie Edits for Online Exhibition - YouTube Edition
How to Upload a Video from iMovie to YouTube?

Liza Brown
Aug 18, 2022• Proven solutions
“Is iMovie good for YouTube?”
The iMovie is not only good for YouTube but various other social media platforms. The thing is, you have to compromise with the quality offered by Apple’s video editor iMovie. Well, iMovie is perfect for getting started for beginners. But, the professionals and ones who want a bit high features than basic ones should look elsewhere. Thus, we always recommend alternatives to a particular software for our audience. In this article, there is a mention of Wondershare Filmora to overcome the drawbacks of iMovie.
Without further ado, let’s begin with how to upload a video from iMovie to YouTube. We want to lead with the best iMovie export settings, specific troubleshooting issues, and our alternative intro section to overcome iMovie’s limitations.
Part 1: How to Upload a Video from iMovie to YouTube?
iMovie is ideal for making YouTube videos if you are too basic and are not looking for advanced features. Remember that professionalism pays in these platforms and helps you stand better among others. If you’re still interested in making introductory videos, here is a step-by-step guide on uploading a video to YouTube from iMovie on Mac first and leading with iPhone.
Step-by-Step Tutorial on how to upload a video from iMovie to YouTube on Mac
Step 1: Create a Project
On the first step, go to iMovie on Mac and click the Create New tab below.
Step 2: Import Media
Click the Import Media button and browse the files on your computer, as shown below.
Step 3: Edit Clips
It’s time to edit video footage. Drag your video to the timeline, as shown below.
Then, you can trim and drag the edges of video clips to allow editing.
Step 4: Add Titles
You can add titles by clicking the Title tab and further drag the Title’s template into the timeline.
Step 5: Export the Video
Click the Export button as follows after editing is over.
Select YouTube to upload your video over the platform directly.
Step 6: Save
After selecting the desired platform, click the Next tab to proceed with saving the file.
At last, save your video as shown below.
Step-by-Step Tutorial on how to upload iMovie to YouTube from iPhone
Step 1: Share the iMovie Project
Go to iMovie on your iPhone. Open the iMovie project on your iPhone and tap the Share button to select YouTube. Enter the information of Title, Description, Size, Tags, Privacy, and Location (optional).
Step 2: Upload iMovie Files
For ease of use, you can upload saved videos in Photo Library on your iPhone. Then, you can upload iMovie videos via the YouTube iOS app. Sign In to YouTube and click the Camera icon at the top of the Home page. Select your iPhone Photo Library file and set the video Title, Description, Size, Tags, and Privacy. Then, hit the Upload button to confirm.
Part 2: The Best iMovie Export Settings for YouTube Videos
As we all know that iMovie consists of a bit long procedure to export projects. Here are some tips on the best iMovie export settings to avoid an unnecessary headache.
- Set small resolution: Small resolution plays a more significant role, especially while uploading. Thus, you can set the smallest resolution in the Email tab of the Export button.
2. Change Export settings in the File tab: There is a File tab under the Export button. Click it and find various settings that you need to change to get the best export settings for YouTube 2021. Make the Title of the video as small as possible. Set the resolution at 1080P than 4K.
However, it isn’t going to upgrade the resolution if your video is already in the 1080P definition. Now, the last setting that will crazily offer you the best quality and lots of space-saving. You have to select Best (ProRes) in quality settings for this purpose. These settings also take less time to upload to YouTube.
3. Compress is not for speed: Various options you see in the Compresstab are not for speed. They are for how you save the video on a desktop. Thus, always choose the Better Quality tab than Faster.
- Do not export directly to YouTube: iMovie is pretty basic and doesn’t offer great settings to upload your video instantly. You may have to make changes to the uploaded video even if you do this as per our step-by-step guide mentioned above.
Part 3: How to fix the “Failed to Upload to YouTube” Error on iMovie?
The “iMovie to YouTube failed” problem occurs when you directly upload a YouTube video from iMovie. The issue will result if you upload from any third-party uploader. That is why the direct upload doesn’t work, especially in iMovie. You can opt to share your video to the desktop first and then drag it to upload to the YouTube platform.
Part 4: Upload Videos to YouTube with the Best Alternative to iMovie - Wondershare Filmora
“What can I use instead of iMovie to overcome its limitations?”
When you see that iMovie is not uploading to YouTube or iMovie upload to YouTube got stuck, go for a better alternative. In this section, we’d like to recommend Wondershare Filmora that offers the best export settings compared to iMovie. It is the go-to solution if you can’t upload video from iMovie to YouTube directly. Filmora further provides intuitive editing tools that professionally make your YouTube video projects.
Export Key Aspects of Wondershare Filmora in comparison to iMovie:
- It offers a long list of export resolutions to choose from.
- You get separate video and audio settings such as Encoder, Channel, Frame Rate, Bit Rate, Resolution, etc.
- It is further compatible with export to various devices including the iPhone, Samsung, iPod, Apple TV, iPad, Google Pixel, PSP, Smart TV, etc.
Step-by-Step Guide on how to upload a video from iMovie to YouTube via Wondershare Filmora
Step 1: Click the Export button and select resolution
After your project in Wondershare Filmora is over, click the Export tab and select video resolution from the Local tab, as shown below.
It has a list of formats. You can also edit the Name and saving location here.
Step 2: Select Quality
Select the Settings button and choose from three quality levels of Best, Better, and Good. You can also adjust video and audio parameters, including the Encoder, Frame Rate, Resolution, Bit Rate, etc.
Step 3: Select platform
Select the YouTube tab, Sign In to your YouTube account, and hit the Export button after modifying the Title and Quality if needed. Also, make sure to check the Enable GPU accelerated video encoding tab.
Select Wondershare Filmora as the ultimate solution even if iMovie upload to YouTube not showing up.
Conclusion
Hopefully, we’ve informed you of the relevant facts on how to upload a video from iMovie to YouTube. We have also examined the number of troubleshooting issues involved in the iMovie video editor. Well, you will get to face similar kinds of export difficulties in the iMovie editor. Also, the entire procedure to end the exporting task is a bit long in iMovie compared to any other video editing software. Thus, it’s crucial to check out what other alternatives the technological world has today. We can’t state to you a better beginner-friendly yet advanced editing option than Wondershare Filmora that rightly outtakes the iMovie video editor in all aspects.
Liza Brown
Liza Brown is a writer and a lover of all things video.
Follow @Liza Brown
Liza Brown
Aug 18, 2022• Proven solutions
“Is iMovie good for YouTube?”
The iMovie is not only good for YouTube but various other social media platforms. The thing is, you have to compromise with the quality offered by Apple’s video editor iMovie. Well, iMovie is perfect for getting started for beginners. But, the professionals and ones who want a bit high features than basic ones should look elsewhere. Thus, we always recommend alternatives to a particular software for our audience. In this article, there is a mention of Wondershare Filmora to overcome the drawbacks of iMovie.
Without further ado, let’s begin with how to upload a video from iMovie to YouTube. We want to lead with the best iMovie export settings, specific troubleshooting issues, and our alternative intro section to overcome iMovie’s limitations.
Part 1: How to Upload a Video from iMovie to YouTube?
iMovie is ideal for making YouTube videos if you are too basic and are not looking for advanced features. Remember that professionalism pays in these platforms and helps you stand better among others. If you’re still interested in making introductory videos, here is a step-by-step guide on uploading a video to YouTube from iMovie on Mac first and leading with iPhone.
Step-by-Step Tutorial on how to upload a video from iMovie to YouTube on Mac
Step 1: Create a Project
On the first step, go to iMovie on Mac and click the Create New tab below.
Step 2: Import Media
Click the Import Media button and browse the files on your computer, as shown below.
Step 3: Edit Clips
It’s time to edit video footage. Drag your video to the timeline, as shown below.
Then, you can trim and drag the edges of video clips to allow editing.
Step 4: Add Titles
You can add titles by clicking the Title tab and further drag the Title’s template into the timeline.
Step 5: Export the Video
Click the Export button as follows after editing is over.
Select YouTube to upload your video over the platform directly.
Step 6: Save
After selecting the desired platform, click the Next tab to proceed with saving the file.
At last, save your video as shown below.
Step-by-Step Tutorial on how to upload iMovie to YouTube from iPhone
Step 1: Share the iMovie Project
Go to iMovie on your iPhone. Open the iMovie project on your iPhone and tap the Share button to select YouTube. Enter the information of Title, Description, Size, Tags, Privacy, and Location (optional).
Step 2: Upload iMovie Files
For ease of use, you can upload saved videos in Photo Library on your iPhone. Then, you can upload iMovie videos via the YouTube iOS app. Sign In to YouTube and click the Camera icon at the top of the Home page. Select your iPhone Photo Library file and set the video Title, Description, Size, Tags, and Privacy. Then, hit the Upload button to confirm.
Part 2: The Best iMovie Export Settings for YouTube Videos
As we all know that iMovie consists of a bit long procedure to export projects. Here are some tips on the best iMovie export settings to avoid an unnecessary headache.
- Set small resolution: Small resolution plays a more significant role, especially while uploading. Thus, you can set the smallest resolution in the Email tab of the Export button.
2. Change Export settings in the File tab: There is a File tab under the Export button. Click it and find various settings that you need to change to get the best export settings for YouTube 2021. Make the Title of the video as small as possible. Set the resolution at 1080P than 4K.
However, it isn’t going to upgrade the resolution if your video is already in the 1080P definition. Now, the last setting that will crazily offer you the best quality and lots of space-saving. You have to select Best (ProRes) in quality settings for this purpose. These settings also take less time to upload to YouTube.
3. Compress is not for speed: Various options you see in the Compresstab are not for speed. They are for how you save the video on a desktop. Thus, always choose the Better Quality tab than Faster.
- Do not export directly to YouTube: iMovie is pretty basic and doesn’t offer great settings to upload your video instantly. You may have to make changes to the uploaded video even if you do this as per our step-by-step guide mentioned above.
Part 3: How to fix the “Failed to Upload to YouTube” Error on iMovie?
The “iMovie to YouTube failed” problem occurs when you directly upload a YouTube video from iMovie. The issue will result if you upload from any third-party uploader. That is why the direct upload doesn’t work, especially in iMovie. You can opt to share your video to the desktop first and then drag it to upload to the YouTube platform.
Part 4: Upload Videos to YouTube with the Best Alternative to iMovie - Wondershare Filmora
“What can I use instead of iMovie to overcome its limitations?”
When you see that iMovie is not uploading to YouTube or iMovie upload to YouTube got stuck, go for a better alternative. In this section, we’d like to recommend Wondershare Filmora that offers the best export settings compared to iMovie. It is the go-to solution if you can’t upload video from iMovie to YouTube directly. Filmora further provides intuitive editing tools that professionally make your YouTube video projects.
Export Key Aspects of Wondershare Filmora in comparison to iMovie:
- It offers a long list of export resolutions to choose from.
- You get separate video and audio settings such as Encoder, Channel, Frame Rate, Bit Rate, Resolution, etc.
- It is further compatible with export to various devices including the iPhone, Samsung, iPod, Apple TV, iPad, Google Pixel, PSP, Smart TV, etc.
Step-by-Step Guide on how to upload a video from iMovie to YouTube via Wondershare Filmora
Step 1: Click the Export button and select resolution
After your project in Wondershare Filmora is over, click the Export tab and select video resolution from the Local tab, as shown below.
It has a list of formats. You can also edit the Name and saving location here.
Step 2: Select Quality
Select the Settings button and choose from three quality levels of Best, Better, and Good. You can also adjust video and audio parameters, including the Encoder, Frame Rate, Resolution, Bit Rate, etc.
Step 3: Select platform
Select the YouTube tab, Sign In to your YouTube account, and hit the Export button after modifying the Title and Quality if needed. Also, make sure to check the Enable GPU accelerated video encoding tab.
Select Wondershare Filmora as the ultimate solution even if iMovie upload to YouTube not showing up.
Conclusion
Hopefully, we’ve informed you of the relevant facts on how to upload a video from iMovie to YouTube. We have also examined the number of troubleshooting issues involved in the iMovie video editor. Well, you will get to face similar kinds of export difficulties in the iMovie editor. Also, the entire procedure to end the exporting task is a bit long in iMovie compared to any other video editing software. Thus, it’s crucial to check out what other alternatives the technological world has today. We can’t state to you a better beginner-friendly yet advanced editing option than Wondershare Filmora that rightly outtakes the iMovie video editor in all aspects.
Liza Brown
Liza Brown is a writer and a lover of all things video.
Follow @Liza Brown
Also read:
- [Updated] Cost-Effective Growth Tactic for YouTube Fanbases
- Channel Name Magic Ideas for Impactful Titles
- A Professional's Playbook to Profitable YouTube Ventures for 2024
- [Updated] Elevate Your Youtube Profitability Anywhere, Anytime
- Dive Into the World of Youtuber Shorts for 2024
- The Essential Guide to Tracking Down Your YouTube Voice
- 2024 Approved Conquering the Fan Base YouTube's Pathway to More Followers
- Charting the Future The Next Gen Youtube Festivals
- Youtube Newbie's Guide to Channels and Cashflow Creation
- Unlocking Your Videos The Pathway to Streamlined CC & Subtitling on YouTube
- Calculating Youtube's AdSense Gains Per Thousand Viewer Income for 2024
- 2024 Approved Captivating Audiences Adopting YouTube Vlogger Charisma
- [Updated] Daily Digital Domination Top 10 YouTube Viewership Ranking
- Unleashing Creativity How to Convert Your Favorite Youtube Videos To Gifs
- 7 Easy Steps for a Subscriber Surge on YouTube
- [New] Copyright Concerns with Recording YouTube Content
- Streaming Made Simple Free Downloader to MP3s Now!
- Make a Lasting Impression - YouTube's Anime-Style Subscribe Buttons in Filmora
- Integrating Shorts for Social Networks
- Screen Spectrum Your Gateway to Gameplay
- A Producer's Roadmap Pioneering High-Quality ASMR Content
- [Updated] 80+ Catchy Cooking Channel Names to Attract More Audience
- Smart Growth Metropolis Balancing Development and Nature
- In 2024, Essential Insights for Crafting YouTube Intros A+B Methods
- [New] 8 Best Free Video Editing Software for YouTube
- In 2024, Complete Investigation Virtual Stars' Journey Explored
- A Quick Tutorial On How To Convert Image To YouTube Thumbnail for 2024
- [New] Elevating Video Experience Non-Youtube Hubs Explained
- In 2024, Apex Producers Blending Photography & Music
- The Artisan's Almanac Makeup, Tools & More on Youtube
- Accelerated Steps to Rearrange YouTube Music Ordering
- Aggregated Compendium of Podcast Publishing Services
- Full Guide to Bypass Infinix Note 30 VIP FRP
- 10 Easy-to-Use FRP Bypass Tools for Unlocking Google Accounts On Infinix Zero 5G 2023 Turbo
- How To Exit Recovery Mode on Apple iPhone 15? | Dr.fone
- Three Solutions to Hard Reset Sony Xperia 5 V? | Dr.fone
- 2024 Approved Trending TikTok Laughter Stars and Sensations
- [Updated] 2024 Approved Crafting a New You on TikTok Bio & Picture Transformation Guide
- How to Share/Fake Location on WhatsApp for Samsung Galaxy F34 5G | Dr.fone
- Remove Xiaomi Lock Screen without Password(Xiaomi )
- 2023 Fix Reappear Disappeared Watch Video Icon
- [Updated] Deciphering Every Element in Discord
- [Updated] 2024 Approved IPhone Tips Remove Watermarks From Downloaded TikTok Videos
- In 2024, MOV File Editing Made Easy Top 10 Free Video Editors
- How To Restore Missing Contacts Files from A05s.
- 5 Ways to Track Nubia Z50 Ultra without App | Dr.fone
- In 2024, A Step-by-Step Guide on Using ADB and Fastboot to Remove FRP Lock from your Nokia C32
- [New] 2024 Approved Inverted Illusions The Art of Rotating Visuals for Social Media Success
- How to Change Google Play Location On Lava Yuva 2 Pro | Dr.fone
- Cellular Network Not Available for Voice Calls On Nokia C12 Pro | Dr.fone
- In 2024, How To Unlock iPhone 12 mini Without Swiping Up? 6 Ways
- New In 2024, Make a Movie on Your Mac Tips and Tricks for Success
- [Updated] Pro-Tips for Streaming & Screening Netflix on Mac for 2024
- Updated Unleash Your Creativity The Best Animation Software for Mac and PC
- In 2024, Venturing Through TikTok’s Anime Landscape Choreographies, Melodic Intrigues and Visual Delights
- [Updated] Top FBX Capture Tools Beyond Traditional Recorders for 2024
- 5 Best Route Generator Apps You Should Try On Vivo Y77t | Dr.fone
- Updated In 2024, Save Time, Save Stress A Quick Guide to FCP Project Management
- [New] Ultimate Screen Recorder Guide – Apeak vs Others for 2024
- In 2024, Mastering Instagram Videos Size and Format Tips
- In 2024, How to Reset Gmail Password on Samsung Galaxy M54 5G Devices
- In 2024, How to Screen Mirroring Samsung Galaxy XCover 7 to PC? | Dr.fone
- Title: "[Updated] Elevate Your Video Impact 20 Essential Thumbnail Fonts"
- Author: Steven
- Created at : 2024-05-25 20:58:23
- Updated at : 2024-05-26 20:58:23
- Link: https://youtube-clips.techidaily.com/updated-elevate-your-video-impact-20-essential-thumbnail-fonts/
- License: This work is licensed under CC BY-NC-SA 4.0.
