
![[Updated] Easy Way to Edit YouTube Videos in iMovie](https://thmb.techidaily.com/15566fd0d6cad9f26c793e08c16498fac2c5b48034aed23a907d05190328dc6a.png)
[Updated] Easy Way to Edit YouTube Videos in iMovie
The Art of Crafting YouTube Content: Expert Tips with iMovie Integration
Easy Way to Edit YouTube Videos in iMovie

Richard Bennett
Mar 27, 2024• Proven solutions
iMovie is the built-in video editor that allows you to combine several video clips. It is available for both Mac and iOS devices. This app was first released in 1999 when it came with the iMac DV model.
With the use of the iMovie, you are able to create movies that include sound effects, menus, transitions, titles, themes, and music, just to name a few. The resulting movie can be saved onto physical media or as a file on the hard drive.
If you are a Mac user, then you can easily edit YouTube videos in iMovie. All you need to do is to follow the simple steps below. In this article, you will learn how to import videos, organize videos, add YouTube titles and add transitions.
Part 1. Steps on Editing YouTube Videos Using iMovie
To edit a video for YouTube with iMovie, you can follow these steps.
Step 1: Import Video Clips into iMovie
If you have recorded the video clips with the use of a videocam, then connect the camera to the Mac and open the app. You can import the videos by manually selecting the clips that will be part of the YouTube video.
Note: If you want to import videos that you have already published on your YouTube channel, then you can download them from the channel, and save them as MP4. However, if the videos were uploaded by other users, then you need to use a video converter, this article will let you know the 8 best video converters to convert video to MP4.
Step 2: Edit the Video Clips
Once you have all the clips that you need, the next step is to edit YouTube videos in iMovie. When you import the clips, you have created an Event in the app. If you want to include a clip in your final video, just drag the file to the project browser, where you can edit the video.

You can also add videos from other Events into the current project. You can select the parts of the video by dragging across the video from the chosen start to stop points. Edit the video until you are satisfied with the results.
Step 3: Enhance the Video
Once you have edited the video, you can then add background music, themes, sound effects, onscreen text, transitions between clips, and photos. The best thing about iMovie is that it comes with a sound effects library. It also allows you to upload audio from your iTunes library, iLife, and GarageBand.
iMovie allows you to add text to any part of the video, whether it is a title screen at the start, credits at the end, and everything in between. Try to enhance the video until you think it is ready to be uploaded to YouTube.
- Add YouTube title : If you want to add a title for YouTube Video, all you need to do is click Title in the toolbar, and then highlight My Movie on the left. From here, enter the title you like.
- Organize videos : You also can rearrange video clips in the timeline. Just drag the video on the timeline to wherever you want.
- Add transitions : If you have more than one video clip, you definitely need transitions between them. Click the Transitions tab, and then select one transition you like. In the end, drag it to stop between two clips.
Step 4: Export and Upload the Video to YouTube

When you edit YouTube videos in iMovie, you have the option to export the video straight to the video streaming website. All you need to do is to click on the Share button found at the top of the screen. Then select YouTube. Add your YouTube account in iMovie by entering your username and password. Then you choose a title, description, and tags for the video.
You can choose the resolution and size of the video that includes HD 720p and HD 1080p, mobile, medium, and large. Click on Publish to upload the video to YouTube. Uploading the video will take several minutes to a couple of hours, depending on the resolution and size of the video.
Part 2. A Better Choice to Edit YouTube Videos
There’s a better way to edit YouTube videos. It involves the use of Wondershare Filmora . It is user-friendly and allows beginners to make videos professional-looking videos.


This software has more than 300 video effects for family, weddings, love, and travel, etc. You can also add animated captions to photos that will help tell the story. It comes with an array of intro and credit templates that will enhance your video.
Lastly, you can easily share the resulting movie on YouTube, DVD, other devices, and a lot more.
Richard Bennett
Richard Bennett is a writer and a lover of all things video.
Follow @Richard Bennett
Richard Bennett
Mar 27, 2024• Proven solutions
iMovie is the built-in video editor that allows you to combine several video clips. It is available for both Mac and iOS devices. This app was first released in 1999 when it came with the iMac DV model.
With the use of the iMovie, you are able to create movies that include sound effects, menus, transitions, titles, themes, and music, just to name a few. The resulting movie can be saved onto physical media or as a file on the hard drive.
If you are a Mac user, then you can easily edit YouTube videos in iMovie. All you need to do is to follow the simple steps below. In this article, you will learn how to import videos, organize videos, add YouTube titles and add transitions.
Part 1. Steps on Editing YouTube Videos Using iMovie
To edit a video for YouTube with iMovie, you can follow these steps.
Step 1: Import Video Clips into iMovie
If you have recorded the video clips with the use of a videocam, then connect the camera to the Mac and open the app. You can import the videos by manually selecting the clips that will be part of the YouTube video.
Note: If you want to import videos that you have already published on your YouTube channel, then you can download them from the channel, and save them as MP4. However, if the videos were uploaded by other users, then you need to use a video converter, this article will let you know the 8 best video converters to convert video to MP4.
Step 2: Edit the Video Clips
Once you have all the clips that you need, the next step is to edit YouTube videos in iMovie. When you import the clips, you have created an Event in the app. If you want to include a clip in your final video, just drag the file to the project browser, where you can edit the video.
You can also add videos from other Events into the current project. You can select the parts of the video by dragging across the video from the chosen start to stop points. Edit the video until you are satisfied with the results.
Step 3: Enhance the Video
Once you have edited the video, you can then add background music, themes, sound effects, onscreen text, transitions between clips, and photos. The best thing about iMovie is that it comes with a sound effects library. It also allows you to upload audio from your iTunes library, iLife, and GarageBand.
iMovie allows you to add text to any part of the video, whether it is a title screen at the start, credits at the end, and everything in between. Try to enhance the video until you think it is ready to be uploaded to YouTube.
- Add YouTube title : If you want to add a title for YouTube Video, all you need to do is click Title in the toolbar, and then highlight My Movie on the left. From here, enter the title you like.
- Organize videos : You also can rearrange video clips in the timeline. Just drag the video on the timeline to wherever you want.
- Add transitions : If you have more than one video clip, you definitely need transitions between them. Click the Transitions tab, and then select one transition you like. In the end, drag it to stop between two clips.
Step 4: Export and Upload the Video to YouTube
When you edit YouTube videos in iMovie, you have the option to export the video straight to the video streaming website. All you need to do is to click on the Share button found at the top of the screen. Then select YouTube. Add your YouTube account in iMovie by entering your username and password. Then you choose a title, description, and tags for the video.
You can choose the resolution and size of the video that includes HD 720p and HD 1080p, mobile, medium, and large. Click on Publish to upload the video to YouTube. Uploading the video will take several minutes to a couple of hours, depending on the resolution and size of the video.
Part 2. A Better Choice to Edit YouTube Videos
There’s a better way to edit YouTube videos. It involves the use of Wondershare Filmora . It is user-friendly and allows beginners to make videos professional-looking videos.
This software has more than 300 video effects for family, weddings, love, and travel, etc. You can also add animated captions to photos that will help tell the story. It comes with an array of intro and credit templates that will enhance your video.
Lastly, you can easily share the resulting movie on YouTube, DVD, other devices, and a lot more.
Richard Bennett
Richard Bennett is a writer and a lover of all things video.
Follow @Richard Bennett
The Art of Patience: Slowing Down Videos on YouTube (51 Chars)
YouTube Slow: How to Slow Down YouTube Videos [3 Ways]
Richard Bennett
Mar 27, 2024• Proven solutions
Have you ever wanted to learn something from a YouTube video, but found that the video is too fast? If you are wondering how to slow down YouTube videos, then you’re in the right place. Well, there are different ways to slow down YouTube videos and in this article, we will show you how to slow down the YouTube videos with 3 most effective ways: slow down the YouTube videos by changing playback video speed at playback, slow down YouTube video using YouTube’s Video Editor tools or change YouTube video speed to slow down or speed up with Wondershare Filmora video editor .
- Part 1: How to Play YouTube Videos in Slow Motion
- Part 2: Add Slow Motion with Wondershare Filmora (originally Wondershare Video Editor)
- Part 3: Add Slow Motion with YouTube Video Editor
Part 1: YouTube Slow Down: How to Play YouTube Videos in Slow Motion
While, you can now change the speed of any YouTube videos easily and watch YouTube videos in slow motion in a few steps. Below is how to slow down YouTube Videos:
- Open the video in YouTube
- Click the Settings icon on the bottom right and then you will see Autoplay, Annotations, Speed, Subtitles, and Quality options. By default, the speed is set to Normal. Click Speed and open the speed change options. The speed options are in multiples.
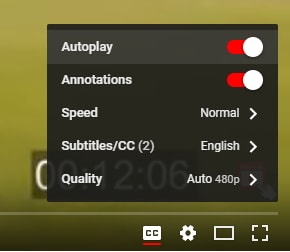
- Choose the target video speed from 0.25x, 0.5x, 0.75x to slow down the play back speed of the YouTube video. You can also select 1.25x, 1.5x, 1.75x or 2x to fast forward this YouTube video depending on how fast or slow you want the playback of the YouTube video to be.
- That’s it how to make a YouTube video slow down by changing the playback speed. If you selected 0.5X, you will see the playback speed is half of the original speed. You can now see the YouTube video is played back in a slower speed.
You May Also Like: Take good use of YouTube’s Enhancements feature to improve your video quality.
Besides, watching YouTube videos in slow motion, you can also make a slow motion video and upload to YouTube. The Flash from Zootopia is so impressive and you can see a lot of memes and gifs online about this funny cute sloth. In the following part, we will show you how to make a slow motion YouTube video like the sloth Flash in two ways by adding slow motion effects.
Part 2: Add Slow Motion to YT Videos with Wondershare Filmora video editor [3 Steps]Wondershare Filmora is an easy-to-use yet powerful video editing tool to which let beginners edit their YouTube videos in minutes. It includes every classic video editing functions including adjust playback speed, trim, crop, rotate, split as well as many special editing features like Jump Cut, Mosaic Blur and Tilt Shift. Now let’s see how to add slow motion with this video editing software.
Step 1. Import Video Footage to Filmora Video Editor
First of all, you need to import all your video footage for YouTube videos to Filmora. If you want to slow down a video downloaded from online, like youtube, please make sure there is copyright issue for you to use the video before processing. In case that you want to download YouTube with free youtube downloader, you can try Wondershare Free Youtube Downloader and Video DownloadHelper (Firefox Add-on).
After downloading YouTube videos on hard disk, you can now import it to this YouTube video editor. The downloaded YouTube videos is usually in FLV format, and Filmora has a wide range of support for video formats, which includes FLV as well. You can either click “Import” on the primary windows and select YouTube FLV video file from your computer, or simply drag and drop YouTube FLV file to the User’s Album. Next, drag YouTube video from User’s Album to Timeline for editing.

Step 2. One click to add slow motion to YouTube video
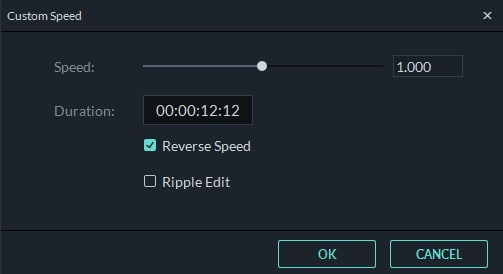
On the Timeline, click on the added YouTube video and select Speed and Duration to open up the video custom speed window. You will see the Speed option, Duration, Reverse Speed and Ripple Edit options. and the speed number indicates fast or slow motion. To slow down the YouTube video, drag the speed slider to left and you get a slow down version of the YouTube video. You can slow down the YouTube video in 0.01x. Click the OK button to save the slow motion settings and then click the Play button in the preview windows to have a look at the new YouTube slow down video. You can also change the duration of the YouTube video to change the YouTube video speed. For example, if you want to slow down a 30-second YouTube video to half speed, you can just enter the duration to 60 seconds to get a slow down motion effect.
With Filmora youtube video editor, you can also add the slow motion effects to some certain clips of the video footage. What you need to do is use the split feature to split the video first. Learn more details about How to Cut / Split / Trim Videos without Quality Loss
Step 3. Export slow down YouTube video
You could continue editing YouTube videos. When all done, click “Export” to save the result. You can save YouTube video in any popular formats on the computer by clicking “Format”. If you want to play YouTube video on iPod, iPhone, iPad, click “Device” and select your device. You can also share the YouTube video up to YouTube or Vimeo directly or burn YouTube video to DVD.

See, with Filmora video editor you can slow down YouTube videos with ease, what’s more, you can also apply reverse effects to play Youtube videos backwards. Download and try this YouTube Slow motion effect and you will master how to slow down YouTube videos.
Related:How to Make Slow/Fast Motion Videos
Part 3: Slow down YouTube videos with Slow Motion in YouTube Video Editor
Updated: From 20th September 2017 users will no longer be able to use the complimentary editing suite. Check the best YouTube video editor alternatives from this complete guide.
If you’ve ever been annoyed by the speed of your user-generated videos on YouTube, try out its own video editor. As YouTube has added a new “slow motion” tool to its YouTube Editor, it does pretty much exactly what it sounds like. Here is a simple guide on how to add slow motion with it.
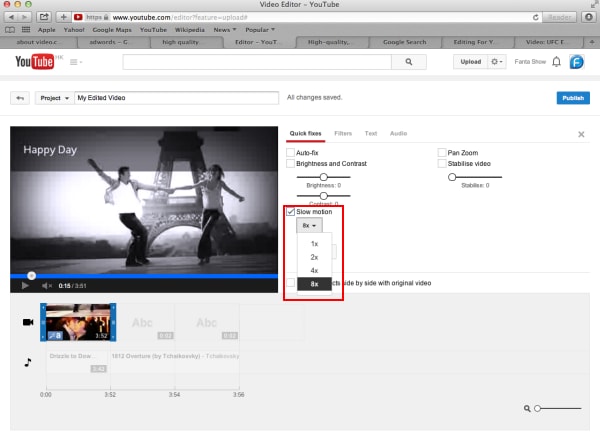
Step 1: Get Access to YouTube Video Editor. You can either go directly to the URL, which is https://www.youtube.com/editor , or click “Upload”>”Edit” to the Video Editor tab.
Step 2: Drag your video on the timeline and double click it. In the pop up window, you will see the “Slow Motion” option. Enable it and then select how slow you want the video to be. This applies the effect to the entire video that you’ve selected.
If you just want to slow down parts of the video, go back to the main editing tab, clip it from the original video using the slicing tool and add the slow-motion effect to that clip only. You can then arrange the different clips you have in the editor to create your final video.
Step 3: Tick the option “Preview effects side-by-side” with original video and then you can see how the original video plays compared to the one you’ve slowed down. If you’re happy with the result, hit “Done” to save the settings.
Conclusion
Above are the 3 ways that you can watch a YouTube video in slow motion, and slow down YouTube videos. You can directly change the playback speed of the YouTube video on Youtube, or download the YouTube video first and then slow down the speed of the YouTube video with some video editing software for YouTube like Filmora. No matter which way you prefer, we hope these information can help you slow down youtube videos.
Richard Bennett
Richard Bennett is a writer and a lover of all things video.
Follow @Richard Bennett
Richard Bennett
Mar 27, 2024• Proven solutions
Have you ever wanted to learn something from a YouTube video, but found that the video is too fast? If you are wondering how to slow down YouTube videos, then you’re in the right place. Well, there are different ways to slow down YouTube videos and in this article, we will show you how to slow down the YouTube videos with 3 most effective ways: slow down the YouTube videos by changing playback video speed at playback, slow down YouTube video using YouTube’s Video Editor tools or change YouTube video speed to slow down or speed up with Wondershare Filmora video editor .
- Part 1: How to Play YouTube Videos in Slow Motion
- Part 2: Add Slow Motion with Wondershare Filmora (originally Wondershare Video Editor)
- Part 3: Add Slow Motion with YouTube Video Editor
Part 1: YouTube Slow Down: How to Play YouTube Videos in Slow Motion
While, you can now change the speed of any YouTube videos easily and watch YouTube videos in slow motion in a few steps. Below is how to slow down YouTube Videos:
- Open the video in YouTube
- Click the Settings icon on the bottom right and then you will see Autoplay, Annotations, Speed, Subtitles, and Quality options. By default, the speed is set to Normal. Click Speed and open the speed change options. The speed options are in multiples.
- Choose the target video speed from 0.25x, 0.5x, 0.75x to slow down the play back speed of the YouTube video. You can also select 1.25x, 1.5x, 1.75x or 2x to fast forward this YouTube video depending on how fast or slow you want the playback of the YouTube video to be.
- That’s it how to make a YouTube video slow down by changing the playback speed. If you selected 0.5X, you will see the playback speed is half of the original speed. You can now see the YouTube video is played back in a slower speed.
You May Also Like: Take good use of YouTube’s Enhancements feature to improve your video quality.
Besides, watching YouTube videos in slow motion, you can also make a slow motion video and upload to YouTube. The Flash from Zootopia is so impressive and you can see a lot of memes and gifs online about this funny cute sloth. In the following part, we will show you how to make a slow motion YouTube video like the sloth Flash in two ways by adding slow motion effects.
Part 2: Add Slow Motion to YT Videos with Wondershare Filmora video editor [3 Steps]Wondershare Filmora is an easy-to-use yet powerful video editing tool to which let beginners edit their YouTube videos in minutes. It includes every classic video editing functions including adjust playback speed, trim, crop, rotate, split as well as many special editing features like Jump Cut, Mosaic Blur and Tilt Shift. Now let’s see how to add slow motion with this video editing software.
Step 1. Import Video Footage to Filmora Video Editor
First of all, you need to import all your video footage for YouTube videos to Filmora. If you want to slow down a video downloaded from online, like youtube, please make sure there is copyright issue for you to use the video before processing. In case that you want to download YouTube with free youtube downloader, you can try Wondershare Free Youtube Downloader and Video DownloadHelper (Firefox Add-on).
After downloading YouTube videos on hard disk, you can now import it to this YouTube video editor. The downloaded YouTube videos is usually in FLV format, and Filmora has a wide range of support for video formats, which includes FLV as well. You can either click “Import” on the primary windows and select YouTube FLV video file from your computer, or simply drag and drop YouTube FLV file to the User’s Album. Next, drag YouTube video from User’s Album to Timeline for editing.
Step 2. One click to add slow motion to YouTube video
On the Timeline, click on the added YouTube video and select Speed and Duration to open up the video custom speed window. You will see the Speed option, Duration, Reverse Speed and Ripple Edit options. and the speed number indicates fast or slow motion. To slow down the YouTube video, drag the speed slider to left and you get a slow down version of the YouTube video. You can slow down the YouTube video in 0.01x. Click the OK button to save the slow motion settings and then click the Play button in the preview windows to have a look at the new YouTube slow down video. You can also change the duration of the YouTube video to change the YouTube video speed. For example, if you want to slow down a 30-second YouTube video to half speed, you can just enter the duration to 60 seconds to get a slow down motion effect.
With Filmora youtube video editor, you can also add the slow motion effects to some certain clips of the video footage. What you need to do is use the split feature to split the video first. Learn more details about How to Cut / Split / Trim Videos without Quality Loss
Step 3. Export slow down YouTube video
You could continue editing YouTube videos. When all done, click “Export” to save the result. You can save YouTube video in any popular formats on the computer by clicking “Format”. If you want to play YouTube video on iPod, iPhone, iPad, click “Device” and select your device. You can also share the YouTube video up to YouTube or Vimeo directly or burn YouTube video to DVD.
See, with Filmora video editor you can slow down YouTube videos with ease, what’s more, you can also apply reverse effects to play Youtube videos backwards. Download and try this YouTube Slow motion effect and you will master how to slow down YouTube videos.
Related:How to Make Slow/Fast Motion Videos
Part 3: Slow down YouTube videos with Slow Motion in YouTube Video Editor
Updated: From 20th September 2017 users will no longer be able to use the complimentary editing suite. Check the best YouTube video editor alternatives from this complete guide.
If you’ve ever been annoyed by the speed of your user-generated videos on YouTube, try out its own video editor. As YouTube has added a new “slow motion” tool to its YouTube Editor, it does pretty much exactly what it sounds like. Here is a simple guide on how to add slow motion with it.
Step 1: Get Access to YouTube Video Editor. You can either go directly to the URL, which is https://www.youtube.com/editor , or click “Upload”>”Edit” to the Video Editor tab.
Step 2: Drag your video on the timeline and double click it. In the pop up window, you will see the “Slow Motion” option. Enable it and then select how slow you want the video to be. This applies the effect to the entire video that you’ve selected.
If you just want to slow down parts of the video, go back to the main editing tab, clip it from the original video using the slicing tool and add the slow-motion effect to that clip only. You can then arrange the different clips you have in the editor to create your final video.
Step 3: Tick the option “Preview effects side-by-side” with original video and then you can see how the original video plays compared to the one you’ve slowed down. If you’re happy with the result, hit “Done” to save the settings.
Conclusion
Above are the 3 ways that you can watch a YouTube video in slow motion, and slow down YouTube videos. You can directly change the playback speed of the YouTube video on Youtube, or download the YouTube video first and then slow down the speed of the YouTube video with some video editing software for YouTube like Filmora. No matter which way you prefer, we hope these information can help you slow down youtube videos.
Richard Bennett
Richard Bennett is a writer and a lover of all things video.
Follow @Richard Bennett
Also read:
- Masterpiece Maker Top Free Editors for Android Devices
- Elevate Your Content Visibility - Discover 6 Thumbnail Designers' Best Tools
- Gain Popularity on YouTube 11 Powerful SEO Techniques for Video Content
- Top 8 YouTube Ranks Expertly Navigating with Key Tools
- Loop & Love Effortless YouTube Video Views on Your TV Screen
- Crafting a Profitable Channel in Your First Youtube Steps for 2024
- Streamlining Video Features YouTube Annotations Guide
- [Updated] Crafting a YouTube Empire 26 Successful Techniques
- Snippet Supremacy Essential Hashes for Accelerated Viewership Growth
- 2024 Approved A Comprehensive Tutorial for YouTube Customization Tools
- Cross-Application Title Guidance YTB to Fb for 2024
- [Updated] Amplifying Your Content Free Techniques to Boost YouTube Views
- Identifying the Most Versatile Cam Top 12 Screen Swivel Gadgets
- 2024 Approved Creating Engaging Stream Content Shorts
- [Updated] Accelerate Channels YouTube's Top Collaborative Growth Tips
- In 2024, Aesthetic Backdrops YouTube Thumbnail Boosters
- [Updated] Co-Create Content to Maximize YouTube Follower Count
- Your Comprehensible Guide to Economical Webinars on YouTube
- [Updated] Deciding on the Best Videography Camera Type DSLR or Mirrorless?
- Break Free From Fee-Free Youtube - Start at 500+ Subscriber Level
- [Updated] Elevate Your YouTube Presence with Masterful Editing Skills
- Eco-Filmmaking Simplified YouTube's Green Screen Wonders for 2024
- 2024 Approved Essential Video Marketing Strategies Top 8 Verified Services
- Verifying Ad Revenue on YT A Step-by-Step Tutorial
- [Updated] Best Microphone for YouTubers
- [Updated] Create Effective YouTube Advertisements on a Budget
- Unveiling Success The Best Tools for YouTube SEO and Keyword Research
- Becoming a Director Top Film Tips & Tricks on YouTube
- [New] Elite 7 DSLR Options Superior for Professional Videography
- Mastering YouTube Engagement Optimal Video Formats Guide
- Unseen YouTube Videos The Meaning of 'Unlisted' Status
- [Updated] Effortless Spotify-to-YouTube Playlist Conversion 5 Must-Have Apps
- [New] Award-Winning Musicians on YouTube You Must See
- [Updated] Direct Download & MP3 Creation for Streaming Video Files
- Elevate Your Game with Immediate, Skilled Valorant Thumbnails
- Escalate Your Channel's Popularity to 1K+ for 2024
- [Updated] Breaking Even on YouTube Key View Figures Explored
- [Updated] Crafting Visual Stories In-Depth PC Editing Techniques for YouTube
- Boosting Your Content Reach with Eye-Catching YouTube Video Thumbnails for 2024
- Easy Replay on iPhone Set Videos Cycling
- In 2024, Become a YouTube Live Expert Strategies and Insights
- [New] Digital Elites 8 The Speedy Video Channels
- [Updated] Enhance Content Reach and Impact - Social Blade's Role in YouTube Analytics
- Paving the Way for YouTube Wealth Reaching a Threshold of 500 Subs
- In 2024, Discovering 2023'S Cinematic Hidden Gems
- [New] Does Rapid Subscription Improve Video Watching?
- 2024 Approved Breakdown of Popular Elements in YouTube Shorts
- 9 Best Phone Monitoring Apps for Tecno Pova 5 | Dr.fone
- In 2024, How To Get the Apple ID Verification Code From iPhone 11 Pro in the Best Ways
- [New] In 2024, From Playtime to Pixels The Ultimate List of 6 Ways to Record Minecraft
- [New] Steps for Accessing Google Meet Video Conferencing
- 9 Best Free Android Monitoring Apps to Monitor Phone Remotely For your Poco M6 5G | Dr.fone
- Revolutionizing Facebook Advertising Through Creative Insight for 2024
- 6 Solutions to Fix Error 505 in Google Play Store on Nokia G22 | Dr.fone
- [Updated] 4 Top-Ranked Ways To Grab Your Chromebook Screen Shot
- What Is an AI Editor? | Wondershare Virbo Glossary
- How to Change your Xiaomi Civi 3 Location on Twitter | Dr.fone
- Y100i Power 5G Unlock Tool - Remove android phone password, PIN, Pattern and fingerprint
- Unlock the Potential of Your FB Cover Image with These Top 11 Websites
- In 2024, How to get the dragon scale and evolution-enabled pokemon On Apple iPhone 12 Pro Max? | Dr.fone
- In 2024, Learn the Step-by-Step Process of Slowing Down Time-Lapse Videos on Your iPhone
- [New] In 2024, Expert Screenshots for Discord Enthusiasts
- How to Bypass FRP on Realme GT Neo 5?
- In 2024, Top 5 Xiaomi Redmi A2 Bypass FRP Tools for PC That Actually Work
- In 2024, Top 10 Android Options Empathy in 3D Gaming
- Possible solutions to restore deleted contacts from Nokia XR21.
- Visual Perfection Ahead Comprehensively Mastering Video Enhancer 2.2
- Updated Mastering Text-to-Speech Essential Conversion Techniques for 2024
- [Updated] In 2024, Tweak Quick Twitter Video Preview
- [Updated] Beyond Samsung Gear 360 Top Alternative Cameras of 2023
- In 2024, What Legendaries Are In Pokemon Platinum On Huawei Nova Y71? | Dr.fone
- Why Your Honor V Purse Screen Might be Unresponsive and How to Fix It | Dr.fone
- Reaper Remixing Rituals Volume Control Chronicles
- Top-Notch Solutions for Disabled Apple ID From Apple iPhone 13 Making It Possible
- How to Reset a Xiaomi Redmi 12 5G Phone that is Locked?
- How to Change Google Play Location On Infinix Note 30 Pro | Dr.fone
- [New] Assessing Different Versions Available for Windows Movie Maker
- [Updated] 2024 Approved Easy Steps to Capture iPhone Screens Seamlessly
- In 2024, How To Do Tecno Phantom V Fold Screen Sharing | Dr.fone
- In 2024, Masterclass Series Incorporating Timekeepers Into Live Production
- New GoPro Video Editing on Mac Tips, Tricks, and Tutorials
- Process of Screen Sharing Vivo Y27 4G to PC- Detailed Steps | Dr.fone
- Title: [Updated] Easy Way to Edit YouTube Videos in iMovie
- Author: Steven
- Created at : 2024-06-19 02:39:10
- Updated at : 2024-06-20 02:39:10
- Link: https://youtube-clips.techidaily.com/updated-easy-way-to-edit-youtube-videos-in-imovie/
- License: This work is licensed under CC BY-NC-SA 4.0.
