![[Updated] Direct Conversion Convert & Upload MP3 Songs on YouTube](https://www.lifewire.com/thmb/qx60cS4CmTRezctL0-71-tWrmCg=/400x300/filters:no_upscale():max_bytes(150000):strip_icc()/MountainLionInstall-570abf063df78c7d9edd5072.jpg)
"[Updated] Direct Conversion Convert & Upload MP3 Songs on YouTube"
Direct Conversion: Convert & Upload MP3 Songs on YouTube
MP3 to YouTube Converter: Upload MP3 to YouTube

Richard Bennett
Mar 27, 2024• Proven solutions
Latest survey shows that Google’s video streaming site Youtube has surpassed radio, as well as CDs to be the most popular way American adolescents listen to music. Almost 91% of the music fans would listen to the samples before they purchase a song on iTunes. “Watching” music is getting more and more popular with Youtube’s arising popularity among music fans.
However, here comes the dilemma if you are trying to share your favorite music list with your friends on Youtube since Youtube is not designed to host files that are purely audio. Only video files are allowed to be uploaded to its server. Despite all this, is there a safe and easy solution to this issue? The answer if absolutely Yes! Wondershare audio converter let you upload an MP3 to Youtube by converting them to videos files first without losing any of its quality, helping you remove the barrier of uploading audio files to Youtube.
With it, you can not only add pictures to your MP3 files but also retouch them with various fantastic effects. Now follow the steps below to check out how to achieve it.


1 Import Files to Audio Converter
Before upload MP3 to YouTube, you can collect the relevant image, album cover or band picture to your music. Then run this MP3 to YouTube converter and choose 16:9 or 4:3 ratio according to your needs. After that, click “Import” to add the MP3 file and the pictures to the program. Then all the imported files will be displayed as thumbnails in the Media library.
2 Add Pictures to MP3 Files
Drag and drop your MP3 file to the music layer, and the picture to the video layer. These will be located under the timeline bar. Then choose the picture and move your mouse to expand the picture exposure time frame exactly as long as your MP3 file. If less, the remaining part will be blacked out, while too long will create silence in the overextended portions of the video.
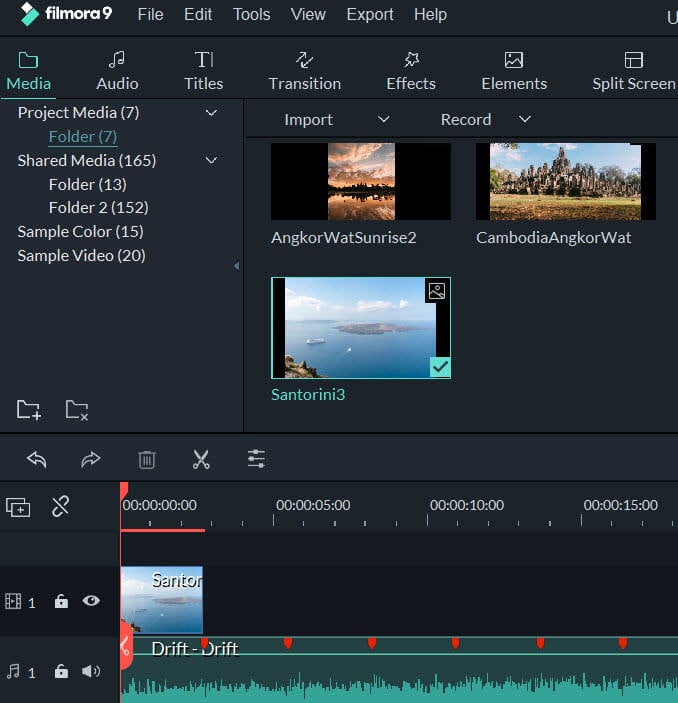
If you want to add and show multiple pictures at a time for a single MP3 file, drag-n-drop them to the PIP layers. This MP3 to YouTube converter supports up to 10 pictures for the same MP3 file. Then adjust the position and size of each picture. You can also do more touch up to your creation. For example, you can right click and choose edit to add motion, mask and more effects as you like.
3 Directly Upload MP3s to YouTube
Watch and check the audio quality of your video. When you are satisfied, click “Create” and switch to the YouTube tab. Enter your YouTube Account, Password and related MP3 information to directly upload your works to YouTube.

Tip:
Besides uploading to YouTube, you can also save your creation to various formats and play on different devices or burn to DVD.
See, it’s easy convert MP3 to YouTube using this powerful video editing tool. Download and have a try now!
Richard Bennett
Richard Bennett is a writer and a lover of all things video.
Follow @Richard Bennett
Richard Bennett
Mar 27, 2024• Proven solutions
Latest survey shows that Google’s video streaming site Youtube has surpassed radio, as well as CDs to be the most popular way American adolescents listen to music. Almost 91% of the music fans would listen to the samples before they purchase a song on iTunes. “Watching” music is getting more and more popular with Youtube’s arising popularity among music fans.
However, here comes the dilemma if you are trying to share your favorite music list with your friends on Youtube since Youtube is not designed to host files that are purely audio. Only video files are allowed to be uploaded to its server. Despite all this, is there a safe and easy solution to this issue? The answer if absolutely Yes! Wondershare audio converter let you upload an MP3 to Youtube by converting them to videos files first without losing any of its quality, helping you remove the barrier of uploading audio files to Youtube.
With it, you can not only add pictures to your MP3 files but also retouch them with various fantastic effects. Now follow the steps below to check out how to achieve it.
1 Import Files to Audio Converter
Before upload MP3 to YouTube, you can collect the relevant image, album cover or band picture to your music. Then run this MP3 to YouTube converter and choose 16:9 or 4:3 ratio according to your needs. After that, click “Import” to add the MP3 file and the pictures to the program. Then all the imported files will be displayed as thumbnails in the Media library.
2 Add Pictures to MP3 Files
Drag and drop your MP3 file to the music layer, and the picture to the video layer. These will be located under the timeline bar. Then choose the picture and move your mouse to expand the picture exposure time frame exactly as long as your MP3 file. If less, the remaining part will be blacked out, while too long will create silence in the overextended portions of the video.
If you want to add and show multiple pictures at a time for a single MP3 file, drag-n-drop them to the PIP layers. This MP3 to YouTube converter supports up to 10 pictures for the same MP3 file. Then adjust the position and size of each picture. You can also do more touch up to your creation. For example, you can right click and choose edit to add motion, mask and more effects as you like.
3 Directly Upload MP3s to YouTube
Watch and check the audio quality of your video. When you are satisfied, click “Create” and switch to the YouTube tab. Enter your YouTube Account, Password and related MP3 information to directly upload your works to YouTube.
Tip:
Besides uploading to YouTube, you can also save your creation to various formats and play on different devices or burn to DVD.
See, it’s easy convert MP3 to YouTube using this powerful video editing tool. Download and have a try now!
Richard Bennett
Richard Bennett is a writer and a lover of all things video.
Follow @Richard Bennett
Anonymous Sharing Simplified: Blurring Techniques for Videos
How to Blur Faces or Objects in YouTube Videos
Richard Bennett
Mar 27, 2024• Proven solutions
Suppose you are interested in preserving the identity of people in your YouTube videos, or you are simply interested in luring out some of the faces of the objects in your YouTube videos to retain filming rights. In that case, you can do it quite easily. With the help of a proper editing application and some online tools, you can very quickly blur out faces or objects from your YouTube videos.
Blur Faces With the Best YouTube Video Editing Software
Wondershare Filmora is one of the best video editing tools for YouTube videos. Through the Filmora editing suite, you can quickly import the video and then go to the power town to blur out faces, distort objects, and more.
Download Mac Version ](https://tools.techidaily.com/wondershare/filmora/download/ )

- You first need to download and install Wondershare Filmora
- Then it is time to load the video you wish to edit
- You can either browse the tape from your computer or drag and drop it
- Once loading is finished, you can drag and drop the video to the Video Timeline
- Afterward, you must target the exact video on the timeline
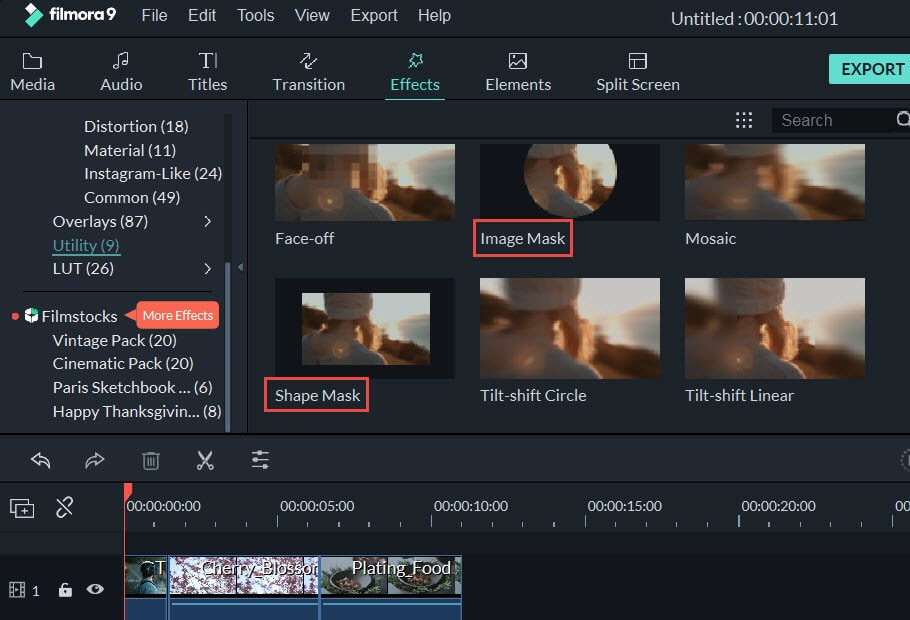
- Right-click and choose the Power Tool available
- A pop-up window will appear, where you must choose Face-Off and then Apply Face Off to the Clip
- The effect you want is the first option you get, or else the mosaic
- By clicking on the mosaic, it will be applied to your video
- Click OK
- Now you must choose Export to save the video
- Please choose the right format and the save option of your choosing (instant post on YouTube, burn the video on CD/DVD or save it on your PC)
If you are recording your tutorial for YouTube or your demonstration videos, you may need to blur or hide the private and sensitive information. Click to check how did I hide the personal info in the video .
How to Blur Faces or Objects in Videos With YouTube Video Editor
YouTube has offered the chance to blur out images, faces, and more since 2012. The face blur tool available on YouTube works quite well.
Here is what you need to do:
- First of all, open YouTube Video Manager
- Click on the Edit button
- Choose the Enhancements
- Click on the Blurring option (it is on the right of your screen)
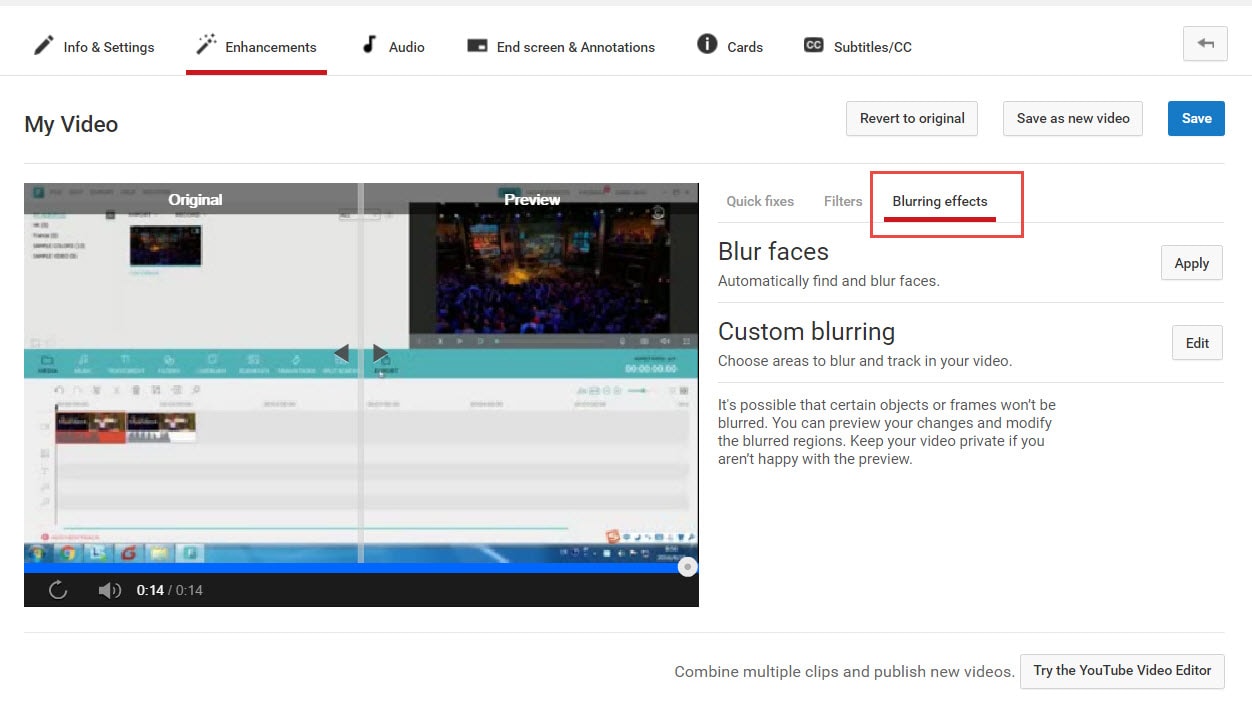
- Click on the Edit button of the Custom blurring option
- This time, a pop-up window will appear
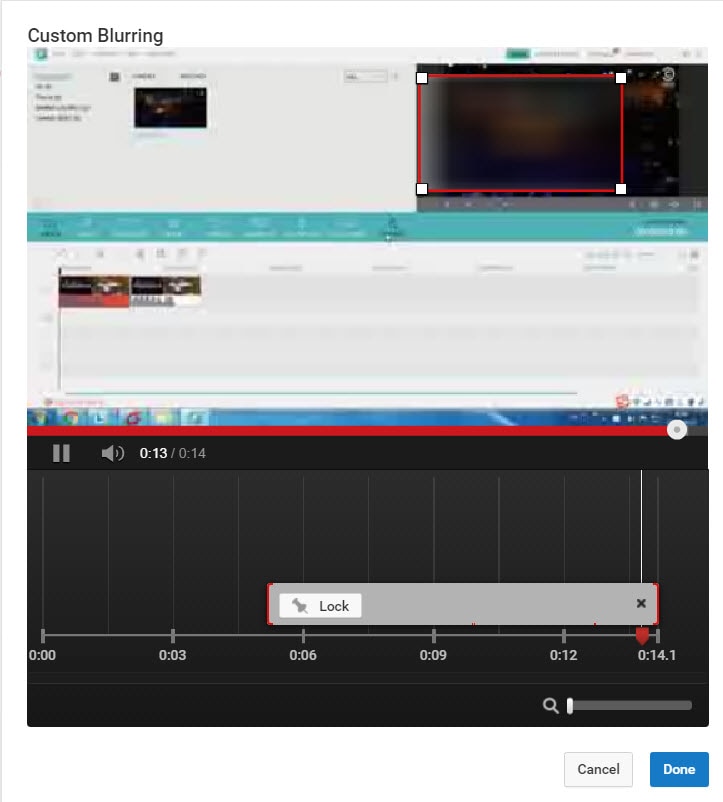
- With the use of click and drag properties, you can create the blurred content
- Click on Done
- Save the video, as per your preferences (Save as new video, revert to the original or overwrite)
Here is a tutorial video for how to blur faces or objects on YouTube:
Richard Bennett
Richard Bennett is a writer and a lover of all things video.
Follow @Richard Bennett
Richard Bennett
Mar 27, 2024• Proven solutions
Suppose you are interested in preserving the identity of people in your YouTube videos, or you are simply interested in luring out some of the faces of the objects in your YouTube videos to retain filming rights. In that case, you can do it quite easily. With the help of a proper editing application and some online tools, you can very quickly blur out faces or objects from your YouTube videos.
Blur Faces With the Best YouTube Video Editing Software
Wondershare Filmora is one of the best video editing tools for YouTube videos. Through the Filmora editing suite, you can quickly import the video and then go to the power town to blur out faces, distort objects, and more.
Download Mac Version ](https://tools.techidaily.com/wondershare/filmora/download/ )
- You first need to download and install Wondershare Filmora
- Then it is time to load the video you wish to edit
- You can either browse the tape from your computer or drag and drop it
- Once loading is finished, you can drag and drop the video to the Video Timeline
- Afterward, you must target the exact video on the timeline
- Right-click and choose the Power Tool available
- A pop-up window will appear, where you must choose Face-Off and then Apply Face Off to the Clip
- The effect you want is the first option you get, or else the mosaic
- By clicking on the mosaic, it will be applied to your video
- Click OK
- Now you must choose Export to save the video
- Please choose the right format and the save option of your choosing (instant post on YouTube, burn the video on CD/DVD or save it on your PC)
If you are recording your tutorial for YouTube or your demonstration videos, you may need to blur or hide the private and sensitive information. Click to check how did I hide the personal info in the video .
How to Blur Faces or Objects in Videos With YouTube Video Editor
YouTube has offered the chance to blur out images, faces, and more since 2012. The face blur tool available on YouTube works quite well.
Here is what you need to do:
- First of all, open YouTube Video Manager
- Click on the Edit button
- Choose the Enhancements
- Click on the Blurring option (it is on the right of your screen)
- Click on the Edit button of the Custom blurring option
- This time, a pop-up window will appear
- With the use of click and drag properties, you can create the blurred content
- Click on Done
- Save the video, as per your preferences (Save as new video, revert to the original or overwrite)
Here is a tutorial video for how to blur faces or objects on YouTube:
Richard Bennett
Richard Bennett is a writer and a lover of all things video.
Follow @Richard Bennett
Also read:
- [New] 2024 Approved Best Practices Apps & Sites - Mastering Photo Framing
- [New] Insightful Update Sony's S6500 HD & BD Player
- [Updated] In 2024, The Ultimate List of Android MOBAs
- [Updated] In-Depth Steps to Document Google's Collaborative Sessions
- [Updated] Step-by-Step Recording Games on Xbox One for 2024
- 2024 Approved Achieving Visual Excellence ASPECT RATIO Mastery on YOUTUBE
- 2024 Approved Dominate the Digital Space YouTube Leadership
- 2024 Approved Elevating Your Channel A Gamers' Blueprint for Success
- 2024 Approved Empowerment in Entertainment Top 10 Inspirational Women
- A Compreranstive Approach to High-Fidelity Recording, No Mic Necessary for 2024
- Chart Your Course to YouTube Success with These Techniques for 2024
- Compact Content Leading 5 Services to Compress Video URLs for 2024
- Content Creation in Today’s Revenue Landscape for 2024
- In 2024, Sketched Snicker-Fits Kapwing Meme Artisan
- Innovative Water World Leading Game Experience Hits
- Precision in Perception Eliminating Background Buzz with Audacitys Tools
- Step-by-Step Solution: Fixing MPOW Microphone Malfunctions in Windows OS
- Title: [Updated] Direct Conversion Convert & Upload MP3 Songs on YouTube
- Author: Steven
- Created at : 2024-11-14 02:45:10
- Updated at : 2024-11-15 07:35:16
- Link: https://youtube-clips.techidaily.com/updated-direct-conversion-convert-and-upload-mp3-songs-on-youtube/
- License: This work is licensed under CC BY-NC-SA 4.0.