![[Updated] Digital Makeup Mastering Youtube's Chromatic Alignment](https://thmb.techidaily.com/d4a38ebeef7fcde8439a2a50391d7bd9b46cb2287710359624ae1485aff3b993.jpg)
"[Updated] Digital Makeup Mastering Youtube's Chromatic Alignment"
Digital Makeup: Mastering Youtube’s Chromatic Alignment
Video Color Correction for YouTube Beauty

Richard Bennett
Mar 27, 2024• Proven solutions
As a YouTube video creator, especially a YouTube beauty, you must know how important video color correction is. In case you want to make your YouTube video look more vibrant or pop out the colors of your video, knowing the basics of video color correction will certainly help you. In this article, we are going to show you how to correct your YouTube videos with 3 different video editing software.
You may also like: Color Correction vs Color Grading >>
Video Color Correction for YouTube Beauty
1. By using Wondershare Filmora
There are multiple professional color correction/grading software options for you to choose like Red Giant Colorista, but, to be honest, they are very difficult to get along with. Wondershare Filmora is an easy to use video editing software available both on Win and Mac which can help you make your video cinematic within a few clicks.
 Download Mac Version ](https://tools.techidaily.com/wondershare/filmora/download/ )
Color correction with Wondershare Filmora
Wondershare Filmora can be used to adjust the color of your video. To do this, select your target video and drag it to the timeline. You will see a video editing window and four parameters i.e. Saturation, brightness, contrast, and hue.

Brightness settings can be used to adjust the overall look of your video. In case your video seems to be too dark or bright, you can take the cursor to the slider and adjust the color manually.
Saturation helps you control how much you want the color of your video pop out. The color can be faded or enhanced through this setting.
Contrast settings help to adjust the difference in color and brightness in different parts of the video.
Color grading with Wondershare Filmora
Hit the button Advanced at the lower corner, then a powerful color grading window will pop up, and you can explore your options.

In this tool, you can adjust the white balance, temperature, tint, and more.
2. By Using Adobe Premiere Pro CC
Adobe Speed Grade is a software intelligently designed to fix all the color issues of your video and helps you make your videos look more stylish. Using it, you can make your video cooler or warmer by adjusting the RGB. It has a temperature slider as well which helps you adjust the overall color of video. The adjustments of highlights, shadows and midtones can also be done for accurate representation of colors in your video. Various trackball and slider controls are available in this software which gives you a large variety of options to experiment with colors of your digital video. Using this software, you can even add different film stock effects which give a traditional film appearance to your video. What else do you need? This software has a lot in store to fit your demands. Go for it!
3. By Using Final Cut Pro
Final Cut Pro lets you adjust your video color with the help of a tool called the Color Board. There are a lot of tools available in The Color section for adjusting the color of your video clip. The first option is of “Balance” which lets you alter the brightness of video. You can also try the option of “Match Color” which lets you match one video clip’s color settings with another. You can be as creative as you want to be by adjusting the brightness, saturation and RGB values of your video with this software. It will not disappoint with the outstanding output.
You may also like: Color grading and correction in Final Cut Pro >>
Richard Bennett
Richard Bennett is a writer and a lover of all things video.
Follow @Richard Bennett
Richard Bennett
Mar 27, 2024• Proven solutions
As a YouTube video creator, especially a YouTube beauty, you must know how important video color correction is. In case you want to make your YouTube video look more vibrant or pop out the colors of your video, knowing the basics of video color correction will certainly help you. In this article, we are going to show you how to correct your YouTube videos with 3 different video editing software.
You may also like: Color Correction vs Color Grading >>
Video Color Correction for YouTube Beauty
1. By using Wondershare Filmora
There are multiple professional color correction/grading software options for you to choose like Red Giant Colorista, but, to be honest, they are very difficult to get along with. Wondershare Filmora is an easy to use video editing software available both on Win and Mac which can help you make your video cinematic within a few clicks.
Download Mac Version ](https://tools.techidaily.com/wondershare/filmora/download/ )
Color correction with Wondershare Filmora
Wondershare Filmora can be used to adjust the color of your video. To do this, select your target video and drag it to the timeline. You will see a video editing window and four parameters i.e. Saturation, brightness, contrast, and hue.
Brightness settings can be used to adjust the overall look of your video. In case your video seems to be too dark or bright, you can take the cursor to the slider and adjust the color manually.
Saturation helps you control how much you want the color of your video pop out. The color can be faded or enhanced through this setting.
Contrast settings help to adjust the difference in color and brightness in different parts of the video.
Color grading with Wondershare Filmora
Hit the button Advanced at the lower corner, then a powerful color grading window will pop up, and you can explore your options.
In this tool, you can adjust the white balance, temperature, tint, and more.
2. By Using Adobe Premiere Pro CC
Adobe Speed Grade is a software intelligently designed to fix all the color issues of your video and helps you make your videos look more stylish. Using it, you can make your video cooler or warmer by adjusting the RGB. It has a temperature slider as well which helps you adjust the overall color of video. The adjustments of highlights, shadows and midtones can also be done for accurate representation of colors in your video. Various trackball and slider controls are available in this software which gives you a large variety of options to experiment with colors of your digital video. Using this software, you can even add different film stock effects which give a traditional film appearance to your video. What else do you need? This software has a lot in store to fit your demands. Go for it!
3. By Using Final Cut Pro
Final Cut Pro lets you adjust your video color with the help of a tool called the Color Board. There are a lot of tools available in The Color section for adjusting the color of your video clip. The first option is of “Balance” which lets you alter the brightness of video. You can also try the option of “Match Color” which lets you match one video clip’s color settings with another. You can be as creative as you want to be by adjusting the brightness, saturation and RGB values of your video with this software. It will not disappoint with the outstanding output.
You may also like: Color grading and correction in Final Cut Pro >>
Richard Bennett
Richard Bennett is a writer and a lover of all things video.
Follow @Richard Bennett
Richard Bennett
Mar 27, 2024• Proven solutions
As a YouTube video creator, especially a YouTube beauty, you must know how important video color correction is. In case you want to make your YouTube video look more vibrant or pop out the colors of your video, knowing the basics of video color correction will certainly help you. In this article, we are going to show you how to correct your YouTube videos with 3 different video editing software.
You may also like: Color Correction vs Color Grading >>
Video Color Correction for YouTube Beauty
1. By using Wondershare Filmora
There are multiple professional color correction/grading software options for you to choose like Red Giant Colorista, but, to be honest, they are very difficult to get along with. Wondershare Filmora is an easy to use video editing software available both on Win and Mac which can help you make your video cinematic within a few clicks.
Download Mac Version ](https://tools.techidaily.com/wondershare/filmora/download/ )
Color correction with Wondershare Filmora
Wondershare Filmora can be used to adjust the color of your video. To do this, select your target video and drag it to the timeline. You will see a video editing window and four parameters i.e. Saturation, brightness, contrast, and hue.
Brightness settings can be used to adjust the overall look of your video. In case your video seems to be too dark or bright, you can take the cursor to the slider and adjust the color manually.
Saturation helps you control how much you want the color of your video pop out. The color can be faded or enhanced through this setting.
Contrast settings help to adjust the difference in color and brightness in different parts of the video.
Color grading with Wondershare Filmora
Hit the button Advanced at the lower corner, then a powerful color grading window will pop up, and you can explore your options.
In this tool, you can adjust the white balance, temperature, tint, and more.
2. By Using Adobe Premiere Pro CC
Adobe Speed Grade is a software intelligently designed to fix all the color issues of your video and helps you make your videos look more stylish. Using it, you can make your video cooler or warmer by adjusting the RGB. It has a temperature slider as well which helps you adjust the overall color of video. The adjustments of highlights, shadows and midtones can also be done for accurate representation of colors in your video. Various trackball and slider controls are available in this software which gives you a large variety of options to experiment with colors of your digital video. Using this software, you can even add different film stock effects which give a traditional film appearance to your video. What else do you need? This software has a lot in store to fit your demands. Go for it!
3. By Using Final Cut Pro
Final Cut Pro lets you adjust your video color with the help of a tool called the Color Board. There are a lot of tools available in The Color section for adjusting the color of your video clip. The first option is of “Balance” which lets you alter the brightness of video. You can also try the option of “Match Color” which lets you match one video clip’s color settings with another. You can be as creative as you want to be by adjusting the brightness, saturation and RGB values of your video with this software. It will not disappoint with the outstanding output.
You may also like: Color grading and correction in Final Cut Pro >>
Richard Bennett
Richard Bennett is a writer and a lover of all things video.
Follow @Richard Bennett
Step by Step Guide: How To Convert YouTube Streaming Into a Free Screencast
How To Record Screencast From YouTube For Free

Max Wales
Mar 27, 2024• Proven solutions
Screencasting is a simple task anyone can do it with ease. All that you need to do is download a software program, press the record button and soon all movements on your device screen video will be recorded. Crazy video gamers do the same thing to share their interesting game videos on YouTube channels.
There is a wide range of software tools that can assists you with screencasting needs. Even YouTube itself has the ability to capture device screens without the need for additional software tool. If you are interested to know how it can be done, simply go through the details below.
Note: We resolutely oppose all forms of copyright-infringing downloads. This tutorial is only for downloading YouTube videos/audio materials from your own channel.
![]()

The All-in-One Screen Recorder & Video Editor
- Record desktop screen, voiceover, and webcam simultaneously
- Edit recorded clips quickly with a wide range of professional tools
- Built-in plentiful templates and effects
- Export to MP4, MOV, MKV, GIF and multiple formats
For Win 7 or later (64-bit)
For macOS 10.12 or later
 Secure Download
Recording Screencast Video with YouTube
Step 1: Open YouTube on your computer and sign by using your Google Account. On the top left corner, you will find the Upload button, press it and go to live streaming section and choose events from the drop-down menu. When you are doing this for the very first time, YouTube will ask your phone number to verify the streaming process. You can also click here to get to the Livestreaming page directly.
Step 2: On the create an event page, add a title for your screencast video; set privacy terms and then hit “Go Live Now” option.

Step 3: The Hangout on Air page will get opened. It will allow you to select-deselect webcam recording as well as mic recording.
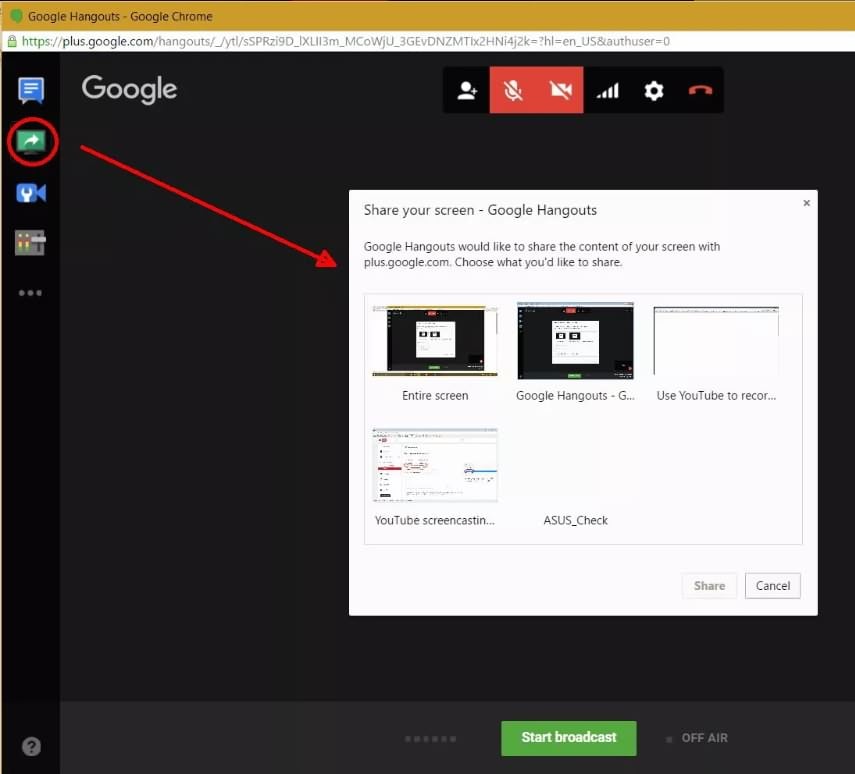
Step 4: Hit the screen share button from the left toolbox and choose the desktop window that you wish to record. Now press start the Broadcast button to start screen recording. Note that it is a private session that cannot be watched by anyone else.
Step 5: When your video is ready to go to YouTube video dashboard and choose your recent screencast video. Download it to Google Drive and share it with the world.
A better way to record Screencast and Upload to YouTube
For those who are interested in capturing screencast with high-quality videos and need an easy to use the built-in editor to customize these videos; it is good to look for some dedicated screencast tools. Experts recommend using Wondershare Filmora due to its advanced features and interactive software platform.

Top Features
- Filmora is one of the most interactive software tools that works perfectly on Windows and Mac platforms.
- It supports more than 50 media file formats.
- Filmora allows users to record with Webcam and PC simultaneously.
- It is possible to record audio from mic input and internal computer audio as well.
- With Filmora users can record high paced videos at 120fps.
- Add markers to important frames during recording.
There are so many benefits of using Filmora for YouTube screencast video recordings. The biggest trouble with YouTube based recording is that when you try it for the very first time, YouTube will take 24 hours to verify your account for the live streaming. But by using Filmora, you can do this task instantly at any hour of the day. Another great news is that Fillmore Scrn comes with a built-in video editor that allows users to customize videos with ease. Once your videos are ready, you can share them directly to social media platforms including YouTube, Facebook, Twitch, and Vimeo etc.
Let’s watch the video below to check how to record your screen with Filmora and upload the recorded video to YouTube.
Conclusion
With all impressive features, there is no doubt to say that Filmora can serve your screencasting needs in the best possible manner. Whether you are a crazy gamer interested to share your adventure videos with the world or want to create useful tutorials for your audience, Filmora is your best companion for all your needs.
Max Wales
Max Wales is a writer and a lover of all things video.
Follow @Max Wales
Max Wales
Mar 27, 2024• Proven solutions
Screencasting is a simple task anyone can do it with ease. All that you need to do is download a software program, press the record button and soon all movements on your device screen video will be recorded. Crazy video gamers do the same thing to share their interesting game videos on YouTube channels.
There is a wide range of software tools that can assists you with screencasting needs. Even YouTube itself has the ability to capture device screens without the need for additional software tool. If you are interested to know how it can be done, simply go through the details below.
Note: We resolutely oppose all forms of copyright-infringing downloads. This tutorial is only for downloading YouTube videos/audio materials from your own channel.
![]()
The All-in-One Screen Recorder & Video Editor
- Record desktop screen, voiceover, and webcam simultaneously
- Edit recorded clips quickly with a wide range of professional tools
- Built-in plentiful templates and effects
- Export to MP4, MOV, MKV, GIF and multiple formats
For Win 7 or later (64-bit)
For macOS 10.12 or later
Secure Download
Recording Screencast Video with YouTube
Step 1: Open YouTube on your computer and sign by using your Google Account. On the top left corner, you will find the Upload button, press it and go to live streaming section and choose events from the drop-down menu. When you are doing this for the very first time, YouTube will ask your phone number to verify the streaming process. You can also click here to get to the Livestreaming page directly.
Step 2: On the create an event page, add a title for your screencast video; set privacy terms and then hit “Go Live Now” option.
Step 3: The Hangout on Air page will get opened. It will allow you to select-deselect webcam recording as well as mic recording.
Step 4: Hit the screen share button from the left toolbox and choose the desktop window that you wish to record. Now press start the Broadcast button to start screen recording. Note that it is a private session that cannot be watched by anyone else.
Step 5: When your video is ready to go to YouTube video dashboard and choose your recent screencast video. Download it to Google Drive and share it with the world.
A better way to record Screencast and Upload to YouTube
For those who are interested in capturing screencast with high-quality videos and need an easy to use the built-in editor to customize these videos; it is good to look for some dedicated screencast tools. Experts recommend using Wondershare Filmora due to its advanced features and interactive software platform.
Top Features
- Filmora is one of the most interactive software tools that works perfectly on Windows and Mac platforms.
- It supports more than 50 media file formats.
- Filmora allows users to record with Webcam and PC simultaneously.
- It is possible to record audio from mic input and internal computer audio as well.
- With Filmora users can record high paced videos at 120fps.
- Add markers to important frames during recording.
There are so many benefits of using Filmora for YouTube screencast video recordings. The biggest trouble with YouTube based recording is that when you try it for the very first time, YouTube will take 24 hours to verify your account for the live streaming. But by using Filmora, you can do this task instantly at any hour of the day. Another great news is that Fillmore Scrn comes with a built-in video editor that allows users to customize videos with ease. Once your videos are ready, you can share them directly to social media platforms including YouTube, Facebook, Twitch, and Vimeo etc.
Let’s watch the video below to check how to record your screen with Filmora and upload the recorded video to YouTube.
Conclusion
With all impressive features, there is no doubt to say that Filmora can serve your screencasting needs in the best possible manner. Whether you are a crazy gamer interested to share your adventure videos with the world or want to create useful tutorials for your audience, Filmora is your best companion for all your needs.
Max Wales
Max Wales is a writer and a lover of all things video.
Follow @Max Wales
Also read:
- [New] Mastering Photopea's Background Erase Technique
- 2024 Approved Clip Weaver Workshop
- 2024 Approved Essential Rules for a Positive YouTube Experience
- 2024 Approved Essential Travel Vloggers The Ultimate 10 List
- 2024 Approved Rediscover Classics at Your Fingertits Pick From The Ultimate 5 GB Emulator List on PC
- 2024 Approved Top 5 YouTube Video Editor Alternatives
- 7 Ways to Unlock a Locked Infinix Note 30 VIP Phone
- Binge Your Way Into Animated Gifs Turning YouTube Content Without Downloads for 2024
- Boosting Your Channel A Guide to Gaining Viewers
- Brand Your Content Download Complimentary Templates for YouTube Makers
- Connect & Conquer: The Simple Way to Sync with Your PS4 Controller
- Restore Your Lost Photographs After Formatting: Two Effective, No-Cost Methods Explored
- The Artisan's Guide to Podcast Scriptwriting (Including Free Samples) for 2024
- Top 5 Sony Xperia 1 V Bypass FRP Tools for PC That Actually Work
- Xbox Wireless Button Tuning Guide (Reverting)
- Title: [Updated] Digital Makeup Mastering Youtube's Chromatic Alignment
- Author: Steven
- Created at : 2024-11-12 19:10:16
- Updated at : 2024-11-14 18:07:54
- Link: https://youtube-clips.techidaily.com/updated-digital-makeup-mastering-youtubes-chromatic-alignment/
- License: This work is licensed under CC BY-NC-SA 4.0.