
!["[Updated] Cutting Through the Clutter How to Stream Top-Notch Upside-Down Content on Youtube"](https://www.lifewire.com/thmb/Dl9yEfjLblLLqaUBxpcE0bOUpF4=/540x405/filters:no_upscale():max_bytes(150000):strip_icc():format(webp)/001_2654847-5b99b903c9e77c005077d0d8.jpg)
"[Updated] Cutting Through the Clutter How to Stream Top-Notch Upside-Down Content on Youtube"
Cutting Through the Clutter: How to Stream Top-Notch Upside-Down Content on Youtube
How to live streaming 360 video to youtube

Richard Bennett
Mar 27, 2024• Proven solutions
- Part1.Stream 360 to Youtube via Ricoh Theta S and OBS on PC
- Part2.Live Stream from Allie 360 Camera to YouTube on Mobile
1. Stream 360 to Youtube via Ricoh Theta S and OBS on PC
Step 1: First of all you need to get ready with your Ricoh Theta S 360 camera unit.
Step 2: Now visit the official website of Theta 360 in order to download your dedicated live streaming application.
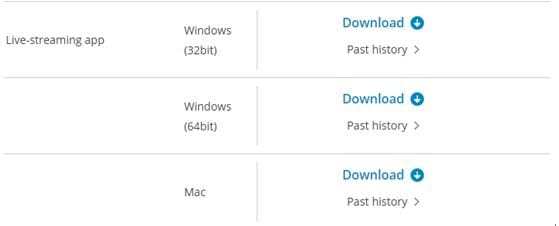
Step 3: Get your application and install it on your Mac or PC as per need.
Step 4: It is time to plug in to your Ricoh Theta S 360 camera using your PC.
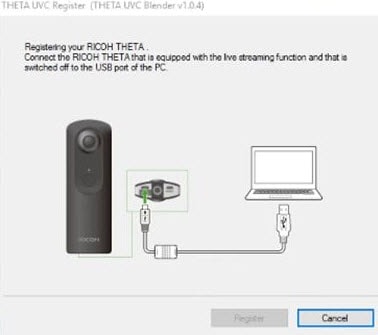
Step 5: Now select your device ‘Ricoh Theta S’ and then hit Okay.
Step 6: You will find option to register to application with your respective device. Select and hit register.
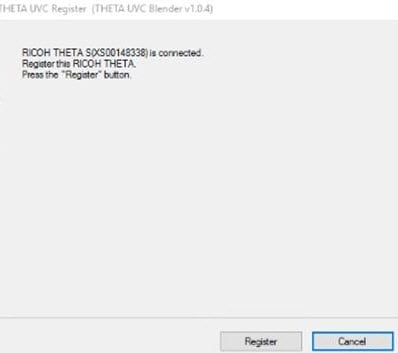
Step 7: As soon as your registration process is complete then un-plug your USB cable.
Step 8: It is time to turn the Ricoh Theta device to Live Mode; you simple need to press the top power and lower video button simultaneously to directly switch to the live mode.
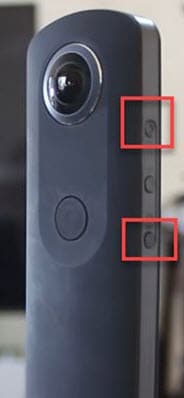
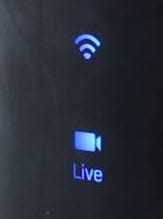
Step 9: Once your device enters into Live Stream mode then a Led will start blinking on your device that represents your device is live at this moment.
Step 10: Now you need to plug in the USB cable again with your computer.
Step 11: Visit the official site of OBS and download your software; install it on your system.
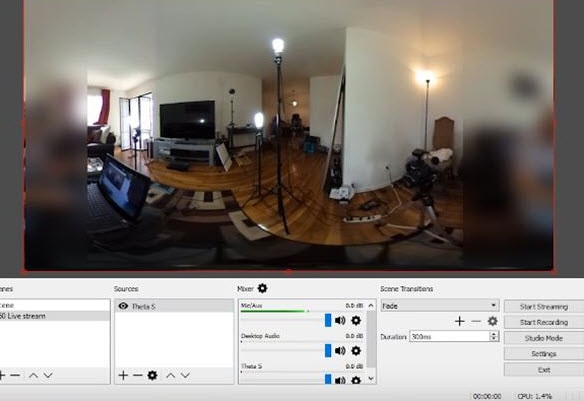
Step 12: Go to create scene option and then switch to create sources.
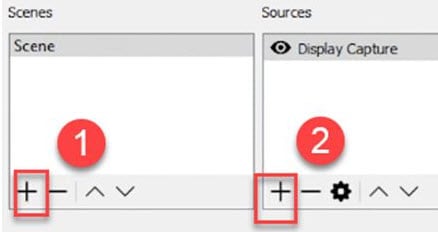
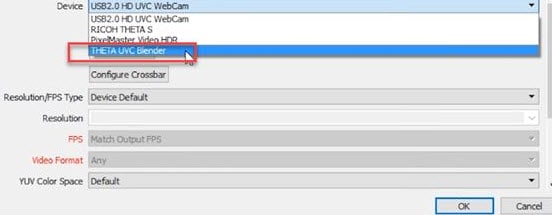
Step 13: Select video capture device as your source from drop down menu.
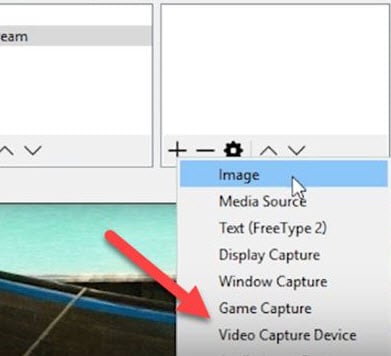
Step 14: Now from available list select Theta UVC as your active video capture source.
Step 15: You need to adjust screen as per your requirements.
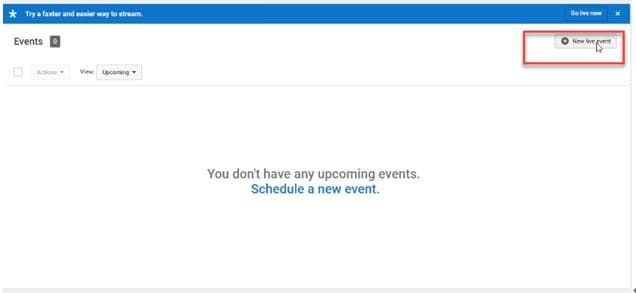
Step 16: Now move to YouTube and then hit New Live Events option.
Step 17: Complete the basic information.
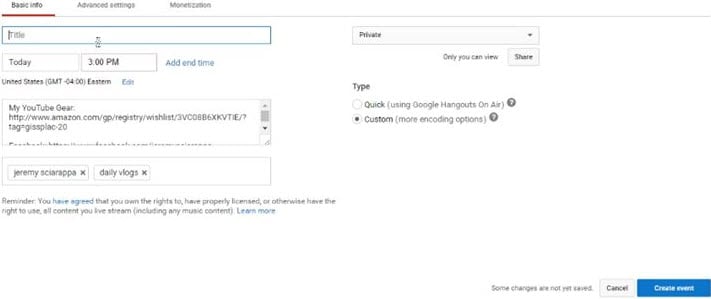
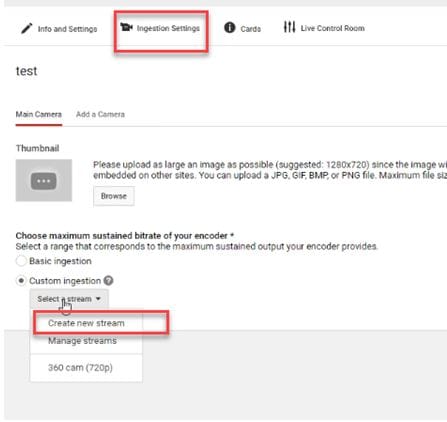
Step 18: You need to move to advanced settings now; select 360 live stream option and then create event.
Step 19: Now complete the ingesting settings and finally select create new stream option.

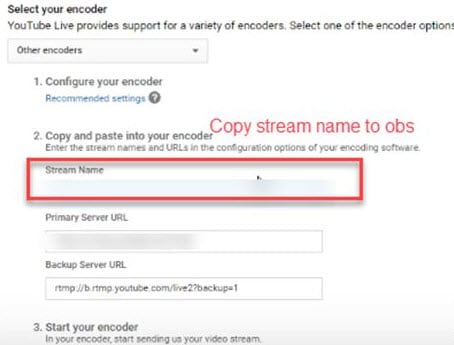
Step 20: As soon as your event is created then you will be able to find your stream name on screen, copy it and simply paste it on OBS window.
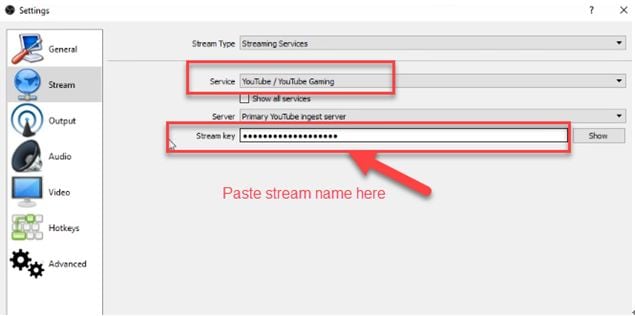
Step 21: It is time to return to OBS settings and then you need to paste that copied name on stream key option.
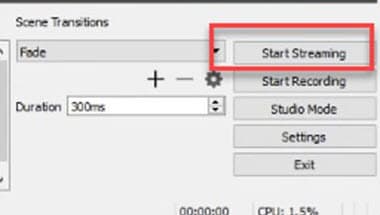
Step 22: Once all above settings are complete then click start stream option from your OBS window and you will soon be able to find your 360 live on YouTube.
2.Live Stream from Allie 360 Camera to YouTube on Mobile
Step 1: Get ready with your Allie 360 camera unit.
Step 2: Visit YouTube and then hit the option to create your live event.
Step 3: It is time to download your Allie Application and then get it installed on your device.
- Prefer to use this link if you are working on iOS: https://itunes.apple.com/app/allie-home/id1063986074
- Android users need to visit: https://play.google.com/store/apps/details?id=com.icrealtime.allie
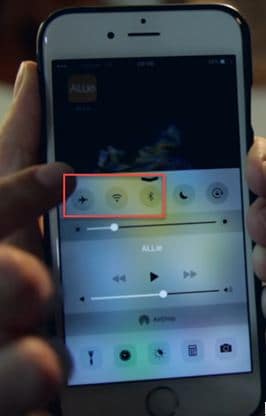
Step 4: As soon as you have downloaded your app then simply turn on the Bluetooth, Wi-Fi and air plane mode on your device.
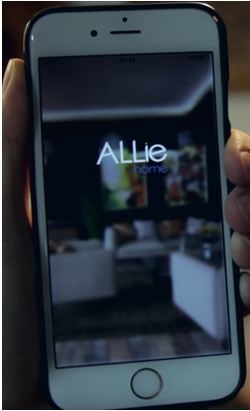
Step 5: Simply open your Allie application and then connect your camera.
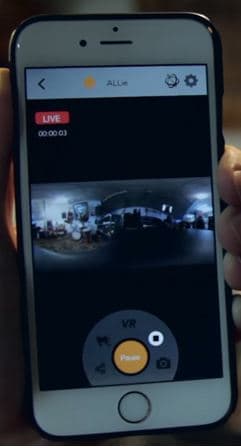
Step 6: Now users need to hit stream icon on screen.
![]()
Step 7: You will be asked to fill the necessary information about your video. It is also possible to make adjustments regarding video quality. Once you are done with all required settings then hit Submit option.

Step 8: Soon your video will become live; note that you can also share your live video via SNS platform with other viewers.
Richard Bennett
Richard Bennett is a writer and a lover of all things video.
Follow @Richard Bennett
Richard Bennett
Mar 27, 2024• Proven solutions
- Part1.Stream 360 to Youtube via Ricoh Theta S and OBS on PC
- Part2.Live Stream from Allie 360 Camera to YouTube on Mobile
1. Stream 360 to Youtube via Ricoh Theta S and OBS on PC
Step 1: First of all you need to get ready with your Ricoh Theta S 360 camera unit.
Step 2: Now visit the official website of Theta 360 in order to download your dedicated live streaming application.
Step 3: Get your application and install it on your Mac or PC as per need.
Step 4: It is time to plug in to your Ricoh Theta S 360 camera using your PC.
Step 5: Now select your device ‘Ricoh Theta S’ and then hit Okay.
Step 6: You will find option to register to application with your respective device. Select and hit register.
Step 7: As soon as your registration process is complete then un-plug your USB cable.
Step 8: It is time to turn the Ricoh Theta device to Live Mode; you simple need to press the top power and lower video button simultaneously to directly switch to the live mode.
Step 9: Once your device enters into Live Stream mode then a Led will start blinking on your device that represents your device is live at this moment.
Step 10: Now you need to plug in the USB cable again with your computer.
Step 11: Visit the official site of OBS and download your software; install it on your system.
Step 12: Go to create scene option and then switch to create sources.
Step 13: Select video capture device as your source from drop down menu.
Step 14: Now from available list select Theta UVC as your active video capture source.
Step 15: You need to adjust screen as per your requirements.
Step 16: Now move to YouTube and then hit New Live Events option.
Step 17: Complete the basic information.
Step 18: You need to move to advanced settings now; select 360 live stream option and then create event.
Step 19: Now complete the ingesting settings and finally select create new stream option.
Step 20: As soon as your event is created then you will be able to find your stream name on screen, copy it and simply paste it on OBS window.
Step 21: It is time to return to OBS settings and then you need to paste that copied name on stream key option.
Step 22: Once all above settings are complete then click start stream option from your OBS window and you will soon be able to find your 360 live on YouTube.
2.Live Stream from Allie 360 Camera to YouTube on Mobile
Step 1: Get ready with your Allie 360 camera unit.
Step 2: Visit YouTube and then hit the option to create your live event.
Step 3: It is time to download your Allie Application and then get it installed on your device.
- Prefer to use this link if you are working on iOS: https://itunes.apple.com/app/allie-home/id1063986074
- Android users need to visit: https://play.google.com/store/apps/details?id=com.icrealtime.allie
Step 4: As soon as you have downloaded your app then simply turn on the Bluetooth, Wi-Fi and air plane mode on your device.
Step 5: Simply open your Allie application and then connect your camera.
Step 6: Now users need to hit stream icon on screen.
![]()
Step 7: You will be asked to fill the necessary information about your video. It is also possible to make adjustments regarding video quality. Once you are done with all required settings then hit Submit option.
Step 8: Soon your video will become live; note that you can also share your live video via SNS platform with other viewers.
Richard Bennett
Richard Bennett is a writer and a lover of all things video.
Follow @Richard Bennett
Lost in the Stream: Reclaiming Deleted YouTube Videos
How to Watch Deleted YouTube Videos Online in 2 Ways | Ultimate Guide
Richard Bennett
Mar 27, 2024• Proven solutions


YouTube features a wide variety of corporate and user-generated content ranging from music to DIY videos. Along with all this massive inflow, there are scenarios where the video content that you like or wanted to watch gets deleted for any reason. Either the uploading channel deleted the video, or YouTube sometimes deletes videos for violating any of the platform’s rules – showing the dismal message “We’re sorry, this video is no longer available”. You’ll be thinking it is probably impossible to access deleted YouTube videos that you wanted to watch so badly. Though it may be true to some extent, in reality, nothing gets deleted from the internet. To help you watch deleted YouTube videos, we’ll dive into the two most handy methods down below. So, let get started.
You might be interested in How to Make a Playlist of Uploaded Videos and Others’ Video on YouTube>>>
- Part 1: Watch Deleted YouTube Videos with a URL
- Part 2: Watch Deleted YouTube Videos without a URL
- Part 3: Bonus Tip—Make Your Own YouTube Video with Wondershare FilmoraX
Part 1: Watch Deleted YouTube Videos with a URL
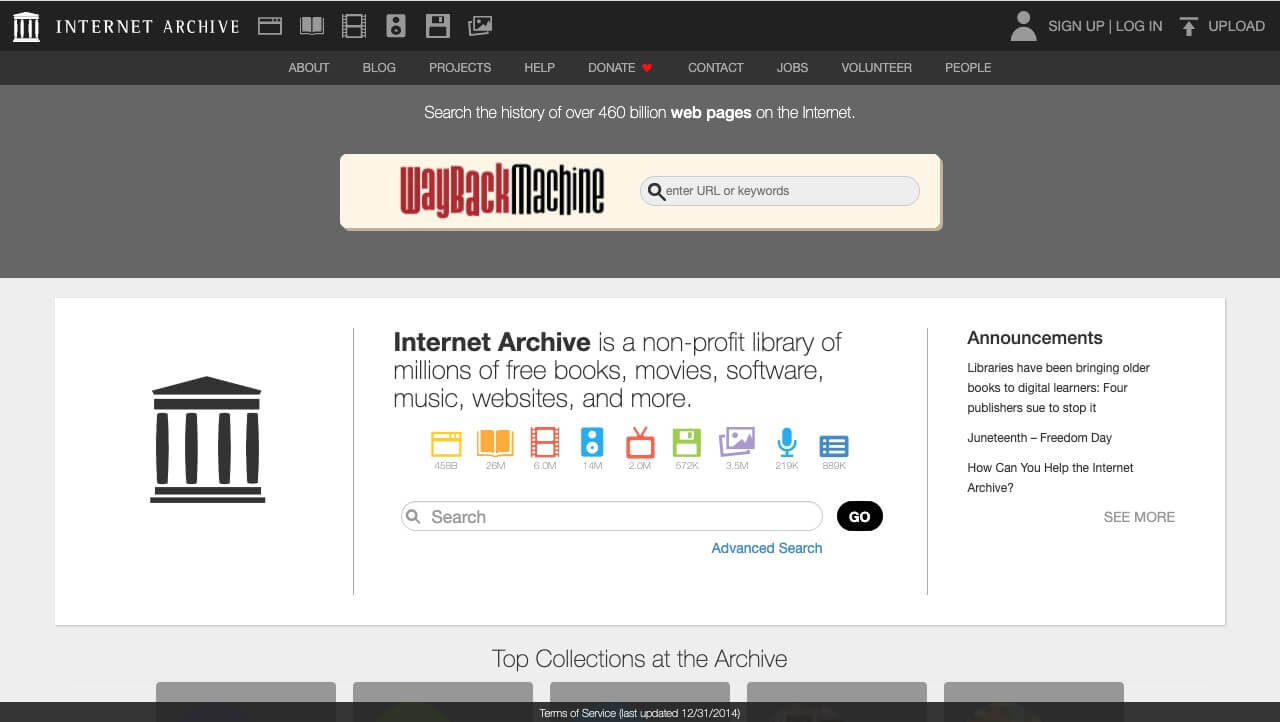
Internet Archive(known as the Wayback Machine) is a website archival system that has been collecting and cataloging websites since 1996. This means the system has effectively saved the site’s current layout and data. This enormous world archive of the Web’s past has amassed over 100 terabytes of storage with around 10 billion web pages.
On the archive.org website, you can find many of your favorite web site’s “snapshot” at a time in the past. For our case, we need to find and watch deleted YouTube videos, so for that, all we need is the link of the video, and we can most probably find it on archive.org. The steps for finding and restoring deleted YouTube videos are simple and as follows.
1. First of all, find the URL in your YouTube email, channel account if you’re searching for your uploaded video. You can find the link in browser history, in YouTube history, or you may have shared the link on social media.
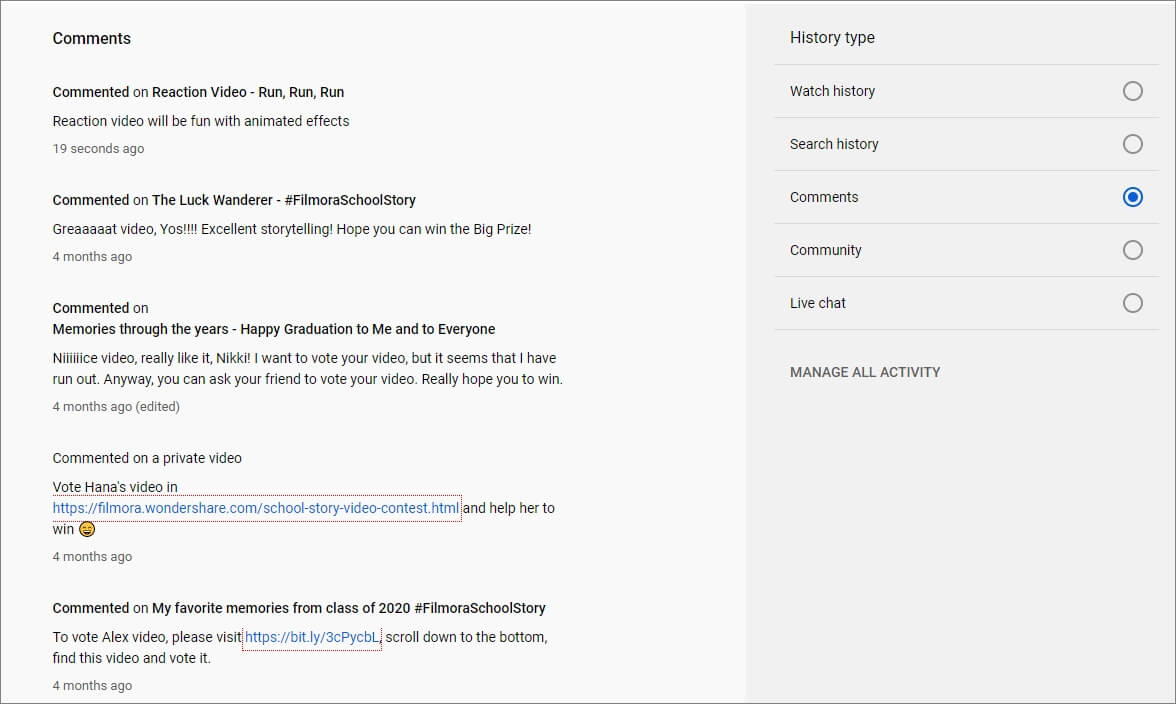
If you want to watch a deleted YouTube video using the Wayback Machine, you must find the link to the video you want to access; without the URL, you won’t be able to access the deleted YouTube video.
2. Head over to the archive.org website and paste the YouTube video URL in the search bar and press return.
3. Once you find your video on the internet archive, you can see the details of the video.
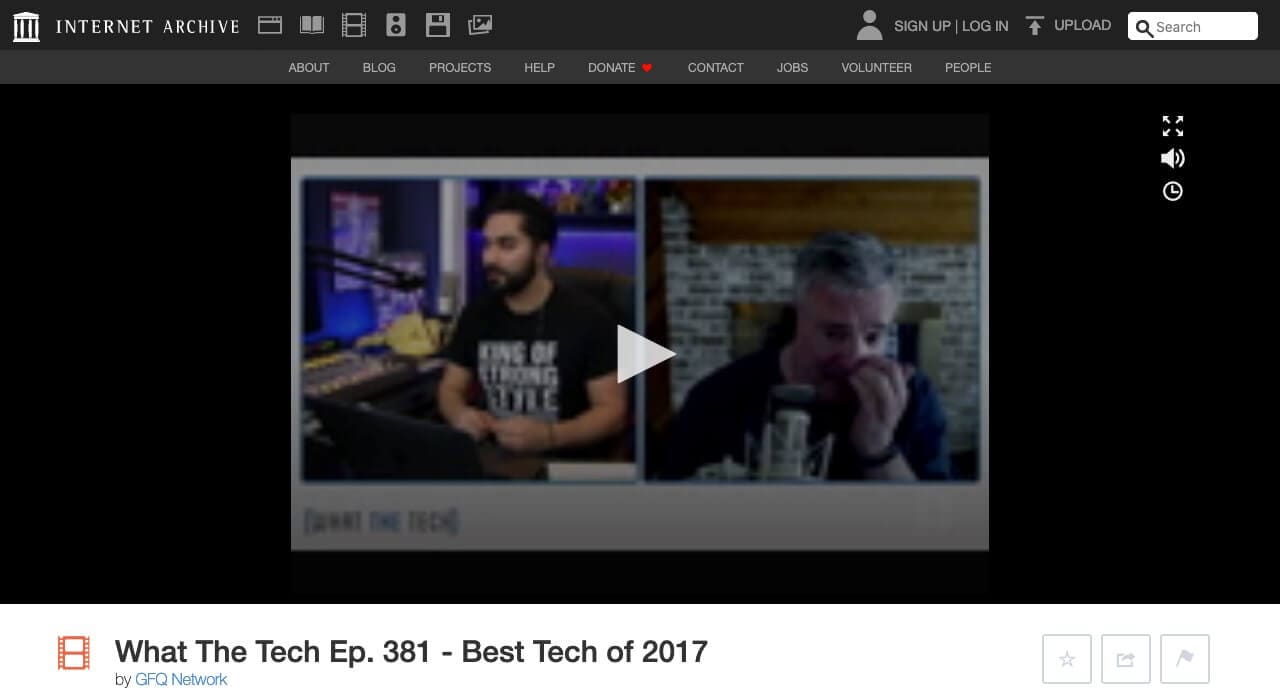
4. You won’t be able to play the video directly, but you should be able to download it. Right, click the video to find the option to download the video.

This method works mostly as the Wayback machine is pretty active and regularly crawls the web to archive the sites. But sometimes, this method may not work and would require a more sophisticated way to watch deleted YouTube videos.
Part 2: Watch Deleted YouTube Videos without a URL
But what if you don’t have a URL for the deleted YouTube video? The internet is a global village network. Everything on the internet is connected, and that connection makes it more useful for example, even though a YouTube video might be deleted, you can somehow access and watch the deleted YouTube videos without a URL because people always replicate videos and share them on other YouTube channels or social media platforms. To make sure you get to watch your favorite YouTube video again, we will dive into the vast internet and find the deleted YouTube videos.
This method can be a bit complicated and would require you to give full attention to find the video you want to watch that badly that you’ve landed on this article.
1. Open a new tab in your browser and go to the Google search bar. We’re going to employ a technique from the SEO expert’s toolbox – Google Search Operators.
2. In the search bar, type “site:www.youtube.com + name Of TheVideo”
3. This way Google will crawl all the name relevant videos only from the YouTube databases and move us closer to finding our deleted YouTube video.
4. If you know the video was shared by someone on Facebook or any other social media platform, you can change the site URL in the search bar, replacing YouTube with Facebook, for example.
5. Once you find the video URL, you can simply go back to the first method that we discussed and paste the URL into the internet archive. The archive will give you the video and you can enjoy watching a deleted YouTube video.
Note: If you still cannot find the video using this method, I’m sorry to tell you the video may be completely deleted from the server, and you cannot access it anymore.
Part 3: Bonus Tip—Make Your Own YouTube Video with Wondershare Filmora
Want to make a YouTube video again? Wondershare Filmora is a relatively lightweight and powerful platform you get an intuitive interface and the power to create wonderful, unique content. To help you make your own YouTube video with Filmora, we’ll go through a short introduction of the flow and features first:
- Organize media with folders and projects
- Cutting and trimming raw footage
- Unlimited Layering
- Visual effects and filters
- Attach/detach audio and music
- Add creative text and icons with a wide range of templates to choose from
- Advanced color correction tools
- Export videos to YouTube directly and support various output formats
Make a YouTube video with several clicks using Wondershare Filmora:
1. Download and install Wondershare Filmora on your computer by tapping the download wizard below. Remember to join the Wondershare Video Community to connect with other video creators.
2. Launch Wondershare Filmora, add your videos to the Media Library. And you’ll also be greeted with a sleek and simple interface with controls for everything such as transitions, titles, layering clips, soundtrack, and more.

3. Add your video to the timeline, then go to the Titles tab, and you will see hundreds of titles and text templates. Select the template you love and add it to the video.
4. Then you can also go to the Effects tab and apply astonishing filters to the video
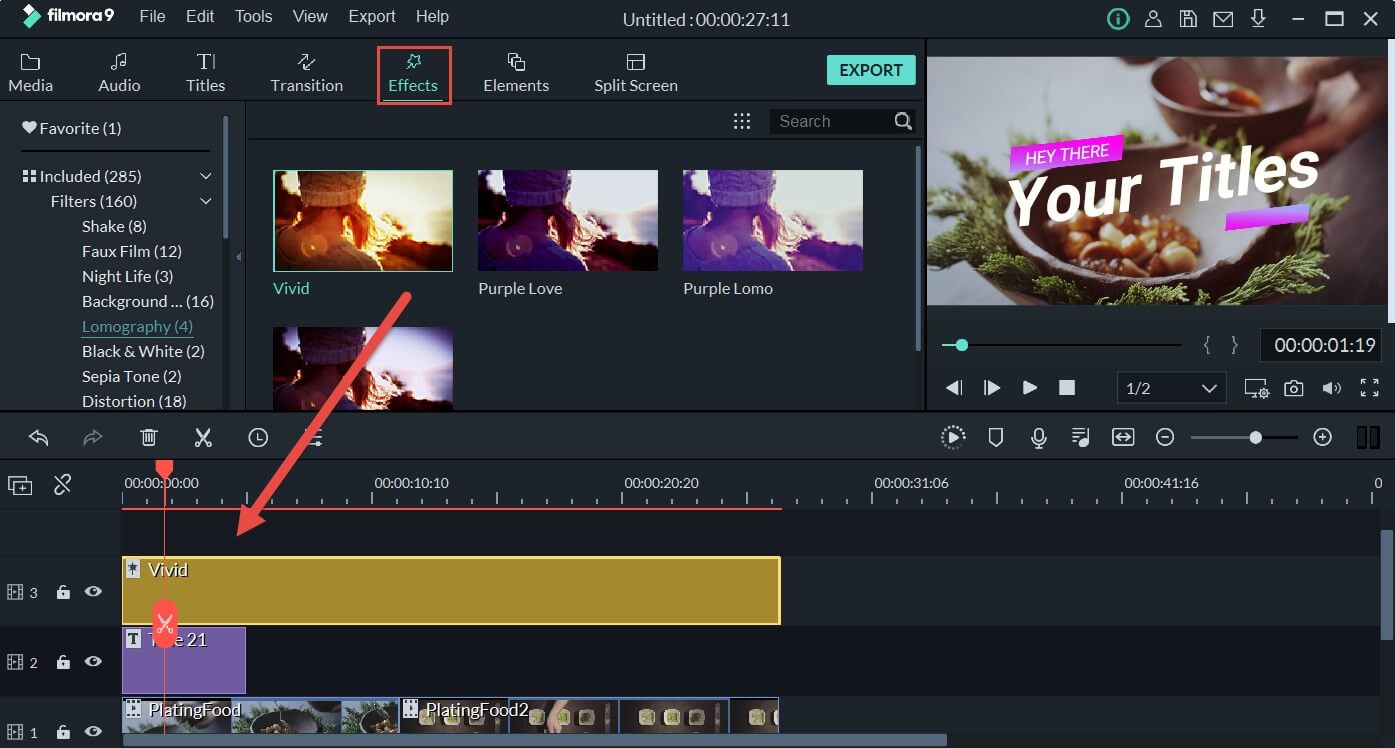
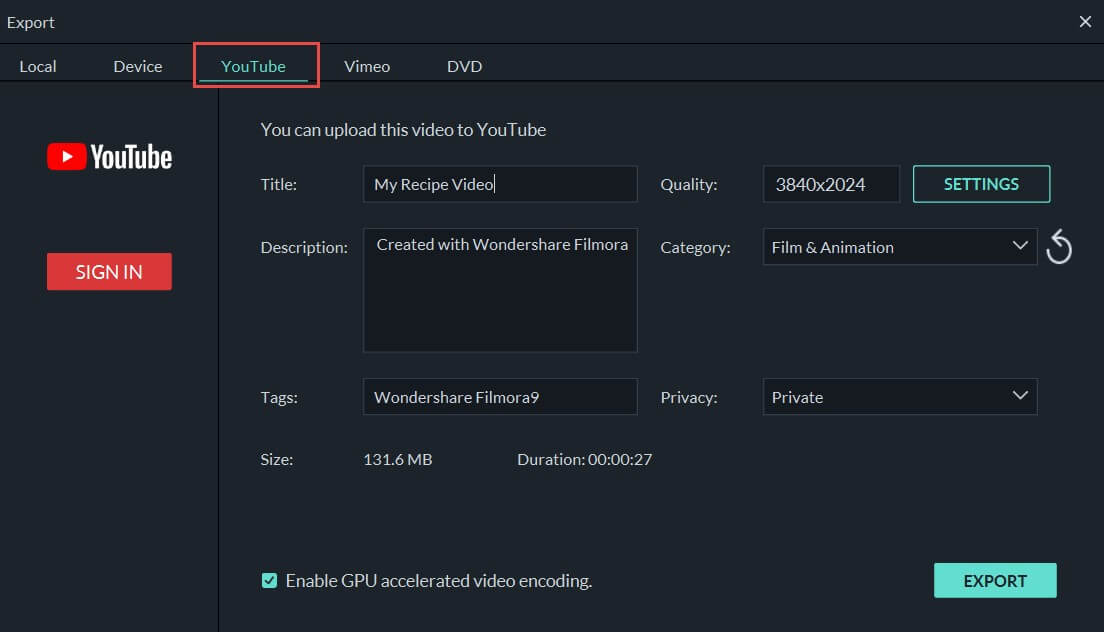
5. Once you’re done, you can click Export and upload your video to YouTube directly.
The free version will have a watermark on the exported video.
There’s nothing more delightful than to put your skills to work and save time by using Filmora. The time you save can be put into making more content and editing videos to boast of your creativity to friends.
Conclusion
YouTube has immersed so much in our day-to-day life that on average a mobile viewing session lasts more than 40 mins. To satiate our thirst for video content, YouTube has become the sole free platform. But even if your favorite song or movie gets deleted, you don’t have to worry as I’ve compiled the best solution to watch deleted YouTube videos and even be able to restore deleted YouTube videos to relish watching them with your friends and family. Leave your comments below if you love this article.
Richard Bennett
Richard Bennett is a writer and a lover of all things video.
Follow @Richard Bennett
Richard Bennett
Mar 27, 2024• Proven solutions
YouTube features a wide variety of corporate and user-generated content ranging from music to DIY videos. Along with all this massive inflow, there are scenarios where the video content that you like or wanted to watch gets deleted for any reason. Either the uploading channel deleted the video, or YouTube sometimes deletes videos for violating any of the platform’s rules – showing the dismal message “We’re sorry, this video is no longer available”. You’ll be thinking it is probably impossible to access deleted YouTube videos that you wanted to watch so badly. Though it may be true to some extent, in reality, nothing gets deleted from the internet. To help you watch deleted YouTube videos, we’ll dive into the two most handy methods down below. So, let get started.
You might be interested in How to Make a Playlist of Uploaded Videos and Others’ Video on YouTube>>>
- Part 1: Watch Deleted YouTube Videos with a URL
- Part 2: Watch Deleted YouTube Videos without a URL
- Part 3: Bonus Tip—Make Your Own YouTube Video with Wondershare FilmoraX
Part 1: Watch Deleted YouTube Videos with a URL
Internet Archive(known as the Wayback Machine) is a website archival system that has been collecting and cataloging websites since 1996. This means the system has effectively saved the site’s current layout and data. This enormous world archive of the Web’s past has amassed over 100 terabytes of storage with around 10 billion web pages.
On the archive.org website, you can find many of your favorite web site’s “snapshot” at a time in the past. For our case, we need to find and watch deleted YouTube videos, so for that, all we need is the link of the video, and we can most probably find it on archive.org. The steps for finding and restoring deleted YouTube videos are simple and as follows.
1. First of all, find the URL in your YouTube email, channel account if you’re searching for your uploaded video. You can find the link in browser history, in YouTube history, or you may have shared the link on social media.
If you want to watch a deleted YouTube video using the Wayback Machine, you must find the link to the video you want to access; without the URL, you won’t be able to access the deleted YouTube video.
2. Head over to the archive.org website and paste the YouTube video URL in the search bar and press return.
3. Once you find your video on the internet archive, you can see the details of the video.
4. You won’t be able to play the video directly, but you should be able to download it. Right, click the video to find the option to download the video.
This method works mostly as the Wayback machine is pretty active and regularly crawls the web to archive the sites. But sometimes, this method may not work and would require a more sophisticated way to watch deleted YouTube videos.
Part 2: Watch Deleted YouTube Videos without a URL
But what if you don’t have a URL for the deleted YouTube video? The internet is a global village network. Everything on the internet is connected, and that connection makes it more useful for example, even though a YouTube video might be deleted, you can somehow access and watch the deleted YouTube videos without a URL because people always replicate videos and share them on other YouTube channels or social media platforms. To make sure you get to watch your favorite YouTube video again, we will dive into the vast internet and find the deleted YouTube videos.
This method can be a bit complicated and would require you to give full attention to find the video you want to watch that badly that you’ve landed on this article.
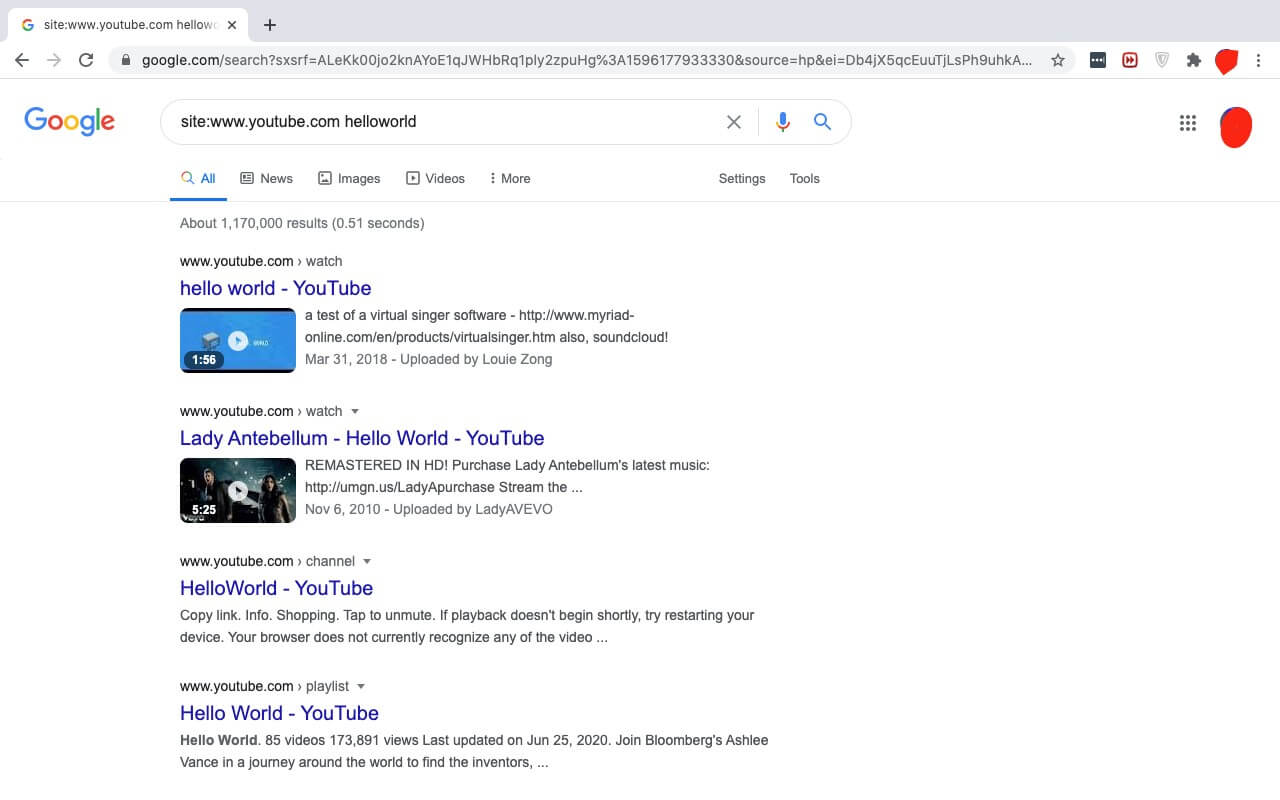
1. Open a new tab in your browser and go to the Google search bar. We’re going to employ a technique from the SEO expert’s toolbox – Google Search Operators.
2. In the search bar, type “site:www.youtube.com + name Of TheVideo”
3. This way Google will crawl all the name relevant videos only from the YouTube databases and move us closer to finding our deleted YouTube video.
4. If you know the video was shared by someone on Facebook or any other social media platform, you can change the site URL in the search bar, replacing YouTube with Facebook, for example.
5. Once you find the video URL, you can simply go back to the first method that we discussed and paste the URL into the internet archive. The archive will give you the video and you can enjoy watching a deleted YouTube video.
Note: If you still cannot find the video using this method, I’m sorry to tell you the video may be completely deleted from the server, and you cannot access it anymore.
Part 3: Bonus Tip—Make Your Own YouTube Video with Wondershare Filmora
Want to make a YouTube video again? Wondershare Filmora is a relatively lightweight and powerful platform you get an intuitive interface and the power to create wonderful, unique content. To help you make your own YouTube video with Filmora, we’ll go through a short introduction of the flow and features first:
- Organize media with folders and projects
- Cutting and trimming raw footage
- Unlimited Layering
- Visual effects and filters
- Attach/detach audio and music
- Add creative text and icons with a wide range of templates to choose from
- Advanced color correction tools
- Export videos to YouTube directly and support various output formats
Make a YouTube video with several clicks using Wondershare Filmora:
1. Download and install Wondershare Filmora on your computer by tapping the download wizard below. Remember to join the Wondershare Video Community to connect with other video creators.
2. Launch Wondershare Filmora, add your videos to the Media Library. And you’ll also be greeted with a sleek and simple interface with controls for everything such as transitions, titles, layering clips, soundtrack, and more.
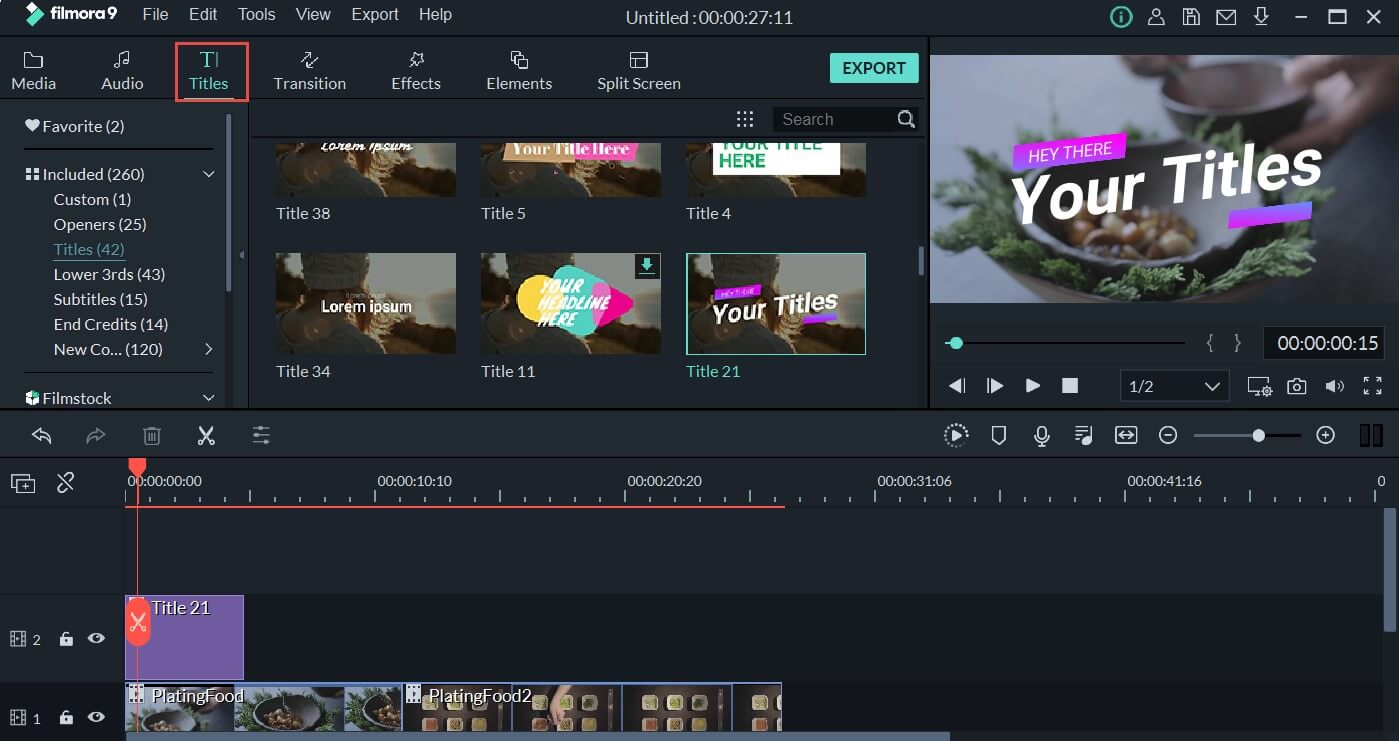
3. Add your video to the timeline, then go to the Titles tab, and you will see hundreds of titles and text templates. Select the template you love and add it to the video.
4. Then you can also go to the Effects tab and apply astonishing filters to the video
5. Once you’re done, you can click Export and upload your video to YouTube directly.
The free version will have a watermark on the exported video.
There’s nothing more delightful than to put your skills to work and save time by using Filmora. The time you save can be put into making more content and editing videos to boast of your creativity to friends.
Conclusion
YouTube has immersed so much in our day-to-day life that on average a mobile viewing session lasts more than 40 mins. To satiate our thirst for video content, YouTube has become the sole free platform. But even if your favorite song or movie gets deleted, you don’t have to worry as I’ve compiled the best solution to watch deleted YouTube videos and even be able to restore deleted YouTube videos to relish watching them with your friends and family. Leave your comments below if you love this article.
Richard Bennett
Richard Bennett is a writer and a lover of all things video.
Follow @Richard Bennett
Richard Bennett
Mar 27, 2024• Proven solutions
YouTube features a wide variety of corporate and user-generated content ranging from music to DIY videos. Along with all this massive inflow, there are scenarios where the video content that you like or wanted to watch gets deleted for any reason. Either the uploading channel deleted the video, or YouTube sometimes deletes videos for violating any of the platform’s rules – showing the dismal message “We’re sorry, this video is no longer available”. You’ll be thinking it is probably impossible to access deleted YouTube videos that you wanted to watch so badly. Though it may be true to some extent, in reality, nothing gets deleted from the internet. To help you watch deleted YouTube videos, we’ll dive into the two most handy methods down below. So, let get started.
You might be interested in How to Make a Playlist of Uploaded Videos and Others’ Video on YouTube>>>
- Part 1: Watch Deleted YouTube Videos with a URL
- Part 2: Watch Deleted YouTube Videos without a URL
- Part 3: Bonus Tip—Make Your Own YouTube Video with Wondershare FilmoraX
Part 1: Watch Deleted YouTube Videos with a URL
Internet Archive(known as the Wayback Machine) is a website archival system that has been collecting and cataloging websites since 1996. This means the system has effectively saved the site’s current layout and data. This enormous world archive of the Web’s past has amassed over 100 terabytes of storage with around 10 billion web pages.
On the archive.org website, you can find many of your favorite web site’s “snapshot” at a time in the past. For our case, we need to find and watch deleted YouTube videos, so for that, all we need is the link of the video, and we can most probably find it on archive.org. The steps for finding and restoring deleted YouTube videos are simple and as follows.
1. First of all, find the URL in your YouTube email, channel account if you’re searching for your uploaded video. You can find the link in browser history, in YouTube history, or you may have shared the link on social media.
If you want to watch a deleted YouTube video using the Wayback Machine, you must find the link to the video you want to access; without the URL, you won’t be able to access the deleted YouTube video.
2. Head over to the archive.org website and paste the YouTube video URL in the search bar and press return.
3. Once you find your video on the internet archive, you can see the details of the video.
4. You won’t be able to play the video directly, but you should be able to download it. Right, click the video to find the option to download the video.
This method works mostly as the Wayback machine is pretty active and regularly crawls the web to archive the sites. But sometimes, this method may not work and would require a more sophisticated way to watch deleted YouTube videos.
Part 2: Watch Deleted YouTube Videos without a URL
But what if you don’t have a URL for the deleted YouTube video? The internet is a global village network. Everything on the internet is connected, and that connection makes it more useful for example, even though a YouTube video might be deleted, you can somehow access and watch the deleted YouTube videos without a URL because people always replicate videos and share them on other YouTube channels or social media platforms. To make sure you get to watch your favorite YouTube video again, we will dive into the vast internet and find the deleted YouTube videos.
This method can be a bit complicated and would require you to give full attention to find the video you want to watch that badly that you’ve landed on this article.
1. Open a new tab in your browser and go to the Google search bar. We’re going to employ a technique from the SEO expert’s toolbox – Google Search Operators.
2. In the search bar, type “site:www.youtube.com + name Of TheVideo”
3. This way Google will crawl all the name relevant videos only from the YouTube databases and move us closer to finding our deleted YouTube video.
4. If you know the video was shared by someone on Facebook or any other social media platform, you can change the site URL in the search bar, replacing YouTube with Facebook, for example.
5. Once you find the video URL, you can simply go back to the first method that we discussed and paste the URL into the internet archive. The archive will give you the video and you can enjoy watching a deleted YouTube video.
Note: If you still cannot find the video using this method, I’m sorry to tell you the video may be completely deleted from the server, and you cannot access it anymore.
Part 3: Bonus Tip—Make Your Own YouTube Video with Wondershare Filmora
Want to make a YouTube video again? Wondershare Filmora is a relatively lightweight and powerful platform you get an intuitive interface and the power to create wonderful, unique content. To help you make your own YouTube video with Filmora, we’ll go through a short introduction of the flow and features first:
- Organize media with folders and projects
- Cutting and trimming raw footage
- Unlimited Layering
- Visual effects and filters
- Attach/detach audio and music
- Add creative text and icons with a wide range of templates to choose from
- Advanced color correction tools
- Export videos to YouTube directly and support various output formats
Make a YouTube video with several clicks using Wondershare Filmora:
1. Download and install Wondershare Filmora on your computer by tapping the download wizard below. Remember to join the Wondershare Video Community to connect with other video creators.
2. Launch Wondershare Filmora, add your videos to the Media Library. And you’ll also be greeted with a sleek and simple interface with controls for everything such as transitions, titles, layering clips, soundtrack, and more.
3. Add your video to the timeline, then go to the Titles tab, and you will see hundreds of titles and text templates. Select the template you love and add it to the video.
4. Then you can also go to the Effects tab and apply astonishing filters to the video
5. Once you’re done, you can click Export and upload your video to YouTube directly.
The free version will have a watermark on the exported video.
There’s nothing more delightful than to put your skills to work and save time by using Filmora. The time you save can be put into making more content and editing videos to boast of your creativity to friends.
Conclusion
YouTube has immersed so much in our day-to-day life that on average a mobile viewing session lasts more than 40 mins. To satiate our thirst for video content, YouTube has become the sole free platform. But even if your favorite song or movie gets deleted, you don’t have to worry as I’ve compiled the best solution to watch deleted YouTube videos and even be able to restore deleted YouTube videos to relish watching them with your friends and family. Leave your comments below if you love this article.
Richard Bennett
Richard Bennett is a writer and a lover of all things video.
Follow @Richard Bennett
Also read:
- Unveiling Purchasing Illegitimate Views Online
- 2024 Approved Boosted Audio-Visual Experience Choose AV1 on YouTube
- Trending Tactics Select Keywords That Ignite Social Media Traffic
- In 2024, Earn While Playing Games Online
- [Updated] Charting the Course of Knowledge Best History YT Channels for Students
- [New] Cutting-Edge Strategies for YouTube Shorts to MP4 Exportation
- Streamline Your Listening Experience Convert Spotify to YouTube with These Tools
- Is Youtube Popularity a Purely Organic Trait?
- A Beginner's Guide to Embedding YouTube Playlists in Code for 2024
- 10 Free YouTube Thumbnail Downloaders/Savers Online-Download YouTube Thumbnail
- In 2024, Award-Winning Musicians on YouTube You Must See
- [New] A Comprehensive List of the Best Video Sites Post-YouTube
- Sites Like FameBit Where You Can Find YouTube Sponsorships for 2024
- In 2024, Easy Paths to Profitable YouTube Business Channels, Top 10 List
- [Updated] Accelerated Steps to Rearrange YouTube Music Ordering
- Unearthing Unique Content for Youtube's Spotlight
- [Updated] Decoding Veiled Content on YouTube
- How to Create YouTube Intros & End Cards - Free and Easy
- [New] Enhance Your Content's Visibility - Peak Days
- Charting a Course to Success Understanding YouTube Income for 2024
- Enhancing Viewer Experience with Immersive 360 Video Content for YouTube for 2024
- [Updated] Charting Success with These Top 15 YouTube Introduction Techniques
- Your Step-by-Step Pathway to Efficient iDevice Video Uploads
- Navigating the Youtube Numbers Views & Earnings Unpacked
- PixelPie Editor
- Unified Platform Dimensions Guide
- Navigating YouTube's Featured Slot A Detailed Explanimation
- The Art of Conveying Excitement Perfecting Your Valorant Video Thumbnails
- In 2024, Digital Broadcast Face-Off FACEbook Vs. YOUTube & TweetStreams
- Mastering the Art of YouTube Micro Clips
- In 2024, Enhance Audio Quality, Get High-Quality FX
- Discover 7 Premium Android AdBlocking Tools for 2024
- Unveiling the Secrets of Successful YouTube Videos
- 2024 Approved DSLR's Place Among Mirrorless Cameras for Videos
- Boredom's Ender The Ultimate List of Jovial YouTube Content
- Video Virtuosity Expertly Attaching Audio to YouTube Videos
- [New] Cross-Platform Comparison IPhone vs Android YouTube Viewing
- In 2024, Efficient Techniques IOS Screenshots and YouTube Content Creation
- The Comprehensive Youtube Monetization Playbook - 2024 Edition
- YouTube Earnings Guide Achieving Profitability Through View Counts
- In 2024, Free Online Movie Creation Top 9 Picks
- Mastering Instagram A Guide to Sharing GIFs in 4 Simple Steps
- In 2024, How to Intercept Text Messages on Apple iPhone SE | Dr.fone
- [Updated] Maximizing Twitter Video Quality Full HD Tips
- 2024 Approved Cashing in on Creativity The Vimeo Income Playbook
- New 2024 Approved Discover the Best Free and Paid Subtitle Editors for Mac
- Updated 2024 Approved Top 10 Windows 10 Photos Replacements You Need to Try
- In 2024, Expert Tips for Capturing Desktop Activity - The Ezvide Way
- [Updated] Step-by-Step Method for Changing TikTok Sounds
- How to Rescue Lost Photos from Realme C51?
- Premiere Picks 5 Highest-Rated Gratis Volume Equalizer Apps for 2024
- Best Free iPhone 6s IMEI Checker
- In 2024, Avoiding Common Pitfalls Crafting Memes on 9GAG Successfully
- How to Bypass FRP on Realme?
- In 2024, Download Your Instagram Masterpieces Easily
- [Updated] Archive of Awe High-Quality GIF Preservation for Tweeters
- [Updated] Comedic Content Coder
- [Updated] In 2024, The Path to Perfect Presence on Zoom Platforms
- 2024 Approved Augmented Gaming Experience The Top 8 List
- Unlock Final Cut Pro at a Steal Explore Education Discounts
- FCPX Masterclass How to Create Visually Stunning Videos
- [New] Social Simulacrum Sculpting Constructing Playful Profiles
- [New] Visionary Designs for Future Mojave Dwellings for 2024
- 2024 Approved How to Edit Videos with Vimeo Create?
- [New] Legitimacy in the Limelight Copyright Verification Before Upload
- [New] 2024 Approved Snap It All! Top 5 Windows 11 Recording Strategies for Gamers
- [Updated] The Definitive Guide to Instagram-to-MP4 Transformation 2 Ways
- In 2024, Top 7 Phone Number Locators To Track Lava Agni 2 5G Location | Dr.fone
- [Updated] 2024 Approved Enjoy Your TikTok Vids as High-Quality MP4s, No Watermark
- How to share/fake gps on Uber for Vivo T2 5G | Dr.fone
- Title: "[Updated] Cutting Through the Clutter How to Stream Top-Notch Upside-Down Content on Youtube"
- Author: Steven
- Created at : 2024-05-25 20:53:23
- Updated at : 2024-05-26 20:53:23
- Link: https://youtube-clips.techidaily.com/updated-cutting-through-the-clutter-how-to-stream-top-notch-upside-down-content-on-youtube/
- License: This work is licensed under CC BY-NC-SA 4.0.
