
!["[Updated] Cut The Cost, Not The Creativity Best Free Editing Tools (Top 9)"](https://www.lifewire.com/thmb/ky9dx6TkOY6aQ-Ch6TfW7sMDBu8=/400x300/filters:no_upscale():max_bytes(150000):strip_icc():format(webp)/best-free-movies-on-youtube-5114491-12-811d37329347405eab1a368e3018dc54.jpg)
"[Updated] Cut The Cost, Not The Creativity Best Free Editing Tools (Top 9)"
Cut The Cost, Not The Creativity: Best Free Editing Tools (Top 9)
9 Best Free and Easy Editing Apps You Should Know

Richard Bennett
Dec 14, 2023• Proven solutions
Have you ever made a video 100% on your phone using a mobile video editing app?
If you’ve just started off on YouTube, there’s a good chance your main camera is the one in your phone. Actually, there’s a good chance of that even if you’ve been making YouTube videos for a while now.
Since you’re shooting videos on your phone, why shouldn’t you edit them there too? Here are 9 free video editing apps you can use for YouTube.
Note: This is not a ranked list. The apps will appear in alphabetical order.
- Adobe Premiere Clip (Android or iOS)
- Cameo (iOS)
- Clips (iOS)
- Filmora (Android or iOS)
- Funimate (Android or iOS)
- iMovie (iOS)
- Movie Maker Filmmaker by Alive (Android or iOS)
- PowerDirector (Android)
- Vlogit (Android or iOS)
Adobe Premiere Clip (Android or iOS )

Key Points:
- Automatic using clips. Times them to music
- Guides you with pop-up tips
- No text/title overlays
- Exports directly to YouTube
Adobe Premiere Pro is a professional-grade desktop editor, and Adobe Premiere Clip lives up to the quality standards set by its big-brother software. It is missing some features you might want for YouTube videos, like title effects, but it does have some bells and whistles. There’s a good selection of filters.

Making changes to your picture, like adjusting the exposure or the prevalence of highlights or shadows, is just a matter of sliding bars. The tools for splitting and duplicating clips are easy to find too. You just toggle between the two icons right above your video – the one that looks like a shutter and the one that looks like adjustment bars – to switch between the picture tools and the other tools.

You cannot add what you might normally think of as a title effect in Adobe Premiere Clip, so it’ll be hard to fully complete your video. You can add text cards to put in-between your video clips, but you can’t overlay the title on top of a clip.
You can share your video directly to YouTube when you export.
Cameo (iOS)

Key Points:
- Easy-to-apply themes
- Customizable titles
- Limited features
- Exports to 4K (if your clips are 4K)
Vimeo is a video sharing site with more of a ‘filmmaker’ focus than YouTube, so it isn’t a surprise that their mobile editing app Cameo can export high-quality 4K videos.
Like some of the other apps on this list, Cameo does not have a huge variety of functions. You can reorder your clips, trim them, add titles, and apply themes (essentially filter and title combos).
There are three icons on the main interface: Scissors, a Music Note, and Filters.
The Scissors will take you to the trimming screen, where you can make your clip shorter or longer.

You can also add a title in the trimming screen, but you will not be able to change the font style or color until you are in the Filter screen.
In the Filter screen (tap the overlapping filters icon on the main interface) you will be able to adjust the color of your text by tapping on the circle with the A in it. Tapping where it says ‘Font’ will change your font style.

You can also tap on Themes and choose a premade style.

Here’s what ‘Crush’ looks like applied:

My font was changed, and there’s also a filter now. In order to apply a filter, you must start with a theme.
Clips (iOS)

Key Points:
- Great selection of stickers
- Lacks some basic tools
- Simple interface
Clips is an intuitive app with a lot of options for decorating your videos. It is lacking in some of the more basic editings features you might expect (i.e. you cannot split clips or do any color correction), but it has a lot of fun features like stickers and emojis that could make up for that depending on your needs.

There are also more traditional effects, like filters and titles. There are a wide range of title options in styles that are popular on YouTube, and a fairly standard filter selection.

While you cannot split clips in this app, but trimming and reordering them is easy. For trimming, you just select the clip and then Trim to open a screen where you can drag the start and end points of the clip.
To rearrange your clips, just tap the clip you want to move and hold down. You’ll be able to drag it to a new location.
It’d be hard to rely on Clips exclusively as your YouTube video editor, but it’s well suited for Instagram or for making quick ‘on-the-go’ videos.
Filmora (Android or iOS)

Key Points:
- Export directly to YouTube
- 16:9 or 1:1 for Instagram
- Includes effects like transitions, filters, and overlays
- End-roll logo
You can make a complete video easily just by tapping and dragging in Filmora, and there are even effects like filters, transitions, and overlays you can add to make your video more polished.
After importing your media into Filmora (you can import videos and photos saved on your phone, or media which has been uploaded to a social media account like Facebook or Instagram) you can change the order of your clips by tapping one, pressing down for a moment, and then dragging your clips where you want them.
Trimming a clip is as simple as tapping on it and then Duration. You’ll get this screen where you can adjust the length easily by dragging the markers to beginning or endpoints.

Cropping and zooming are simple too.

Filmora comes with pre-made themes you can apply which include titles, filters, and other effects. These might not be ideal if you already have branding you like to use for YouTube, but in some situations, they can make video creation a lot faster.

Filmora comes loaded with music, or you can even import your own music from your phone.
Once you’re done, tap ‘save’ in the top right corner of your screen to export your video. From the save screen, you’ll be able to export your video directly to YouTube.

One potential drawback is that Filmora will add its own logo to the end of your exported video. This logo will not distract from your video content since it is added at the end and never overlaps any of your clips, but it still might not be ideal for all creators.
Funimate (Android or iOS )

Key Points:
- Easily add text and shapes
- Rainbow doodling
- Shake effects
- Small ‘Funimate’ watermark in videos from the free version
Funimate is lives up to the ‘fun’ promise in its name. It’s designed mostly for music videos/Musical.ly and while it is missing a lot of more typical editing options, there are a few free tools in Funimate that other apps just don’t have.
For example, there are shake and distortion effects available through Funimate that you usually only find in desktop software.
You can also draw rainbow designs on your video with your finger – no other app on this list can do that.
The text tool in Funimate is easy to use, and there are cool looking glow effects you can apply in the color selection screen. Those options are also available when you’re adding shapes, likes stars and sparkles.
Funimate is not built for typical editing, which is both its strength and its weakness. Trimming your clips is its own stage which you must complete before you start adding effects, and you cannot split clips or add multiple clips.
The free version of Funimate does add a small watermark to your videos in the bottom-right corner, but it is subtle enough that I almost missed it completely while reviewing the app.
iMovie (iOS)

Key Points:
- Trailer templates
- Themes
- Limited tools and resources
iMovie’s mobile app is designed for ease and includes things like ‘trailer templates’ and themes that allow you to make a video quickly and with minimal effort.
This streamlined app is limited in its features. Other apps on this list have left out color correction tools or clip splitting tools and instead loaded up on decorative features like stickers, emojis, and overlays. iMovie has left out these tools and does not have an abundance of decorative features either.
There are filters, themes, and titles, however.
The titles are simple but polished, and you’ll find all the standard types of filters.
The themes include a variety of graphics and are applied to your entire video, not individual clips. You can also apply one filter to your entire video.
iMovie also includes a decent selection of transitions, which you can apply easily by tapping the area between two clips.
Movie Maker Filmmaker by Alive (Android or iOS )

Key Points:
- Good title tool
- Stickers
- Change clip duration
- 16:9 or 1:1
Movie Maker Filmmaker (the app will be labeled ‘Alive’ in on your phone) has a lot of features that will help you put together a fun YouTube video. There’s a great selection of stickers, filters, and overlays and they’re all easy to apply. You just click on what you want and resize/reposition it in the player.

This app is missing a lot of basic editing features, however. You cannot adjust things like brightness or saturation. This won’t be a problem if you’re happy with your clips as-is, but it’s a bit odd to not have those options.
There is a text tool and while it is fairly basic, it is also flexible. There is a good selection of fonts to choose from, and you can also choose whether or not you want a colored background, and if your text should have a shadow.
Once you’ve decided on the look of your text you can drag it, resize it, and tilt it however you want in the preview screen.
A slightly odd feature of this app is that it doesn’t save your video to your phone or export it directly to YouTube. Instead, it saves it – and shares it – within the app and gives you the option of sharing it with YouTube after.
Power Director (Android)

Key Points:
- A timeline like desktop software
- All the basic editing features
- Lots of transitions
- Videos from the free version will be watermarked
The first thing you’ll notice when you open up Power Director is that the interface looks a lot like the interface of a lot of desktop editors with a very classic timeline. This familiarity could make it easy to jump into if you’re used to editing on your laptop.
However, Power Director is a bit less intuitive than most of the other apps on this list. I wouldn’t go so far as to say it’s difficult to use – it isn’t, it’s much easier than a lot of desktop software – but among mobile apps designed for streamlined efficiency it does stand out as being a bit harder to dive into.
That is partly because there’s a lot you can do with it. It has the tools you would expect in an editor. You can split and trim clips, and you have all the standard color tools including some that most mobile apps leave out.
A lot of apps have Brightness, Contrast, and Saturation, but PowerDirector also has Color Temperature and Tint.
In addition to editing tools, PowerDirector has bells and whistles like filters –
- and a ton of great transitions.
One drawback of PowerDirector is that the free version will watermark your videos. This watermark is not intrusive, but it isn’t as subtle as the Funimate one either.
You can export videos from PowerDirector directly to YouTube.
Vlogit (Android or iOS )

Key Points:
- Easy thumbnail maker
- Export directly to YouTube
- Animated stickers
Vlogit is also an app from the creators of the Filmora Video Editor. It isn’t quite as intuitive as Filmora, but the major benefit of Vlogit for YouTube creators is that it was designed with you in mind. It has features like animated stickers, emojis, and a thumbnail maker which were included specifically because YouTubers and vloggers need them.
All the usual adjustments you might want to make, like saturation or sharpness, are easy in Vlogit. So are adjustments to the length or crop of clips.
After you save your video you’ll have the option of creating a thumbnail using a screenshot from your video. You can add a colored border, text, emojis, and more!
Once you’re done, you can export directly to YouTube. Like Filmora, Vlogit does have a post-video logo roll.
Have you ever used a free mobile app to edit one of your YouTube videos? What did you use, and were you happy with the results?
Richard Bennett
Richard Bennett is a writer and a lover of all things video.
Follow @Richard Bennett
Richard Bennett
Dec 14, 2023• Proven solutions
Have you ever made a video 100% on your phone using a mobile video editing app?
If you’ve just started off on YouTube, there’s a good chance your main camera is the one in your phone. Actually, there’s a good chance of that even if you’ve been making YouTube videos for a while now.
Since you’re shooting videos on your phone, why shouldn’t you edit them there too? Here are 9 free video editing apps you can use for YouTube.
Note: This is not a ranked list. The apps will appear in alphabetical order.
- Adobe Premiere Clip (Android or iOS)
- Cameo (iOS)
- Clips (iOS)
- Filmora (Android or iOS)
- Funimate (Android or iOS)
- iMovie (iOS)
- Movie Maker Filmmaker by Alive (Android or iOS)
- PowerDirector (Android)
- Vlogit (Android or iOS)
Adobe Premiere Clip (Android or iOS )
Key Points:
- Automatic using clips. Times them to music
- Guides you with pop-up tips
- No text/title overlays
- Exports directly to YouTube
Adobe Premiere Pro is a professional-grade desktop editor, and Adobe Premiere Clip lives up to the quality standards set by its big-brother software. It is missing some features you might want for YouTube videos, like title effects, but it does have some bells and whistles. There’s a good selection of filters.
Making changes to your picture, like adjusting the exposure or the prevalence of highlights or shadows, is just a matter of sliding bars. The tools for splitting and duplicating clips are easy to find too. You just toggle between the two icons right above your video – the one that looks like a shutter and the one that looks like adjustment bars – to switch between the picture tools and the other tools.
You cannot add what you might normally think of as a title effect in Adobe Premiere Clip, so it’ll be hard to fully complete your video. You can add text cards to put in-between your video clips, but you can’t overlay the title on top of a clip.
You can share your video directly to YouTube when you export.
Cameo (iOS)
Key Points:
- Easy-to-apply themes
- Customizable titles
- Limited features
- Exports to 4K (if your clips are 4K)
Vimeo is a video sharing site with more of a ‘filmmaker’ focus than YouTube, so it isn’t a surprise that their mobile editing app Cameo can export high-quality 4K videos.
Like some of the other apps on this list, Cameo does not have a huge variety of functions. You can reorder your clips, trim them, add titles, and apply themes (essentially filter and title combos).
There are three icons on the main interface: Scissors, a Music Note, and Filters.
The Scissors will take you to the trimming screen, where you can make your clip shorter or longer.
You can also add a title in the trimming screen, but you will not be able to change the font style or color until you are in the Filter screen.
In the Filter screen (tap the overlapping filters icon on the main interface) you will be able to adjust the color of your text by tapping on the circle with the A in it. Tapping where it says ‘Font’ will change your font style.
You can also tap on Themes and choose a premade style.
Here’s what ‘Crush’ looks like applied:
My font was changed, and there’s also a filter now. In order to apply a filter, you must start with a theme.
Clips (iOS)
Key Points:
- Great selection of stickers
- Lacks some basic tools
- Simple interface
Clips is an intuitive app with a lot of options for decorating your videos. It is lacking in some of the more basic editings features you might expect (i.e. you cannot split clips or do any color correction), but it has a lot of fun features like stickers and emojis that could make up for that depending on your needs.
There are also more traditional effects, like filters and titles. There are a wide range of title options in styles that are popular on YouTube, and a fairly standard filter selection.
While you cannot split clips in this app, but trimming and reordering them is easy. For trimming, you just select the clip and then Trim to open a screen where you can drag the start and end points of the clip.
To rearrange your clips, just tap the clip you want to move and hold down. You’ll be able to drag it to a new location.
It’d be hard to rely on Clips exclusively as your YouTube video editor, but it’s well suited for Instagram or for making quick ‘on-the-go’ videos.
Filmora (Android or iOS)
Key Points:
- Export directly to YouTube
- 16:9 or 1:1 for Instagram
- Includes effects like transitions, filters, and overlays
- End-roll logo
You can make a complete video easily just by tapping and dragging in Filmora, and there are even effects like filters, transitions, and overlays you can add to make your video more polished.
After importing your media into Filmora (you can import videos and photos saved on your phone, or media which has been uploaded to a social media account like Facebook or Instagram) you can change the order of your clips by tapping one, pressing down for a moment, and then dragging your clips where you want them.
Trimming a clip is as simple as tapping on it and then Duration. You’ll get this screen where you can adjust the length easily by dragging the markers to beginning or endpoints.
Cropping and zooming are simple too.
Filmora comes with pre-made themes you can apply which include titles, filters, and other effects. These might not be ideal if you already have branding you like to use for YouTube, but in some situations, they can make video creation a lot faster.
Filmora comes loaded with music, or you can even import your own music from your phone.
Once you’re done, tap ‘save’ in the top right corner of your screen to export your video. From the save screen, you’ll be able to export your video directly to YouTube.
One potential drawback is that Filmora will add its own logo to the end of your exported video. This logo will not distract from your video content since it is added at the end and never overlaps any of your clips, but it still might not be ideal for all creators.
Funimate (Android or iOS )
Key Points:
- Easily add text and shapes
- Rainbow doodling
- Shake effects
- Small ‘Funimate’ watermark in videos from the free version
Funimate is lives up to the ‘fun’ promise in its name. It’s designed mostly for music videos/Musical.ly and while it is missing a lot of more typical editing options, there are a few free tools in Funimate that other apps just don’t have.
For example, there are shake and distortion effects available through Funimate that you usually only find in desktop software.
You can also draw rainbow designs on your video with your finger – no other app on this list can do that.
The text tool in Funimate is easy to use, and there are cool looking glow effects you can apply in the color selection screen. Those options are also available when you’re adding shapes, likes stars and sparkles.
Funimate is not built for typical editing, which is both its strength and its weakness. Trimming your clips is its own stage which you must complete before you start adding effects, and you cannot split clips or add multiple clips.
The free version of Funimate does add a small watermark to your videos in the bottom-right corner, but it is subtle enough that I almost missed it completely while reviewing the app.
iMovie (iOS)
Key Points:
- Trailer templates
- Themes
- Limited tools and resources
iMovie’s mobile app is designed for ease and includes things like ‘trailer templates’ and themes that allow you to make a video quickly and with minimal effort.
This streamlined app is limited in its features. Other apps on this list have left out color correction tools or clip splitting tools and instead loaded up on decorative features like stickers, emojis, and overlays. iMovie has left out these tools and does not have an abundance of decorative features either.
There are filters, themes, and titles, however.
The titles are simple but polished, and you’ll find all the standard types of filters.
The themes include a variety of graphics and are applied to your entire video, not individual clips. You can also apply one filter to your entire video.
iMovie also includes a decent selection of transitions, which you can apply easily by tapping the area between two clips.
Movie Maker Filmmaker by Alive (Android or iOS )
Key Points:
- Good title tool
- Stickers
- Change clip duration
- 16:9 or 1:1
Movie Maker Filmmaker (the app will be labeled ‘Alive’ in on your phone) has a lot of features that will help you put together a fun YouTube video. There’s a great selection of stickers, filters, and overlays and they’re all easy to apply. You just click on what you want and resize/reposition it in the player.
This app is missing a lot of basic editing features, however. You cannot adjust things like brightness or saturation. This won’t be a problem if you’re happy with your clips as-is, but it’s a bit odd to not have those options.
There is a text tool and while it is fairly basic, it is also flexible. There is a good selection of fonts to choose from, and you can also choose whether or not you want a colored background, and if your text should have a shadow.
Once you’ve decided on the look of your text you can drag it, resize it, and tilt it however you want in the preview screen.
A slightly odd feature of this app is that it doesn’t save your video to your phone or export it directly to YouTube. Instead, it saves it – and shares it – within the app and gives you the option of sharing it with YouTube after.
Power Director (Android)
Key Points:
- A timeline like desktop software
- All the basic editing features
- Lots of transitions
- Videos from the free version will be watermarked
The first thing you’ll notice when you open up Power Director is that the interface looks a lot like the interface of a lot of desktop editors with a very classic timeline. This familiarity could make it easy to jump into if you’re used to editing on your laptop.
However, Power Director is a bit less intuitive than most of the other apps on this list. I wouldn’t go so far as to say it’s difficult to use – it isn’t, it’s much easier than a lot of desktop software – but among mobile apps designed for streamlined efficiency it does stand out as being a bit harder to dive into.
That is partly because there’s a lot you can do with it. It has the tools you would expect in an editor. You can split and trim clips, and you have all the standard color tools including some that most mobile apps leave out.
A lot of apps have Brightness, Contrast, and Saturation, but PowerDirector also has Color Temperature and Tint.
In addition to editing tools, PowerDirector has bells and whistles like filters –
- and a ton of great transitions.
One drawback of PowerDirector is that the free version will watermark your videos. This watermark is not intrusive, but it isn’t as subtle as the Funimate one either.
You can export videos from PowerDirector directly to YouTube.
Vlogit (Android or iOS )
Key Points:
- Easy thumbnail maker
- Export directly to YouTube
- Animated stickers
Vlogit is also an app from the creators of the Filmora Video Editor. It isn’t quite as intuitive as Filmora, but the major benefit of Vlogit for YouTube creators is that it was designed with you in mind. It has features like animated stickers, emojis, and a thumbnail maker which were included specifically because YouTubers and vloggers need them.
All the usual adjustments you might want to make, like saturation or sharpness, are easy in Vlogit. So are adjustments to the length or crop of clips.
After you save your video you’ll have the option of creating a thumbnail using a screenshot from your video. You can add a colored border, text, emojis, and more!
Once you’re done, you can export directly to YouTube. Like Filmora, Vlogit does have a post-video logo roll.
Have you ever used a free mobile app to edit one of your YouTube videos? What did you use, and were you happy with the results?
Richard Bennett
Richard Bennett is a writer and a lover of all things video.
Follow @Richard Bennett
Blueprints to Masterful Valorant Thumbnail Designs on Social Platforms
As a content creator on YouTube, you know how important it is to have a strong thumbnail that stands out from the competition. Not only does a thumbnail help attract viewers to your video, but it’s also the first thing people see when they come across your content on the platform. That’s why it’s crucial to put effort into designing an eye-catching thumbnail that accurately represents your video.
When creating a thumbnail for your Valorant video, it’s important to remember that the recommended size is 1280 x 720 pixels. This will ensure that your thumbnail looks clear and professional on all devices. In addition to size, it’s also essential to consider the composition of your thumbnail. In this article, we’ll provide tips and tricks for creating professional Valorant thumbnails that will help boost your views and engagement.

What Is Valorant?
Valorant is a free-to-play tactical first-person shooter video game developed and published by Riot Games. The game was released in June 2020 and has quickly gained popularity due to its high-stakes, team-based gameplay and unique characters.
In Valorant, players choose from a roster of agents, each with their abilities and playstyle, and compete in 5v5 objective-based matches. The game has a variety of game modes, including the popular “Spike Rush” mode, which features a shorter round time and special abilities for all players. Valorant is available on Microsoft Windows and will soon be available on other platforms.

Why Create Thumbnails for Your Valorant YouTube Videos?
Creating a thumbnail for your Valorant YouTube video is an important step in the video creation process. A thumbnail is a visual representation of your video and can help attract viewers to your content.
When someone comes across your video in their feed, the thumbnail is often the first thing they see, so it’s crucial to make it as eye-catching and compelling as possible. A strong thumbnail can help increase your views and engagement and establish your brand as a content creator. By putting effort into designing a professional and relevant thumbnail, you can set your video apart from the competition and entice viewers to click and watch.
How To Make a Valorant Thumbnail for Free?
If you want to create a Valorant thumbnail for your YouTube videos but don’t want to spend any money, you still have plenty of options. One way to create a thumbnail for free is by using a free online design tool or thumbnail maker. Or, you can try Wondershare Filmora .
Free Download For Win 7 or later(64-bit)
Free Download For macOS 10.14 or later
Not only is Filmora a powerful video editing software, and it has a range of features and tools that make it easy to design and create custom thumbnails. Even better, you can use the trial version of Filmora to create a thumbnail for free. You need to download the trial version and start experimenting with the various design tools and templates to create a thumbnail that reflects your style and brand.
Creating a Valorant thumbnail for YouTube using Filmora can be very easy. Just follow these steps:
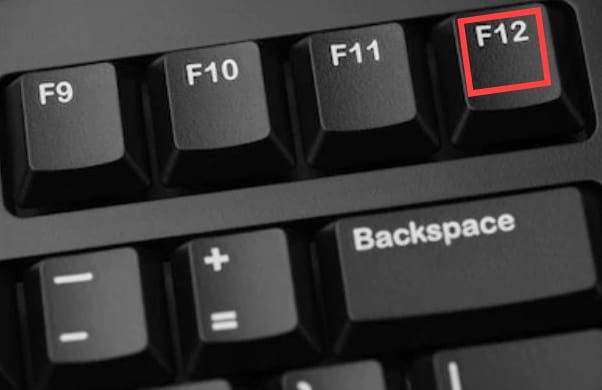
Step1 Take a screenshot of your gameplay by pressing the “F12“ key on your keyboard while in the game. This will save the screenshot to your computer.
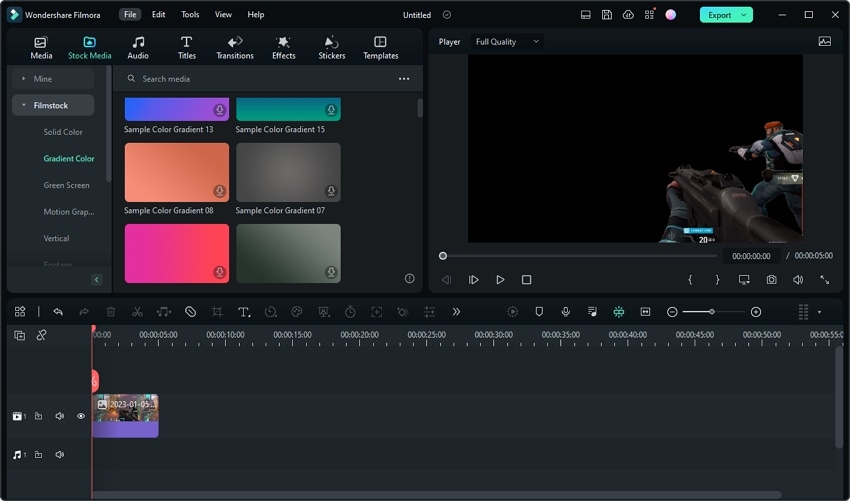
Step2 Launch Filmora and create a new project.

Step3 Import the screenshot into the media library by clicking the “Import“ button.

Step4 Drag the screenshot from the media library into the timeline.

Step5 Use the “Smart Cutout“ feature to select and cut out specific elements from the screenshot.

Step6 Choose the elements of the screenshot that you want to keep.

Step7 Remove any parts of the screenshot that you do not want to include in the thumbnail.

Step8 Extract the selected elements from the screenshot. You can resize the elements as desired.
Step9 Add a background to the track below the screenshot by dragging a background image from the media library into the timeline. Alternatively, you can import your image as a background by clicking the “Import“ button and selecting the image file from your computer.

Step10 Add an effect, such as a gun effect, by searching for the desired effect in the “Effects“ tab and dragging it into the timeline.

Step11 Adjust the opacity of the effect as desired.

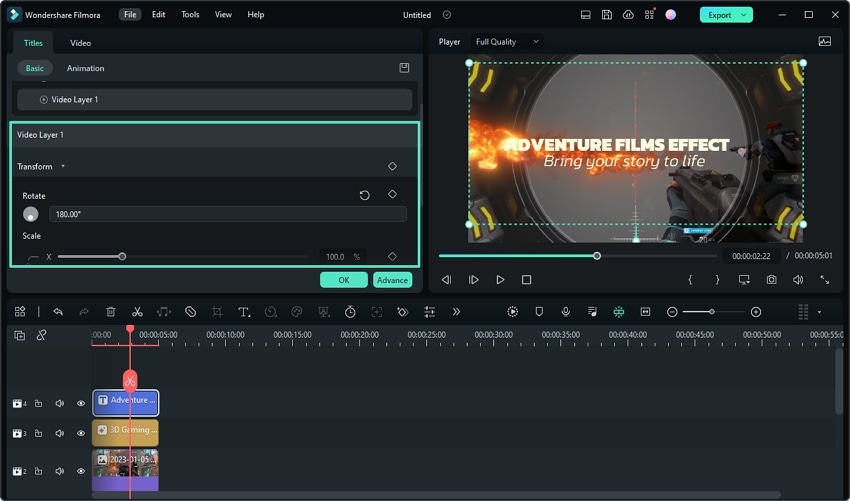
Step12 Add some titles and texts for your thumbnail.

Step13 Customize the appearance and rotation of the fire effect as desired.
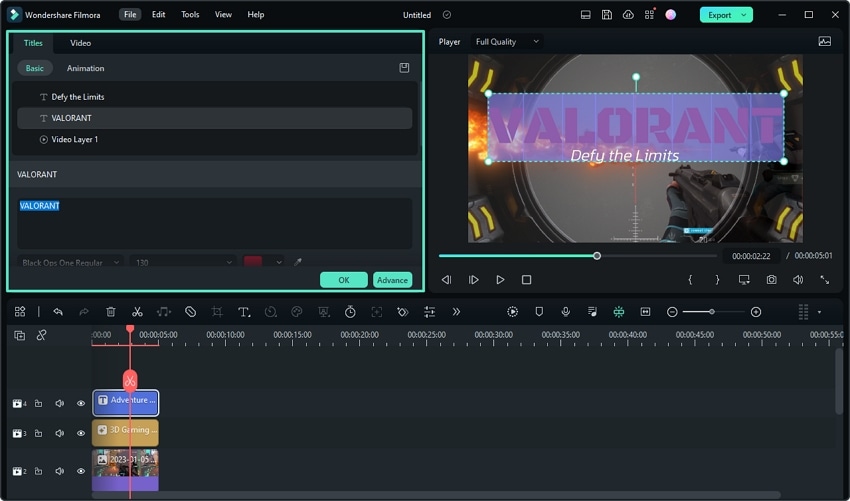
Step14 Edit the texts and adjust the appearance of the texts in the Titles window.
Step15 Choose a still frame that you like and take a snapshot of it.

Step16 Select the snapshot format and storage path. The snapshot will appear in the media library.

Step17 Right-click on the snapshot and select “Reveal in Explorer“ to find the file on your computer. You can now use it as your Valorant thumbnail.

Please note that while using the trial version of Filmora, a watermark will be added to the exported video. However, the watermark will not be added to the snapshot, so you can use the snapshot as your Valorant thumbnail without any issues.

Tips for Making Awesome Thumbnails for Your YouTube Valorant Videos
By following these tips, you can create an eye-catching and effective thumbnail for your Valorant YouTube videos that will help boost your views and engagement.
- Use high-quality images and graphics: A thumbnail with low-quality or pixelated images will not be as effective as a thumbnail with clear, high-resolution graphics.
- Use bold, eye-catching colors: Bright colors can help your thumbnail stand out in a crowded feed.
- Include relevant text: Use text to give viewers an idea of what to expect from your video and to entice them to click.
- Use clear, legible fonts: Make sure the text on your thumbnail is easy to read and doesn’t distract from the overall design.
- Keep it simple: Avoid overcrowding your thumbnail with too many elements or text. A clean, simple design is often more effective.
- Make it relevant: Your thumbnail should accurately represent the content of your video.
- Test different designs: Be bold and experiment with design elements and layouts to find what works best for your brand.
Want To Be a Valorant YouTuber? Learn From These 5 Ones
If you’re interested in becoming a Valorant YouTuber, there are many successful content creators in the Valorant community whom you can learn from. Here are five Valorant YouTubers that are worth checking out:
1. Shroud – Well-Known Valorant YouTuber With 6.8M Subscribers
Shroud is a well-known and respected content creator and player in the Valorant community. He has a strong background in professional CS:GO and has continued to thrive in the competitive Valorant scene despite being older than many other eSports players.
He is known for his gameplay videos and relaxed, easygoing personality, contributing to his widespread popularity and admiration among fans. In addition to his professional gameplay, Shroud is highly skilled and continues to compete at a high level, further solidifying his reputation as a top Valorant player.

2. TenZ – Popular Valorant Player With 1.6M Subscribers
TenZ is a highly skilled and popular Valorant player and content creator known for his exceptional ability in the game. He has achieved a high level of success and has been recognized as one of the best Valorant players in the world.
In addition to his full matches and 1v1 videos, TenZ also produces educational content, providing tips and tricks to his viewers. Despite facing some challenges and setbacks, TenZ has remained a prominent figure in the Valorant community and continues to be highly respected for his skills and contributions.

3. n0ted – Prolific Valorant YouTuber With 614k Subscribers
n0ted is a dedicated and prolific Valorant content creator, consistently uploading new videos to his YouTube channel daily. He offers a wide range of content, including gameplay highlights, funny moments, helpful tips, and updates on the latest happenings in the Valorant community.
His channel is a reliable source for those looking for consistently fresh and diverse Valorant content on YouTube. Whether you’re interested in learning new strategies, having a few laughs, or staying up to date with the latest developments in the game, n0ted’s channel has something for everyone.

4. Hiko - Valorant Content Creator With 382k YouTube Subscrbers
Hiko is a well-known Valorant content creator and former player of Counter-Strike: Global Offensive (CS:GO). He is known for his skill in first-person shooter games and his expertise in Valorant, which he shares through tips and gameplay videos on his channels on Twitch and YouTube.
Hiko is currently a content creator for 100 Thieves, a gaming organization he represents in various tournaments and competitions. He is a reliable source of high-quality Valorant content and regularly uploads new videos for his followers.

5. C9 meL – Professional Valorant Player With 33.6K YouTube Subscribers
C9 meL is a highly respected professional Valorant player and leader of the team Cloud 9 White. She is known for her sense of humor, helpful tips, and Agent tutorials and montages. As the in-game leader for her team, MeL has developed exceptional game sense and strategic skills, making her a valuable teacher and resource for other players.
In addition to her instructional content, MeL’s videos often feature a mix of comedy and skill, making them enjoyable for entertainment and improvement purposes. Overall, MeL is a talented and well-respected member of the Valorant community.

Conclusion
Creating a Valorant thumbnail for your YouTube videos can be important for promoting and attracting views to your content. Using Filmora, you can easily create a thumbnail for free by following the steps outlined in this article.
Additionally, there are many successful Valorant YouTubers who offer a range of content and can serve as inspiration for those interested in starting their channel. Creating visually appealing and engaging thumbnails ensures that your videos stand out and draw in viewers.
Free Download For macOS 10.14 or later
Not only is Filmora a powerful video editing software, and it has a range of features and tools that make it easy to design and create custom thumbnails. Even better, you can use the trial version of Filmora to create a thumbnail for free. You need to download the trial version and start experimenting with the various design tools and templates to create a thumbnail that reflects your style and brand.
Creating a Valorant thumbnail for YouTube using Filmora can be very easy. Just follow these steps:
Step1 Take a screenshot of your gameplay by pressing the “F12“ key on your keyboard while in the game. This will save the screenshot to your computer.
Step2 Launch Filmora and create a new project.
Step3 Import the screenshot into the media library by clicking the “Import“ button.
Step4 Drag the screenshot from the media library into the timeline.
Step5 Use the “Smart Cutout“ feature to select and cut out specific elements from the screenshot.
Step6 Choose the elements of the screenshot that you want to keep.
Step7 Remove any parts of the screenshot that you do not want to include in the thumbnail.
Step8 Extract the selected elements from the screenshot. You can resize the elements as desired.
Step9 Add a background to the track below the screenshot by dragging a background image from the media library into the timeline. Alternatively, you can import your image as a background by clicking the “Import“ button and selecting the image file from your computer.
Step10 Add an effect, such as a gun effect, by searching for the desired effect in the “Effects“ tab and dragging it into the timeline.
Step11 Adjust the opacity of the effect as desired.
Step12 Add some titles and texts for your thumbnail.
Step13 Customize the appearance and rotation of the fire effect as desired.
Step14 Edit the texts and adjust the appearance of the texts in the Titles window.
Step15 Choose a still frame that you like and take a snapshot of it.
Step16 Select the snapshot format and storage path. The snapshot will appear in the media library.
Step17 Right-click on the snapshot and select “Reveal in Explorer“ to find the file on your computer. You can now use it as your Valorant thumbnail.
Please note that while using the trial version of Filmora, a watermark will be added to the exported video. However, the watermark will not be added to the snapshot, so you can use the snapshot as your Valorant thumbnail without any issues.
Tips for Making Awesome Thumbnails for Your YouTube Valorant Videos
By following these tips, you can create an eye-catching and effective thumbnail for your Valorant YouTube videos that will help boost your views and engagement.
- Use high-quality images and graphics: A thumbnail with low-quality or pixelated images will not be as effective as a thumbnail with clear, high-resolution graphics.
- Use bold, eye-catching colors: Bright colors can help your thumbnail stand out in a crowded feed.
- Include relevant text: Use text to give viewers an idea of what to expect from your video and to entice them to click.
- Use clear, legible fonts: Make sure the text on your thumbnail is easy to read and doesn’t distract from the overall design.
- Keep it simple: Avoid overcrowding your thumbnail with too many elements or text. A clean, simple design is often more effective.
- Make it relevant: Your thumbnail should accurately represent the content of your video.
- Test different designs: Be bold and experiment with design elements and layouts to find what works best for your brand.
Want To Be a Valorant YouTuber? Learn From These 5 Ones
If you’re interested in becoming a Valorant YouTuber, there are many successful content creators in the Valorant community whom you can learn from. Here are five Valorant YouTubers that are worth checking out:
1. Shroud – Well-Known Valorant YouTuber With 6.8M Subscribers
Shroud is a well-known and respected content creator and player in the Valorant community. He has a strong background in professional CS:GO and has continued to thrive in the competitive Valorant scene despite being older than many other eSports players.
He is known for his gameplay videos and relaxed, easygoing personality, contributing to his widespread popularity and admiration among fans. In addition to his professional gameplay, Shroud is highly skilled and continues to compete at a high level, further solidifying his reputation as a top Valorant player.
2. TenZ – Popular Valorant Player With 1.6M Subscribers
TenZ is a highly skilled and popular Valorant player and content creator known for his exceptional ability in the game. He has achieved a high level of success and has been recognized as one of the best Valorant players in the world.
In addition to his full matches and 1v1 videos, TenZ also produces educational content, providing tips and tricks to his viewers. Despite facing some challenges and setbacks, TenZ has remained a prominent figure in the Valorant community and continues to be highly respected for his skills and contributions.
3. n0ted – Prolific Valorant YouTuber With 614k Subscribers
n0ted is a dedicated and prolific Valorant content creator, consistently uploading new videos to his YouTube channel daily. He offers a wide range of content, including gameplay highlights, funny moments, helpful tips, and updates on the latest happenings in the Valorant community.
His channel is a reliable source for those looking for consistently fresh and diverse Valorant content on YouTube. Whether you’re interested in learning new strategies, having a few laughs, or staying up to date with the latest developments in the game, n0ted’s channel has something for everyone.
4. Hiko - Valorant Content Creator With 382k YouTube Subscrbers
Hiko is a well-known Valorant content creator and former player of Counter-Strike: Global Offensive (CS:GO). He is known for his skill in first-person shooter games and his expertise in Valorant, which he shares through tips and gameplay videos on his channels on Twitch and YouTube.
Hiko is currently a content creator for 100 Thieves, a gaming organization he represents in various tournaments and competitions. He is a reliable source of high-quality Valorant content and regularly uploads new videos for his followers.
5. C9 meL – Professional Valorant Player With 33.6K YouTube Subscribers
C9 meL is a highly respected professional Valorant player and leader of the team Cloud 9 White. She is known for her sense of humor, helpful tips, and Agent tutorials and montages. As the in-game leader for her team, MeL has developed exceptional game sense and strategic skills, making her a valuable teacher and resource for other players.
In addition to her instructional content, MeL’s videos often feature a mix of comedy and skill, making them enjoyable for entertainment and improvement purposes. Overall, MeL is a talented and well-respected member of the Valorant community.
Conclusion
Creating a Valorant thumbnail for your YouTube videos can be important for promoting and attracting views to your content. Using Filmora, you can easily create a thumbnail for free by following the steps outlined in this article.
Additionally, there are many successful Valorant YouTubers who offer a range of content and can serve as inspiration for those interested in starting their channel. Creating visually appealing and engaging thumbnails ensures that your videos stand out and draw in viewers.
Also read:
- Unveil Top 8 Websites with FREE Green Screen Video Treasures
- [New] Digital Dynamo Women The Fastest-Growing Female Channel Owners
- 2024 Approved Essentials YouTube's Premier Music Bands
- [Updated] Beyond Views A Triadic Approach to Analyzing YouTube Income
- Transform Your Channel Into a Revenue Powerhouse with Impactful Trailers
- Unplug and Laugh Select the Best 15 Funny YouTube Sources
- [Updated] Elevated Engagement Awards on Video Realms
- Unravel the Mysteries of YouTube Metrics for Growth
- First Steps in Digital Content Top 10 Easy-to-Make YouTube Projects
- In 2024, Elevating Engagement The Pillars of YouTube Rankings
- Pro-Gif Maker Software That Wins Every Time
- In 2024, A Closer Look at YouTube's Payment System and Its Potential
- The Ultimate Unboxing Playbook Transform Your Channel Now
- In 2024, Digital Symphony Adding Tracks to Youtube Hub
- [Updated] Classic Film Aesthetics Masterclass in Video Production
- [New] Building Your Brand with a Sports YouTube Chain on macOS
- 2024 Approved Discover the Top 3 Alternative Video Portals
- Bridging the Gap YouTube Editing Mastered in iMovie Workflows for 2024
- The Ultimate Ratio Reference for YouTube Videos & Ads
- Mastering Viral Fame Boosting Your Video's Popularity on YouTube
- Charting a Course to Success Understanding YouTube Income for 2024
- Is Paying Monthly Just For Ad-Free Streaming, Or Are There More Benefits?
- [New] Channel Command Center Masterminding Visionary Content
- The Ultimate Guide How iPhone/iPad Users Can Upload YouTube Videos
- [New] Crafting a Commercial Channel YouTube's Premium Pathway Guide
- 2024 Approved Cultivate Calmness & Flexibility with Top 10 Yoga Streams
- From Ordinary to Enchantment Crafting Spectacular Backgrounds on YouTube
- Download Playback Streaming Youtube Videos on iOS Securely and Smoothly
- The Essential Guide to Editing YouTube Videos Seamlessly in iMovie
- [Updated] Dominating Search Results Essential YouTube SEO Tricks
- In 2024, Blurred Lines The Art of Anonymizing YouTube Content
- Elite Gamers' Capturing Solutions for 2024
- 2024 Approved Access Unlimited Free, High-Quality Green Screen Footage Online
- 2024 Approved Crafting Curls and Contours Creating a Personalized Beauty Channel
- Crafting Engaging Video Content for Live Streams for 2024
- A Step-by-Step Guide to Edit YouTube Videos in FinalCut for 2024
- [Updated] Customize and Upload Longer YouTube Content
- [Updated] Cutting-Edge Editing Techniques YouTube & Comparable Tools
- [Updated] Balancing Consistency & Quality A Key to Increasing YouTube Viewership
- The Complete Playbook to Propel Your YouTube Gaming Vids with Hashes
- Elevate, Create & Earn A Startup Guide for YouTube Channels for 2024
- How to Mirror Your Itel S23 Screen to PC with Chromecast | Dr.fone
- What Is a SIM Network Unlock PIN? Get Your Samsung Galaxy F54 5G Phone Network-Ready
- Free Screen Recorder for Mac
- Updated 2024 Approved Pinnacle Audio Refinement Toolkit for Videos on Desktop Systems (Updated )
- 2024 Approved The Conductors Toolkit Unpackaging the Finest Digital Audio Workstations
- Getting the Pokemon Go GPS Signal Not Found 11 Error in Oppo Reno 9A | Dr.fone
- The Ultimate Guide to Samsung Galaxy A14 5G Pattern Lock Screen Everything You Need to Know
- 2024 Approved Get Started with Jaycut A Beginners Guide to Free Video Editing
- The Easy Way to Remove an Apple ID from Your MacBook For your Apple iPhone 12
- [Updated] Audio Log Analysis Guidebook
- Top 15 Augmented Reality Games Like Pokémon GO To Play On Apple iPhone 12 Pro Max | Dr.fone
- 2024 Approved Top 8 Dictation Software for Windows, Mac and Online-2023 List
- Updated Amplifying Your Auditory Experience Leading Providers of Sound Libraries for 2024
- Navigate and Enhance Podcast Listening on Mac (Top 10 Apps)
- [Updated] Top 25 Hashtags That Will Make You a Social Media Star on Instagram for 2024
- [Updated] Mastering Social Media Marketing 2024'S Top FB Strategies
- [New] 2024 Approved Crafting a Hit A TikTok Reaction Video Guide
- Updated 2024 Approved Transition Like a Pro 3 Expert Techniques in Final Cut Pro
- 10 Best Voice Recording Apps for Android Devices Free Included for 2024
- New 2024 Approved Exploring Resources for Clap-Induced Acoustic Enhancements
- In 2024, A Perfect Guide To Remove or Disable Google Smart Lock On Motorola Moto G24
- In 2024, 3 Facts You Need to Know about Screen Mirroring Xiaomi Redmi Note 12T Pro | Dr.fone
- How to Cast Vivo Y100i Screen to PC Using WiFi | Dr.fone
- In 2024, Anonymous Access to Instagram's Hidden Narratives Device Guide
- Title: "[Updated] Cut The Cost, Not The Creativity Best Free Editing Tools (Top 9)"
- Author: Steven
- Created at : 2024-05-25 20:53:02
- Updated at : 2024-05-26 20:53:02
- Link: https://youtube-clips.techidaily.com/updated-cut-the-cost-not-the-creativity-best-free-editing-tools-top-9/
- License: This work is licensed under CC BY-NC-SA 4.0.
