![[Updated] Crafting Perfect YouTube Music Playlists via Web & Mobile Platforms](https://thmb.techidaily.com/fa134e33a19af2a6d89131747e3b5172ee7c3295829397bcf7ff50f7e4bad5d7.png)
[Updated] Crafting Perfect YouTube Music Playlists via Web & Mobile Platforms
Crafting Perfect YouTube Music Playlists via Web & Mobile Platforms
YouTube is one of the biggest video-sharing websites where you can find unlimited videos of your favorite songs in various genres for free. However, due to the thousands of channels on YouTube, remember a soundtrack you once liked.
To tackle this issue, you must create a playlist containing only those you prefer to listen to.
So, if you are looking for information on creating a YouTube music playlist on your Windows or Mac PC, Android, or iPhone web browser, read this article and follow the steps carefully.
How to Create a YouTube Music Playlist?
Are you one of those who want to listen to their favorite tracks while working out or carrying on their work-related tasks? If that’s the case, a YouTube Playlist might come in handy as you don’t have to search again and again for your songs on your device.
How To Create a YouTube Music Playlist on the Web?
If you are using a Windows or Mac computer and want to create a YouTube music playlist on a web browser, follow the below steps:
Step1 In the first step, turn on your PC, launch a web browser from the desktop or Dock, and head to theYouTube website. Next, Sign into your account with your Google email ID if you are not already logged in.

![]()

Note: It is only possible to create a YouTube music playlist by signing into your account.
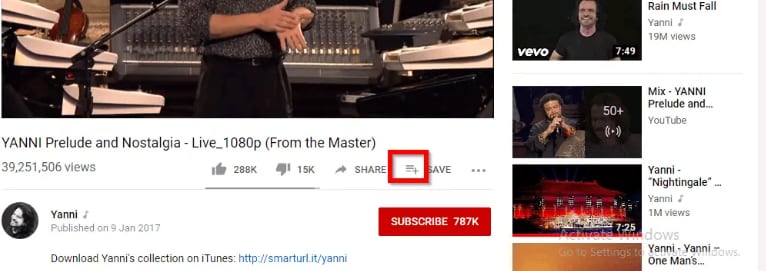
Step2 When you have signed in, look for your favorite track on the YouTube live feed page or search for it in the search bar at the top of the screen. Once you have found the song, click on it to play it, click the three horizontal dots at the bottom right-hand side of the video, and select the “Save” option from the small pop-up.
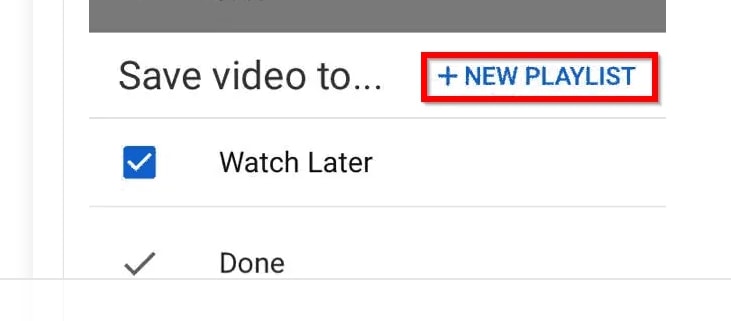
Step3
- Now, select the “Create a new playlist”
- Type in the name of your playlist.
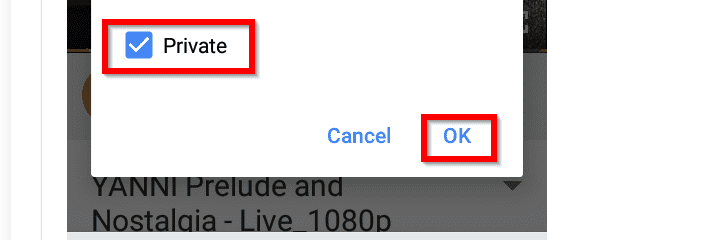
- Choose to make it Public, Unlisted, or Private.

The differences between the three options are:
- A Public playlist is a list of videos that any random person can see, access, or use it.
- An Unlisted playlist can be shared with others by using its link to access it.
- A Private playlist cannot be seen, accessed or used by anyone except you.
Finally, click the “Create” button, and your YouTube music playlist will be saved automatically.
Step4 Repeat the second and third steps to save all the other songs you wish to add to the same playlist. Once done, head back to the main YouTube feed page, click “Library,” and scroll to the middle of the page in the right pane to access and play the music playlist at your will.

![]()
Note: You can always edit your YouTube music playlist by changing its name, privacy, and description or adding and removing any tracks. It is also possible to delete any of your playlists or create and save multiple playlists on your device’s web browser.
How to Create a YouTube Music playlist on iPhone?
To create a YouTube music playlist on your iPhone, follow these quick steps.:
Step1 Download and launch the YouTube Music app on your iPhone , sign into your account, and tap a song you want to add to your playlist. Next, tap on the music video once for the create a playlist option to pop up.

Step2 Now tap the three horizontal lines with the Plus icon, tap “+ NEW PLAYLIST” at the bottom right corner of the screen, and type in the name of the new music playlist.
Step3 In the next step, type in the name of your new playlist, select your privacy preferences, i.e., Private, Public, or unlisted, and tap “Create” to complete the process.

Finally, close the video, tap “Library” at the bottom of the screen, scroll down and see your new YouTube music playlist.
How to Create a YouTube Music playlist on Android?
YouTube Music app interface for Android is different than for iPhone, so do the following steps to create a new playlist quickly.
Step1 Download and launch the YouTube Music app on your Android , sign into your account, and tap a song to open it. Next, tap on the music video once and tap the three horizontal lines with the Plus icon.
Then, tap “Create a new playlist” at the bottom right corner of the screen, and type in the name of the new music playlist.

Step2 In the next step, choose your privacy preferences and tap “OK” to create the new YouTube music playlist.
Now tap to close the video, tap “Library” at the bottom of the screen, scroll down in the middle of the app and view your new YouTube music playlist.
![]()
Note: You may see an option to create a new channel during the YouTube music playlist process. If so, tap “Create Channel” to see the “+ NEW PLAYLIST” option on your iPhone and the “Create a new playlist” option on your Android YouTube app.
Bonus Video Tutorial: From a YouTube User to Creator - How To Make Music Video
You know how to create a YouTube playlist on the web or on your mobile. However, as you are a music lover and use YouTube frequently, are you interested in creating music videos by yourself? If yes, please watch the video below. It will show you how to make music videos with a user-friendly video editor, Filmora . We hope you can enjoy your YouTube music while exploring more creative possibilities:
Free Download For Win 7 or later(64-bit)
Free Download For macOS 10.14 or later
Conclusion
Listening to YouTube’s free music tracks is more fun when you do not have to go and forth to search for your favorite songs. You can enjoy the experience more when you have personalized playlists for situations like a long drive, studying, or working in an office.
So, in this article, we have discussed a step-by-step process for creating a YouTube music playlist on a web browser, Android, and iPhone, and hopefully, you can dance to your favorite beats without searching for them first on YouTube.
Step2 When you have signed in, look for your favorite track on the YouTube live feed page or search for it in the search bar at the top of the screen. Once you have found the song, click on it to play it, click the three horizontal dots at the bottom right-hand side of the video, and select the “Save” option from the small pop-up.
Step3
- Now, select the “Create a new playlist”
- Type in the name of your playlist.
- Choose to make it Public, Unlisted, or Private.
The differences between the three options are:
- A Public playlist is a list of videos that any random person can see, access, or use it.
- An Unlisted playlist can be shared with others by using its link to access it.
- A Private playlist cannot be seen, accessed or used by anyone except you.
Finally, click the “Create” button, and your YouTube music playlist will be saved automatically.
Step4 Repeat the second and third steps to save all the other songs you wish to add to the same playlist. Once done, head back to the main YouTube feed page, click “Library,” and scroll to the middle of the page in the right pane to access and play the music playlist at your will.
![]()
Note: You can always edit your YouTube music playlist by changing its name, privacy, and description or adding and removing any tracks. It is also possible to delete any of your playlists or create and save multiple playlists on your device’s web browser.
How to Create a YouTube Music playlist on iPhone?
To create a YouTube music playlist on your iPhone, follow these quick steps.:
Step1 Download and launch the YouTube Music app on your iPhone , sign into your account, and tap a song you want to add to your playlist. Next, tap on the music video once for the create a playlist option to pop up.
Step2 Now tap the three horizontal lines with the Plus icon, tap “+ NEW PLAYLIST” at the bottom right corner of the screen, and type in the name of the new music playlist.
Step3 In the next step, type in the name of your new playlist, select your privacy preferences, i.e., Private, Public, or unlisted, and tap “Create” to complete the process.
Finally, close the video, tap “Library” at the bottom of the screen, scroll down and see your new YouTube music playlist.
How to Create a YouTube Music playlist on Android?
YouTube Music app interface for Android is different than for iPhone, so do the following steps to create a new playlist quickly.
Step1 Download and launch the YouTube Music app on your Android , sign into your account, and tap a song to open it. Next, tap on the music video once and tap the three horizontal lines with the Plus icon.
Then, tap “Create a new playlist” at the bottom right corner of the screen, and type in the name of the new music playlist.
Step2 In the next step, choose your privacy preferences and tap “OK” to create the new YouTube music playlist.
Now tap to close the video, tap “Library” at the bottom of the screen, scroll down in the middle of the app and view your new YouTube music playlist.
![]()
Note: You may see an option to create a new channel during the YouTube music playlist process. If so, tap “Create Channel” to see the “+ NEW PLAYLIST” option on your iPhone and the “Create a new playlist” option on your Android YouTube app.
Bonus Video Tutorial: From a YouTube User to Creator - How To Make Music Video
You know how to create a YouTube playlist on the web or on your mobile. However, as you are a music lover and use YouTube frequently, are you interested in creating music videos by yourself? If yes, please watch the video below. It will show you how to make music videos with a user-friendly video editor, Filmora . We hope you can enjoy your YouTube music while exploring more creative possibilities:
Free Download For Win 7 or later(64-bit)
Free Download For macOS 10.14 or later
Conclusion
Listening to YouTube’s free music tracks is more fun when you do not have to go and forth to search for your favorite songs. You can enjoy the experience more when you have personalized playlists for situations like a long drive, studying, or working in an office.
So, in this article, we have discussed a step-by-step process for creating a YouTube music playlist on a web browser, Android, and iPhone, and hopefully, you can dance to your favorite beats without searching for them first on YouTube.
Premier Choice: The Best 10 Recorders for Tech Talks
Best 10 Screen Recorders for YouTube

Richard Bennett
Mar 27, 2024• Proven solutions
If you are interested in making tutorial videos by capturing videos from your computer screen then following details will definitely help you. It is possible to share wonderful details with screen recorder tools that are discussed below in this article:
Looking for Screen recorders for your smartphone? Kindly check this screen recorder Apps for iPhone>>
![]()

The All-in-One Screen Recorder & Video Editor
- Record desktop screen, voiceover, and webcam simultaneously
- Edit recorded clips quickly with a wide range of professional tools
- Built-in plentiful templates and effects
- Export to MP4, MOV, MKV, GIF and multiple formats
For Win 7 or later (64-bit)
For macOS 10.12 or later
 Secure Download
Top 10 Screen Recorders for YouTube video creators
Note: We resolutely oppose all forms of copyright-infringing downloads. This tutorial is only for downloading YouTube videos/audio materials from your own channel.
For Windows
1. Wondershare Filmora
Wondershare Filmora is an easy-to-use while light screen recorder for PC and Mac. It allows you to record desktop screen by customizing areas you like, and you can record popular games at up to 120fps without lagging. What’s more, Filmora also offers you a built-in video editing tool that allows you to add annotations, personalize cursor effects, and crop, trim, cut your recorded footage as you like.


Price:
Free trial/$49.99 per year/$79.99 for perpetual
2.Cam Studio:
It is an open-source screen recorder for YouTube that can be learned within few minutes and results in higher quality video outcomes. Offers a small file size along with the facility to convert from AVI to SWF.
Pros:
It allows users to add captions to videos and possesses a built-in help file.
Cons:
The website suffers from few bugs.
Price:
It is 100% free for use.
3.iSpring Free Cam:
Users are likely to get built in type video/audio editor with this screen recorder that has intuitive interface with professional screencasts.
Pros:
High Quality resolution with no time limits and it also records user’s voice along with computer sounds.
Cons:
Do not allow webcam type recording and output file format use to be WMV only.
Price:
Free tool for screen recording needs.
4.ShareX:
ShareX is a well-known open source type ad free tool that comes with numerous customization features. It is targeted for professional video developers who need advanced editing options.
Pros:
Custom colour effects with watermarks where you can easily import existing photos, music or videos from your device.
Cons:
It does not possess video editor, webcam recording feature and is little complicated to use for beginners.
Price:
Can be used for free.
5.MadCap Mimic:
Here is a highly advanced multimedia tool with interactive simulation options. Users can access this screen recorder for YouTube with three different modes as like full motion, automatic and manual.
Pros:
Automatically saved content for future needs, wide variety of video effects, fast technical support and results in highly interactive content.
Cons:
Occasional bugs are reported and users can access free trial only for 30 days.
Price:
For full year version you need to pay $144 whereas life time access can be obtained by paying only $428.
For Mac
1.Camtasia 2:
This is a comprehensive tool for your screen recording needs where you can also connect external devices for input. Users will be able to enjoy smooth editing features with its studio like platform, layered timeline and fast mixing.
Pros:
It is fully interactive screen recorder that can be used as an interactive mobile application. This tool is supported by Windows, Android and iPhone devices.
Cons:
Aimed for professional users only.
Price:
Although free trial is available for few days but actual featured version can be accessed after payment of $99.
2.ScreenFlow:
Here is a popular paid offering for all professionals who are interested to create interactive educational videos. There are unlimited powerful features with easy to use interface and one can import input from externally connected devices as like iPad, iPod and iPhones etc.
Pros:
High class motion control features with attractive zooming facility so that you can manage videos from all views.
Cons:
Difficult to use for beginners due to advanced design tools.
Price:
Screen Flow packages are available on payment of $99 and more.
3.Snapz Pro X:
Snapz Pro X offers various tutorials along with training videos so that users can avail resizable video creation options with a straightforward type interface. The live preview feature allows users to generate customized videos with easy corrections. Snapz Pro X is commonly used by professionals for learning and training related video creations as it offers lesser mistakes.
Pros:
It offers live preview, selective region capture facility and high end pixel perfection services.
Cons:
Free or trial version comes with unwanted watermarks.
Price:
Cheaper option as compared to above two tools as it can be accessed by paying only $69.
4.Screencast-o-Matic:
You will be glad to know about this online screen recorder for YouTube that can be accessed by anyone with installation of a specially designed launcher. The screen recording length can go up to 15 minutes and resolution quality offered goes up to 720p. The free version can be accessed by anyone but if you need advanced features then you have to spend some money.
Pros:
Offers real time editing as well as recording for video shooting; users need not to download this tool on their personal device rather it can be accessed online with ease.
Cons:
Video quality is little poor as compared to other tools.
Price:
The free version is available with limited features whereas fully featured tool is accessible with a payment of $15/ year.
5.QuickTime:
It is one of the latest screen recorder tool for all Mac users that can grab audio from microphone but not compatible with system audio. If you need to use a video creator tool without spending even a single penny then QuickTime software is best option for you.
Pros:
It is available for free and can be used by beginners as well as professionals easily. QuickTime is compatible with almost all versions of Mac devices.
Cons:
It is a restricted solution for screen recording with limited tools and features. QuickTime is not preferred for game recording videos due to low-resolution outputs.
Price:
Available for free.
Richard Bennett
Richard Bennett is a writer and a lover of all things video.
Follow @Richard Bennett
Richard Bennett
Mar 27, 2024• Proven solutions
If you are interested in making tutorial videos by capturing videos from your computer screen then following details will definitely help you. It is possible to share wonderful details with screen recorder tools that are discussed below in this article:
Looking for Screen recorders for your smartphone? Kindly check this screen recorder Apps for iPhone>>
![]()
The All-in-One Screen Recorder & Video Editor
- Record desktop screen, voiceover, and webcam simultaneously
- Edit recorded clips quickly with a wide range of professional tools
- Built-in plentiful templates and effects
- Export to MP4, MOV, MKV, GIF and multiple formats
For Win 7 or later (64-bit)
For macOS 10.12 or later
Secure Download
Top 10 Screen Recorders for YouTube video creators
Note: We resolutely oppose all forms of copyright-infringing downloads. This tutorial is only for downloading YouTube videos/audio materials from your own channel.
For Windows
1. Wondershare Filmora
Wondershare Filmora is an easy-to-use while light screen recorder for PC and Mac. It allows you to record desktop screen by customizing areas you like, and you can record popular games at up to 120fps without lagging. What’s more, Filmora also offers you a built-in video editing tool that allows you to add annotations, personalize cursor effects, and crop, trim, cut your recorded footage as you like.
Price:
Free trial/$49.99 per year/$79.99 for perpetual
2.Cam Studio:
It is an open-source screen recorder for YouTube that can be learned within few minutes and results in higher quality video outcomes. Offers a small file size along with the facility to convert from AVI to SWF.
Pros:
It allows users to add captions to videos and possesses a built-in help file.
Cons:
The website suffers from few bugs.
Price:
It is 100% free for use.
3.iSpring Free Cam:
Users are likely to get built in type video/audio editor with this screen recorder that has intuitive interface with professional screencasts.
Pros:
High Quality resolution with no time limits and it also records user’s voice along with computer sounds.
Cons:
Do not allow webcam type recording and output file format use to be WMV only.
Price:
Free tool for screen recording needs.
4.ShareX:
ShareX is a well-known open source type ad free tool that comes with numerous customization features. It is targeted for professional video developers who need advanced editing options.
Pros:
Custom colour effects with watermarks where you can easily import existing photos, music or videos from your device.
Cons:
It does not possess video editor, webcam recording feature and is little complicated to use for beginners.
Price:
Can be used for free.
5.MadCap Mimic:
Here is a highly advanced multimedia tool with interactive simulation options. Users can access this screen recorder for YouTube with three different modes as like full motion, automatic and manual.
Pros:
Automatically saved content for future needs, wide variety of video effects, fast technical support and results in highly interactive content.
Cons:
Occasional bugs are reported and users can access free trial only for 30 days.
Price:
For full year version you need to pay $144 whereas life time access can be obtained by paying only $428.
For Mac
1.Camtasia 2:
This is a comprehensive tool for your screen recording needs where you can also connect external devices for input. Users will be able to enjoy smooth editing features with its studio like platform, layered timeline and fast mixing.
Pros:
It is fully interactive screen recorder that can be used as an interactive mobile application. This tool is supported by Windows, Android and iPhone devices.
Cons:
Aimed for professional users only.
Price:
Although free trial is available for few days but actual featured version can be accessed after payment of $99.
2.ScreenFlow:
Here is a popular paid offering for all professionals who are interested to create interactive educational videos. There are unlimited powerful features with easy to use interface and one can import input from externally connected devices as like iPad, iPod and iPhones etc.
Pros:
High class motion control features with attractive zooming facility so that you can manage videos from all views.
Cons:
Difficult to use for beginners due to advanced design tools.
Price:
Screen Flow packages are available on payment of $99 and more.
3.Snapz Pro X:
Snapz Pro X offers various tutorials along with training videos so that users can avail resizable video creation options with a straightforward type interface. The live preview feature allows users to generate customized videos with easy corrections. Snapz Pro X is commonly used by professionals for learning and training related video creations as it offers lesser mistakes.
Pros:
It offers live preview, selective region capture facility and high end pixel perfection services.
Cons:
Free or trial version comes with unwanted watermarks.
Price:
Cheaper option as compared to above two tools as it can be accessed by paying only $69.
4.Screencast-o-Matic:
You will be glad to know about this online screen recorder for YouTube that can be accessed by anyone with installation of a specially designed launcher. The screen recording length can go up to 15 minutes and resolution quality offered goes up to 720p. The free version can be accessed by anyone but if you need advanced features then you have to spend some money.
Pros:
Offers real time editing as well as recording for video shooting; users need not to download this tool on their personal device rather it can be accessed online with ease.
Cons:
Video quality is little poor as compared to other tools.
Price:
The free version is available with limited features whereas fully featured tool is accessible with a payment of $15/ year.
5.QuickTime:
It is one of the latest screen recorder tool for all Mac users that can grab audio from microphone but not compatible with system audio. If you need to use a video creator tool without spending even a single penny then QuickTime software is best option for you.
Pros:
It is available for free and can be used by beginners as well as professionals easily. QuickTime is compatible with almost all versions of Mac devices.
Cons:
It is a restricted solution for screen recording with limited tools and features. QuickTime is not preferred for game recording videos due to low-resolution outputs.
Price:
Available for free.
Richard Bennett
Richard Bennett is a writer and a lover of all things video.
Follow @Richard Bennett
Also read:
- [New] Tall Screen Editing Made Easy Using FCPX on Instagram for 2024
- [Updated] Comprehensive 2024 Video Showcase Analysis
- [Updated] FusionVisualizer IPad+MacMedia Combining Tool
- [Updated] In 2024, Mastering Instagram's Peak Moments A How-To Guide
- Best-Practice Queries for Crypto & GPT Blend
- Cut the Clutter, Convert Videos Discover the Best Alternatives for Flv to YT for 2024
- Educational Gaming Content on YouTube
- Engaging Local Audiences with Social Media Videos
- Essential Solutions to Overcome Severe Driver Problems in Videos (Dxgkrnl)
- From Novice to Viewer-Keeper Top 10 Basic Yet Captivating Video Ideas
- From Video Content to Cash Flow YouTube's Profit Mechanics
- Gmail Not Working on Honor V Purse 7 Common Problems & Fixes | Dr.fone
- In 2024, A Dive Into the Premium List of Top 10 Budget-Friendly YouTube Designers
- In 2024, Achieve Uninterrupted YouTube Experience Across OS Platforms
- In 2024, Bypassing Barriers Privately Share YouTube Video via Google
- In 2024, Capturing Moments with the Best 5 Photo & Video Apps for iPhones/Android
- Maximize Your Online Presence with These 5 Streaming Techniques
- Strategic Hashing Techniques for Success in YouTube Game Vids
- The Roadmap to Your Influencer Destiny
- Title: [Updated] Crafting Perfect YouTube Music Playlists via Web & Mobile Platforms
- Author: Steven
- Created at : 2024-11-13 04:58:01
- Updated at : 2024-11-15 12:29:18
- Link: https://youtube-clips.techidaily.com/updated-crafting-perfect-youtube-music-playlists-via-web-and-mobile-platforms/
- License: This work is licensed under CC BY-NC-SA 4.0.