
!["[Updated] Concluding Your Channel on YouTube - Expert Guides & Templates"](https://www.lifewire.com/thmb/b7hSKwI9Oajpbwr32n5Vsf7fcds=/400x300/filters:no_upscale():max_bytes(150000):strip_icc():format(webp)/operationcouldnotcomplete-95695abe458d4062a2c2f7e46e656b08.png)
"[Updated] Concluding Your Channel on YouTube - Expert Guides & Templates"
Concluding Your Channel on YouTube - Expert Guides & Templates
YouTube Outro Complete Guide [+Best Makers & Templates]

Richard Bennett
Mar 27, 2024• Proven solutions
The key reason your YouTube videos have a hundred views a year after publication is because they lack good YouTube intro and outro.
How interactive is your YouTube channel? Or, what’s the bounce rate of your YouTube videos? As you answer this, you’ll realize how important YouTube outro is. Very few people know to add outro to YouTube videos is the best YouTube SEO technique.
In this guide, I’ll demystify what YouTube outro is and how to make outro and add it to a YouTube video. If you are not a tech expert, use intro and outro makers highlighted herein to make your videos as interactive pas possible.
To get a sneak preview of what is entailed here; this guide has been subdivided into five parts:
- Part 1: YouTube Outro Prerequisites
- Part 2: Best 8 Intro And Outro Makers For YouTube
- Part 3: How To Make And Add Outro To YouTube Video
- Part 4: How To Add An Outro To A Youtube Video
- Part 5: Frequently Asked Questions about YouTube Outro
Part 1: YouTube Outro Prerequisites
In this part, we will learn what outros for YouTube are, the importance of land that distinguishes them from the intro. Also included are expert tips on how to make YouTube outro that attracts a hundred thousand subscribers in seven days included.
To understand what YouTube outro is and why you should add it to your videos, here is a detailed explanation.
Section 1: What is a Youtube Outro?
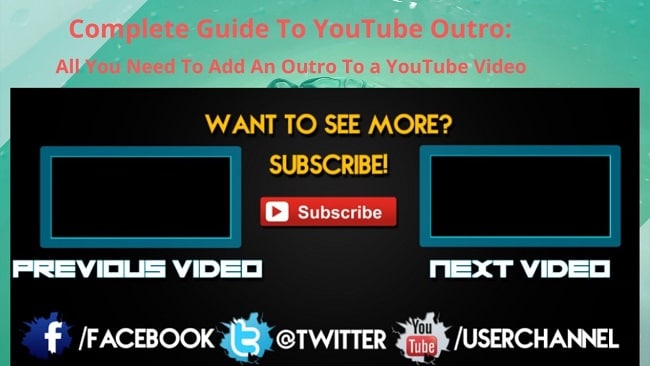
YouTube outro aka end screen is the last part of a video with a call to action statement, button or video suggestion to view other YouTube videos. In other words, it’s the last part of a video with calls to action links.
One of the most effective technical methods of optimizing YouTube videos is by adding an outro. This helps attract huge traffic, increase conversion and engage viewers.
Why spend your time adding outro? You can add Outro to YouTube videos to direct viewers to your website, other selected videos, engage viewers for longer and to persuade them to subscribe to the channel. In short, most end screens have four elements incorporated into an outro: Channel, subscribe, Video playlist and a website link.
Section 2: Difference Between Outro and Intro
Most YouTube videos have an intro and an outro. In this case, an intro is a short clip at the beginning of a YouTube video that introduces you to the viewers and your brand.
Even though video creators attach more emphasis on intros, both are both very critical. For your videos to achieve meaningful results, it’s important to view each as distinct from the other. Equally important to know, both intros and outros have different purposes.
| Differences Between YouTube Intro And Outro | |
|---|---|
| Intro | Outro |
| Inserted at the begging of a video | Inserted at the end of a video |
| Used to capture audience attention | Directs the audience to the next step |
| Introduces the topic | Suggests new topics to viewers |
| Attract viewers to the video | Contains a call-action button |
| Showcases a brand, logo, business slogan or a statement mission |
Section 3: YouTube Outro Requirements
Just as their requirements for any video uploaded on YouTube, outros are no exception. For your outro to be interactive, observe the following requirements:
1. Outro Resolution
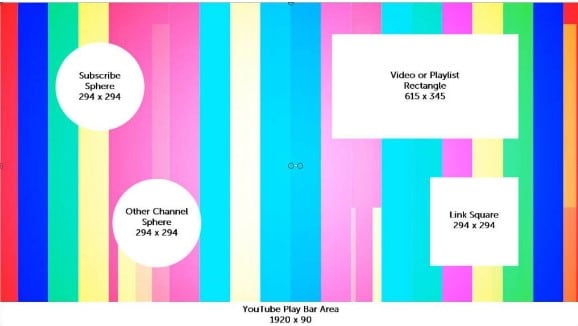
Outros for YouTube should have an aspect ratio of 16:9 and a resolution of 1920px X 1080px.
2. Outro Element Sizes and Dimensions
End screen templates comprise elements that are in different shapes and sizes. When using a YouTube outro size of 1920px X 1080px, here are the element dimensions to use:
- Subscribe – 294px X 294px
- Channel – 294px X 294px
- Website link - 294px X 294px
- Video playlist – 615px X 345px
3. Outro Length
If you want to make your outro boring, make it long. So, how long should YouTube outro be? For your outros to have a high conversation rate, they should be approximately 10-20 seconds long. However, the length of your video should be the determining factor. A one-hour YouTube video can have a longer outro.
Don’t be challenged by setting the above sizes because nearly all intro and outro makers have already set dimensions for the elements. The major requirements are done for you
Section 4: Best Practices When Making A YouTube Outro
Imagine given 10 seconds to showcase your YouTube channel and direct viewers on the next move without breaking the engagement! Different YouTube outros come in different styles; certainly a show of one’s degree of creativity.
At this point, you should be already be having the best outro maker in mind - Filmora. The below YouTube outro tips should coincide with the features of your selected outro maker.
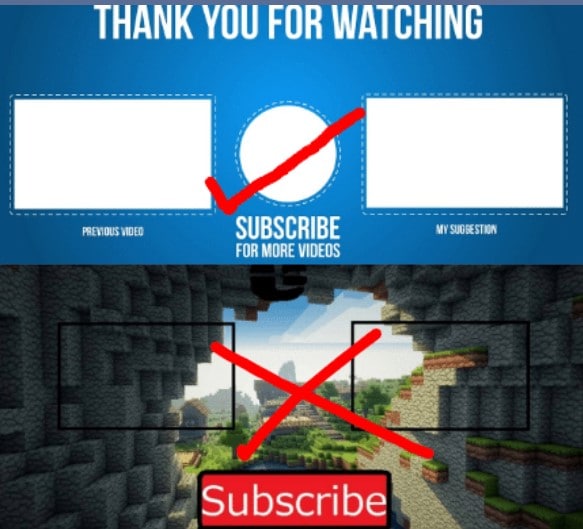
- Be relevant
The featured elements should be related to the video. Adding irrelevant elements your outro will most likely make the viewer click away.
- Keep to your goals
The big question is; what do you want to achieve from the YouTube end screen? Draw your attention to the subject matter of that particular video, your channel or the product highlighted in the video. Try to align your thoughts with those of the viewer.
Every video creator wishes for the following goals, increasing your channel subscribers, sending traffic to another site, viewing more videos and sharing to social media. Each YouTube outro element should have its own goal.
- Simple, clear and easy to interpret
Your outro will be meaningless if the audience cannot take action due to the complexity of either the language used or the ambiguity of words used. Use colors that pop out the elements making them the center of focus. Make them clear and avoid anything distractive.
- Use similar outro templates
Apart from being a good method of branding your channel, using similar outro on your videos adds credibility. It is, therefore, a good practice to have the consistency of colors, elements, images, and logos.
It’s absolutely important to understand all the prerequisites related to YouTube outros. Make use of the tips and requirements explained above when making and adding YouTube end screens to achieve the best results.
Part 2: Best 8 Intro And Outro Makers For YouTube
If you are wondering how to make the best magnetic intro and converting outro for your YouTube videos, this is your best article for you. Whether it’s the free online intro maker or the YouTube outro maker free no watermark, just select one that suits you most from the below list.
1. Wondershare Filmora
Quick fact – Using Filmora as an outro maker, allows you to select your admired background and outro template.
Do you want to make HD YouTube intros and outros that will grow your channel? I recommend Wondershare Filmora.


This software has the simplest friendly interface that any new and expert video editor would understand easily. This is very important for you; to use the best intro or outro for your YouTube videos, download Filmora video editor to get access to Filmstock. There are plenty of free and editable YouTube intro and outro templates ready for download.
Filmora is an all in one YouTube outro maker: you can download intro and outro templates, edit, add to your YouTube video and publish to your channel. There are innumerable backgrounds, transitions and effects to make an outro that matches the video colors, speed, and theme.
2. Outromaker
Quick fact – Outromaker is highly preferred for adding YouTube end screens with animated backgrounds that are mobile-friendly.
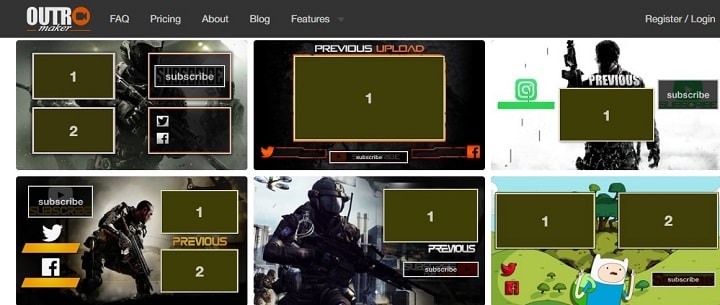
In spite of its pricey plans, Outro Maker continues to be more and more users due to its high genre of outro templates. Among the features included in this app are outro templates, YouTube mobile cards, and YouTube graphics.
To insert a Pokémon Go or animated cartoon background that rhymes with your videos, you have to register an account. Secondly, you must have a registered YouTube channel with videos. Lastly, subscribe to a paid plan.
3. MotionDen
Quick fact – MotionDen is an online into and outro maker. To create YouTube intro and outro without watermark, you have to first pay.
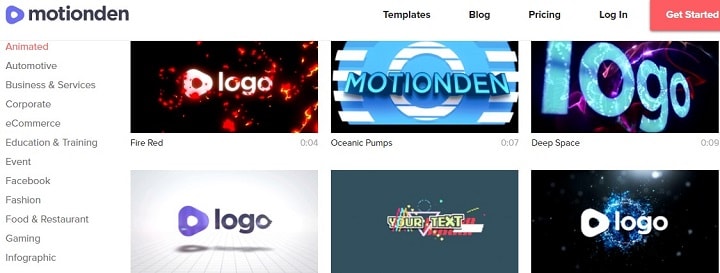
There are plenty of YouTube intro and outro templates for your marketing videos, showdown movies or hard sports videos. Only two pricing plans are available, namely $9.0/Video and $39/ month. Both plans produce HD intros and outros for YouTube and give access to directly publish to YouTube.
To start creating end screens, creating an account is a requirement. MotionDen has rich text editing features and direct typography to edit your logo.
4. Snappa
Quick fact- With Snappa as your YouTube outro maker, only 60 seconds are enough to create a professional high-quality outro.

This is the perfect YouTube outro maker online free with over a 5000+ outro template and million-plus royalty-free HD photos and graphics. Among the features it’s renowned for include, thousands of templates in different sizes, resizable graphics, a huge library of HD intros and outros and seamless integration with uploaded logos and custom fonts.
Most of the YouTube outro requirements like dimensions have been done for you. To access more features, subscribe to either the Pro plan for $10/month or the Team plan for $20/month.
5. Biteable
Quick fact- Biteable is a free online YouTube outro creator. It’s compatible with mobile phones and computers and is highly used by content marketing experts.

The clarity of the interface is enough to prove its simplicity and user-friendliness. The only requirement to use this app is registration. However, the free plan is limited to 10 projects per month, the basic content and 24/7 customer support. Its main limitation is any project under the free plan bears the Biteable watermark.
Biteable Youtube outro template download feature contains 85,000 Shutterstock clips. There are four optional pricing plans. The free plan with limited features, Starter Plan for $29/mo, Pro Plan for $29/mo and Unlimited Plan for $49/mo. You can also subscribe annually.
6. Tube Arsenal
Quick fact – Tube Arsenal is among the best HD intro and outro maker for YouTube. No monthly/annual subscription plans. Each outro template can be customized online.
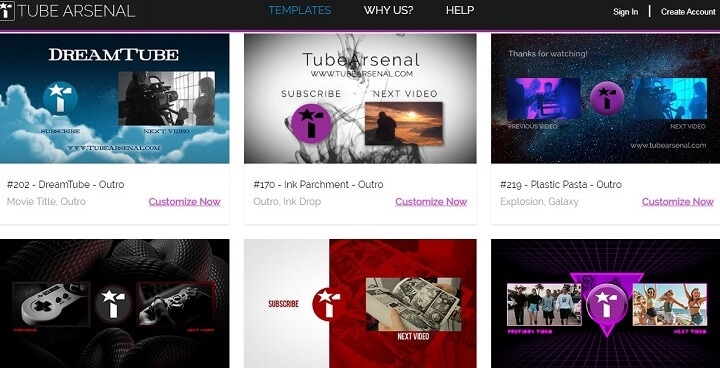
Despite its high quality and professional templates, Tube Arsenal is suitable for both beginners and experts. Would you like to add the best YouTube outro songs to your videos? Select any intro or outro and on the customizing chart to the left, scroll to the bottom and click “Music”.
Some of the features include unlimited downloads, free downloads, online template customization and curated collection of intros and outros. Each outros’ price is determined by its resolution (720px for $9 and 180px for $11).
7. Animaker
Quick fact – Animaker takes cognizance of human creative ability. You can, therefore, create your own intro from scratch or edit the provided templates.

Animaker is among the world’s most used YouTube intro maker. It’s trusted by over 1000 big brands like Adidas, Google, UNICEF, and Uber. You can start with the free plan if it’s your first time then upgrade to the complex paid plans. The paid plans are Personal for $19/mo, Startup for $35/mo and Business for $59/mo.
There are many features to look out for in Animaker. Some include 50+ backgrounds YouTube intro music, over 175 sound effects, custom font support and pre-designed templates.
8. Video Jaguar
Quick fact – Video Jaguar is a cloud-based software used creating YouTube intros and outros. You can, therefore, use it from any location without downloading it.

This app’s outro maker interface comes equipped with easy to use features like full HD intro and outro templates, licensed music and text editor. There are also plenty of royalty-free photos.
Video Jaguar is majorly designed for marketers who specialize in video ads to grow their brand awareness.
You may also like: How to Convert YouTube to MP4 Safely? [Step by Step Guide] >>
Part 3: How To Make And Add Outro To YouTube Video
How to make a YouTube outro was comprehensively answered by the launch Filmora video editor. Why say Filmora? We all know how the best professional YouTube outros should look like, right? Go to the Filmora products page then click download. Among the features, you’ll find include transitions, backgrounds, effects, rich text editor and free audio and voiceover recorder among others.
Step 1: Start by downloading and installing Filmora on your Windows or Mac by clicking any of the below icons.
Step 2: Once it’s fully installed, double-click on the Filmora icon on your desktop to open a welcome screen for you to start a new project. Adjust the project aspect ratio to 16:9.
Step 3: Click the new project and wait for the software full interface to open. On the Filmora Filmstock page, search and select a YouTube outro template of your choice, download and save to your media.
Before importing the template, click “Sample Colours” to choose a color that rhymes with your video and set it as the background.
Click “Media” on the top menu and import your outro template to the timeline.
Step 4: Use the screen blind mode to edit the YouTube outro elements at the preview window. Also, you can select audio and add it as outro music for YouTube. Click “Title” to select your preferred font editor. Once you are done, export the outro to the media file.
Check this video tutorial. It’s very easy and simple to make a YouTube outro. Free to download the video maker and have a try now!
Part 4: How To Add An Outro To A Youtube Video
To understand the whole end screen process we will continue with the Filmora video editing procedure.
Step 1: Upload your video to the timeline and create a space for the video outro.
Step 2: Import the YouTube outro created earlier and drag it down to the timeline. Now that you have two imports on your timeline, drag the outro to the videos end section.

Step 3: Click “Export” to save or upload the video on YouTube. You now have your video with an end screen.
Part 5: Frequently Asked Questions about YouTube Outro

Best Websites for YouTube Outro Template Download
YouTube Outro templates are helping websites grow their revenue by setting pricing plans. Nevertheless, there are some websites with even better free outro templates for download. Here is a combination of both paid and free websites to download YouTube outros:
Best Websites to Find YouTube Outro Songs
Finding outro songs for YouTube is a bit challenging partly because not many YouTube outro makers have also songs on the website. Video creators also tend to use video audio in their end screens thereby reducing the demand for outro songs.
Despite their low demand, few websites continue to create YouTube outro songs like:
You may also like: 10 Best Sources to Download Free Outro Music [No Copyright] >>
Conclusion
We all wish to create YouTube videos that attract many viewers and eventually subscribers! To grow your YouTube channel, start adding outros to your videos before uploading them to YouTube. YouTube outro engages viewers for longer by clicking the suggested videos or helps grow the channel.
It’s not a surprise to find some of your videos with no outros despite the high number of free intro and outro YouTube makers. Use the above list to make a stunning outro for YouTube.
Was this guide helpful to you? Kindly share your comments or thoughts on the social media platforms on this site.
Richard Bennett
Richard Bennett is a writer and a lover of all things video.
Follow @Richard Bennett
Richard Bennett
Mar 27, 2024• Proven solutions
The key reason your YouTube videos have a hundred views a year after publication is because they lack good YouTube intro and outro.
How interactive is your YouTube channel? Or, what’s the bounce rate of your YouTube videos? As you answer this, you’ll realize how important YouTube outro is. Very few people know to add outro to YouTube videos is the best YouTube SEO technique.
In this guide, I’ll demystify what YouTube outro is and how to make outro and add it to a YouTube video. If you are not a tech expert, use intro and outro makers highlighted herein to make your videos as interactive pas possible.
To get a sneak preview of what is entailed here; this guide has been subdivided into five parts:
- Part 1: YouTube Outro Prerequisites
- Part 2: Best 8 Intro And Outro Makers For YouTube
- Part 3: How To Make And Add Outro To YouTube Video
- Part 4: How To Add An Outro To A Youtube Video
- Part 5: Frequently Asked Questions about YouTube Outro
Part 1: YouTube Outro Prerequisites
In this part, we will learn what outros for YouTube are, the importance of land that distinguishes them from the intro. Also included are expert tips on how to make YouTube outro that attracts a hundred thousand subscribers in seven days included.
To understand what YouTube outro is and why you should add it to your videos, here is a detailed explanation.
Section 1: What is a Youtube Outro?
YouTube outro aka end screen is the last part of a video with a call to action statement, button or video suggestion to view other YouTube videos. In other words, it’s the last part of a video with calls to action links.
One of the most effective technical methods of optimizing YouTube videos is by adding an outro. This helps attract huge traffic, increase conversion and engage viewers.
Why spend your time adding outro? You can add Outro to YouTube videos to direct viewers to your website, other selected videos, engage viewers for longer and to persuade them to subscribe to the channel. In short, most end screens have four elements incorporated into an outro: Channel, subscribe, Video playlist and a website link.
Section 2: Difference Between Outro and Intro
Most YouTube videos have an intro and an outro. In this case, an intro is a short clip at the beginning of a YouTube video that introduces you to the viewers and your brand.
Even though video creators attach more emphasis on intros, both are both very critical. For your videos to achieve meaningful results, it’s important to view each as distinct from the other. Equally important to know, both intros and outros have different purposes.
| Differences Between YouTube Intro And Outro | |
|---|---|
| Intro | Outro |
| Inserted at the begging of a video | Inserted at the end of a video |
| Used to capture audience attention | Directs the audience to the next step |
| Introduces the topic | Suggests new topics to viewers |
| Attract viewers to the video | Contains a call-action button |
| Showcases a brand, logo, business slogan or a statement mission |
Section 3: YouTube Outro Requirements
Just as their requirements for any video uploaded on YouTube, outros are no exception. For your outro to be interactive, observe the following requirements:
1. Outro Resolution
Outros for YouTube should have an aspect ratio of 16:9 and a resolution of 1920px X 1080px.
2. Outro Element Sizes and Dimensions
End screen templates comprise elements that are in different shapes and sizes. When using a YouTube outro size of 1920px X 1080px, here are the element dimensions to use:
- Subscribe – 294px X 294px
- Channel – 294px X 294px
- Website link - 294px X 294px
- Video playlist – 615px X 345px
3. Outro Length
If you want to make your outro boring, make it long. So, how long should YouTube outro be? For your outros to have a high conversation rate, they should be approximately 10-20 seconds long. However, the length of your video should be the determining factor. A one-hour YouTube video can have a longer outro.
Don’t be challenged by setting the above sizes because nearly all intro and outro makers have already set dimensions for the elements. The major requirements are done for you
Section 4: Best Practices When Making A YouTube Outro
Imagine given 10 seconds to showcase your YouTube channel and direct viewers on the next move without breaking the engagement! Different YouTube outros come in different styles; certainly a show of one’s degree of creativity.
At this point, you should be already be having the best outro maker in mind - Filmora. The below YouTube outro tips should coincide with the features of your selected outro maker.
- Be relevant
The featured elements should be related to the video. Adding irrelevant elements your outro will most likely make the viewer click away.
- Keep to your goals
The big question is; what do you want to achieve from the YouTube end screen? Draw your attention to the subject matter of that particular video, your channel or the product highlighted in the video. Try to align your thoughts with those of the viewer.
Every video creator wishes for the following goals, increasing your channel subscribers, sending traffic to another site, viewing more videos and sharing to social media. Each YouTube outro element should have its own goal.
- Simple, clear and easy to interpret
Your outro will be meaningless if the audience cannot take action due to the complexity of either the language used or the ambiguity of words used. Use colors that pop out the elements making them the center of focus. Make them clear and avoid anything distractive.
- Use similar outro templates
Apart from being a good method of branding your channel, using similar outro on your videos adds credibility. It is, therefore, a good practice to have the consistency of colors, elements, images, and logos.
It’s absolutely important to understand all the prerequisites related to YouTube outros. Make use of the tips and requirements explained above when making and adding YouTube end screens to achieve the best results.
Part 2: Best 8 Intro And Outro Makers For YouTube
If you are wondering how to make the best magnetic intro and converting outro for your YouTube videos, this is your best article for you. Whether it’s the free online intro maker or the YouTube outro maker free no watermark, just select one that suits you most from the below list.
1. Wondershare Filmora
Quick fact – Using Filmora as an outro maker, allows you to select your admired background and outro template.
Do you want to make HD YouTube intros and outros that will grow your channel? I recommend Wondershare Filmora.
This software has the simplest friendly interface that any new and expert video editor would understand easily. This is very important for you; to use the best intro or outro for your YouTube videos, download Filmora video editor to get access to Filmstock. There are plenty of free and editable YouTube intro and outro templates ready for download.
Filmora is an all in one YouTube outro maker: you can download intro and outro templates, edit, add to your YouTube video and publish to your channel. There are innumerable backgrounds, transitions and effects to make an outro that matches the video colors, speed, and theme.
2. Outromaker
Quick fact – Outromaker is highly preferred for adding YouTube end screens with animated backgrounds that are mobile-friendly.
In spite of its pricey plans, Outro Maker continues to be more and more users due to its high genre of outro templates. Among the features included in this app are outro templates, YouTube mobile cards, and YouTube graphics.
To insert a Pokémon Go or animated cartoon background that rhymes with your videos, you have to register an account. Secondly, you must have a registered YouTube channel with videos. Lastly, subscribe to a paid plan.
3. MotionDen
Quick fact – MotionDen is an online into and outro maker. To create YouTube intro and outro without watermark, you have to first pay.
There are plenty of YouTube intro and outro templates for your marketing videos, showdown movies or hard sports videos. Only two pricing plans are available, namely $9.0/Video and $39/ month. Both plans produce HD intros and outros for YouTube and give access to directly publish to YouTube.
To start creating end screens, creating an account is a requirement. MotionDen has rich text editing features and direct typography to edit your logo.
4. Snappa
Quick fact- With Snappa as your YouTube outro maker, only 60 seconds are enough to create a professional high-quality outro.
This is the perfect YouTube outro maker online free with over a 5000+ outro template and million-plus royalty-free HD photos and graphics. Among the features it’s renowned for include, thousands of templates in different sizes, resizable graphics, a huge library of HD intros and outros and seamless integration with uploaded logos and custom fonts.
Most of the YouTube outro requirements like dimensions have been done for you. To access more features, subscribe to either the Pro plan for $10/month or the Team plan for $20/month.
5. Biteable
Quick fact- Biteable is a free online YouTube outro creator. It’s compatible with mobile phones and computers and is highly used by content marketing experts.
The clarity of the interface is enough to prove its simplicity and user-friendliness. The only requirement to use this app is registration. However, the free plan is limited to 10 projects per month, the basic content and 24/7 customer support. Its main limitation is any project under the free plan bears the Biteable watermark.
Biteable Youtube outro template download feature contains 85,000 Shutterstock clips. There are four optional pricing plans. The free plan with limited features, Starter Plan for $29/mo, Pro Plan for $29/mo and Unlimited Plan for $49/mo. You can also subscribe annually.
6. Tube Arsenal
Quick fact – Tube Arsenal is among the best HD intro and outro maker for YouTube. No monthly/annual subscription plans. Each outro template can be customized online.
Despite its high quality and professional templates, Tube Arsenal is suitable for both beginners and experts. Would you like to add the best YouTube outro songs to your videos? Select any intro or outro and on the customizing chart to the left, scroll to the bottom and click “Music”.
Some of the features include unlimited downloads, free downloads, online template customization and curated collection of intros and outros. Each outros’ price is determined by its resolution (720px for $9 and 180px for $11).
7. Animaker
Quick fact – Animaker takes cognizance of human creative ability. You can, therefore, create your own intro from scratch or edit the provided templates.
Animaker is among the world’s most used YouTube intro maker. It’s trusted by over 1000 big brands like Adidas, Google, UNICEF, and Uber. You can start with the free plan if it’s your first time then upgrade to the complex paid plans. The paid plans are Personal for $19/mo, Startup for $35/mo and Business for $59/mo.
There are many features to look out for in Animaker. Some include 50+ backgrounds YouTube intro music, over 175 sound effects, custom font support and pre-designed templates.
8. Video Jaguar
Quick fact – Video Jaguar is a cloud-based software used creating YouTube intros and outros. You can, therefore, use it from any location without downloading it.
This app’s outro maker interface comes equipped with easy to use features like full HD intro and outro templates, licensed music and text editor. There are also plenty of royalty-free photos.
Video Jaguar is majorly designed for marketers who specialize in video ads to grow their brand awareness.
You may also like: How to Convert YouTube to MP4 Safely? [Step by Step Guide] >>
Part 3: How To Make And Add Outro To YouTube Video
How to make a YouTube outro was comprehensively answered by the launch Filmora video editor. Why say Filmora? We all know how the best professional YouTube outros should look like, right? Go to the Filmora products page then click download. Among the features, you’ll find include transitions, backgrounds, effects, rich text editor and free audio and voiceover recorder among others.
Step 1: Start by downloading and installing Filmora on your Windows or Mac by clicking any of the below icons.
Step 2: Once it’s fully installed, double-click on the Filmora icon on your desktop to open a welcome screen for you to start a new project. Adjust the project aspect ratio to 16:9.
Step 3: Click the new project and wait for the software full interface to open. On the Filmora Filmstock page, search and select a YouTube outro template of your choice, download and save to your media.
Before importing the template, click “Sample Colours” to choose a color that rhymes with your video and set it as the background.
Click “Media” on the top menu and import your outro template to the timeline.
Step 4: Use the screen blind mode to edit the YouTube outro elements at the preview window. Also, you can select audio and add it as outro music for YouTube. Click “Title” to select your preferred font editor. Once you are done, export the outro to the media file.
Check this video tutorial. It’s very easy and simple to make a YouTube outro. Free to download the video maker and have a try now!
Part 4: How To Add An Outro To A Youtube Video
To understand the whole end screen process we will continue with the Filmora video editing procedure.
Step 1: Upload your video to the timeline and create a space for the video outro.
Step 2: Import the YouTube outro created earlier and drag it down to the timeline. Now that you have two imports on your timeline, drag the outro to the videos end section.
Step 3: Click “Export” to save or upload the video on YouTube. You now have your video with an end screen.
Part 5: Frequently Asked Questions about YouTube Outro
Best Websites for YouTube Outro Template Download
YouTube Outro templates are helping websites grow their revenue by setting pricing plans. Nevertheless, there are some websites with even better free outro templates for download. Here is a combination of both paid and free websites to download YouTube outros:
Best Websites to Find YouTube Outro Songs
Finding outro songs for YouTube is a bit challenging partly because not many YouTube outro makers have also songs on the website. Video creators also tend to use video audio in their end screens thereby reducing the demand for outro songs.
Despite their low demand, few websites continue to create YouTube outro songs like:
You may also like: 10 Best Sources to Download Free Outro Music [No Copyright] >>
Conclusion
We all wish to create YouTube videos that attract many viewers and eventually subscribers! To grow your YouTube channel, start adding outros to your videos before uploading them to YouTube. YouTube outro engages viewers for longer by clicking the suggested videos or helps grow the channel.
It’s not a surprise to find some of your videos with no outros despite the high number of free intro and outro YouTube makers. Use the above list to make a stunning outro for YouTube.
Was this guide helpful to you? Kindly share your comments or thoughts on the social media platforms on this site.
Richard Bennett
Richard Bennett is a writer and a lover of all things video.
Follow @Richard Bennett
Understanding Light Settings in YouTube Video Editing
How To Light Your YouTube Video
Richard Bennett
Oct 26, 2023• Proven solutions
When it comes to sensitivity to light, no consumer-level camera sensor comes close in performance to the human eye. Many newbies to videography, though, don’t think about this when they use their camera indoors and discover that their recorded footage appears too dark.
If you want to use your camera indoors as many YouTubers do, you’ll need to have extra light. But the solution is not as simple as surrounding yourself with lamps that are all randomly placed.
Below, I’ll go into detail on how you can set up your lighting equipment to make your YouTube videos look good.
| Table of Contents Using Light You Already Have Window LightingHome Lighting Home Studio Lighting Light Control3-Point Lighting4-Point Lighting |
|---|
Part 1: Using Light You Already Have
Most beginner YouTubers light their videos with what they already have. That’s what I did to start as well. In the past, my video recording space consisted of natural sunlight coming from my window and ceiling light for times when the sunlight wasn’t strong enough.
1. Window Lighting
The best thing about window lighting is that it’s free. The worst thing about it is that it’s uncontrollable. The amount of light you get in your video can vary with all the changes in the weather.
Window lighting for me was especially difficult to work with because I live in a very rainy and cloudy city, Vancouver, Canada, where we pretty much just get three months of good sun.

Above are two freeze frames from one of Daniel’s past window-lit vlogs. Although these two frames are both from the same vlog, you can see that the image on the right looks brighter due to clearer skies at that moment. These varying amounts of light is what you will have to deal with if you choose to light your YouTube video with window lighting.
2. Home Lighting
Home lighting is another source of light that many new YouTubers use. In the past, when my window light wasn’t strong enough to light my video recording space, I would turn on the ceiling light.

Notice how the color of Daniel’s skin looks much more orange here (above) than the color of the skin in the two side-by-side window lighting examples? The side of the face also appears to look bluer. This all happened because he mixed up different color temperatures shining out of the two lights (cooler window light and warmer ceiling light).
Most home lighting is warmer in its color temperature. If you want to use your home lights without everything being orange-tinted, you’ll need to switch out your light bulbs for daytime LED light bulbs.
Ceiling lights are also typically situated in the center of a room in order to light an entire room evenly. This is not likely to be the best location for your filming video. Since the ceiling light was directly above the face in the above example, you can see harder shadows beneath his cheeks.
Part 2: Home Studio Lighting
If you rather not deal with all the window and home lighting challenges, you can set up studio lighting in your home.
1. Light Control
The first thing you’ll want to do to set up studio lighting in your home is to pick a room to film in and eliminate as much external lighting as you can. Use blinds, curtains, towels, or any thick fabric to block sunlight from shining into your room.
2. 3-Point Lighting
The most common setup for studio lighting is 3-point lighting. For this kind of lighting you’ll need three lights: a key light, a fill light, and a back light (also called a hair light).

Out of the three lights, the key light should be the brightest. When it is positioned to the left of you (as shown in the diagram above) your right side will have shadows.
To minimize the shadows on your right side, use a weaker light as a fill light. You don’t want your fill light to completely eliminate all your shadows or else your shot will look flat.
Lastly, a backlight positioned behind you can give an appealing highlight to the ends of your head and even help to separate your hair from blending into your background if both happen to be dark.
3. 4-Point Lighting
As a YouTuber, you may not only want yourself to be seen optimally with proper lighting, but you may also want your background to be seen optimally, especially if you’ve taken the time to decorate it for your audience.
What you’ll need to ensure that your background is sufficiently lit is 4-point lighting setup. The 4-point lighting setup is the same as a 3-point lighting setup, but with an additional light shining at your background.
For more information on lighting equipment, check out my Top 17 Video Lighting Equipment For YouTubers .
Touch Up YouTube Videos with Filmora
Filmora is one of the best video editing software for YouTube beginners to start the YouTube channel. So, if you find the lighting isn’t perfect after recording, you can use the Auto Color Enhancement feature in Filmora to adjust the color with one-click. Or, you can change the white balance, Light, color, and HSL manually. Filmora also features some presets and LUTs templates , which allows you to apply pre-programmed effects to video for color correction faster.
Richard Bennett
Richard Bennett is a writer and a lover of all things video.
Follow @Richard Bennett
Richard Bennett
Oct 26, 2023• Proven solutions
When it comes to sensitivity to light, no consumer-level camera sensor comes close in performance to the human eye. Many newbies to videography, though, don’t think about this when they use their camera indoors and discover that their recorded footage appears too dark.
If you want to use your camera indoors as many YouTubers do, you’ll need to have extra light. But the solution is not as simple as surrounding yourself with lamps that are all randomly placed.
Below, I’ll go into detail on how you can set up your lighting equipment to make your YouTube videos look good.
| Table of Contents Using Light You Already Have Window LightingHome Lighting Home Studio Lighting Light Control3-Point Lighting4-Point Lighting |
|---|
Part 1: Using Light You Already Have
Most beginner YouTubers light their videos with what they already have. That’s what I did to start as well. In the past, my video recording space consisted of natural sunlight coming from my window and ceiling light for times when the sunlight wasn’t strong enough.
1. Window Lighting
The best thing about window lighting is that it’s free. The worst thing about it is that it’s uncontrollable. The amount of light you get in your video can vary with all the changes in the weather.
Window lighting for me was especially difficult to work with because I live in a very rainy and cloudy city, Vancouver, Canada, where we pretty much just get three months of good sun.
Above are two freeze frames from one of Daniel’s past window-lit vlogs. Although these two frames are both from the same vlog, you can see that the image on the right looks brighter due to clearer skies at that moment. These varying amounts of light is what you will have to deal with if you choose to light your YouTube video with window lighting.
2. Home Lighting
Home lighting is another source of light that many new YouTubers use. In the past, when my window light wasn’t strong enough to light my video recording space, I would turn on the ceiling light.
Notice how the color of Daniel’s skin looks much more orange here (above) than the color of the skin in the two side-by-side window lighting examples? The side of the face also appears to look bluer. This all happened because he mixed up different color temperatures shining out of the two lights (cooler window light and warmer ceiling light).
Most home lighting is warmer in its color temperature. If you want to use your home lights without everything being orange-tinted, you’ll need to switch out your light bulbs for daytime LED light bulbs.
Ceiling lights are also typically situated in the center of a room in order to light an entire room evenly. This is not likely to be the best location for your filming video. Since the ceiling light was directly above the face in the above example, you can see harder shadows beneath his cheeks.
Part 2: Home Studio Lighting
If you rather not deal with all the window and home lighting challenges, you can set up studio lighting in your home.
1. Light Control
The first thing you’ll want to do to set up studio lighting in your home is to pick a room to film in and eliminate as much external lighting as you can. Use blinds, curtains, towels, or any thick fabric to block sunlight from shining into your room.
2. 3-Point Lighting
The most common setup for studio lighting is 3-point lighting. For this kind of lighting you’ll need three lights: a key light, a fill light, and a back light (also called a hair light).
Out of the three lights, the key light should be the brightest. When it is positioned to the left of you (as shown in the diagram above) your right side will have shadows.
To minimize the shadows on your right side, use a weaker light as a fill light. You don’t want your fill light to completely eliminate all your shadows or else your shot will look flat.
Lastly, a backlight positioned behind you can give an appealing highlight to the ends of your head and even help to separate your hair from blending into your background if both happen to be dark.
3. 4-Point Lighting
As a YouTuber, you may not only want yourself to be seen optimally with proper lighting, but you may also want your background to be seen optimally, especially if you’ve taken the time to decorate it for your audience.
What you’ll need to ensure that your background is sufficiently lit is 4-point lighting setup. The 4-point lighting setup is the same as a 3-point lighting setup, but with an additional light shining at your background.
For more information on lighting equipment, check out my Top 17 Video Lighting Equipment For YouTubers .
Touch Up YouTube Videos with Filmora
Filmora is one of the best video editing software for YouTube beginners to start the YouTube channel. So, if you find the lighting isn’t perfect after recording, you can use the Auto Color Enhancement feature in Filmora to adjust the color with one-click. Or, you can change the white balance, Light, color, and HSL manually. Filmora also features some presets and LUTs templates , which allows you to apply pre-programmed effects to video for color correction faster.
Richard Bennett
Richard Bennett is a writer and a lover of all things video.
Follow @Richard Bennett
Also read:
- Cinema for All? A Comparative Look at Vimeo & YouTube for 2024
- [Updated] Efficient Tools Simplifying the Task of Feedback Erasure
- YouTube Alternatives Round-Up Top 3 Contenders
- Cutting-Edge Studio Lights for Online Filmmakers
- Mastering the Art of Viral Video Marketing
- [New] Enjoy a Stream of Nine Complete Christmas Capsules on YouTube
- [New] Easy Ways to Make a Great Educational Video for YouTube
- In 2024, Decoding YouTube's Earning Rules Update
- Notes Navigated Steps for Sound Submissions to YouTube
- In-Depth Explanation Implementing CC License Types
- [Updated] Capturing Moments with the Best 5 Photo & Video Apps for iPhones/Android
- Implementing YouTube's Custom Markup Guide
- [Updated] Breakdown Fundamental Aspects of ASMR Videos
- Share Smart Optimizing YouTube Videos on FB Platform
- [New] Dive Into the World of Expertise with YouTube's Top 10 Makeup Vloggers
- Master the Art of YouTubing with Pro Tools
- Concealed Video Streaming Background YouTube Watch for 2024
- Key Strategies Utilizing Hashtags in YouTube Gaming Content
- [Updated] Boost Your Blogging Bravery Following YouTuber Leaders
- 2024 Approved Access Creative Banners for Video Makers at Zero Price
- Amplify Your Video's Impact Increasing View Count on YouTube Shorts
- Boost Engagement Crafting Effective Thumbnails for 2024
- [New] Elevate Your Videos with Effective YouTube Thumbnails
- In 2024, Capture Clearness Without a Tripod Tool
- 2024 Approved Ensemble Dynamics Crafting Collaborative Content for Musicians
- Tailoring Thumbnail Lengths for YouTube Audience Focus
- 2024 Approved Beneath the Spotlight Top YouTube Events After VidCon
- Demystifying Creator Studio A Practical Handbook
- 2024 Approved Boosting Budgets with Effective YouTube Marketing
- Cash Rides High with Well-Crafted YouTube Shorts for 2024
- 2024 Approved Complete Overview V-YouTubers in the Digital Arena
- 2024 Approved Analyzing YouTube Rankings What Drives Top Placement?
- How Can You Grow Without Buying Views?
- Perfect Your Channel Imagery YouTube Thumbnail Do's & Don'ts
- The Premier Guide to Cost-Free Video Editors
- 2024 Approved Decoding YouTube's Algorithm The Role of Keyword Optimization
- In 2024, Effortless Online Audio Accessibility Ideal Tools for iPhone & YouTube
- Efficient Hashtag Use for Skyrocketing YouTube Audience for 2024
- [New] A Beginner's Path to Compiling a YouTube Playlist
- [New] Earning Power Through Engagement Ajay’s Success on YouTube Monetization
- Earnings Enlightenment Joshi and YouTube Success Stories for 2024
- Eye-Catching Thumbnails The Top 20 YouTube Fonts Unveiled
- In 2024, Discover 10 Amazing World Wanderlust Channels
- 10 Top YouTube Music Collectives Unveiled
- Step Into Profitability on YouTube - Beginner's Guide
- In 2024, Creative Freedom on a Budget Essential Green Screen Effects From Top 4 Tutorial Sources
- Best Fixes For Xiaomi Redmi Note 13 Pro 5G Hard Reset | Dr.fone
- In 2024, Mend Facebook Story Playback Pauses
- 2024 Approved The Essential Blueprint for Updating Your TikTok Presence
- Remove Google FRP Lock on Nubia Red Magic 9 Pro+
- [Updated] Next-Gen Broadcasting The Best Streamers' Choices Beyond OBS
- Fundamental Video Editing Software for All
- In 2024, What is the best Pokemon for pokemon pvp ranking On Poco C55? | Dr.fone
- 2024 Approved Comprehensive Guide to Top AE Extensions
- Essential 15 Cameras for Professional Vlogging Experience
- The Essentials of Simple, Straightforward HDR Techniques
- 2024 Approved Capturing Your iPhone/iPad Display Now
- In 2024, How to Unlock iPhone 7? | Dr.fone
- Top 15 Apps To Hack WiFi Password On Poco C50
- Top 10 Stress Relieving Games for 2024
- 2024 Approved Unlocking 12 Steps Fixing Hidden FB Video Issues
- 2024 Approved Chronoscope Effect Flip Your Snapchat Videos Right
- Eyecatch Protector Cam Cover
- [Updated] Evaluating Rival Tools to Superior ShareX
- [Updated] Dual-Display Audio Preservation for 2024
- Ultimate Choice for Live TV Access with Regional Networks, 2024 Edition
- Google Play Services Wont Update? 12 Fixes are Here on Honor V Purse | Dr.fone
- Updated Aspect Ratio Calculator How to Get the Perfect Proportions
- Screen Snatching Savvy Top Tools to Transform Your Workflow for 2024
- [Updated] 6 Innovative MC House Concepts for Community Living for 2024
- [New] In 2024, Twitter Video Viral
- 2024 Approved Gamer's Gauntlet Bizarre TikTok Games You Must Try
- Harmonizing Hits The Best Melodies to Complement Cinematic Short Films and Videos
- New 2024 Approved Create Unforgettable Videos Top 5 Photo Slideshow Makers Revealed
- [New] SmoothRecorder Ultimate Edition
- [New] In 2024, Zoom Chat How to Chat in Zoom Meeting? [Tips & Tricks]
- New Streamline Your Workflow Best Light Video Editors for 2024
- [Updated] 2024 Approved Navigate the Top 8 FB Movie Downloader Choices
- The 6 Best SIM Unlock Services That Actually Work On Your Samsung Galaxy A15 5G Device
- [Updated] Top Tech Reviews with a Focus on Alternatives
- In 2024, Ideal Emulation Tools to Relive Sony's PlayStation Experience
- [Updated] In 2024, Comprehensive Razer Camera Study
- Initiating Efficient Conversations on Snapchat with Three Steps
- How to Make the Most Out of Spotify's Advertising Features
- [Updated] 2024 Approved Enhancing Engagement The Art of Animated FB Advertising
- [New] Streaming Directly From Facebook to Your Screen for 2024
- New In 2024, Unlock Pro-Level Text Animation on Your Phone with These Apps
- About Honor 100 FRP Bypass
- In 2024, How to Bypass iPhone XS Max Passcode Easily Video Inside
- Title: "[Updated] Concluding Your Channel on YouTube - Expert Guides & Templates"
- Author: Steven
- Created at : 2024-05-25 20:50:49
- Updated at : 2024-05-26 20:50:49
- Link: https://youtube-clips.techidaily.com/updated-concluding-your-channel-on-youtube-expert-guides-and-templates/
- License: This work is licensed under CC BY-NC-SA 4.0.
