
![[Updated] Comprerante Titling Matrix for Multiple Platforms](https://www.lifewire.com/thmb/4tUkHI9DMwB9qvnmAkwvCvX7ps8=/400x300/filters:no_upscale():max_bytes(150000):strip_icc()/GIF-Gallery-Instagram-iPhone-8635408-3bc01cb02a56401883d0b483d91a57f0.jpg)
[Updated] Comprerante Titling Matrix for Multiple Platforms
Comprerante Titling Matrix for Multiple Platforms
Versatile Video Editor - Wondershare Filmora
An easy yet powerful editor
Numerous effects to choose from
Detailed tutorials provided by the official channel
The vertical video went to a mainstream media style. Nowadays, it’s common for online video, especially on social apps. Mobile video has become the most common way to watch online videos. It makes sense then that vertical is the preferred familiarization for videos. Users don’t want to twist their phones to watch a 30-second ad. Knowing YouTube shorts vertical size is important as well as Facebook vertical video specs.
Social juggernauts like Facebook and YouTube have adopted vertical video size or formats in current years. The newer social apps, like Snapchat and TikTok, use vertical video completely. While most platforms now prefer vertical video, they each have different patterns. Even Instagram vertical video dimensions premiere is different.
Users tinkering in video marketing know it’s essential to stay updated on social media video sizes across all platforms. But, we also know that it is time-consuming to dig through each technical specification of each social app. For that purpose, we have covered all network video sizes for each platform. So, browse the table of contents below and find the video dimensions, aspect ratios, and file sizes you need.
In this article
01 [What Vertical Video Size Do We Usually Use?](#Part 1)
02 [Vertical Video Dimension for Different Social Apps](#Part 2)
03 [Tips: How to Adjust Vertical Videos Size](#Part 3)
Part 1 What Vertical Video Size Do We Usually Use?
Videos come in different sizes. However, one principle is standard in creating them, the vertical video aspect ratio (width to height). This refers to how you compare and create the video height to video ratio (how you intend to record and produce your video).
Ideally, it is what you and viewers will see while watching your video. To create a perfect video, any video creator should decide on the relationship between the video height and width.
When creating YouTube vertical video dimensions, the width is usually longer than the height. Most television videos have a standard ratio of 4:3 and 16:9. However, social media videos are created using a 1:1 and 9:16 ratio.

A smartphone can shoot vertical videos perfectly, but some media players like cameras require editing and adjusting the sizes to get the correct aspect ratio. Experts won’t have difficulties adjusting horizontally shot videos, but an amateur will. Fortunately, you can avoid taking unprofessional shoots by focusing on the frame’s center to capture your subject wholly without clipping important aspects. While editing Facebook vertical video dimensions and other social apps, the results could vary depending on the editing software. But you can rotate the video within the software to get the correct dimensions lest you get ugly videos full of black backgrounds filling the frame.
Most cameras and video recorders have inbuilt settings that switch to aspect ratio when you start recording. And the good thing is that you can adjust the settings to your desired dimensions in the settings section. If you are shooting a vertical video without a preset aspect ratio, then:
- Shoot gently without switching your camera horizontally, especially if you are capturing a narrow view.
- Avoid fast spans as it appears intense on the camera that could result in blurry animations.
- Focus on what you are capturing, and if need be, zoom in to capture every essential detail.
The importance of applying aspect ratio in videos is to ensure your images and videos have excellent resolution. This way, you have a chance to present (market) your idea professionally.
Part 2 Vertical Video Dimension for Different Social Apps
Here is a guide on how to shoot vertical dimensions for various social apps –
1. YouTube Vertical Video Dimension Guide
It is common for viewers to switch to YouTube and watch videos, and this is why you need the work on the perfect YouTube vertical video size. Initially, you could display YouTube videos in different dimensions, but this is no longer the case since the app’s dynamic innovation to view animations in preferred sizes.

Usually, YouTube videos are recorded at a standard aspect ratio of 16: 9. It means that you cannot customize the dimensions as this is this ratio is the default.
Though the 16:9 dimensions are standard, you can also shoot your videos using different ratios like 1:1 (square), 4:3, or 9:16 (vertically). In this case, your video will fit different YouTube videos on each device but will display white or grey padding on the frames by default.
Manually adding padding to your videos reduces the ability to adjust them to different ratios on various devices. If you are yet to switch to YouTube vertical video dimensions, you are missing to increase brand awareness.
2. Facebook Vertical Video Dimension Guide
Facebook vertical video specs have mainly been using the 16:9 ratio. And since the app attracts billions of global users, it’s high time to optimize your snapshots and try posting in different formats.

For your next FB vertical video size for feed videos, think of square snapshots (1:1), 2:3, 4:5, or 16:9. If you love creating Facebook stories, you can stick to the 9:16 ratio. And for Facebook live videos, stick with the Facebook video vertical size, 16:9 dimensions. Note that most Facebook video posts will automatically have a standard measurement of 16:9.
3. Instagram Vertical Video Dimensions Guide
Since the inception of Instagram vertical video dimensions premiere, the ratio has always been 1:1. This dimension makes it optimal for phones and small-sized screens. Here is the ultimate guide for your new Instagram animations:
- 1:1 for square videos.
- 4:5 for portrait shots.
- 9:16 when shooting vertical animations.
If you are going live on Instagram, we recommend 9:16, while you can shoot in 1:1, 4:5, and 16:9 ratios for feed videos. For Instagram stories, we suggest 9:16, but you can always work around 1:1, 4:9, and 16:9.

4. Twitter Vertical Video Dimension Guide
Twitter is quite different when considering feed video dimensions; portrait and square. The former (portrait) is a favorite for ads and marketing videos display (increase brand visibility), whereas the latter is perfect for displaying videos on multiple devices.
Twitter videos can be perfect in the below dimensions:
- Promotional video ads 1:2 39 to 2.39:1
- Six-second short ads 1:2.39 – 2.39:1
- First video ads 1:2.39 – 2.39:1
- Personal portrait (vertical) videos 9:16
- Personal horizontal animations 1:2.39 – 2.39:1

5. WhatsApp Vertical Video Dimension Guide
Most people don’t know the importance of resizing WhatsApp videos. Sharing videos on your WhatsApp status is a marketing strategy, but you must resize your videos well. Most video WhatsApp vertical videos have 4:3 dimensions and a 1080 × 1920 pixels size.
Part 3 Tips: How to Adjust Vertical Videos Size
The smartphone has become the primary tool for taking photos or recording videos, but we hold our mobile phone in a different direction while shooting videos, which causes the wrong adjustment while uploading it. Fortunately, there are ways, and your video can fit any screen without any compromises. Bellow, we are going to tell you two methods to adjust vertical video size
Method 1: Filmora
Filmora allows users to rotate your video to any point they want. What’s more, you can zoom in or crop the undesired parts in the video with a snap. It also offers you preset aspect ratios like 16:9, 9:16; 4:5, 1:1, etc., to help you quickly find the perfect aspect ratio for YouTube, Instagram, and other social apps. Let’s see how to change video adjustment in Filmora.
How to crop aspect ratio at the starting interface:
In this method, you must upload the animation first. Follow these steps:
Step 1: Upload your video into the editing panel.
Step2: Scroll to the drop-down menu to see various dimensions (1:1. 4:3, 9:16, 16:9, and 21:9).
Step3: Select the desired ratio and apply.

Modifying aspect ratio in project settings:
This method allows you to preset the ratios before uploading your media. Most files are preset to a 4:3 ratio, but you can adjust as you wish. Note that uploading a video with other aspect ratios will automatically switch to the default one. However, you can change the ratio by clicking on the project settings tab.

Changing aspect ratio when editing:
You can crop your video after importing it to the Filmora panel using the crop and zoom tools.
Step 1: Right-click on the file in the panel.
Step 2: Select crop and zoom.
Step 3: Click on the desired ratio from the suggestions (16:9, 4:3, 1:1, and 9:16) and confirm the action by clicking OK.

You can also modify the aspect ratio manually, add filters, and blur the background to enhance resolution when editing.
Auto reframing:
Latest Filmora running versions like V10.5 have the auto-reframe feature that can help crop aspect ratio seamlessly. The good thing about this feature is that it detects any object and can remove it if need be. Plus, this video editor also comes with preset aspect ratios that conveniently suit different social apps.
You can auto reframe by:
Step 1: Import the video to the panel. Right-click on the file and select the auto-reframe icon.

Step 2: Choose the desired aspect ratio.

Step 3: Click the analyze icon and wait for the results in a preview window.
Step 4: Adjust the frame by dragging the box to balance the object or leave it if you love the results.

Step 5: When done, rename it and click the export feature to save your new file.

Step 6: Edit (add effects) as desired.
Modifying aspect ratio when exporting:
After saving your file, you can export it to your desired media display device and change the aspect ratio based on your platform settings, as discussed above.

Method 2: Final Cut Pro
Apple’s Final Cut Pro is a compelling software for video editing and compositing. The interface is designed similar with many other video editing programs such as Adobe Premiere and Combustion etc.
To prepare:
- Take vertical videos.
- Connect iPhone to an editing system.
- Enter a password on the iPhone.
- Started Final Cut Pro.
- Create a new library, named it “Vertical Video”.
Steps to adjust vertical video size with Final cut pro:
Step 1: To import the video clip, you want to edit, click on the File > Import Media. The connected iPhone screen appears in the top left corner. The circle icon shows that FCP is still collecting data from the phone and the pointing arrow allows to disconnect.
Step 2: When the iPhone is chosen in the sidebar, thumbnails appear at the bottom of the Media Import window. For example, you can see the four vertical video clips, choose one to edit.
Step 3: The iPhone compresses MP4 video. While editing a simple project, you don’t need to generate optimized media. However, optimizing media will save you time in the long run if you plan to add lots of effects.
Step 4: Now, generate a new project and apply the Automatic settings.
Step 5: Next, edit a vertical clip into the empty new project. Even if this isn’t the first clip you want the audience to see, it is essential because FCP uses this clip to configure the project settings.
Step 6: When that first video clip is edited into the timeline, this dialog arrives. Note that the frame size is already fixed by the size of the video you shot on the iPhone. Don’t change any settings. It allows FCP to automatically configure the project to match the specs of this clip. If you’ve done this correctly, your clip appears vertically in the Viewer.
Wondershare Filmora
Get started easily with Filmora’s powerful performance, intuitive interface, and countless effects!
Try It Free Try It Free Try It Free Learn More >

AI Portrait – The best feature of Wondershare Filmora for gameplay editing
The AI Portrait is a new add-on in Wondershare Filmora. It can easily remove video backgrounds without using a green screen or chroma key, allowing you to add borders, glitch effects, pixelated, noise, or segmentation video effects.

Conclusion
As you can tell, video dimensions significantly influence your media resolution and impact. Aspect ratio is the standard way to modify your media to fit YouTube, Instagram, Facebook, and other social apps. Changing dimensions is a DIY process; you can edit YouTube vertical video dimensions and other social apps like Facebook and Instagram through Filmora or Final Cut Pro.
The vertical video went to a mainstream media style. Nowadays, it’s common for online video, especially on social apps. Mobile video has become the most common way to watch online videos. It makes sense then that vertical is the preferred familiarization for videos. Users don’t want to twist their phones to watch a 30-second ad. Knowing YouTube shorts vertical size is important as well as Facebook vertical video specs.
Social juggernauts like Facebook and YouTube have adopted vertical video size or formats in current years. The newer social apps, like Snapchat and TikTok, use vertical video completely. While most platforms now prefer vertical video, they each have different patterns. Even Instagram vertical video dimensions premiere is different.
Users tinkering in video marketing know it’s essential to stay updated on social media video sizes across all platforms. But, we also know that it is time-consuming to dig through each technical specification of each social app. For that purpose, we have covered all network video sizes for each platform. So, browse the table of contents below and find the video dimensions, aspect ratios, and file sizes you need.
In this article
01 [What Vertical Video Size Do We Usually Use?](#Part 1)
02 [Vertical Video Dimension for Different Social Apps](#Part 2)
03 [Tips: How to Adjust Vertical Videos Size](#Part 3)
Part 1 What Vertical Video Size Do We Usually Use?
Videos come in different sizes. However, one principle is standard in creating them, the vertical video aspect ratio (width to height). This refers to how you compare and create the video height to video ratio (how you intend to record and produce your video).
Ideally, it is what you and viewers will see while watching your video. To create a perfect video, any video creator should decide on the relationship between the video height and width.
When creating YouTube vertical video dimensions, the width is usually longer than the height. Most television videos have a standard ratio of 4:3 and 16:9. However, social media videos are created using a 1:1 and 9:16 ratio.
A smartphone can shoot vertical videos perfectly, but some media players like cameras require editing and adjusting the sizes to get the correct aspect ratio. Experts won’t have difficulties adjusting horizontally shot videos, but an amateur will. Fortunately, you can avoid taking unprofessional shoots by focusing on the frame’s center to capture your subject wholly without clipping important aspects. While editing Facebook vertical video dimensions and other social apps, the results could vary depending on the editing software. But you can rotate the video within the software to get the correct dimensions lest you get ugly videos full of black backgrounds filling the frame.
Most cameras and video recorders have inbuilt settings that switch to aspect ratio when you start recording. And the good thing is that you can adjust the settings to your desired dimensions in the settings section. If you are shooting a vertical video without a preset aspect ratio, then:
- Shoot gently without switching your camera horizontally, especially if you are capturing a narrow view.
- Avoid fast spans as it appears intense on the camera that could result in blurry animations.
- Focus on what you are capturing, and if need be, zoom in to capture every essential detail.
The importance of applying aspect ratio in videos is to ensure your images and videos have excellent resolution. This way, you have a chance to present (market) your idea professionally.
Part 2 Vertical Video Dimension for Different Social Apps
Here is a guide on how to shoot vertical dimensions for various social apps –
1. YouTube Vertical Video Dimension Guide
It is common for viewers to switch to YouTube and watch videos, and this is why you need the work on the perfect YouTube vertical video size. Initially, you could display YouTube videos in different dimensions, but this is no longer the case since the app’s dynamic innovation to view animations in preferred sizes.
Usually, YouTube videos are recorded at a standard aspect ratio of 16: 9. It means that you cannot customize the dimensions as this is this ratio is the default.
Though the 16:9 dimensions are standard, you can also shoot your videos using different ratios like 1:1 (square), 4:3, or 9:16 (vertically). In this case, your video will fit different YouTube videos on each device but will display white or grey padding on the frames by default.
Manually adding padding to your videos reduces the ability to adjust them to different ratios on various devices. If you are yet to switch to YouTube vertical video dimensions, you are missing to increase brand awareness.
2. Facebook Vertical Video Dimension Guide
Facebook vertical video specs have mainly been using the 16:9 ratio. And since the app attracts billions of global users, it’s high time to optimize your snapshots and try posting in different formats.
For your next FB vertical video size for feed videos, think of square snapshots (1:1), 2:3, 4:5, or 16:9. If you love creating Facebook stories, you can stick to the 9:16 ratio. And for Facebook live videos, stick with the Facebook video vertical size, 16:9 dimensions. Note that most Facebook video posts will automatically have a standard measurement of 16:9.
3. Instagram Vertical Video Dimensions Guide
Since the inception of Instagram vertical video dimensions premiere, the ratio has always been 1:1. This dimension makes it optimal for phones and small-sized screens. Here is the ultimate guide for your new Instagram animations:
- 1:1 for square videos.
- 4:5 for portrait shots.
- 9:16 when shooting vertical animations.
If you are going live on Instagram, we recommend 9:16, while you can shoot in 1:1, 4:5, and 16:9 ratios for feed videos. For Instagram stories, we suggest 9:16, but you can always work around 1:1, 4:9, and 16:9.
4. Twitter Vertical Video Dimension Guide
Twitter is quite different when considering feed video dimensions; portrait and square. The former (portrait) is a favorite for ads and marketing videos display (increase brand visibility), whereas the latter is perfect for displaying videos on multiple devices.
Twitter videos can be perfect in the below dimensions:
- Promotional video ads 1:2 39 to 2.39:1
- Six-second short ads 1:2.39 – 2.39:1
- First video ads 1:2.39 – 2.39:1
- Personal portrait (vertical) videos 9:16
- Personal horizontal animations 1:2.39 – 2.39:1
5. WhatsApp Vertical Video Dimension Guide
Most people don’t know the importance of resizing WhatsApp videos. Sharing videos on your WhatsApp status is a marketing strategy, but you must resize your videos well. Most video WhatsApp vertical videos have 4:3 dimensions and a 1080 × 1920 pixels size.
Part 3 Tips: How to Adjust Vertical Videos Size
The smartphone has become the primary tool for taking photos or recording videos, but we hold our mobile phone in a different direction while shooting videos, which causes the wrong adjustment while uploading it. Fortunately, there are ways, and your video can fit any screen without any compromises. Bellow, we are going to tell you two methods to adjust vertical video size
Method 1: Filmora
Filmora allows users to rotate your video to any point they want. What’s more, you can zoom in or crop the undesired parts in the video with a snap. It also offers you preset aspect ratios like 16:9, 9:16; 4:5, 1:1, etc., to help you quickly find the perfect aspect ratio for YouTube, Instagram, and other social apps. Let’s see how to change video adjustment in Filmora.
How to crop aspect ratio at the starting interface:
In this method, you must upload the animation first. Follow these steps:
Step 1: Upload your video into the editing panel.
Step2: Scroll to the drop-down menu to see various dimensions (1:1. 4:3, 9:16, 16:9, and 21:9).
Step3: Select the desired ratio and apply.
Modifying aspect ratio in project settings:
This method allows you to preset the ratios before uploading your media. Most files are preset to a 4:3 ratio, but you can adjust as you wish. Note that uploading a video with other aspect ratios will automatically switch to the default one. However, you can change the ratio by clicking on the project settings tab.
Changing aspect ratio when editing:
You can crop your video after importing it to the Filmora panel using the crop and zoom tools.
Step 1: Right-click on the file in the panel.
Step 2: Select crop and zoom.
Step 3: Click on the desired ratio from the suggestions (16:9, 4:3, 1:1, and 9:16) and confirm the action by clicking OK.
You can also modify the aspect ratio manually, add filters, and blur the background to enhance resolution when editing.
Auto reframing:
Latest Filmora running versions like V10.5 have the auto-reframe feature that can help crop aspect ratio seamlessly. The good thing about this feature is that it detects any object and can remove it if need be. Plus, this video editor also comes with preset aspect ratios that conveniently suit different social apps.
You can auto reframe by:
Step 1: Import the video to the panel. Right-click on the file and select the auto-reframe icon.
Step 2: Choose the desired aspect ratio.
Step 3: Click the analyze icon and wait for the results in a preview window.
Step 4: Adjust the frame by dragging the box to balance the object or leave it if you love the results.
Step 5: When done, rename it and click the export feature to save your new file.
Step 6: Edit (add effects) as desired.
Modifying aspect ratio when exporting:
After saving your file, you can export it to your desired media display device and change the aspect ratio based on your platform settings, as discussed above.
Method 2: Final Cut Pro
Apple’s Final Cut Pro is a compelling software for video editing and compositing. The interface is designed similar with many other video editing programs such as Adobe Premiere and Combustion etc.
To prepare:
- Take vertical videos.
- Connect iPhone to an editing system.
- Enter a password on the iPhone.
- Started Final Cut Pro.
- Create a new library, named it “Vertical Video”.
Steps to adjust vertical video size with Final cut pro:
Step 1: To import the video clip, you want to edit, click on the File > Import Media. The connected iPhone screen appears in the top left corner. The circle icon shows that FCP is still collecting data from the phone and the pointing arrow allows to disconnect.
Step 2: When the iPhone is chosen in the sidebar, thumbnails appear at the bottom of the Media Import window. For example, you can see the four vertical video clips, choose one to edit.
Step 3: The iPhone compresses MP4 video. While editing a simple project, you don’t need to generate optimized media. However, optimizing media will save you time in the long run if you plan to add lots of effects.
Step 4: Now, generate a new project and apply the Automatic settings.
Step 5: Next, edit a vertical clip into the empty new project. Even if this isn’t the first clip you want the audience to see, it is essential because FCP uses this clip to configure the project settings.
Step 6: When that first video clip is edited into the timeline, this dialog arrives. Note that the frame size is already fixed by the size of the video you shot on the iPhone. Don’t change any settings. It allows FCP to automatically configure the project to match the specs of this clip. If you’ve done this correctly, your clip appears vertically in the Viewer.
Wondershare Filmora
Get started easily with Filmora’s powerful performance, intuitive interface, and countless effects!
Try It Free Try It Free Try It Free Learn More >
AI Portrait – The best feature of Wondershare Filmora for gameplay editing
The AI Portrait is a new add-on in Wondershare Filmora. It can easily remove video backgrounds without using a green screen or chroma key, allowing you to add borders, glitch effects, pixelated, noise, or segmentation video effects.
Conclusion
As you can tell, video dimensions significantly influence your media resolution and impact. Aspect ratio is the standard way to modify your media to fit YouTube, Instagram, Facebook, and other social apps. Changing dimensions is a DIY process; you can edit YouTube vertical video dimensions and other social apps like Facebook and Instagram through Filmora or Final Cut Pro.
A Comprehensible Walkthrough: Finding Your YouTube Remarks
How to Find Your Comments on YouTube?

Richard Bennett
Mar 27, 2024• Proven solutions
Have you ever felt worried about any YouTube comment that you published long ago, and later you realized that it was a mistake? Or, do you want to know what comments did you post and when? If so, YouTube offers a simple way of finding your past remarks, and making any changes to them if need be.
That said, the following sections teach you how to find your YouTube comments on a desktop or laptop computer, and also on a mobile device if you are a gadget freak.
- Part 1: How to Find Comments You’ve Posted on YouTube?
- Part 2: How to Find All YouTube Comments Your Channel Has Received?
- Part 3: How to Find Someone’s YouTube Comments by User Name?
- Part 4: How to Edit and Reply to YouTube Comments?
- Part 5: How to Moderate YouTube Comments?
- Part 6: Tips for Writing Good YouTube Comments
Part 1: How to Find All the Comments You’ve Posted on YouTube?
YouTube allows you to post comments on any video only if you are signed in to your Google account while browsing the streaming platform. Because of this, the portal is able to keep a record of your activities, thus enabling you to track all your comments, and take necessary action such as deleting or modifying them as required.
You can learn how to find all the comments you have posted on YouTube while using your preferred device by following the instructions given below:
1. Find Your YouTube Comments on a Desktop or Laptop Computer
Step 1: Sign In to Your YouTube Account
Launch your favorite web browser, go to the YouTube page, click SIGN IN from the top-right corner, and follow the on-screen instructions to enter your credentials and sign in to your Google/YouTube account.
Step 2: Get to the History Page
Click the Menu button from the top-left corner of the page, and then click History from the categories available in the navigation bar in the left.

Step 3: Access/View Your Past Comments
Click Comments from the right of the History page to view all the comments that you have posted earlier.

2. Find Your YouTube Comments on an iPhone
Unfortunately, at the time of this writing, the YouTube app for iOS doesn’t have the feature to view your comments history. However, there is a workaround where you can use a web browser on your smartphone to get this done. The process that is given below explains how to view your past YouTube comments on an iPhone:
Step 1: Sign In to Your YouTube Account on an Internet Browser
Launch your favorite web browser on your iPhone (Safari, the default one, is used here for illustration), go to https://m.youtube.com , tap the profile icon from the top-right corner, tap Sign in from the menu that appears, and follow the on-screen instructions to use your Google account credentials to sign in to YouTube.
Step 2: Access the Desktop Version of YouTube
Tap the More Options icon from the top-left corner of the browser, and then tap Request Desktop Website from the menu that appears to access the desktop version of YouTube on your iPhone.

Step 3: View Your Past YouTube Comments
Tap the Menu icon from the top-left corner of the YouTube page, and tap History from the menu that appears. On the History page, tap Comments from the right pane to view/access your YouTube comments that you posted in the past.

3. Find Your YouTube Comments on an Android Smartphone
As it is with iOS, the YouTube app for Android doesn’t allow you to view your comments history either. However, the workaround of using a web browser works pretty well on Android smartphones too, but with a few tweaks. The process of doing so is given below:
Step 1: Use a Web Browser to Sign In to Your YouTube Account
Launch Google Chrome on your Android smartphone (you can use any other web browser of your choice), and go to https://m.youtube.com . Notice how the interface automatically changes to the desktop version. Note: If the desktop version of the website isn’t visible, you can tap the More button (with three vertical dots) from the top-right corner of the browser, and check the Desktop site box.
Next, tap SIGN IN from the top-right corner of the YouTube page, enter your Google account credentials in the box available on the Sign in screen, enter your password when prompted, and sign in to your YouTube account.
Step 2: Choose a Web Browser (for Confirmation)
When the confirmation box pops up at the bottom, choose your preferred web browser, and tap the frequency of its usage for accessing YouTube. For instance, choose Chrome and Just once to use Google Chrome to access YouTube only for this session.
Step 3: View/Access Your Past YouTube Comments
Once you are signed in to your account, tap the Menu icon from the top-left corner of the YouTube page, and tap History from the menu that appears. When the History page opens up, tap Comments from the right pane to view and/or access your past YouTube comments.
Part 2: How to Find All YouTube Comments Your Channel Has Received?
If you own a YouTube channel and have posted several videos there, it is likely that you also have received a decent number of comments. Usually, these remarks are pretty helpful as they tell you how to improve your production quality, and what your audience prefers to watch in the future. Therefore, it is imperative to learn how to find all the comments that your YouTube channel has received, and the process given below explains exactly that:
1. Find Your Channel’s YouTube Comments on a Desktop or Laptop Computer
You can use your favorite web browser on a PC to easily find all the comments that the videos on your YouTube channel have received as long as you are signed in to your Google account. The step-by-step instructions on how this can be done are given below:
Step 1: Go to the Your videos Page
Open your favorite Internet browser, go to https://www.youtube.com , and sign in to your YouTube account as explained in the previous sections. Next, click the Menu icon from the top-left corner of the YouTube homepage, and click Your videos from the menu that appears.

Step 2: View the Comments
Make sure that the Uploads tab is selected on the Channel content window, and check the number under the Comments column of each video to see how many comments that particular film has received. You can click the number for any video to view its comments.

Step 3: Hide or Hold a Comment for Approval
Click the More icon from the right of the comment you want to moderate, and click Hide user from channel or Always approve comments from this user to hide the comments from the selected user or keep their comments on hold until you review and approve them respectively.

Note: To view all comments received on your YouTube channel, go to the Comments tab under YouTube Studio, and you will find all Channel comments & mentions.
2. Find Your Channel’s YouTube Comments on a Mobile App
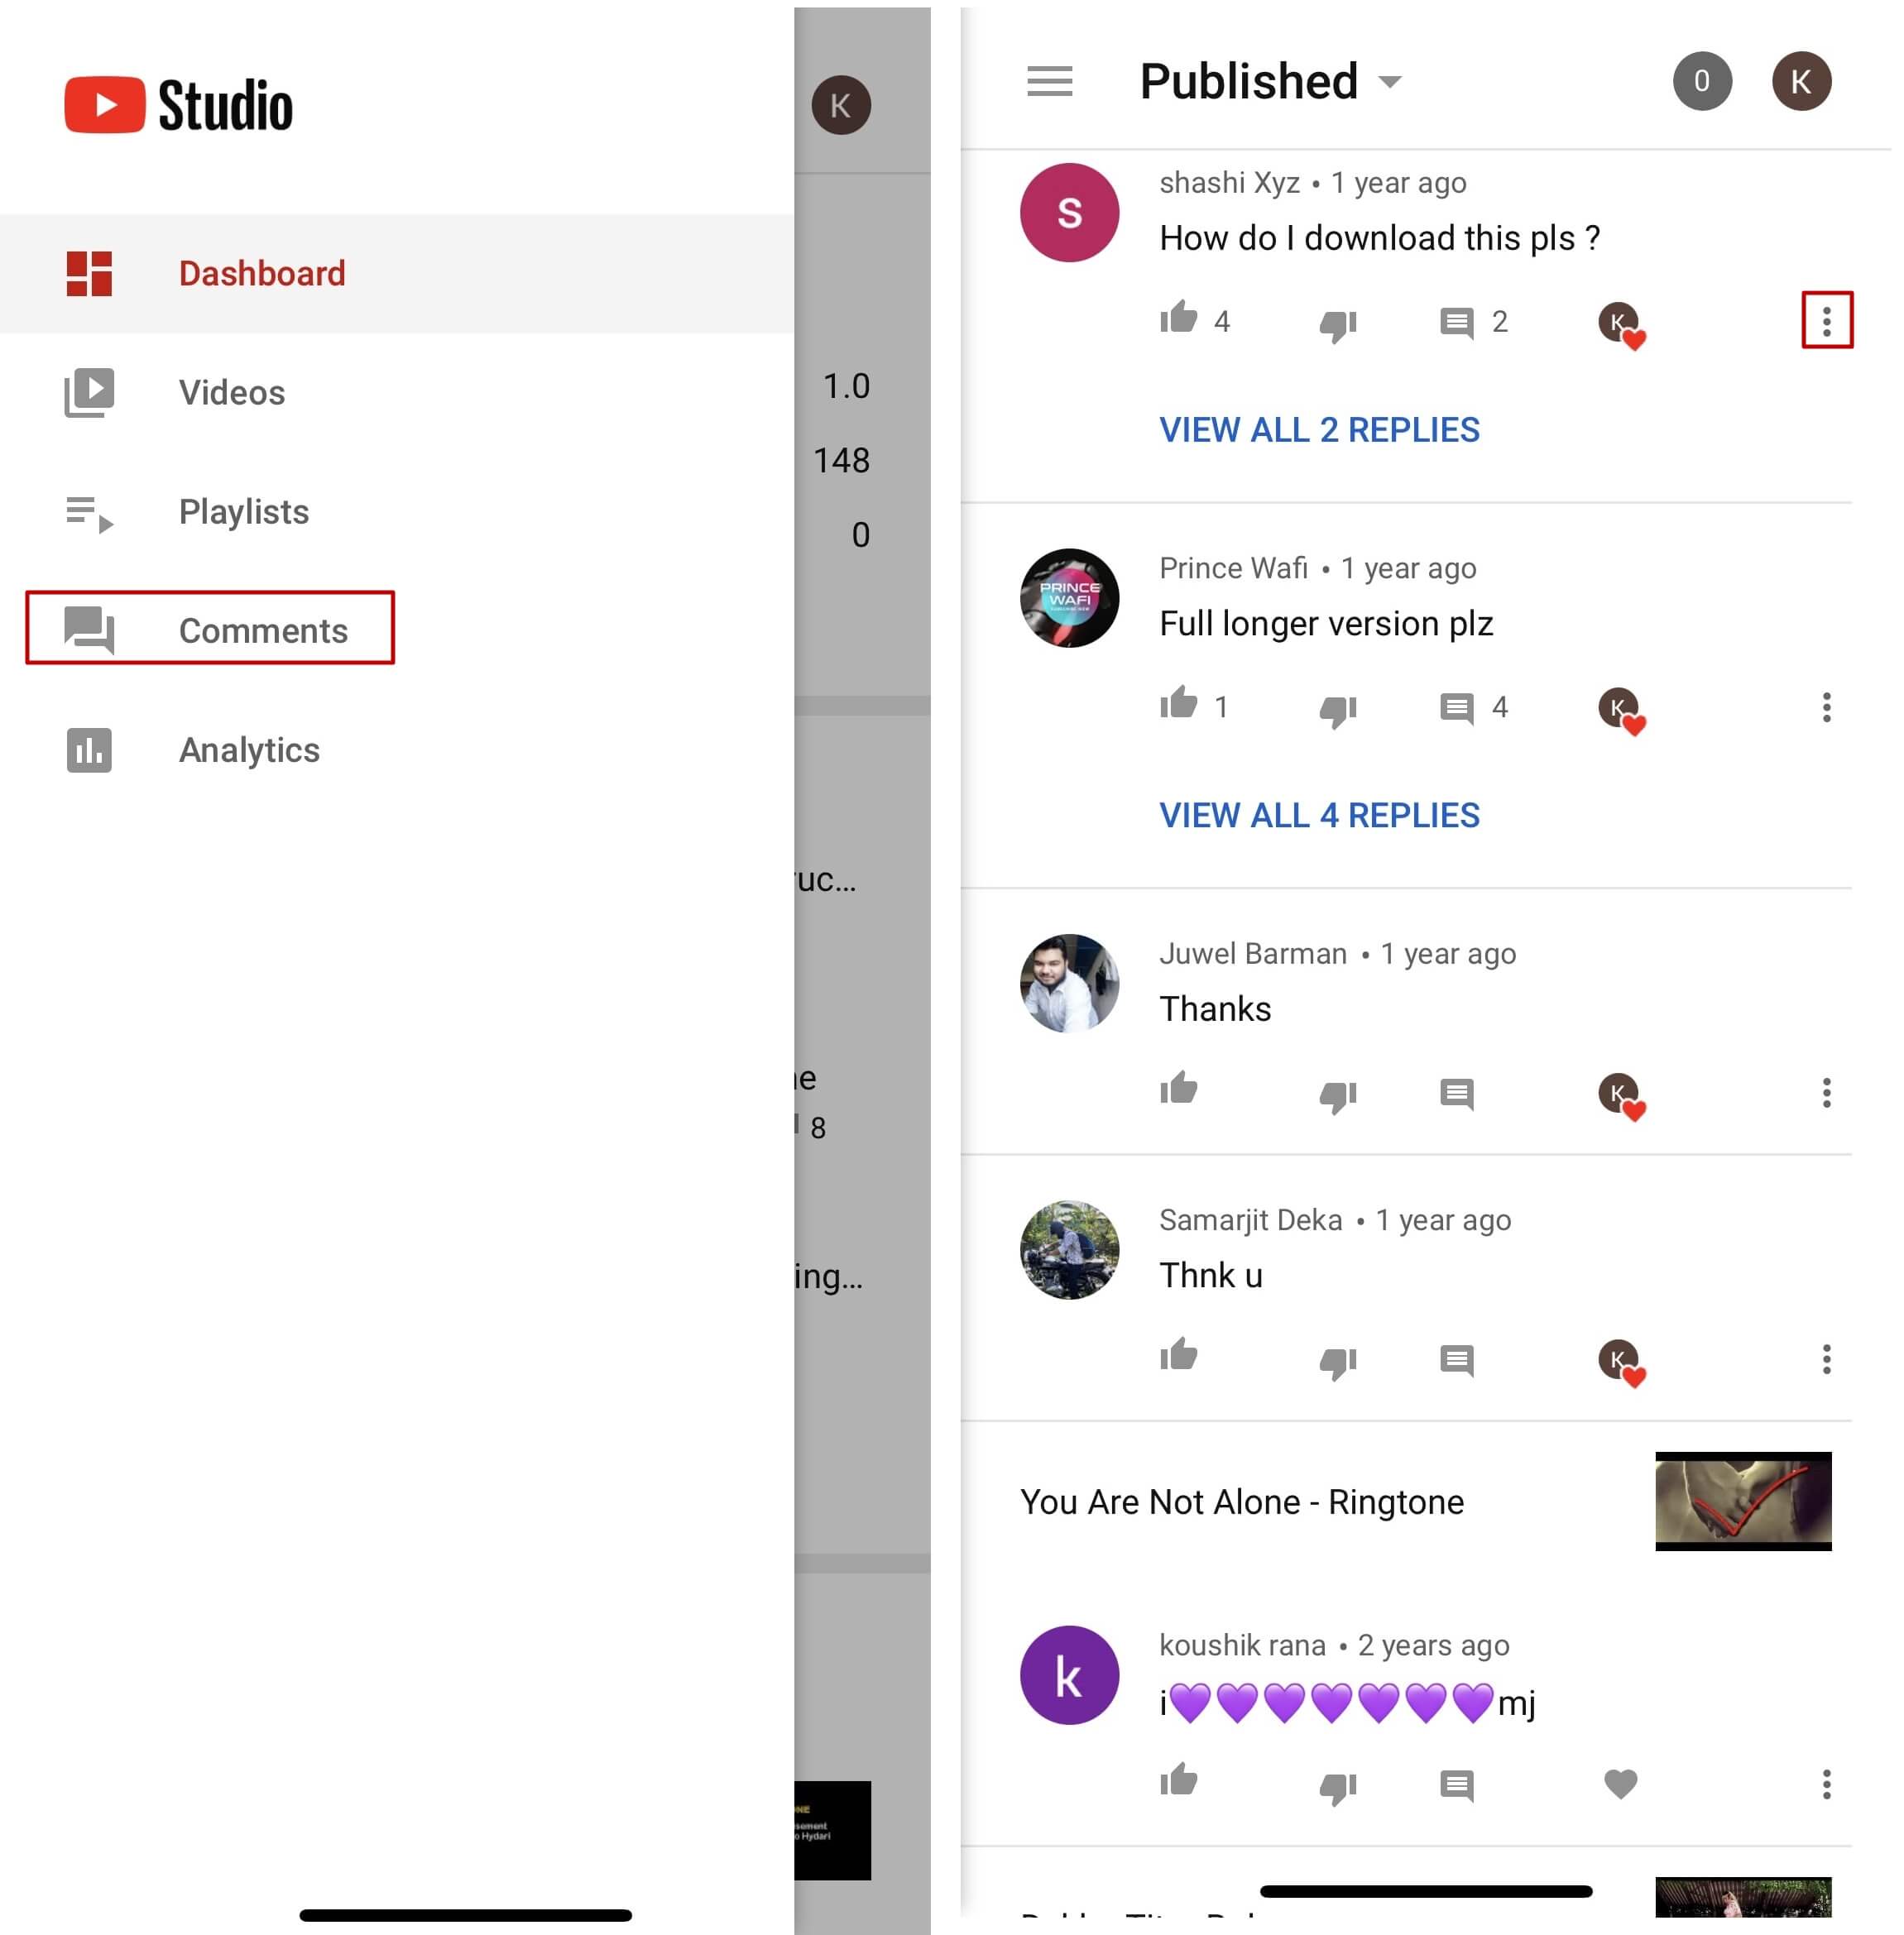
This process is comparatively simpler than the previous one as all that you need to do is download the YT Studio app, and access a central location where all the comments for all the videos can be viewed. The process is given below:
Step 1: Obtain a Mobile App
Go to App Store or Google Play Store, and search and download the YT Studio app on your iPhone or Android smartphone (iPhone X is used here for illustration).
Step 2: View/Access All the Comments
Launch the YT Studio app, and sign in to your YouTube account. Tap the Menu icon from the top-left corner of the interface, and tap Comments from the menu to view all the published comments for all the videos that you have received on your YouTube channel.
Step 3: Hide Users and View Held Comments
Tap the More button from the right of an inappropriate comment, and tap Hide user from channel from the menu that comes up. In addition, you can tap the More button next to Published from the top, and tap Held for review from the box that pops up to view the comments that are waiting for your approval.
Note: Unfortunately, you cannot hold the comments for approval using the YT Studio app. As a workaround, you can follow the procedure given earlier to access the desktop version of YouTube on your smartphone, and then use the method explained in the previous section to get this done. However, it is recommended that you do all such sensitive tasks on a laptop or desktop computer to avoid any errors.
Part 3: Find Someone’s YouTube Comments by User Name
If any of your YouTube videos has thousands of comments and you need to find a particular one from a specific user, checking each remark manually would be an extremely time-consuming and tedious task. Therefore, it is a good idea to let an efficient application do the job for you.
One program, a Google Chrome extension called YCS – YouTube Comment Search to be precise, can help you with this. All you are required to do is, install the extension, go to the video, and search the comment by the name of the user. The step-by-step instructions on how this can be done are given below:
Step 1: Install YCS – YouTube Comment Search
Launch Google Chrome on your desktop or laptop computer, search for YCS – YouTube Comment Search, click Add to Chrome, and click Add extension on the notification box that pops up to install the YCS – YouTube Comment Search extension on your instance of Google Chrome.
Step 2: Load All Comments
Go to your or any other’s YouTube video, and click Load All from the top-right corner of the YouTube Comment Search panel that is present under the description box to allow YCS to scan all the comments the video has received.

Step 3: Search Comments from a Particular User
Choose Comments from the search type drop-down list, enter the name of the user in question in the Search box, and click Search to fetch all their comments on the video.

Part 4: How to Edit and Reply to YouTube Comments?
Editing an existing YouTube comment that you have posted earlier, or replying to the one published by someone else is simple. The process is given below:
Step 1: Edit an Existing Comment
Use any of the methods explained above to locate your YouTube comment that you want to edit. Next, click the More icon from the right of the comment, click Edit from the menu, make the required changes to the text, and click SAVE.
Step 2: Reply to a Comment
Locate the comment that you want to reply to, click REPLY from under the comment, type your text in the available field, and click REPLY.

Part 5: How to Moderate YouTube Comments?
If you publish videos on YouTube that may put some impact on people’s lifestyle, you are likely to face criticism quite often. Therefore, you might want to moderate all your comments before they become visible to the audience so as not to spread negativity among the mass. Fortunately, YouTube helps you get this done easily, and the instructions that teach you the process are given below:
Step 1: Get to Your Channel’s Settings Box
Sign in to your YouTube account, click the Menu icon from the top-left corner of the homepage, and click Your videos from the menu that appears.
From the bottom of the navigation bar on the left of the YouTube Studio page, click Settings to open the channel’s Settings box.
Step 2: Moderate YouTube Comments
Go to the Community category from the left pane, and go to the Defaults tab from the right. Next, choose Hide all comments for review from the Comments on your new videos drop-down list, and click SAVE from the bottom-right corner of the box to moderate all YouTube comments that your new videos receive from this point onward.

Part 6: Tips for Writing Good YouTube Comments
While posting a comment on a YouTube video, it is imperative to keep a few things in mind. Some important tips that might come in handy in this regard are suggested below:
- Make your comment as relevant to the video as you possibly can
- Avoid using harsh language or slangs to maintain decency
- Be genuine while leaving feedback. However, make sure to choose polite words while typing a comment
- In case you want to add some suggestions, make sure to be humble
- Ignore the replies with inappropriate content
FAQs About YouTube Comments
Q1) Why can’t I see the comments I posted?
A: If you cannot see your comments, this could be because the owner or moderator has configured the channel or the video to hold all the comments for review before they are visible on YouTube.
In such a case, you are advised to wait for the authorized person to approve your remark before it is published. Another possibility is that the moderator/owner has added you to the ‘hidden users’ list due to some reason. Even in this case, your comment won’t be visible until you are removed from that list.
Q2) I have enabled ‘Notify me’ about comments and other activity on my channel or videos, but can’t see the comments on my video. Why?
A: You won’t be able to view the unpublished comments or those from the users you have added to the ‘hidden’ list. To fix this problem, you may want to disable moderation from your channel or the videos, and also unhide the users. The processes of both these configurations are explained in detail in the above sections.
Richard Bennett
Richard Bennett is a writer and a lover of all things video.
Follow @Richard Bennett
Richard Bennett
Mar 27, 2024• Proven solutions
Have you ever felt worried about any YouTube comment that you published long ago, and later you realized that it was a mistake? Or, do you want to know what comments did you post and when? If so, YouTube offers a simple way of finding your past remarks, and making any changes to them if need be.
That said, the following sections teach you how to find your YouTube comments on a desktop or laptop computer, and also on a mobile device if you are a gadget freak.
- Part 1: How to Find Comments You’ve Posted on YouTube?
- Part 2: How to Find All YouTube Comments Your Channel Has Received?
- Part 3: How to Find Someone’s YouTube Comments by User Name?
- Part 4: How to Edit and Reply to YouTube Comments?
- Part 5: How to Moderate YouTube Comments?
- Part 6: Tips for Writing Good YouTube Comments
Part 1: How to Find All the Comments You’ve Posted on YouTube?
YouTube allows you to post comments on any video only if you are signed in to your Google account while browsing the streaming platform. Because of this, the portal is able to keep a record of your activities, thus enabling you to track all your comments, and take necessary action such as deleting or modifying them as required.
You can learn how to find all the comments you have posted on YouTube while using your preferred device by following the instructions given below:
1. Find Your YouTube Comments on a Desktop or Laptop Computer
Step 1: Sign In to Your YouTube Account
Launch your favorite web browser, go to the YouTube page, click SIGN IN from the top-right corner, and follow the on-screen instructions to enter your credentials and sign in to your Google/YouTube account.
Step 2: Get to the History Page
Click the Menu button from the top-left corner of the page, and then click History from the categories available in the navigation bar in the left.
Step 3: Access/View Your Past Comments
Click Comments from the right of the History page to view all the comments that you have posted earlier.
2. Find Your YouTube Comments on an iPhone
Unfortunately, at the time of this writing, the YouTube app for iOS doesn’t have the feature to view your comments history. However, there is a workaround where you can use a web browser on your smartphone to get this done. The process that is given below explains how to view your past YouTube comments on an iPhone:
Step 1: Sign In to Your YouTube Account on an Internet Browser
Launch your favorite web browser on your iPhone (Safari, the default one, is used here for illustration), go to https://m.youtube.com , tap the profile icon from the top-right corner, tap Sign in from the menu that appears, and follow the on-screen instructions to use your Google account credentials to sign in to YouTube.
Step 2: Access the Desktop Version of YouTube
Tap the More Options icon from the top-left corner of the browser, and then tap Request Desktop Website from the menu that appears to access the desktop version of YouTube on your iPhone.
Step 3: View Your Past YouTube Comments
Tap the Menu icon from the top-left corner of the YouTube page, and tap History from the menu that appears. On the History page, tap Comments from the right pane to view/access your YouTube comments that you posted in the past.
3. Find Your YouTube Comments on an Android Smartphone
As it is with iOS, the YouTube app for Android doesn’t allow you to view your comments history either. However, the workaround of using a web browser works pretty well on Android smartphones too, but with a few tweaks. The process of doing so is given below:
Step 1: Use a Web Browser to Sign In to Your YouTube Account
Launch Google Chrome on your Android smartphone (you can use any other web browser of your choice), and go to https://m.youtube.com . Notice how the interface automatically changes to the desktop version. Note: If the desktop version of the website isn’t visible, you can tap the More button (with three vertical dots) from the top-right corner of the browser, and check the Desktop site box.
Next, tap SIGN IN from the top-right corner of the YouTube page, enter your Google account credentials in the box available on the Sign in screen, enter your password when prompted, and sign in to your YouTube account.
Step 2: Choose a Web Browser (for Confirmation)
When the confirmation box pops up at the bottom, choose your preferred web browser, and tap the frequency of its usage for accessing YouTube. For instance, choose Chrome and Just once to use Google Chrome to access YouTube only for this session.
Step 3: View/Access Your Past YouTube Comments
Once you are signed in to your account, tap the Menu icon from the top-left corner of the YouTube page, and tap History from the menu that appears. When the History page opens up, tap Comments from the right pane to view and/or access your past YouTube comments.
Part 2: How to Find All YouTube Comments Your Channel Has Received?
If you own a YouTube channel and have posted several videos there, it is likely that you also have received a decent number of comments. Usually, these remarks are pretty helpful as they tell you how to improve your production quality, and what your audience prefers to watch in the future. Therefore, it is imperative to learn how to find all the comments that your YouTube channel has received, and the process given below explains exactly that:
1. Find Your Channel’s YouTube Comments on a Desktop or Laptop Computer
You can use your favorite web browser on a PC to easily find all the comments that the videos on your YouTube channel have received as long as you are signed in to your Google account. The step-by-step instructions on how this can be done are given below:
Step 1: Go to the Your videos Page
Open your favorite Internet browser, go to https://www.youtube.com , and sign in to your YouTube account as explained in the previous sections. Next, click the Menu icon from the top-left corner of the YouTube homepage, and click Your videos from the menu that appears.
Step 2: View the Comments
Make sure that the Uploads tab is selected on the Channel content window, and check the number under the Comments column of each video to see how many comments that particular film has received. You can click the number for any video to view its comments.
Step 3: Hide or Hold a Comment for Approval
Click the More icon from the right of the comment you want to moderate, and click Hide user from channel or Always approve comments from this user to hide the comments from the selected user or keep their comments on hold until you review and approve them respectively.
Note: To view all comments received on your YouTube channel, go to the Comments tab under YouTube Studio, and you will find all Channel comments & mentions.
2. Find Your Channel’s YouTube Comments on a Mobile App
This process is comparatively simpler than the previous one as all that you need to do is download the YT Studio app, and access a central location where all the comments for all the videos can be viewed. The process is given below:
Step 1: Obtain a Mobile App
Go to App Store or Google Play Store, and search and download the YT Studio app on your iPhone or Android smartphone (iPhone X is used here for illustration).
Step 2: View/Access All the Comments
Launch the YT Studio app, and sign in to your YouTube account. Tap the Menu icon from the top-left corner of the interface, and tap Comments from the menu to view all the published comments for all the videos that you have received on your YouTube channel.
Step 3: Hide Users and View Held Comments
Tap the More button from the right of an inappropriate comment, and tap Hide user from channel from the menu that comes up. In addition, you can tap the More button next to Published from the top, and tap Held for review from the box that pops up to view the comments that are waiting for your approval.
Note: Unfortunately, you cannot hold the comments for approval using the YT Studio app. As a workaround, you can follow the procedure given earlier to access the desktop version of YouTube on your smartphone, and then use the method explained in the previous section to get this done. However, it is recommended that you do all such sensitive tasks on a laptop or desktop computer to avoid any errors.
Part 3: Find Someone’s YouTube Comments by User Name
If any of your YouTube videos has thousands of comments and you need to find a particular one from a specific user, checking each remark manually would be an extremely time-consuming and tedious task. Therefore, it is a good idea to let an efficient application do the job for you.
One program, a Google Chrome extension called YCS – YouTube Comment Search to be precise, can help you with this. All you are required to do is, install the extension, go to the video, and search the comment by the name of the user. The step-by-step instructions on how this can be done are given below:
Step 1: Install YCS – YouTube Comment Search
Launch Google Chrome on your desktop or laptop computer, search for YCS – YouTube Comment Search, click Add to Chrome, and click Add extension on the notification box that pops up to install the YCS – YouTube Comment Search extension on your instance of Google Chrome.
Step 2: Load All Comments
Go to your or any other’s YouTube video, and click Load All from the top-right corner of the YouTube Comment Search panel that is present under the description box to allow YCS to scan all the comments the video has received.
Step 3: Search Comments from a Particular User
Choose Comments from the search type drop-down list, enter the name of the user in question in the Search box, and click Search to fetch all their comments on the video.
Part 4: How to Edit and Reply to YouTube Comments?
Editing an existing YouTube comment that you have posted earlier, or replying to the one published by someone else is simple. The process is given below:
Step 1: Edit an Existing Comment
Use any of the methods explained above to locate your YouTube comment that you want to edit. Next, click the More icon from the right of the comment, click Edit from the menu, make the required changes to the text, and click SAVE.
Step 2: Reply to a Comment
Locate the comment that you want to reply to, click REPLY from under the comment, type your text in the available field, and click REPLY.
Part 5: How to Moderate YouTube Comments?
If you publish videos on YouTube that may put some impact on people’s lifestyle, you are likely to face criticism quite often. Therefore, you might want to moderate all your comments before they become visible to the audience so as not to spread negativity among the mass. Fortunately, YouTube helps you get this done easily, and the instructions that teach you the process are given below:
Step 1: Get to Your Channel’s Settings Box
Sign in to your YouTube account, click the Menu icon from the top-left corner of the homepage, and click Your videos from the menu that appears.
From the bottom of the navigation bar on the left of the YouTube Studio page, click Settings to open the channel’s Settings box.
Step 2: Moderate YouTube Comments
Go to the Community category from the left pane, and go to the Defaults tab from the right. Next, choose Hide all comments for review from the Comments on your new videos drop-down list, and click SAVE from the bottom-right corner of the box to moderate all YouTube comments that your new videos receive from this point onward.
Part 6: Tips for Writing Good YouTube Comments
While posting a comment on a YouTube video, it is imperative to keep a few things in mind. Some important tips that might come in handy in this regard are suggested below:
- Make your comment as relevant to the video as you possibly can
- Avoid using harsh language or slangs to maintain decency
- Be genuine while leaving feedback. However, make sure to choose polite words while typing a comment
- In case you want to add some suggestions, make sure to be humble
- Ignore the replies with inappropriate content
FAQs About YouTube Comments
Q1) Why can’t I see the comments I posted?
A: If you cannot see your comments, this could be because the owner or moderator has configured the channel or the video to hold all the comments for review before they are visible on YouTube.
In such a case, you are advised to wait for the authorized person to approve your remark before it is published. Another possibility is that the moderator/owner has added you to the ‘hidden users’ list due to some reason. Even in this case, your comment won’t be visible until you are removed from that list.
Q2) I have enabled ‘Notify me’ about comments and other activity on my channel or videos, but can’t see the comments on my video. Why?
A: You won’t be able to view the unpublished comments or those from the users you have added to the ‘hidden’ list. To fix this problem, you may want to disable moderation from your channel or the videos, and also unhide the users. The processes of both these configurations are explained in detail in the above sections.
Richard Bennett
Richard Bennett is a writer and a lover of all things video.
Follow @Richard Bennett
Also read:
- How to Record Good Audio Without a Microphone?
- [New] Crafting a Winning Edge Mastering Keywords in Digital Marketing
- Thumbnail Artistry for Valorant Game Imagery, Swiftly Executed
- In 2024, Channel Growth Blueprint Selecting Between Studio and Latest Beta
- In 2024, Directing Fundamentals A Comprehensive Online Course by YouTube Experts
- Understanding the Economics YouTube's New Model for Content Creators and Viewers
- [Updated] Crafting Captivating YouTube Presence The Ultimate Guide to Making Thumbnails on Phones
- VR Journey Begins with These TOP Titles
- [New] Enhancing Engagement How to Utilize YouTube's Prominent Channels
- [Updated] Ahead of the Game in Sub4sub Essential Beginner's Guide Recommended
- Key View Figures for Earning Living on YouTube
- In 2024, 3-Step Financial Forecasting Assessing Revenue From Google's Platform, YouTube
- Unlocking Secrets for Superior ASMR Viewing
- [New] Effortless Calls Combining YouTube & Green Screens
- Best Talker Alteration Apps for Video Content Makers for 2024
- [New] Cultivating a Unique Vibe in Your Own Mukbang Content
- The Best Free, No-Money Tools for Digital Video Cutting
- In 2024, Earnings Update Navigating YouTube Monetization
- Unearthing Unique Content for Youtube's Spotlight
- In 2024, Cutting-Edge Techniques for Private YT Content Dissemination in Gmail
- 2024 Approved Bridging App Dimensions with YouTube Shorts
- [New] Charting a Course to Riches YouTube's Monetary Milestones
- [Updated] Access Top Shorter Video Downloads for FREE Online
- Boost or Bust Is Investing in Video Popularity Worthwhile?
- Analyzing TSeries’ Income via Subscriber Engagement on YouTube
- 2024 Approved Creating Engaging Haul Videos Techniques & Tips
- Crafting Intriguing YouTube Intros Without Spending for 2024
- Reimagine YouTube Snapshots With Luminous Outlines
- The Dual Approach – Mastering Two-Point of View Techniques in Your YouTube Reaction Video Content
- 2024 Approved Essentials YouTube's Premier Music Bands
- YouTube & Dailymotion Unveiling Core Variations
- Step Toward Balance Best Yoga Series to Watch and Learn From
- Uncover the Most Trusted YouTube Sources for News
- 2024 Approved Crafting Splitscreen YouTube Videos A Guide to Creativity
- [New] Essential Tech for New Channel Launches
- How to Fix the Green Screen on YouTube on Mac
- YouTube's Updated Monetization Playbook
- [New] Acoustic Mastery Secrets for Exceptional Audio Capture
- [Updated] Culinary Connoisseurs Must-Watch Food Content
- Elite 10 Volume Augmenters for All OS
- [Updated] A Comprehensive Guide to the Best Makeup Tutorials on YouTube
- 2024 Approved Analyzing T-Series Youtube Financial Gains
- [New] Channel Dominance Plan Studio Protocol Vs. Beta Update
- [Updated] Decoding the Functionality of YouTube's Media Hub
- In 2024, How to Remove Activation Lock From the Apple iPhone 12 mini Without Previous Owner?
- 2024 Approved Rotating the Audio and Video Files Is Quite a Challenging Task Though, but the Arrival of some of the Well Known Video Rotators Has Solved This Problem
- Updated 2024 Approved Unlocking the Power of Speech Synthesis Expert Conversion Tips
- Canvas Clearance Techniques for Uncluttered Image Frames for 2024
- The Right Path to Precise Speech-to-Text with Google App
- How to play HEVC H.265 video on Defy 2?
- New In 2024, That Will Make Aesthetic Cartoon Drawing More Understandable
- Advanced Techniques for MOV File Editing in Win 11
- 2024 Approved Effortless Selfie Sending - Learn the Technique Now
- [Updated] In 2024, LinkedIn Luminaries Chatting with Snapchat
- [New] Unlock Potential The 15 Best Tools for Transforming FB Revenue for 2024
- [New] 2024 Approved Easy Gaming Memories Start Recording Now!
- How to Watch Hulu Outside US On Xiaomi 14 | Dr.fone
- [Updated] Streamlined Methods to Store .mov on Your Windows PC
- DJI Drone Spectrum Entry, Enhanced, and Elite 4K
- Horizontal/Vertical Selecting Facebook Video Format for 2024
- [Updated] In 2024, Essential 15 Tools for Windows 11 Video Capture
- [New] No Stress, Just Peaceful PC Gaming for 2024
- New In 2024, Best Ways to Add Meme Text to Videos
- How to Remove Activation Lock On the iPhone XS Without Previous Owner?
- [New] Streaming HD 1080P on Facebook Tips and Tricks for 2024
- [Updated] In 2024, Beam Into a TikTok Live Your Seamless Integration Techniques
- Vintage Vibes Top Apps for Adding Retro VHS Effects to Your Mobile Videos
- Updated 2024 Approved Exploring the Hidden Gems of Jazz Musics Fundamentals
- Title: [Updated] Comprerante Titling Matrix for Multiple Platforms
- Author: Steven
- Created at : 2024-05-25 20:50:47
- Updated at : 2024-05-26 20:50:47
- Link: https://youtube-clips.techidaily.com/updated-comprerante-titling-matrix-for-multiple-platforms/
- License: This work is licensed under CC BY-NC-SA 4.0.
