[Updated] Comprehensive Guide to Embedding YouTube Playlists Online
Comprehensive Guide to Embedding YouTube Playlists Online
YouTube is an excellent resource for entertainment, education, and general information, but did you know you can also display a YouTube playlist on your website?
Embedding a YouTube playlist will allow you to showcase a collection of videos on a topic or theme on your website. It’s also a great way to keep your visitors engaged on your site for more extended periods.
To help you with the process, we’ll explore different step-by-step methods to embed a YouTube playlist on a website to add interactivity to your site.
So, if you’re ready to get started, read on!
How To Embed a YouTube Playlist on a Website
If you want to embed and display a YouTube playlist on your website, we’ll give you a complete rundown of the three methods you can try to get this done. But, of course, each method has its pros and cons, so you’ll need to decide which is right for you.
Here’s how to embed a YouTube playlist on a Website:
Embedding a YouTube Playlist on Website Using WordPress Plugin
The plugin is the simplest way to add a YouTube Playlist to your WordPress website. This will help you get this done in no time without having to write any code for the process.
With plugins like YouTube Feed Pro by Smash Balloon , you can extend your website’s functionality and create, customize, or embed a YouTube playlist with just a few clicks of a mouse.
To embed and add a YouTube playlist on your website page/post, do the following steps in sequence:
Step1 Launch a browser on your PC and head to your WordPress website’s login page. Sign in to your dashboard using your username and password.
Step2 Click the “Plugins” option from the left-hand side menu on the WordPress dashboard. Now, click “Add New” and use the search option to find and install the YouTube Feed Pro plugin. Afterward, click the “Activate” option to enable the plugin.
Step3 Click the “YouTube Feed” option from the left menu and open “All Feeds.” On the next page, click “Add New” at the top left of the screen.
You will now be asked what type of feed you want to create. Select “Playlist” and click “Next.”
Step4 You need to create your YouTube API Key , copy it, and paste it into the pop-up. Click “Add” to connect your YouTube account to the plugin.
Step5 Select the Playlist you want to display on your WordPress website and take its ID. Paste that in the next pop-up window and click “Next” to continue the process.
Your YouTube playlist will be connected to your WordPress website. To further customize it, select the template you want and click “Next.” You can also configure the Feed Layout and Color Scheme.
Step6 Once you are done with customization, click the “Embed” option on the top-right side of the screen, and a pop-up window will appear. Next, click “Add to a Page,” and a list of pages on your website will be displayed.
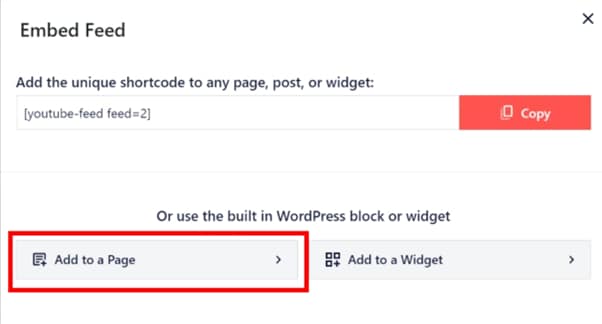
Choose your page and click “Add” at the bottom of the pop-up window. You’ll be directed to a new page where you can embed the feed. Click the “Plus” icon at the top-left of the screen, search for YouTube Feed and choose the Feeds for YouTube block to embed and add your playlist.
That’s about it! You’ve successfully embedded a YouTube playlist on your WordPress website.
Embedding a YouTube Playlist on a Website Using oEmbed Code
Another method to embed a YouTube playlist on your WordPress website is to use oEmbed Code. This method requires basic CSS, HTML, or Java knowledge; otherwise, you won’t be able to customize your playlist.
Moreover, this method is too complicated for beginners, and you will miss the customer support provided by WordPress plugin developers in case of any mishaps.
To use the oEmbed Code method, do the following steps:
Step1 In the first step, head to your YouTube account and access the Playlist you want to embed. Next, click the three dots below it and copy its URL.
Step2 Now, login to your WordPress dashboard and open the post or page editor where you want to add the playlist.
Step3 Paste the URL directly in the editor and click “Update” to save the changes.
WordPress will grab your playlist from YouTube and automatically show it in your post using oEmbed. The outcome is a single video with a menu that your viewers can click to see other videos in the playlist.
Embedding a YouTube Playlist on WebsiteUsing
Another way to embed a playlist of your YouTube channel on your WordPress site is by using the iFrame code with the following step-by-step instructions:
Step1 In the first step, launch a browser on your desktop or laptop and go to your YouTube channel.
Step2 Now, head to the YouTube playlist you want to embed, click the “Share” icon, and a pop-up window will appear.
Step3 Choose the “Embed” option, and a new lightbox pop-up will appear, having your playlist’s embed code. Click “Copy” to save the code on your clipboard.
Step4 Log in to your WordPress dashboard and open the page/post editor where you want to embed the playlist. Click the “Plus” icon, search for “custom HTML,” and select “Custom HTML block” to add to the page/post.
Now, paste the iFrame embed code you’ve copied from YouTube and click “Update” at the top-right of the screen to save the changes and embed your playlist.
This method will also display one video with a menu from where you and your website viewers can access the playlist. Moreover, there are few customization options to change the appearance.
A Bonus Tip: YouTube Video Maker - Filmora
If you find your YouTube videos as boring and not engaging as other content on your website, we recommend using Wondershare Filmora for your next project.
Free Download For Win 7 or later(64-bit)
Free Download For macOS 10.14 or later
With this software, you can quickly make eye-captivating YouTube videos by recording from a screen or webcam and can edit them using advanced editing features. Filmora also allows you to instantly export your content to YouTube with just a few clicks, which you can later embed into your website.
Some key features of Wondershare Filmora are as follows:
- Advanced video editing features include keyframing, speed ramping, Boris FX, Motion Tracking, Titles, and more.
- Massive library of preset templates, effects, transitions, animations, and royalty-free music.
- Instant Export to YouTube channel.
- Record from webcam, screen, and voiceover.
- Simple drag-and-drop interface.
Conclusion
This article discusses step-by-step methods to embed a YouTube playlist on a website using the WordPress plugin, oEmbed code, and iFrame embed code.
Additionally, we’ve recommended Wondershare Filmora for making engaging and captivating YouTube videos that you can export directly to your channel from the software.
We hope you’ve found this article informative and can now display your YouTube playlist on your site without hassle.
Script to Screen: Your Guide to YouTube Storytelling
How to Make YouTube Video
Richard Bennett
Mar 27, 2024• Proven solutions
Finding the audience for short videos you create, sharing your knowledge of publicizing the music you create has become a much simpler and cheaper process in the last fourteen years. ‘Everyone deserves a voice’ is one of the core values that motivates the founders of YouTube to continue developing the world’s largest video sharing platform. So if you are looking for your own voice, but you’re not really sure where to start, you’ve come to the right place, because in this article we are going to show you how to make attention-grabbing YouTube videos that are going to attract a huge audience.
- Preparation Stage for Making YouTube Video [4 Aspects You Should Consider]
- Production Stage: Recording a YouTube Video [5 Tips and Tricks]
- YouTube Video Postproduction Stage: Editing the Footage You Recorded
- Uploading Videos to Your YouTube Channel
- How to Make YouTube Videos from a Mac or PC Computer? [Step Guide]
Preparation Stage: Getting Ready to Make a YouTube Video
Achieving success on YouTube may only seem easy before you realize how much time and effort it takes to run a successful YouTube channel. Making a YouTube video isn’t much different than making any other type of short or feature film as you have to go through the same stages of the video production process. Everything, including creating YouTube videos starts with an idea, so let’s take a look at the steps you’ll need to take before you actually start recording your first YouTube video.
1. Start a YouTube Channel
The journey towards success begins with seemingly small and insignificant steps. Creating a YouTube channel is exactly that, a step, without which you won’t be able to become a YouTuber. All you have to do in order to create a channel on YouTube is sign in to the platform using your Google account and then head over to the Settings menu. Click on the Create a new channel option and then pick a name for your Brand channel . Dedicate some extra time to the process of selecting a name for the channel, because that is the first thing your potential followers are going to notice. The platform lets you start as many as fifty channels with one Gmail ID, and as your channels grow, you can add multiple managers to each channel you’ve started. Click on the Create button when you’re done and that’s it you’re now a proud owner of a YouTube channel.
We have summarized some tips and tricks for creating a YouTube channel account , hope that will help you to create a channel more easily.
2. Choose a Niche and Craft a Video Content Strategy
Devising a plan before you start producing content you are going to share on YouTube is going to give you a sense of direction, since there are so many different types of videos that can attract a large audience. Try to imagine your ideal YouTube follower, and then think about what they are interested in or how you can generate value for them through the content you post on your channel. Attempting to cover a broad spectrum of topics usually doesn’t produce the best results, so instead, you should focus on a specific subject and do your best to offer a unique perspective to your viewers on that subject. More importantly, you need to choose the themes for your videos that are relevant to the audience you would like to reach. Gaming, tutorials, beauty or comedy videos are just a few of the most popular genres of videos on YouTube, although which niche you’re going to pick ultimately depends on your personal interests and reasons why you chose to become a YouTuber in the first place.
Additionally, you should follow the hottest trends on the Internet so that you can find out which topics are drawing the most attention at the moment. Don’t let all these questions trouble you, simply choose a niche in which you feel the most comfortable in and start shooting. Keep a watchful eye on how your followers respond to the videos you share on your channel as time goes on and remain open to new ideas or collaborations.
3. Secure a Fresh Supply of YouTube Video Ideas
Defining your niche is just a beginning because you have to keep producing your videos at a steady pace. Most YouTube experts say that sharing new content at least once a week is necessary if you want to gather a large group of followers on your channel. Consequently, you’ll need a constant supply of ideas for new videos that cover topics your audience is interested in. A simple search on YouTube can help you discover the videos on the platform that have the most views. This should give you a pretty good idea which types of videos are the most popular at the moment and what viewers want to see the most.
Reading the comments section below a YouTube video can be a great way to discover new ideas since viewers often ask questions or search for advice on very specific aspects of the topic that particular video is covering. Moreover, YouTube isn’t the only destination on the Internet where you can find inspiration for your next video since there are countless groups and communities where you can come across interesting topics for your next video.
4. Get the Right Video and Audio Recording Equipment
The list of audio and video recording gear you’re going to need to create a YouTube video depends on the type of video you’re trying to make. Gamers who want to record gameplay and post it on their YouTube channel only need a screen capturing software or a capture card and a microphone. The list of equipment is a bit longer for YouTubers interested in the production of vlogs, comedy or review videos since they are going to need a camera or a Smartphone capable of recording videos at high resolutions, lighting equipment, tripods, steady cams, microphones. If you would like to learn more about the pieces of equipment you are going to need while recording a YouTube video, check our picks of the YouTube Video Shooting Equipment List .
Production Stage: Recording a YouTube Video
After you’ve successfully completed the preparation stage it is time to start getting ready for the next step of the process of making a YouTube video. However, you can’t just pick up a camera and start randomly shooting unrelated scenes, instead, you should follow the steps below that make the production of a video much less complicated.
1. Write a Script and Make a Shooting Schedule
Write down all of your ideas for your next video prior to shooting the first shot of that video. A script can be particularly useful if the video you’re planning on making involves a lot of narration since you’ll always know what to say next. Furthermore, you don’t have to record the entire video on the same day, and you have the freedom to plan when and where you are going to record each scene you want to include in the video.
2. Set a Scene
You control what the viewers of your YouTube video are going to see. That’s why you have to choose your shooting locations carefully and to hand-pick each prop that is going to be visible in the shot. Avoid shooting in messy rooms, because the items in the background are going to distract the viewer and reduce the quality of your videos.
3. Pick the Best Camera Positions
Once you know where and when you are going to shoot your video, you should start planning your shots. Most YouTube videos are recorded from a single camera position, but you can also experiment with different shot angles if it helps you to tell the story of the video. Don’t put the actors near direct sources of light like windows or lamps because if you do so you can easily end up ruining the shot.
4. Make Sure that You Have Enough Light in The Shot
Natural sources of light are often not enough to light a scene properly, because the amount of available light you’ll have at your disposal can change in a few minutes. That’s why nearly all YouTubers use lighting kits that enable them to control the amount of light in the shot at any moment.
5. Bonus: Making YouTube Videos Without a Camera
In case using video and audio recording equipment is a bit too technical for you, there is a simple alternative solution since you can capture all activities on your computer’s screen with software products such as Filmora or OBS Studio. This is an excellent option for gamers who want to record gameplay of their favorite video games or skilled educators that would like to share their knowledge and show others how to use a piece of software or perform any other computer-based task.
Besides screencasting, you can also assemble existing footage from old TV shows, movies or cartoons to make a YouTube video. You don’t have to worry about copyright infringements, as long as the footage you’re using is within the public domain. However, if you accidentally end up using footage without permission it is highly unlikely that anyone is going to file a lawsuit, but your video may be removed from your YouTube channel if someone reports that you’ve used footage without the permission from its owners.
Postproduction Stage: Editing the Footage You Recorded
Before you can share the video clips you recorded with a camera, Smartphone or a screencasting software, you should edit them first. Choosing video editing software isn’t always easy since there are so many different options that enable you to perform both basic and advanced video editing tasks. You can check our recommendations about some of the best video editing software for YouTube videos, in case you are still looking for a video editor that is best suited for the price range you’ve had in mind or your skill level. You should choose a video editing app that you feel the most comfortable using since you are going to spend a lot of time editing videos with it.
The video editing techniques you will utilize during the process of piecing together a YouTube video depend on a number of factors that range from the genre of the video to its visual style. However, trimming or cutting the footage, creating opening titles and end credits are among the most common video editing actions you will have to perform on each new project. Mastering these basic video editing techniques is essential for the success of your videos on YouTube since it will enable you to quickly trim a video clip by dragging one of its ends in an inward or outward direction or remove a portion of a clip you don’t want to feature in the final cut of the video from the timeline.
Hard cuts can at times disrupt the flow of a video, but you can easily fix this by adding a transition between two clips. What’s more, nearly all video editing software products on the market come bundled with rich visual and audio effects libraries that make the color grading or audio editing process much faster. Adding opening titles, lower thirds or any other image overlay can help you introduce the characters in the video to the audience, inform the audience about important aspects of the topic you’re covering or summarize the key points of the video.
Creating a soundtrack is also a vital step of the video editing process that largely influences the quality of the final video. That’s why the narration or the dialogues must be recorded professionally since even the slightest background noise can distract the viewer. Whether or not you are going to add music to a video, depends on the type of project you’re working on. Video editing software products like Filmora have their own royalty free music libraries that offer songs from Rock or Electronic and numerous other genres.
When you complete the video editing process, you should export the video to a folder on your hard drive or directly to your YouTube channel if the video editing app you’ve chosen provides that option. How long the rendering of a video is going to take depends on your computer’s processing power, video’s length, and the output resolution.
Adding/Uploading Videos to Your YouTube Channel
As we already noted you can either upload a video to YouTube directly from a video editing software or from a hard drive after the rendering process is completed. You can upload videos with 16:9 or 4:3 aspect ratios to your channel, and the platform support videos in resolutions up to 8K. The minimum length of a YouTube video is 33 seconds while a video’s maximum length cannot exceed the twelve-hour limit. The file’s size can’t be larger than 128GB while the frame rates can go as high as 60fps. If you need to edit the uploaded and published YouTube videos, you can check our tips about editing existing YouTube videos , and you can check out our guide about how to make money on YouTube if you would like to learn more about account monetization.
Read More to Get : How to Loop a YouTube Video >>
1. Optimize Your Content for YouTube Searches
Every bit of information you add to the video increases its visibility on the platform. Even the name of the file you’re uploading to your channel should contain a keyword, and once the upload is completed you should add a title, description, and metadata if you would like to increase the video’s visibility on the platform. It is vital to select your YouTube SEO strategy before you actually start adding new videos to your strategy. In case you’re not familiar with the concept of search engine optimization for YouTube, you can find everything you need to know aboutYouTube SEO in our guide.
2. Create Visually Captivating Thumbnails and End Screen Elements
A thumbnail is usually a snapshot of a frame from a video, you’ve created during the video editing process or any other still image that suggests what the video is about. A small thing like adding a thumbnail to a YouTube video can increase both the number of views and the number of likes that video is getting. In addition, YouTube’s video editor enables you to add end screens that last anywhere between five and twenty seconds to your videos, but keep in mind that the video must be at least 25 seconds long to have an end screen. There are a number of fully customizable templates available that can be uses to promote your upcoming videos or to invite viewers to subscribe to your channel.
Wanna making YouTube thumbnail yourself? Check some of the best YouTube thumbnail makers list.
3. Publish, Interact and Share
YouTube lets you keep your videos private until you are ready to make them public. Once you decide to make a video available to all YouTube users, you should share it on social media like Twitter, Facebook or Tumblr. Furthermore, embedding a YouTube video on your blog or website can drastically increase the number of views it’s getting. The YouTube Analytics tool is designed to help you track the metrics that indicate how well your video is performing. Don’t know which analytics tools should use? Check our picks of some useful YouTube Analytics Tools to learn how to analyze your video.
How to Make YouTube Videos from a Mac or PC Computer?
Even though you can use almost any video editing software to edit a YouTube video, we recommend trying a versatile video editing app like Filmora to edit videos on Windows PC and Mac which offers both basic and advanced video editing features. Creating a video in Filmora doesn’t require a developed set of video editing skills, since all of the tools and options the editor offers are remarkably easy to use.
When you are ready to start a new project you should simply launch the software, and once the new project loads, you should head over to the File menu and select the Project Settings option that lets you set the resolution, aspect ratio and the frame rate of the video. Proceed to import the footage into the project by selecting one of the available options in the Import drop-down menu or by simply dragging the media assets from a folder on your hard drive and dropping them to the Filmora’s Media Panel. In case you don’t have your own audio and video footage you can download videos, music, visual and audio effects from a stock footage website like Filmstock effects store . Filmora also offers screen casting features, so you can easily record gameplay, show viewers how to use a software or capture any other type of activity on your computer’s screen.
Add each media asset you want to include in the final cut of the video to the timeline and then proceed to remove all unwanted parts of the video and audio clips from the timeline using the Cut or Trim options. Filmora offers rich transitions and visual effects libraries you can use to make the cuts between shot smoother or enhance the colors in the video clips you’re editing. Furthermore, the editor lets you take snapshots of any frame in video clips you’ve placed on the timeline in a single click which can be quite useful if you want to create a thumbnail for your YouTube video. Creating the opening titles, end credits or adding different image overlays to a video is a straight forward process since you just have to select the option that fits the style of the video you’re creating and add it to the timeline. Once you’ve completed the video editing process, you can click on the Export button and decide if you want to export a video directly to your YouTube channel or to a destination on your hard drive.
New to Filmora? Check our beginner guide about How to Edit Videos in Filmora in details or check the quick video tutorial below to find out more details.
Conclusion
Becoming a successful YouTuber requires a lot of dedication and hard work, so if at first, you don’t succeed, you should be patient and persistent. In time, as your channel grows, you will be able to monetize your videos, but only if you keep producing new content at a steady pace. Each step of the YouTube creation process is equally important, and you should dedicate an equal amount of attention to recording high-quality footage, editing, and promotion of the content you share on your YouTube channel. Was this article helpful? Leave a comment below and share your thoughts and experiences with us.
Richard Bennett
Richard Bennett is a writer and a lover of all things video.
Follow @Richard Bennett
Richard Bennett
Mar 27, 2024• Proven solutions
Finding the audience for short videos you create, sharing your knowledge of publicizing the music you create has become a much simpler and cheaper process in the last fourteen years. ‘Everyone deserves a voice’ is one of the core values that motivates the founders of YouTube to continue developing the world’s largest video sharing platform. So if you are looking for your own voice, but you’re not really sure where to start, you’ve come to the right place, because in this article we are going to show you how to make attention-grabbing YouTube videos that are going to attract a huge audience.
- Preparation Stage for Making YouTube Video [4 Aspects You Should Consider]
- Production Stage: Recording a YouTube Video [5 Tips and Tricks]
- YouTube Video Postproduction Stage: Editing the Footage You Recorded
- Uploading Videos to Your YouTube Channel
- How to Make YouTube Videos from a Mac or PC Computer? [Step Guide]
Preparation Stage: Getting Ready to Make a YouTube Video
Achieving success on YouTube may only seem easy before you realize how much time and effort it takes to run a successful YouTube channel. Making a YouTube video isn’t much different than making any other type of short or feature film as you have to go through the same stages of the video production process. Everything, including creating YouTube videos starts with an idea, so let’s take a look at the steps you’ll need to take before you actually start recording your first YouTube video.
1. Start a YouTube Channel
The journey towards success begins with seemingly small and insignificant steps. Creating a YouTube channel is exactly that, a step, without which you won’t be able to become a YouTuber. All you have to do in order to create a channel on YouTube is sign in to the platform using your Google account and then head over to the Settings menu. Click on the Create a new channel option and then pick a name for your Brand channel . Dedicate some extra time to the process of selecting a name for the channel, because that is the first thing your potential followers are going to notice. The platform lets you start as many as fifty channels with one Gmail ID, and as your channels grow, you can add multiple managers to each channel you’ve started. Click on the Create button when you’re done and that’s it you’re now a proud owner of a YouTube channel.
We have summarized some tips and tricks for creating a YouTube channel account , hope that will help you to create a channel more easily.
2. Choose a Niche and Craft a Video Content Strategy
Devising a plan before you start producing content you are going to share on YouTube is going to give you a sense of direction, since there are so many different types of videos that can attract a large audience. Try to imagine your ideal YouTube follower, and then think about what they are interested in or how you can generate value for them through the content you post on your channel. Attempting to cover a broad spectrum of topics usually doesn’t produce the best results, so instead, you should focus on a specific subject and do your best to offer a unique perspective to your viewers on that subject. More importantly, you need to choose the themes for your videos that are relevant to the audience you would like to reach. Gaming, tutorials, beauty or comedy videos are just a few of the most popular genres of videos on YouTube, although which niche you’re going to pick ultimately depends on your personal interests and reasons why you chose to become a YouTuber in the first place.
Additionally, you should follow the hottest trends on the Internet so that you can find out which topics are drawing the most attention at the moment. Don’t let all these questions trouble you, simply choose a niche in which you feel the most comfortable in and start shooting. Keep a watchful eye on how your followers respond to the videos you share on your channel as time goes on and remain open to new ideas or collaborations.
3. Secure a Fresh Supply of YouTube Video Ideas
Defining your niche is just a beginning because you have to keep producing your videos at a steady pace. Most YouTube experts say that sharing new content at least once a week is necessary if you want to gather a large group of followers on your channel. Consequently, you’ll need a constant supply of ideas for new videos that cover topics your audience is interested in. A simple search on YouTube can help you discover the videos on the platform that have the most views. This should give you a pretty good idea which types of videos are the most popular at the moment and what viewers want to see the most.
Reading the comments section below a YouTube video can be a great way to discover new ideas since viewers often ask questions or search for advice on very specific aspects of the topic that particular video is covering. Moreover, YouTube isn’t the only destination on the Internet where you can find inspiration for your next video since there are countless groups and communities where you can come across interesting topics for your next video.
4. Get the Right Video and Audio Recording Equipment
The list of audio and video recording gear you’re going to need to create a YouTube video depends on the type of video you’re trying to make. Gamers who want to record gameplay and post it on their YouTube channel only need a screen capturing software or a capture card and a microphone. The list of equipment is a bit longer for YouTubers interested in the production of vlogs, comedy or review videos since they are going to need a camera or a Smartphone capable of recording videos at high resolutions, lighting equipment, tripods, steady cams, microphones. If you would like to learn more about the pieces of equipment you are going to need while recording a YouTube video, check our picks of the YouTube Video Shooting Equipment List .
Production Stage: Recording a YouTube Video
After you’ve successfully completed the preparation stage it is time to start getting ready for the next step of the process of making a YouTube video. However, you can’t just pick up a camera and start randomly shooting unrelated scenes, instead, you should follow the steps below that make the production of a video much less complicated.
1. Write a Script and Make a Shooting Schedule
Write down all of your ideas for your next video prior to shooting the first shot of that video. A script can be particularly useful if the video you’re planning on making involves a lot of narration since you’ll always know what to say next. Furthermore, you don’t have to record the entire video on the same day, and you have the freedom to plan when and where you are going to record each scene you want to include in the video.
2. Set a Scene
You control what the viewers of your YouTube video are going to see. That’s why you have to choose your shooting locations carefully and to hand-pick each prop that is going to be visible in the shot. Avoid shooting in messy rooms, because the items in the background are going to distract the viewer and reduce the quality of your videos.
3. Pick the Best Camera Positions
Once you know where and when you are going to shoot your video, you should start planning your shots. Most YouTube videos are recorded from a single camera position, but you can also experiment with different shot angles if it helps you to tell the story of the video. Don’t put the actors near direct sources of light like windows or lamps because if you do so you can easily end up ruining the shot.
4. Make Sure that You Have Enough Light in The Shot
Natural sources of light are often not enough to light a scene properly, because the amount of available light you’ll have at your disposal can change in a few minutes. That’s why nearly all YouTubers use lighting kits that enable them to control the amount of light in the shot at any moment.
5. Bonus: Making YouTube Videos Without a Camera
In case using video and audio recording equipment is a bit too technical for you, there is a simple alternative solution since you can capture all activities on your computer’s screen with software products such as Filmora or OBS Studio. This is an excellent option for gamers who want to record gameplay of their favorite video games or skilled educators that would like to share their knowledge and show others how to use a piece of software or perform any other computer-based task.
Besides screencasting, you can also assemble existing footage from old TV shows, movies or cartoons to make a YouTube video. You don’t have to worry about copyright infringements, as long as the footage you’re using is within the public domain. However, if you accidentally end up using footage without permission it is highly unlikely that anyone is going to file a lawsuit, but your video may be removed from your YouTube channel if someone reports that you’ve used footage without the permission from its owners.
Postproduction Stage: Editing the Footage You Recorded
Before you can share the video clips you recorded with a camera, Smartphone or a screencasting software, you should edit them first. Choosing video editing software isn’t always easy since there are so many different options that enable you to perform both basic and advanced video editing tasks. You can check our recommendations about some of the best video editing software for YouTube videos, in case you are still looking for a video editor that is best suited for the price range you’ve had in mind or your skill level. You should choose a video editing app that you feel the most comfortable using since you are going to spend a lot of time editing videos with it.
The video editing techniques you will utilize during the process of piecing together a YouTube video depend on a number of factors that range from the genre of the video to its visual style. However, trimming or cutting the footage, creating opening titles and end credits are among the most common video editing actions you will have to perform on each new project. Mastering these basic video editing techniques is essential for the success of your videos on YouTube since it will enable you to quickly trim a video clip by dragging one of its ends in an inward or outward direction or remove a portion of a clip you don’t want to feature in the final cut of the video from the timeline.
Hard cuts can at times disrupt the flow of a video, but you can easily fix this by adding a transition between two clips. What’s more, nearly all video editing software products on the market come bundled with rich visual and audio effects libraries that make the color grading or audio editing process much faster. Adding opening titles, lower thirds or any other image overlay can help you introduce the characters in the video to the audience, inform the audience about important aspects of the topic you’re covering or summarize the key points of the video.
Creating a soundtrack is also a vital step of the video editing process that largely influences the quality of the final video. That’s why the narration or the dialogues must be recorded professionally since even the slightest background noise can distract the viewer. Whether or not you are going to add music to a video, depends on the type of project you’re working on. Video editing software products like Filmora have their own royalty free music libraries that offer songs from Rock or Electronic and numerous other genres.
When you complete the video editing process, you should export the video to a folder on your hard drive or directly to your YouTube channel if the video editing app you’ve chosen provides that option. How long the rendering of a video is going to take depends on your computer’s processing power, video’s length, and the output resolution.
Adding/Uploading Videos to Your YouTube Channel
As we already noted you can either upload a video to YouTube directly from a video editing software or from a hard drive after the rendering process is completed. You can upload videos with 16:9 or 4:3 aspect ratios to your channel, and the platform support videos in resolutions up to 8K. The minimum length of a YouTube video is 33 seconds while a video’s maximum length cannot exceed the twelve-hour limit. The file’s size can’t be larger than 128GB while the frame rates can go as high as 60fps. If you need to edit the uploaded and published YouTube videos, you can check our tips about editing existing YouTube videos , and you can check out our guide about how to make money on YouTube if you would like to learn more about account monetization.
Read More to Get : How to Loop a YouTube Video >>
1. Optimize Your Content for YouTube Searches
Every bit of information you add to the video increases its visibility on the platform. Even the name of the file you’re uploading to your channel should contain a keyword, and once the upload is completed you should add a title, description, and metadata if you would like to increase the video’s visibility on the platform. It is vital to select your YouTube SEO strategy before you actually start adding new videos to your strategy. In case you’re not familiar with the concept of search engine optimization for YouTube, you can find everything you need to know aboutYouTube SEO in our guide.
2. Create Visually Captivating Thumbnails and End Screen Elements
A thumbnail is usually a snapshot of a frame from a video, you’ve created during the video editing process or any other still image that suggests what the video is about. A small thing like adding a thumbnail to a YouTube video can increase both the number of views and the number of likes that video is getting. In addition, YouTube’s video editor enables you to add end screens that last anywhere between five and twenty seconds to your videos, but keep in mind that the video must be at least 25 seconds long to have an end screen. There are a number of fully customizable templates available that can be uses to promote your upcoming videos or to invite viewers to subscribe to your channel.
Wanna making YouTube thumbnail yourself? Check some of the best YouTube thumbnail makers list.
3. Publish, Interact and Share
YouTube lets you keep your videos private until you are ready to make them public. Once you decide to make a video available to all YouTube users, you should share it on social media like Twitter, Facebook or Tumblr. Furthermore, embedding a YouTube video on your blog or website can drastically increase the number of views it’s getting. The YouTube Analytics tool is designed to help you track the metrics that indicate how well your video is performing. Don’t know which analytics tools should use? Check our picks of some useful YouTube Analytics Tools to learn how to analyze your video.
How to Make YouTube Videos from a Mac or PC Computer?
Even though you can use almost any video editing software to edit a YouTube video, we recommend trying a versatile video editing app like Filmora to edit videos on Windows PC and Mac which offers both basic and advanced video editing features. Creating a video in Filmora doesn’t require a developed set of video editing skills, since all of the tools and options the editor offers are remarkably easy to use.
When you are ready to start a new project you should simply launch the software, and once the new project loads, you should head over to the File menu and select the Project Settings option that lets you set the resolution, aspect ratio and the frame rate of the video. Proceed to import the footage into the project by selecting one of the available options in the Import drop-down menu or by simply dragging the media assets from a folder on your hard drive and dropping them to the Filmora’s Media Panel. In case you don’t have your own audio and video footage you can download videos, music, visual and audio effects from a stock footage website like Filmstock effects store . Filmora also offers screen casting features, so you can easily record gameplay, show viewers how to use a software or capture any other type of activity on your computer’s screen.
Add each media asset you want to include in the final cut of the video to the timeline and then proceed to remove all unwanted parts of the video and audio clips from the timeline using the Cut or Trim options. Filmora offers rich transitions and visual effects libraries you can use to make the cuts between shot smoother or enhance the colors in the video clips you’re editing. Furthermore, the editor lets you take snapshots of any frame in video clips you’ve placed on the timeline in a single click which can be quite useful if you want to create a thumbnail for your YouTube video. Creating the opening titles, end credits or adding different image overlays to a video is a straight forward process since you just have to select the option that fits the style of the video you’re creating and add it to the timeline. Once you’ve completed the video editing process, you can click on the Export button and decide if you want to export a video directly to your YouTube channel or to a destination on your hard drive.
New to Filmora? Check our beginner guide about How to Edit Videos in Filmora in details or check the quick video tutorial below to find out more details.
Conclusion
Becoming a successful YouTuber requires a lot of dedication and hard work, so if at first, you don’t succeed, you should be patient and persistent. In time, as your channel grows, you will be able to monetize your videos, but only if you keep producing new content at a steady pace. Each step of the YouTube creation process is equally important, and you should dedicate an equal amount of attention to recording high-quality footage, editing, and promotion of the content you share on your YouTube channel. Was this article helpful? Leave a comment below and share your thoughts and experiences with us.
Richard Bennett
Richard Bennett is a writer and a lover of all things video.
Follow @Richard Bennett
Also read:
- [New] Culinary Connoisseurs Must-Watch Food Content
- Elevating Your Channels' Profits with Impactful and Effective Trailers for 2024
- Conquer the Crowd Initiating Your Top-Ranked Gaming Channel
- [Updated] Best 12 YouTube Gaming Intro Makers - Free and Paid
- [Updated] Channel-Specific Audio Excellence Top 156 Character Titles For YT Sound Solutions
- Navigating YouTube Skip the Top 8 Novice Missteps!
- Tips for Capturing YouTube Sounds
- Enhance Interaction Share Your Custom YouTube Playlist for 2024
- Mobile Sound Library Explore the Best Free Downloader Apps for YouTube
- Innovative Approaches to YouTube Teaser Trailblazing
- Professional Choice High-Quality Laptops for Media Workers
- Mini YouTube Content Explained
- Guide to Producing Effective YouTube Promo Videos
- [Updated] Earnings Engineering Crafting a High Yield Strategy for Your YouTube Channel
- Youtube Newbie's Guide to Channels and Cashflow Creation
- Decoding Vtubers The Path From Concept to Career for 2024
- [New] Complete Overview V-YouTubers in the Digital Arena
- In 2024, Crafting Distinctive Video Stream Names Tips for Filmora Users
- Discover the Ideal Release Windows on YouTube for 2024
- In 2024, Detailed Look Into YouTube's Featured Community Dialogue
- The Art of Acoustic Capture Secrets to High-End Home Recordings
- [Updated] Best 10 Volume Magnifiers for Windows/MacOS
- Top Voice Modification Tools for YouTube Creators
- The Ultimate Blueprint for Your Mobile YouTube Business/Personal Platform
- The Pathway to Crafting a Viral Video Introduction
- 2024 Approved Day Jobs & Digital Passion Striking a Balance
- Adaptive Gaming Techniques by Pros for 2024
- The Ultimate Guide to Fostering Viewer Commitment in YouTube Videos
- Comparing Micro-Video Formats The Battle of TikTok and YouTube Shorts
- 2024 Approved Breakneck Buzzers YouTube's Hottest Topics Amassing Views Overnight by '24
- FIFA Video Highlights Top YouTube Data Infographics
- Android & iOS Leaders in ASMR Content
- [Updated] Discover the Best Yoga Vlogs - Perfect Balance Guide
- [Updated] Bypassing YouTube's Copyright Strike Legal Strategies and Precautions
- Skyrocket Your Stream's Earnings Universal Strategies for Success
- Understanding Legality in Screenshots From YouTube
- [New] Best Voice Conversion Tools for Vlogging Professionals
- In 2024, Curating Historical Wisdom The Ultimate Student-Friendly Channel List (#1-10)
- 2024 Approved Diving Deep YouTube's Best Immersive Experiences
- [Updated] Dream Weavers The Marvel Interactive Sculptors
- [New] Affordable & Accessible The Definitive Guide to 9 Budget-Friendly Editors
- [New] Capture the Action Crafting Best-in-Class Sports Films
- Can Subforsub Help Increase My YouTube Subscribers Without Risk for 2024
- In 2024, 10 Must-Watch Historical Channels for Students
- Top 10 Ultimate Apps for Seamless YouTube to WebM Conversion
- [New] Boost Traffic to Your Videos Top SEO Practices for YouTube Success
- Tutorial to Change OnePlus Nord N30 5G IMEI without Root A Comprehensive Guide
- Internal Device Recorder to Capture Screens on Mate 10/20 & P Series Phones (P20/10). For 2024
- 5 Best Online MP3 Tag Editor That You Cant Miss for 2024
- Needlework Networking Sewing Skills in Social Spaces (TikTok) for 2024
- [Updated] Frame It Up Right Insta-Ready Video Edits for Final Cut Pro X
- In 2024, iSpoofer is not working On Motorola G24 Power? Fixed | Dr.fone
- Updated In 2024, Create Stunning Video Invites with These iOS and Android Apps
- 2024 Approved How to Add 3D Effects to Video in Windows 10 and Windows 11
- [New] Streaming Success Live TikTok Broadcasts on Computers for 2024
- Optimize Your Facebook Videos A Beginners Guide to Aspect Ratios for 2024
- In 2024, 3 Effective Ways to Unlock iCloud Account Without Password From iPhone 14 Pro
- Spotlight on Top TikTok Gaming Pros for 2024
- How to Resolve OnePlus Ace 3 Screen Not Working | Dr.fone
- In 2024, Live-Stream Magic Setting Up Logitech Cam for Videos
- How to remove Google FRP Lock on 90 GT
- [Updated] In 2024, Revealing the Ultimate Screencasting Software List, Win Edition
- How to Repair corrupt MP4 and AVI files of Poco X6 with Video Repair Utility on Windows?
- In 2024, How I Transferred Messages from Honor Magic 5 Pro to iPhone 12/XS (Max) in Seconds | Dr.fone
- In 2024, 3 Ways for Android Pokemon Go Spoofing On Poco F5 5G | Dr.fone
- Fascinated About Exploring Your Graphic Creativity by Experimenting with Designing Slideshow Presentations on a Variety of Software Programs? Stay Here to Get the Know-How of Using Clideo for 2024
- In 2024, How to Migrate Android Data From Infinix Hot 40 Pro to New Android Phone? | Dr.fone
- In 2024, The Best iSpoofer Alternative to Try On Realme C33 2023 | Dr.fone
- 2024 Approved Streamlining Your Mac 5 Best Screen Shot Approaches
- In 2024, Endless Screen Saving Software
- How to Change GPS Location on Honor Magic 5 Lite Easily & Safely | Dr.fone
- In 2024, Unlocking FB The Ultimate Guide to Downloading Messages
- 2024 Approved Screenshot & Recording Masterclass IOS Devices 2023
- Updated 2024 Approved Types of Cartoon Styles You May Use for The Next Marketing Project
- Home Button Not Working on Vivo Y36i? Here Are Real Fixes | Dr.fone
- What to Do if Google Play Services Keeps Stopping on Samsung Galaxy S24 | Dr.fone
- [New] 2024 Approved PC Screenshot Wizardry Unveiling Apowersoft Screen Recorder
- [Updated] Essential Mac Screen Recorders – Top 10 FREE List for 2024
- The Best iSpoofer Alternative to Try On Apple iPhone 13 Pro Max | Dr.fone
- [Updated] Capture Attention with Top Mobile Video Editing Software for Snapchats
- Find Hidden Watch Tile Artwork
- In 2024, 5 Easy Ways to Copy Contacts from Samsung Galaxy A15 4G to iPhone 14 and 15 | Dr.fone
- New The A-List of Audio Harvesters 10 Indispensable Tools to Master Your Sound Design for 2024
- Title: [Updated] Comprehensive Guide to Embedding YouTube Playlists Online
- Author: Steven
- Created at : 2024-05-25 20:50:42
- Updated at : 2024-05-26 20:50:42
- Link: https://youtube-clips.techidaily.com/updated-comprehensive-guide-to-embedding-youtube-playlists-online/
- License: This work is licensed under CC BY-NC-SA 4.0.