![[Updated] Clear Screen, Clear Content How to Disable YouTube Channels Efficiently](https://thmb.techidaily.com/a6435a313e4469213bebd5ae38a7530a7b0364be00feda91bc9b60c48edb8ed3.jpg)
"[Updated] Clear Screen, Clear Content How to Disable YouTube Channels Efficiently"
Clear Screen, Clear Content: How to Disable YouTube Channels Efficiently
How to Block YouTube Channels on Computer and Mobile Phones

Richard Bennett
Mar 27, 2024• Proven solutions
Anyone spending any time online recently might have come across something they regard as deplorable. YouTube consumes more than half of the internet’s users with its whopping 2 billion active monthly users. For all that might seem good on the humongous video sharing platform some of the most divisive of all human interactions happen on YouTube.
Now the question arises on how you can safeguard yourself and your family from the bad and inadequate content and how to block YouTube channels that create the toxic material.
In this article, we’ll go through how you can block YouTube channels and content creators that you consider will have bad effects on your mental health. You will learn:
- Part 1: How to block YouTube channels on a computer (Mac & Windows)
- Part 2: How to block YouTube channels on Mobile Phones (Android & iPhone)
- Part 3: How to block content on YouTube Kids
Part 1: How to block YouTube channels on a computer (Mac & Windows)
Blocking will prevent the user from trolling and bullying you or your channel subscribers. This will effectively prevent them to comment and interact with your video content. However, there is no way for you to prevent the bullies from watching your content you can at least prevent them from damaging your reputation, badmouthing, and inciting your active subscribers.
The process of blocking YouTube channels on a computer system is fairly simple and will only require a minute if you know the name of the user you want to block. Follow the steps below:
- 1. Log in to your YouTube account and look out for the account you want to block.
- 2. When you’re in the account head over to the About section. You can find it in the toolbar beneath the channel art or banner.
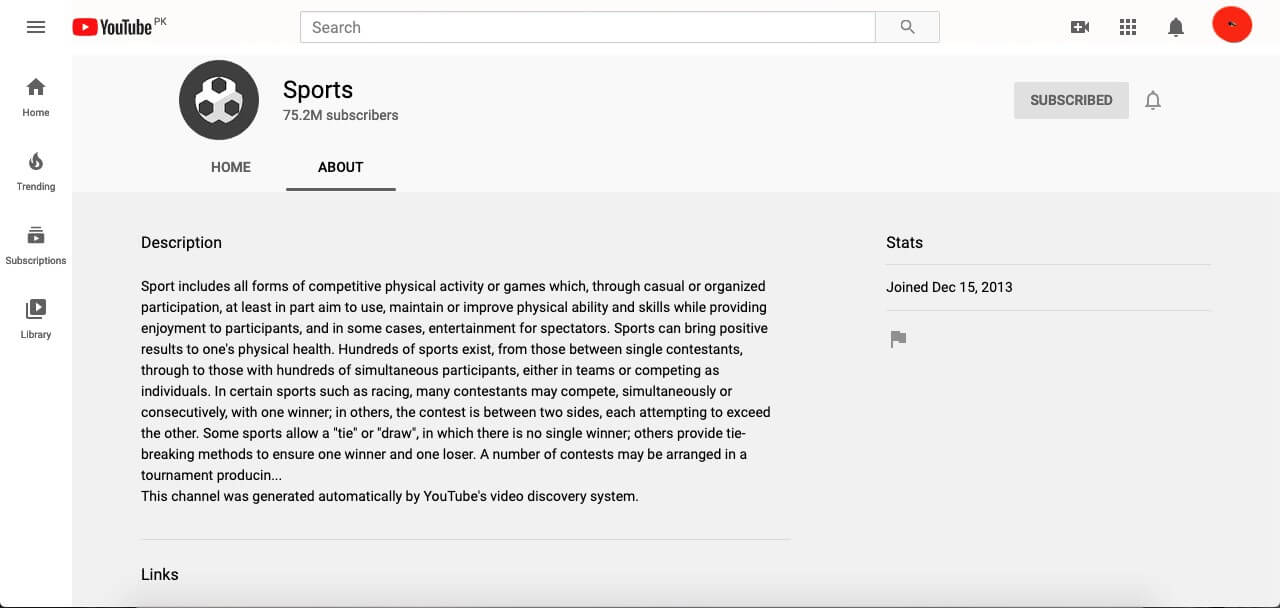
- 3. On the right-hand side right under the Stats, you will find a flag icon. Press the icon and it will show a drop-down menu, select Block user.
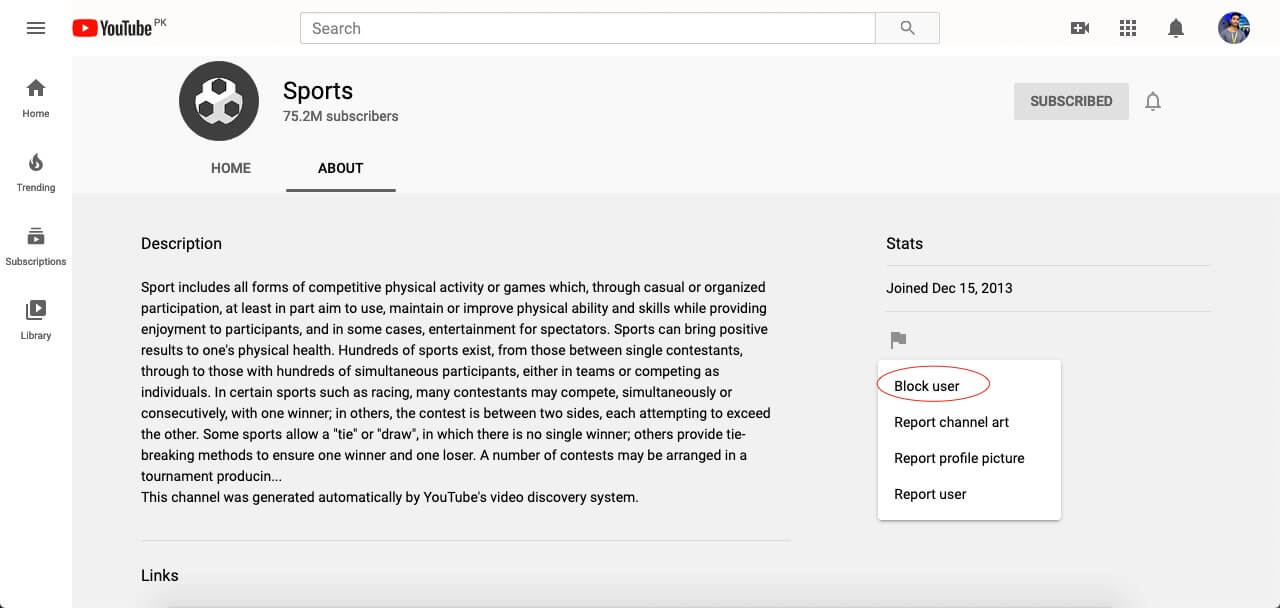
- 4. You will be prompted to confirm your selection, click Submit to confirm.


Part 2: How to block YouTube channels on Mobile Phones (Android & iPhone)
One can also block YouTube channels on mobile devices in the same manner as you would do it on the desktop computer. It will do the same effect and prevent bullying users from interacting with your content.
- 1. Sign in to your YouTube account on either YouTube’s Android or iPhone app.
- 2. Look around for the account or user you want to block.
- 3. Open a particular account that you intend to block and go to their main account page.

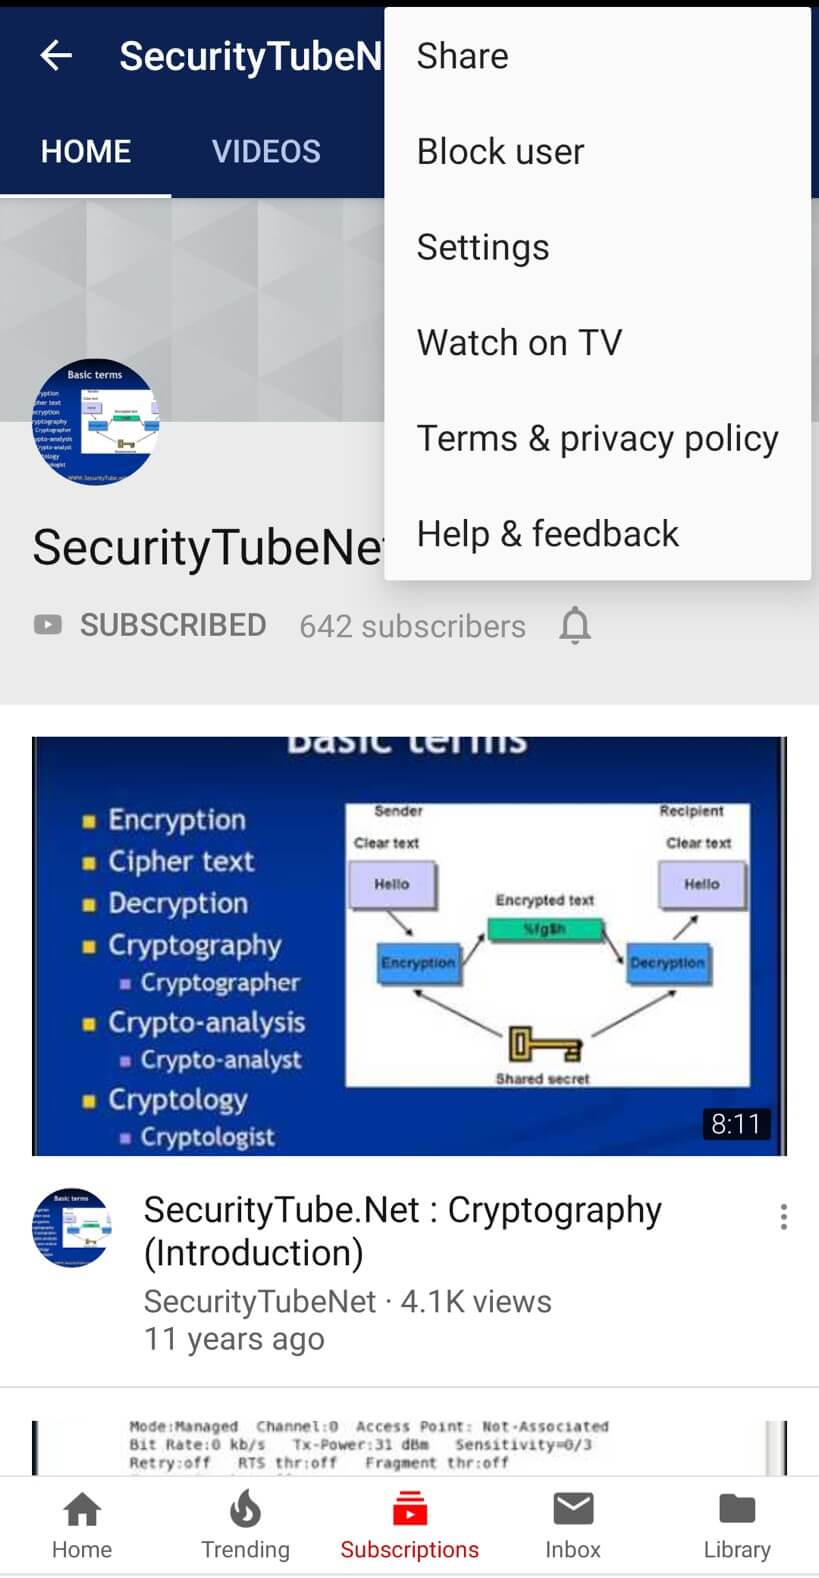
- 4. When you’re on the account page, open the menu at the top-right corner of the screen and tap Block user.
Part 3: Block content on YouTube kids
YouTube Kids is the alternative version of YouTube’s video service dedicated and designed for kids. It’s entirely for children with all the content curated for kids’ education, family-friendly videos, and channels surrounding kid’s liking. The interface features colorful large images, and icons with five categories to explore from.
The app filters all the content allowing only safe content and parental control to watch their children’s online activity. The app prevents commenting and any kind of cyber bullying-related issues. YouTube Kids need to be set up by an adult with singing into the app with their Google credentials. Parents can sign in and block channels or videos they don’t see fit for their children. Let us see how to block YouTube channels on YouTube kids.
- 1. Open the YouTube Kids app and tap on I’m a parent to set up the app.

- 2. Sign in with your preferred Google account.

- 3. Here you’ll see a button Send Parental Consent Email, press it.
- 4. You’ll get an activation code on your email address.
- 5. Come back to the application and enter the code.
Now as you’re signed in as a parent you can block channels and specific content.
I. Block on Home screen
- 1. On the Home screen press the dotted menu next to the video

- 2. In the menu list, you will see Block this video, tap it.
- 3. You’ll be asked to enter the numbers written on the screen or a custom passcode.

II. Block from Watch Page
- 1. On the Watch Page tap the dotted More option at the top right corner of the video.

- 2. Press the Block option.
- 3. A dialog box will appear with two options, Block this video for blocking only this particular video or Block this channel to block the entire channel associated with the video.

- 4. Select any of the two options and then press Block again.
- 5. Enter the numbers you calculate from the presented numbers or a custom passcode.

Conclusion
Every minute more than 300 hours of video content is uploaded on to the YouTube databases while 5 billion videos are watched every day. This only shows the metrics a content creator and a user have to deal with. Content creators need to protect themselves from the unending trolls and scams that hit every other channel and affect its userbase. While kids and sensitive portions of the human population have to maintain a safe distance from damaging and provoking content that circulates on the platform. To safeguard both ends of the platform I made this guide to streamline the process of how to block YouTube channels and videos from affecting your happy life.
Richard Bennett
Richard Bennett is a writer and a lover of all things video.
Follow @Richard Bennett
Richard Bennett
Mar 27, 2024• Proven solutions
Anyone spending any time online recently might have come across something they regard as deplorable. YouTube consumes more than half of the internet’s users with its whopping 2 billion active monthly users. For all that might seem good on the humongous video sharing platform some of the most divisive of all human interactions happen on YouTube.
Now the question arises on how you can safeguard yourself and your family from the bad and inadequate content and how to block YouTube channels that create the toxic material.
In this article, we’ll go through how you can block YouTube channels and content creators that you consider will have bad effects on your mental health. You will learn:
- Part 1: How to block YouTube channels on a computer (Mac & Windows)
- Part 2: How to block YouTube channels on Mobile Phones (Android & iPhone)
- Part 3: How to block content on YouTube Kids
Part 1: How to block YouTube channels on a computer (Mac & Windows)
Blocking will prevent the user from trolling and bullying you or your channel subscribers. This will effectively prevent them to comment and interact with your video content. However, there is no way for you to prevent the bullies from watching your content you can at least prevent them from damaging your reputation, badmouthing, and inciting your active subscribers.
The process of blocking YouTube channels on a computer system is fairly simple and will only require a minute if you know the name of the user you want to block. Follow the steps below:
- 1. Log in to your YouTube account and look out for the account you want to block.
- 2. When you’re in the account head over to the About section. You can find it in the toolbar beneath the channel art or banner.
- 3. On the right-hand side right under the Stats, you will find a flag icon. Press the icon and it will show a drop-down menu, select Block user.
- 4. You will be prompted to confirm your selection, click Submit to confirm.
Part 2: How to block YouTube channels on Mobile Phones (Android & iPhone)
One can also block YouTube channels on mobile devices in the same manner as you would do it on the desktop computer. It will do the same effect and prevent bullying users from interacting with your content.
- 1. Sign in to your YouTube account on either YouTube’s Android or iPhone app.
- 2. Look around for the account or user you want to block.
- 3. Open a particular account that you intend to block and go to their main account page.
- 4. When you’re on the account page, open the menu at the top-right corner of the screen and tap Block user.
Part 3: Block content on YouTube kids
YouTube Kids is the alternative version of YouTube’s video service dedicated and designed for kids. It’s entirely for children with all the content curated for kids’ education, family-friendly videos, and channels surrounding kid’s liking. The interface features colorful large images, and icons with five categories to explore from.
The app filters all the content allowing only safe content and parental control to watch their children’s online activity. The app prevents commenting and any kind of cyber bullying-related issues. YouTube Kids need to be set up by an adult with singing into the app with their Google credentials. Parents can sign in and block channels or videos they don’t see fit for their children. Let us see how to block YouTube channels on YouTube kids.
- 1. Open the YouTube Kids app and tap on I’m a parent to set up the app.
- 2. Sign in with your preferred Google account.
- 3. Here you’ll see a button Send Parental Consent Email, press it.
- 4. You’ll get an activation code on your email address.
- 5. Come back to the application and enter the code.
Now as you’re signed in as a parent you can block channels and specific content.
I. Block on Home screen
- 1. On the Home screen press the dotted menu next to the video
- 2. In the menu list, you will see Block this video, tap it.
- 3. You’ll be asked to enter the numbers written on the screen or a custom passcode.
II. Block from Watch Page
- 1. On the Watch Page tap the dotted More option at the top right corner of the video.
- 2. Press the Block option.
- 3. A dialog box will appear with two options, Block this video for blocking only this particular video or Block this channel to block the entire channel associated with the video.
- 4. Select any of the two options and then press Block again.
- 5. Enter the numbers you calculate from the presented numbers or a custom passcode.
Conclusion
Every minute more than 300 hours of video content is uploaded on to the YouTube databases while 5 billion videos are watched every day. This only shows the metrics a content creator and a user have to deal with. Content creators need to protect themselves from the unending trolls and scams that hit every other channel and affect its userbase. While kids and sensitive portions of the human population have to maintain a safe distance from damaging and provoking content that circulates on the platform. To safeguard both ends of the platform I made this guide to streamline the process of how to block YouTube channels and videos from affecting your happy life.
Richard Bennett
Richard Bennett is a writer and a lover of all things video.
Follow @Richard Bennett
Vlog Glow: Achieving Professional Video Setup
Lighting Tips for Vlogging: How to Light
Richard Bennett
Mar 27, 2024• Proven solutions
One of the best things you can do for your video quality is to ensure you have great lighting. Viewers find poor lighting distracting and it’s hard for them to see how great your content is if they are busy thinking about why your video is so dark. By creating a great lighting set up you can ensure that the people watching your videos are only thinking about how much they’re enjoying them.
Going outside and using natural light is the cheapest way to get a lot of light for your videos. If your vlog is not suited to the great outdoors then you need to get more strategic. You can turn on all the lights in your living room and still end up with a dark, grainy, video.
Video Lighting Basics: Three Point Lighting

The most common technique of lighting a scene is called three-point lighting. It involves three different sources of light in the shot and is used by portrait photographers, which is also a great method for lighting your vlog.
The brightest source of light is also known as the key light which need to be high quality. A window will work, but if you do not have access to one where you are filming then consider an LED panel light or a softbox light like the ones used in portrait photography.
This first light will create a dramatic shadow across half of your face. You want to reduce this shadow, but not get rid of it completely.
Rather than setting up another light source on the opposite side of the camera, put up a reflector to bounce some light back onto your face. This reflector is called your ‘Fill Light’.
The fill light is less bright than the primary source of light and it is placed on the side opposite to the key light. Its purpose is to reduce shadows produced by the key light and the reflector will need to be mounted on a stand.
The final step to creating three point lighting is to set up another light behind you. This is your ‘Backlight’, and it will help you stand out from your background. Backlight or Hair light is always placed behind and above the subject to create separation between the subject in the shot and the background. This basic lighting technique can be applied in almost every scene you shoot, which is why it is important to keep an open mind and to continue experimenting with possible light setups.
Watch Video! Top Lighting Tips for Vlogging
Lightning Tips for Aspiring YouTube Videographers
Becoming the master of light will take some time and practice, so it is crucial to remain curious and anxious to learn new tricks throughout that process if you want to continually become better. These tips will help you make the first steps on that journey.
1. Focus Your Key Light
Try to focus your Key Light so that it lights only you and not your background. Do this by mounting anything that can cast a shadow onto your Key Light to control the area where the light hits. If you are using a window for your Key Light then you can use a curtain. If you use a softbox light then your light will already be somewhat focused.
2. Use Natural Lighting
The light provided by the Sun is still the best light source, you can have in your video. The trouble is that natural light changes quickly, which makes it highly unpredictable. The best way to deal with this challenge is to come prepared to the set and to get the shot you want as quickly as you can.
3. Try DIY Lightning
Literally, anything from candles to LED light bulbs can serve as a source of light in a shot. You just need to pay attention to the light temperature, because warmer light sources may highlight reds and yellows that can make your footage look less realistic.
4. Use Lightning Kits
This is by far the best option if you want to be in complete control of the light on your set. You can adjust the intensity of the lights, use filters, diffusers and all sorts of other accessories to create the light that flatters the subjects of your videos. The only downside is that you’ll have to spend a considerable amount of money if you want to have a professional lighting kit.
5. Set up reflectors
Sets of reflectors are often under $50, so they are fairly affordable. However, some vloggers choose to forgo purchasing reflectors and make their own out of tinfoil.

If your strong main light is too hard on your eyes then you can use a translucent ‘reflector’ to soften it. Set your translucent reflector, or other screen, up in front of your main light to diffuse it.
If you are hosting a beauty vlog then you might consider a slightly different set up. Instead of having your main light off to one side set it up directly in front of you so your entire face is lit evenly. It is still a good idea to use fill lights in this set up to give you some dimension, and a backlight is even more essential for helping you stand out from the background. The even light hitting your face will also make you look flat if you do not use a backlight.

If you are using all of the lighting options available to you and your video still looks too dark then you can try brightening it by opening up the aperture of your camera lens/setting a lower f-stop. Letting more light into your camera can help your footage look brighter, although you also run the risk of making things look overexposed/ washed out if you are not careful.
If you are stuck shooting in low light conditions it is best to use a lens with a wider aperture/lower f-stop. This will make the best of the light you do have.
Richard Bennett
Richard Bennett is a writer and a lover of all things video.
Follow @Richard Bennett
Richard Bennett
Mar 27, 2024• Proven solutions
One of the best things you can do for your video quality is to ensure you have great lighting. Viewers find poor lighting distracting and it’s hard for them to see how great your content is if they are busy thinking about why your video is so dark. By creating a great lighting set up you can ensure that the people watching your videos are only thinking about how much they’re enjoying them.
Going outside and using natural light is the cheapest way to get a lot of light for your videos. If your vlog is not suited to the great outdoors then you need to get more strategic. You can turn on all the lights in your living room and still end up with a dark, grainy, video.
Video Lighting Basics: Three Point Lighting
The most common technique of lighting a scene is called three-point lighting. It involves three different sources of light in the shot and is used by portrait photographers, which is also a great method for lighting your vlog.
The brightest source of light is also known as the key light which need to be high quality. A window will work, but if you do not have access to one where you are filming then consider an LED panel light or a softbox light like the ones used in portrait photography.
This first light will create a dramatic shadow across half of your face. You want to reduce this shadow, but not get rid of it completely.
Rather than setting up another light source on the opposite side of the camera, put up a reflector to bounce some light back onto your face. This reflector is called your ‘Fill Light’.
The fill light is less bright than the primary source of light and it is placed on the side opposite to the key light. Its purpose is to reduce shadows produced by the key light and the reflector will need to be mounted on a stand.
The final step to creating three point lighting is to set up another light behind you. This is your ‘Backlight’, and it will help you stand out from your background. Backlight or Hair light is always placed behind and above the subject to create separation between the subject in the shot and the background. This basic lighting technique can be applied in almost every scene you shoot, which is why it is important to keep an open mind and to continue experimenting with possible light setups.
Watch Video! Top Lighting Tips for Vlogging
Lightning Tips for Aspiring YouTube Videographers
Becoming the master of light will take some time and practice, so it is crucial to remain curious and anxious to learn new tricks throughout that process if you want to continually become better. These tips will help you make the first steps on that journey.
1. Focus Your Key Light
Try to focus your Key Light so that it lights only you and not your background. Do this by mounting anything that can cast a shadow onto your Key Light to control the area where the light hits. If you are using a window for your Key Light then you can use a curtain. If you use a softbox light then your light will already be somewhat focused.
2. Use Natural Lighting
The light provided by the Sun is still the best light source, you can have in your video. The trouble is that natural light changes quickly, which makes it highly unpredictable. The best way to deal with this challenge is to come prepared to the set and to get the shot you want as quickly as you can.
3. Try DIY Lightning
Literally, anything from candles to LED light bulbs can serve as a source of light in a shot. You just need to pay attention to the light temperature, because warmer light sources may highlight reds and yellows that can make your footage look less realistic.
4. Use Lightning Kits
This is by far the best option if you want to be in complete control of the light on your set. You can adjust the intensity of the lights, use filters, diffusers and all sorts of other accessories to create the light that flatters the subjects of your videos. The only downside is that you’ll have to spend a considerable amount of money if you want to have a professional lighting kit.
5. Set up reflectors
Sets of reflectors are often under $50, so they are fairly affordable. However, some vloggers choose to forgo purchasing reflectors and make their own out of tinfoil.
If your strong main light is too hard on your eyes then you can use a translucent ‘reflector’ to soften it. Set your translucent reflector, or other screen, up in front of your main light to diffuse it.
If you are hosting a beauty vlog then you might consider a slightly different set up. Instead of having your main light off to one side set it up directly in front of you so your entire face is lit evenly. It is still a good idea to use fill lights in this set up to give you some dimension, and a backlight is even more essential for helping you stand out from the background. The even light hitting your face will also make you look flat if you do not use a backlight.
If you are using all of the lighting options available to you and your video still looks too dark then you can try brightening it by opening up the aperture of your camera lens/setting a lower f-stop. Letting more light into your camera can help your footage look brighter, although you also run the risk of making things look overexposed/ washed out if you are not careful.
If you are stuck shooting in low light conditions it is best to use a lens with a wider aperture/lower f-stop. This will make the best of the light you do have.
Richard Bennett
Richard Bennett is a writer and a lover of all things video.
Follow @Richard Bennett
Also read:
- [New] Creating Impressive Video Tracks with a Newbie Mac User
- [New] Creating on the Side Balancing Employment with YouTube
- [New] Enriching Vlog Topics to Share
- [Updated] 2024 Approved Understanding Viva's Video Experience
- [Updated] Best Practices for Video Thumbnail Creation in the Digital Age
- [Updated] DSLR vs Mirrorless Optimal Choice for Video Production
- [Updated] How to Make Shorts Into Compact MP4 Files for 2024
- [Updated] Integrate XP's Essential Movie Making Features for 2024
- 2024 Approved How to Upload TikTok Videos to Twitter
- A Comprehensive Guide to Apple iPhone 15 Pro Blacklist Removal Tips and Tools | Dr.fone
- Easy steps to recover deleted pictures from Y27s.
- How to Rescue Lost Messages from OnePlus Ace 2V
- How to Unlock Apple iPhone 14 Pro With an Apple Watch & What to Do if It Doesnt Work
- In 2024, Comic Capers Top 10 Hilarious YouTube Short Film Ideas
- Methoden Zur Wiederherstellung Von Mit CMD Formatierten Daten Vom USB-Speicherstick
- Optimal Visual Branding Best Practices for YouTube Channel Size
- Resolving External Monitor Connectivity Problems in Windows
- The Ultimate Guide to Quieter YouTube Videos
- Unearthing Highlighted Online Dialogue
- Title: [Updated] Clear Screen, Clear Content How to Disable YouTube Channels Efficiently
- Author: Steven
- Created at : 2024-11-14 01:57:54
- Updated at : 2024-11-15 04:42:11
- Link: https://youtube-clips.techidaily.com/updated-clear-screen-clear-content-how-to-disable-youtube-channels-efficiently/
- License: This work is licensed under CC BY-NC-SA 4.0.