
!["[Updated] Channeling Success Emulating Top Video Bloggers' Techniques"](https://www.lifewire.com/thmb/lA2tRRJbMgwqvG8pw2WQZdj5YEg=/400x300/filters:no_upscale():max_bytes(150000):strip_icc()/Vivianne1-5a65ca2378d44b4cb65e69b433bd1768.jpeg)
"[Updated] Channeling Success Emulating Top Video Bloggers' Techniques"
Channeling Success: Emulating Top Video Bloggers’ Techniques
8 Tips on How to Vlog Confidently Like Popular YouTubers

Richard Bennett
Oct 26, 2023• Proven solutions
For most people, vlogging is not something that comes naturally. Like any skill, it takes practice to improve. When someone is good at vlogging, they make it look easy.
When we watch the most popular YouTubers, the traits that make them successful are often invisible, because we are so consumed by their vlog. In this article, I’ll highlight 8 tips from the most accomplished vloggers on the Internet, so that you can vlog confidently and make the best YouTube videos.
1. Be Authentic
People opt to watch vlogs because they want to see something real.
Vlogging is about honesty, telling a story that is truthful and showing your personality. The most popular vloggers are likable because they don’t deceive the audience, they befriend them. Vloggers treat their audience with respect and that comes from being honest.
There will be an urge for you to mimic other vloggers, talking and acting the way they do, but savvy YouTube viewers will be able to see your faux personality pretty quickly.
Don’t focus on your image, but instead focus on your voice. What makes you different? That is how you will build a proper reputation.
2. Tell A Story
A vlog is not an assortment of footage haphazardly put together. A successful vlog must have a story: a conflict told with a beginning, middle, and end.
When you are casually telling a story to a friend, you are not thinking about the structure or the plot. You are focused on what happened and you want to communicate it as accurately as you can. While vlogging, you should approach it much the same way. Ad-libbing is fine. Stumbling is fine. Going back and repeating a part of the story is fine. By simply getting your story on camera, you now have all the pieces.
Once all the pieces of the story are captured — including your storytelling, b-roll, and other supportive footage — you must now cut out all the irrelevant or repetitive parts and edit it so it can be enjoyed as one cohesive tale.
Take a look at this example from Tiffany Alvord and notice how there are jump cuts both to skip information that can be assumed by the audience and add the tension to the story she’s telling.
3. Surprise and Delight Your Audience
There is a saying that a great ending to a story is that it is surprising, yet inevitable .
The ending needs to be justified even if there is a twist. Everything before that had worked to build up the tension and when it concludes it needs to be logical. However, the ending cannot be something that the audience can guess. Remember those mystery movies where you know who the murderer is after the first few scenes? Yeah… those aren’t satisfying. A good story ends with a surprise, and with everything prior leading up to it.
The gold standard example of a surprising, yet inevitable end is Casey Neistat’s bike lane video. Everything in the video is leading up to the end, but when you watch it the first time it’s unexpected, and that’s why it’s so good.
4. Be Inviting
A common trait of successful vloggers is that they are welcoming. They share their passion and encourage others to join in. Vlogging is about being a guide. It doesn’t matter if you are leading a tour of your home or showing your viewer an interesting new skill, it is important for you to approach the whole process with open arms.
Unlike being invited to a party, there is no obligation when it comes to YouTube. Your viewers can continue to live vicariously through you or they may be inspired by your experience and dare to try it themselves.
The opposite of inviting is rejecting, and when you are a vlogger, you don’t want to reject anyone from enjoying your videos.
5. Compose the Shot
Vlogging is a visual medium, and while the story is important, what is captured in the frame will play an impactful role in the video as well.
In a way, every vlogger needs to have a director’s eye for cinematography. I’m not saying that you need to be Wes Anderson to be an awesome vlogger, but knowing what is in the frame with you, the angle of the shot, the movement of the camera, and the quality of light will help the product look better.
The great thing about vlogging is that you will get a lot of practice framing shots, so I encourage you to learn the basics of video editing .
Check out this example from Rosanna Pansino , where she gives a tour of her bedroom.
The camera follows her fluidly throughout the video, but it is her eyes that guide both the camera moves and what she wants our attention to be directed to. Don’t hesitate to let the viewer know what you want them to see.
6. Be Prepared
While you can pick up a camera and start vlogging on the fly, being prepared enables you to produce the best video possible. Take a few minutes before you hit record simply to outline the key points you want to talk about and how the video will end, ensuring that after filming you haven’t forgotten a crucial part.
Additionally, knowing what to say makes you a better host for your vlog. Watch your favorite vlogger, I bet when they are speaking on camera, their speech is not littered with umms and ahhs…
Good preparation includes having all your gear ready for filming when you need it. There is nothing worse than being set to shoot and running out of battery or memory.
Take a look at Ashley Nichole in this vlog and notice that although she sounds spontaneous, it is also evident that she knows what she is going to talk about next.
7. Be Expressive
Remember those teachers that drone on and on, without adding any expression or passion to what they are lecturing? While they might have been perfectly suitable as teachers, they wouldn’t make good vloggers.
If you speak on camera in a monotone voice, you are not being expressive. Your facial and body language will match your lackluster performance. Even if you are talking about something you are excited about, if your demeanor doesn’t match that, then the video is going to be lifeless. Vlogging is a presentation, a performance. There needs to be energy.
Consider your audience: they are coming home from school or work, where there were classes and meetings, and the last thing they want to watch is a video of your speaking without energy.
Want to see a vlogger that is awesome at being expressive on camera? Check out Emma Chamberlain , if you haven’t already. Every word she says in her video is layered with emotion. We know exactly how she feels.
8. Stay Organized
The same way you should prepare before filming, it’s also important to be organized comes the editing phase. Editing is arguably the most time-consuming part of the vlogging process, so have a system for categorizing and finding your footages.
This is especially important when you have multiple video and audio files and if you are capturing footage over a number of days or in different locations.
Additionally, while filming your vlog, you are going to mess up. It’s also helpful to add a cue after you messed up, this can be a sound cue that causes the levels to spike (clapping or snapping your fingers work) or a video cue such as a dramatic gesture to the camera. When skipping through your footage to find the part where you messed up, later on, it’s easier to have a mark to help you locate it.
Vlogging is hard, so don’t make more work for yourself. Learn little tricks to make life easier for yourself at every step.
The more organized you are the more attention you can put into the creative aspect of vlogging, and less time finding a video file or syncing audio to video.
There you have it, 8 tips to help you vlog like the pros. Anyone can vlog. But only until you point a camera at yourself in public for the first time, do you realize how uncomfortable vlogging can be.
Even filming yourself in your room with the door closed — and nobody is in the house with you — can be a challenge for beginning vloggers. If you find watching your first few videos to be cringy, don’t be discouraged. There are fears of vlogging, but you can overcome them .
Take a look at some of the first videos from popular YouTubers and you can see that everyone had a starting point.
Do you have any vlogging tricks of your own? Leave a comment below.
If you want to find a video editing solution that empowers your imagination and creativity yet takes less effort, please try this robust and user-friendly video editing software Wondershare Filmora, which will definitely enhance your productivity and helps you to make money by making videos much easier.


Richard Bennett
Richard Bennett is a writer and a lover of all things video.
Follow @Richard Bennett
Richard Bennett
Oct 26, 2023• Proven solutions
For most people, vlogging is not something that comes naturally. Like any skill, it takes practice to improve. When someone is good at vlogging, they make it look easy.
When we watch the most popular YouTubers, the traits that make them successful are often invisible, because we are so consumed by their vlog. In this article, I’ll highlight 8 tips from the most accomplished vloggers on the Internet, so that you can vlog confidently and make the best YouTube videos.
1. Be Authentic
People opt to watch vlogs because they want to see something real.
Vlogging is about honesty, telling a story that is truthful and showing your personality. The most popular vloggers are likable because they don’t deceive the audience, they befriend them. Vloggers treat their audience with respect and that comes from being honest.
There will be an urge for you to mimic other vloggers, talking and acting the way they do, but savvy YouTube viewers will be able to see your faux personality pretty quickly.
Don’t focus on your image, but instead focus on your voice. What makes you different? That is how you will build a proper reputation.
2. Tell A Story
A vlog is not an assortment of footage haphazardly put together. A successful vlog must have a story: a conflict told with a beginning, middle, and end.
When you are casually telling a story to a friend, you are not thinking about the structure or the plot. You are focused on what happened and you want to communicate it as accurately as you can. While vlogging, you should approach it much the same way. Ad-libbing is fine. Stumbling is fine. Going back and repeating a part of the story is fine. By simply getting your story on camera, you now have all the pieces.
Once all the pieces of the story are captured — including your storytelling, b-roll, and other supportive footage — you must now cut out all the irrelevant or repetitive parts and edit it so it can be enjoyed as one cohesive tale.
Take a look at this example from Tiffany Alvord and notice how there are jump cuts both to skip information that can be assumed by the audience and add the tension to the story she’s telling.
3. Surprise and Delight Your Audience
There is a saying that a great ending to a story is that it is surprising, yet inevitable .
The ending needs to be justified even if there is a twist. Everything before that had worked to build up the tension and when it concludes it needs to be logical. However, the ending cannot be something that the audience can guess. Remember those mystery movies where you know who the murderer is after the first few scenes? Yeah… those aren’t satisfying. A good story ends with a surprise, and with everything prior leading up to it.
The gold standard example of a surprising, yet inevitable end is Casey Neistat’s bike lane video. Everything in the video is leading up to the end, but when you watch it the first time it’s unexpected, and that’s why it’s so good.
4. Be Inviting
A common trait of successful vloggers is that they are welcoming. They share their passion and encourage others to join in. Vlogging is about being a guide. It doesn’t matter if you are leading a tour of your home or showing your viewer an interesting new skill, it is important for you to approach the whole process with open arms.
Unlike being invited to a party, there is no obligation when it comes to YouTube. Your viewers can continue to live vicariously through you or they may be inspired by your experience and dare to try it themselves.
The opposite of inviting is rejecting, and when you are a vlogger, you don’t want to reject anyone from enjoying your videos.
5. Compose the Shot
Vlogging is a visual medium, and while the story is important, what is captured in the frame will play an impactful role in the video as well.
In a way, every vlogger needs to have a director’s eye for cinematography. I’m not saying that you need to be Wes Anderson to be an awesome vlogger, but knowing what is in the frame with you, the angle of the shot, the movement of the camera, and the quality of light will help the product look better.
The great thing about vlogging is that you will get a lot of practice framing shots, so I encourage you to learn the basics of video editing .
Check out this example from Rosanna Pansino , where she gives a tour of her bedroom.
The camera follows her fluidly throughout the video, but it is her eyes that guide both the camera moves and what she wants our attention to be directed to. Don’t hesitate to let the viewer know what you want them to see.
6. Be Prepared
While you can pick up a camera and start vlogging on the fly, being prepared enables you to produce the best video possible. Take a few minutes before you hit record simply to outline the key points you want to talk about and how the video will end, ensuring that after filming you haven’t forgotten a crucial part.
Additionally, knowing what to say makes you a better host for your vlog. Watch your favorite vlogger, I bet when they are speaking on camera, their speech is not littered with umms and ahhs…
Good preparation includes having all your gear ready for filming when you need it. There is nothing worse than being set to shoot and running out of battery or memory.
Take a look at Ashley Nichole in this vlog and notice that although she sounds spontaneous, it is also evident that she knows what she is going to talk about next.
7. Be Expressive
Remember those teachers that drone on and on, without adding any expression or passion to what they are lecturing? While they might have been perfectly suitable as teachers, they wouldn’t make good vloggers.
If you speak on camera in a monotone voice, you are not being expressive. Your facial and body language will match your lackluster performance. Even if you are talking about something you are excited about, if your demeanor doesn’t match that, then the video is going to be lifeless. Vlogging is a presentation, a performance. There needs to be energy.
Consider your audience: they are coming home from school or work, where there were classes and meetings, and the last thing they want to watch is a video of your speaking without energy.
Want to see a vlogger that is awesome at being expressive on camera? Check out Emma Chamberlain , if you haven’t already. Every word she says in her video is layered with emotion. We know exactly how she feels.
8. Stay Organized
The same way you should prepare before filming, it’s also important to be organized comes the editing phase. Editing is arguably the most time-consuming part of the vlogging process, so have a system for categorizing and finding your footages.
This is especially important when you have multiple video and audio files and if you are capturing footage over a number of days or in different locations.
Additionally, while filming your vlog, you are going to mess up. It’s also helpful to add a cue after you messed up, this can be a sound cue that causes the levels to spike (clapping or snapping your fingers work) or a video cue such as a dramatic gesture to the camera. When skipping through your footage to find the part where you messed up, later on, it’s easier to have a mark to help you locate it.
Vlogging is hard, so don’t make more work for yourself. Learn little tricks to make life easier for yourself at every step.
The more organized you are the more attention you can put into the creative aspect of vlogging, and less time finding a video file or syncing audio to video.
There you have it, 8 tips to help you vlog like the pros. Anyone can vlog. But only until you point a camera at yourself in public for the first time, do you realize how uncomfortable vlogging can be.
Even filming yourself in your room with the door closed — and nobody is in the house with you — can be a challenge for beginning vloggers. If you find watching your first few videos to be cringy, don’t be discouraged. There are fears of vlogging, but you can overcome them .
Take a look at some of the first videos from popular YouTubers and you can see that everyone had a starting point.
Do you have any vlogging tricks of your own? Leave a comment below.
If you want to find a video editing solution that empowers your imagination and creativity yet takes less effort, please try this robust and user-friendly video editing software Wondershare Filmora, which will definitely enhance your productivity and helps you to make money by making videos much easier.
Richard Bennett
Richard Bennett is a writer and a lover of all things video.
Follow @Richard Bennett
YouTube Short Mastery: From Idea to Final Product
YouTube Shorts Ultimate Guide in 2024
Richard Bennett
Mar 27, 2024• Proven solutions
Since smartphones are cheap and easily available in the market today, and there is also a huge range of contents to view online, a majority of users prefer watching videos that are both short enough to convey the message within a few seconds, and can be seen on your phone’s screen with decent picture quality. Considering this, Google lately came up with a Tik Tok-style app calledYouTube shorts that can be accessed right from your Android or iPhone as long as you are using the YouTube app, and are signed in to your Google account.
That said, in the following sections you will learn everything about the YouTube Shorts app, and how it could help you gain more viewers for your YouTube channel.
- Part 1: What Is YouTube Shorts?
- Part 2: How to Make and Upload a YouTube Shorts Video with Shorts App?
- Part 3: Creating Vertical YouTube Shorts Video in Filmora [Step by Step Tutorial]
Part 1: What Is YouTube Shorts?
A short and quick answer to the question is, YouTube Shorts is a Tik Tok competitor developed by Google and can be accessed via the YouTube app on an Android or iOS device. In order to use the YouTube Shorts app, all you need to do is, sign in to your YouTube account on the YouTube app, and you are good to go.
1. YouTube Shorts Release History
At the time of this writing, YouTube Shorts is still in the Beta phase, and there is a lot more that the developers at Google have yet to explore and discover. However, for now, the fully functional variant of the program is available only for users in India on Android and iOS platforms.
2. YouTube Shorts Target Audience
A majority of people who can be called the target audience for YouTube Shorts are the artists and creators looking forward to getting noticed. Some of them could also be among those who wish to become an influencer, or get their YouTube channel more subscribers to be able to become eligible for YouTube Partnership Program.
And of course, the viewers and subscribers cannot be left alone when talking about the target audiences of YouTube Shorts as without them, there’s no point in creating short videos in the first place.
The type of contents that the viewers expect to see as YouTube Shorts could include:
- Entertainment – While movies are of longer duration, roasting the characters in it, or explaining some other stuff to the subscribers could be one of the things that could keep the viewers engaged
- Gaming – Some extraordinary gaming tips, tricks, and skills can be demonstrated in a short video
- How-To – A couple of brief how-to illustrations can yet be another attraction for DIY-loving viewers
- Science and Technology – A short introduction of upcoming gadgets or applications along with their usability can be explained within the timeframe of 60 seconds as well
In addition to the above, a few other categories could be People and Places, Music, Domestic and Wild Animals, Education, etc.
3. YouTube Shorts Content Requirements
While creating YouTube Shorts, there are certain guidelines that must be followed. These points include:
- YouTube Shorts videos must not be more than 60 seconds long
- The videos must be vertically shot, and must not be in the landscape orientation
- You can have multiple short videos clubbed together. However, the total length of the final video must not exceed 60 seconds in duration
- While posting YouTube Shorts videos, the title or the description must contain ‘#shorts’ in it
Certain things that you must keep in mind while creating YouTube Shorts include:
- YouTube Shorts cannot be monetized. However, they can serve as a good medium to attract and redirect the audiences to your main YouTube channel which may contain several videos that are eligible for monetization.
- The number of views and the total playtime of the YouTube Shorts videos DO affect your YouTube channel statistics
4. Where People Can Find YouTube Shorts
As mentioned earlier, YouTube Shorts can be accessed by launching the YouTube app on your Android or iOS device. You can use YouTube Shorts by clicking the + (Add) icon present at the bottom. Once the YouTube Shorts app is initialized, you can easily create and publish short videos by following the simple on-screen instructions.
Part 2: How to Make and Upload a YouTube Shorts Video with Shorts App?
You can follow the instructions given below to make and upload a YouTube Shorts video using the YouTube Shorts app:
Step 1: Record a Video with YouTube Shorts

Launch the YouTube app on your Android or iOS smart device (Samsung Galaxy Note 10+ is used here for demonstration), make sure that you are signed in to your Google account, tap the + (Add) button present at the bottom of the screen, tap Create a Short on the popup box that appears next, tap the Record button on the next window to start the recording. Once you are done, tap the Stop button to stop the recording.
Step 2: Edit the Video
Tap Music from the bottom of the screen to add background music to the video. The music that you can use in your short videos must be either created by you, or you should have permission to use them. However, the audio files that the Music library contains is made available by Google, is royalty-free, and can be used throughout the platform.

Likewise, you can tap Text to add captions as well. As for the text type, the app offers various formatting options such as alignment (left, center, and right), text highlighter, font changer, and even color selector. Further, the Speed and Timer icons at the top-right area allow you to manage the playback speed anywhere between 0.3x to 3x, and automatically stop the recording after the set time limit respectively. Once everything is set up, tap NEXT from the top-right corner to proceed to the next step.
Step 3: Pick Target Audience Type
On the Add details window, tap Select audience, and on the Select audience window, tap to select the appropriate radio button to define whether the video is suitable for kids. Tap the Back button once the target audience is selected.

Step 4: Add Details and Upload the Video
Enter a title for the video in the Title field. Make sure to include #shorts to help YouTube understand that you are preparing a YouTube Shorts video. Next, tap UPLOAD from the upper-right corner of the screen to submit the video for review. Once YouTube reviews the recording and finds it appropriate, it will be published on the portal, and will be visible throughout and even under the Shorts category of the main page.

Part 3: How to Create a Vertical YouTube Shorts Video in Filmora?
The YouTube Shorts app is pretty convenient to access and use alright. However, it doesn’t allow you to fine edit the videos. The app doesn’t even have many filtering options such as Effects, Elements, etc. to make your videos more engaging.
With that said, you can always use an efficient third-party program like Wondershare Filmora to create professionally-looking YouTube Shorts videos to attract your viewers.
When talking about Wondershare Filmora, it is a production and post-production app available for both Windows and Mac computers, and gives tough competition to some of the globally accepted similar programs like Adobe Premiere Pro, Final Cut Pro X, etc. Furthermore, Filmora has its own built-in screen, webcam, and voice recording features that can be used to prepare interactive videos, game walkthroughs, and voiceovers as needed.
For Win 7 or later (64-bit)
 Secure Download
For macOS 10.12 or later
Secure Download
The following step-by-step guide teaches you how to use Wondershare Filmora to create a vertical YouTube Shorts video:
Note: Before proceeding to the instructions, make sure that you have already recorded a vertical video using your cellphone, and that it has been transferred to your PC.
Step 1: Add the Video to Timeline
Launch Wondershare Filmora on your Windows or Mac PC (a Windows 10 computer is used here for demonstration), go to File > New Project, and click 9:16 (Portrait). Click anywhere inside the Media box, and select and import the source vertical video from your PC to Filmora.
Next, hover the mouse over the clip in the Media box, click the + button that appears at the bottom-right corner of the thumbnail, and in the resolution confirmation box that comes up next, click the button under the Match to Media section to add the video in the correct orientation to the Timeline at the bottom.
Step 2: Edit the Video
Select the clip in the Timeline, and use the Split, Crop, Speed, etc. buttons above the Timeline itself to remove the unwanted portions from the clip, manage its playback speed, and do other fine-tuning tasks.

You can even click the Edit button, and use the available editing features like Motion Tracking and Stabilization to add text or objects to a moving body in the video and stabilize the clip if the camera shook during the recording session respectively. Click OK to save the changes when done.

Note: To be able to remain compliant with the YouTube Shorts policies, make sure that the video length is no longer than 60 seconds.
Step 3: Beautify the Video

Click Titles from the standard toolbox at the top, choose your preferred text category from the list in the left, hover the mouse over a decent preset in the right window, and click the + button at the bottom-right corner of the thumbnail to add the preset on top of the media track in the Timeline. Next, you can double-click the preset track in the Timeline to modify the text and make granular modifications to it as needed. Click OK to save the changes.
Similarly, you can select the Effects and Elements tools to add effects and elements to the video as needed. To add background music, you can go to the Audio tool, and pick your preferred preset from the available options. A custom music can be added by going to the Media tool, and importing an audio file from your PC using the method explained in Step 1.

After this, optionally, you can go to Split Screen from the standard toolbar at the top, and use your preferred Split Screen preset to club multiple video clips into one screen. In Filmora, you can add as many as 6 screens in a video.
For Win 7 or later (64-bit)
Secure Download
For macOS 10.12 or later
Secure Download
Step 4: Render the Final Output
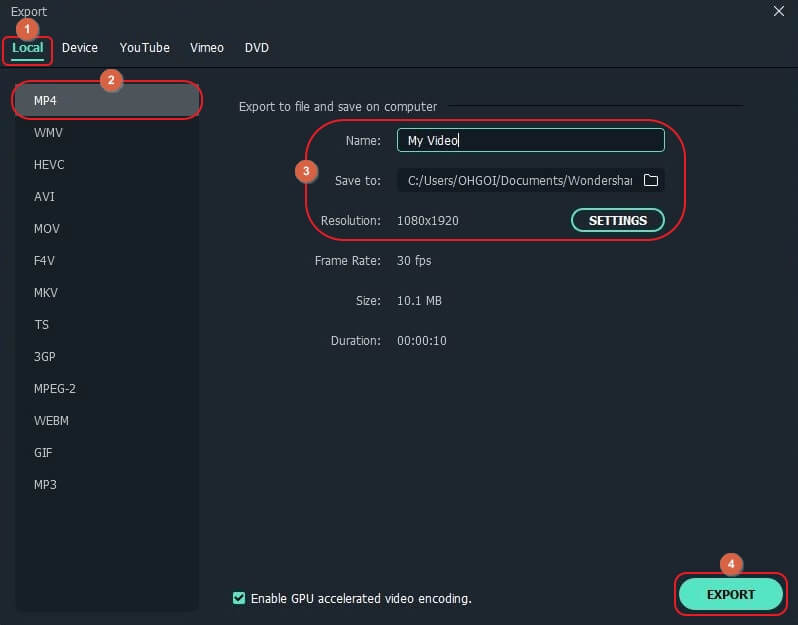
Once everything is set up, click EXPORT from the top of the window, go to the Local tab on the Export window, select MP4 from the formats list in the left, give a name and configure other settings from the available options in the right, and click EXPORT from the bottom-right corner to create a YouTube Shorts video. Once the clip is generated, you can upload the video to YouTube using #Shorts in the title or description to publish the video under the YouTube Shorts section.
FAQs About YouTube Shorts
- Where to download the YouTube Shorts app?
The YouTube Shorts app is already present in the YouTube app that your Android or iOS smartphone has. All you need to do to access it is, sign in to your Google account, tap the + button at the bottom, and tap Create a Short in the popup box that comes up.
- What if YouTube Shorts is not showing on my YouTube app?
Make sure that your YouTube app is updated to its latest version. If the app is already updated, and YouTube Shorts is still unavailable, the chances are that Google hasn’t rolled the app in your region. Since YouTube Shorts is still in its Beta phase, only the region of India can use all the functions of the app at the time of this writing. In such a case, you are suggested to wait until the YouTube Shorts app is made available for your location.
- What’s the YouTube Shorts video duration?
A YouTube Shorts video can be of only up to 60 seconds.
- What’s the YouTube Shorts size limitation?
YouTube hasn’t provided any information related to this as of now. However, you can rest assure that a 60 seconds long video file wouldn’t be too large for YouTube to handle.
- How many subs do you need to access Shorts?
YouTube Shorts is available for everyone regardless of the number of subscribers the channel has.
- Can you make money on Shorts?
Unfortunately, NO. Although you cannot monetize the recordings published as YouTube Shorts, they can be a good source to drive subscribers to your main YouTube channel that may have the videos that can be monetized.
Richard Bennett
Richard Bennett is a writer and a lover of all things video.
Follow @Richard Bennett
Richard Bennett
Mar 27, 2024• Proven solutions
Since smartphones are cheap and easily available in the market today, and there is also a huge range of contents to view online, a majority of users prefer watching videos that are both short enough to convey the message within a few seconds, and can be seen on your phone’s screen with decent picture quality. Considering this, Google lately came up with a Tik Tok-style app calledYouTube shorts that can be accessed right from your Android or iPhone as long as you are using the YouTube app, and are signed in to your Google account.
That said, in the following sections you will learn everything about the YouTube Shorts app, and how it could help you gain more viewers for your YouTube channel.
- Part 1: What Is YouTube Shorts?
- Part 2: How to Make and Upload a YouTube Shorts Video with Shorts App?
- Part 3: Creating Vertical YouTube Shorts Video in Filmora [Step by Step Tutorial]
Part 1: What Is YouTube Shorts?
A short and quick answer to the question is, YouTube Shorts is a Tik Tok competitor developed by Google and can be accessed via the YouTube app on an Android or iOS device. In order to use the YouTube Shorts app, all you need to do is, sign in to your YouTube account on the YouTube app, and you are good to go.
1. YouTube Shorts Release History
At the time of this writing, YouTube Shorts is still in the Beta phase, and there is a lot more that the developers at Google have yet to explore and discover. However, for now, the fully functional variant of the program is available only for users in India on Android and iOS platforms.
2. YouTube Shorts Target Audience
A majority of people who can be called the target audience for YouTube Shorts are the artists and creators looking forward to getting noticed. Some of them could also be among those who wish to become an influencer, or get their YouTube channel more subscribers to be able to become eligible for YouTube Partnership Program.
And of course, the viewers and subscribers cannot be left alone when talking about the target audiences of YouTube Shorts as without them, there’s no point in creating short videos in the first place.
The type of contents that the viewers expect to see as YouTube Shorts could include:
- Entertainment – While movies are of longer duration, roasting the characters in it, or explaining some other stuff to the subscribers could be one of the things that could keep the viewers engaged
- Gaming – Some extraordinary gaming tips, tricks, and skills can be demonstrated in a short video
- How-To – A couple of brief how-to illustrations can yet be another attraction for DIY-loving viewers
- Science and Technology – A short introduction of upcoming gadgets or applications along with their usability can be explained within the timeframe of 60 seconds as well
In addition to the above, a few other categories could be People and Places, Music, Domestic and Wild Animals, Education, etc.
3. YouTube Shorts Content Requirements
While creating YouTube Shorts, there are certain guidelines that must be followed. These points include:
- YouTube Shorts videos must not be more than 60 seconds long
- The videos must be vertically shot, and must not be in the landscape orientation
- You can have multiple short videos clubbed together. However, the total length of the final video must not exceed 60 seconds in duration
- While posting YouTube Shorts videos, the title or the description must contain ‘#shorts’ in it
Certain things that you must keep in mind while creating YouTube Shorts include:
- YouTube Shorts cannot be monetized. However, they can serve as a good medium to attract and redirect the audiences to your main YouTube channel which may contain several videos that are eligible for monetization.
- The number of views and the total playtime of the YouTube Shorts videos DO affect your YouTube channel statistics
4. Where People Can Find YouTube Shorts
As mentioned earlier, YouTube Shorts can be accessed by launching the YouTube app on your Android or iOS device. You can use YouTube Shorts by clicking the + (Add) icon present at the bottom. Once the YouTube Shorts app is initialized, you can easily create and publish short videos by following the simple on-screen instructions.
Part 2: How to Make and Upload a YouTube Shorts Video with Shorts App?
You can follow the instructions given below to make and upload a YouTube Shorts video using the YouTube Shorts app:
Step 1: Record a Video with YouTube Shorts
Launch the YouTube app on your Android or iOS smart device (Samsung Galaxy Note 10+ is used here for demonstration), make sure that you are signed in to your Google account, tap the + (Add) button present at the bottom of the screen, tap Create a Short on the popup box that appears next, tap the Record button on the next window to start the recording. Once you are done, tap the Stop button to stop the recording.
Step 2: Edit the Video
Tap Music from the bottom of the screen to add background music to the video. The music that you can use in your short videos must be either created by you, or you should have permission to use them. However, the audio files that the Music library contains is made available by Google, is royalty-free, and can be used throughout the platform.
Likewise, you can tap Text to add captions as well. As for the text type, the app offers various formatting options such as alignment (left, center, and right), text highlighter, font changer, and even color selector. Further, the Speed and Timer icons at the top-right area allow you to manage the playback speed anywhere between 0.3x to 3x, and automatically stop the recording after the set time limit respectively. Once everything is set up, tap NEXT from the top-right corner to proceed to the next step.
Step 3: Pick Target Audience Type
On the Add details window, tap Select audience, and on the Select audience window, tap to select the appropriate radio button to define whether the video is suitable for kids. Tap the Back button once the target audience is selected.
Step 4: Add Details and Upload the Video
Enter a title for the video in the Title field. Make sure to include #shorts to help YouTube understand that you are preparing a YouTube Shorts video. Next, tap UPLOAD from the upper-right corner of the screen to submit the video for review. Once YouTube reviews the recording and finds it appropriate, it will be published on the portal, and will be visible throughout and even under the Shorts category of the main page.
Part 3: How to Create a Vertical YouTube Shorts Video in Filmora?
The YouTube Shorts app is pretty convenient to access and use alright. However, it doesn’t allow you to fine edit the videos. The app doesn’t even have many filtering options such as Effects, Elements, etc. to make your videos more engaging.
With that said, you can always use an efficient third-party program like Wondershare Filmora to create professionally-looking YouTube Shorts videos to attract your viewers.
When talking about Wondershare Filmora, it is a production and post-production app available for both Windows and Mac computers, and gives tough competition to some of the globally accepted similar programs like Adobe Premiere Pro, Final Cut Pro X, etc. Furthermore, Filmora has its own built-in screen, webcam, and voice recording features that can be used to prepare interactive videos, game walkthroughs, and voiceovers as needed.
For Win 7 or later (64-bit)
Secure Download
For macOS 10.12 or later
Secure Download
The following step-by-step guide teaches you how to use Wondershare Filmora to create a vertical YouTube Shorts video:
Note: Before proceeding to the instructions, make sure that you have already recorded a vertical video using your cellphone, and that it has been transferred to your PC.
Step 1: Add the Video to Timeline
Launch Wondershare Filmora on your Windows or Mac PC (a Windows 10 computer is used here for demonstration), go to File > New Project, and click 9:16 (Portrait). Click anywhere inside the Media box, and select and import the source vertical video from your PC to Filmora.
Next, hover the mouse over the clip in the Media box, click the + button that appears at the bottom-right corner of the thumbnail, and in the resolution confirmation box that comes up next, click the button under the Match to Media section to add the video in the correct orientation to the Timeline at the bottom.
Step 2: Edit the Video
Select the clip in the Timeline, and use the Split, Crop, Speed, etc. buttons above the Timeline itself to remove the unwanted portions from the clip, manage its playback speed, and do other fine-tuning tasks.
You can even click the Edit button, and use the available editing features like Motion Tracking and Stabilization to add text or objects to a moving body in the video and stabilize the clip if the camera shook during the recording session respectively. Click OK to save the changes when done.
Note: To be able to remain compliant with the YouTube Shorts policies, make sure that the video length is no longer than 60 seconds.
Step 3: Beautify the Video
Click Titles from the standard toolbox at the top, choose your preferred text category from the list in the left, hover the mouse over a decent preset in the right window, and click the + button at the bottom-right corner of the thumbnail to add the preset on top of the media track in the Timeline. Next, you can double-click the preset track in the Timeline to modify the text and make granular modifications to it as needed. Click OK to save the changes.
Similarly, you can select the Effects and Elements tools to add effects and elements to the video as needed. To add background music, you can go to the Audio tool, and pick your preferred preset from the available options. A custom music can be added by going to the Media tool, and importing an audio file from your PC using the method explained in Step 1.
After this, optionally, you can go to Split Screen from the standard toolbar at the top, and use your preferred Split Screen preset to club multiple video clips into one screen. In Filmora, you can add as many as 6 screens in a video.
For Win 7 or later (64-bit)
Secure Download
For macOS 10.12 or later
Secure Download
Step 4: Render the Final Output
Once everything is set up, click EXPORT from the top of the window, go to the Local tab on the Export window, select MP4 from the formats list in the left, give a name and configure other settings from the available options in the right, and click EXPORT from the bottom-right corner to create a YouTube Shorts video. Once the clip is generated, you can upload the video to YouTube using #Shorts in the title or description to publish the video under the YouTube Shorts section.
FAQs About YouTube Shorts
- Where to download the YouTube Shorts app?
The YouTube Shorts app is already present in the YouTube app that your Android or iOS smartphone has. All you need to do to access it is, sign in to your Google account, tap the + button at the bottom, and tap Create a Short in the popup box that comes up.
- What if YouTube Shorts is not showing on my YouTube app?
Make sure that your YouTube app is updated to its latest version. If the app is already updated, and YouTube Shorts is still unavailable, the chances are that Google hasn’t rolled the app in your region. Since YouTube Shorts is still in its Beta phase, only the region of India can use all the functions of the app at the time of this writing. In such a case, you are suggested to wait until the YouTube Shorts app is made available for your location.
- What’s the YouTube Shorts video duration?
A YouTube Shorts video can be of only up to 60 seconds.
- What’s the YouTube Shorts size limitation?
YouTube hasn’t provided any information related to this as of now. However, you can rest assure that a 60 seconds long video file wouldn’t be too large for YouTube to handle.
- How many subs do you need to access Shorts?
YouTube Shorts is available for everyone regardless of the number of subscribers the channel has.
- Can you make money on Shorts?
Unfortunately, NO. Although you cannot monetize the recordings published as YouTube Shorts, they can be a good source to drive subscribers to your main YouTube channel that may have the videos that can be monetized.
Richard Bennett
Richard Bennett is a writer and a lover of all things video.
Follow @Richard Bennett
Also read:
- Diving Into VTUBERdom Career Beginnings Explained
- How to Add YouTube Annotations and Cards for 2024
- Scaling Up A Creator's Guide to Major Content Partnerships
- Automated Subscription Link Creation for Youtube
- Chuckle-Filled Chapters Best Comedy Video Plans in a Nutshell for 2024
- [New] 20 Essential YouTube Groups Navigating Stocks
- In 2024, Access Exclusive Stock Images Through Vital 4 YouTube Sources
- In 2024, 2023'S Top Social Moment Infographics
- Thumbnail Transformation Stunning Visuals
- [New] Affordable Gear Guide Choosing the Right Cam For You
- In 2024, Best of the Best Cutting-Edge Hiring Videos #1-10
- [Updated] A Beginner's Guide to Embedding YouTube Playlists in Code
- Smartphone Intro Maker Tools Choosing the Right One
- [Updated] Elevate Your Social Media Presence with These High-Impact YouTube Strategies
- Boost Length on YouTube Entry Filming for 2024
- [Updated] Can You Receive a Monthly Check From YouTube?
- In 2024, Create a Unique Identity Personalize Your YouTube URL Today
- [New] Curating Soundscapes A Detailed Look at YouTube Playlists
- [New] Building Connections Through Collaborative Playlists
- Flash Forward Quick Youtube Playlists Distribution
- Audience Allure 3 Ultimate Video Growth Methods
- Streamline Your Experience with These Top 7 Mobile AdBlockers
- 2024 Approved Elevating Your Artistry in Lyric Videos Through Lyric Video Maker Mastery
- Engage Viewers with Powerful Channel-Building Stories for 2024
- Earnings Escalation via YouTube Channel Initiatives
- [New] Best Free YouTube Video Editing Apps for iPhone & iPad & How-Tos
- Optimal 7 DSLR Selections For In-Depth Vlog Documentaries
- The Verdict on Your Next Step with YouTube MNCs
- [Updated] Advanced Techniques Using Jump Cuts Effectively
- [Updated] Creating Classical Cinematography A Modern Tutorial
- [New] Enhance Your YouTube Journey with Analytic Know-How
- In 2024, Engage Enthusiastically, Earn Enticingly The Entrepreneurial Editor’s Handbook
- [Updated] Enhancing YouTube Presence Creating Professional Thumbnails From Smartphones
- [Updated] Beauty Brilliance Masterclasses and Product Explorations
- Saving YouTube Videos A Legal Overview
- The Ultimate Gear List for Any Aspiring Vlogger - Top 12 Cameras
- [Updated] Elevate Your Content Top Reasons and Solutions for Gaining Video Views
- 2024 Approved Access YouTube Tracks Without Spending a Dime 25+ No-Cost Audio Extractors
- Bridging Mac & Monetization IMovie Editing to YouTube Success for 2024
- In 2024, Crafting Viral Videos on YouTube A Strategic Plan
- In 2024, Enhancing Your Stream's Visibility by Sharing via YouTube
- [Updated] Unveiling the Power of Social Media Video Marketing Strategies for 2024
- Essential Pick for Retro Gaming Top 5 Android Tools for PS2 Titles
- 10 Best Fake GPS Location Spoofers for Itel S23 | Dr.fone
- Maximize Android Screen Brightness
- In 2024, The Ultimate Tutorial for Audacitys PC Microphone Recording
- [New] 2024 Approved Expert Techniques for Superior Quality in Zoom Meetings
- Process of Screen Sharing Realme 10T 5G to PC- Detailed Steps | Dr.fone
- How to Change Location On Facebook Dating for your Xiaomi Redmi Note 12 Pro 4G | Dr.fone
- [New] 2024 Approved Professional Noise-Reduction Software for Video Editing
- New 2024 Approved How to Choose the Best FLAC Audio Converter for Your Needs
- [Updated] Celebrating the Best Ten Music Video Lives
- In 2024, 4 Feasible Ways to Fake Location on Facebook For your Infinix Smart 7 | Dr.fone
- What is Fake GPS Location Pro and Is It Good On OnePlus 11R? | Dr.fone
- Updated In 2024, PC Video Editing Made Easy A Review of VN Video Editor
- [Updated] 2024 Approved The Secret Sauce to Instagram Success with Engaging Puzzles
- Locating Authentic Bell Ringing Audio Samples
- [New] Unrivaled Tag Analyzers Your Key to Hashtag Success (FB/Twitter/Insta) for 2024
- [New] Streamline Skype Calls with Effective Recording Techniques for 2024
- Tutorial to Change Vivo Y200e 5G IMEI without Root A Comprehensive Guide
- 11 Proven Solutions to Fix Google Play Store Not Working Issue on Honor X8b | Dr.fone
- How to Stop Life360 from Tracking You On Samsung Galaxy A14 5G? | Dr.fone
- [New] In 2024, Weaving a Captivating TikTok Closure Narrative
- Hunt for Impactful Personalities Navigating Influencer Spaces for 2024
- [New] 2024 Approved Essential Tactics for Adding Vimeo Clips to PowerPoint Slides
- iSpoofer is not working On Apple iPhone 7? Fixed | Dr.fone
- [New] Unlocking Hidden Social Content Where Are Your Vids for 2024
- [New] In 2024, Analyzing the Full Range of OBS Studio's Capabilities
- In 2024, How To Fix Auto Lock Greyed Out on iPhone 7
- Essential Tips for Effective FB Live Split Screens for 2024
- Updated 2024 Approved The Ultimate Guide to Video Editing on Your Phone IPhone and Android Apps
- [Updated] 2024 Approved Simplified Guide Effortless iPad Screen Recording Techniques
- [New] 2024 Approved Silliest Stories on Twitter
- New In 2024, Decoding the Selection Process for Premier Mac Music Metadata Tools
- [Updated] 2024 Approved The Ultimate Guide to Voiceovers in TikTok Amplifying Your Presence
- [New] Unlocking Hidden Potential of Instagram’s Question Marker
- Preparation to Beat Giovani in Pokemon Go For Vivo S18e | Dr.fone
- In 2024, Best Practices for Writing Captivating Episode Summaries
- In 2024, 5 Ways Change Your Home Address in Google/Apple Map on Apple iPhone 6 Plus/iPad | Dr.fone
- [New] Revolutionary Approaches to Share FB Videos on WhatsApp
- 2024 Approved Compreenas An Insightful Guide to Photography Mastery
- 11 Tips for Facebook Video Marketing to Drive More Traffic
- Title: "[Updated] Channeling Success Emulating Top Video Bloggers' Techniques"
- Author: Steven
- Created at : 2024-05-25 20:49:32
- Updated at : 2024-05-26 20:49:32
- Link: https://youtube-clips.techidaily.com/updated-channeling-success-emulating-top-video-bloggers-techniques/
- License: This work is licensed under CC BY-NC-SA 4.0.
