
!["[Updated] Channel Titans The Current List of Top Subscribers"](https://www.lifewire.com/thmb/M6RqwXYKRKXknyDHSnVV_p-NdUQ=/400x300/filters:no_upscale():max_bytes(150000):strip_icc()/GettyImages-1047108570-cbefd6798c804163ba75bbe7f0173e2f.jpg)
"[Updated] Channel Titans The Current List of Top Subscribers"
Channel Titans: The Current List of Top Subscribers
Create High-Quality Video - Wondershare Filmora
An easy and powerful YouTube video editor
Numerous video and audio effects to choose from
Detailed tutorials provided by the official channel
It is that time of the year when everyone is jostling for creators who made it on YouTube. Being a popular streaming service with over 2 billion monthly viewers, YouTube fans are far attached to the proceedings and improvements of YouTube. More so, it’s the place where you get any content, no matter what interests you, from podcasts, videos, music, vlogs, and other tutorials. And you must be eager to meet the biggest YouTuber in the world among other well-rated creators. Well, we have compiled a complete list of 10 creators with the most subscribers. Dive in for more!
In this article
01 Top 10 YouTubers with the Most Subscribers in 2024
02 What are the similarities of the top 10 YouTubers listed above?
03 Additional thoughts - the importance of a well-made video
Top 10 YouTubers with the Most Subscribers in 2024
Check out the YouTubers who scaled the heights in 2024.
1) T-Series
The top on our list is T-Series. This group is led by the Great Visionary, Sh. Gulshan Kumar, whose focus has been on offering quality content to viewers. This is a film production company from India and has been at the forefront of giving constant entertainment. From its 30 years of existence, the group has potentially grown to own 166 million subscribers worldwide.
2) Felix Arvid PewDiePie

Among the most subs on YouTube is PweDiePie that has been at the forefront for quite some time but was recently pushed to the second position. He dwells on hilarious meme videos, cracking your ribs and kicking that chilly feeling out of you. The Swedish YouTuber has reached the 102 million subscriber mark. He is regarded as an influencer due to his entertaining personality. Check out some of his works and subscribe to his channel for more updates as well.
3) Cocomelon

Cocomelon knows how to keep you locked in with his 3D animation videos. His videos suit both children and the old. Kids can laugh their hearts out as they dance to the tunes of original children’s songs that this YouTuber brings to the table. Get videos of a mix of music, videos, and live streams from this top US YouTube channel. They have a total of 101 million subscribers so far.
4) WWE
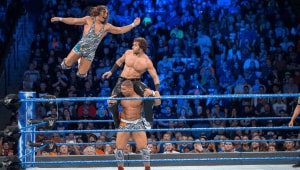
The World Wrestling Entertainment has rocked your screens for the better part of your heydays. It also scales among the biggest YouTuber in the world this year. It is entertainment-based and splashes your screen with scripted and partially choreographed boxing matches. Check out the channel for your favorite WWE superstars and other original shows. It has subscribers reaching 76 million.
5) Mr. Beast

In the fifth position is Mr. Beast, with 75 million subscribers. He is based in the US and is well known for his easy tactics of capturing an audience. He dwells majorly on pranks and other social events. Also known for his philanthropic nature, sending smiles to huge crowds with his charitable donations.
6) Kids Diana Show

Here comes number 6 in the top 10 YouTubers with the most subscribers. This Ukrain based YouTube channel has about 70.4 million subscribers and is mostly watched by children alike. Kids Diana focuses on a beautiful princess known as Diana, her life, and how it feels to be a loved kid. It dwells on play videos of toy unboxing and going for trips, among other adventure activities for kids.
7) 5-Minute Crafts
The Do-It-Yourself channel show is a darling to many fans who wish to learn new home science tricks. It offers easy means to learn a couple of crafts, giving you the joy of knowing how to maneuver on any home project. Its subscribers reached about 70.3 million this year. Do the tricks work? Try one popular one demonstrating how to make an egg bigger and bluer by simply socking it in white vinegar overnight.
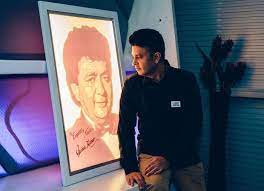
8) Zee Music Company
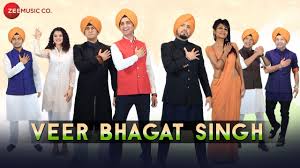
This is an Indian company, bringing to your screens Indian music and other videos. It had reached 70 million viewers by 2021. If you want to learn some Indian dance moves, then this is a perfect platform for you. It also houses over 200,000 hours of television content and much more.
9) Like Nastya
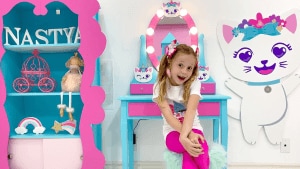
It is also among the biggest YouTuber in the world and focuses on kids’ TV shows. It’s a Russian Federation show that features Like Nastya and her parents. Its major focus is on kids’ activities like singing, going on adventure trips, and some nursery rhymes. It has about 70 million subscribers.
10) Justin Bieber

He is a Canadian singer and songwriter. He started singing at a tender age and even one time took the second position in a local competition. He eventually rose to fame after appearing on YouTube, managing a rise in the number of subscribers, currently at 60 million. Watch his channel for music videos, promotion materials, interviews, and behind-the-scenes footage from his shoots.
What are the similarities of the top 10 YouTubers listed above?
A few lines of thought are common with these top 10 YouTubers with the most subscribers. Here are some similarities.
Highly watchable content
These top YouTubers know how to engage their viewers. They take their time and give a much deeper approach to the content that they post on YouTube. It is a quick turnaround for subscribers who want value.
Focusing on a market niche
These YouTubers have a passion for a particular niche. For example, film production, kid’s shows, music, and so on. It seems they are talented in those areas of choice, and much focus is on how to better them.
Engage with your audience
This is a crucial part if you want to be a successful YouTuber. These top 10 creators have shown that engaging with their audience has a great impact on the outcome of their production.
They have executed channel trailers
Another common similarity with these top 10 YouTubers is the use of channel trailers features. You get short trailers that automatically play when a viewer lands on the YouTube channel page. These should, however, be short and give viewers a welcoming feeling to stay along.
Call To Action
The reason why these content creators stay ahead is the urge to continue getting more subscribers. These channels have well-illustrated avenues for more potential subscribers. More so, they have several elements at the end-screen.
They earn
Their YouTube channels are making some good bucks for them. It is estimated that PewDiePie makes about $10 million per year from his YouTube channel, while Justin Bier gets about $9 million from YouTube advertising.
Additional thoughts - the importance of a well-made video
A well-made video is all you need to make an impact on your YouTube channel journey.
- It automatically boosts conversions and sales by engaging your viewers. In no time, this will directly lead to sales.
- Content marketing involves building trust to create a long-term relationship. A good video will let people come to you because they know you got value, just as the video attests.
- It is a perfect form of igniting emotions and engaging your viewers. So, better give them quality content.
- Videos are good platforms for viewers to learn in detail. For example, a tutorial video will show clearly the steps to follow for a particular project until success.
- If you want your content to be widely accessed, then use a video to encourage social shares. Any good content will automatically find its way into the social world via shares among friends.
How to make a good video using Filmora
Using available video editors can help you become among the most subs on YouTube. Filmora comes loaded with editing effects to help you create quality and amazing videos. The user interface is easy to navigate, therefore suiting even beginners. Follow these steps to make a quality video with Filmora.
Step 1. Launch Filmora
Firstly, download and install Filmora on your computer. Then launch it by double-clicking on the desktop icon. You have two options. Either to create a new project or to open an existing project.
Step 2. Create a new project
If you don’t have any project you were using before, you can create a new one. Click the “New Project” option and wait for the editor to load. Also, ensure to register your product by clicking the “Register” button. Then go to the “Project settings” option and select the aspect ratio to use.
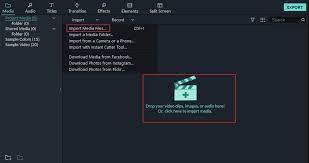
Step 3. Import the footage
Go to the upper section of the screen and click the “Import” button > “Import Media Files” option. Then go to the section on your computer hard drive where your footage to be edited is stored. Next, select the video and click on the “Import” button.
Step 4. Organize your material
Then begin to organize the files you have imported. You can create and use folders to sort out your files from the “My Album” section. Just click on the “Add a New Folder” icon to create a folder and rename it. Then arrange your footage as you wish.
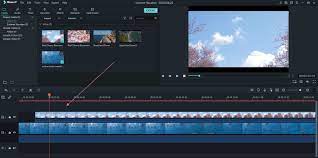
Step 5. Move your videos to the timeline
Here is where you can edit your videos freely. Use the drag and drop feature to add them. You can also rearrange your files by dragging the files to the desired position in the timeline. You can then preview your videos by clicking the “Play” tab or using the “Playhead” to jump to a certain portion of the video.
Step 6. Edit video
Filmora lets you add effects and modify your video to your satisfaction. You can trim by dragging the end of a video clip on the right or left side. Likewise, you can apply other visual effects like insert transitions, add music, or even detach the audio and video to put background music of choice. More so, it’s easy to add text like opening titles, end credits, and so on to your video. Engage the available templates by dragging and dropping that of your choice to the timeline. Then add the appropriate text in Filmora’s preview window.
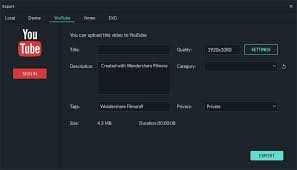
Step 7. Export and Share
Finally, you can export your video in any format. Just click on the “Export” button, and you’ll be redirected to the “Output Window”. Select the video file format in the “Format” menu and optimize your video YouTube.
For Win 7 or later (64-bit)
For macOS 10.12 or later
Conclusion
● It’s a done deal. Filmora works best to help you create quality content for your YouTube channel. Follow the steps, and you could be the next most subs on YouTube next year.
It is that time of the year when everyone is jostling for creators who made it on YouTube. Being a popular streaming service with over 2 billion monthly viewers, YouTube fans are far attached to the proceedings and improvements of YouTube. More so, it’s the place where you get any content, no matter what interests you, from podcasts, videos, music, vlogs, and other tutorials. And you must be eager to meet the biggest YouTuber in the world among other well-rated creators. Well, we have compiled a complete list of 10 creators with the most subscribers. Dive in for more!
In this article
01 Top 10 YouTubers with the Most Subscribers in 2024
02 What are the similarities of the top 10 YouTubers listed above?
03 Additional thoughts - the importance of a well-made video
Top 10 YouTubers with the Most Subscribers in 2024
Check out the YouTubers who scaled the heights in 2024.
1) T-Series
The top on our list is T-Series. This group is led by the Great Visionary, Sh. Gulshan Kumar, whose focus has been on offering quality content to viewers. This is a film production company from India and has been at the forefront of giving constant entertainment. From its 30 years of existence, the group has potentially grown to own 166 million subscribers worldwide.
2) Felix Arvid PewDiePie
Among the most subs on YouTube is PweDiePie that has been at the forefront for quite some time but was recently pushed to the second position. He dwells on hilarious meme videos, cracking your ribs and kicking that chilly feeling out of you. The Swedish YouTuber has reached the 102 million subscriber mark. He is regarded as an influencer due to his entertaining personality. Check out some of his works and subscribe to his channel for more updates as well.
3) Cocomelon
Cocomelon knows how to keep you locked in with his 3D animation videos. His videos suit both children and the old. Kids can laugh their hearts out as they dance to the tunes of original children’s songs that this YouTuber brings to the table. Get videos of a mix of music, videos, and live streams from this top US YouTube channel. They have a total of 101 million subscribers so far.
4) WWE
The World Wrestling Entertainment has rocked your screens for the better part of your heydays. It also scales among the biggest YouTuber in the world this year. It is entertainment-based and splashes your screen with scripted and partially choreographed boxing matches. Check out the channel for your favorite WWE superstars and other original shows. It has subscribers reaching 76 million.
5) Mr. Beast
In the fifth position is Mr. Beast, with 75 million subscribers. He is based in the US and is well known for his easy tactics of capturing an audience. He dwells majorly on pranks and other social events. Also known for his philanthropic nature, sending smiles to huge crowds with his charitable donations.
6) Kids Diana Show
Here comes number 6 in the top 10 YouTubers with the most subscribers. This Ukrain based YouTube channel has about 70.4 million subscribers and is mostly watched by children alike. Kids Diana focuses on a beautiful princess known as Diana, her life, and how it feels to be a loved kid. It dwells on play videos of toy unboxing and going for trips, among other adventure activities for kids.
7) 5-Minute Crafts
The Do-It-Yourself channel show is a darling to many fans who wish to learn new home science tricks. It offers easy means to learn a couple of crafts, giving you the joy of knowing how to maneuver on any home project. Its subscribers reached about 70.3 million this year. Do the tricks work? Try one popular one demonstrating how to make an egg bigger and bluer by simply socking it in white vinegar overnight.
8) Zee Music Company
This is an Indian company, bringing to your screens Indian music and other videos. It had reached 70 million viewers by 2021. If you want to learn some Indian dance moves, then this is a perfect platform for you. It also houses over 200,000 hours of television content and much more.
9) Like Nastya
It is also among the biggest YouTuber in the world and focuses on kids’ TV shows. It’s a Russian Federation show that features Like Nastya and her parents. Its major focus is on kids’ activities like singing, going on adventure trips, and some nursery rhymes. It has about 70 million subscribers.
10) Justin Bieber
He is a Canadian singer and songwriter. He started singing at a tender age and even one time took the second position in a local competition. He eventually rose to fame after appearing on YouTube, managing a rise in the number of subscribers, currently at 60 million. Watch his channel for music videos, promotion materials, interviews, and behind-the-scenes footage from his shoots.
What are the similarities of the top 10 YouTubers listed above?
A few lines of thought are common with these top 10 YouTubers with the most subscribers. Here are some similarities.
Highly watchable content
These top YouTubers know how to engage their viewers. They take their time and give a much deeper approach to the content that they post on YouTube. It is a quick turnaround for subscribers who want value.
Focusing on a market niche
These YouTubers have a passion for a particular niche. For example, film production, kid’s shows, music, and so on. It seems they are talented in those areas of choice, and much focus is on how to better them.
Engage with your audience
This is a crucial part if you want to be a successful YouTuber. These top 10 creators have shown that engaging with their audience has a great impact on the outcome of their production.
They have executed channel trailers
Another common similarity with these top 10 YouTubers is the use of channel trailers features. You get short trailers that automatically play when a viewer lands on the YouTube channel page. These should, however, be short and give viewers a welcoming feeling to stay along.
Call To Action
The reason why these content creators stay ahead is the urge to continue getting more subscribers. These channels have well-illustrated avenues for more potential subscribers. More so, they have several elements at the end-screen.
They earn
Their YouTube channels are making some good bucks for them. It is estimated that PewDiePie makes about $10 million per year from his YouTube channel, while Justin Bier gets about $9 million from YouTube advertising.
Additional thoughts - the importance of a well-made video
A well-made video is all you need to make an impact on your YouTube channel journey.
- It automatically boosts conversions and sales by engaging your viewers. In no time, this will directly lead to sales.
- Content marketing involves building trust to create a long-term relationship. A good video will let people come to you because they know you got value, just as the video attests.
- It is a perfect form of igniting emotions and engaging your viewers. So, better give them quality content.
- Videos are good platforms for viewers to learn in detail. For example, a tutorial video will show clearly the steps to follow for a particular project until success.
- If you want your content to be widely accessed, then use a video to encourage social shares. Any good content will automatically find its way into the social world via shares among friends.
How to make a good video using Filmora
Using available video editors can help you become among the most subs on YouTube. Filmora comes loaded with editing effects to help you create quality and amazing videos. The user interface is easy to navigate, therefore suiting even beginners. Follow these steps to make a quality video with Filmora.
Step 1. Launch Filmora
Firstly, download and install Filmora on your computer. Then launch it by double-clicking on the desktop icon. You have two options. Either to create a new project or to open an existing project.
Step 2. Create a new project
If you don’t have any project you were using before, you can create a new one. Click the “New Project” option and wait for the editor to load. Also, ensure to register your product by clicking the “Register” button. Then go to the “Project settings” option and select the aspect ratio to use.
Step 3. Import the footage
Go to the upper section of the screen and click the “Import” button > “Import Media Files” option. Then go to the section on your computer hard drive where your footage to be edited is stored. Next, select the video and click on the “Import” button.
Step 4. Organize your material
Then begin to organize the files you have imported. You can create and use folders to sort out your files from the “My Album” section. Just click on the “Add a New Folder” icon to create a folder and rename it. Then arrange your footage as you wish.
Step 5. Move your videos to the timeline
Here is where you can edit your videos freely. Use the drag and drop feature to add them. You can also rearrange your files by dragging the files to the desired position in the timeline. You can then preview your videos by clicking the “Play” tab or using the “Playhead” to jump to a certain portion of the video.
Step 6. Edit video
Filmora lets you add effects and modify your video to your satisfaction. You can trim by dragging the end of a video clip on the right or left side. Likewise, you can apply other visual effects like insert transitions, add music, or even detach the audio and video to put background music of choice. More so, it’s easy to add text like opening titles, end credits, and so on to your video. Engage the available templates by dragging and dropping that of your choice to the timeline. Then add the appropriate text in Filmora’s preview window.
Step 7. Export and Share
Finally, you can export your video in any format. Just click on the “Export” button, and you’ll be redirected to the “Output Window”. Select the video file format in the “Format” menu and optimize your video YouTube.
For Win 7 or later (64-bit)
For macOS 10.12 or later
Conclusion
● It’s a done deal. Filmora works best to help you create quality content for your YouTube channel. Follow the steps, and you could be the next most subs on YouTube next year.
Inject Energy Into YouTube Snapshots
Your YouTube video, or any other clip published on any forum, gets a larger number of hits if it has an attractive thumbnail. And, the fact is, a thumbnail becomes 10x more attractive when the main character that the image has have a neon border around it.
With that said, in the following sections, you will learn a couple of methods on how to add a YouTube thumbnail border around the main characters and/or objects that are significant to the clip.
In this article
01 Add Glowing Neon Border to YouTube Thumbnail with Filmora
02 Add a Glowing Neon Border in YouTube Thumbnail with Canva
03 Outline a Person in a YouTube Thumbnail with Photoshop
Part 1: How to Add Neon Border to YouTube Thumbnail for Free with Filmora
Being one of the most versatile and intuitive post-production tools available in the market today, Wondershare Filmora X allows you to add a neon border to a YouTube thumbnail quite conveniently. You can learn how to get this done on Windows or Mac by following the steps given below.
For Win 7 or later (64-bit)
For macOS 10.12 or later
Step 1: Define Project Settings and Add Image to the Timeline
Launch Wondershare Filmora X on your PC (a MacBook Pro M1 is used here), ensure that the project aspect ratio is set to 16:9 (Widescreen) on the splash screen, and click New Project. On the main interface, click the Preview quality and display settings icon from the upper-right area of the Timeline, click Change Project Aspect Ratio, click to select 1280 x 720 (HD) from the Resolution menu of the Project Settings box, and click OK to save the custom project settings.

Then select My Media from the menu bar if not already selected, click Project Media from the navigation pane, and click Import from the Media box to select and import the image of the main character or object that you want to use in the thumbnail.

Now, drag the image from the Media box to the Timeline at the bottom.

Step 2: Clear Image Background, Add Border, and Add Custom Background
Go to Effects from the menu bar, click to select the Default tab and then AI Portrait from the navigation pane, and click and drag the Human Segmentation preset from the right box, and place it over the image track in the Timeline.

Double-click the image layer, scroll down the upper-left box to the Video Effects section, and use the Edge Thickness and Edge Feather sliders to adjust the character’s edges to make them as realistic as possible. Click OK when done.

Next, click and drag the Human Border preset over the image track in the Timeline, and follow the same procedure to customize the border. This will give the character a neon border effect.

Now, use the method explained earlier to import a custom image for the background, and drag and place it under the previous track in the Timeline.

If you are running the latest version of Filmora, you will find there are some neon light effects available under AI Portrait as well.

Step 3: Add Titles to Thumbnail
Go to Titles from the menu bar, click to select the Default tab and then Lower 3rds from the navigation pane, and click and drag your preferred lower-third preset from the right window to a separate layer in the Timeline. Double-click the lower-third layer, and use the available options in the upper-left window to change the text, its color, etc., and drag the textbox to place it to your preferred position on the image as well. Click OK to save the changes.
Next, click to select Titles from the navigation pane, and drag your preferred title from the right window to the upper-most track in the Timeline. Now use the method explained earlier to edit the text, its color, position, etc. to make it look professional.

For more tips and tricks for creating YouTube thumbnail, you can check this You Tube thumbnail creating guide.
Step 4: Get the Neon Border Thumbnail
Click the Snapshot (Camera) icon from the upper-right area of the Timeline, go to My Media from the menu bar, right-click the thumbnail of the screenshot you captured, and click Reveal in Finder (on Mac) or Reveal in Explorer (on Windows) to get to the folder the YouTube thumbnail border is saved in.

Part 2: How to Add a Glowing Neon Border in Your YouTube Thumbnail with Canva
Canva is another intuitive editing program that works on the web interface rather than having you download and install an app on your PC. You can add a neon border for YouTube thumbnails using Canva by following the instructions given below:
Step 1: Define Project Settings and Add a Background
After signing in to your Canva account, click Create a design from the top-right corner of the page, click Custom size from the bottom, define 1280 and 720 in the Width and Height fields on the box that appears respectively, and click Create new design.

Now, click to select Background from the navigation bar on the left (if the Background tool is not visible, click More and then choose Background from the expanded list), and click to select a background from the images available in the center pane.

Step 2: Upload an Image and Add Effects
Click Uploads from the navigation bar, click the More icon from the right of the Upload media button present at the top of the center pane, choose your preferred method to upload the image (with the transparent background) that you want to use, upload the image, and drag it from the center pane to the Canvas.
Note: You can use any of the tools available online to remove the background from your image for free.

To add a YouTube thumbnail border, make sure that the image that you added to the Canvas is selected, click the Duplicate icon from the upper-right area, and use the scaling handles of the copy of the image to increase its size a bit. Reposition the image back to its original location as well.
Then, click Edit image from the upper-left corner of the Canvas, click Duotone from the Edit image pane at the center, if need be, click See all, choose your preferred duotone effect to apply on the image, choose your preferred highlight and shadow colors from the box that appears next, and click Back from the top of the pane.

Next, click See all next to the Adjust section from the center pane, and drag the Blur slider to the right to increase the blur effect on the image.

Step 3: Position the Layers
While keeping the duplicate image selected, click the Position button from the upper-right area of the Canvas, and click Background to send the second image behind the first one to get the neon border effect for the photo.

Part 3: How to Outline a Person in a YouTube Thumbnail with Photoshop
Because YouTube thumbnails are nothing but static images, creating YouTube thumbnail border with Adobe Photoshop is comparatively easier. The process of doing this is given below:
Step 1: Define Document Preferences and Import an Image
Launch Adobe Photoshop on your PC, click Create new, and on the New Document customization box, define the width and height values to 1280 and 720 pixels respectively. Select Transparent from the Background Contents menu as well if not already selected. Click Create from the bottom to create a new Photoshop document with the specified document settings. Next, open the folder that contains the source image, drag the photo to Photoshop, and press Enter to place the photo.

Step 2: Remove Background from the Image
Make sure that the image layer is selected in the Layers panel on the right, go to Select from the menu bar at the top, and click Subject. From the bottom of the Layers panel, click the Add a mask icon to get rid of the background, leaving only the human on the Canvas.

Step 3: Add a Custom Background and an Outline Around the Subject
Use the method explained earlier to import a background image of your choice to Photoshop. Drag the background image layer to the bottom in the Layers panel. Double-click the masked layer, click to select Stroke from the left pane of the Layer Style box, and use the options available on the right to manage the size, color, position, etc. of the stroke that has been added around the human subject. Click OK when done, and then export the image normally to use it as a YouTube thumbnail border.

Summary
It is important to know that the default resolution of a YouTube thumbnail is 1280 x 720 pixels that is usually written and referred to as 720p. While adding a YouTube thumbnail border, it is also imperative to have a good sense of color combination and fonts. Furthermore, a decent tool like Wondershare Filmora X must be used to add an appealing neon border around the main subject in the thumbnail image easily and quickly.
02 Add a Glowing Neon Border in YouTube Thumbnail with Canva
03 Outline a Person in a YouTube Thumbnail with Photoshop
Part 1: How to Add Neon Border to YouTube Thumbnail for Free with Filmora
Being one of the most versatile and intuitive post-production tools available in the market today, Wondershare Filmora X allows you to add a neon border to a YouTube thumbnail quite conveniently. You can learn how to get this done on Windows or Mac by following the steps given below.
For Win 7 or later (64-bit)
For macOS 10.12 or later
Step 1: Define Project Settings and Add Image to the Timeline
Launch Wondershare Filmora X on your PC (a MacBook Pro M1 is used here), ensure that the project aspect ratio is set to 16:9 (Widescreen) on the splash screen, and click New Project. On the main interface, click the Preview quality and display settings icon from the upper-right area of the Timeline, click Change Project Aspect Ratio, click to select 1280 x 720 (HD) from the Resolution menu of the Project Settings box, and click OK to save the custom project settings.
Then select My Media from the menu bar if not already selected, click Project Media from the navigation pane, and click Import from the Media box to select and import the image of the main character or object that you want to use in the thumbnail.
Now, drag the image from the Media box to the Timeline at the bottom.
Step 2: Clear Image Background, Add Border, and Add Custom Background
Go to Effects from the menu bar, click to select the Default tab and then AI Portrait from the navigation pane, and click and drag the Human Segmentation preset from the right box, and place it over the image track in the Timeline.
Double-click the image layer, scroll down the upper-left box to the Video Effects section, and use the Edge Thickness and Edge Feather sliders to adjust the character’s edges to make them as realistic as possible. Click OK when done.
Next, click and drag the Human Border preset over the image track in the Timeline, and follow the same procedure to customize the border. This will give the character a neon border effect.
Now, use the method explained earlier to import a custom image for the background, and drag and place it under the previous track in the Timeline.
If you are running the latest version of Filmora, you will find there are some neon light effects available under AI Portrait as well.
Step 3: Add Titles to Thumbnail
Go to Titles from the menu bar, click to select the Default tab and then Lower 3rds from the navigation pane, and click and drag your preferred lower-third preset from the right window to a separate layer in the Timeline. Double-click the lower-third layer, and use the available options in the upper-left window to change the text, its color, etc., and drag the textbox to place it to your preferred position on the image as well. Click OK to save the changes.
Next, click to select Titles from the navigation pane, and drag your preferred title from the right window to the upper-most track in the Timeline. Now use the method explained earlier to edit the text, its color, position, etc. to make it look professional.
For more tips and tricks for creating YouTube thumbnail, you can check this You Tube thumbnail creating guide.
Step 4: Get the Neon Border Thumbnail
Click the Snapshot (Camera) icon from the upper-right area of the Timeline, go to My Media from the menu bar, right-click the thumbnail of the screenshot you captured, and click Reveal in Finder (on Mac) or Reveal in Explorer (on Windows) to get to the folder the YouTube thumbnail border is saved in.
Part 2: How to Add a Glowing Neon Border in Your YouTube Thumbnail with Canva
Canva is another intuitive editing program that works on the web interface rather than having you download and install an app on your PC. You can add a neon border for YouTube thumbnails using Canva by following the instructions given below:
Step 1: Define Project Settings and Add a Background
After signing in to your Canva account, click Create a design from the top-right corner of the page, click Custom size from the bottom, define 1280 and 720 in the Width and Height fields on the box that appears respectively, and click Create new design.
Now, click to select Background from the navigation bar on the left (if the Background tool is not visible, click More and then choose Background from the expanded list), and click to select a background from the images available in the center pane.
Step 2: Upload an Image and Add Effects
Click Uploads from the navigation bar, click the More icon from the right of the Upload media button present at the top of the center pane, choose your preferred method to upload the image (with the transparent background) that you want to use, upload the image, and drag it from the center pane to the Canvas.
Note: You can use any of the tools available online to remove the background from your image for free.
To add a YouTube thumbnail border, make sure that the image that you added to the Canvas is selected, click the Duplicate icon from the upper-right area, and use the scaling handles of the copy of the image to increase its size a bit. Reposition the image back to its original location as well.
Then, click Edit image from the upper-left corner of the Canvas, click Duotone from the Edit image pane at the center, if need be, click See all, choose your preferred duotone effect to apply on the image, choose your preferred highlight and shadow colors from the box that appears next, and click Back from the top of the pane.
Next, click See all next to the Adjust section from the center pane, and drag the Blur slider to the right to increase the blur effect on the image.
Step 3: Position the Layers
While keeping the duplicate image selected, click the Position button from the upper-right area of the Canvas, and click Background to send the second image behind the first one to get the neon border effect for the photo.
Part 3: How to Outline a Person in a YouTube Thumbnail with Photoshop
Because YouTube thumbnails are nothing but static images, creating YouTube thumbnail border with Adobe Photoshop is comparatively easier. The process of doing this is given below:
Step 1: Define Document Preferences and Import an Image
Launch Adobe Photoshop on your PC, click Create new, and on the New Document customization box, define the width and height values to 1280 and 720 pixels respectively. Select Transparent from the Background Contents menu as well if not already selected. Click Create from the bottom to create a new Photoshop document with the specified document settings. Next, open the folder that contains the source image, drag the photo to Photoshop, and press Enter to place the photo.
Step 2: Remove Background from the Image
Make sure that the image layer is selected in the Layers panel on the right, go to Select from the menu bar at the top, and click Subject. From the bottom of the Layers panel, click the Add a mask icon to get rid of the background, leaving only the human on the Canvas.
Step 3: Add a Custom Background and an Outline Around the Subject
Use the method explained earlier to import a background image of your choice to Photoshop. Drag the background image layer to the bottom in the Layers panel. Double-click the masked layer, click to select Stroke from the left pane of the Layer Style box, and use the options available on the right to manage the size, color, position, etc. of the stroke that has been added around the human subject. Click OK when done, and then export the image normally to use it as a YouTube thumbnail border.
Summary
It is important to know that the default resolution of a YouTube thumbnail is 1280 x 720 pixels that is usually written and referred to as 720p. While adding a YouTube thumbnail border, it is also imperative to have a good sense of color combination and fonts. Furthermore, a decent tool like Wondershare Filmora X must be used to add an appealing neon border around the main subject in the thumbnail image easily and quickly.
Also read:
- [Updated] Elevate Views Premium Hashtags to Spark Virality in Video Snippets
- In 2024, Designing Custom YouTube Music Sequences
- 2024 Approved Add More Minutes to YouTube Content
- Kaji Kid’s Financial Flight A 10-Year-Old’s Path to Prosperity
- 2024 Approved Anime for the Soul Selecting YouTube Channels to Brighten Today
- [New] Discovering the Secrets to Targeted YouTubes Likes and Views
- [New] Enhance Your Channel's Voice Dive Into the World of Banner Makers (Apps)
- Beginning the Video Odyssey How to Create an Engaging YouTube Channel for 2024
- [Updated] Are There Restrictions in Saving YouTube Videos?
- Boosting YouTube Interaction with Emojis for 2024
- Auditing Video Content Monetization Success for 2024
- 2024 Approved Crafting Comfortable Cinematography Amidst the Chill
- Culinary Callings Innovative Naming for Foodie Channels for 2024
- 2024 Approved Best Binge-Watch Top 10 Free Films Online
- Boost Your View Count Explore These 12 Effective YouTube Strategies for 2024
- 5 Inspirational Winter Bgs to Heat Your Videos
- 2024 Approved Elevate Your Gameplay Videos The Ultimate Collection of FreeFire Tags
- 2024 Approved Boosting Profitability in the World of Youtube Shorts
- DIY Guide Screen Capture & Sound From YouTube for 2024
- 2024 Approved Comprerante Titling Matrix for Multiple Platforms
- 2024 Approved Elevate Your Video Presence Mastery of Channel Art and Banner Sizes
- Maximizing Revenue Average Income From YouTube's AdSense Per Thousand Watchers
- [Updated] 2023'S Standout YouTube Music Playback Gems
- [Updated] Dynamic Techniques for YouTube Promotional Videos
- Best Practices for Producing Encouragement-Driven Vlogs
- A Close Look at T-Series Revenue From Online Channels for 2024
- Top 8 YouTube Rankers for Content Optimization Revealed
- Essential 7 Apps for High-Quality YouTube Live Streaming on iPhones & Android for 2024
- [Updated] Everything Uncovered About the World of YT Shorts
- [New] Beauty Blogging Beginnings Crafting a Captivating YouTube Channel
- Unveiling the Secrets to Thriving With YouTube AdSense
- 5 Key Aspects to Consider When Sizing Your YouTube Thumbnail
- [Updated] Engage More Users with Dual-Stream Approach (YT+Twitch)
- [New] Decoding the Language of ASMR Videos
- In 2024, Complete Guide to Crafting Killer YouTube Outros
- Sub4sub Newbie? Discover Why This Pre-Journey Guide Matters Most
- The Ultimate Strategy to Dominate YouTube Via Creator Hub
- In 2024, Best Recording Equipment For Creating YouTube Masterpieces
- [New] Disrupt Bot Patterns for Natural Viewer Increase
- [Updated] Avoid Boredom Learn to Shuffle YouTube Lists
- 2024 Approved Cutting Edge MP4 Utilities Choosing the Right One for Mac
- In 2024, Current Lighting Infrastructure
- Best Buy List Selecting the Premier Video Cards for YouTube
- [Updated] A Step-by-Step Guide to Amplify Your Content Through Spotlighting
- [Updated] Duality of Delivery Engaging Audiences Through Alternative Perspectives for Reaction Videos
- In 2024, Automatic Cycling of Videos on iPhone Ease
- Dial Up the Impact with 50 FREE Branding Graphics for 2024
- How to Change Netflix Location to Get More Country Version On Vivo Y78 5G | Dr.fone
- In 2024, How to use Snapchat Location Spoofer to Protect Your Privacy On Lava Blaze 2 Pro? | Dr.fone
- [New] 2024 Approved Driving Engagement and Visibility Effective Strategies for FB Video Marketing
- [New] In 2024, Exploring the Authenticity of Visual Identity Sharing on Instagram
- Top 15 Augmented Reality Games Like Pokémon GO To Play On Vivo V27e | Dr.fone
- Updated In 2024, Are You Ready to Animate Game Character From Scratch?
- In 2024, List of Pokémon Go Joysticks On Nokia C110 | Dr.fone
- In 2024, Effortless Communication Unveil the Three-Step Method for Snapchat Calls
- How to Change Google Play Location On Vivo Y27 4G | Dr.fone
- Harness the Power of Hashtags in Instagram Marketing Strategies for 2024
- [Updated] Stepwise Guide Integrating Subtitles Into Your Vimeo Content
- [New] 2024 Approved From Obscurity to Opulence Grow Your Insta Following to 1,000
- In 2024, How to Bypass FRP from Vivo Y100t?
- New 2024 Approved Sound Innovators Choice The Best FREE Audio Mixer Platforms Ranked!
- In 2024, How to get the dragon scale and evolution-enabled pokemon On OnePlus 11R? | Dr.fone
- In 2024, Edit and Send Fake Location on Telegram For your Apple iPhone 6 in 3 Ways | Dr.fone
- Fixing Persistent Pandora Crashes on Vivo Y200 | Dr.fone
- [New] Best Undersea Gopro Enhancements
- How to Rescue Lost Music from Infinix Smart 7 HD
- In 2024, Tips and Tricks for Setting Up your Nokia C02 Phone Pattern Lock
- 6 Ways to Change Spotify Location On Your Apple iPhone 6 Plus | Dr.fone
- The Secret Life of Instagram’s Interrogation Icon for 2024
- [Updated] 2024 Approved Achieving Flawless Zoom Meeting Setups
- [New] In 2024, Why Are Recommended YouTube Movies Elusive on Facebook?
- Updated 2024 Approved Premiere Pro on Mac The Industry Standard for Video Editing Pros
- Updated Efficient Techniques for Removing Audible Elements From Windows 10 Video Content (No Cost Involved) for 2024
- Updated Do You Want to Create Adjustment Layers in Final Cut Pro? This Article Will Discuss a Simple yet Efficient Method to Generate Adjustment Layers in Final Cut Pro
- New Video on the Go 10 Best Free Speed Adjustment Apps for Mobile Editing for 2024
- Transform Your Footage How to Create Stunning 3D Videos on Windows for 2024
- 3 Ways for Android Pokemon Go Spoofing On Huawei Nova Y91 | Dr.fone
- In 2024, Step-by-Step Tutorial How To Bypass Motorola Razr 40 FRP
- [New] 2024 Approved Superior Internet Audio Devices Reviewed & Ranked 2023
- What to Do if Google Play Services Keeps Stopping on Samsung Galaxy M34 | Dr.fone
- 2024 Approved Easy Steps for iOS and Android Capture Google Meet
- [New] Transforming Social Media Traffic Into Revenue for 2024
- Advanced PhotoText Techniques for Stunning 3D Effects
- Title: "[Updated] Channel Titans The Current List of Top Subscribers"
- Author: Steven
- Created at : 2024-05-25 20:49:25
- Updated at : 2024-05-26 20:49:25
- Link: https://youtube-clips.techidaily.com/updated-channel-titans-the-current-list-of-top-subscribers/
- License: This work is licensed under CC BY-NC-SA 4.0.
