![[Updated] Building a Studio-Quality Setup at Home](https://thmb.techidaily.com/bca0e2a8225a07a3beb4a4a94473f168eb2b08c9ce7db19335f27276911d69ad.jpg)
"[Updated] Building a Studio-Quality Setup at Home"
Building a Studio-Quality Setup at Home
YouTube Video Shooting Equipment List: What You Need to Start Recording Videos

Richard Bennett
Mar 27, 2024• Proven solutions
Shooting a video has never been easier because there are so many different cameras you can use to capture the footage for your YouTube video. In the past, professional video equipment has been expensive and difficult to operate, but all of this has changed with the invention of digital cameras.
On the other hand, buying the most expensive microphones, lighting equipment or cameras doesn’t guarantee that your videos will be a major success once you post them on YouTube. Instead, you should look for the equipment that is best suited for the type of videos you want to create. Let’s explore the equipment that is necessary for running a successful YouTube channel.
What Equipment Will You Need to Start Your New YouTube Channel?
The process of creating a video can be divided into three different stages, the pre-production, production, and post-production. Each stage has its own tools, without which completing a video would be impossible. In this article, we will be covering the equipment that will make the production stage of the process much smoother, and it will also help you to go through post-production much faster.
Equipment 1: Camera
You can’t shoot a video without a camera, but which camera you’re going to use depends on the type of the video you want to produce. Sometimes the camera that offers the most shooting options is not the best choice, and different factors like size or the weight of the camera can be much more important than the sheer quality of the footage.
1. Cellphone Cameras
If you own a smartphone , you already have a camera you can use to create a YouTube video. Mobile phone cameras are easy to operate and they are perfect for shooting videos while you are on the go. However, most phones are incredibly light and holding the device in your hand while shooting may produce camera shakes that ruin the video. You’ll also need a third-party app in order to control all of the camera settings manually.
You can also make YouTube videos with just your phone , check this video for more details.


2. Action Cameras
If you are a fan of outdoor activities and you want to shoot your YouTube videos while you’re having an adventure action cam may be your best choice. The GoPro and all similar types of cameras are small, lightweight, and they can produce videos in high resolution. Most of these cameras come with mounts and accessories that enable you to shoot perfectly stable footage while you are climbing, running or walking.
We have composed some useful tips and trick of buying and using action camera, in cast that you want to buy an action camera for shooting videos, do check out this ultimate action camera guide .
3. Camcorders
YouTubers that often shoot videos on different locations, can hardly go wrong if they decide to capture their videos with a camcorder. The best models on the market enable you to shoot 4K videos, even in less than perfect light conditions and you can also adjust the camera settings manually. Camcorders are a great choice if you want to make sure that your footage always looks great, regardless of the location on which you recorded it.
If you want to buy a camcorder to shoot your YouTube vlog video, please do check this list of best 4k camcorders that you can buy.
4. Mirrorless Cameras
Besides offering superb image quality, mirrorless cameras also let you change lenses so you get the best shot in every scene you want to include in your video. These types of cameras are a popular choice for vlogging or capturing footage for all types of YouTube videos because they feature professional video recording options while remaining relatively lightweight and easy to carry around. However, the best mirrorless cameras on the market can be quite expensive, and you must be prepared to invest money in lenses and other equipment.
If you want to buy a mirrorless camera to shoot your YouTube vlog video, please do check this list of best 4k mirrorless cameras.
5. DSLR Cameras
Seasoned professionals, as well as the newcomers to the world of video production, can benefit from using a DSLR camera for shooting the content for their YouTube channel. These types of cameras allow you to change lenses, pull focus manually, shoot at different frame rates or capture the footage in 4K and Full HD quality. What’s more, you can use a DSLR camera even in challenging light conditions, because most models support ISO sensitivity values that enable the camera to produce remarkable image quality even when the amount of light in a shot is far from perfect.
With a DSLR camera, you can also use it a webcam for recording your face and your desktop screen at the same time, check how to use a DSLR camera as a webcam .
Equipment 2: Microphones
Moving images are less effective without sound, which is the reason why you should pay close attention to this aspect of the video making process. All cameras have built-in microphones, but the audio quality they produce is often not good enough to actually use it in a YouTube video. That’s why recording sound with an external microphone is a common practice among the most successful YouTubers.
The location at which you’re shooting the video will help you determine which microphone you should use for that project. If you are recording your YouTube video in the exterior an omnidirectional microphone is your best choice because it will eliminate the wind noise. Furthermore, as their name suggests these microphones can pick up sounds from all directions so people in your videos don’t have to speak directly into the microphone.
Shotgun or unidirectional mics are frequently used in studio conditions when you want to eliminate all other sounds except the narrator’s voice. Gamers, tutorial makers and all other YouTube content creators that rely heavily on narration in their videos use shotgun mics because they produce great audio quality. Even though it is easy to overlook the importance of sound for the overall quality of the video you’re working on, a video with great audio quality may actually help you attract more followers on YouTube.
Check: best microphones for YouTube vloggers.
Equipment 3: Video Stabilization Equipment
Holding a camera in your hand while shooting a video is often not the best idea, because even breathing may cause the camera to move and produce camera shakes. That’s where tripods , steadicams, gimbals , rigs and other video stabilization equipment comes in. As a matter of fact, you should only shoot handheld videos when you want to achieve this effect, while all another camera movement should be avoided without the use of appropriate equipment.
Shaky videos are not very pleasant to watch and they can reduce your chances of attracting more followers on YouTube. The video stabilization equipment offers a great solution, and you can get a professional tripod or gimbal at a very reasonable price. However, which video stabilization equipment you are going to use depends on the camera you have and the type of shot you want to get.
Check our list of best camera stabilizer for YouTubers in 2018 .
Equipment 4: Lighting Equipment
Instead of struggling with natural light sources and having to deal with shadows, you can simply use the lighting equipment to equalize the light values in a shot. Of course, whether or not you will use artificial light in your video depends on a number of factors, including the location and the visual style you’re trying to achieve.
Whether you will use an on-camera LED light, ring light or softbox video lights is yet another creative decision you will have to make during the process of shooting your YouTube video. The great majority of video lighting equipment produces the best results in controlled, studio-like conditions, so before you go ahead and buy an on-camera light or a softbox make sure that you know how the equipment will perform on the interior and exterior locations.
Conclusion
Producing YouTube videos on a constant basis requires you to have the right equipment for the job. You don’t have to shoot your videos with the most expensive camera out there or have the best microphone on the market in order to create a great YouTube video, but having the equipment capable of delivering a professional level of video and audio quality won’t hurt your chances of becoming a successful YouTuber.
We’d love to hear all about the gear you’re using to capture your videos, so leave a comment and let us know.
Richard Bennett
Richard Bennett is a writer and a lover of all things video.
Follow @Richard Bennett
Richard Bennett
Mar 27, 2024• Proven solutions
Shooting a video has never been easier because there are so many different cameras you can use to capture the footage for your YouTube video. In the past, professional video equipment has been expensive and difficult to operate, but all of this has changed with the invention of digital cameras.
On the other hand, buying the most expensive microphones, lighting equipment or cameras doesn’t guarantee that your videos will be a major success once you post them on YouTube. Instead, you should look for the equipment that is best suited for the type of videos you want to create. Let’s explore the equipment that is necessary for running a successful YouTube channel.
What Equipment Will You Need to Start Your New YouTube Channel?
The process of creating a video can be divided into three different stages, the pre-production, production, and post-production. Each stage has its own tools, without which completing a video would be impossible. In this article, we will be covering the equipment that will make the production stage of the process much smoother, and it will also help you to go through post-production much faster.
Equipment 1: Camera
You can’t shoot a video without a camera, but which camera you’re going to use depends on the type of the video you want to produce. Sometimes the camera that offers the most shooting options is not the best choice, and different factors like size or the weight of the camera can be much more important than the sheer quality of the footage.
1. Cellphone Cameras
If you own a smartphone , you already have a camera you can use to create a YouTube video. Mobile phone cameras are easy to operate and they are perfect for shooting videos while you are on the go. However, most phones are incredibly light and holding the device in your hand while shooting may produce camera shakes that ruin the video. You’ll also need a third-party app in order to control all of the camera settings manually.
You can also make YouTube videos with just your phone , check this video for more details.
2. Action Cameras
If you are a fan of outdoor activities and you want to shoot your YouTube videos while you’re having an adventure action cam may be your best choice. The GoPro and all similar types of cameras are small, lightweight, and they can produce videos in high resolution. Most of these cameras come with mounts and accessories that enable you to shoot perfectly stable footage while you are climbing, running or walking.
We have composed some useful tips and trick of buying and using action camera, in cast that you want to buy an action camera for shooting videos, do check out this ultimate action camera guide .
3. Camcorders
YouTubers that often shoot videos on different locations, can hardly go wrong if they decide to capture their videos with a camcorder. The best models on the market enable you to shoot 4K videos, even in less than perfect light conditions and you can also adjust the camera settings manually. Camcorders are a great choice if you want to make sure that your footage always looks great, regardless of the location on which you recorded it.
If you want to buy a camcorder to shoot your YouTube vlog video, please do check this list of best 4k camcorders that you can buy.
4. Mirrorless Cameras
Besides offering superb image quality, mirrorless cameras also let you change lenses so you get the best shot in every scene you want to include in your video. These types of cameras are a popular choice for vlogging or capturing footage for all types of YouTube videos because they feature professional video recording options while remaining relatively lightweight and easy to carry around. However, the best mirrorless cameras on the market can be quite expensive, and you must be prepared to invest money in lenses and other equipment.
If you want to buy a mirrorless camera to shoot your YouTube vlog video, please do check this list of best 4k mirrorless cameras.
5. DSLR Cameras
Seasoned professionals, as well as the newcomers to the world of video production, can benefit from using a DSLR camera for shooting the content for their YouTube channel. These types of cameras allow you to change lenses, pull focus manually, shoot at different frame rates or capture the footage in 4K and Full HD quality. What’s more, you can use a DSLR camera even in challenging light conditions, because most models support ISO sensitivity values that enable the camera to produce remarkable image quality even when the amount of light in a shot is far from perfect.
With a DSLR camera, you can also use it a webcam for recording your face and your desktop screen at the same time, check how to use a DSLR camera as a webcam .
Equipment 2: Microphones
Moving images are less effective without sound, which is the reason why you should pay close attention to this aspect of the video making process. All cameras have built-in microphones, but the audio quality they produce is often not good enough to actually use it in a YouTube video. That’s why recording sound with an external microphone is a common practice among the most successful YouTubers.
The location at which you’re shooting the video will help you determine which microphone you should use for that project. If you are recording your YouTube video in the exterior an omnidirectional microphone is your best choice because it will eliminate the wind noise. Furthermore, as their name suggests these microphones can pick up sounds from all directions so people in your videos don’t have to speak directly into the microphone.
Shotgun or unidirectional mics are frequently used in studio conditions when you want to eliminate all other sounds except the narrator’s voice. Gamers, tutorial makers and all other YouTube content creators that rely heavily on narration in their videos use shotgun mics because they produce great audio quality. Even though it is easy to overlook the importance of sound for the overall quality of the video you’re working on, a video with great audio quality may actually help you attract more followers on YouTube.
Check: best microphones for YouTube vloggers.
Equipment 3: Video Stabilization Equipment
Holding a camera in your hand while shooting a video is often not the best idea, because even breathing may cause the camera to move and produce camera shakes. That’s where tripods , steadicams, gimbals , rigs and other video stabilization equipment comes in. As a matter of fact, you should only shoot handheld videos when you want to achieve this effect, while all another camera movement should be avoided without the use of appropriate equipment.
Shaky videos are not very pleasant to watch and they can reduce your chances of attracting more followers on YouTube. The video stabilization equipment offers a great solution, and you can get a professional tripod or gimbal at a very reasonable price. However, which video stabilization equipment you are going to use depends on the camera you have and the type of shot you want to get.
Check our list of best camera stabilizer for YouTubers in 2018 .
Equipment 4: Lighting Equipment
Instead of struggling with natural light sources and having to deal with shadows, you can simply use the lighting equipment to equalize the light values in a shot. Of course, whether or not you will use artificial light in your video depends on a number of factors, including the location and the visual style you’re trying to achieve.
Whether you will use an on-camera LED light, ring light or softbox video lights is yet another creative decision you will have to make during the process of shooting your YouTube video. The great majority of video lighting equipment produces the best results in controlled, studio-like conditions, so before you go ahead and buy an on-camera light or a softbox make sure that you know how the equipment will perform on the interior and exterior locations.
Conclusion
Producing YouTube videos on a constant basis requires you to have the right equipment for the job. You don’t have to shoot your videos with the most expensive camera out there or have the best microphone on the market in order to create a great YouTube video, but having the equipment capable of delivering a professional level of video and audio quality won’t hurt your chances of becoming a successful YouTuber.
We’d love to hear all about the gear you’re using to capture your videos, so leave a comment and let us know.
Richard Bennett
Richard Bennett is a writer and a lover of all things video.
Follow @Richard Bennett
Enhancing Television Experience: Playback Tips for YouTube Content
Loop is a YouTube video format that allows viewers to watch a continuous sequence of videos. Loop is similar to traditional YouTube videos, but it can be played on a TV screen like a traditional TV show. Loop is a great way to keep viewers engaged with your content. It’s like a one-stop shop for all your content needs. You can use it to promote your latest video series.
Why looping YouTube videos on a TV is a great idea? First, it can be a fun way to watch your favorite videos without having to worry about the time. Second, it can be a way to save money on your cable. By watching your favorite videos on loop, you can cut down on the number of times you need to watch them.
If you are watching a series of videos, for example, looping them can help you to remember what happened in each one. Secondly, it can help you to learn new information more easily. If you are watching a tutorial or a video about a new topic, looping can help you to remember the details better.
Free Download For Win 7 or later(64-bit)
Free Download For macOS 10.14 or later


Part 1: How to Create a Loop Video for YouTube
There is a lot of debate around whether or not creating a loop video is necessary for success on YouTube. Some people believe that it’s not necessary, while others believe that it is a must. The main benefit of creating a loop video is that it helps to keep your audience engaged. It also helps to create a sense of continuity between your videos.
Creating a loop video for your YouTube channel increases engagement because viewers can watch the video over and over again. This can lead to more clicks on your ads, which can lead to more revenue. It can also increase your subscribers and views. Maybe some people want to watch the same video multiple times in a row without having to keep pressing the play button on the remote.
Filmora is the best video loop editor:
If you need a powerful video editing tool that will let you create high-quality clips with multiple loops, look no further than Filmora . This software allows you to make various loops of your videos for use in social media, on your website or wherever desired. Plus, with Filmora, there is no limit on the number of loops you can create.
Loop video works well for corporate presentations, tutorials, explainer videos, and much more. You can create looping videos by choosing from one of Filmora’s many templates or creating your own. It’s easy to get started with looping video editing in Filmora! Some people want to watch a video while they do other things, like work on the computer.
Filmora is incredibly easy to use. You can quickly create videos by importing footage, editing and adding effects, and exporting your videos. Plus, the software has several built-in tools that let you customize your videos further. It has many features that make it an excellent choice for anyone looking to create high-quality videos quickly and easily.
How can we loop a video on Filmora? Follow these steps to create a looping video on Filmora:
Step 1 Download the Filmora and create a project
Free Download For Win 7 or later(64-bit)
Free Download For macOS 10.14 or later
You can download the Filmora for free. After installation of this software open it and click on Create New Project. Filmora is not only the video maker or editor, you can also add text and music to your videos, and share them on social media or with friends.

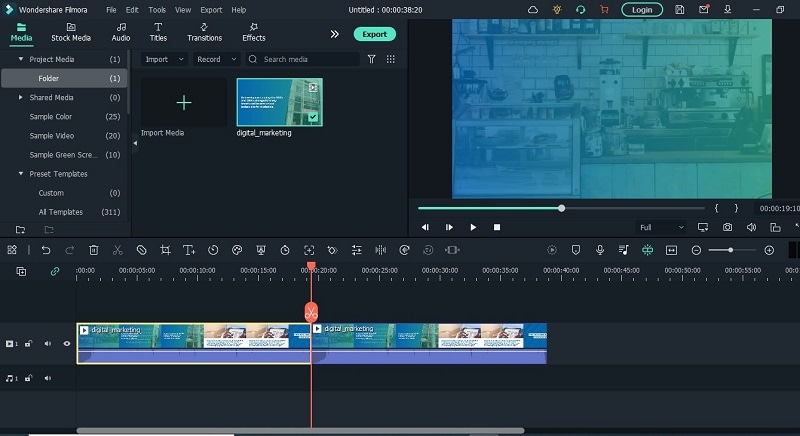
Step 2 Open the video and make copies
Open the video in your timeline. All you need to do is right-click on the video and click on copy. Then simply click or press Ctrl+V on your keyboard and do that for times. You can make as many copies as you want. Then you will have the same clip over and over again which creates the loop effect.
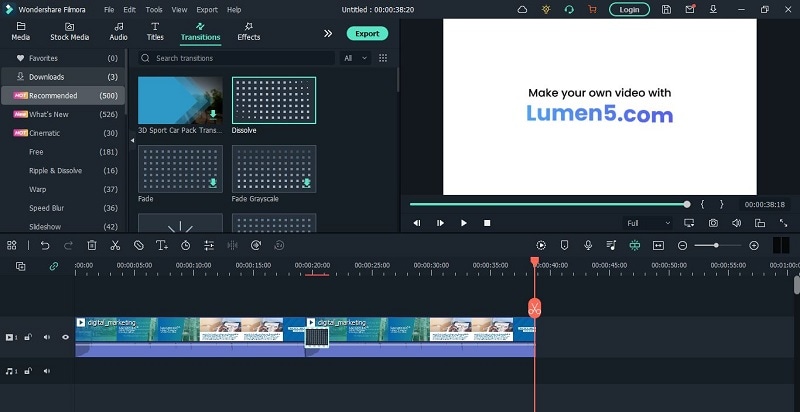
Step 3 Add Transition or any title in the video
After making copies of your video. Add some transitions in your video. Adding transitions to videos can help to keep your videos looking polished and professional. Not only do transitions add an extra layer of visual interest, but they can also help to underscore specific points in your video.
Benefits to create loop video on Filmora
There are many benefits to creating looping videos, especially when using a tool like Filmora. Loop videos are great for social media since they can be set to play on a loop and are viewable without sound. They’re also perfect for short attention spans since you can watch them over and over again without getting bored.
This can be useful for marketing purposes, as it can keep people interested in your video content. Additionally, looping can create a more engaging video experience for viewers, as it keeps them engaged by playing the same clip over and over again. You can easily add captions, and titles to your loop video.
When viewers can pause, rewind, and playback a video over and over again, they are more engaged with it. This increases the chances that they will watch the entire video, and may even share it with friends. You can create a sense of community and connection with your customers. And best of all? You can keep the magic going by adding sound effects and music!
Part 2: Loop a YouTube Video on TV from a Mobile
One of the great features of YouTube is that you can loop YouTube videos on your TV. This means that you can watch a video over and over again without having to fast forward through it. This is great for kids who are constantly asking to watch the same video over and over again. You can also use this feature to watch videos that you have missed.
There is something about relaxing music on the loop that can help to take the edge off. Whether it’s to help you wind down before bed, or to help you relax after a long day, there’s no doubt that looping YouTube on TV can be helpful. Whether you’re looking for something light and calming, or something to help you wind down after a long day, there’s sure to be something on YouTube that can fit the bill.
Let’s have a look at some steps that how to repeat YouTube videos on smart TV.
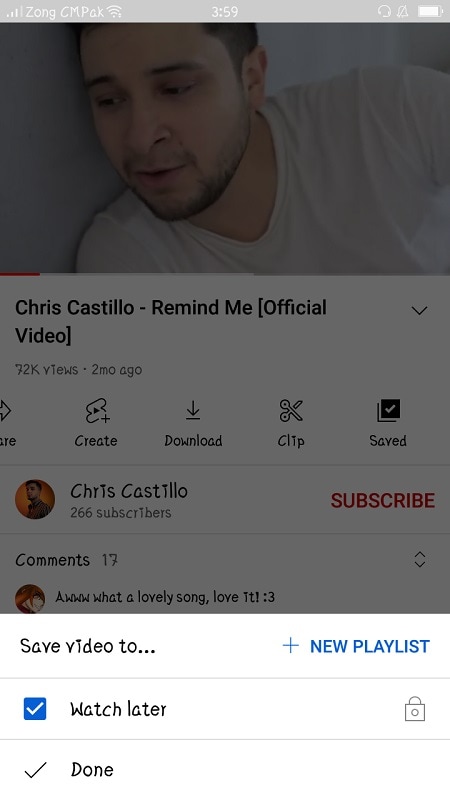
Step 1 Create a Playlist of one or multiple videos
The YouTube app is available on the google play store. You can easily download it from your mobile phones, android, etc. When you open a video on YouTube, several options will appear (like, share, subscribe). You can save the video in your existing playlist or you can create a new playlist.
Step 2 Go to the library and select the loop symbol
Click on library this will take you to a list of libraries that have YouTube collections. This can be a great way to find new material to watch, or to find old material that you may have missed. Play back the playlist that you want to loop on the smart TV.
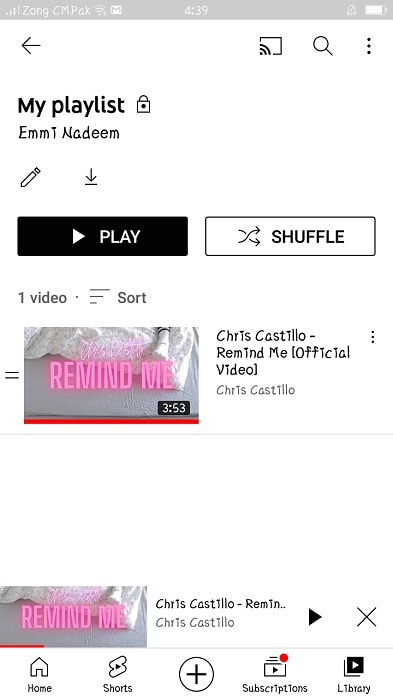
Step 3 Loop the playlist and send the list to the TV
Play the list and click on the loop symbol. At last, launch the YouTube video on your TV. The video will start playing in a loop. It can only be stopped from your mobile phone on which you start playing the list.
Why you might want to loop a YouTube video on a smart TV?
Some people want to watch a video over and over again without having to wait for it to load each time. Looping in a YouTube video can help you do this. Another reason to loop a YouTube video on your TV is if you want to watch it while you are doing something else. YouTube only loops the playlist.
Looping a YouTube video on your TV can also be useful if you have a lot of videos that you want to watch but don’t have enough time for. Looping YouTube videos on your television is a great way to keep your young ones entertained and engaged. Not only are they getting their daily dose of educational content, but they are also being kept enertained.
Wondershare Filmora Loop YouTube videos on PC and Mac with simple clicks.
Free Download Free Download Learn More

![]()
Conclusion
Looping YouTube videos on smart TV is an excellent way to watch the content you love, no matter where you are. While it may be true that loop YouTube videos on a smart TV are not imminent, there are some major benefits to be gained from implementing the new technology.
It’s easy to do, and it can be a great way to spend time with family members and friends. Looping YouTube videos on a smart TV is a great way to add some fun and excitement to your experience. The best part is, there are no limitations or restrictions you can loop as many videos as you want, and watch them in any order!
Free Download For Win 7 or later(64-bit)
Free Download For macOS 10.14 or later
Part 1: How to Create a Loop Video for YouTube
There is a lot of debate around whether or not creating a loop video is necessary for success on YouTube. Some people believe that it’s not necessary, while others believe that it is a must. The main benefit of creating a loop video is that it helps to keep your audience engaged. It also helps to create a sense of continuity between your videos.
Creating a loop video for your YouTube channel increases engagement because viewers can watch the video over and over again. This can lead to more clicks on your ads, which can lead to more revenue. It can also increase your subscribers and views. Maybe some people want to watch the same video multiple times in a row without having to keep pressing the play button on the remote.
Filmora is the best video loop editor:
If you need a powerful video editing tool that will let you create high-quality clips with multiple loops, look no further than Filmora . This software allows you to make various loops of your videos for use in social media, on your website or wherever desired. Plus, with Filmora, there is no limit on the number of loops you can create.
Loop video works well for corporate presentations, tutorials, explainer videos, and much more. You can create looping videos by choosing from one of Filmora’s many templates or creating your own. It’s easy to get started with looping video editing in Filmora! Some people want to watch a video while they do other things, like work on the computer.
Filmora is incredibly easy to use. You can quickly create videos by importing footage, editing and adding effects, and exporting your videos. Plus, the software has several built-in tools that let you customize your videos further. It has many features that make it an excellent choice for anyone looking to create high-quality videos quickly and easily.
How can we loop a video on Filmora? Follow these steps to create a looping video on Filmora:
Step 1 Download the Filmora and create a project
Free Download For Win 7 or later(64-bit)
Free Download For macOS 10.14 or later
You can download the Filmora for free. After installation of this software open it and click on Create New Project. Filmora is not only the video maker or editor, you can also add text and music to your videos, and share them on social media or with friends.
Step 2 Open the video and make copies
Open the video in your timeline. All you need to do is right-click on the video and click on copy. Then simply click or press Ctrl+V on your keyboard and do that for times. You can make as many copies as you want. Then you will have the same clip over and over again which creates the loop effect.
Step 3 Add Transition or any title in the video
After making copies of your video. Add some transitions in your video. Adding transitions to videos can help to keep your videos looking polished and professional. Not only do transitions add an extra layer of visual interest, but they can also help to underscore specific points in your video.
Benefits to create loop video on Filmora
There are many benefits to creating looping videos, especially when using a tool like Filmora. Loop videos are great for social media since they can be set to play on a loop and are viewable without sound. They’re also perfect for short attention spans since you can watch them over and over again without getting bored.
This can be useful for marketing purposes, as it can keep people interested in your video content. Additionally, looping can create a more engaging video experience for viewers, as it keeps them engaged by playing the same clip over and over again. You can easily add captions, and titles to your loop video.
When viewers can pause, rewind, and playback a video over and over again, they are more engaged with it. This increases the chances that they will watch the entire video, and may even share it with friends. You can create a sense of community and connection with your customers. And best of all? You can keep the magic going by adding sound effects and music!
Part 2: Loop a YouTube Video on TV from a Mobile
One of the great features of YouTube is that you can loop YouTube videos on your TV. This means that you can watch a video over and over again without having to fast forward through it. This is great for kids who are constantly asking to watch the same video over and over again. You can also use this feature to watch videos that you have missed.
There is something about relaxing music on the loop that can help to take the edge off. Whether it’s to help you wind down before bed, or to help you relax after a long day, there’s no doubt that looping YouTube on TV can be helpful. Whether you’re looking for something light and calming, or something to help you wind down after a long day, there’s sure to be something on YouTube that can fit the bill.
Let’s have a look at some steps that how to repeat YouTube videos on smart TV.
Step 1 Create a Playlist of one or multiple videos
The YouTube app is available on the google play store. You can easily download it from your mobile phones, android, etc. When you open a video on YouTube, several options will appear (like, share, subscribe). You can save the video in your existing playlist or you can create a new playlist.
Step 2 Go to the library and select the loop symbol
Click on library this will take you to a list of libraries that have YouTube collections. This can be a great way to find new material to watch, or to find old material that you may have missed. Play back the playlist that you want to loop on the smart TV.
Step 3 Loop the playlist and send the list to the TV
Play the list and click on the loop symbol. At last, launch the YouTube video on your TV. The video will start playing in a loop. It can only be stopped from your mobile phone on which you start playing the list.
Why you might want to loop a YouTube video on a smart TV?
Some people want to watch a video over and over again without having to wait for it to load each time. Looping in a YouTube video can help you do this. Another reason to loop a YouTube video on your TV is if you want to watch it while you are doing something else. YouTube only loops the playlist.
Looping a YouTube video on your TV can also be useful if you have a lot of videos that you want to watch but don’t have enough time for. Looping YouTube videos on your television is a great way to keep your young ones entertained and engaged. Not only are they getting their daily dose of educational content, but they are also being kept enertained.
Wondershare Filmora Loop YouTube videos on PC and Mac with simple clicks.
Free Download Free Download Learn More
![]()
Conclusion
Looping YouTube videos on smart TV is an excellent way to watch the content you love, no matter where you are. While it may be true that loop YouTube videos on a smart TV are not imminent, there are some major benefits to be gained from implementing the new technology.
It’s easy to do, and it can be a great way to spend time with family members and friends. Looping YouTube videos on a smart TV is a great way to add some fun and excitement to your experience. The best part is, there are no limitations or restrictions you can loop as many videos as you want, and watch them in any order!
Also read:
- [New] Beauty Behind the Screen Color Correction Insights
- [New] Composing News Wrap-Up Scripts
- [New] Conciseness in Content Editing Your YouTube Videos Smartly
- [New] Discovering Your Customized YouTube Playlist
- [New] Dynamic Website Content Incorporating YouTube Playlists
- [Updated] Essential Strategies for Professional-Grade Video Editing
- 10 Must-See VR Videos on YouTube for Deep Immersion for 2024
- Conversion Gratuite D'un Fichier AAC Au Format WMV Sur Internet - Tapez Un Ordre À Movavi
- Creating Impactful YouTube Thumbnails & Ads for 2024
- Gratuito Conversor De Milhas Por Galão Para Vídeo Em Formato WMA - Online E Fácil De Usar Com O MovieMaker Da Movavi
- Guide to Uploading Videos Into YouTube Lists
- How To Overcome No Image Problem in YouTube Shorts
- In 2024, Eco-Film Frameworks Unlimited Free Template Access for Pros & Amateurs
- Karma | Free Book
- Key Moments in Tech: When Did Humans Unveil the Concept of AI?
- Tailor-Made Downloads Selecting Your Perfect 4K App for 2024
- Troubleshoot iPhone Mute Issues: Discover the Top 7 Solutions!
- Title: [Updated] Building a Studio-Quality Setup at Home
- Author: Steven
- Created at : 2024-11-23 17:42:07
- Updated at : 2024-11-24 19:28:54
- Link: https://youtube-clips.techidaily.com/updated-building-a-studio-quality-setup-at-home/
- License: This work is licensed under CC BY-NC-SA 4.0.