
!["[Updated] Budget-Conscious Filmmaker's Essential Video Gear List"](https://www.lifewire.com/thmb/jEvS4hCjQpYChJrL63gqB32mNQ8=/400x300/filters:no_upscale():max_bytes(150000):strip_icc()/185267882-56a0e1e03df78cafdaa603c6.jpg)
"[Updated] Budget-Conscious Filmmaker's Essential Video Gear List"
Budget-Conscious Filmmaker’s Essential Video Gear List
Top 11 Cheap Vlogging Cameras

Shanoon Cox
Oct 26, 2023• Proven solutions
Is the most expensive camera always the best for you? No. It depends. If you are a determined and ambitious beginner, it’s a good decision to invest in advanced cameras when you have an adequate budget. However, if you are not sure whether your enthusiasm for vlogging or photography will last or not, starting with an entry-level camera could be much wiser. As camera technology continues to advance, prices on cameras are coming down. Now, as a vlogger/YouTuber, you can get your hands on some decent vlogging cameras with a small budget. Before you get into the recommendation, please keep in mind that these budget camera still allows you to shoot fantastic videos and photos. Below, I have prepared a list of the top eleven cheap vlogging cameras, all of which can record at least full HD 1080p videos, that you can get for under $600.
If you have a bigger budget, you may prefer to check out my other posts on:
- 12 Best Vlogging Cameras
- 7 Best DSLR Cameras For Vlogging
- 8 Best Mirrorless Cameras For Vlogging
- 12 Best Vlogging Cameras With A Flip Screen
TOP 11 CHEAP VLOGGING CAMERAS
| Camera | Camera Type | Flip Screen | 4K | Price | |
|---|---|---|---|---|---|
| GoPro Hero5 |  |
Action Camera | No | No | Check on Amazon |
| Canon EOS M100 |  |
Mirrorless | Flip Up | No | Check on Amazon |
| Canon PowerShot SX730 HS |  |
Ultra Compact | Flip Up | No | Check on Amazon |
| Panasonic Lumix DC-ZS70 |  |
Compact | Flip Up | Yes | Check on Amazon |
| Yi 4K Action Camera |  |
Action Camera | No | Yes | Check on Amazon |
| Sony Cybershot DSC-HX80 |  |
Ultra Compact | Flip Up | No | Check on Amazon |
| Nikon Coolpix A900 |  |
Compact | Flip Up | Yes | Check on Amazon |
 |
Best Cheap Vlogging Camera Under $100: Polaroid Cube+ Recording outdoor action videos for your vlog with a DSLR camera is impractical. They’re heavy and bulky, getting in the way of whatever you’re doing. Action cameras like the GoPro and Polaroid Cube are much better for these occasions because they’re small enough to be mounted on a bike or a helmet. The Polaroid Cube also has built-in magnets on the top and bottom of the camera, giving you the ability to attach them to most metal surfaces. The camera’s 1.4-inch rubber body is resistant to water, shock, and all types of weather and it is capable of capturing footage even under the most extreme weather conditions. The Cube action camera can record full HD 1080p videos at 60 fps and it has a 124-degree wide-angle lens that performs best when it is used for exterior shots. The camera is compatible with microSDHC memory cards that can store up to 128GB of footage. The Cube’s battery can record up to 107 minutes before it needs another charge. With the Polaroid Cube+, you can preview or control your camera from your phone because it comes with Wi-Fi connectivity. PROS - Cheap vlogging camera for outdoor videos - Multiple mounting options CONS - Low-quality built-in microphone - No preview screen |
|---|---|
 |
Best Cheap Vlogging Camera Under $200: Yi 4K If you are looking for an affordable vlogging camera that costs less than $200, then currently the best option for you is the Yi 4K Action Camera. Its 2.19” LCD Gorilla Glass retina touchscreen is resistant to scratches and mild impacts. Much like a lot of action cameras, this camera is equipped with a wide-angle lens, 160-degree to be exact. The camera, however, is not waterproof, and you need to buy additional accessories so you can protect the camera from accidental damage. You can record 120 minutes of 4K footage at 60 fps without having to recharge the camera’s 4.35V lithium-ion battery. All the footage you record with the Yi 4K action camera can easily be transferred to a computer or broadcasted live on Facebook, YouTube, and other live streaming platforms using the camera’s high-speed 5GHz Wi-Fi feature. The built-in EIS (electronic image stabilization) contains a 3-axis gyroscope and 3-axis accelerometer that reduces the camera shakes caused by movements and enables you to produce smooth recordings of your wildest adventures. The Yi 4K action camera has two built-in microphones that can capture audio recordings, but there is no audio jack input for recording audio from an external microphone. PROS - Weighs only 3.4 Oz - Powerful electronic image stabilization CONS - Limited mounting capabilities - The camera’s fisheye lens can distort footage |
 |
Best Cheap Vlogging Camera Under $300: Nikon B500 Unlike the action cams that can capture ultra-wide-angle shots, the Nikon’s Coolpix B500 model is designed to also help you zoom in closer. The camera has a built-in 40X optical zoom NIKKOR lens that can be extended to 80X when used with the Dynamic Fine Zoom feature, which means you can easily record things that are further away. The Nikon Coolpix B500’s ISO can only go up to ISO 3200, despite the camera’s 16 MP BSI-CMOS sensor that supports full HD 1080p recording at 30 or 25 fps. The 3-inch 920K-dot LCD screen is fully adjustable but it doesn’t have touchscreen functionality, and the camera doesn’t have a viewfinder, which can slightly complicate the process of composing shots for your vlogs. The Nikon Coolpix B500 is conveniently powered by 4 AA batteries. This cheap vlogging camera offers more features than similar cameras in its price range. PROS - Great connectivity features - 80x optical zoom CONS - No manual exposure controls - Limited ISO sensitivity |
 |
Best Cheap Vlogging Camera Under $400: Nikon A900 This Coolpix series digital camera model is much more powerful than the Nikon B500 because it is a 20.3 MP camera that can record videos in UHD 4K quality. The non-interchangeable 35X optical zoom NIKKOR f/3.4-6.9 lens performs well in capturing footage of both closeup and faraway objects. Like the B500, the A900’s ISO sensitivity goes up to a maximum of 3200. Consequently, this camera won’t be ideal for filming in poorly lit conditions. The Nikon Coolpix A900 features a variety of handy modes, including creative, super lapse, and multiple exposure modes, to mention a few. The SnapBridge app allows you to connect the camera to a smartphone or a tablet via the built-in Wi-Fi NFC so you can transfer and edit the footage immediately after you stop recording. The A900 is a small and light digital camera, which makes it a great companion on your daily vlogging adventures. PROS - 4K and Full HD video recording options - Manual exposure control CONS - Limited audio recording features - No viewfinder |
 |
Best Cheap Vlogging Camera Under $500: Sony a5100 Sony’s a5100 is the successor of the NEX-5 series. Four years after its initial release in 2014, it is still considered the best vlogging camera under $500. The 24.3 MP Exmor APS-C CMOS sensor and the BIONZ X image processor reduce image noise and increase the level of detail in your vlogs. This mirrorless camera ships with the standard 16-50 mm lens, but it is compatible with all of Sony’s E-mount lenses. The Sony a5100 can record up to 1080p videos at 60 fps. Its HVAC S codec support enables you to produce videos that have 50Mbps bit rates. The Hybrid AF system featuring both a 179 phase-detect points as well as 25 contrast-detect points guarantees that all videos you record with the Sony a5100 will be sharp and in focus. Wi-Fi with NFC feature enables you to easily transfer or share your recorded footage. PROS - AF speeds exceed all expectations - The camera body is resistant to moderate impact CONS - Can’t record 4K videos - Fake shutter sounds |
Wondershare Filmora supports most video formats that you can find. If you have no idea about which software can edit the video filmed by your camera, try Filmora. It provides special effects, stock photo & video, sound library, etc., which will definitely enhance your productivity and helps to make money by making videos much easier


Shanoon Cox
Shanoon Cox is a writer and a lover of all things video.
Follow @Shanoon Cox
Shanoon Cox
Oct 26, 2023• Proven solutions
Is the most expensive camera always the best for you? No. It depends. If you are a determined and ambitious beginner, it’s a good decision to invest in advanced cameras when you have an adequate budget. However, if you are not sure whether your enthusiasm for vlogging or photography will last or not, starting with an entry-level camera could be much wiser. As camera technology continues to advance, prices on cameras are coming down. Now, as a vlogger/YouTuber, you can get your hands on some decent vlogging cameras with a small budget. Before you get into the recommendation, please keep in mind that these budget camera still allows you to shoot fantastic videos and photos. Below, I have prepared a list of the top eleven cheap vlogging cameras, all of which can record at least full HD 1080p videos, that you can get for under $600.
If you have a bigger budget, you may prefer to check out my other posts on:
- 12 Best Vlogging Cameras
- 7 Best DSLR Cameras For Vlogging
- 8 Best Mirrorless Cameras For Vlogging
- 12 Best Vlogging Cameras With A Flip Screen
TOP 11 CHEAP VLOGGING CAMERAS
| Camera | Camera Type | Flip Screen | 4K | Price | |
|---|---|---|---|---|---|
| GoPro Hero5 | |
Action Camera | No | No | Check on Amazon |
| Canon EOS M100 | |
Mirrorless | Flip Up | No | Check on Amazon |
| Canon PowerShot SX730 HS | |
Ultra Compact | Flip Up | No | Check on Amazon |
| Panasonic Lumix DC-ZS70 | |
Compact | Flip Up | Yes | Check on Amazon |
| Yi 4K Action Camera | |
Action Camera | No | Yes | Check on Amazon |
| Sony Cybershot DSC-HX80 | |
Ultra Compact | Flip Up | No | Check on Amazon |
| Nikon Coolpix A900 | |
Compact | Flip Up | Yes | Check on Amazon |
|
Best Cheap Vlogging Camera Under $100: Polaroid Cube+ Recording outdoor action videos for your vlog with a DSLR camera is impractical. They’re heavy and bulky, getting in the way of whatever you’re doing. Action cameras like the GoPro and Polaroid Cube are much better for these occasions because they’re small enough to be mounted on a bike or a helmet. The Polaroid Cube also has built-in magnets on the top and bottom of the camera, giving you the ability to attach them to most metal surfaces. The camera’s 1.4-inch rubber body is resistant to water, shock, and all types of weather and it is capable of capturing footage even under the most extreme weather conditions. The Cube action camera can record full HD 1080p videos at 60 fps and it has a 124-degree wide-angle lens that performs best when it is used for exterior shots. The camera is compatible with microSDHC memory cards that can store up to 128GB of footage. The Cube’s battery can record up to 107 minutes before it needs another charge. With the Polaroid Cube+, you can preview or control your camera from your phone because it comes with Wi-Fi connectivity. PROS - Cheap vlogging camera for outdoor videos - Multiple mounting options CONS - Low-quality built-in microphone - No preview screen |
|---|---|
|
Best Cheap Vlogging Camera Under $200: Yi 4K If you are looking for an affordable vlogging camera that costs less than $200, then currently the best option for you is the Yi 4K Action Camera. Its 2.19” LCD Gorilla Glass retina touchscreen is resistant to scratches and mild impacts. Much like a lot of action cameras, this camera is equipped with a wide-angle lens, 160-degree to be exact. The camera, however, is not waterproof, and you need to buy additional accessories so you can protect the camera from accidental damage. You can record 120 minutes of 4K footage at 60 fps without having to recharge the camera’s 4.35V lithium-ion battery. All the footage you record with the Yi 4K action camera can easily be transferred to a computer or broadcasted live on Facebook, YouTube, and other live streaming platforms using the camera’s high-speed 5GHz Wi-Fi feature. The built-in EIS (electronic image stabilization) contains a 3-axis gyroscope and 3-axis accelerometer that reduces the camera shakes caused by movements and enables you to produce smooth recordings of your wildest adventures. The Yi 4K action camera has two built-in microphones that can capture audio recordings, but there is no audio jack input for recording audio from an external microphone. PROS - Weighs only 3.4 Oz - Powerful electronic image stabilization CONS - Limited mounting capabilities - The camera’s fisheye lens can distort footage |
|
Best Cheap Vlogging Camera Under $300: Nikon B500 Unlike the action cams that can capture ultra-wide-angle shots, the Nikon’s Coolpix B500 model is designed to also help you zoom in closer. The camera has a built-in 40X optical zoom NIKKOR lens that can be extended to 80X when used with the Dynamic Fine Zoom feature, which means you can easily record things that are further away. The Nikon Coolpix B500’s ISO can only go up to ISO 3200, despite the camera’s 16 MP BSI-CMOS sensor that supports full HD 1080p recording at 30 or 25 fps. The 3-inch 920K-dot LCD screen is fully adjustable but it doesn’t have touchscreen functionality, and the camera doesn’t have a viewfinder, which can slightly complicate the process of composing shots for your vlogs. The Nikon Coolpix B500 is conveniently powered by 4 AA batteries. This cheap vlogging camera offers more features than similar cameras in its price range. PROS - Great connectivity features - 80x optical zoom CONS - No manual exposure controls - Limited ISO sensitivity |
|
Best Cheap Vlogging Camera Under $400: Nikon A900 This Coolpix series digital camera model is much more powerful than the Nikon B500 because it is a 20.3 MP camera that can record videos in UHD 4K quality. The non-interchangeable 35X optical zoom NIKKOR f/3.4-6.9 lens performs well in capturing footage of both closeup and faraway objects. Like the B500, the A900’s ISO sensitivity goes up to a maximum of 3200. Consequently, this camera won’t be ideal for filming in poorly lit conditions. The Nikon Coolpix A900 features a variety of handy modes, including creative, super lapse, and multiple exposure modes, to mention a few. The SnapBridge app allows you to connect the camera to a smartphone or a tablet via the built-in Wi-Fi NFC so you can transfer and edit the footage immediately after you stop recording. The A900 is a small and light digital camera, which makes it a great companion on your daily vlogging adventures. PROS - 4K and Full HD video recording options - Manual exposure control CONS - Limited audio recording features - No viewfinder |
|
Best Cheap Vlogging Camera Under $500: Sony a5100 Sony’s a5100 is the successor of the NEX-5 series. Four years after its initial release in 2014, it is still considered the best vlogging camera under $500. The 24.3 MP Exmor APS-C CMOS sensor and the BIONZ X image processor reduce image noise and increase the level of detail in your vlogs. This mirrorless camera ships with the standard 16-50 mm lens, but it is compatible with all of Sony’s E-mount lenses. The Sony a5100 can record up to 1080p videos at 60 fps. Its HVAC S codec support enables you to produce videos that have 50Mbps bit rates. The Hybrid AF system featuring both a 179 phase-detect points as well as 25 contrast-detect points guarantees that all videos you record with the Sony a5100 will be sharp and in focus. Wi-Fi with NFC feature enables you to easily transfer or share your recorded footage. PROS - AF speeds exceed all expectations - The camera body is resistant to moderate impact CONS - Can’t record 4K videos - Fake shutter sounds |
Wondershare Filmora supports most video formats that you can find. If you have no idea about which software can edit the video filmed by your camera, try Filmora. It provides special effects, stock photo & video, sound library, etc., which will definitely enhance your productivity and helps to make money by making videos much easier
Shanoon Cox
Shanoon Cox is a writer and a lover of all things video.
Follow @Shanoon Cox
Supercharge Your Content: Editing and Enhancing YouTube Tags
How to Optimize YouTube Tags/Title/Description for More Views

Richard Bennett
Mar 27, 2024• Proven solutions
Making awesome video content is just the first hurdle to overcome. Getting people to watch them is the next and a much bigger obstacle in your path. Just as a blogger must work hard to get people to read their blog, so a YouTuber needs to find ways to get more views on their videos.
For any piece of content on the internet, discoverability is key to exposure. After all, nobody will watch your video or read your blog if they can’t find it, right? A blogger would do this by lacing their content with SEO - search engine optimization. But how can a YouTuber do the same? The answer lies in something known as YouTube tags optimization. In this article, we will let you know how to add, edit and optimize YouTube tags easily for more views, and some tips on YouTube title and description.
Quick Jump Menu
- What are YouTube tags and why they are so important
- How to come up with YouTube tags and optimize them
- How to Tag YouTube and Add Title, Description
- How to Improve YouTube video Metadata: Tags, Title, Description
- Tips for Tagging YouTube and Writing Title, Description
Before we get started, I want to recommend the best video editing software for YouTubers - Wondershare Filmora , an easy to use while powerful video editor that allows you not only to cut, split, crop, resize, reverse your videos, but also offers you multiple video effects specially designed for Fashion, Beauty, Gaming, Travel, Education, etc. Check the video to know more fantastic features:
Download Mac Version ](https://tools.techidaily.com/wondershare/filmora/download/ )
Part 1: What are YouTube tags and why they are so important
YouTube tags are used when you upload a video on YouTube. You need to specify the type of video. In other words, you need to describe your video with keywords. But you might think about why you need to add these words. YouTube can’t figure out what my videos are about? Unfortunately, YouTube can’t though its algorithm is much more advanced than before.
You must know the competition between videos is furious since 500 hours of video per minute are uploaded on YouTube . In this case, it is important to let the YouTube algorithm know your video by adding related tags to have a higher ranking. So the better tags we choose, the higher chance to rank in the top 1, which means you will get more views!
Using YouTube meta tags wisely can broaden your reach and help new people discover your content. However, don’t be tempted to insert irrelevant tags just because you know they are high traffic. You will be found out and penalized as a result. Just as you did with your description, research your keywords, place the most important ones first and use as many as you can.
What are the three YouTube tag types?
YouTube has three different types of tags and each of them has a specific purpose. The tags are-
Specific – The specific tag types are keywords-oriented. These keywords specifically pertain to the content of your video. In this tag type, the particular video is highlighted with the keyword tags. Often while typing the keywords in your mind, YouTube suggests phrases and keywords according to the content of your video. You may apply the suggestions and also add more general or common versions of the same keywords.
Compound – The compound tags are usually using more than two words. Many a time it is seen that users prefer tagging the complete title of the video. If you are using your video title as the compound tag, ensure that you do not include the prepositions like or, as, and, etc. This is because YouTube allows just 500 characters in the title and ignore the prepositions. It is always advised to use all the 500 characters YouTube has allowed without wasting the characters on prepositions as it will automatically be ignored.
Generic – The generic tags are the ones that describe the entire video in one or two words. These tags are used in all the videos of yours. These tags are used across your channel for all the videos you post. It is important to have such general constant tags.
Part 2: How to add YouTube tags and optimize them
The more relevant tags you add, the better it is. The best part is YouTube doesn’t restrict the number of tags but adding all is not possible and adding something irrelevant doesn’t make sense. So, your YouTube video tags must be the smart ones for more views. Educated tagging is what is required.
1. Brand-Specific Tags Addition - Every business wants their brand name to show up in the search results on YouTube and Google. Self-referencing your video or tagging your brand name in a number of variations is a smart way of letting others know your brand.
2. Using YouTube Auto Suggest – Play with the search option on YouTube and check out the YouTube suggestions when you search. Try to recognize the common videos that pop up while searching for something important and relevant to yours. Try searching for random keywords according to your YouTube search experience.
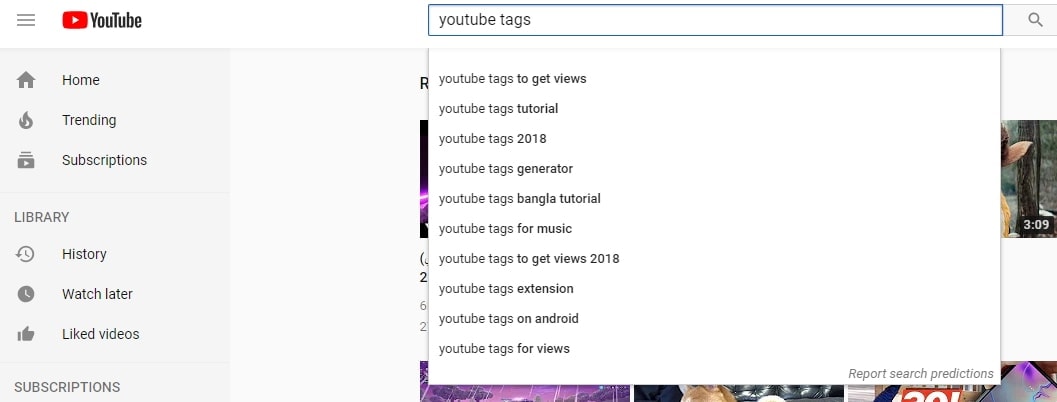
3. Use the YouTube Keyword Search Tool – Lastly, you may use the YouTube keyword suggestion tool. It helps you to extract the relevant keywords from the videos of your competitors and create suggestions according to the basic term provided by you.
4. Use Specific Tags - After using tools, you need to narrow down your tags specifically, like tags “learn 3D paper cutting”. The search volume may not be huge, but these kinds of tags can let YouTube know your video very well. Give it a try!
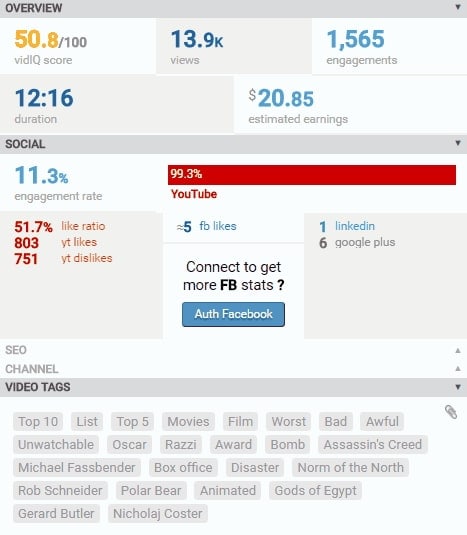
5. Check competitor’s Tags - When you check tags from other brands, it is not suggested to copy them all. What you need to do is find what you are missing and try to cover that area. However, only third-party tools can help you do that. In the market, VidIQ is highly used. It has a free version. Most of all data including tags can be found for higher views.
YouTube Tags Bonus Tips
Here you can learn some tips when optimizing tags. You can use singular and plural tags. Sometimes remember to add some misspelling tags because users tend to mistype some words, so it’s better to cover this kind of tag. You can get more information on misspelled words . More tips are listed below.
- Build on what you learned in your keyword research and use high traffic keywords as tags
- Use as many tags as possible, but without being spammy
- Build related playlists using particular tags
- Be generic; ‘big’, ‘funny’ and ‘sweet’ are fine, but ‘luscious’, ‘delightful’ and ‘splendid’ don’t make the best tags
- Put the most important tags first
- Mix single word tags with ‘long tail’ tags, e.g. ‘how to’
Part 3: How to Tag YouTube and Add Title, Description
For a New Video
- Step 1. The first thing you need to do is to sign in to your YouTube account .
- Step 2. Then click the Upload button that’s found on the top right corner of the window.

- Step 3. Then select the video that you want to upload. You will be asked to add a title, description, and tags.
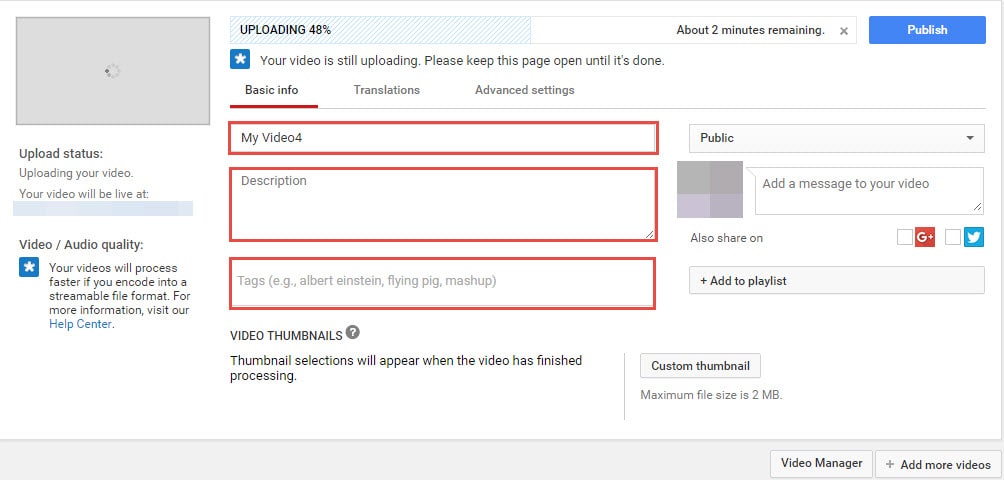
- Step 4. After uploading, you can still edit the YouTube title, description, and tags.
For a Published Video
There are times when you want to change the title, description or tag of an already published video. The good news is that YouTube allows you to re-edit them whenever you want to.
- Step 1. Log into your YouTube account
- Step 2. Click the account name found at the top right-hand corner of the screen. Then you will have a dropdown menu. Select Video Manager to show a list of your uploaded videos.

- Step 3. Click the Edit button that’s found right next to the video that you want to modify. In the Video Information, you can now change the title, description or any of the tags. Click on the Save Changes button when you are done.
Part 4: How to Improve YouTube Video Title and Description
Metadata on YouTube is where both the viewers and the platform itself can find out what your video is all about. It helps people search for your video, helps YouTube to categorize it correctly and, when done well, can broaden the reach of your content. YouTube meta consists of three main parts: tags, title and description. Here’s how you can use each of these three elements to create powerful metadata for your video:
1. Title
YouTube titles play a big part in the ranking factors for search. That means you’ve got to think about what the people most likely to want to see your video will type into the search bar, as well as the words that accurately describe your video.
For example, if you have a clip of your cat Fluffy climbing a tree, calling your video ‘Fluffy climbs a tree’ is not the best idea. Nobody knows who Fluffy is; it could be your rabbit, dog, daughter or feather duster for all the YouTube community knows, and nobody is going to be searching for it.
A better title would be ‘cat climbs a tree, but you could even improve on that. How about ‘funny cat climbs a tree’, which would capture all those people looking for funny cat videos. Or, even better, ‘funny Persian cat climbs a tree’, also capturing those people who adore Persian cats.
You can see how building awesome YouTube titles can happen organically like this, but it’s also worth doing your homework too. We have collected a handful of YouTube Keyword tools for you to improve your YouTube meta, so check out the suggestions and work forwards from there.
Best practices
- Research your keywords and include high traffic keywords at the start of the title
- Keep titles under 70 characters
- Branding, episode number, and other non-essential info should be at the end of the title
- Review your YouTube titles from time to time and update with new keywords as search trends change
- Avoid clickbait titles or misleading titles as this will affect your view time and subsequently your ranking in search
2. Description
Your description is a much longer piece of YouTube meta, so you can really go to town with your YouTube keywords here. You’ve got up to 5,000 characters to fill in, and we strongly advise that you aim to use every single one. This really is a golden opportunity, not only to get people motivated to watch all of your video, but also to be indexed correctly through well researched YouTube keywords.
You may have noticed that, on the search page itself, only a small part of the description actually shows up; 120 characters of it to be precise. This doesn’t affect indexing, but it does mean you have to plan your YouTube description carefully to really hook people into clicking through from just the first sentence or two.
Best practices
- Make the first sentence or two compelling and captivating to get people to click
- Research the best YouTube keywords to use to ensure your video is correctly indexed
- At the end of your YouTube description, include a call to action to direct viewers on what to do next (subscribe, click through to the website, look at a product, watch more videos, etc.)
- If your video is long, consider placing time codes in your description to help users jump to their areas of interest
- Add links to products showcased, your social channels, or website as you wish
- Don’t forget to credit any music you’ve used here
Part 5: Tips for Tagging YouTube and Writing Title, Description
So, now we’ve got the basics down, let’s move on to some top tips for getting your metadata just right:
- 1. Do not spam
Irrelevant keywords will not do you any favors in the long run. Using a popular search term such as ‘funny cat’ when actually it’s a video of you unboxing your product will simply irritate your viewers. You’ll get more views, but for shorter durations, and that will hurt not only your ranking but also your reputation. The people you want to draw in with your YouTube meta should be those who are genuinely interested in your videos, as these are the people who will share, comment and interact with you.
- 2. Don’t put tags in the description
YouTube has given you a place to put your tags, and that’s not in the description area of your meta. Placing tags in the description area is known as tag stuffing and can lead to videos being removed or penalized.
- 3. Update regularly
YouTube meta is not a static thing. Trends change, search statistics fluctuate, and the needs of your viewers alter as time goes on. For this reason, you should look to update your meta from time to time, at least once every six months or so. Re-research your keywords and optimize for today’s trending search terms.
You May Also Like: YouTube SEO Complete Guide
Conclusion
Take some time to perfect your meta on YouTube and see how many more views it helps you get. Let us know if you have any other tips for developing powerful metadata, and how optimizing your meta has worked for you!
Download Mac Version ](https://tools.techidaily.com/wondershare/filmora/download/ )
Richard Bennett
Richard Bennett is a writer and a lover of all things video.
Follow @Richard Bennett
Richard Bennett
Mar 27, 2024• Proven solutions
Making awesome video content is just the first hurdle to overcome. Getting people to watch them is the next and a much bigger obstacle in your path. Just as a blogger must work hard to get people to read their blog, so a YouTuber needs to find ways to get more views on their videos.
For any piece of content on the internet, discoverability is key to exposure. After all, nobody will watch your video or read your blog if they can’t find it, right? A blogger would do this by lacing their content with SEO - search engine optimization. But how can a YouTuber do the same? The answer lies in something known as YouTube tags optimization. In this article, we will let you know how to add, edit and optimize YouTube tags easily for more views, and some tips on YouTube title and description.
Quick Jump Menu
- What are YouTube tags and why they are so important
- How to come up with YouTube tags and optimize them
- How to Tag YouTube and Add Title, Description
- How to Improve YouTube video Metadata: Tags, Title, Description
- Tips for Tagging YouTube and Writing Title, Description
Before we get started, I want to recommend the best video editing software for YouTubers - Wondershare Filmora , an easy to use while powerful video editor that allows you not only to cut, split, crop, resize, reverse your videos, but also offers you multiple video effects specially designed for Fashion, Beauty, Gaming, Travel, Education, etc. Check the video to know more fantastic features:
Download Mac Version ](https://tools.techidaily.com/wondershare/filmora/download/ )
Part 1: What are YouTube tags and why they are so important
YouTube tags are used when you upload a video on YouTube. You need to specify the type of video. In other words, you need to describe your video with keywords. But you might think about why you need to add these words. YouTube can’t figure out what my videos are about? Unfortunately, YouTube can’t though its algorithm is much more advanced than before.
You must know the competition between videos is furious since 500 hours of video per minute are uploaded on YouTube . In this case, it is important to let the YouTube algorithm know your video by adding related tags to have a higher ranking. So the better tags we choose, the higher chance to rank in the top 1, which means you will get more views!
Using YouTube meta tags wisely can broaden your reach and help new people discover your content. However, don’t be tempted to insert irrelevant tags just because you know they are high traffic. You will be found out and penalized as a result. Just as you did with your description, research your keywords, place the most important ones first and use as many as you can.
What are the three YouTube tag types?
YouTube has three different types of tags and each of them has a specific purpose. The tags are-
Specific – The specific tag types are keywords-oriented. These keywords specifically pertain to the content of your video. In this tag type, the particular video is highlighted with the keyword tags. Often while typing the keywords in your mind, YouTube suggests phrases and keywords according to the content of your video. You may apply the suggestions and also add more general or common versions of the same keywords.
Compound – The compound tags are usually using more than two words. Many a time it is seen that users prefer tagging the complete title of the video. If you are using your video title as the compound tag, ensure that you do not include the prepositions like or, as, and, etc. This is because YouTube allows just 500 characters in the title and ignore the prepositions. It is always advised to use all the 500 characters YouTube has allowed without wasting the characters on prepositions as it will automatically be ignored.
Generic – The generic tags are the ones that describe the entire video in one or two words. These tags are used in all the videos of yours. These tags are used across your channel for all the videos you post. It is important to have such general constant tags.
Part 2: How to add YouTube tags and optimize them
The more relevant tags you add, the better it is. The best part is YouTube doesn’t restrict the number of tags but adding all is not possible and adding something irrelevant doesn’t make sense. So, your YouTube video tags must be the smart ones for more views. Educated tagging is what is required.
1. Brand-Specific Tags Addition - Every business wants their brand name to show up in the search results on YouTube and Google. Self-referencing your video or tagging your brand name in a number of variations is a smart way of letting others know your brand.
2. Using YouTube Auto Suggest – Play with the search option on YouTube and check out the YouTube suggestions when you search. Try to recognize the common videos that pop up while searching for something important and relevant to yours. Try searching for random keywords according to your YouTube search experience.
3. Use the YouTube Keyword Search Tool – Lastly, you may use the YouTube keyword suggestion tool. It helps you to extract the relevant keywords from the videos of your competitors and create suggestions according to the basic term provided by you.
4. Use Specific Tags - After using tools, you need to narrow down your tags specifically, like tags “learn 3D paper cutting”. The search volume may not be huge, but these kinds of tags can let YouTube know your video very well. Give it a try!
5. Check competitor’s Tags - When you check tags from other brands, it is not suggested to copy them all. What you need to do is find what you are missing and try to cover that area. However, only third-party tools can help you do that. In the market, VidIQ is highly used. It has a free version. Most of all data including tags can be found for higher views.
YouTube Tags Bonus Tips
Here you can learn some tips when optimizing tags. You can use singular and plural tags. Sometimes remember to add some misspelling tags because users tend to mistype some words, so it’s better to cover this kind of tag. You can get more information on misspelled words . More tips are listed below.
- Build on what you learned in your keyword research and use high traffic keywords as tags
- Use as many tags as possible, but without being spammy
- Build related playlists using particular tags
- Be generic; ‘big’, ‘funny’ and ‘sweet’ are fine, but ‘luscious’, ‘delightful’ and ‘splendid’ don’t make the best tags
- Put the most important tags first
- Mix single word tags with ‘long tail’ tags, e.g. ‘how to’
Part 3: How to Tag YouTube and Add Title, Description
For a New Video
- Step 1. The first thing you need to do is to sign in to your YouTube account .
- Step 2. Then click the Upload button that’s found on the top right corner of the window.
- Step 3. Then select the video that you want to upload. You will be asked to add a title, description, and tags.
- Step 4. After uploading, you can still edit the YouTube title, description, and tags.
For a Published Video
There are times when you want to change the title, description or tag of an already published video. The good news is that YouTube allows you to re-edit them whenever you want to.
- Step 1. Log into your YouTube account
- Step 2. Click the account name found at the top right-hand corner of the screen. Then you will have a dropdown menu. Select Video Manager to show a list of your uploaded videos.
- Step 3. Click the Edit button that’s found right next to the video that you want to modify. In the Video Information, you can now change the title, description or any of the tags. Click on the Save Changes button when you are done.
Part 4: How to Improve YouTube Video Title and Description
Metadata on YouTube is where both the viewers and the platform itself can find out what your video is all about. It helps people search for your video, helps YouTube to categorize it correctly and, when done well, can broaden the reach of your content. YouTube meta consists of three main parts: tags, title and description. Here’s how you can use each of these three elements to create powerful metadata for your video:
1. Title
YouTube titles play a big part in the ranking factors for search. That means you’ve got to think about what the people most likely to want to see your video will type into the search bar, as well as the words that accurately describe your video.
For example, if you have a clip of your cat Fluffy climbing a tree, calling your video ‘Fluffy climbs a tree’ is not the best idea. Nobody knows who Fluffy is; it could be your rabbit, dog, daughter or feather duster for all the YouTube community knows, and nobody is going to be searching for it.
A better title would be ‘cat climbs a tree, but you could even improve on that. How about ‘funny cat climbs a tree’, which would capture all those people looking for funny cat videos. Or, even better, ‘funny Persian cat climbs a tree’, also capturing those people who adore Persian cats.
You can see how building awesome YouTube titles can happen organically like this, but it’s also worth doing your homework too. We have collected a handful of YouTube Keyword tools for you to improve your YouTube meta, so check out the suggestions and work forwards from there.
Best practices
- Research your keywords and include high traffic keywords at the start of the title
- Keep titles under 70 characters
- Branding, episode number, and other non-essential info should be at the end of the title
- Review your YouTube titles from time to time and update with new keywords as search trends change
- Avoid clickbait titles or misleading titles as this will affect your view time and subsequently your ranking in search
2. Description
Your description is a much longer piece of YouTube meta, so you can really go to town with your YouTube keywords here. You’ve got up to 5,000 characters to fill in, and we strongly advise that you aim to use every single one. This really is a golden opportunity, not only to get people motivated to watch all of your video, but also to be indexed correctly through well researched YouTube keywords.
You may have noticed that, on the search page itself, only a small part of the description actually shows up; 120 characters of it to be precise. This doesn’t affect indexing, but it does mean you have to plan your YouTube description carefully to really hook people into clicking through from just the first sentence or two.
Best practices
- Make the first sentence or two compelling and captivating to get people to click
- Research the best YouTube keywords to use to ensure your video is correctly indexed
- At the end of your YouTube description, include a call to action to direct viewers on what to do next (subscribe, click through to the website, look at a product, watch more videos, etc.)
- If your video is long, consider placing time codes in your description to help users jump to their areas of interest
- Add links to products showcased, your social channels, or website as you wish
- Don’t forget to credit any music you’ve used here
Part 5: Tips for Tagging YouTube and Writing Title, Description
So, now we’ve got the basics down, let’s move on to some top tips for getting your metadata just right:
- 1. Do not spam
Irrelevant keywords will not do you any favors in the long run. Using a popular search term such as ‘funny cat’ when actually it’s a video of you unboxing your product will simply irritate your viewers. You’ll get more views, but for shorter durations, and that will hurt not only your ranking but also your reputation. The people you want to draw in with your YouTube meta should be those who are genuinely interested in your videos, as these are the people who will share, comment and interact with you.
- 2. Don’t put tags in the description
YouTube has given you a place to put your tags, and that’s not in the description area of your meta. Placing tags in the description area is known as tag stuffing and can lead to videos being removed or penalized.
- 3. Update regularly
YouTube meta is not a static thing. Trends change, search statistics fluctuate, and the needs of your viewers alter as time goes on. For this reason, you should look to update your meta from time to time, at least once every six months or so. Re-research your keywords and optimize for today’s trending search terms.
You May Also Like: YouTube SEO Complete Guide
Conclusion
Take some time to perfect your meta on YouTube and see how many more views it helps you get. Let us know if you have any other tips for developing powerful metadata, and how optimizing your meta has worked for you!
Download Mac Version ](https://tools.techidaily.com/wondershare/filmora/download/ )
Richard Bennett
Richard Bennett is a writer and a lover of all things video.
Follow @Richard Bennett
Also read:
- [Updated] Craft Your Online Identity with Customized YouTube URLs
- [New] Avoid Common Mistakes in YouTube Livestreaming with Best Webcams
- Elevate Vlogging Quality - The Ultimate 12 Recommended Cam Picks
- In 2024, A Step-by-Step Guide How To Record, Save & Share YouTube Video for No Cost
- [Updated] Elevate Video Engagement by Inserting Captions
- 15 Best YouTube Movies Channels for You to Kill Time for 2024
- [New] Entering Income Territory with a Thousand Followers
- 2024 Approved Aural Adventures Discovering the Top 15 Instructional Music Videos
- Creating Engaging YouTube Openings & Closers for Free
- 2024 Approved ASMR Gurus Recommend Best Microphones Reviewed
- Essentials for Efficient YouTube Content Trimming
- In 2024, 3-Step Financial Forecasting Assessing Revenue From Google's Platform, YouTube
- Capturing Audiene with Spectacular Gadget Unboxing Vlogs
- Guide to Producing Effective YouTube Promo Videos
- 2024 Approved Elevate Your YouTube Shorts Top 10 Strategies for Uniqueness
- [New] Easier Than Ever Top 9 Uncomplicated, No-Cost Video Tools for You
- [New] Easy-to-Use Platforms for Free YouTube Thumbnail Extracting
- Top 10 Video Maker's Choices Audio Enhancing Software
- Free Online Platform Convert Any FB Video Into a Song
- Updated In 2024, M4A File Editor Top 5 Free Tools
- [Updated] In 2024, Capture Your Social Face Video
- Apple ID Unlock From iPhone SE (2022)? How to Fix it?
- Play Store Not Working On Lava Blaze Curve 5G? 8 Solutions Inside | Dr.fone
- [New] In 2024, Taking Control of Your TikTok Experience, PC & Mac Style
- [Updated] 2024 Approved Navigating Through Facebook GIF Downloads Across Platforms
- [Updated] Dissecting Instagram's Per-Post Video Quota for 2024
- Updated Sync Up! 5 Essential Apps for Making Lip Sync Videos for 2024
- Unlock Professional-Grade Video Editing on Windows 8 and Later for 2024
- List of Pokémon Go Joysticks On Xiaomi Redmi A2 | Dr.fone
- [Updated] In 2024, Laptop & Mobile Guide for Initiating Google Meet
- In 2024, Here are Some Pro Tips for Pokemon Go PvP Battles On Xiaomi Redmi Note 12 Pro+ 5G | Dr.fone
- In 2024, The Ultimate Blueprint for Dominating Facebook Video Advertising
- A How-To Guide on Bypassing Apple iPhone XS iCloud Activation Lock
- Complete Guide to Choose Movie Maker Android App
- Step-by-Step Laptop ScreenRecord Guide for 2024
- Title: "[Updated] Budget-Conscious Filmmaker's Essential Video Gear List"
- Author: Steven
- Created at : 2024-05-25 20:48:20
- Updated at : 2024-05-26 20:48:20
- Link: https://youtube-clips.techidaily.com/updated-budget-conscious-filmmakers-essential-video-gear-list/
- License: This work is licensed under CC BY-NC-SA 4.0.
