![[Updated] Boost Your YouTube Output - Rapid Video Rendering and Transfer](https://thmb.techidaily.com/738343d11636524e97e883ecdfb55ee8c179338e8409002b7334f65b8debc634.jpg)
"[Updated] Boost Your YouTube Output - Rapid Video Rendering and Transfer"
Boost Your YouTube Output - Rapid Video Rendering and Transfer
How to Render and Upload YouTube Videos Faster?

Richard Bennett
Oct 26, 2023• Proven solutions
You’ve shot a video you’re proud of and you can’t wait to post it! But, slow down, you have to edit all your clips together first. And then you have to export your video from the editing program, which can take a while. Then you have to wait for it to upload to YouTube, and once it’s up you have to write your description, add cards, and do a handful of other things.
The period between finishing a video and actually posting it for your subscribers to see can be long and tiresome. A lot of videos have probably died in these stages because their creators ran out of energy and patience.
Don’t let this happen to your videos! Here are 4 ways you can save time and avoid headaches during post-production:
3. Use default descriptions and tags
4. TubeBuddy’s bulk features and tagging tools
1. Create mini-projects
When you have alarge editing project with lots of different titles, animations, clip sequences, and PIP tracks it can get hard to keep track of everything. That’s especially true if you need to go back and make changes. A change to one part of your video could affect other parts of it.
Also, the more complex your video is the longer it will take to render/export.
There is a way you can keep your project more organized, save time making minor adjustments, and speed up rendering: create sub-projects of different segments of your video and import them into your main project as their own clips.
This helps you in 3 ways:
1. If there are a lot of effects it’ll be faster to render a shorter video.
2. If you import your sequence as its own clip you won’t have to worry about adjusting little parts of it whenever you change earlier sections of your video.
3. If you do want to make adjustments to your sequence you can open up your mini-project and change it without affecting anything in your main project.
2. Optimize your upload speed
At home, your videos will upload fastest if all of your internet resources are devoted to the upload. That means you should not have any other windows open on your computer while you are uploading. You should also make sure there aren’t other devices competing for wifi like smart tvs, cell phones, or really fancy coffee makers.
If you have neighbors on the same wifi signal as you and they are online at the same time, this will slow you down too.
Because there is so much that can interfere with wifi, you might want to consider a wired Ethernet cable. Ethernet connections are faster in general, and you won’t have any problems with other devices competing for resources like you get with wifi.
If you’re doing everything you can to optimize your upload speed at home and still find that it takes an unreasonable amount of time to upload videos to YouTube, go somewhere with a better connection. Save your video to a USB drive and take it to a library or college to upload. Connections in these kinds of places tend to be very strong.
3. Use default descriptions and tags
In your Creator Studio, go to Channel > Upload defaults. Here you can write in titles, descriptions, and tags which will automatically be applied to every video you upload.

Note: in the latest YouTube Studio, the upload interface is changed but the main process is similar.

You probably have tags you use for almost every video you post. For example, if your channel is about vegan cooking then every one of your videos is probably tagged ‘vegan’, ‘food’, and ‘cooking’. If you type those tags in here then you don’t have to keep adding them to every new video, and you can still add or remove tags from individual uploads so you aren’t stuck using the exact same set of tags every time.
Similarly, you probably have some default text that goes in the description of every one of your videos (i.e. a link to your personal website or a brief introduction of yourself). If you type in a default description then that text will appear automatically in every new video description and you can just add to it when you need to for individual videos.
Using defaults might only save you a couple of minutes per video, but those minutes add up.
4. TubeBuddy’s bulk features and tagging tools
TubeBuddy is a channel management tool for YouTube. Most of its features are more geared towards very large channels or companies with a YouTube presence, but there are also features that can help small or mid-sized YouTubers save time and stay organized.
Some of these tools include templates for things like cards and end screens and bulk processing tools for when you want to change a lot of things at once. For example, if you wanted to update the links in every card in every one of your videos at once then TubeBuddy could help with that.
Some of TubeBuddy’s best features for growing channels are the tagging features. TubeBuddy will help you discover tags, suggest new tags, and even copy whole lists of tags from rival videos.
There are different levels of pricing for TubeBuddy (including a free version, although it’s very limited) and you get a discount on the Pro version if you have less than 50,000 lifetime views on your channel. It ends up being $4.50USD a month (or $3.60 USD a month if you pay for a year in advance). It’s a good investment for someone who’s starting to see some growth on YouTube, but probably not if you’re still trying to reach milestones like 500 subs or 10,000 views.
You have to work hard to get anywhere on YouTube, but that doesn’t mean you should be toiling away at tedious stuff like typing in the same tags over and over. If you have any time-saving tips then make sure to share them with everyone in the comments!
Remember that your time is valuable =)

If you are using Filmora to edit YouTube videos, you can upload the video to YouTube directly from Filmora without download it again first, which can save you time. Besides, if you don’t want the video to be public, you can change Privacy to unlisted or private in Filmora.


Richard Bennett
Richard Bennett is a writer and a lover of all things video.
Follow @Richard Bennett
Richard Bennett
Oct 26, 2023• Proven solutions
You’ve shot a video you’re proud of and you can’t wait to post it! But, slow down, you have to edit all your clips together first. And then you have to export your video from the editing program, which can take a while. Then you have to wait for it to upload to YouTube, and once it’s up you have to write your description, add cards, and do a handful of other things.
The period between finishing a video and actually posting it for your subscribers to see can be long and tiresome. A lot of videos have probably died in these stages because their creators ran out of energy and patience.
Don’t let this happen to your videos! Here are 4 ways you can save time and avoid headaches during post-production:
3. Use default descriptions and tags
4. TubeBuddy’s bulk features and tagging tools
1. Create mini-projects
When you have alarge editing project with lots of different titles, animations, clip sequences, and PIP tracks it can get hard to keep track of everything. That’s especially true if you need to go back and make changes. A change to one part of your video could affect other parts of it.
Also, the more complex your video is the longer it will take to render/export.
There is a way you can keep your project more organized, save time making minor adjustments, and speed up rendering: create sub-projects of different segments of your video and import them into your main project as their own clips.
This helps you in 3 ways:
1. If there are a lot of effects it’ll be faster to render a shorter video.
2. If you import your sequence as its own clip you won’t have to worry about adjusting little parts of it whenever you change earlier sections of your video.
3. If you do want to make adjustments to your sequence you can open up your mini-project and change it without affecting anything in your main project.
2. Optimize your upload speed
At home, your videos will upload fastest if all of your internet resources are devoted to the upload. That means you should not have any other windows open on your computer while you are uploading. You should also make sure there aren’t other devices competing for wifi like smart tvs, cell phones, or really fancy coffee makers.
If you have neighbors on the same wifi signal as you and they are online at the same time, this will slow you down too.
Because there is so much that can interfere with wifi, you might want to consider a wired Ethernet cable. Ethernet connections are faster in general, and you won’t have any problems with other devices competing for resources like you get with wifi.
If you’re doing everything you can to optimize your upload speed at home and still find that it takes an unreasonable amount of time to upload videos to YouTube, go somewhere with a better connection. Save your video to a USB drive and take it to a library or college to upload. Connections in these kinds of places tend to be very strong.
3. Use default descriptions and tags
In your Creator Studio, go to Channel > Upload defaults. Here you can write in titles, descriptions, and tags which will automatically be applied to every video you upload.
Note: in the latest YouTube Studio, the upload interface is changed but the main process is similar.
You probably have tags you use for almost every video you post. For example, if your channel is about vegan cooking then every one of your videos is probably tagged ‘vegan’, ‘food’, and ‘cooking’. If you type those tags in here then you don’t have to keep adding them to every new video, and you can still add or remove tags from individual uploads so you aren’t stuck using the exact same set of tags every time.
Similarly, you probably have some default text that goes in the description of every one of your videos (i.e. a link to your personal website or a brief introduction of yourself). If you type in a default description then that text will appear automatically in every new video description and you can just add to it when you need to for individual videos.
Using defaults might only save you a couple of minutes per video, but those minutes add up.
4. TubeBuddy’s bulk features and tagging tools
TubeBuddy is a channel management tool for YouTube. Most of its features are more geared towards very large channels or companies with a YouTube presence, but there are also features that can help small or mid-sized YouTubers save time and stay organized.
Some of these tools include templates for things like cards and end screens and bulk processing tools for when you want to change a lot of things at once. For example, if you wanted to update the links in every card in every one of your videos at once then TubeBuddy could help with that.
Some of TubeBuddy’s best features for growing channels are the tagging features. TubeBuddy will help you discover tags, suggest new tags, and even copy whole lists of tags from rival videos.
There are different levels of pricing for TubeBuddy (including a free version, although it’s very limited) and you get a discount on the Pro version if you have less than 50,000 lifetime views on your channel. It ends up being $4.50USD a month (or $3.60 USD a month if you pay for a year in advance). It’s a good investment for someone who’s starting to see some growth on YouTube, but probably not if you’re still trying to reach milestones like 500 subs or 10,000 views.
You have to work hard to get anywhere on YouTube, but that doesn’t mean you should be toiling away at tedious stuff like typing in the same tags over and over. If you have any time-saving tips then make sure to share them with everyone in the comments!
Remember that your time is valuable =)
If you are using Filmora to edit YouTube videos, you can upload the video to YouTube directly from Filmora without download it again first, which can save you time. Besides, if you don’t want the video to be public, you can change Privacy to unlisted or private in Filmora.
Richard Bennett
Richard Bennett is a writer and a lover of all things video.
Follow @Richard Bennett
Securing Cash Through YouTube Content Sales
YouTube Affiliate Marketing: How to Make Money with It
Richard Bennett
Mar 27, 2024• Proven solutions
Many people are finding it harder to make money online today. However, there are always avenues to explore that can help you increase your revenue. If you’ve never considered YouTube affiliate marketing before, or you are considering to step into it, now could be the perfect time to find out more about this valuable opportunity.
In this article, we will explain how you can make money via YouTube affiliate marketing, so read on to find out more.
- Part1: What is YouTube affiliate marketing
- Part2: Steps to start your YouTube affiliate marketing project
- Part2: 3 Tips before you begin
Want to join the Filmora affiliate program but don’t have the media kit? Visit the Filmora Marketing Kit to download banners, logos and demo videos from Filmora.
Part 1: What is YouTube affiliate marketing?
In YouTube affiliate marketing, videos are made to encourage customers to purchase products from third-party sites including Amazon.
When users buy products via your links, you can receive commission, which can be up to 10% depending on the category of the product and how much you are selling.
Examples of YouTube affiliate marketing videos include reviews, how-to guides, un-boxing videos and more. Videos are designed to show off what products can do and explain why customers should go on to make a purchase.
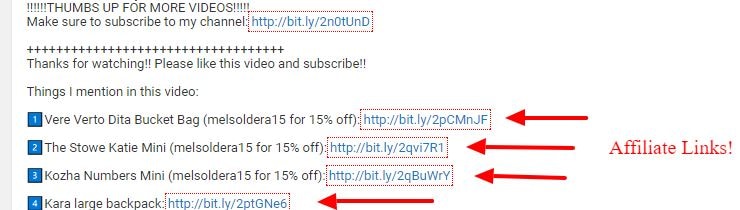
When you have completed your video, you can register for an affiliate marketing program and then add links to your video. The links can be placed either in the video description or as annotations in the clip itself.
Amazon affiliate marketers don’t always just produce videos – they can also promote products via articles, written reviews and more. To make your marketing program successful, you must ensure people know about your video and encourage them to click on the links and buy the products.
Though this can seem daunting at first, the more experience you gain, the more revenue you can generate.
Part 2: Steps to start your YouTube affiliate marketing project
Step 1: build affiliate relationship
One of the first steps you should take when getting your project off the ground is to establish relationships with brands that you love. If you do have a genuine love for the product, this should be reflected in the content and encourage others to make purchases.
Viewers can often tell when your enthusiasm is not genuine, which is why it’s so important to identify products that really do appeal to you. Make a list of the products or programs you use in your daily life and search online to see if there is an affiliate program for it.
If this is the case, you simply need to apply to join it. You may find that the product, program or service that you love does not have a program. Should this be the situation, contact partners to tell them about your love for the product or service and see if they can set something up. Chances are they will be more than happy to do so, as it could be very beneficial for them.

Step 2: Create your product video
The next step is to actually produce your video. Viewers love honesty, so don’t be afraid to say so if there is a way you feel the product or service could be improved.
Remember to include calls to action. Un-boxing videos are very popular and show viewers everything inside a package, whilst review videos can also provide valuable insights.
Top 10 lists also generate high views. You must also remember to include a disclosure that informs viewers that you are being paid via an affiliate marketing scheme. This is a legal obligation.
Step 3: Promote your content
There are many things you can do to ensure your product is seen. Share your video on all your social media channels, respond to as many questions from viewers as possible and add links to online environments where the product is already being discussed.
Set up a channel that can be found when relevant search terms are used and make sure your titles are optimized for search too.

Part 3: 3 Tips before you begin
1. Commission Rate
All brands have different commission rates, with some offering up to 50% and others providing around 5%. Make sure you know what the rates are before you proceed and read the terms and conditions carefully. You may well wish to create a dedicated channel or channels to bring everything together. If you’re passionate about other people’s products, it makes perfect sense to get paid to talk about them.

2. Where affiliate links appear
Affiliate links are placed below the YouTube video in the description. One issue for YouTube affiliate marketers is that buyers tend to exit YouTube once they have clicked on your link, whether they go on to buy the product or not.
It is important to try and get as many views as possible to boost exposure for your video, whilst achieving as many sales as you can. Try to strike the ideal balance between encouraging viewers to make a purchase and to watch as much of your content as possible. The more views you receive, the more favorably your content will be treated by YouTube.
3. Know your product well
It is really essential to know your product inside out when you are marketing it to viewers. YouTube viewers expect you to be an expert when it comes to the products you are showcasing, so take as much time as you need to gain an in-depth understanding of how it works and what its features are.
You must also be able to explain why it makes so much sense to choose the specific product or service over its competitors. Try not to be repetitive, use HD footage and a quality mic, avoid link spamming, choose the best kind of video for the product and plan out the video before you start creating it. Again, engage with your audience as much as you can.

Conclusion
There are various great reasons for getting involved in YouTube affiliate marketing. You may be amazed to see just how much cash you can generate when you follow the above steps and create inspiring videos that showcase products in the best possible light. Just remember to be honest and talk about the cons as well as the pros if they are any. Doing this will help you become a trusted, authentic YouTube affiliate marketer. Why wait any longer to get started?
Richard Bennett
Richard Bennett is a writer and a lover of all things video.
Follow @Richard Bennett
Richard Bennett
Mar 27, 2024• Proven solutions
Many people are finding it harder to make money online today. However, there are always avenues to explore that can help you increase your revenue. If you’ve never considered YouTube affiliate marketing before, or you are considering to step into it, now could be the perfect time to find out more about this valuable opportunity.
In this article, we will explain how you can make money via YouTube affiliate marketing, so read on to find out more.
- Part1: What is YouTube affiliate marketing
- Part2: Steps to start your YouTube affiliate marketing project
- Part2: 3 Tips before you begin
Want to join the Filmora affiliate program but don’t have the media kit? Visit the Filmora Marketing Kit to download banners, logos and demo videos from Filmora.
Part 1: What is YouTube affiliate marketing?
In YouTube affiliate marketing, videos are made to encourage customers to purchase products from third-party sites including Amazon.
When users buy products via your links, you can receive commission, which can be up to 10% depending on the category of the product and how much you are selling.
Examples of YouTube affiliate marketing videos include reviews, how-to guides, un-boxing videos and more. Videos are designed to show off what products can do and explain why customers should go on to make a purchase.
When you have completed your video, you can register for an affiliate marketing program and then add links to your video. The links can be placed either in the video description or as annotations in the clip itself.
Amazon affiliate marketers don’t always just produce videos – they can also promote products via articles, written reviews and more. To make your marketing program successful, you must ensure people know about your video and encourage them to click on the links and buy the products.
Though this can seem daunting at first, the more experience you gain, the more revenue you can generate.
Part 2: Steps to start your YouTube affiliate marketing project
Step 1: build affiliate relationship
One of the first steps you should take when getting your project off the ground is to establish relationships with brands that you love. If you do have a genuine love for the product, this should be reflected in the content and encourage others to make purchases.
Viewers can often tell when your enthusiasm is not genuine, which is why it’s so important to identify products that really do appeal to you. Make a list of the products or programs you use in your daily life and search online to see if there is an affiliate program for it.
If this is the case, you simply need to apply to join it. You may find that the product, program or service that you love does not have a program. Should this be the situation, contact partners to tell them about your love for the product or service and see if they can set something up. Chances are they will be more than happy to do so, as it could be very beneficial for them.
Step 2: Create your product video
The next step is to actually produce your video. Viewers love honesty, so don’t be afraid to say so if there is a way you feel the product or service could be improved.
Remember to include calls to action. Un-boxing videos are very popular and show viewers everything inside a package, whilst review videos can also provide valuable insights.
Top 10 lists also generate high views. You must also remember to include a disclosure that informs viewers that you are being paid via an affiliate marketing scheme. This is a legal obligation.
Step 3: Promote your content
There are many things you can do to ensure your product is seen. Share your video on all your social media channels, respond to as many questions from viewers as possible and add links to online environments where the product is already being discussed.
Set up a channel that can be found when relevant search terms are used and make sure your titles are optimized for search too.
Part 3: 3 Tips before you begin
1. Commission Rate
All brands have different commission rates, with some offering up to 50% and others providing around 5%. Make sure you know what the rates are before you proceed and read the terms and conditions carefully. You may well wish to create a dedicated channel or channels to bring everything together. If you’re passionate about other people’s products, it makes perfect sense to get paid to talk about them.
2. Where affiliate links appear
Affiliate links are placed below the YouTube video in the description. One issue for YouTube affiliate marketers is that buyers tend to exit YouTube once they have clicked on your link, whether they go on to buy the product or not.
It is important to try and get as many views as possible to boost exposure for your video, whilst achieving as many sales as you can. Try to strike the ideal balance between encouraging viewers to make a purchase and to watch as much of your content as possible. The more views you receive, the more favorably your content will be treated by YouTube.
3. Know your product well
It is really essential to know your product inside out when you are marketing it to viewers. YouTube viewers expect you to be an expert when it comes to the products you are showcasing, so take as much time as you need to gain an in-depth understanding of how it works and what its features are.
You must also be able to explain why it makes so much sense to choose the specific product or service over its competitors. Try not to be repetitive, use HD footage and a quality mic, avoid link spamming, choose the best kind of video for the product and plan out the video before you start creating it. Again, engage with your audience as much as you can.
Conclusion
There are various great reasons for getting involved in YouTube affiliate marketing. You may be amazed to see just how much cash you can generate when you follow the above steps and create inspiring videos that showcase products in the best possible light. Just remember to be honest and talk about the cons as well as the pros if they are any. Doing this will help you become a trusted, authentic YouTube affiliate marketer. Why wait any longer to get started?
Richard Bennett
Richard Bennett is a writer and a lover of all things video.
Follow @Richard Bennett
Also read:
- [New] 2024 Approved Masterclass Review of Vidma Screen Reporter App
- [New] Circling Success How to Captivate Your Instagram Audience for 2024
- [Updated] 2024 Approved Pro-Level Video Edits Made Simple in Windows 11
- [Updated] Clearing Your Name After a YouTube Copyright Strike Notice
- [Updated] Top 8 Innovative, Affordable Online SRT Services Exposed
- 2024 Approved Banter Bonanza The Funniest Content on the Internet
- 2024 Approved Essential Free Services for Designing Impactful YouTube Intros
- 2024 Approved Remove Default Podcasts From Your Spotify Feed
- Become a Youtube Gif Wizard Your Complete Online Transformation Tutorial
- Best Apps for 3D Video Intros on Social Platforms
- Calls on Oppo A59 5G Go Straight to Voicemail? 12 Fixes | Dr.fone
- Diablo Immortal Stability Hacks for Players: No More PC Crashes
- Digital Content Arena Competing Titans - Vimeo, YouTube, DailyMotion for 2024
- Infographic Exploration Premier FIFA Videos
- Inside the World of 'Pay to Talk': A Detailed Analysis of Viber Out Services
- Live Streaming Mastery: Discover ManyCam - Ultimate Virtual Camera Solution
- Unveiling the Secrets to Thriving With YouTube AdSense
- Title: [Updated] Boost Your YouTube Output - Rapid Video Rendering and Transfer
- Author: Steven
- Created at : 2024-11-23 20:44:40
- Updated at : 2024-11-24 16:40:29
- Link: https://youtube-clips.techidaily.com/updated-boost-your-youtube-output-rapid-video-rendering-and-transfer/
- License: This work is licensed under CC BY-NC-SA 4.0.