
![[Updated] Best Mic Matches for Video Editors](https://www.lifewire.com/thmb/_zRh-AGrdlf_tw2GGE_lGwA-SOU=/400x300/filters:no_upscale():max_bytes(150000):strip_icc()/MonicaKang-68f114568a6b4ef98603bc5154109387.jpg)
[Updated] Best Mic Matches for Video Editors
Best Mic Matches for Video Editors
Best Microphone for YouTubers

Richard Bennett
Mar 27, 2024• Proven solutions
If you want your viewers to be glued to their screens then quality audio is just as important as quality video for your YouTube channel. People will watch your vlog because they want to hear what you are saying. It can be tempting to use the audio your camera records rather than buy a separate microphone. Unfortunately, the microphones built into most cameras will only record mediocre audio. In this case, we have researched and found out the following best microphones for YouTube videos based on its price and performance. Besides, we will also highlight the best microphones for different recording scenarios. Whether you’re making gaming videos or recording yourself singing, or filming inside or outside, you will get to know which one is best for your situation. Let’s check out now.
- Best Microphones for YouTube Videos
- Best Microphones for Different Types of YouTube Creators
- Tips for Recording YouTube Audio
- How to Sync your Audio in Filmora
Part 1: Best Microphones for YouTube Videos [Best for All]
Here are examples of some of the best external microphones for YouTube:
1. Blue Snowball USB Mic - $60
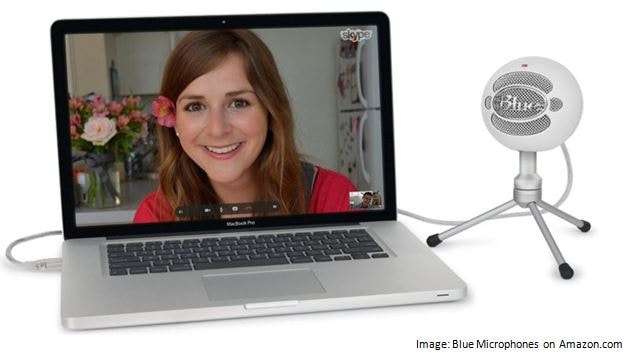
The Snowball is especially good for vlogging from your webcam because it is easy to hook up to your computer using a USB port. It will record your audio simultaneously while you are using your webcam. The biggest drawback of the Snowball is that it needs to be close to you while your record. This combined with its larger size means that it will probably need to be in your shot.
2. RØDE Video Shotgun Mic - $140
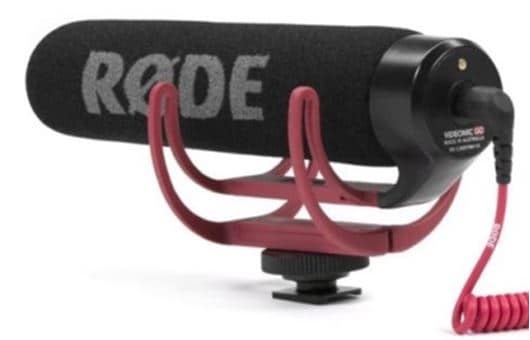
The Shotgun attaches to your DSLR camera and is great for capturing specific sounds, like dialogue, without a lot of background noise. To work well it needs to be pointing at the person who is speaking, and it should be fairly close to them as well. This means that the camera cannot be too far back from you while you vlog.
3. Audio-Technica AT875R Line + Gradient Condenser Microphone - $240
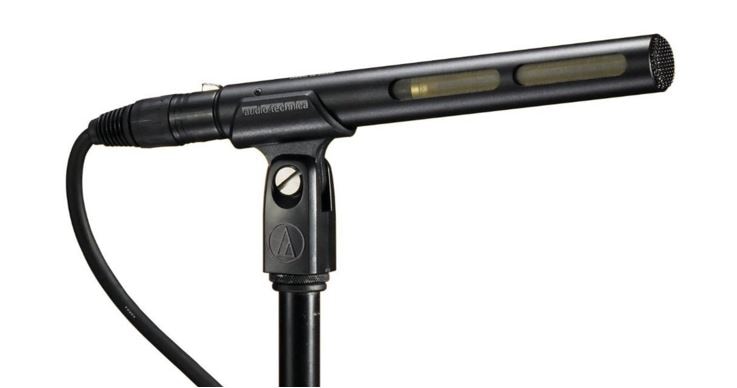
This microphone is similar to the ones you think of being mounted on boom poles on professional sets, and it can easily be mounted onto a pole and used the same way. This gradient condenser mic is good at picking up sound at a distance, and at only picking up sound coming from directly in front of it. If you are working alone then you can set this mic up on a stand so it is pointing at you, or if you have a friend to help you you can ask them to hold it on a boom pole.
4. Sony LAV Wireless Mic System - $600
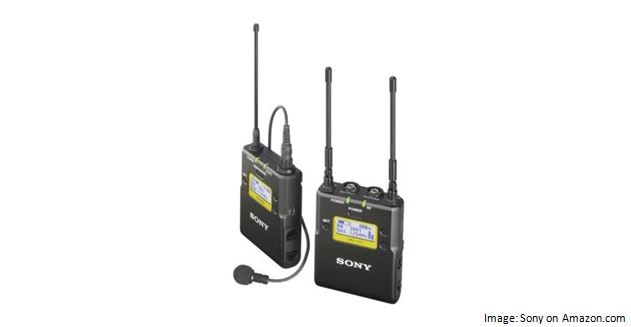
A LAV Mic, also called a lavalier or lapel mic, is a small microphone which can be clipped onto clothing. Wearing a LAV Mic while you vlog will allow you to move around freely and still capture great audio, rather than being stuck in range of a stationary mic. There are both wired and wireless options available in LAV Mics.
5. Roland R-05 WAVE/MP3 Recorder - $200
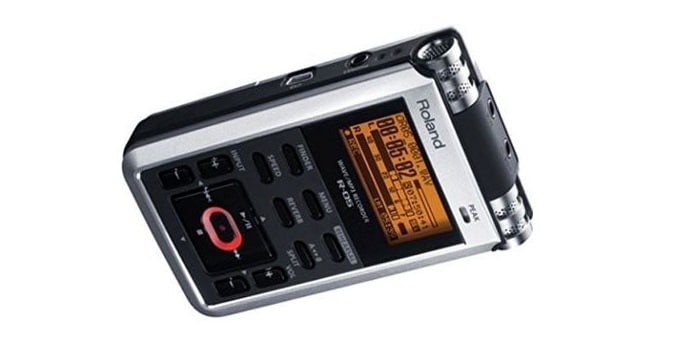
The R-05 is a pocket recorder that captures flawless audio. Its small size means you can hide it in your pocket and it will not show up in your video. Also, since it does not need to hook up to your camera or computer you will have freedom of movement.
Part 2: Best Microphones for All Types of YouTube Creators
If you have to invest in a new piece of equipment for your YouTube channel, consider upgrading your microphones. Your viewers can forgive your grainy video footage, poor lighting, and unsteady camera handling, but if your audio sounds like you’re speaking across the road on a busy highway, all your hard work will be wasted, because nobody will want to watch it.
But the thing about microphones is that they are not all created equal. Depending on the type of videos you’re filming and the environment where you’re recording, the capabilities of the microphone will differ.
1. Best Microphone for Live Streamers and Gamers
Blue Yeti USB - $150
As a live streamer, gamer, or vlogger such as beauty or lifestyle, you’ll want a balance of easy setup and high-quality audio. The Blue Yeti USB delivers on that.
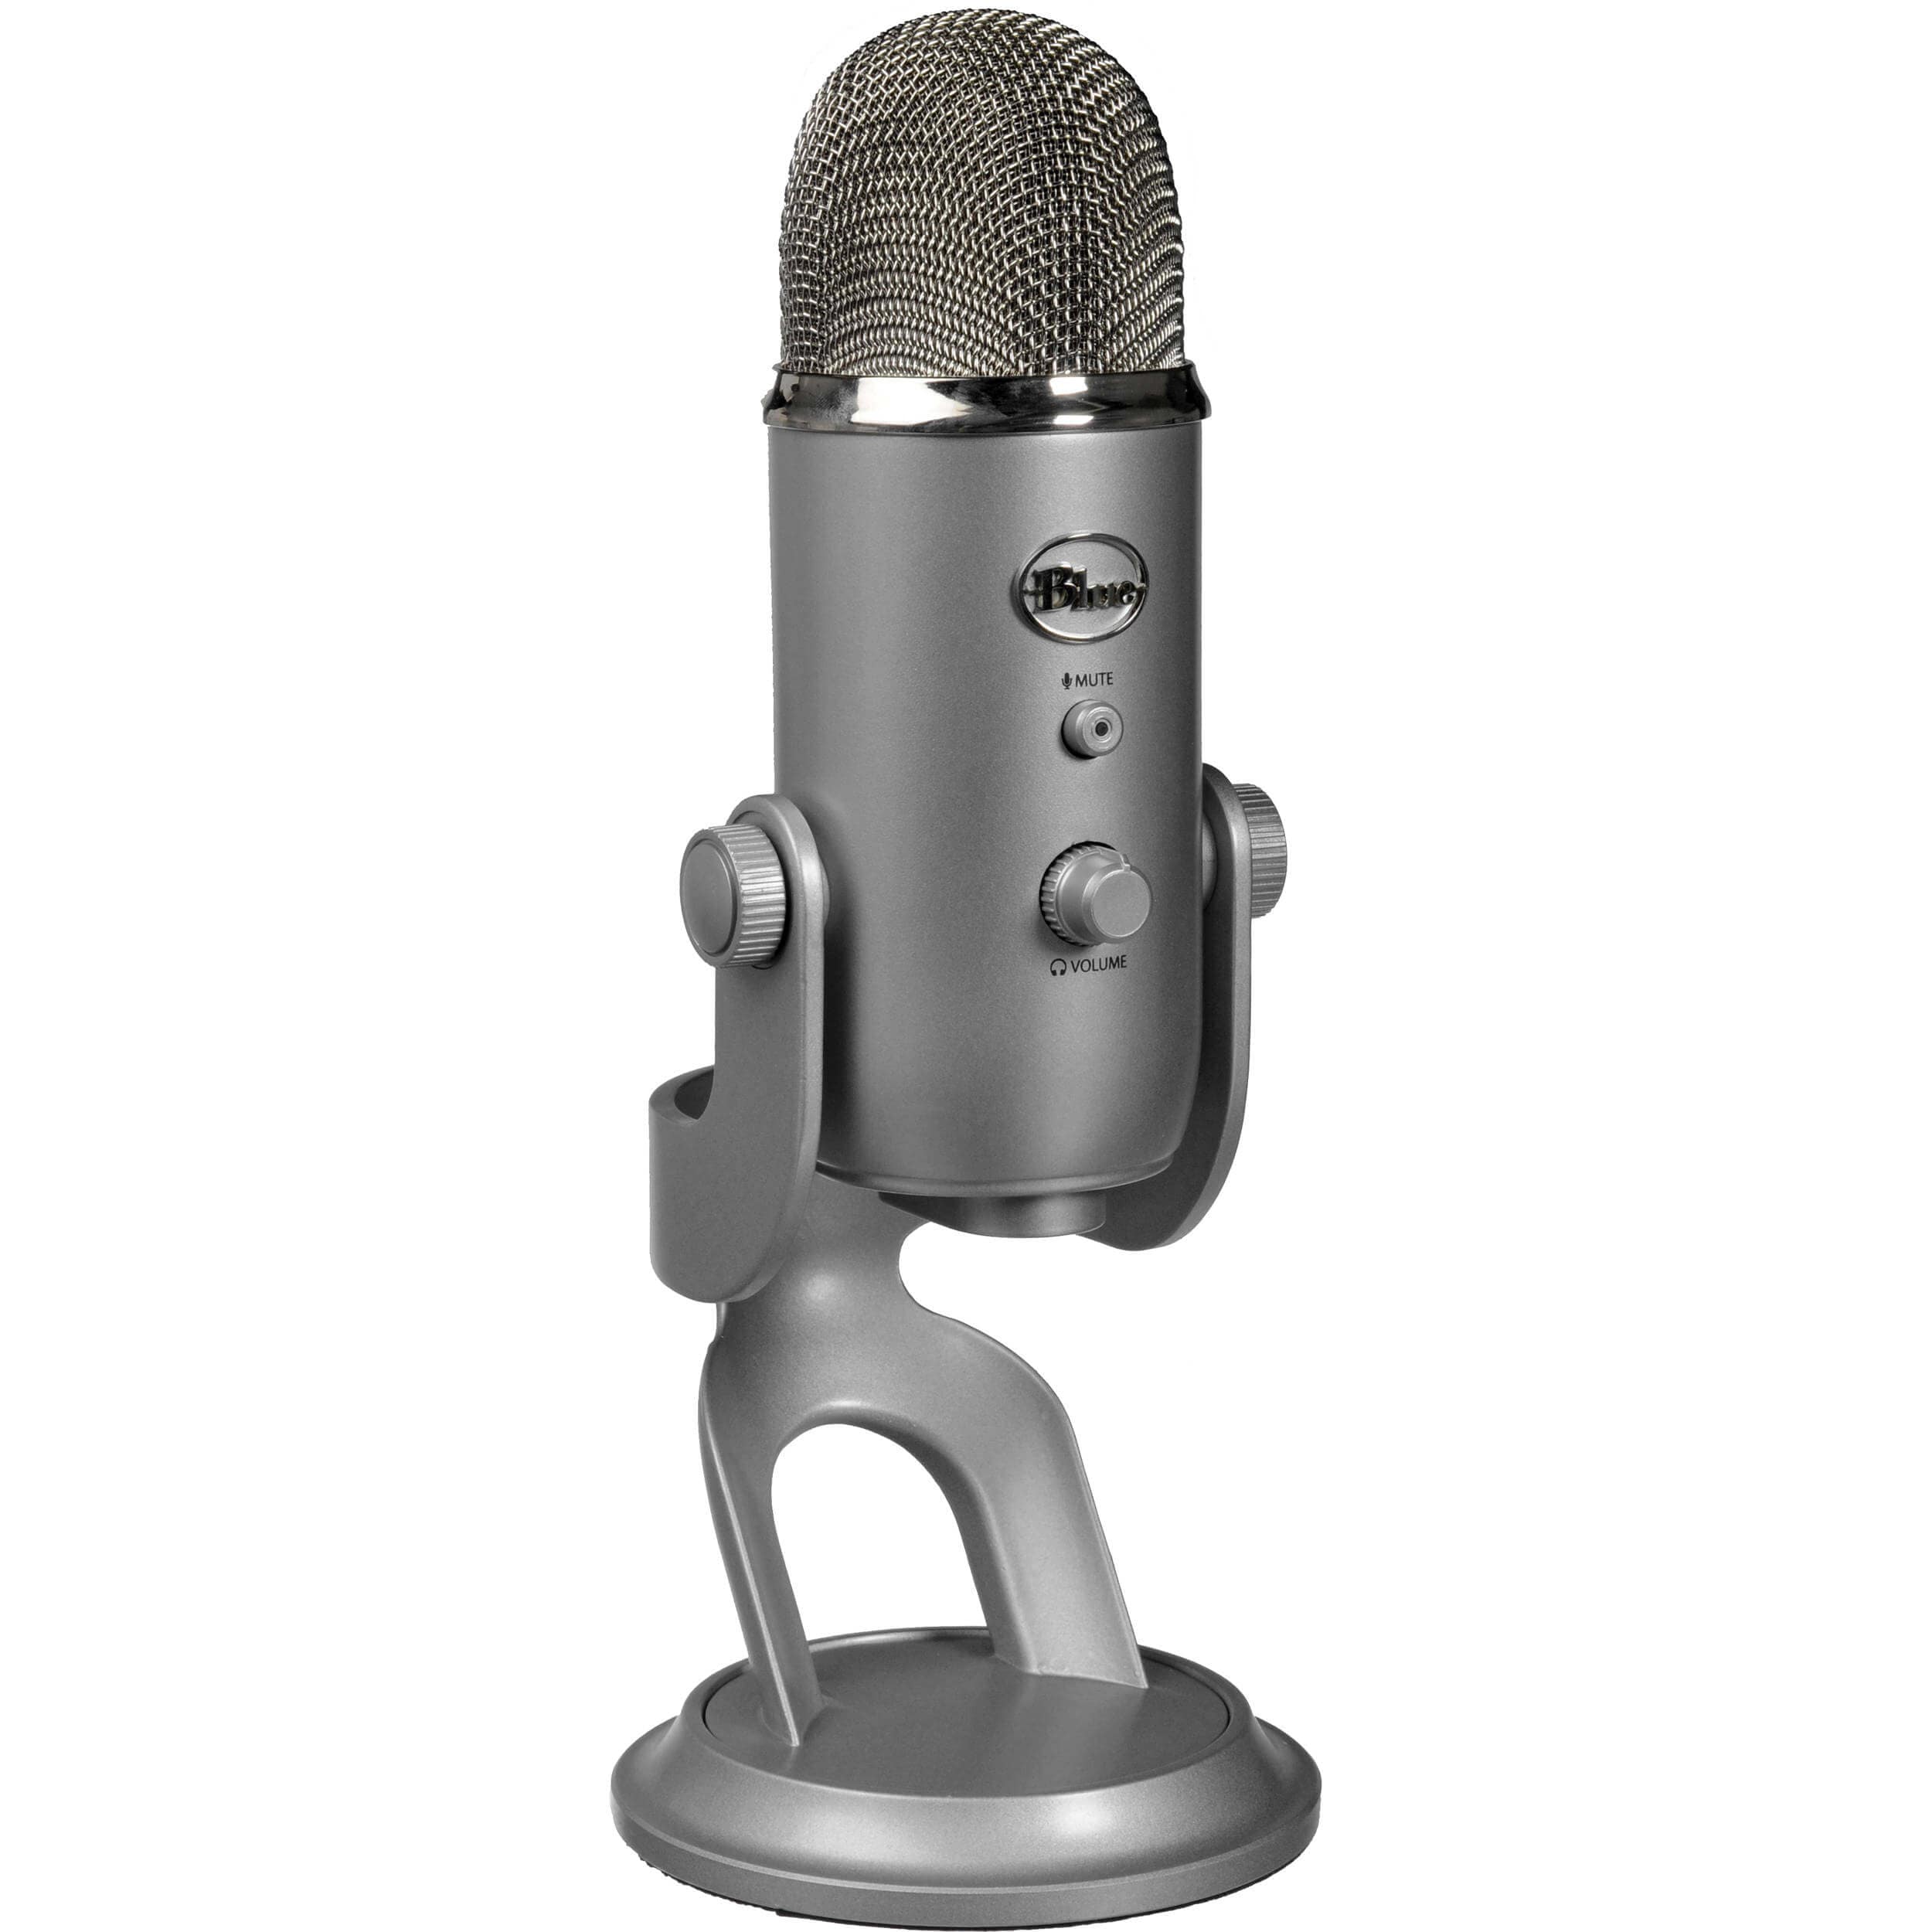
It’s the closest budget microphone to a professional studio mic on the market, and it feels that way when you hold its solid metal frame for the first time. Connecting directly to your computer via USB, the Blue Yeti comes with a 6-feet long USB cable. Out of the box, it sits upon a sturdy stand, which can be removed and the mic can be threaded a shock mount.
The Blue Yeti can pick up audio in four different polar patterns: cardioid, bidirectional, omnidirectional, and stereo. This makes it incredibly versatile, but if you are streaming, I recommend keeping it on cardioid.
Tip: In cardioid mode, speak into the front of the mic, not the top of it.
2. Best Microphones for Outdoor Locations
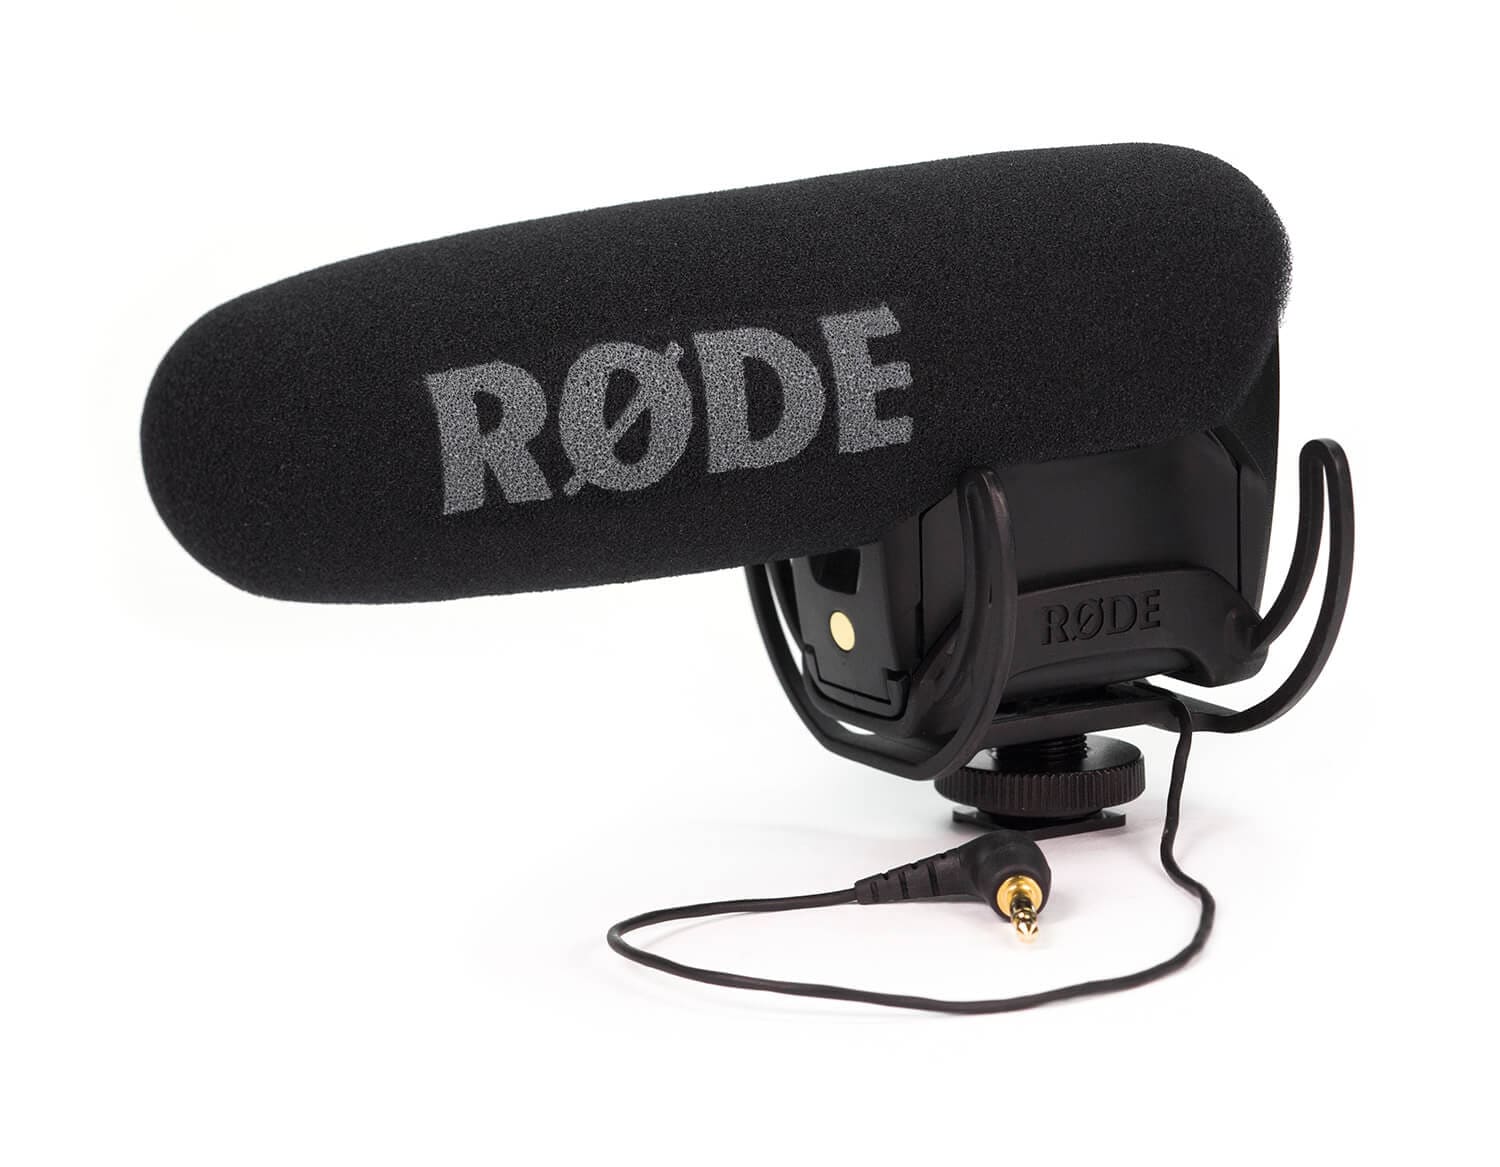
Rode VideoMic Pro Compact VMP Shotgun Microphone - $268
When you are filming outside, you are dealing with audio from all different directions: distant traffic, a gust of wind, the neighbor’s kids, etc.
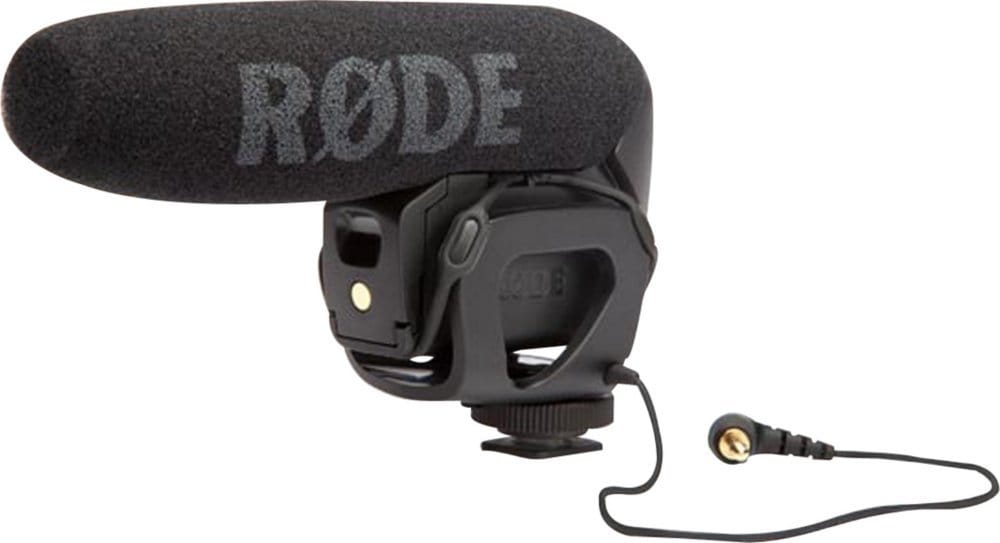
That’s why a shotgun mic is better than an omnidirectional one for outdoor situations. Shotgun microphones, such as the Rode VideoMic Pro, picks up audio only in the direction it’s pointing in. You can aim it at your subject and it will give you clear audio without a lot of background noises.
The Rode VideoMic Pro comes with a mount that attaches on top of your camera, if you are filming outdoors. So if you are holding the camera and vlogging, then the audio will be great. However, if you want to take advantage of the space, and set the camera further away, you should attach the mic on a boom or a stand to get the best audio.
Tip: With Rode VideoMic Pro, and any mic you use to shoot outdoors, always do a sound check to make sure the quality is up to standard. Ten seconds of your subject talking at the level they will be speaking in will be enough to judge the sound quality.
3. Best Microphone for Music (Vocals)
Audio-Technica AT2035 - $163
If you are a serious musician on YouTube, then you will need a serious microphone like the Audio-Technica AT2035. This microphone connects via an XLR cable and requires phantom power, so you will need to invest in an audio interface, if you don’t already have one.
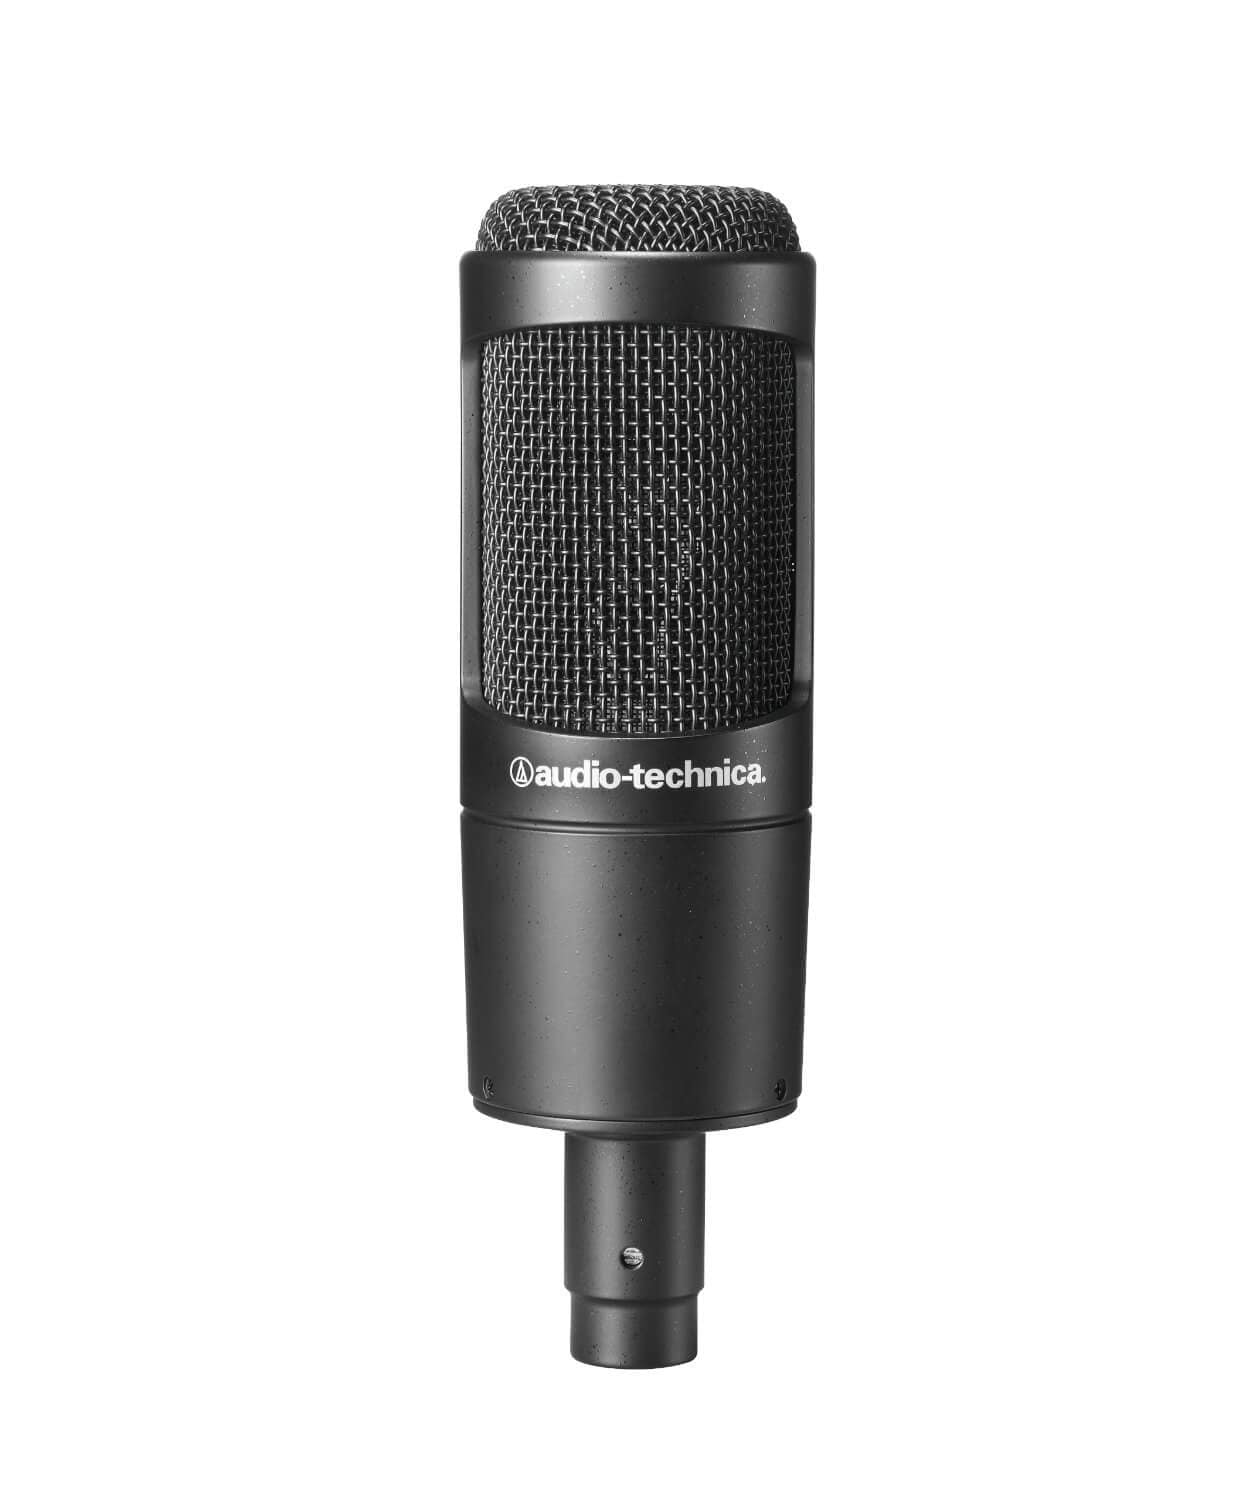
Nevertheless, this microphone does a fantastic job isolating the source of sound and eliminating background noise. Even if you’re recording in your bedroom, and not a professional studio, you’ll still get high quality vocals from this microphone.
Tip : Position yourself 8-12 inches away from the mic when singing. This allows your voice to sound more natural (too close and it’ll sound bassy) and it prevents the audio volume from fluctuating too dramatically as you move around or sing loudly one part and quietly at another.
4. Best Microphone for Voice Over
Rode NTK Tube Condenser Microphone - $529
The Rode NTK Tube is arguably one of the best microphone for its price. You can spend a thousand dollars and get a professional studio microphone, but you can’t do much better than the Rode NTK.
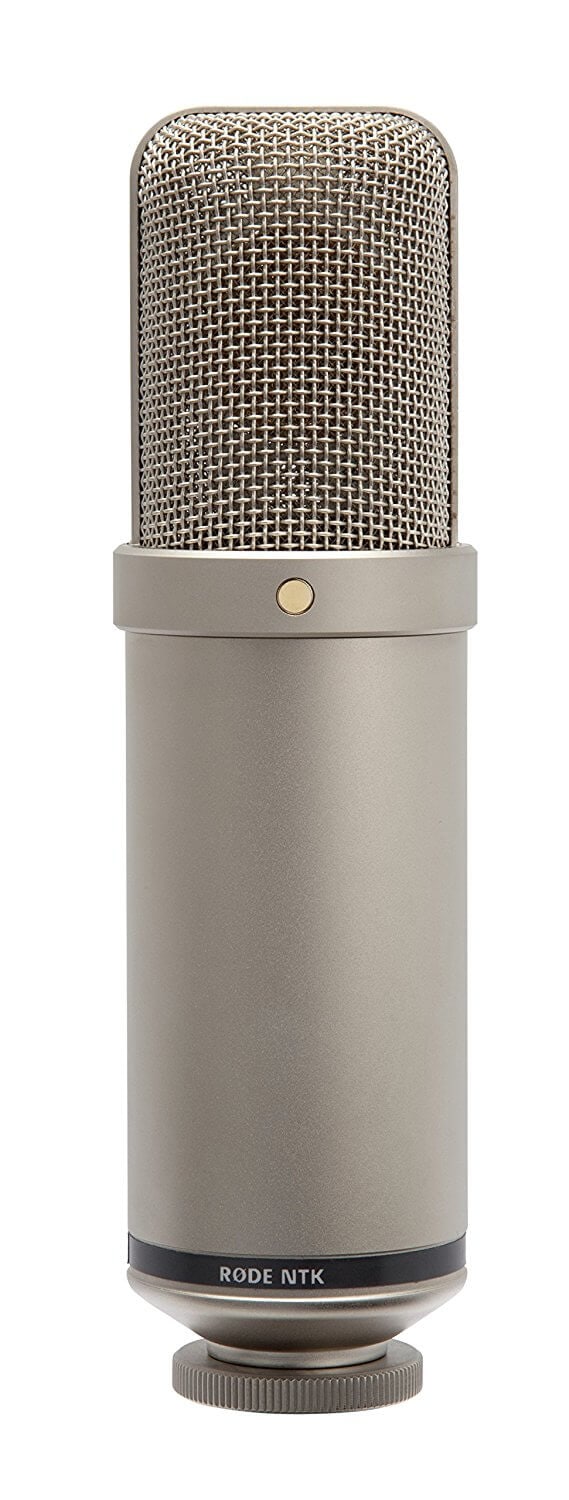
If you’re recording out of a studio environment, whether it’s a professional, semi-professional, or a closet with soft padded walls, the Rode NTK will give warmth and richness to every word you speak, while still offering crispness. Allow it to warm up for a few minutes before you start recording, and you’ll have awesome audio for your voice over.
This mic is great for YouTubers who are creating video essays, ADR, animated videos, or other videos that require top quality narrations.
Tip: Make sure you have a mic stand that you can raise to your standing height. Standing while recording voice over allows you diaphragm to open up, which will improve the quality of your voice.
5. Best Microphone for Big Echoey Space
Sennheiser MD 421 II Cardioid Dynamic Mic - $449
Commonly used to record isolated percussions or brass instruments, the Sennheiser MD 421 II is also wonderful if you need to record vocals in a large room. As a versatile dynamic mic, it doesn’t allow background noises or reverberations to bleed into the source vocal.
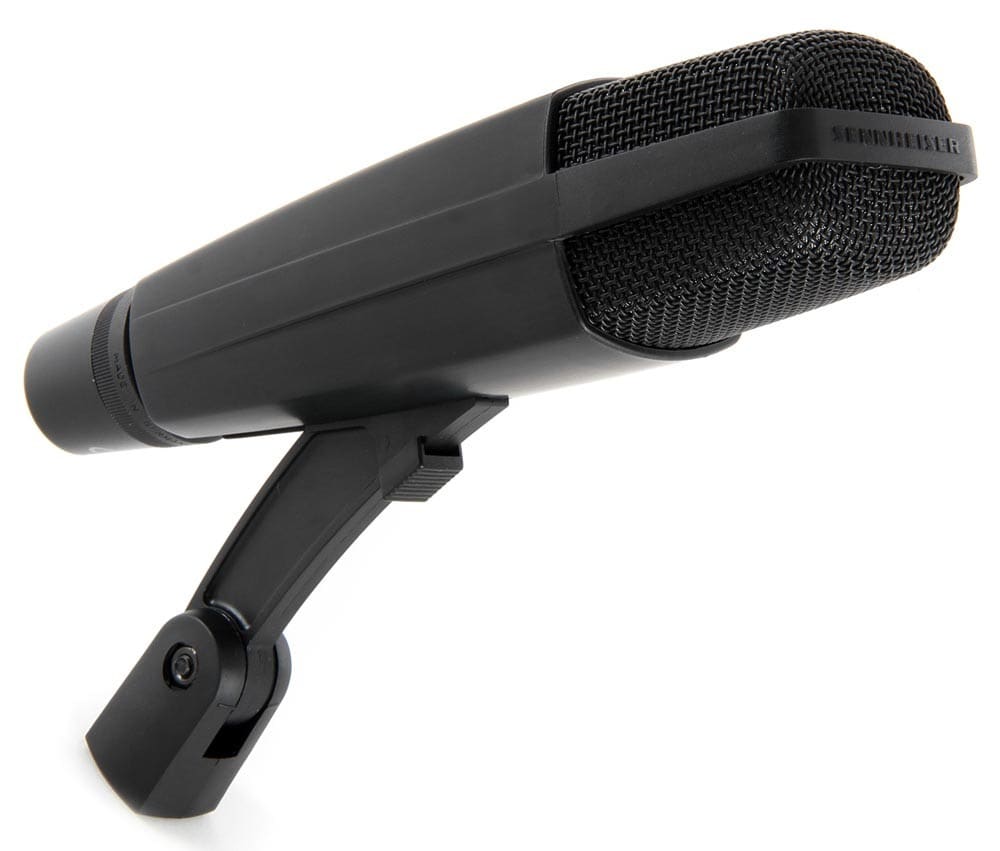
The Sennheiser MD 421 II has a rugged design as it’s built for live situations, such as concerts. This is a great microphone to have in your arsenal, should you end up recording in a large venue such as a conference or an arena.
If you are a YouTuber who makes a lot of video in warehouses, workshops, or rehearsal halls, then you should consider investing in a Sennheiser MD 421 II to get the most out of these acoustically complicated locations.
Tip : Sometimes audio in a loud, big environment can’t be saved by the best microphone. If that’s the case, film the source of the background noise. Get b-roll of people walking around, machinery operating, or whatever challenging sound you are dealing with in the large space. Cutting to these noise makers will give the audience a reference for the background noise, which helps conceal it.
6. Best Handheld Microphone for Interviews
Zoom ZH1 H1 Handy Portable Digital Recorder - $68.99
This unidirectional microphone delivers clear and crisp audio. Compact, portable, and lightweight, the Zoom ZH1 H1 is a terrific choice for YouTubers who are looking for a handheld option for a microphone.
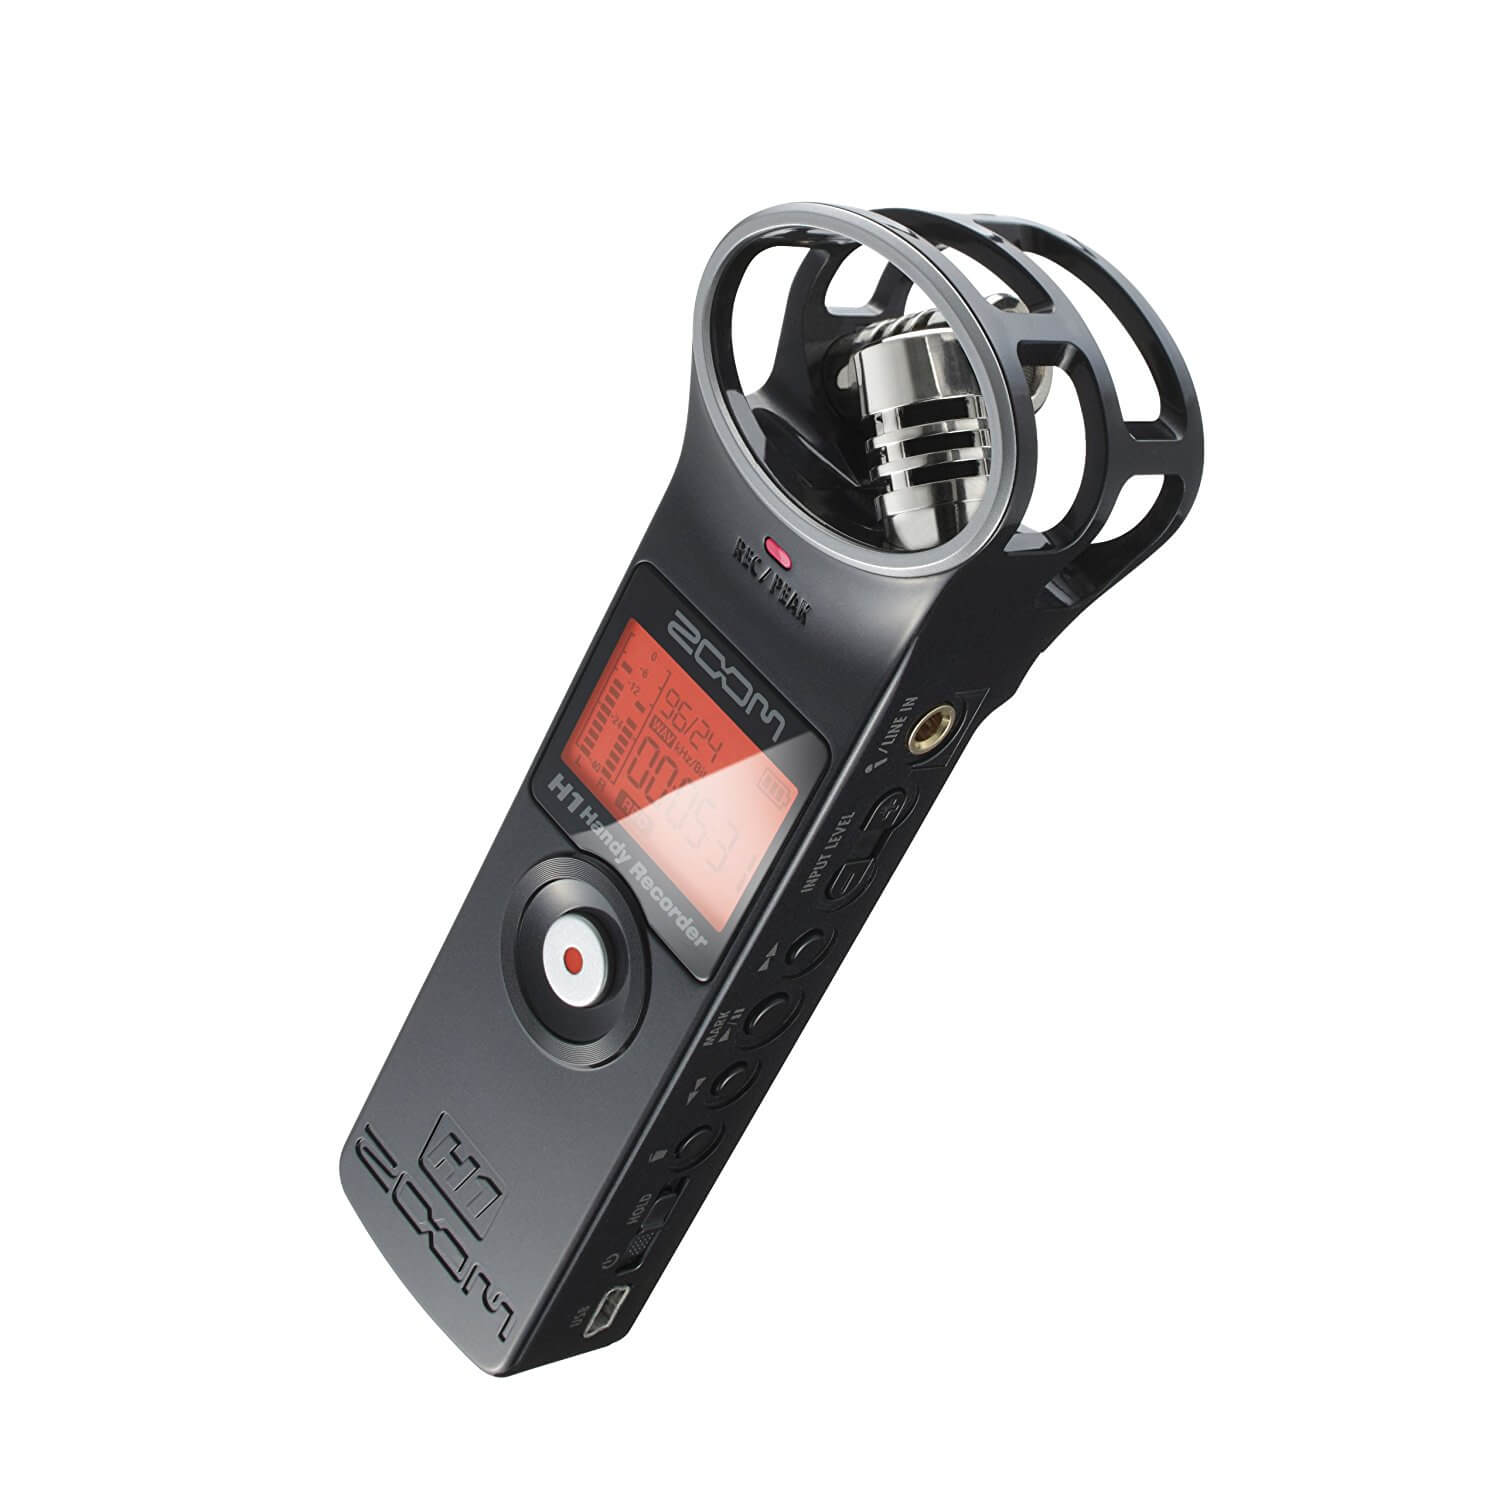
As a YouTuber, you may not have a crew to help you wrangle cable or a team member to help you monitor your audio levels, that is what makes Zoom ZH1 H1 a solid choice, as it is wireless and you can check the levels right in the palm of your hands as you record and even hear playback on the device.
The only thing that might slow you down, is that the audio will be captured directly onto the device, which means that you will need to sync up your audio to video afterward.
Tip : Before you start your interview, hit record on video and audio and then clap on camera, causing the audio to spike and giving you a video reference. This will give you a clear mark for syncing up, the sound of the clap and your hands coming together on camera.
7. Best Microphone for Action and Fitness
Rode VMPR VideoMic Pro R with Rycote Lyre Shockmount - $214.90
If you’re a YouTuber who films a lot of action shots or fitness videos, where you, your camera and your microphone are in motion, then I recommend the Rode VMPR VideoMic Pro R with Rycote Lyre Shockmount.
The Rode VMRP VideoMic Pro is a shotgun microphone that can focus on your subject in front of the camera with a low self-noise. This is excellent when you’re filming action shots, because you can always direct your mic at what you want to record knowing you won’t capture too much from other angles.
The Rycote Lyre shock mount eliminates any external audio that can be caused by movements to the microphone and camera. The shock mount is made of an elastic solution, so it’s incredibly durable.
Tip : For a greater range, the Rode VMRP Video Mic Pro can be mounted onto a boom pole, should the subject need to move around within the shot or if the camera needs to move away from the subject.
8. Best Waterproof Microphone
Sennheiser MKE 2 elements - Action Mic for the GoPro HERO4 - $200
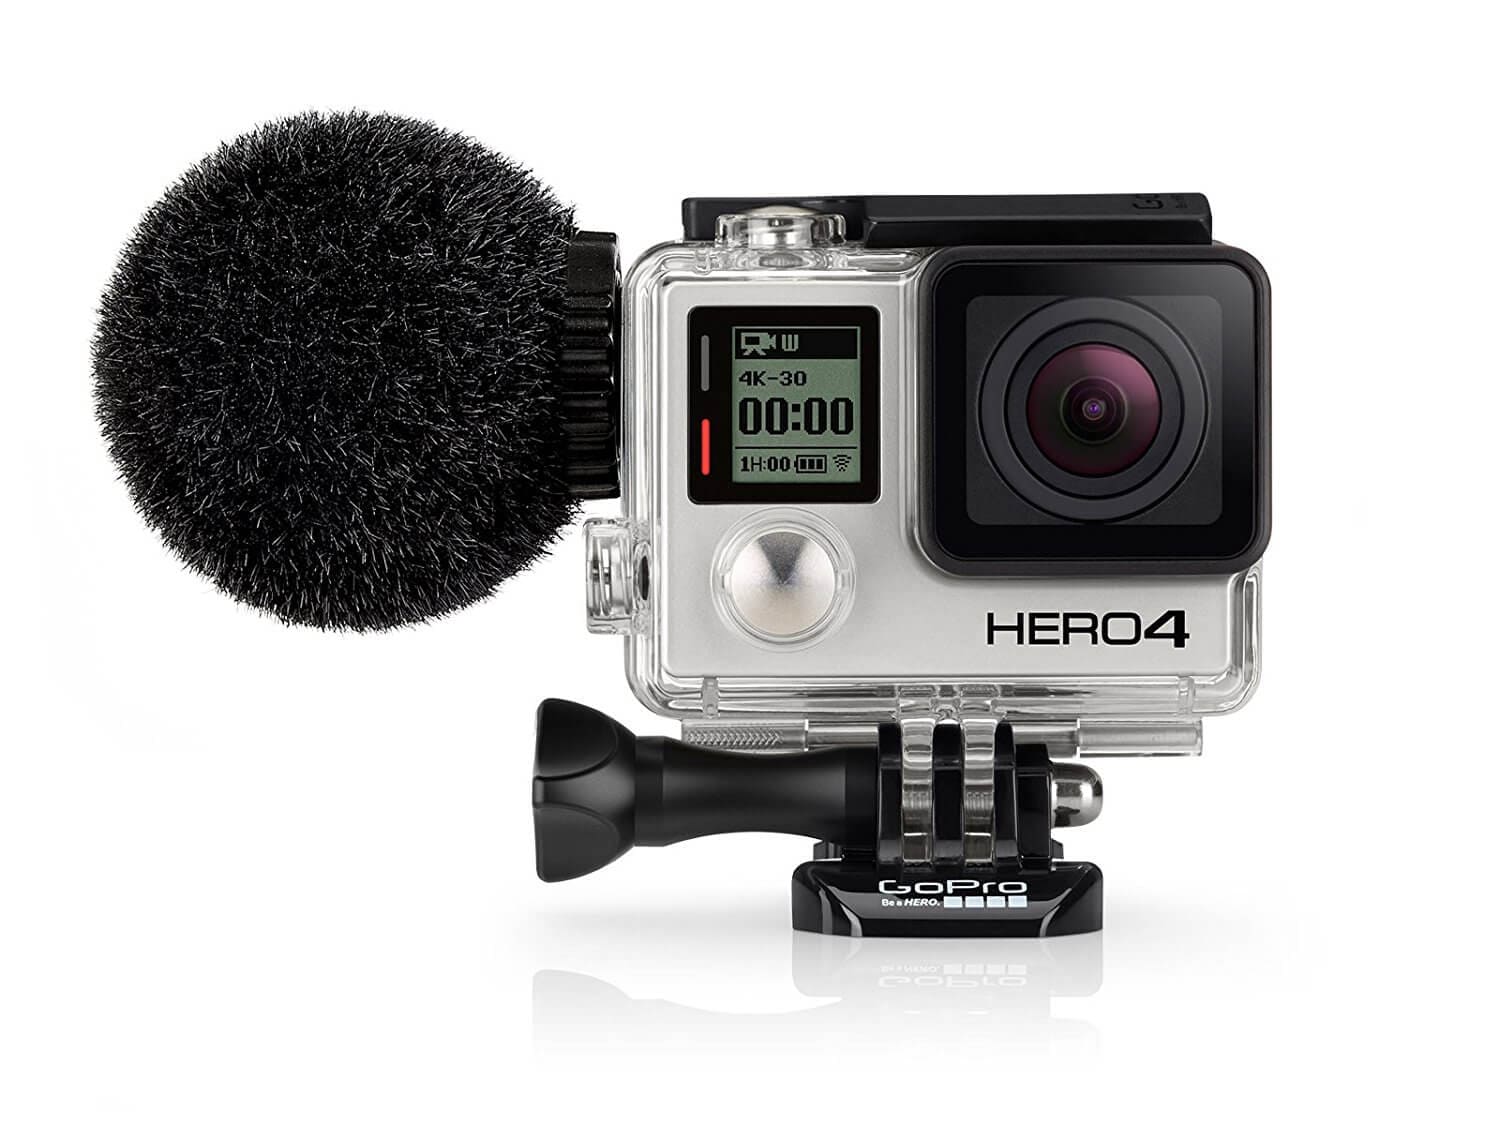
In or around water, nothing can ruin a day of shooting faster than getting your equipment wet. If you’re using GoPro Hero4 for shooting all your intense water shots, you would be familiar with the awful audio you capture when the camera is inside the waterproof casing.
Lucky for you, Sennheiser has developed a waterproof microphone, the MKE 2 elements. This little furry ball that connects to your GoPro Hero4 can withstand up to 1 meter of water. Because underwater sound is captured differently (via a hydrophone ), the Sennheiser MKE 2 elements can’t actually record audio underwater, however, it’ll be ready to keep recording quality audio once it resurfaces.
Tip: Double check to make sure that the mic cable is not blocking the seal of the waterproof case of the camera before launching it into the water.
Different situations call for different equipment. This is the true for tradespeople, golfers, and YouTubers. If you want to get the best audio, it’s more than simply buying the most expensive one, you’ll also need to find the microphone most suited for that situation.
I hope this post helped you improve your audio quality. If you are having challenges finding a good microphone for a particular scenario, let us know in the comments below!
Part 3: 10 Tips for Recording YouTube Audio [Video Tutorial]
After picking up the best microphone based on your need, you can record your audio now. But wait, here are 10 tips for using the microphones to record better audio for your YouTube video. In case that you are in a hurry, we have summarized the following tips for a quick look.
- Silence everything you don’t want your mic to record.
- Put your mobile phone in airplane mode.
- Minimize echo.
- Block wind from reaching your mic.
- Upgrade your mic.
- Adjust your levels.
- Start with a sound cue if you’re planning to do some syncing in post.
- Get close to the sound.
- ADR.
- Record Ambient Sound.
 Download Mac Version ](https://tools.techidaily.com/wondershare/filmora/download/ )
Part 4: How to Sync your Audio in Filmora
Both the LAV Mics and the R-05 will create separate audio clips which you will need to sync up with your video when you are finished recording.
Note: when you start recording, clap two or three times. This will create distinct and visible audio spikes for you to look for when you sync the audio with video.
1. Import Video and Audio Files
Once you have finished recording and have opened up Filmora Video Editor , import your video and drag and drop it into your timeline. The audio recorded with the built in camera mic is already lined with your video clip and your audio and video will both automatically share the video track.
Now import the audio from your external microphone and drag and drop it to your audio track. The audio track is initially hidden, but it will appear when you pull an audio file into the timeline.
Download Mac Version ](https://tools.techidaily.com/wondershare/filmora/download/ )
2.Detach Default Audio from Video
Since you have recorded a separate audio file, you should detach the original audio recorded with the built-in camera mic from the video. To do this, just right click the video clip in the timeline and select Audio Detach from the drop down menu.

3.Align Spikes in Video Audio and Recorded Audio
Find the spikes that represent your clapping in both audio tracks. Then, adjust your external audio so its clapping patterns are in line with those in your camera’s audio track. You can magnify your timeline for a better control.
Once your external audio is synced to your camera’s audio it will also be synced to your video. You no longer need your camera’s audio and can delete it.
Watch the video below to check more features about Filmora.

Richard Bennett
Richard Bennett is a writer and a lover of all things video.
Follow @Richard Bennett
Richard Bennett
Mar 27, 2024• Proven solutions
If you want your viewers to be glued to their screens then quality audio is just as important as quality video for your YouTube channel. People will watch your vlog because they want to hear what you are saying. It can be tempting to use the audio your camera records rather than buy a separate microphone. Unfortunately, the microphones built into most cameras will only record mediocre audio. In this case, we have researched and found out the following best microphones for YouTube videos based on its price and performance. Besides, we will also highlight the best microphones for different recording scenarios. Whether you’re making gaming videos or recording yourself singing, or filming inside or outside, you will get to know which one is best for your situation. Let’s check out now.
- Best Microphones for YouTube Videos
- Best Microphones for Different Types of YouTube Creators
- Tips for Recording YouTube Audio
- How to Sync your Audio in Filmora
Part 1: Best Microphones for YouTube Videos [Best for All]
Here are examples of some of the best external microphones for YouTube:
1. Blue Snowball USB Mic - $60
The Snowball is especially good for vlogging from your webcam because it is easy to hook up to your computer using a USB port. It will record your audio simultaneously while you are using your webcam. The biggest drawback of the Snowball is that it needs to be close to you while your record. This combined with its larger size means that it will probably need to be in your shot.
2. RØDE Video Shotgun Mic - $140
The Shotgun attaches to your DSLR camera and is great for capturing specific sounds, like dialogue, without a lot of background noise. To work well it needs to be pointing at the person who is speaking, and it should be fairly close to them as well. This means that the camera cannot be too far back from you while you vlog.
3. Audio-Technica AT875R Line + Gradient Condenser Microphone - $240
This microphone is similar to the ones you think of being mounted on boom poles on professional sets, and it can easily be mounted onto a pole and used the same way. This gradient condenser mic is good at picking up sound at a distance, and at only picking up sound coming from directly in front of it. If you are working alone then you can set this mic up on a stand so it is pointing at you, or if you have a friend to help you you can ask them to hold it on a boom pole.
4. Sony LAV Wireless Mic System - $600
A LAV Mic, also called a lavalier or lapel mic, is a small microphone which can be clipped onto clothing. Wearing a LAV Mic while you vlog will allow you to move around freely and still capture great audio, rather than being stuck in range of a stationary mic. There are both wired and wireless options available in LAV Mics.
5. Roland R-05 WAVE/MP3 Recorder - $200
The R-05 is a pocket recorder that captures flawless audio. Its small size means you can hide it in your pocket and it will not show up in your video. Also, since it does not need to hook up to your camera or computer you will have freedom of movement.
Part 2: Best Microphones for All Types of YouTube Creators
If you have to invest in a new piece of equipment for your YouTube channel, consider upgrading your microphones. Your viewers can forgive your grainy video footage, poor lighting, and unsteady camera handling, but if your audio sounds like you’re speaking across the road on a busy highway, all your hard work will be wasted, because nobody will want to watch it.
But the thing about microphones is that they are not all created equal. Depending on the type of videos you’re filming and the environment where you’re recording, the capabilities of the microphone will differ.
1. Best Microphone for Live Streamers and Gamers
Blue Yeti USB - $150
As a live streamer, gamer, or vlogger such as beauty or lifestyle, you’ll want a balance of easy setup and high-quality audio. The Blue Yeti USB delivers on that.
It’s the closest budget microphone to a professional studio mic on the market, and it feels that way when you hold its solid metal frame for the first time. Connecting directly to your computer via USB, the Blue Yeti comes with a 6-feet long USB cable. Out of the box, it sits upon a sturdy stand, which can be removed and the mic can be threaded a shock mount.
The Blue Yeti can pick up audio in four different polar patterns: cardioid, bidirectional, omnidirectional, and stereo. This makes it incredibly versatile, but if you are streaming, I recommend keeping it on cardioid.
Tip: In cardioid mode, speak into the front of the mic, not the top of it.
2. Best Microphones for Outdoor Locations
Rode VideoMic Pro Compact VMP Shotgun Microphone - $268
When you are filming outside, you are dealing with audio from all different directions: distant traffic, a gust of wind, the neighbor’s kids, etc.
That’s why a shotgun mic is better than an omnidirectional one for outdoor situations. Shotgun microphones, such as the Rode VideoMic Pro, picks up audio only in the direction it’s pointing in. You can aim it at your subject and it will give you clear audio without a lot of background noises.
The Rode VideoMic Pro comes with a mount that attaches on top of your camera, if you are filming outdoors. So if you are holding the camera and vlogging, then the audio will be great. However, if you want to take advantage of the space, and set the camera further away, you should attach the mic on a boom or a stand to get the best audio.
Tip: With Rode VideoMic Pro, and any mic you use to shoot outdoors, always do a sound check to make sure the quality is up to standard. Ten seconds of your subject talking at the level they will be speaking in will be enough to judge the sound quality.
3. Best Microphone for Music (Vocals)
Audio-Technica AT2035 - $163
If you are a serious musician on YouTube, then you will need a serious microphone like the Audio-Technica AT2035. This microphone connects via an XLR cable and requires phantom power, so you will need to invest in an audio interface, if you don’t already have one.
Nevertheless, this microphone does a fantastic job isolating the source of sound and eliminating background noise. Even if you’re recording in your bedroom, and not a professional studio, you’ll still get high quality vocals from this microphone.
Tip : Position yourself 8-12 inches away from the mic when singing. This allows your voice to sound more natural (too close and it’ll sound bassy) and it prevents the audio volume from fluctuating too dramatically as you move around or sing loudly one part and quietly at another.
4. Best Microphone for Voice Over
Rode NTK Tube Condenser Microphone - $529
The Rode NTK Tube is arguably one of the best microphone for its price. You can spend a thousand dollars and get a professional studio microphone, but you can’t do much better than the Rode NTK.
If you’re recording out of a studio environment, whether it’s a professional, semi-professional, or a closet with soft padded walls, the Rode NTK will give warmth and richness to every word you speak, while still offering crispness. Allow it to warm up for a few minutes before you start recording, and you’ll have awesome audio for your voice over.
This mic is great for YouTubers who are creating video essays, ADR, animated videos, or other videos that require top quality narrations.
Tip: Make sure you have a mic stand that you can raise to your standing height. Standing while recording voice over allows you diaphragm to open up, which will improve the quality of your voice.
5. Best Microphone for Big Echoey Space
Sennheiser MD 421 II Cardioid Dynamic Mic - $449
Commonly used to record isolated percussions or brass instruments, the Sennheiser MD 421 II is also wonderful if you need to record vocals in a large room. As a versatile dynamic mic, it doesn’t allow background noises or reverberations to bleed into the source vocal.
The Sennheiser MD 421 II has a rugged design as it’s built for live situations, such as concerts. This is a great microphone to have in your arsenal, should you end up recording in a large venue such as a conference or an arena.
If you are a YouTuber who makes a lot of video in warehouses, workshops, or rehearsal halls, then you should consider investing in a Sennheiser MD 421 II to get the most out of these acoustically complicated locations.
Tip : Sometimes audio in a loud, big environment can’t be saved by the best microphone. If that’s the case, film the source of the background noise. Get b-roll of people walking around, machinery operating, or whatever challenging sound you are dealing with in the large space. Cutting to these noise makers will give the audience a reference for the background noise, which helps conceal it.
6. Best Handheld Microphone for Interviews
Zoom ZH1 H1 Handy Portable Digital Recorder - $68.99
This unidirectional microphone delivers clear and crisp audio. Compact, portable, and lightweight, the Zoom ZH1 H1 is a terrific choice for YouTubers who are looking for a handheld option for a microphone.
As a YouTuber, you may not have a crew to help you wrangle cable or a team member to help you monitor your audio levels, that is what makes Zoom ZH1 H1 a solid choice, as it is wireless and you can check the levels right in the palm of your hands as you record and even hear playback on the device.
The only thing that might slow you down, is that the audio will be captured directly onto the device, which means that you will need to sync up your audio to video afterward.
Tip : Before you start your interview, hit record on video and audio and then clap on camera, causing the audio to spike and giving you a video reference. This will give you a clear mark for syncing up, the sound of the clap and your hands coming together on camera.
7. Best Microphone for Action and Fitness
Rode VMPR VideoMic Pro R with Rycote Lyre Shockmount - $214.90
If you’re a YouTuber who films a lot of action shots or fitness videos, where you, your camera and your microphone are in motion, then I recommend the Rode VMPR VideoMic Pro R with Rycote Lyre Shockmount.
The Rode VMRP VideoMic Pro is a shotgun microphone that can focus on your subject in front of the camera with a low self-noise. This is excellent when you’re filming action shots, because you can always direct your mic at what you want to record knowing you won’t capture too much from other angles.
The Rycote Lyre shock mount eliminates any external audio that can be caused by movements to the microphone and camera. The shock mount is made of an elastic solution, so it’s incredibly durable.
Tip : For a greater range, the Rode VMRP Video Mic Pro can be mounted onto a boom pole, should the subject need to move around within the shot or if the camera needs to move away from the subject.
8. Best Waterproof Microphone
Sennheiser MKE 2 elements - Action Mic for the GoPro HERO4 - $200
In or around water, nothing can ruin a day of shooting faster than getting your equipment wet. If you’re using GoPro Hero4 for shooting all your intense water shots, you would be familiar with the awful audio you capture when the camera is inside the waterproof casing.
Lucky for you, Sennheiser has developed a waterproof microphone, the MKE 2 elements. This little furry ball that connects to your GoPro Hero4 can withstand up to 1 meter of water. Because underwater sound is captured differently (via a hydrophone ), the Sennheiser MKE 2 elements can’t actually record audio underwater, however, it’ll be ready to keep recording quality audio once it resurfaces.
Tip: Double check to make sure that the mic cable is not blocking the seal of the waterproof case of the camera before launching it into the water.
Different situations call for different equipment. This is the true for tradespeople, golfers, and YouTubers. If you want to get the best audio, it’s more than simply buying the most expensive one, you’ll also need to find the microphone most suited for that situation.
I hope this post helped you improve your audio quality. If you are having challenges finding a good microphone for a particular scenario, let us know in the comments below!
Part 3: 10 Tips for Recording YouTube Audio [Video Tutorial]
After picking up the best microphone based on your need, you can record your audio now. But wait, here are 10 tips for using the microphones to record better audio for your YouTube video. In case that you are in a hurry, we have summarized the following tips for a quick look.
- Silence everything you don’t want your mic to record.
- Put your mobile phone in airplane mode.
- Minimize echo.
- Block wind from reaching your mic.
- Upgrade your mic.
- Adjust your levels.
- Start with a sound cue if you’re planning to do some syncing in post.
- Get close to the sound.
- ADR.
- Record Ambient Sound.
Download Mac Version ](https://tools.techidaily.com/wondershare/filmora/download/ )
Part 4: How to Sync your Audio in Filmora
Both the LAV Mics and the R-05 will create separate audio clips which you will need to sync up with your video when you are finished recording.
Note: when you start recording, clap two or three times. This will create distinct and visible audio spikes for you to look for when you sync the audio with video.
1. Import Video and Audio Files
Once you have finished recording and have opened up Filmora Video Editor , import your video and drag and drop it into your timeline. The audio recorded with the built in camera mic is already lined with your video clip and your audio and video will both automatically share the video track.
Now import the audio from your external microphone and drag and drop it to your audio track. The audio track is initially hidden, but it will appear when you pull an audio file into the timeline.
Download Mac Version ](https://tools.techidaily.com/wondershare/filmora/download/ )
2.Detach Default Audio from Video
Since you have recorded a separate audio file, you should detach the original audio recorded with the built-in camera mic from the video. To do this, just right click the video clip in the timeline and select Audio Detach from the drop down menu.
3.Align Spikes in Video Audio and Recorded Audio
Find the spikes that represent your clapping in both audio tracks. Then, adjust your external audio so its clapping patterns are in line with those in your camera’s audio track. You can magnify your timeline for a better control.
Once your external audio is synced to your camera’s audio it will also be synced to your video. You no longer need your camera’s audio and can delete it.
Watch the video below to check more features about Filmora.
Richard Bennett
Richard Bennett is a writer and a lover of all things video.
Follow @Richard Bennett
Video Construction Lab
In today’s world where businesses are going digital, it is very important to think of how you are going to get your products in front of many customers as possible without having to spend a fortune. That’s where YouTube Clip Maker comes in. It is an effective way for making YouTube videos that you can use for your business advertisements.
If you are a budding YouTuber or just looking at starting to make YouTube videos, you should consider among your editing tools a YouTube Clip Maker. It is an application that has all the tools necessary for you to edit videos in a fast and convenient way and enables you to upload the completed videos to YouTube. It is a simple tool with a friendly-to-use interface for editing videos, it should be a must-have for all users.
Part 1. Best YouTube Clip Maker Filmora
Filmora is a feature-rich audio and video editor that helps beginners with the editing of their audio and video files. The designers did their job with the armature editors in mind. It gives them a simple and easy-to-use layout that makes the work less complicated. Filmora has a built-in feature that lets you record your music and voice and also trim, merge, and cut a split your mp3 files.
Besides all the wonderful features, Filmora lets you make adjustments to speed, pitch, and volume, this makes you improve the clarity of your audio file. The app can be used to customize ringtones and specialized sound effects for your presentation.

For Win 7 or later (64-bit)
For macOS 10.12 or later
Steps on How to Use Filmora
This is an app that is best suited to those starting in video editing and requires the use of an easy-to-use app that can as well deliver quality work. Filmora is an application that was made with the armature editors in mind and is one they should consider while looking for a program to work with. It features some of the essential tools one would require and it is easy to learn how to navigate through it.
Installation Steps
- Click the icon in the center of the Media Library to add files directly.
- Go File > Import Media > Import Media Files.
- Drag and drop to the ‘media library’ directly.
When importing a media file and Filmora asks you to create a proxy file to speed up the editing process. Select “Yes” to have a fast video editing experience.
You can also import video clips using your Touch Bar controls if your computer has Touch Bar.
Record a media file
Apart from the videos shot by your digital devices, you can also directly import media files by recording video from your webcam, screen recording your computer, and a voice-over recording.
Computer screen recording:
Click the “Record” option, and choose “Record PC Screen” to get the built-in Wondershare Screen Recorder. Hit the red button to get started. To finish recording click on F9
Record videos from webcam:
Also, click the “Record” option, and choose “Record from Webcam”. In the recording pop-up window, select the red button, it will start the recording process and is also the button to choose when you want to stop recording. You will then select OK to save the recorded video clip.
Record voice-over:
Choose “Record a voiceover” on the Record menu. It would be better to connect a microphone to your Mac for a better result. Hit the Record button, and it leaves you 3 seconds to get ready.
All media files recorded are automatically saved in the “Media Library”, in case of further editing, you can drag them to the timeline.
Part 2. How to Make YouTube Clip Online
The application lets you trim your YouTube videos without having to have an account. It provides you with a quick way to either cut the beginning or end of a YouTube video. YouTube Trimmer will let you trim the video in a couple of seconds with just a few clicks. To use the app, you just need to copy and paste the earl and you are on your way to editing. You don’t have to be worried about downloading or installing the application for you to use it.
Steps on How to Use YouTube Trimmer
Step 1:
Import
Copy the YouTube link that you want to work on and paste it into the field indicated on the application.
Step 2:
Trim and Edit
You can drag the video at the edges to trim it. You can also move the playhead with your mouse and manually make cuts by clicking on the cut button.
Step 3:
Export
Once you are done editing and happy with the outcome, select the Export button to start rendering the video. Here you can choose to publish it on YouTube or save it for other uses.
Part 3. YouTube Clip Maker for Android and iPhone
KineMaster
It is a simple-to-use application that lets you create professional-quality videos in very short minutes. It enables you to edit pre-made videos or lets you make fresh ones by combining your video with several visual and sound effects. After you are done with the editing, you can save your video or share it out there.
Steps on How to Use Kinemater
Step 1:Create
It lets you import videos, audio, and images from your device. After which you can cut, rearrange, and transition between your images and videos using the KineMaster’s video layering support. This is highly dependent on your computer’s hardware capabilities.
Step 2:Edit
Adjust your video’s appearance parameters by blending color modes, adding light and sound effects, overlaying graphics, and text, or rather directly drawing on the video by using the handwriting layers.
Step 3:Share
You can export your project up to 4k and 60fps. The app saves directly to your camera’s roll besides letting you share to social media.
Part 4: Related FAQs
**How to Make a Clip from a YouTube Video ?
First, sign in to YouTube and start playing a video. Under the video click on the Clip, this will create a clip box after which you will select the part of the video that you want to clip. Give the clip a title then click share after which you will be prompted to choose an option for sharing.
**How to Clip Parts of a YouTube Video ?
Start by sign-in and opening YouTube then proceed by watching a video. If clips are available, you will see a clips icon in the bar at the bottom of the video. Click on the clip icon and select that part of the video you are interested in, give the clip a title, and select Share Clip. Choose whether you want to share the clip or save it for later use.
**What YouTubers Use to Get Clips ?
YouTubers use several video editors for their work. Some of the most popular editors are iMovie, Final Cut Pro X, and Premier Pro CC. These YouTube editing apps vary in technicalities of use and features whereby you will find that some are easy to use and have varying features. Some of the editors are free while others require payments for one to use.
Also read:
- [New] Culinary Connoisseurs Must-Watch Food Content
- In 2024, Banishing Unwanted Green in Mac-Recorded YouTube Content
- YouTube Community Guidelines That You Should Know
- [New] Comprehensive Codes of Conduct for the Yt Community
- Paving the Way to YouTube Stardom Through Effective SEO Keywords
- Elevate Your Online Presence with Captivating Haul Videos for 2024
- Channel Surge Strategy Using YouTube Outros for Rapid Expansion for 2024
- Prime Guidelines YouTube Respect & Usage
- The Ultimate Guide to Crafting Engaging ASMR Content
- Digital Dynamos YouTube’s Most-Watched Videos in a Day for 2024
- In 2024, Enhancing YouTube Presence with Strategic Banners
- 2024 Approved Elite Creator Hub Professional PC Cutting and Tunes
- Dive Into YouTube TV Tips & Tricks for Optimal Viewing for 2024
- [Updated] Enhancing Video Content Through Effective Use of Cards/Annotations
- Become a Trending Sensation with These Effective YouTube SEO Strategies for 2024
- In 2024, 20 YouTube Channels for All-Time Favorite Bands
- Craft Your Channel Studio or Beta Innovation Comparison for 2024
- 2024 Approved A Step-by-Step Approach to Professional Video Sharing
- Quick and Easy Channels Personalize Your YouTube URL Now
- The Ultimate Guide to Live Recording - Best 15 Video Resources
- [Updated] 20 Must-Try Video Apps for iPhone/Android Users Avoiding YouTube
- In 2024, Auto Subscribe URL Creation for YouTube Enthusiasts
- [Updated] Enhancing YouTube Content with Free Music Sources
- Maximize Impact with Customized YouTube End Screen Templates
- In 2024, All-Time Highest Chart YouTube's Premier Video List
- A Dive Into the Premium List of Top 10 Budget-Friendly YouTube Designers
- Subscribers on a Shoestring Grow Your Channel Fast
- Jumpstarting Your YouTube Dreams Setting Up Personal/Business Channels on Mobile
- In 2024, Critical ASMR Video Elements to Note
- Adapting Shorts Strategy for Multiple Platforms for 2024
- Educational Power Leveraging YouTube in Academic Settings for 2024
- 2024 Approved Decoding the Payment Structure on YouTube
- [Updated] Conquering the Fan Base YouTube's Pathway to More Followers
- Speed Demons of Videography YouTube's Velocity to Million View Landmarks by '24
- [New] Discover the Top 7 Free YouTube Tag Extractor Vendors
- In 2024, Efficient Solutions for YouTube Short Snags
- The Novice's Guide to Building a YouTube Studio Setup
- In 2024, Elevate Your Metadata Management Unveiling the Best 7 Affordable Online Tags Extractors
- [New] Converting In-Meeting Google Meet to YouTube Broadcasts Your Guide
- [Updated] Comparing YouTube Video Downloader Apps on Android
- Ranking 8 YouTube Channels with Dramatic Upswings
- The Art of Video Popularity Secrets for YouTube Stardom
- [New] Edit Like a Pro 10 Must-Know Tips for Newbies
- Bringing Your Video Games to Life Customizable Channel Headers
- [Updated] Decoding Earnings for Content Producers on Short-Form Platform
- Exploring YouTube's Financial Blueprint for Short-Form Video Success
- [Updated] Key 15 Low-Fee Screen Recording Tools for Windows/Mac for 2024
- 2024 Approved Crafting Immersive Podcast Episodes A Comprehensive Directory of Sound FX Providers
- How to use iSpoofer on Motorola Moto G04? | Dr.fone
- [Updated] The Tapestry of Tech Loom Recording Explained
- How to Repair corrupt MP4 and AVI files of Motorola Moto G Stylus 5G (2023)?
- 5 Easy Ways to Copy Contacts from Vivo Y56 5G to iPhone 14 and 15 | Dr.fone
- How to Transfer Music from Vivo Y100 to iPod | Dr.fone
- [New] Unveil Authenticity Premier Marker Eraser Tools for 2024
- 2024 Approved A Step-by-Step Guide to Integrating Lame MP3 Encoder with Audacity
- [New] 2024 Approved Avoiding Common Pitfalls in RL Gameplay Recordings
- [New] 2024 Approved Pixel Prowess Unleashed Pro Techniques for Filters Mastery
- How to Unlock iPhone 15 Plus Passcode without Computer?
- Top-Rated Free WMV Video Joining Programs for 2024
- [New] In 2024, Elevate Your FB Video Marketing with Novel Strategies
- New 2024 Approved The Secret Sauce for Making GIF Instagram Story More Aesthetic
- Still Using Pattern Locks with Nubia Red Magic 8S Pro? Tips, Tricks and Helpful Advice
- 2024 Approved Video Production on Mac Tips and Tricks
- [New] Unmasked Instagram Stories PC/Android/iOS Exploration Tips for 2024
- [New] QuickQuip QuarterFreeze Media
- [New] In 2024, Exclusive Insta Stories for Private Eyes
- Beat the Hate Smoothly Add Tracks Into Your Video on Windows 11 for 2024
- HTC U23 Pro Not Receiving Texts? 10 Hassle-Free Solutions Here | Dr.fone
- [Updated] Compliance with Copyright Law when Sharing Media Through FB
- [Updated] Zoom's Best Audio Fixes Clear Sounds & Hearing Improvement for 2024
- Top 7 Skype Hacker to Hack Any Skype Account On your Poco M6 Pro 5G | Dr.fone
- Decoding the Art of Identifying Off-the-Beaten-Path Discord Servers for 2024
- Recover iPhone SE Data From iCloud | Dr.fone
- [New] Smooth Techniques Painless iOS Screen Recordings
- Title: [Updated] Best Mic Matches for Video Editors
- Author: Steven
- Created at : 2024-05-25 20:46:35
- Updated at : 2024-05-26 20:46:35
- Link: https://youtube-clips.techidaily.com/updated-best-mic-matches-for-video-editors/
- License: This work is licensed under CC BY-NC-SA 4.0.
