
!["[Updated] Best 7 High-Motion DSLRs for Dynamic Live Content Creation"](https://www.lifewire.com/thmb/X0NLJA7wZWOmsgBrRlyzzPD7H5A=/400x300/filters:no_upscale():max_bytes(150000):strip_icc():format(webp)/GettyImages-1065028028-8e770c58918e4cf8b0852e81cff60ed6.jpg)
"[Updated] Best 7 High-Motion DSLRs for Dynamic Live Content Creation"
Best 7 High-Motion DSLRs for Dynamic Live Content Creation
Best 7 DSLR Vlogging Cameras

Shanoon Cox
Nov 01, 2022• Proven solutions
DSLR cameras are great for vloggers who are serious about filmmaking. But with so many DSLR cameras to choose from, it can be difficult to make a decision on one. We have come up with a list of seven of the best DSLR vlogging cameras to help you with your search.
WHAT TO LOOK FOR IN A VLOGGING CAMERA
1. Fully articulated screen (flip screen)
2. Good continual autofocus while recording video
3. Good focus priority through face recognition
4. Touch to focus
5. Good low-light performance
6. external mic jack, hot/cold shoe bracket
7. optical image stabilization
8. good battery life
Check out my full list of 10 Things To Look For In A Vlogging Camera to understand the importance of these camera features.
THE 7 BEST DSLR CAMERAS FOR VLOGGING
| Camera | Release Date | Sensor Size | Flip Screen | Mic Port | Price | |
|---|---|---|---|---|---|---|
| CanonEOS6D Mark II | 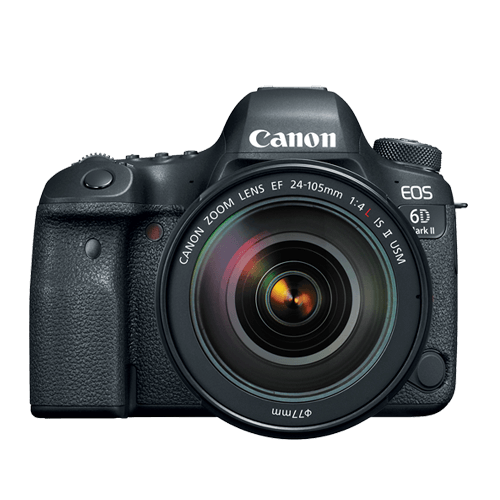 |
June2017 | Full frame(35.9 x 24 mm) | Fully Articulated | Yes | $$ |
| CanonEOS RebelSL2 | 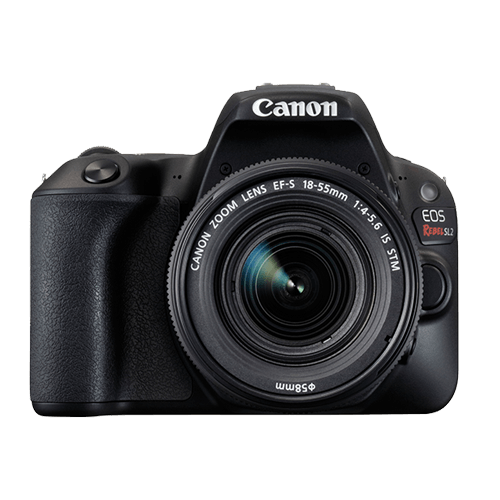 |
June2017 | APS-C(22.3 x 14.9 mm) | Fully Articulated | Yes | $ |
| CanonEOS RebelT7i | 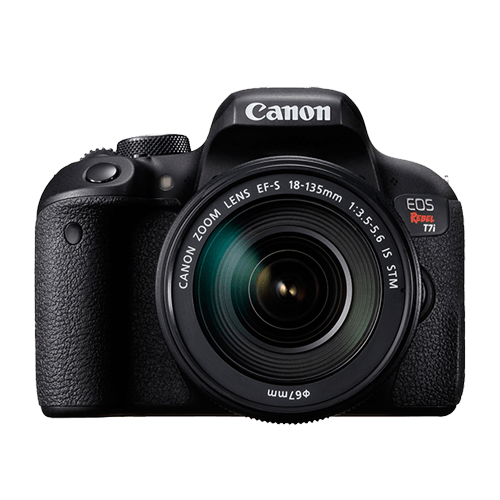 |
February2017 | APS-C(22.3 x 14.9 mm) | Fully Articulated | Yes | $- |
| CanonEOS77D | 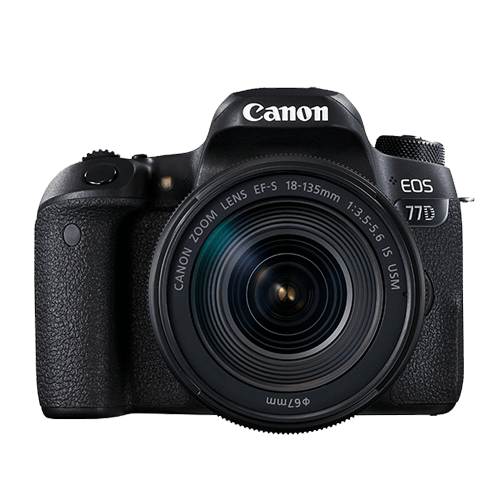 |
February2017 | APS-C(22.3 x 14.9 mm) | Fully Articulated | Yes | $- |
| NikonD5600 |  |
November2016 | APS-C(23.5 x 15.6 mm) | Fully Articulated | Yes | $- |
| CanonEOS5D Mark IV |  |
August2017 | Full frame(36 x 24 mm) | No | Yes | $$$ |
| CanonEOS80D |  |
February2016 | APS-C(22.5 x 15 mm) | Fully Articulated | Yes | $$ |
|
Best daily DSLR camera for vlogging: Canon EOS T7i The camera you use to record your daily vlogs doesn’t have to be the best camera on the market. It just has to offer enough options to make the process of making a vlog as smooth as it can possibly be. The T7i is not the most powerful DSLR camera out there, but its 24.2 MP APS-C CMOS sensor and a DIGIC 7 image processor are more than enough to meet the needs of most daily vloggers. You can record full HD 1080p videos at 60 fps and use this camera to create HDR and time-lapse movies. You can set the T7i’s ISO up as high as 51200, which is pretty good. The T7i’s dual pixel CMOS AF system makes sure that the camera focuses quickly and it helps you avoid creating video clips that are out focus. There’s also a built-in Wi-FI with an NFC feature that enables you to share your videos with a smartphone device you connect to the camera. PROS - Long battery life - Remarkable image quality at high ISO values CONS - Can’t record 4K videos - Viewfinder is tiny |
|---|---|
|
Best entry-level DSLR camera for vlogging: Canon EOS SL2 The Canon EOS SL2 was released just a year ago and it wins our 2018 vote for the best entry-level DSLR camera for vlogging. The SL2 packs a lot of features in a compact camera body. The camera only weighs 1 lb, which is considered light among most DSLR cameras. Many vloggers may enjoy the fact that they can hold up this light camera in front of themselves with more ease. Like a lot of entry-level DSLR cameras, the SL2 comes with an APS-C crop sensor. With ISO capabilities that can reach up to 51200, you’ll be able to film up to full HD 1080p videos at 60 fps, even under low light conditions. All recent Canon cameras perform very well when it comes to autofocus and the SL2 is no exception. It does, however, have fewer points of focus. The SL2 comes with a 9-point AF system. The SL2 also has a fully-articulated screen and a microphone jack. PROS - Microphone jack - Wi-Fi connectivity CONS - No 4K video support - Optical image stabilizer could be better |
|
Best mid-range DSLR camera for vlogging: Canon EOS 80D The Canon EOS 80D is the successor of the 70D which was at one time considered by many YouTubers the ultimate DSLR camera for vlogging. The 80D is a larger camera than the SL2, weighing 1.61 lbs. In its larger build, this camera additionally (compared to the SL2) packs a 45-point AF system, longer battery life, a headphone port, and it is environmentally sealed so you can shoot in tough conditions. This camera’s great performance in autofocusing makes it a great mid-range DSLR camera for vlogging. PROS - Feature-rich - Continuous AF feature performs beautifully while recording high-res videos CONS - Just one SD card slot - PC sync connection features could be better |
|
Best professional DSLR camera for vlogging: Canon EOS 6D Mark II There’s a lot of DSLR cameras that come with a fully-articulated screen and a microphone jack, but the Canon EOS 6D Mark II is actually the only one in the market that comes equipped with both of those, plus a full-frame sensor. It is its full-frame sensor that really sets this camera apart from the other vlogging DLSR cameras. Because of its full-frame sensor, this camera performs much better in low light conditions. With this larger sensor, you’ll also be able to capture footage that looks more cinematic with high-quality bokeh (more blur to your out-of-focus areas). The 6D Mark II also has great battery life compared to all the reviewed cameras above. Unfortunately, this camera does not shoot in 4K. PROS - ISO sensitivity goes up to 102400 - Amazing touchscreen controls CONS - No 4K video recording option - No USB 3.0 |
Want to compare even more cameras? Check out…
12 Best Vlogging Cameras
Top 11 Cheap Vlogging Cameras
8 Best Mirrorless Cameras For Vlogging
12 Best Vlogging Cameras With A Flip Screen
Shanoon Cox
Shanoon Cox is a writer and a lover of all things video.
Follow @Shanoon Cox
Shanoon Cox
Nov 01, 2022• Proven solutions
DSLR cameras are great for vloggers who are serious about filmmaking. But with so many DSLR cameras to choose from, it can be difficult to make a decision on one. We have come up with a list of seven of the best DSLR vlogging cameras to help you with your search.
WHAT TO LOOK FOR IN A VLOGGING CAMERA
1. Fully articulated screen (flip screen)
2. Good continual autofocus while recording video
3. Good focus priority through face recognition
4. Touch to focus
5. Good low-light performance
6. external mic jack, hot/cold shoe bracket
7. optical image stabilization
8. good battery life
Check out my full list of 10 Things To Look For In A Vlogging Camera to understand the importance of these camera features.
THE 7 BEST DSLR CAMERAS FOR VLOGGING
| Camera | Release Date | Sensor Size | Flip Screen | Mic Port | Price | |
|---|---|---|---|---|---|---|
| CanonEOS6D Mark II | |
June2017 | Full frame(35.9 x 24 mm) | Fully Articulated | Yes | $$ |
| CanonEOS RebelSL2 | |
June2017 | APS-C(22.3 x 14.9 mm) | Fully Articulated | Yes | $ |
| CanonEOS RebelT7i | |
February2017 | APS-C(22.3 x 14.9 mm) | Fully Articulated | Yes | $- |
| CanonEOS77D | |
February2017 | APS-C(22.3 x 14.9 mm) | Fully Articulated | Yes | $- |
| NikonD5600 | |
November2016 | APS-C(23.5 x 15.6 mm) | Fully Articulated | Yes | $- |
| CanonEOS5D Mark IV | |
August2017 | Full frame(36 x 24 mm) | No | Yes | $$$ |
| CanonEOS80D | |
February2016 | APS-C(22.5 x 15 mm) | Fully Articulated | Yes | $$ |
|
Best daily DSLR camera for vlogging: Canon EOS T7i The camera you use to record your daily vlogs doesn’t have to be the best camera on the market. It just has to offer enough options to make the process of making a vlog as smooth as it can possibly be. The T7i is not the most powerful DSLR camera out there, but its 24.2 MP APS-C CMOS sensor and a DIGIC 7 image processor are more than enough to meet the needs of most daily vloggers. You can record full HD 1080p videos at 60 fps and use this camera to create HDR and time-lapse movies. You can set the T7i’s ISO up as high as 51200, which is pretty good. The T7i’s dual pixel CMOS AF system makes sure that the camera focuses quickly and it helps you avoid creating video clips that are out focus. There’s also a built-in Wi-FI with an NFC feature that enables you to share your videos with a smartphone device you connect to the camera. PROS - Long battery life - Remarkable image quality at high ISO values CONS - Can’t record 4K videos - Viewfinder is tiny |
|---|---|
|
Best entry-level DSLR camera for vlogging: Canon EOS SL2 The Canon EOS SL2 was released just a year ago and it wins our 2018 vote for the best entry-level DSLR camera for vlogging. The SL2 packs a lot of features in a compact camera body. The camera only weighs 1 lb, which is considered light among most DSLR cameras. Many vloggers may enjoy the fact that they can hold up this light camera in front of themselves with more ease. Like a lot of entry-level DSLR cameras, the SL2 comes with an APS-C crop sensor. With ISO capabilities that can reach up to 51200, you’ll be able to film up to full HD 1080p videos at 60 fps, even under low light conditions. All recent Canon cameras perform very well when it comes to autofocus and the SL2 is no exception. It does, however, have fewer points of focus. The SL2 comes with a 9-point AF system. The SL2 also has a fully-articulated screen and a microphone jack. PROS - Microphone jack - Wi-Fi connectivity CONS - No 4K video support - Optical image stabilizer could be better |
|
Best mid-range DSLR camera for vlogging: Canon EOS 80D The Canon EOS 80D is the successor of the 70D which was at one time considered by many YouTubers the ultimate DSLR camera for vlogging. The 80D is a larger camera than the SL2, weighing 1.61 lbs. In its larger build, this camera additionally (compared to the SL2) packs a 45-point AF system, longer battery life, a headphone port, and it is environmentally sealed so you can shoot in tough conditions. This camera’s great performance in autofocusing makes it a great mid-range DSLR camera for vlogging. PROS - Feature-rich - Continuous AF feature performs beautifully while recording high-res videos CONS - Just one SD card slot - PC sync connection features could be better |
|
Best professional DSLR camera for vlogging: Canon EOS 6D Mark II There’s a lot of DSLR cameras that come with a fully-articulated screen and a microphone jack, but the Canon EOS 6D Mark II is actually the only one in the market that comes equipped with both of those, plus a full-frame sensor. It is its full-frame sensor that really sets this camera apart from the other vlogging DLSR cameras. Because of its full-frame sensor, this camera performs much better in low light conditions. With this larger sensor, you’ll also be able to capture footage that looks more cinematic with high-quality bokeh (more blur to your out-of-focus areas). The 6D Mark II also has great battery life compared to all the reviewed cameras above. Unfortunately, this camera does not shoot in 4K. PROS - ISO sensitivity goes up to 102400 - Amazing touchscreen controls CONS - No 4K video recording option - No USB 3.0 |
Want to compare even more cameras? Check out…
12 Best Vlogging Cameras
Top 11 Cheap Vlogging Cameras
8 Best Mirrorless Cameras For Vlogging
12 Best Vlogging Cameras With A Flip Screen
Shanoon Cox
Shanoon Cox is a writer and a lover of all things video.
Follow @Shanoon Cox
Smartphone Skills: Producing Engaging YouTube Thumbnails
As a content creator, you know the importance of a visually appealing thumbnail for YouTube videos. It gives your viewers a sneak peek of what they can expect from your video and helps it stand out in the crowded world of YouTube.
When creating your thumbnail, it’s important to remember that the recommended size is 1280 x 720 pixels and a minimum width of 640 pixels. With these dimensions in mind, let’s dive into how you can easily create stunning thumbnails for your YouTube videos using your mobile phone.

Method 1. Make a YouTube Thumbnail on iPhone With the iPhone Photos App
One way to create a thumbnail for your YouTube video on your iPhone is to use the built-in Photos app. The Photos app comes pre-installed on all iPhones and offers a range of editing tools you can use to create a thumbnail.
The Photos app on your iPhone offers a range of features that you can use to create a custom thumbnail for your YouTube video. Here are some of the features you can use:
- Crop: The crop tool allows you to resize and reposition your thumbnail image by trimming away any unnecessary parts of the image.
- Rotate: The rotate tool lets you adjust the orientation of your thumbnail image. You can rotate the image clockwise or counterclockwise to achieve the desired angle.
- Adjust lighting and color: The lighting and color tools allow you to adjust the brightness, contrast, saturation, and other aspects of the thumbnail image to enhance its overall appearance.
- Add text: You can use the text tool to add words or phrases to your thumbnail image. This can be a great way to include a call-to-action or to highlight a key feature of your video.
- Add filters and stickers: The Photos app includes a range of filters and stickers that you can use to give your thumbnail image a unique look. You can experiment with filters and stickers to find the perfect one for your thumbnail.
To create a thumbnail using the Photos app on your iPhone, follow these steps:
Step1 Open the Photos app and find the image you want to use as your thumbnail. Tap on the image to open it.

Step2 Tap the Edit button in the top right corner of the screen. Use the crop and rotate tools to adjust the perspective and the aspect ratio of 16:9.

Step3 Tap the Filters button to access the filter effects. Scroll through the available filters and tap on one to apply it to your thumbnail image.

Step4 To write or draw on the image, tap the Markup button. This will open a toolbar with a variety of drawing and text tools. Use these tools to add your personal touch to the thumbnail.

Step5 When you’re satisfied with your thumbnail, tap Done in the top right corner of the screen.

Pros
- Convenient
- Easy to use
- Versatile
Cons
- Limited customization option
- Lower image quality
This method is best for users looking for a quick and easy way to create a thumbnail on the go and doesn’t need many customization options. It’s also a good option for users needing computer or graphic design software access. If you’re looking for more advanced customization options or higher image quality, consider using other methods or software.
Method 2. Make YouTube Thumbnails on Android/iPhone With Third-Party Apps
In addition to using the built-in Photos app on your iPhone or Android device, there are also many third-party apps that you can use to create YouTube thumbnails. Some popular options include Canva, Adobe Spark, and FotoJet. These apps offer a wider range of customization options and design templates, making it easy to create professional-looking thumbnails even if you have yet to gain graphic design experience.
One popular third-party app for creating YouTube thumbnails on both iPhone and Android devices is PixelLab. PixelLab is a powerful graphic design app with many features and tools for creating custom thumbnails. With PixelLab, you can add text, shapes, and stickers to your thumbnail image and adjust the image’s color, lighting, and other aspects to get the perfect look. You can also import your images or graphics for your thumbnail design.
Here are the steps to create a thumbnail using PixelLab on your Android or iOS device:
Step1 Open the Play Store and search for PixelLab. Install the app.
![]()
Step2 Tap the “+” icon to add an image from your gallery.
![]()
Step3 Edit the image using the available tools, such as cropping, rotating, and adjusting the color and lighting.
![]()
Step4 Add text to the image and customize it to your liking.
![]()
Step5 Change the resolution of the image to 1280 x 720 pixels.
![]()
Step6 Save the image to your gallery by exporting it.
![]()
Pros
- More customization options
- Advanced editing tools
- High image quality
Cons
- Requires a separate app download
- It may require a learning curve
This method is best for users looking for more advanced customization options and higher image quality for their YouTube thumbnails. It’s also a good option for users with experience with graphic design software and who are comfortable using advanced editing tools. If you’re looking for a quick and easy way to create a thumbnail and only need a few customization options, consider using the built-in Photos app or other simpler methods.
How To Add Thumbnails to YouTube Videos on Mobile
Once you’ve created your thumbnail image, it’s time to add it to your YouTube video. Adding a thumbnail to your YouTube video on your mobile device is a simple process that only requires a few steps.
Here’s how to do it on your mobile device:
Step1 Open the YouTube app on your mobile device and sign in to your account.

Step2 Tap on the My Videos tab to view a list of your uploaded videos.

Step3 Tap on the video and tap the “Edit“ button in the top right corner of the screen.

Step4 Tap the Custom thumbnail button and upload the image you want to use from your photo library.

Step5 Tap Save in the top right corner to upload the thumbnail to your video.

That’s it! Your new thumbnail will now be displayed on your YouTube video, helping it stand out and attract more views. You can repeat this process for other videos if you want to add a custom thumbnail.
It May Interest You – Make YouTube Thumbnails on Windows/Mac
While it’s convenient to create YouTube thumbnails on your mobile device, there may be times when you need to create a thumbnail on your Windows or Mac computer.
For example, if you need to create a thumbnail with a higher resolution or more advanced customization options, you may find it easier to do so on a computer. Additionally, a computer may be more efficient if you’re working on a larger thumbnail project and need to create multiple thumbnails simultaneously.
One popular tool for creating YouTube thumbnails on a Windows or Mac computer is Filmora. Wondershare Filmora is a powerful video editing software that allows you to easily edit and enhance your YouTube videos and create custom thumbnails for your videos.
Free Download For Win 7 or later(64-bit)
Free Download For macOS 10.14 or later
With Filmora, you can add text, graphics, and special effects to your thumbnail image and import and edit multiple images. Filmora is a great tool for creating professional-looking YouTube thumbnails on your Windows or Mac computer.
To create a thumbnail using Filmora on your Windows or Mac computer, follow these steps:
Step1 Launch Filmora, add the picture to the timeline and select the AI Portrait option in the Effects panel to cut out the subject from the background.

Step2 Scale up and reposition the photo.

Step3 Add a new background to the track below the picture. Use the other editing tools in Filmora to customize the image as desired, such as adding text, graphics, and special effects.

Step4 When you are done editing the thumbnail, take a snapshot by clicking the camera icon.

Step5 Locate the thumbnail in your local drive.

For more detailed instructions and a visual guide, you can watch the following video tutorial:
Add a video
This video will show you how to use Filmora to create a custom thumbnail for your YouTube video, step by step.
People Also Ask
Here are some common questions that people have when it comes to creating YouTube thumbnails on mobile.
Q1. What App Do Youtubers Use To Make Thumbnails?
There are many different apps and tools that YouTubers use to create thumbnails for their videos. The best app for creating YouTube thumbnails will depend on your needs and skill level.
If you’re looking for a quick and easy way to create a thumbnail on your mobile device, start with the built-in Photos app or a third-party app like Canva. If you need more advanced customization options or are comfortable with graphic design software, consider using Adobe Photoshop or another tool.
Q2. What Is YouTube Thumbnail Size?
The recommended size for YouTube thumbnails is 1280 x 720 pixels. This size balances quality and file size, ensuring that your thumbnail looks sharp and loads quickly. It’s also important to note that YouTube thumbnails are displayed at different sizes depending on the device and context in which they are viewed.
For example, a thumbnail may be displayed at a larger size when it’s shown as the main thumbnail for a video but smaller when it’s shown in a list of related videos.
Q3. What Thumbnail Gets the Most Clicks?
There is no one-size-fits-all answer to this question, as the thumbnail that gets the most clicks can vary depending on the topic of your video, your target audience, and other factors.
However, the key to getting clicks on your thumbnail is to make it visually appealing and relevant to your video. Experiment with different thumbnail designs and track which ones get the most clicks to help you identify what works best for your channel.
Conclusion
Many tools are available for creating YouTube thumbnails, including the built-in Photos app on mobile devices and third-party apps like Pixelab. One particularly powerful option is Filmora, a video editing software with features for creating custom thumbnails, such as adding text, graphics, and special effects.
Whether you create your thumbnails on your mobile device or your computer, use a high-quality image and make the thumbnail relevant to your video to increase the chances of it getting clicked.
This method is best for users looking for a quick and easy way to create a thumbnail on the go and doesn’t need many customization options. It’s also a good option for users needing computer or graphic design software access. If you’re looking for more advanced customization options or higher image quality, consider using other methods or software.
Method 2. Make YouTube Thumbnails on Android/iPhone With Third-Party Apps
In addition to using the built-in Photos app on your iPhone or Android device, there are also many third-party apps that you can use to create YouTube thumbnails. Some popular options include Canva, Adobe Spark, and FotoJet. These apps offer a wider range of customization options and design templates, making it easy to create professional-looking thumbnails even if you have yet to gain graphic design experience.
One popular third-party app for creating YouTube thumbnails on both iPhone and Android devices is PixelLab. PixelLab is a powerful graphic design app with many features and tools for creating custom thumbnails. With PixelLab, you can add text, shapes, and stickers to your thumbnail image and adjust the image’s color, lighting, and other aspects to get the perfect look. You can also import your images or graphics for your thumbnail design.
Here are the steps to create a thumbnail using PixelLab on your Android or iOS device:
Step1 Open the Play Store and search for PixelLab. Install the app.
![]()
Step2 Tap the “+” icon to add an image from your gallery.
![]()
Step3 Edit the image using the available tools, such as cropping, rotating, and adjusting the color and lighting.
![]()
Step4 Add text to the image and customize it to your liking.
![]()
Step5 Change the resolution of the image to 1280 x 720 pixels.
![]()
Step6 Save the image to your gallery by exporting it.
![]()
Pros
- More customization options
- Advanced editing tools
- High image quality
Cons
- Requires a separate app download
- It may require a learning curve
This method is best for users looking for more advanced customization options and higher image quality for their YouTube thumbnails. It’s also a good option for users with experience with graphic design software and who are comfortable using advanced editing tools. If you’re looking for a quick and easy way to create a thumbnail and only need a few customization options, consider using the built-in Photos app or other simpler methods.
How To Add Thumbnails to YouTube Videos on Mobile
Once you’ve created your thumbnail image, it’s time to add it to your YouTube video. Adding a thumbnail to your YouTube video on your mobile device is a simple process that only requires a few steps.
Here’s how to do it on your mobile device:
Step1 Open the YouTube app on your mobile device and sign in to your account.
Step2 Tap on the My Videos tab to view a list of your uploaded videos.
Step3 Tap on the video and tap the “Edit“ button in the top right corner of the screen.
Step4 Tap the Custom thumbnail button and upload the image you want to use from your photo library.
Step5 Tap Save in the top right corner to upload the thumbnail to your video.
That’s it! Your new thumbnail will now be displayed on your YouTube video, helping it stand out and attract more views. You can repeat this process for other videos if you want to add a custom thumbnail.
It May Interest You – Make YouTube Thumbnails on Windows/Mac
While it’s convenient to create YouTube thumbnails on your mobile device, there may be times when you need to create a thumbnail on your Windows or Mac computer.
For example, if you need to create a thumbnail with a higher resolution or more advanced customization options, you may find it easier to do so on a computer. Additionally, a computer may be more efficient if you’re working on a larger thumbnail project and need to create multiple thumbnails simultaneously.
One popular tool for creating YouTube thumbnails on a Windows or Mac computer is Filmora. Wondershare Filmora is a powerful video editing software that allows you to easily edit and enhance your YouTube videos and create custom thumbnails for your videos.
Free Download For Win 7 or later(64-bit)
Free Download For macOS 10.14 or later
With Filmora, you can add text, graphics, and special effects to your thumbnail image and import and edit multiple images. Filmora is a great tool for creating professional-looking YouTube thumbnails on your Windows or Mac computer.
To create a thumbnail using Filmora on your Windows or Mac computer, follow these steps:
Step1 Launch Filmora, add the picture to the timeline and select the AI Portrait option in the Effects panel to cut out the subject from the background.
Step2 Scale up and reposition the photo.
Step3 Add a new background to the track below the picture. Use the other editing tools in Filmora to customize the image as desired, such as adding text, graphics, and special effects.
Step4 When you are done editing the thumbnail, take a snapshot by clicking the camera icon.
Step5 Locate the thumbnail in your local drive.
For more detailed instructions and a visual guide, you can watch the following video tutorial:
Add a video
This video will show you how to use Filmora to create a custom thumbnail for your YouTube video, step by step.
People Also Ask
Here are some common questions that people have when it comes to creating YouTube thumbnails on mobile.
Q1. What App Do Youtubers Use To Make Thumbnails?
There are many different apps and tools that YouTubers use to create thumbnails for their videos. The best app for creating YouTube thumbnails will depend on your needs and skill level.
If you’re looking for a quick and easy way to create a thumbnail on your mobile device, start with the built-in Photos app or a third-party app like Canva. If you need more advanced customization options or are comfortable with graphic design software, consider using Adobe Photoshop or another tool.
Q2. What Is YouTube Thumbnail Size?
The recommended size for YouTube thumbnails is 1280 x 720 pixels. This size balances quality and file size, ensuring that your thumbnail looks sharp and loads quickly. It’s also important to note that YouTube thumbnails are displayed at different sizes depending on the device and context in which they are viewed.
For example, a thumbnail may be displayed at a larger size when it’s shown as the main thumbnail for a video but smaller when it’s shown in a list of related videos.
Q3. What Thumbnail Gets the Most Clicks?
There is no one-size-fits-all answer to this question, as the thumbnail that gets the most clicks can vary depending on the topic of your video, your target audience, and other factors.
However, the key to getting clicks on your thumbnail is to make it visually appealing and relevant to your video. Experiment with different thumbnail designs and track which ones get the most clicks to help you identify what works best for your channel.
Conclusion
Many tools are available for creating YouTube thumbnails, including the built-in Photos app on mobile devices and third-party apps like Pixelab. One particularly powerful option is Filmora, a video editing software with features for creating custom thumbnails, such as adding text, graphics, and special effects.
Whether you create your thumbnails on your mobile device or your computer, use a high-quality image and make the thumbnail relevant to your video to increase the chances of it getting clicked.
Also read:
- 2024 Approved Crafting a Non-Ad Revenue Stream on YouTube The Self-Sustaining Creator’s Tale
- [New] Captivate Audiences with Perfectly Tailored Youtube Descriptions
- Today's Ultimate Tutorial IOS-Based YouTube Videos Uploading
- Best Video Apps Review YouTube iPhones & Androids for 2024
- [New] Elevating Positivity in a Constructive Space
- Best Buy List Selecting the Premier Video Cards for YouTube for 2024
- [Updated] DIY Guide Screen Capture & Sound From YouTube
- [Updated] Bringing in the Crowd The Top Ten Reasons and Fixes to Boost YouTube Views
- Hashtag Mastery Pathway to 6-Figure Youtube Impact
- Essential Tips for FLV File Fusion on YouTube for 2024
- What Makes YouTube TV Stand Out in a Crowded Marketplace
- Supercharge Your Channels Mastering YouTube Traffic Boosts
- Guide to Securely Copying YouTube Music Tracks Safely
- In 2024, Boost Engagement Through Best Thumbnail Practices
- [New] Building a Bountiful Beauty Channel Fortune
- [New] Eliminate Camera Sway No Tripods, Allowed
- [Updated] Efficient Audience Growth Subscriber Sale Alert
- 2024 Approved How Do Beginners Make a Cool Video for YouTube on Mac
- In 2024, Cutting Edge MP4 Utilities Choosing the Right One for Mac
- Perfect Lighting Setup for Engaging YouTube Videos
- [New] Charting New Territory in YouTube Advertising Artistry
- Navigating to Your Digital Editing Oasis on YouTube
- In 2024, Elevating YouTube Consumption Strategies for Organizing Videos for Future Viewing
- [Updated] Adobe Premiere Power Enhancing Your YouTube Presence
- Channel Transformation Optimal Video Concepts to Elevate Creativity
- Cutting Through Content Clutter YouTube Shorts Essentials for 2024
- Unique Video Monikers Brainstorming Insights
- [Updated] Apex Artists YouTube's Most-Followed Sages
- Soundscapes Perfected Selecting Microphones That Resonate With YouTubers
- [Updated] Building Engagement The Role of YouTube Shorts Template Design
- Expert Guide to Creating Compact, Engaging YouTube Content
- [Updated] Elevate Video Impact Proven YouTube SEO Methods
- From Live Logging to Global Broadcasting Mastery Through Mindfulness
- Explore 8 Leading Youtube Growth Strategies
- Revolutionize Your Intellect with These 15 YT Channels
- Silencing the Spotlight Avoiding Vlogger's Fears
- In-Depth Analysis of Best YouTube Channel Design Practices
- Step Into Profitability on YouTube - Beginner's Guide
- [Updated] 10 Best Video Streaming Alternatives to YouTube for Smartphone Users
- [New] Discovering 8 Prime Video Advancement Aids
- [Updated] Decrypting YouTube’s View-Count Calculation System
- Streamlining Video Dispatch to Facebook From YouTube
- Unlocking Financial Success Through Youtube's Viewer Count
- Channel Success Strategy - Joining YTP2024 Now!
- Broadcast Your Google Meet Directly to YouTube's Stage for 2024
- Professional Insights Top 10 Capture Cards for YouTube Enthusiasts
- [New] Convert & Share with Ease Selecting the Top FLV-to-YouTube Applications
- Award-Winning Musicians on YouTube You Must See for 2024
- How to recover old videos from your Nokia G310
- Updated Unleash Pro-Level Video Editing on Windows 8 and Beyond for 2024
- Updated 2024 Approved Free and High-Quality Voice Alteration Demystified A Step-by-Step Video Voice Editors Handbook Using Filmora
- In 2024, Is pgsharp legal when you are playing pokemon On Vivo Y78+ (T1) Edition? | Dr.fone
- 3 Ways for Android Pokemon Go Spoofing On Infinix Hot 40 Pro | Dr.fone
- Updated Top Facebook Audio Downloaders Convert to MP3 Instantly
- [Updated] Joining Friends and Family Online (Facebook Setup Guide)
- How To Unlock Apple iPhone 7 3 Ways To Unlock
- [New] In 2024, Windows 10 Storage Guide How to Save and Organize .mov
- Updated WMV Video Joining Made Easy Top Free Software
- Engaging Audiences Perfecting the Art of IGTV Titles & Summaries for 2024
- Elite HD Video Preservation Devices
- [New] Featured Top-Ranked Emulators for 3DS on PC for 2024
- [Updated] In 2024, Unleash Creativity on Instagram's Reels Frontier
- Updated In 2024, Open-Source Audacity Alternatives Top 5 Free Audio Editors Compared on Windows
- Premier Solutions For Virtual Team Interactions
- [Updated] Professional Filming Made Simple The Essentials of Logitech Webcam Setup
- Crafting Gentle Volume Declines in Premiere Pro Videos for 2024
- In 2024, How to Transfer Data from Samsung Galaxy A24 to Other Android Devices? | Dr.fone
- Updated In 2024, Elevating Live Events with Top Audio Visual Blending Systems
- [Updated] In 2024, Boosting Brand Presence with Innovative SnapAds
- Unlock iPhone 6s Plus screen lock without password
- Cerebral Showcase - GK Video Challenge Network for 2024
- [Updated] In 2024, Innovative Techniques for Saving Snapchat Videos
- [New] Creating a Backup Securing Your FB Messenger Records for 2024
- In 2024, 6 Ways To Transfer Contacts From Realme Narzo N53 to iPhone | Dr.fone
- In 2024, Is Fake GPS Location Spoofer a Good Choice On Motorola Moto G34 5G? | Dr.fone
- Stuck at Android System Recovery Of Oppo A78 ? Fix It Easily | Dr.fone
- The Ultimate Guide to Restoring Windows Photo Viewer on Win 11
- Updated The Ultimate 3GP Trimmer Cut, Edit, and Save for 2024
- Superlative Action Video Snapshot Review for 2024
- Examining the Performance of Recmeister for Screen Recording
- Does Life360 Notify When You Log Out On Xiaomi Redmi 12? | Dr.fone
- In 2024, How to Change Google Play Location On Realme C53 | Dr.fone
- How to Turn Off Google Location to Stop Tracking You on Oppo A79 5G | Dr.fone
- [Updated] Electorate Enthrallment Best Politic-Based Game Reviews for 2024
- [New] In 2024, Enhancing Instagram Video Visibility
- Life360 Circle Everything You Need to Know On Infinix Hot 30i | Dr.fone
- [New] 2024 Approved The Ultimate Collection of Free Discord Audio Modifiers
- [New] 2024 Approved Legitimacy in the Limelight Copyright Verification Before Upload
- In 2024, How to Send and Fake Live Location on Facebook Messenger Of your OnePlus Ace 2 | Dr.fone
- Title: "[Updated] Best 7 High-Motion DSLRs for Dynamic Live Content Creation"
- Author: Steven
- Created at : 2024-05-25 20:46:18
- Updated at : 2024-05-26 20:46:18
- Link: https://youtube-clips.techidaily.com/updated-best-7-high-motion-dslrs-for-dynamic-live-content-creation/
- License: This work is licensed under CC BY-NC-SA 4.0.
