
!["[Updated] Behind the Scenes Insider Knowledge for YouTube Video Production"](https://www.lifewire.com/thmb/Wrv6Rby5K8-rR9VDRqGpwRTiO_M=/400x300/filters:no_upscale():max_bytes(150000):strip_icc()/14511925043_956d7ff9af_k-580112be3df78cbc28cc6e94.jpg)
"[Updated] Behind the Scenes Insider Knowledge for YouTube Video Production"
Behind the Scenes: Insider Knowledge for YouTube Video Production
10 Tips For Shooting Profesional YouTube Videos

Richard Bennett
Mar 27, 2024• Proven solutions
We have mentioned before about the equipment you should have to start your YouTube video shooting , however, being methodical in your approach to the video making process and knowing exactly what and where you are going to stage and record will increase the quality of the content. Focus on the technical aspects of your YouTube video before you actually start shooting and strive to be well prepared for all the challenges a day on the set may bring.
These and other useful tips may help you make better videos for your YouTube channel, so let’s explore different ways of improving your video making skills.
10 Tips for Shooting Better YouTube Videos
All videographers agree that you shouldn’t come to the set unprepared. Everything has to be in its place, no matter how insignificant it may seem, because a tiny detail can completely ruin the shot or even an entire day of work. These tips are going to help you avoid common mistakes, inexperienced video producers often make.
1. Write the Script
Everything starts with a script, at least in the cinematography world. You don’t have to write long, detailed descriptions of all scenes, just make a short note of every scene, what is being said in the shot, on-screen actions, camera positions, and so on. By doing this, you’ll save yourself a lot of valuable time, you can then dedicate to other burning issues on the set. Besides, knowing what you are going to say throughout the video so you don’t have to improvise all the time is going to help you feel more relaxed in front of a camera.
2. Build the Set (Lighting included)
Don’t leave anything to chance. You should control everything that is going to be in the shot, so avoid working at locations you can’t at least partially control. Shooting in studio-like conditions will enable you to carefully select the scenography and to design light so it matches the scene perfectly. The actors must always be clearly visible to the audience, which is why you need to pay attention to where they are located in the shot and how much light you have in that part of the shot.
3. Keep Your Batteries Charged
There is nothing more frustrating than arriving at the set anxious to start shooting just to find out that the batteries are empty. Charge the batteries at the end of each day on the set, because the chances are that you are going to need them early in the morning. Always have several spare batteries with you, so even if one battery is empty you have the replacement ready. You can also prolong the battery life by switching the camera off when you are not recording.
4. Do a Microphone Check
Capturing audio with an external microphone drastically increases the quality of the sound in your videos. That’s why making absolutely sure that all cables are connected and that the microphone is perfectly placed is paramount if you want to get the sound right. The host or the hosts of the video must be at the right distance from the microphone, usually, the length of their fist with the thumb and pinky finger extended, but this can vary a few inches to either side.
Check out the best microphone for YouTuber in 2018
5. Pay Attention to The Shot Composition
The rule of thirds is a common composition principle used by videographers to create balanced and unified images. The rule suggests that the subjects in a shot should be placed at the intersections of the lines that divide the screen. Most digital cameras have a grid that makes using the rule of thirds quite simple because you can easily see when the subjects in the shot are not positioned correctly.
This is just one of many shot composition techniques you have at your disposal, and as you gain more experience you’ll learn how to combine them and get aesthetically pleasing results.
6. Always Record Videos in Landscape Mode


Posting vertically oriented videos to your YouTube channel will make you look unprofessional because portrait mode is never used for capturing videos. YouTubers who record their videos with Smartphones are more likely to fall into this trap, but all you need to do to avoid this is remember to hold the device horizontally.
By switching to portrait mode, you’ll be cropping the frame in a way, so you might unknowingly end up removing parts of the shot you wanted to record.
In case that you want to convert your portrait video to landscape, do not miss this article about How to Convert A Portrait Video to Landscape.
7. Eliminate The Background Noises
Professional microphones can pick up even the softest sounds, that might prove difficult to remove in the post-production. You can reduce the noise levels in your videos by using shotgun microphones that only capture sounds that come directly into the microphone, or by using the omnidirectional mic to eliminate the wind if you’re shooting on an outdoor location.
Background noises can be particularly unpleasant when recording narration, because the viewers of the video may not want to watch it until the end if they can’t hear what the person in the video is saying.
If it is hard for you to record your YouTube video in quite environment, you can remove the background noise by using some video editing software. For YouTubers, we recommend you to try Wondershare Filmora to de-noise. Check the video below about how to remove background noise with one click.
8. Keep The Shot in Focus
You can always keep the shot in focus by simply enabling the autofocus feature, but if you do so you won’t be able to control where the focus is going to be. Pulling focus manually is an art that takes years to master, and you have to keep practicing it as much as you can in order to become good at it.
The best way to deal with out of focus shots is to avoid shooting scenes that include a lot of action because you won’t have to pull focus that often.
9. Put The Camera on a Tripod

The footage you produce should be smooth and free of camera shakes. All video cameras pick up vibrations easily, so even the slightest movement or impact can ruin a shot. Putting the camera on a tripod is one of the best ways to stabilize the shot and avoid camera shaking.
In addition, a tripod enables you to maintain image stability even when shooting form lower or upper angles, something that cannot be achieved by simply holding the camera.
We have chosen some of the best tripods that you can use for starting a YouTube vlogging Video shooting . If you are using a 4K camera, here are some tripods that you can use for your 4K Cameras .
10. Find The Best Angle
Every scene has its perfect angle, you just have to find it. This job is much easier if you have already built the set and adjusted the lighting before approaching the shot selection process because it will allow you to know exactly where the camera should be.
The camera position depends on a number of factors, including the video’s aesthetics or the action that takes place in the shot, and you have to go through this process for each shot in your video.
Read More to Get : How to Download YouTube Videos without Any Software Easily >>
Conclusion
Hopefully, the tips we provided in this article are going to help you create better YouTube videos. There are hundreds of tricks you’ll have to learn as your skills become more polished, but sometimes just paying attention to the basic rules of videography is more than enough to create a stunning video.
Leave a comment and let us know which tips helped you the most or tell us which useful tips we failed to mention in this article.
Richard Bennett
Richard Bennett is a writer and a lover of all things video.
Follow @Richard Bennett
Richard Bennett
Mar 27, 2024• Proven solutions
We have mentioned before about the equipment you should have to start your YouTube video shooting , however, being methodical in your approach to the video making process and knowing exactly what and where you are going to stage and record will increase the quality of the content. Focus on the technical aspects of your YouTube video before you actually start shooting and strive to be well prepared for all the challenges a day on the set may bring.
These and other useful tips may help you make better videos for your YouTube channel, so let’s explore different ways of improving your video making skills.
10 Tips for Shooting Better YouTube Videos
All videographers agree that you shouldn’t come to the set unprepared. Everything has to be in its place, no matter how insignificant it may seem, because a tiny detail can completely ruin the shot or even an entire day of work. These tips are going to help you avoid common mistakes, inexperienced video producers often make.
1. Write the Script
Everything starts with a script, at least in the cinematography world. You don’t have to write long, detailed descriptions of all scenes, just make a short note of every scene, what is being said in the shot, on-screen actions, camera positions, and so on. By doing this, you’ll save yourself a lot of valuable time, you can then dedicate to other burning issues on the set. Besides, knowing what you are going to say throughout the video so you don’t have to improvise all the time is going to help you feel more relaxed in front of a camera.
2. Build the Set (Lighting included)
Don’t leave anything to chance. You should control everything that is going to be in the shot, so avoid working at locations you can’t at least partially control. Shooting in studio-like conditions will enable you to carefully select the scenography and to design light so it matches the scene perfectly. The actors must always be clearly visible to the audience, which is why you need to pay attention to where they are located in the shot and how much light you have in that part of the shot.
3. Keep Your Batteries Charged
There is nothing more frustrating than arriving at the set anxious to start shooting just to find out that the batteries are empty. Charge the batteries at the end of each day on the set, because the chances are that you are going to need them early in the morning. Always have several spare batteries with you, so even if one battery is empty you have the replacement ready. You can also prolong the battery life by switching the camera off when you are not recording.
4. Do a Microphone Check
Capturing audio with an external microphone drastically increases the quality of the sound in your videos. That’s why making absolutely sure that all cables are connected and that the microphone is perfectly placed is paramount if you want to get the sound right. The host or the hosts of the video must be at the right distance from the microphone, usually, the length of their fist with the thumb and pinky finger extended, but this can vary a few inches to either side.
Check out the best microphone for YouTuber in 2018
5. Pay Attention to The Shot Composition
The rule of thirds is a common composition principle used by videographers to create balanced and unified images. The rule suggests that the subjects in a shot should be placed at the intersections of the lines that divide the screen. Most digital cameras have a grid that makes using the rule of thirds quite simple because you can easily see when the subjects in the shot are not positioned correctly.
This is just one of many shot composition techniques you have at your disposal, and as you gain more experience you’ll learn how to combine them and get aesthetically pleasing results.
6. Always Record Videos in Landscape Mode
Posting vertically oriented videos to your YouTube channel will make you look unprofessional because portrait mode is never used for capturing videos. YouTubers who record their videos with Smartphones are more likely to fall into this trap, but all you need to do to avoid this is remember to hold the device horizontally.
By switching to portrait mode, you’ll be cropping the frame in a way, so you might unknowingly end up removing parts of the shot you wanted to record.
In case that you want to convert your portrait video to landscape, do not miss this article about How to Convert A Portrait Video to Landscape.
7. Eliminate The Background Noises
Professional microphones can pick up even the softest sounds, that might prove difficult to remove in the post-production. You can reduce the noise levels in your videos by using shotgun microphones that only capture sounds that come directly into the microphone, or by using the omnidirectional mic to eliminate the wind if you’re shooting on an outdoor location.
Background noises can be particularly unpleasant when recording narration, because the viewers of the video may not want to watch it until the end if they can’t hear what the person in the video is saying.
If it is hard for you to record your YouTube video in quite environment, you can remove the background noise by using some video editing software. For YouTubers, we recommend you to try Wondershare Filmora to de-noise. Check the video below about how to remove background noise with one click.
8. Keep The Shot in Focus
You can always keep the shot in focus by simply enabling the autofocus feature, but if you do so you won’t be able to control where the focus is going to be. Pulling focus manually is an art that takes years to master, and you have to keep practicing it as much as you can in order to become good at it.
The best way to deal with out of focus shots is to avoid shooting scenes that include a lot of action because you won’t have to pull focus that often.
9. Put The Camera on a Tripod
The footage you produce should be smooth and free of camera shakes. All video cameras pick up vibrations easily, so even the slightest movement or impact can ruin a shot. Putting the camera on a tripod is one of the best ways to stabilize the shot and avoid camera shaking.
In addition, a tripod enables you to maintain image stability even when shooting form lower or upper angles, something that cannot be achieved by simply holding the camera.
We have chosen some of the best tripods that you can use for starting a YouTube vlogging Video shooting . If you are using a 4K camera, here are some tripods that you can use for your 4K Cameras .
10. Find The Best Angle
Every scene has its perfect angle, you just have to find it. This job is much easier if you have already built the set and adjusted the lighting before approaching the shot selection process because it will allow you to know exactly where the camera should be.
The camera position depends on a number of factors, including the video’s aesthetics or the action that takes place in the shot, and you have to go through this process for each shot in your video.
Read More to Get : How to Download YouTube Videos without Any Software Easily >>
Conclusion
Hopefully, the tips we provided in this article are going to help you create better YouTube videos. There are hundreds of tricks you’ll have to learn as your skills become more polished, but sometimes just paying attention to the basic rules of videography is more than enough to create a stunning video.
Leave a comment and let us know which tips helped you the most or tell us which useful tips we failed to mention in this article.
Richard Bennett
Richard Bennett is a writer and a lover of all things video.
Follow @Richard Bennett
Key Elements of Successful YouTube Channel Imagery
How To Make Good YouTube Banner - Dos and Don’ts
Richard Bennett
Oct 26, 2023• Proven solutions
It’s important to learn how to make a good YouTube banner because, when you click into a channel, the first thing you usually see and pay attention to is the channel art.
Channel art gives viewers a first impression of who you are and allows viewers to know what your channel is all about. Channel art can be a great way to show creativity, and there are also ways you can design your banner to help your channel grow.
Here are the Dos and Don’ts of YouTube Channel Art.
- What Kind of Background Should I Use?
- Should I Use My Face?
- What Should I Write on Banner?
- How Can I Make My Channel Art Look Good?
Part 1: What Kind of Background Should I Use?
DO: High-Quality Photos
It’s easy to take pictures with our phones, but not all of these pictures will look great blown up for channel art.
When choosing great photos for your background, pick ones that are high quality and don’t become pixelated once they are blown up. There are tons of free stock photo websites out there to help you find a high-quality picture that’s perfect for your channel.
DON’T: Use Chaotic Patterns
Using patterns for the background of your channel banner can help your channel look super creative and stand out from others. However, if you use a pattern that is chaotic and hard on the eyes, you may not attract many subscribers. When using patterns, choose patterns that are not heavy in color and have too many lines or shapes. There should be an evenness to the shapes and negative space within the pattern itself. Try to stay away from patterns that are 3D which can conflict with the viewer’s eyesight and make them dizzy.
Part 2: Should I Use My Face?
Whether you should use your face on your channel banner depends on what your channel is about. If you have a channel focused on beauty, fashion, fitness, or family vlogs then it’s a good idea to include your face. It comes off personable and helps viewers relate to you. If you have a channel that is about something like gaming, tech reviews, or book reviews then it isn’t necessary to include your face because the focus of your content isn’t you as a personality.
If you do include pictures, here are some tips:
Don’t: Use Blurry Photos
If your photos are blurry, pixilated, or poor quality then don’t use them. Using blurry pictures comes off as unprofessional.
That doesn’t mean you have to hire a photographer to take pictures for your channel. The average smartphone takes really great pictures, so long as you have enough light. If you need a great picture, use a high-quality selfie or ask a friend to take a nice picture of you.
Don’t: Use Outdated Pictures
It is always best to use a current photo of yourself. Many times viewers will go and follow you on social media as well. If they see that you have current photos on your social media but not on your channel, they are become confused and perhaps lose interest.
Part 3: What Should I Write on My Banner?

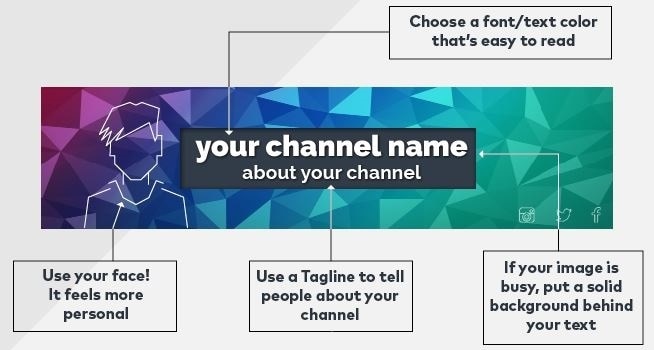
Do: Include Your Channel Name
While including your channel name in your banner seems like a no brainer, it is often left out by aspiring YouTubers. Displaying your channel name in a large font allows it to be more visible for viewers - your channel name is already on the page, but it is underneath your channel art and doesn’t stand out.
Seeing your channel name included in your banner also helps viewers to know they are on the right page, if there are YouTubers out there with similar names to yours.
Do: Include Upload Days
Consistent upload days are highly important for gaining more views and subscribers. Including your exact upload days helps viewers know when they should expect new videos from you. I made the mistake of not including upload days when I first started my channel 3 years ago. I had drops in views because my subscribers didn’t know when I would upload videos.
If you find that you cannot stick to a certain upload day, try to include how often you will post instead. For example, you can say, “New Videos Posted Weekly.” Viewers will respect you more and even be more likely to subscribe when you tell them your upload days. They want a guarantee that you’re going to post again in the near future.
Do: Include Social Media
Social media accounts are important to include in your channel art because we live in a social media generation. People are on social media every second of the day. If you are looking to take your YouTube channel seriously, it is good practice to ask viewers to follow you on your social media.
Including social media icons in your channel art lets people know where they can find you. Another good reason to include your current social media in your banner is that sometimes you might join a new platform or quit an old one. You may be using Twitter for months and then decide that you like Facebook better. Your current social media handles keep subscribers from having to guess which one to follow you on.
Make sure everything important fits in the safe area!
Do: Include Brief Channel Description or Tag Line
Aside from your channel name, you should also include a brief channel description or tag line to tell your viewers what your channel is all about. If you’re an aspiring beauty guru, you may include something like Makeup Tutorials, Product Reviews, or Mommy Makeovers. Or, you may include a cool tag line that describes the goal of your channel, like “Empowering Mother’s Through Makeup.”
I’ve noticed that YouTubers that use 2-3 descriptive words in their channel art make many different types of videos on their channel but they all full under those categories.
YouTubers that use tag lines are using their channel as a platform to carry out a specific mission on giving help or educating others.
Whether you decide to use descriptive words or a tag line, they will help your channel tremendously by setting expectations for your viewers.
Part 4: How Can I Make My Channel Art Look Good?
Do: Create Consistent Branding
Since becoming a YouTuber myself, I’ve come to learn that paying attention to your branding is very important. Focus attention to what colors and fonts you use. The colors you use for your channel can influence your audience to feel a certain way. For example, using yellow can show that you’re happy and upbeat while using blue can show you’re more calm and relaxed. Whatever color you choose, make sure it’s a true representation of who you are.
Using the right font can also be important to your channel. There are many different fonts available now. When choosing a font, choose one that goes with your channel that is easy to read. You might choose a very pretty cursive font, but if your viewers can’t read it, it can be useless.
Don’t: Include Images That Have Nothing to Do with Your Channel
This simple mistake can cost you many subscribers. For example, if your channel is about Beauty videos, then your channel art shouldn’t include pictures of food or you eating a burger. Your channel art is the first thing that viewers see when clicking on your page. You want them to instantly know what your channel is all about without having to find it in the description box. If your channel is about a few different things, then include all of those images in the channel art so they still know what your channel about. Just don’t confuse your viewers as to what your channel is really about.
Don’t: Have Images and Text That Cut Off
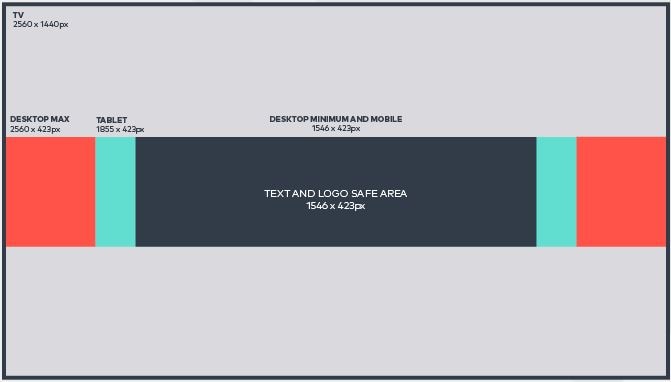
YouTube helps YouTubers by giving them a free channel art template to use as a guide when creating channel art. The template includes 3 different perspectives on how your channel art will be viewed by people looking at mobile devices, computer screens, and TVs. Many people make the mistake of creating art on the TV perspective which then cuts off images and text for the mobile and computer views. To save you the trouble of having images that cut off, it’s best to create your channel in the mobile dimensions that way it will be seen in the computer and TV dimensions with no problem.
Joshelle is a YouTuber from Atlanta, GA. She has a YouTube channel called ElleToshea where she shows viewers how to improve their homes and spaces on an affordable budget through DIY home decor. ElleToshea features minimalist home decor styles based off popular stores such as Anthropologie and Urban Outfitters.
Now that you know how to make a good YouTube banner, what will you do next?
Touch Up YouTube Videos with Filmora
Wondershare Filmora features lots of utilities for both video and audio editing. You can change the video speed or change the aspect ratio easily. Besides, there are plentiful filters, elements, effects and overlays built, so you can use them without costing any extra fee.
Richard Bennett
Richard Bennett is a writer and a lover of all things video.
Follow @Richard Bennett
Richard Bennett
Oct 26, 2023• Proven solutions
It’s important to learn how to make a good YouTube banner because, when you click into a channel, the first thing you usually see and pay attention to is the channel art.
Channel art gives viewers a first impression of who you are and allows viewers to know what your channel is all about. Channel art can be a great way to show creativity, and there are also ways you can design your banner to help your channel grow.
Here are the Dos and Don’ts of YouTube Channel Art.
- What Kind of Background Should I Use?
- Should I Use My Face?
- What Should I Write on Banner?
- How Can I Make My Channel Art Look Good?
Part 1: What Kind of Background Should I Use?
DO: High-Quality Photos
It’s easy to take pictures with our phones, but not all of these pictures will look great blown up for channel art.
When choosing great photos for your background, pick ones that are high quality and don’t become pixelated once they are blown up. There are tons of free stock photo websites out there to help you find a high-quality picture that’s perfect for your channel.
DON’T: Use Chaotic Patterns
Using patterns for the background of your channel banner can help your channel look super creative and stand out from others. However, if you use a pattern that is chaotic and hard on the eyes, you may not attract many subscribers. When using patterns, choose patterns that are not heavy in color and have too many lines or shapes. There should be an evenness to the shapes and negative space within the pattern itself. Try to stay away from patterns that are 3D which can conflict with the viewer’s eyesight and make them dizzy.
Part 2: Should I Use My Face?
Whether you should use your face on your channel banner depends on what your channel is about. If you have a channel focused on beauty, fashion, fitness, or family vlogs then it’s a good idea to include your face. It comes off personable and helps viewers relate to you. If you have a channel that is about something like gaming, tech reviews, or book reviews then it isn’t necessary to include your face because the focus of your content isn’t you as a personality.
If you do include pictures, here are some tips:
Don’t: Use Blurry Photos
If your photos are blurry, pixilated, or poor quality then don’t use them. Using blurry pictures comes off as unprofessional.
That doesn’t mean you have to hire a photographer to take pictures for your channel. The average smartphone takes really great pictures, so long as you have enough light. If you need a great picture, use a high-quality selfie or ask a friend to take a nice picture of you.
Don’t: Use Outdated Pictures
It is always best to use a current photo of yourself. Many times viewers will go and follow you on social media as well. If they see that you have current photos on your social media but not on your channel, they are become confused and perhaps lose interest.
Part 3: What Should I Write on My Banner?
Do: Include Your Channel Name
While including your channel name in your banner seems like a no brainer, it is often left out by aspiring YouTubers. Displaying your channel name in a large font allows it to be more visible for viewers - your channel name is already on the page, but it is underneath your channel art and doesn’t stand out.
Seeing your channel name included in your banner also helps viewers to know they are on the right page, if there are YouTubers out there with similar names to yours.
Do: Include Upload Days
Consistent upload days are highly important for gaining more views and subscribers. Including your exact upload days helps viewers know when they should expect new videos from you. I made the mistake of not including upload days when I first started my channel 3 years ago. I had drops in views because my subscribers didn’t know when I would upload videos.
If you find that you cannot stick to a certain upload day, try to include how often you will post instead. For example, you can say, “New Videos Posted Weekly.” Viewers will respect you more and even be more likely to subscribe when you tell them your upload days. They want a guarantee that you’re going to post again in the near future.
Do: Include Social Media
Social media accounts are important to include in your channel art because we live in a social media generation. People are on social media every second of the day. If you are looking to take your YouTube channel seriously, it is good practice to ask viewers to follow you on your social media.
Including social media icons in your channel art lets people know where they can find you. Another good reason to include your current social media in your banner is that sometimes you might join a new platform or quit an old one. You may be using Twitter for months and then decide that you like Facebook better. Your current social media handles keep subscribers from having to guess which one to follow you on.
Make sure everything important fits in the safe area!
Do: Include Brief Channel Description or Tag Line
Aside from your channel name, you should also include a brief channel description or tag line to tell your viewers what your channel is all about. If you’re an aspiring beauty guru, you may include something like Makeup Tutorials, Product Reviews, or Mommy Makeovers. Or, you may include a cool tag line that describes the goal of your channel, like “Empowering Mother’s Through Makeup.”
I’ve noticed that YouTubers that use 2-3 descriptive words in their channel art make many different types of videos on their channel but they all full under those categories.
YouTubers that use tag lines are using their channel as a platform to carry out a specific mission on giving help or educating others.
Whether you decide to use descriptive words or a tag line, they will help your channel tremendously by setting expectations for your viewers.
Part 4: How Can I Make My Channel Art Look Good?
Do: Create Consistent Branding
Since becoming a YouTuber myself, I’ve come to learn that paying attention to your branding is very important. Focus attention to what colors and fonts you use. The colors you use for your channel can influence your audience to feel a certain way. For example, using yellow can show that you’re happy and upbeat while using blue can show you’re more calm and relaxed. Whatever color you choose, make sure it’s a true representation of who you are.
Using the right font can also be important to your channel. There are many different fonts available now. When choosing a font, choose one that goes with your channel that is easy to read. You might choose a very pretty cursive font, but if your viewers can’t read it, it can be useless.
Don’t: Include Images That Have Nothing to Do with Your Channel
This simple mistake can cost you many subscribers. For example, if your channel is about Beauty videos, then your channel art shouldn’t include pictures of food or you eating a burger. Your channel art is the first thing that viewers see when clicking on your page. You want them to instantly know what your channel is all about without having to find it in the description box. If your channel is about a few different things, then include all of those images in the channel art so they still know what your channel about. Just don’t confuse your viewers as to what your channel is really about.
Don’t: Have Images and Text That Cut Off
YouTube helps YouTubers by giving them a free channel art template to use as a guide when creating channel art. The template includes 3 different perspectives on how your channel art will be viewed by people looking at mobile devices, computer screens, and TVs. Many people make the mistake of creating art on the TV perspective which then cuts off images and text for the mobile and computer views. To save you the trouble of having images that cut off, it’s best to create your channel in the mobile dimensions that way it will be seen in the computer and TV dimensions with no problem.
Joshelle is a YouTuber from Atlanta, GA. She has a YouTube channel called ElleToshea where she shows viewers how to improve their homes and spaces on an affordable budget through DIY home decor. ElleToshea features minimalist home decor styles based off popular stores such as Anthropologie and Urban Outfitters.
Now that you know how to make a good YouTube banner, what will you do next?
Touch Up YouTube Videos with Filmora
Wondershare Filmora features lots of utilities for both video and audio editing. You can change the video speed or change the aspect ratio easily. Besides, there are plentiful filters, elements, effects and overlays built, so you can use them without costing any extra fee.
Richard Bennett
Richard Bennett is a writer and a lover of all things video.
Follow @Richard Bennett
Also read:
- In 2024, Clip Groove Best BGM Choices For Today's Popular YT Shorts
- Analyzing Per-View Gain for Content Making on Video Platforms
- In 2024, Conquering Camera Fear Paving the Path to YouTube Success
- Leveraging SEO for YouTube Popularity A Budget Guide
- 2024 Approved 10 Best ASMR Recorders for Exceptional Audio Quality
- Must-Watch ASMR Video Gems Online
- Perfecting Your Footage YouTube Shorts, Now Mp4
- In 2024, Culinary Craftsmanship Innovative Naming for Food Shows
- [New] Boosting Video Quality The Best Cameras for Vloggers' Dreams
- Explosive Videos Hitting 100M Views on YouTube (2024 Rankings)
- Unleashing the Potential of YouTube Live In-Depth Insights Into WireCast Streaming
- The First-Time Filmmaker's Guide to Gear Selection
- [Updated] Profit From YouTube Monetize YouTube Shorts and Boost Your Income
- Livestream Titans Clash Facebook LIVE & YouTube Vs. Twitter Spaces
- Mastering the Monetized Space A Buyer's Primer
- 2024 Approved Enhancing Comments with Emojis on YouTube
- [New] Blueprint for Buzzing Outro
- 2024 Approved Confirm Monetization Accuracy Essential Steps for Your YT Channels
- The Verdict on Your Next Step with YouTube MNCs
- In 2024, Download Free MCB Skin Designs
- Digital Dominance Display Top 10 by Followers
- In 2024, Embrace the Pause Button 3 Techniques for Decelerating YouTube Video Playback (59 Chars, Slight Overage with Rich Content Justification)
- Catch a Wider Net via Concurrent Streams to Youtube + Twitch for 2024
- [Updated] Decoding YouTube's Earning Rules Update
- In 2024, How to Change your Nokia 105 Classic Location on Twitter | Dr.fone
- [New] 2024 Approved Intuitive Streaming & Storage on MStream Network
- New 2024 Approved Review The Full Spectrum of Features in Adobe Audio Editor (Adobe Audition)
- The Secret to Captivating Videos Freeze Frames Made Easy
- How do I reset my Poco M6 5G Phone without technical knowledge? | Dr.fone
- In 2024, Best Anti Tracker Software For Samsung Galaxy A05s | Dr.fone
- New In 2024, The Best of Both Worlds Free and Paid 3D Animation Software for Artists
- [Updated] 2024 Approved Beats Beyond Boundaries The Top Ten Unforgettable TikTok Songs of the Year
- 2024 Approved Cinema Kings & Queens IPhone's Leading 8 FREE+Paid Watching Options
- [Updated] Unlocking the Secrets to Perfect Thumbnails for 2024
- How To Reset Your Apple iPhone 13 Pro? | Dr.fone
- Essential Windows Voice-to-Text Software Top Picks and Their Rankings
- New WebM to GIF Converters (Online and Offline Solutions)
- Title: "[Updated] Behind the Scenes Insider Knowledge for YouTube Video Production"
- Author: Steven
- Created at : 2024-05-25 20:46:07
- Updated at : 2024-05-26 20:46:07
- Link: https://youtube-clips.techidaily.com/updated-behind-the-scenes-insider-knowledge-for-youtube-video-production/
- License: This work is licensed under CC BY-NC-SA 4.0.
