
!["[Updated] Avoiding Blur Techniques for Hand-Held Stability"](https://www.lifewire.com/thmb/0eladF6N0frE-HtBzdDkcGHF4eU=/360x240/filters:no_upscale():max_bytes(150000):strip_icc():format(webp)/how-to-set-up-a-ps5-5088641-1bcc6bca24cd460bb2b276fdeb6cb830.jpg)
"[Updated] Avoiding Blur Techniques for Hand-Held Stability"
Avoiding Blur: Techniques for Hand-Held Stability
DIY Tripods| How to Stabilize Your Camera without Buying a Tripod

Richard Bennett
Oct 26, 2023• Proven solutions
When you’re trying to grow a channel on YouTube it can feel like equipment is a barrier, but it shouldn’t be. If you can’t afford a high-end tripod, for example, there are loads of ways to get by without one.
DIY Your Video with Wondershare Filmora
Wondershare Filmora has the best video stabilization tool is your videos have a bad frame or were recorded in dim lights. If a video is shot in bad weather or unfriendly situation where you don’t have all the equipment required for a quality recording, Wondershare Filmora can help you in the background to edit your videos like a pro. And it has all the relevant tools like effects, transitions, background removal, overlays, and background music that could turn your normal video to a professional one.


Here are 3 of our favorite DIY tripods.
DIY smartphone tripod using binder clips or hair clips
You’re a solo operation and your best camera is on your phone. That’s pretty common.
If you have a DSLR then you can set it down on any stable surface while filming yourself, but your phone can’t stand up by itself. It needs something or someone to hold it. Do you just accept that and shoot everything as a selfie?
No. No, you don’t, because there are common household items that can help you out of this problem. For this DIY tripod, you need either 2 binder clips or 2 ‘claw clips’ (also called ‘hair jaws’).
Hold your phone in landscape mode (horizontally, so it’s long rather than tall) and attach clips to the bottom corners. If you are worried about scratching your screen, fold up some paper to place between your clip and your phone.
Here it is with binder clips:

And here it is with hair clips:

Now you can set your smartphone upon any stable surface, like a table or a stack of books.
Here are some more cool ideas!
DIY adjustable tripod using books and a towel
You’ve probably heard a million times that you can stabilize your camera by sitting it down on any stable surface – on your desk, on a stack of books, up in a tree, etc. This is very true!
But if you can use any stable surface, why do people buy tripods?
Because it isn’t convenient to rearrange your furniture whenever you want to make a video, and also because tripods are adjustable. You can change their height, you can use them to pan or tilt, and it’s pretty easy to move them a bit forwards or backward while you’re setting up your shot.
To get similar functions from the ‘any stable surface’ solution you can use a table, a stack of books, and a towel.
- Set up the area where you’re going to sit while you’re filming on one end of the table.
- Put the towel down over the approximate spot you want your camera to be.
- Stack your books on top of the towel.
- Put your camera on top of the books.
Now if your camera isn’t up high enough, or is too high, you can adjust it just by adding or taking away books. If you want to move it closer or farther away from you, just pull the towel forwards or backward.
DIY gripping ‘Gorillapod’ using wire and tape
Gorillapod’s are cool because you can use them like normal tripods, carry them around like selfie sticks, or attach them to things like fences and posts. Here’s how you can make something similar using wire, electrical tape or duct tape, and a 1/4 bolt.
Your wire should be fairly stiff and you’ll need three pieces the same length, which should be at least 10 inches. Old clothes hangers work well. This needs to be something strong enough to support the weight of your camera, but soft enough that it’s not impossible for you to bend.

All of your supplies plus the finished product.
Readying your legs
Step 1: Bend 2 inches at one end of each wire into a ‘U’ shape. You will probably need pliers for this.
Step 2: Pick up one of your pieces of wire and wrap one end with electrical tape. Go around 5-10 times (to prevent it from coming undone at the end) and then, without cutting your tape, start moving up and wrapping the rest of your wire. Stop before your ‘U’ section.
Repeat this with the other two wires.
Attaching your legs
Step 1: Place the ‘U’ section of a leg against your bolt. The bolt’s threading should be pointing away from the leg. Now, use your tape to attach them. Wind it around 2 or 3 times, then repeat the process with both of the other legs individually.
Step 2: After all the legs are attached, wrap some more tape around all 3 as tightly as you can.
Your camera will mount onto the bolt! You’ll be able to use this as a normal table-top tripod or use the flexible legs to grab onto different things like a Gorillapod. Read more at Instructables.
Note: make sure the bolt is a fit for your camera before you get too far into this process.
Richard Bennett
Richard Bennett is a writer and a lover of all things video.
Follow @Richard Bennett
Richard Bennett
Oct 26, 2023• Proven solutions
When you’re trying to grow a channel on YouTube it can feel like equipment is a barrier, but it shouldn’t be. If you can’t afford a high-end tripod, for example, there are loads of ways to get by without one.
DIY Your Video with Wondershare Filmora
Wondershare Filmora has the best video stabilization tool is your videos have a bad frame or were recorded in dim lights. If a video is shot in bad weather or unfriendly situation where you don’t have all the equipment required for a quality recording, Wondershare Filmora can help you in the background to edit your videos like a pro. And it has all the relevant tools like effects, transitions, background removal, overlays, and background music that could turn your normal video to a professional one.
Here are 3 of our favorite DIY tripods.
DIY smartphone tripod using binder clips or hair clips
You’re a solo operation and your best camera is on your phone. That’s pretty common.
If you have a DSLR then you can set it down on any stable surface while filming yourself, but your phone can’t stand up by itself. It needs something or someone to hold it. Do you just accept that and shoot everything as a selfie?
No. No, you don’t, because there are common household items that can help you out of this problem. For this DIY tripod, you need either 2 binder clips or 2 ‘claw clips’ (also called ‘hair jaws’).
Hold your phone in landscape mode (horizontally, so it’s long rather than tall) and attach clips to the bottom corners. If you are worried about scratching your screen, fold up some paper to place between your clip and your phone.
Here it is with binder clips:
And here it is with hair clips:
Now you can set your smartphone upon any stable surface, like a table or a stack of books.
Here are some more cool ideas!
DIY adjustable tripod using books and a towel
You’ve probably heard a million times that you can stabilize your camera by sitting it down on any stable surface – on your desk, on a stack of books, up in a tree, etc. This is very true!
But if you can use any stable surface, why do people buy tripods?
Because it isn’t convenient to rearrange your furniture whenever you want to make a video, and also because tripods are adjustable. You can change their height, you can use them to pan or tilt, and it’s pretty easy to move them a bit forwards or backward while you’re setting up your shot.
To get similar functions from the ‘any stable surface’ solution you can use a table, a stack of books, and a towel.
- Set up the area where you’re going to sit while you’re filming on one end of the table.
- Put the towel down over the approximate spot you want your camera to be.
- Stack your books on top of the towel.
- Put your camera on top of the books.
Now if your camera isn’t up high enough, or is too high, you can adjust it just by adding or taking away books. If you want to move it closer or farther away from you, just pull the towel forwards or backward.
DIY gripping ‘Gorillapod’ using wire and tape
Gorillapod’s are cool because you can use them like normal tripods, carry them around like selfie sticks, or attach them to things like fences and posts. Here’s how you can make something similar using wire, electrical tape or duct tape, and a 1/4 bolt.
Your wire should be fairly stiff and you’ll need three pieces the same length, which should be at least 10 inches. Old clothes hangers work well. This needs to be something strong enough to support the weight of your camera, but soft enough that it’s not impossible for you to bend.
All of your supplies plus the finished product.
Readying your legs
Step 1: Bend 2 inches at one end of each wire into a ‘U’ shape. You will probably need pliers for this.
Step 2: Pick up one of your pieces of wire and wrap one end with electrical tape. Go around 5-10 times (to prevent it from coming undone at the end) and then, without cutting your tape, start moving up and wrapping the rest of your wire. Stop before your ‘U’ section.
Repeat this with the other two wires.
Attaching your legs
Step 1: Place the ‘U’ section of a leg against your bolt. The bolt’s threading should be pointing away from the leg. Now, use your tape to attach them. Wind it around 2 or 3 times, then repeat the process with both of the other legs individually.
Step 2: After all the legs are attached, wrap some more tape around all 3 as tightly as you can.
Your camera will mount onto the bolt! You’ll be able to use this as a normal table-top tripod or use the flexible legs to grab onto different things like a Gorillapod. Read more at Instructables.
Note: make sure the bolt is a fit for your camera before you get too far into this process.
Richard Bennett
Richard Bennett is a writer and a lover of all things video.
Follow @Richard Bennett
Masterful Tag Utilization Boosting Video Performance
Create High-Quality Video - Wondershare Filmora
An easy and powerful YouTube video editor
Numerous video and audio effects to choose from
Detailed tutorials provided by the official channel
Tagging your content online greatly impacts how viewers will react to your post. However, it doesn’t end at adding tags; you need to know more. Be savvy to put the tags strategically depending on your topic’s trending. So, why add a tag to YouTube videos? You want to gain enough clicks, yes, right? And that’s what hashtags do. They are online content features that will push the number of clicks to an unimaginable level.
Your content will gain more views and go viral within a short time. After all, that’s what we purpose for when posting videos. No one wants to put effort into editing videos and posting then don’t get a considerable number of views or clicks. But also, know that the ball is at your court. There are no go-zone areas when it comes to dealing with YouTube tags. Check this article on what to do for more views.
In this article
02 How will YouTube tag affect your video performance?
03 Things to consider before you start adding a tag.
04 How to add a tag to YouTube video
What is a YouTube tag?
A tag is a word used to describe a video or image. It is generally added to video titles and descriptions or used independently. They make YouTubers easily discover other posts with similar tags. YouTube tags are vital as they help the YouTube algorithm fully understand the videos you post. It’s by this that those who are interested in your video get hooked to them.
For tags to work ideally, you need to include your brand-specific tags before adding similar tags. YouTube auto-suggest is another gem in this scenario. Just see what YouTube suggests when you type while searching other similar topics. For great results, place the most important keywords and tags first, as these will act as the face of your video.
How will YouTube tag affect your video performance?
It is YouTube tags that help viewers to find videos they are searching for on YouTube. Besides, this is how it works: An audience will type keywords into YouTube’s search bar. Then videos with the same tag and keywords will appear in the search results. If not correctly done, the YouTube tag could affect your video performance and lead to such outcomes.
1. No adequate audience engagement
Your main focus should be audience engagement. You are trying to drive the attention of many YouTube users as possible. A small mistake, and you lose track. It is wise to know the best approach to use your tags. Improper YouTube tagging will not drive enough audience to your channel. You, therefore, won’t get adequate audience engagement.
2. Your video won’t go viral
Anything selling should strive to reach thousands and probably millions of viewers. Perhaps you have put in several days and months of work on a single video, only for it to be viewed by a few fellows. You will feel like a waste of time when you put so much effort, yet your videos don’t go viral. It means there will be fewer people looking out for your content.
3. Limited chances of your video ranking high
If you don’t do YouTube tagging the right way, then the chances are that your video won’t rank high. Everyone feels better when they get a pat on the back for a well-done job. But what happens if there is no traffic to your video? You probably lose the urge to continue doing more videos. Just play right, so you are not demoralized whenever you post your videos.
Things to consider before you start adding a tag
If used properly, YouTube tags are a great way for your video and business to perform well. You’ll attract the audience and probably get a flux of customers. And the tricks are just at your fingertips. You only need to give the best approach possible to all the steps of your YouTube tagging. Here are some tips to help you out.
1) Use keyword variations
Try to use variations of keywords to increase the chances of your video ranking high. The audience will use several phrases to lead them to the right YouTube video. More so, they’ll even change the order of keywords for best results. It would be best to strive to appear in as many searches as possible. The best option is to use the “YouTube” tag generator to gather as many relevant tags as possible. It will pop you more ideas and let you identify the most important core terms that you can build on.
2) Research competitors
This trick works well for you before you add a tag to a YouTube video. Check out what your competitors are up to and what tags they use. While you check at what competitors do, also mind the trending tags. You don’t want to be left behind in the quick-paced technological advances. But ensure your searches are related to your content. Any misleading tags will plunge you into more drawbacks. Checking out on the latest trends will help you generate more ideas for useful keywords that make your videos rank better.
3) Conduct keyword research
Research is a vital point to start from. By this, you’ll find other keyword possibilities for your video. Don’t just think of keywords out of the blue but ensure that the audience searches what you use. It is better to check out the generic relationship between YouTube tags and your video content. Find keywords that will directly link to what your video is all about. You can also find out what has worked for those in your industry to know the best approach to give.
4) Write a keyword-optimized title and description
Ensure that the texts associated with your video are keyword-optimized. Your audience will majorly rely on the video title and description. The description should emphasize more on what the title is. Consider that first, and then find the kinds of tags that would correlate with both your title and description. Besides, it is the best way for your audience to quickly find your videos as the keywords will directly link them.
5) Don’t go overboard
Even though there are no limits on words for YouTube tags, don’t use so many words; it may turn away your audience. Instead, focus on adding relevant tags but don’t stuff in keywords. Going overboard may automatically take you off the topic and mislead your audience.
How to add a tag to a YouTube video
Adding the right YouTube tag will increase the chances of YouTubers finding and watching your video. Here are the steps how to add a tag to a YouTube video.
Step 1. First, log in to your YouTube account and hit the “Camera” icon. It is located at the top-right corner of your screen.
Step 2. Check the drop-down menu and choose the “Upload Video” option.
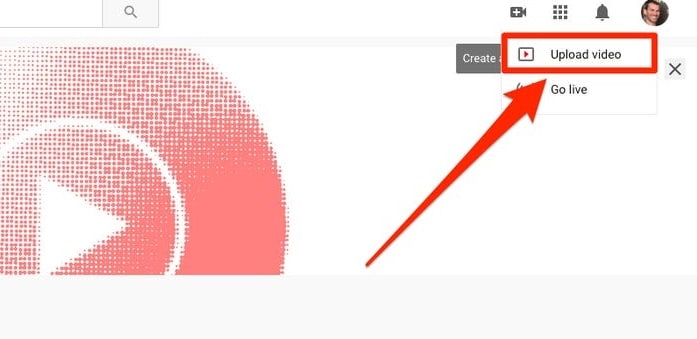
Step 3. Select from your videos which one to upload. Then click on the “Edit” tab to add relevant information like keywords, descriptions, etc.
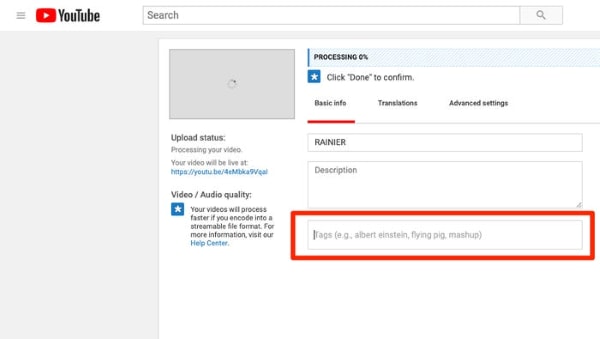
Step 4. Give your video a name and description. Ensure the description correlates to the title of your video.
Step 5. Add relevant tags, separating them with commas. You can use from five to fifteen tags. YouTube may ignore your tags if they are more than 15.
Step 6. Click on the “Save” tab to complete the upload.

Make Your Video Better with Filmora
You may know how to add a tag to a YouTube video, but you might not know how to come up with a compelling piece of video. Filmora works in simple steps to produce a quality video that makes heads turn around. Its powerful editing tools enable you to add several effects for better viewing. It has over 800 stunning effects to enhance your videos with. The export feature also lets you upload your videos to YouTube in any format just with a click of a button.
Key Features
- Edit and export your videos at a high resolution of up to 4K
- Easily remove any background noise from the video
- Make unique clips by slowing them down or increasing speed up to ten times
- It supports GIF files among other output formats
- Easily flip your clips and play them backward.
For Win 7 or later (64-bit)
For macOS 10.12 or later
Conclusion
● YouTube tags play a vital role for you and your potential customers. YouTube’s algorithm uses your tags to match them to similar search queries. When properly utilized, tags can bring an over flux of customers to your video. You have to know how to add a tag to a YouTube video for better results. Remember that YouTube tags can also drive away customers if not properly utilized. We have covered the effects and the best approach when settling on YouTube tags.
● Nonetheless, ensure your videos are top-notch before you tag them around. The best video editor – Filmora – works to produce high-end videos. Try it and gain additional traffic to your video.
Tagging your content online greatly impacts how viewers will react to your post. However, it doesn’t end at adding tags; you need to know more. Be savvy to put the tags strategically depending on your topic’s trending. So, why add a tag to YouTube videos? You want to gain enough clicks, yes, right? And that’s what hashtags do. They are online content features that will push the number of clicks to an unimaginable level.
Your content will gain more views and go viral within a short time. After all, that’s what we purpose for when posting videos. No one wants to put effort into editing videos and posting then don’t get a considerable number of views or clicks. But also, know that the ball is at your court. There are no go-zone areas when it comes to dealing with YouTube tags. Check this article on what to do for more views.
In this article
02 How will YouTube tag affect your video performance?
03 Things to consider before you start adding a tag.
04 How to add a tag to YouTube video
What is a YouTube tag?
A tag is a word used to describe a video or image. It is generally added to video titles and descriptions or used independently. They make YouTubers easily discover other posts with similar tags. YouTube tags are vital as they help the YouTube algorithm fully understand the videos you post. It’s by this that those who are interested in your video get hooked to them.
For tags to work ideally, you need to include your brand-specific tags before adding similar tags. YouTube auto-suggest is another gem in this scenario. Just see what YouTube suggests when you type while searching other similar topics. For great results, place the most important keywords and tags first, as these will act as the face of your video.
How will YouTube tag affect your video performance?
It is YouTube tags that help viewers to find videos they are searching for on YouTube. Besides, this is how it works: An audience will type keywords into YouTube’s search bar. Then videos with the same tag and keywords will appear in the search results. If not correctly done, the YouTube tag could affect your video performance and lead to such outcomes.
1. No adequate audience engagement
Your main focus should be audience engagement. You are trying to drive the attention of many YouTube users as possible. A small mistake, and you lose track. It is wise to know the best approach to use your tags. Improper YouTube tagging will not drive enough audience to your channel. You, therefore, won’t get adequate audience engagement.
2. Your video won’t go viral
Anything selling should strive to reach thousands and probably millions of viewers. Perhaps you have put in several days and months of work on a single video, only for it to be viewed by a few fellows. You will feel like a waste of time when you put so much effort, yet your videos don’t go viral. It means there will be fewer people looking out for your content.
3. Limited chances of your video ranking high
If you don’t do YouTube tagging the right way, then the chances are that your video won’t rank high. Everyone feels better when they get a pat on the back for a well-done job. But what happens if there is no traffic to your video? You probably lose the urge to continue doing more videos. Just play right, so you are not demoralized whenever you post your videos.
Things to consider before you start adding a tag
If used properly, YouTube tags are a great way for your video and business to perform well. You’ll attract the audience and probably get a flux of customers. And the tricks are just at your fingertips. You only need to give the best approach possible to all the steps of your YouTube tagging. Here are some tips to help you out.
1) Use keyword variations
Try to use variations of keywords to increase the chances of your video ranking high. The audience will use several phrases to lead them to the right YouTube video. More so, they’ll even change the order of keywords for best results. It would be best to strive to appear in as many searches as possible. The best option is to use the “YouTube” tag generator to gather as many relevant tags as possible. It will pop you more ideas and let you identify the most important core terms that you can build on.
2) Research competitors
This trick works well for you before you add a tag to a YouTube video. Check out what your competitors are up to and what tags they use. While you check at what competitors do, also mind the trending tags. You don’t want to be left behind in the quick-paced technological advances. But ensure your searches are related to your content. Any misleading tags will plunge you into more drawbacks. Checking out on the latest trends will help you generate more ideas for useful keywords that make your videos rank better.
3) Conduct keyword research
Research is a vital point to start from. By this, you’ll find other keyword possibilities for your video. Don’t just think of keywords out of the blue but ensure that the audience searches what you use. It is better to check out the generic relationship between YouTube tags and your video content. Find keywords that will directly link to what your video is all about. You can also find out what has worked for those in your industry to know the best approach to give.
4) Write a keyword-optimized title and description
Ensure that the texts associated with your video are keyword-optimized. Your audience will majorly rely on the video title and description. The description should emphasize more on what the title is. Consider that first, and then find the kinds of tags that would correlate with both your title and description. Besides, it is the best way for your audience to quickly find your videos as the keywords will directly link them.
5) Don’t go overboard
Even though there are no limits on words for YouTube tags, don’t use so many words; it may turn away your audience. Instead, focus on adding relevant tags but don’t stuff in keywords. Going overboard may automatically take you off the topic and mislead your audience.
How to add a tag to a YouTube video
Adding the right YouTube tag will increase the chances of YouTubers finding and watching your video. Here are the steps how to add a tag to a YouTube video.
Step 1. First, log in to your YouTube account and hit the “Camera” icon. It is located at the top-right corner of your screen.
Step 2. Check the drop-down menu and choose the “Upload Video” option.
Step 3. Select from your videos which one to upload. Then click on the “Edit” tab to add relevant information like keywords, descriptions, etc.
Step 4. Give your video a name and description. Ensure the description correlates to the title of your video.
Step 5. Add relevant tags, separating them with commas. You can use from five to fifteen tags. YouTube may ignore your tags if they are more than 15.
Step 6. Click on the “Save” tab to complete the upload.
Make Your Video Better with Filmora
You may know how to add a tag to a YouTube video, but you might not know how to come up with a compelling piece of video. Filmora works in simple steps to produce a quality video that makes heads turn around. Its powerful editing tools enable you to add several effects for better viewing. It has over 800 stunning effects to enhance your videos with. The export feature also lets you upload your videos to YouTube in any format just with a click of a button.
Key Features
- Edit and export your videos at a high resolution of up to 4K
- Easily remove any background noise from the video
- Make unique clips by slowing them down or increasing speed up to ten times
- It supports GIF files among other output formats
- Easily flip your clips and play them backward.
For Win 7 or later (64-bit)
For macOS 10.12 or later
Conclusion
● YouTube tags play a vital role for you and your potential customers. YouTube’s algorithm uses your tags to match them to similar search queries. When properly utilized, tags can bring an over flux of customers to your video. You have to know how to add a tag to a YouTube video for better results. Remember that YouTube tags can also drive away customers if not properly utilized. We have covered the effects and the best approach when settling on YouTube tags.
● Nonetheless, ensure your videos are top-notch before you tag them around. The best video editor – Filmora – works to produce high-end videos. Try it and gain additional traffic to your video.
Also read:
- Enter the World of Online Promotion Exclusive Free YouTube Banner Access
- Inspire Creativity Brainstorming for Channels' Names
- [New] Ace the Game Crafting a Pro Gaming Channels Success Story
- [Updated] Crafting Impact The Quintessential Five YouTube Marketing Approaches
- Maximizing Impact in the World of Vlog-Style Releases
- Discovering 8 Ultimate Mirrorless Vlogging Cameras
- [New] Best Online Stock Market Channels Reviewed
- [Updated] 5-Second Stories Explained Well
- Unlock Free Designs Download Banners for YouTube Creators
- [New] Comprehensive Guide to Downloading Standardized YouTube Images
- Novice Networking Affordable Channel Buy Options
- The Ultimate Guide to Picking Powerful YT Thumbnails
- Critical Components Affecting YouTube Video Scores
- [Updated] Addressing Missing Image Display in YouTubes Shorts
- Boosting YouTube Ad Revenue Keeping CC Active for 2024
- [New] Audiophile's Guide Techniques to Elevate Sound Recording
- Instantaneity in Playlist Dissemination Webby
- Clearing Process for YouTube's Pending Video List
- Building a Brand, Building Income YouTube Edition for 2024
- In 2024, Double Down on YouTube Visibility (2 Quick Methods)
- In 2024, Avoiding YouTube's Controversial Scrutiny
- Intriguing Stories, Flourishing Channels Top 3 Techniques
- In 2024, Discovering Digital Dominance Which Is Superior, YouTubes Shorts or TikToks?
- In 2024, Champion of Cinematography Audio-Visual Artistry
- In 2024, Enhance Video Popularity with Strategic Timestamps
- Deciphering How TSeries Benefits From YouTube
- Curated List DJ Video Sources at Your Fingertips
- Best Free Downloaders Download YouTube Thumbnail for Free for 2024
- How to Fix the YouTube Shorts Not Showing Up Issue?
- [Updated] Elite Recording Tools for Gamers
- [Updated] Educational History Vlogs - The Ultimate List
- Zany Zooms A List of 10 Hilarious, Short YouTube Video Scenes
- Jump Cut Strategies for Compelling Vlogs
- 2024 Approved Dissecting Mr. Beast's Fortune Portfolio
- [New] Comprehensive Guidebook on Crafting Engaging Videotutorials for 2024
- In 2024, How To Use Special Features - Virtual Location On OnePlus Ace 3? | Dr.fone
- 2024 Approved Time-Lapse Video Editing Top Picks for Free and Paid Tools
- [Updated] 2024 Approved Disconnect and Delete Discord Accounts (Devices)
- [New] First Footage Assessment Breakdown
- Sky-High Adventures The GoPro Karma Experience
- Stealthy Spectator of Online Tales
- In 2024, Fixing Foneazy MockGo Not Working On Apple iPhone SE | Dr.fone
- How to recover deleted photos from Android Gallery after format on Edge+ (2023)
- [New] 2024 Approved Installation Instructions for Snapchat on a Mac
- 2024 Approved Simplify Slide Sharing at Work Webcam-Assisted Tips
- In 2024, How to Bypass FRP on Motorola Moto G Stylus 5G (2023)?
- Reasons for Realme C67 4G Stuck on Startup Screen and Ways To Fix Them | Dr.fone
- In 2024, Free Video Editing Software Top 5 iMovie Alternatives This Year
- In 2024, How to Record Cameras & Monitors Together Efficiently
- [Updated] Rapid Accessibility of Instagram Videos and Stories for 2024
- Title: "[Updated] Avoiding Blur Techniques for Hand-Held Stability"
- Author: Steven
- Created at : 2024-05-25 20:45:39
- Updated at : 2024-05-26 20:45:39
- Link: https://youtube-clips.techidaily.com/updated-avoiding-blur-techniques-for-hand-held-stability/
- License: This work is licensed under CC BY-NC-SA 4.0.
