
![[Updated] Accelerate Mac Youtube Video Matching Aspect Ratio](https://www.lifewire.com/thmb/8AR4KPZSuKj5eifD4ccsltjomD0=/400x300/filters:no_upscale():max_bytes(150000):strip_icc()/SmartLuggage_MaurizioPesce-5a49851522fa3a003693996c.jpg)
[Updated] Accelerate Mac Youtube Video Matching Aspect Ratio
Accelerate Mac Youtube Video Matching Aspect Ratio
Quick Resize YouTube Videos to Right Aspect Ratio on Mac

Liza Brown
Oct 26, 2023• Proven solutions
YouTube is one of the demanding platforms with more than 2.3 billion users worldwide as of 2021. And, in this digitally oriented world, you’re left with no reason not to create a YouTube channel specifically when you have the right talent to use one. Well, this guide is for those who are already into YouTube video creation and now need help on how to resize YouTube videos as per different aspect ratios. According to YouTube’s aspect ratio, it’s the right place to move forward even if you want to resize your videos present on other social media apps. We know brands and other influencers generally practice this kind of social media marketing.
So, let’s get started with our session on resizing YouTube as per the ideal aspect ratio without further ado.
Part 1: What’s the Right Aspect Ratio of YouTube Videos?
For attracting more audience and increasing engagement on YouTube videos, you have to look at each factor, along with the YouTube video quality. And, you cannot overlook the size of YouTube video among these factors to make it your perfect shot among competitors. Considering the importance of such factors, we’ve come up with this specific section on introducing you to the correct aspect ratio for YouTube videos.
It’s crucial to know the size before you start the YouTube game!
YouTube allows you to upload videos of different sizes ranging from 240p to 8K. And, the dimensions for these different sizes are as follows.
- 240p: 426x240 pixels
- 360p: 640x360 pixels
- 480p: 854x480 pixels
- 720p: 1280x720 pixels
- 1080p: 1920x1080 pixels
- 1440p: 2560x1440 pixels
- 2160p: 3840x2160 pixels
- 43200p: 7680×4320 pixels
Along with these, the aspect ratio, video size, and length of YouTube video should also be taken into consideration while uploading YouTube videos.
Thus, the ideal aspect ratio to resize YouTube video is perfect as 16:9, which we’ll diversify in the following three sections.
1. Computer
On a computer, the standard aspect ratio for YouTube video is 16:9. And, the YouTube player will automatically adjust other aspect ratios than the standard size. For instance, it may add padding of white or gray color depending upon the theme. However, it’s advisable to avoid these things like padding as they interfere with YouTube’s dynamic adjustments.
2. Android Phone
In the Android application, the scenario is quite different from YouTube videos. The app automatically adjusts the player as per the video size. The video will always fit the screen, whether it’s square, vertical, or horizontal. Ultimately, the videos will be shorter for widescreen and square for vertical.
3. iPad & iPhone
Similarly, the YouTube app for iPad and iPhone automatically adjust the video size to fit the screen. Thus, every video will fit the screen, even if it’s square, horizontal, or vertical.
Before we let you know how to resize YouTube videos, here are some tips for creating awesome YouTube videos.
- Create a strategy for YouTube video beforehand.
- Search for ideas and topics.
- Understand the use of the best equipment and gear.
- Ensure the best YouTube video editing.
- Optimize YouTube videos.
Part 2: Automatically Resize YouTube Videos to Right Aspect Ratio with Wondershare Filmora for Mac
Hopefully, you have noted the correct aspect ratio required for YouTube videos. Now, it’s time to understand the quick process on how to resize YouTube videos as per this aspect ratio via Wondershare Filmora for Mac. Yes, the Filmora Mac’s latest version, 10.2, has recently launched a competitive feature - Auto Reframe. The feature automatically adjusts your video as per the selected aspect ratio and fits the video’s motion element quite instantly.
About Wondershare Filmora for Mac
Wondershare Filmora is one of the robust video editing programs containing both primary and advanced tools such as Motion Tracking, Keyframing, Green Screen, Audio Ducking, Color Matching, Auto Reframe, and so on.


Steps to Use Auto Reframe in Wondershare Filmora for Mac to Resize YouTube Videos
Step 1. Click the “Try It Free” button to download its latest version and launch it.
Step 2. Choose the More Tools > Auto Reframe after launching the Wondershare Filmora for Mac.

Step 3. Hit the Import button to upload a YouTube video for its resizing.

Step 4. Choose among five different aspect ratios, namely the Vertical, Square, Widescreen, Standard, and Cinema.

Tap the eye icon and preview the whole video.

Step 5. Toggle the Adjust frame tab and adjust the YouTube video screen as shown below.

It is present before the Advanced tab.
Then, adjust the Advanced settings, namely the Tracking Subject and Tracking Speed.

Step 6. Hit the Export tab to save the cropped video.

You can also upload the reframed video to Filmora for further editing.
Conclusion
So, this’s all about how to resize YouTube videos in its ideal aspect ratio. Right from the beginning, we’ve discussed the importance of creating YouTube videos in this digital transformation age and further considering the right fit of factors, including the size, length, quality, and aspect ratio of specific YouTube videos. Even though YouTube has the facility to adjust the video automatically, you have to edit in the cropped video, which is possible through integrated editing programs such as the one we’ve discussed above via Wondershare Filmora for Mac. This video editing software is quite remarkable and offers all the competitive features that both basic and advanced video editors need.
Liza Brown
Liza Brown is a writer and a lover of all things video.
Follow @Liza Brown
Liza Brown
Oct 26, 2023• Proven solutions
YouTube is one of the demanding platforms with more than 2.3 billion users worldwide as of 2021. And, in this digitally oriented world, you’re left with no reason not to create a YouTube channel specifically when you have the right talent to use one. Well, this guide is for those who are already into YouTube video creation and now need help on how to resize YouTube videos as per different aspect ratios. According to YouTube’s aspect ratio, it’s the right place to move forward even if you want to resize your videos present on other social media apps. We know brands and other influencers generally practice this kind of social media marketing.
So, let’s get started with our session on resizing YouTube as per the ideal aspect ratio without further ado.
Part 1: What’s the Right Aspect Ratio of YouTube Videos?
For attracting more audience and increasing engagement on YouTube videos, you have to look at each factor, along with the YouTube video quality. And, you cannot overlook the size of YouTube video among these factors to make it your perfect shot among competitors. Considering the importance of such factors, we’ve come up with this specific section on introducing you to the correct aspect ratio for YouTube videos.
It’s crucial to know the size before you start the YouTube game!
YouTube allows you to upload videos of different sizes ranging from 240p to 8K. And, the dimensions for these different sizes are as follows.
- 240p: 426x240 pixels
- 360p: 640x360 pixels
- 480p: 854x480 pixels
- 720p: 1280x720 pixels
- 1080p: 1920x1080 pixels
- 1440p: 2560x1440 pixels
- 2160p: 3840x2160 pixels
- 43200p: 7680×4320 pixels
Along with these, the aspect ratio, video size, and length of YouTube video should also be taken into consideration while uploading YouTube videos.
Thus, the ideal aspect ratio to resize YouTube video is perfect as 16:9, which we’ll diversify in the following three sections.
1. Computer
On a computer, the standard aspect ratio for YouTube video is 16:9. And, the YouTube player will automatically adjust other aspect ratios than the standard size. For instance, it may add padding of white or gray color depending upon the theme. However, it’s advisable to avoid these things like padding as they interfere with YouTube’s dynamic adjustments.
2. Android Phone
In the Android application, the scenario is quite different from YouTube videos. The app automatically adjusts the player as per the video size. The video will always fit the screen, whether it’s square, vertical, or horizontal. Ultimately, the videos will be shorter for widescreen and square for vertical.
3. iPad & iPhone
Similarly, the YouTube app for iPad and iPhone automatically adjust the video size to fit the screen. Thus, every video will fit the screen, even if it’s square, horizontal, or vertical.
Before we let you know how to resize YouTube videos, here are some tips for creating awesome YouTube videos.
- Create a strategy for YouTube video beforehand.
- Search for ideas and topics.
- Understand the use of the best equipment and gear.
- Ensure the best YouTube video editing.
- Optimize YouTube videos.
Part 2: Automatically Resize YouTube Videos to Right Aspect Ratio with Wondershare Filmora for Mac
Hopefully, you have noted the correct aspect ratio required for YouTube videos. Now, it’s time to understand the quick process on how to resize YouTube videos as per this aspect ratio via Wondershare Filmora for Mac. Yes, the Filmora Mac’s latest version, 10.2, has recently launched a competitive feature - Auto Reframe. The feature automatically adjusts your video as per the selected aspect ratio and fits the video’s motion element quite instantly.
About Wondershare Filmora for Mac
Wondershare Filmora is one of the robust video editing programs containing both primary and advanced tools such as Motion Tracking, Keyframing, Green Screen, Audio Ducking, Color Matching, Auto Reframe, and so on.
Steps to Use Auto Reframe in Wondershare Filmora for Mac to Resize YouTube Videos
Step 1. Click the “Try It Free” button to download its latest version and launch it.
Step 2. Choose the More Tools > Auto Reframe after launching the Wondershare Filmora for Mac.
Step 3. Hit the Import button to upload a YouTube video for its resizing.
Step 4. Choose among five different aspect ratios, namely the Vertical, Square, Widescreen, Standard, and Cinema.
Tap the eye icon and preview the whole video.
Step 5. Toggle the Adjust frame tab and adjust the YouTube video screen as shown below.
It is present before the Advanced tab.
Then, adjust the Advanced settings, namely the Tracking Subject and Tracking Speed.
Step 6. Hit the Export tab to save the cropped video.
You can also upload the reframed video to Filmora for further editing.
Conclusion
So, this’s all about how to resize YouTube videos in its ideal aspect ratio. Right from the beginning, we’ve discussed the importance of creating YouTube videos in this digital transformation age and further considering the right fit of factors, including the size, length, quality, and aspect ratio of specific YouTube videos. Even though YouTube has the facility to adjust the video automatically, you have to edit in the cropped video, which is possible through integrated editing programs such as the one we’ve discussed above via Wondershare Filmora for Mac. This video editing software is quite remarkable and offers all the competitive features that both basic and advanced video editors need.
Liza Brown
Liza Brown is a writer and a lover of all things video.
Follow @Liza Brown
Effective YouTube Banners: Pros and Cons to Avoid
How To Make Good YouTube Banner - Dos and Don’ts

Richard Bennett
Oct 26, 2023• Proven solutions
It’s important to learn how to make a good YouTube banner because, when you click into a channel, the first thing you usually see and pay attention to is the channel art.
Channel art gives viewers a first impression of who you are and allows viewers to know what your channel is all about. Channel art can be a great way to show creativity, and there are also ways you can design your banner to help your channel grow.
Here are the Dos and Don’ts of YouTube Channel Art.
- What Kind of Background Should I Use?
- Should I Use My Face?
- What Should I Write on Banner?
- How Can I Make My Channel Art Look Good?
Part 1: What Kind of Background Should I Use?
DO: High-Quality Photos
It’s easy to take pictures with our phones, but not all of these pictures will look great blown up for channel art.
When choosing great photos for your background, pick ones that are high quality and don’t become pixelated once they are blown up. There are tons of free stock photo websites out there to help you find a high-quality picture that’s perfect for your channel.
DON’T: Use Chaotic Patterns
Using patterns for the background of your channel banner can help your channel look super creative and stand out from others. However, if you use a pattern that is chaotic and hard on the eyes, you may not attract many subscribers. When using patterns, choose patterns that are not heavy in color and have too many lines or shapes. There should be an evenness to the shapes and negative space within the pattern itself. Try to stay away from patterns that are 3D which can conflict with the viewer’s eyesight and make them dizzy.
Part 2: Should I Use My Face?
Whether you should use your face on your channel banner depends on what your channel is about. If you have a channel focused on beauty, fashion, fitness, or family vlogs then it’s a good idea to include your face. It comes off personable and helps viewers relate to you. If you have a channel that is about something like gaming, tech reviews, or book reviews then it isn’t necessary to include your face because the focus of your content isn’t you as a personality.
If you do include pictures, here are some tips:
Don’t: Use Blurry Photos
If your photos are blurry, pixilated, or poor quality then don’t use them. Using blurry pictures comes off as unprofessional.
That doesn’t mean you have to hire a photographer to take pictures for your channel. The average smartphone takes really great pictures, so long as you have enough light. If you need a great picture, use a high-quality selfie or ask a friend to take a nice picture of you.
Don’t: Use Outdated Pictures
It is always best to use a current photo of yourself. Many times viewers will go and follow you on social media as well. If they see that you have current photos on your social media but not on your channel, they are become confused and perhaps lose interest.
Part 3: What Should I Write on My Banner?

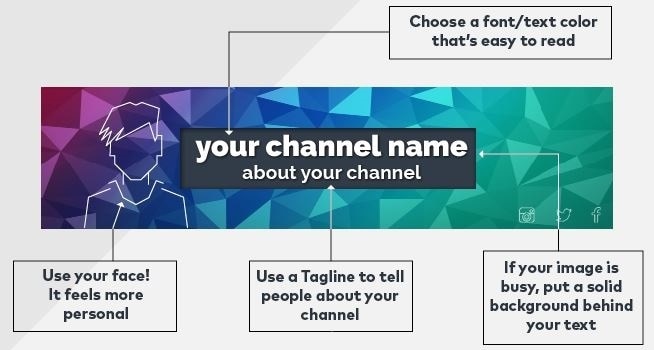
Do: Include Your Channel Name
While including your channel name in your banner seems like a no brainer, it is often left out by aspiring YouTubers. Displaying your channel name in a large font allows it to be more visible for viewers - your channel name is already on the page, but it is underneath your channel art and doesn’t stand out.
Seeing your channel name included in your banner also helps viewers to know they are on the right page, if there are YouTubers out there with similar names to yours.
Do: Include Upload Days
Consistent upload days are highly important for gaining more views and subscribers. Including your exact upload days helps viewers know when they should expect new videos from you. I made the mistake of not including upload days when I first started my channel 3 years ago. I had drops in views because my subscribers didn’t know when I would upload videos.
If you find that you cannot stick to a certain upload day, try to include how often you will post instead. For example, you can say, “New Videos Posted Weekly.” Viewers will respect you more and even be more likely to subscribe when you tell them your upload days. They want a guarantee that you’re going to post again in the near future.
Do: Include Social Media
Social media accounts are important to include in your channel art because we live in a social media generation. People are on social media every second of the day. If you are looking to take your YouTube channel seriously, it is good practice to ask viewers to follow you on your social media.
Including social media icons in your channel art lets people know where they can find you. Another good reason to include your current social media in your banner is that sometimes you might join a new platform or quit an old one. You may be using Twitter for months and then decide that you like Facebook better. Your current social media handles keep subscribers from having to guess which one to follow you on.
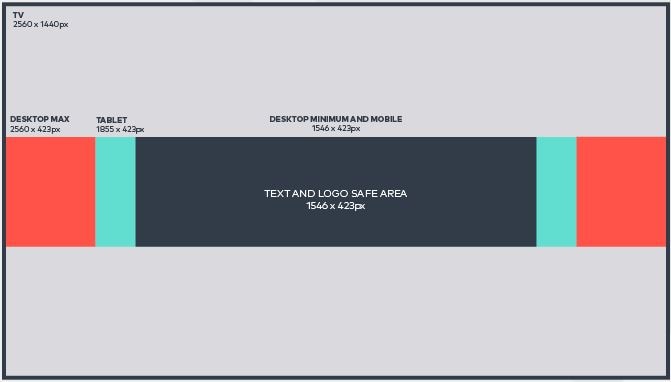
Make sure everything important fits in the safe area!
Do: Include Brief Channel Description or Tag Line
Aside from your channel name, you should also include a brief channel description or tag line to tell your viewers what your channel is all about. If you’re an aspiring beauty guru, you may include something like Makeup Tutorials, Product Reviews, or Mommy Makeovers. Or, you may include a cool tag line that describes the goal of your channel, like “Empowering Mother’s Through Makeup.”
I’ve noticed that YouTubers that use 2-3 descriptive words in their channel art make many different types of videos on their channel but they all full under those categories.
YouTubers that use tag lines are using their channel as a platform to carry out a specific mission on giving help or educating others.
Whether you decide to use descriptive words or a tag line, they will help your channel tremendously by setting expectations for your viewers.
Part 4: How Can I Make My Channel Art Look Good?
Do: Create Consistent Branding
Since becoming a YouTuber myself, I’ve come to learn that paying attention to your branding is very important. Focus attention to what colors and fonts you use. The colors you use for your channel can influence your audience to feel a certain way. For example, using yellow can show that you’re happy and upbeat while using blue can show you’re more calm and relaxed. Whatever color you choose, make sure it’s a true representation of who you are.
Using the right font can also be important to your channel. There are many different fonts available now. When choosing a font, choose one that goes with your channel that is easy to read. You might choose a very pretty cursive font, but if your viewers can’t read it, it can be useless.
Don’t: Include Images That Have Nothing to Do with Your Channel
This simple mistake can cost you many subscribers. For example, if your channel is about Beauty videos, then your channel art shouldn’t include pictures of food or you eating a burger. Your channel art is the first thing that viewers see when clicking on your page. You want them to instantly know what your channel is all about without having to find it in the description box. If your channel is about a few different things, then include all of those images in the channel art so they still know what your channel about. Just don’t confuse your viewers as to what your channel is really about.
Don’t: Have Images and Text That Cut Off
YouTube helps YouTubers by giving them a free channel art template to use as a guide when creating channel art. The template includes 3 different perspectives on how your channel art will be viewed by people looking at mobile devices, computer screens, and TVs. Many people make the mistake of creating art on the TV perspective which then cuts off images and text for the mobile and computer views. To save you the trouble of having images that cut off, it’s best to create your channel in the mobile dimensions that way it will be seen in the computer and TV dimensions with no problem.
Joshelle is a YouTuber from Atlanta, GA. She has a YouTube channel called ElleToshea where she shows viewers how to improve their homes and spaces on an affordable budget through DIY home decor. ElleToshea features minimalist home decor styles based off popular stores such as Anthropologie and Urban Outfitters.
Now that you know how to make a good YouTube banner, what will you do next?
Touch Up YouTube Videos with Filmora
Wondershare Filmora features lots of utilities for both video and audio editing. You can change the video speed or change the aspect ratio easily. Besides, there are plentiful filters, elements, effects and overlays built, so you can use them without costing any extra fee.
Richard Bennett
Richard Bennett is a writer and a lover of all things video.
Follow @Richard Bennett
Richard Bennett
Oct 26, 2023• Proven solutions
It’s important to learn how to make a good YouTube banner because, when you click into a channel, the first thing you usually see and pay attention to is the channel art.
Channel art gives viewers a first impression of who you are and allows viewers to know what your channel is all about. Channel art can be a great way to show creativity, and there are also ways you can design your banner to help your channel grow.
Here are the Dos and Don’ts of YouTube Channel Art.
- What Kind of Background Should I Use?
- Should I Use My Face?
- What Should I Write on Banner?
- How Can I Make My Channel Art Look Good?
Part 1: What Kind of Background Should I Use?
DO: High-Quality Photos
It’s easy to take pictures with our phones, but not all of these pictures will look great blown up for channel art.
When choosing great photos for your background, pick ones that are high quality and don’t become pixelated once they are blown up. There are tons of free stock photo websites out there to help you find a high-quality picture that’s perfect for your channel.
DON’T: Use Chaotic Patterns
Using patterns for the background of your channel banner can help your channel look super creative and stand out from others. However, if you use a pattern that is chaotic and hard on the eyes, you may not attract many subscribers. When using patterns, choose patterns that are not heavy in color and have too many lines or shapes. There should be an evenness to the shapes and negative space within the pattern itself. Try to stay away from patterns that are 3D which can conflict with the viewer’s eyesight and make them dizzy.
Part 2: Should I Use My Face?
Whether you should use your face on your channel banner depends on what your channel is about. If you have a channel focused on beauty, fashion, fitness, or family vlogs then it’s a good idea to include your face. It comes off personable and helps viewers relate to you. If you have a channel that is about something like gaming, tech reviews, or book reviews then it isn’t necessary to include your face because the focus of your content isn’t you as a personality.
If you do include pictures, here are some tips:
Don’t: Use Blurry Photos
If your photos are blurry, pixilated, or poor quality then don’t use them. Using blurry pictures comes off as unprofessional.
That doesn’t mean you have to hire a photographer to take pictures for your channel. The average smartphone takes really great pictures, so long as you have enough light. If you need a great picture, use a high-quality selfie or ask a friend to take a nice picture of you.
Don’t: Use Outdated Pictures
It is always best to use a current photo of yourself. Many times viewers will go and follow you on social media as well. If they see that you have current photos on your social media but not on your channel, they are become confused and perhaps lose interest.
Part 3: What Should I Write on My Banner?
Do: Include Your Channel Name
While including your channel name in your banner seems like a no brainer, it is often left out by aspiring YouTubers. Displaying your channel name in a large font allows it to be more visible for viewers - your channel name is already on the page, but it is underneath your channel art and doesn’t stand out.
Seeing your channel name included in your banner also helps viewers to know they are on the right page, if there are YouTubers out there with similar names to yours.
Do: Include Upload Days
Consistent upload days are highly important for gaining more views and subscribers. Including your exact upload days helps viewers know when they should expect new videos from you. I made the mistake of not including upload days when I first started my channel 3 years ago. I had drops in views because my subscribers didn’t know when I would upload videos.
If you find that you cannot stick to a certain upload day, try to include how often you will post instead. For example, you can say, “New Videos Posted Weekly.” Viewers will respect you more and even be more likely to subscribe when you tell them your upload days. They want a guarantee that you’re going to post again in the near future.
Do: Include Social Media
Social media accounts are important to include in your channel art because we live in a social media generation. People are on social media every second of the day. If you are looking to take your YouTube channel seriously, it is good practice to ask viewers to follow you on your social media.
Including social media icons in your channel art lets people know where they can find you. Another good reason to include your current social media in your banner is that sometimes you might join a new platform or quit an old one. You may be using Twitter for months and then decide that you like Facebook better. Your current social media handles keep subscribers from having to guess which one to follow you on.
Make sure everything important fits in the safe area!
Do: Include Brief Channel Description or Tag Line
Aside from your channel name, you should also include a brief channel description or tag line to tell your viewers what your channel is all about. If you’re an aspiring beauty guru, you may include something like Makeup Tutorials, Product Reviews, or Mommy Makeovers. Or, you may include a cool tag line that describes the goal of your channel, like “Empowering Mother’s Through Makeup.”
I’ve noticed that YouTubers that use 2-3 descriptive words in their channel art make many different types of videos on their channel but they all full under those categories.
YouTubers that use tag lines are using their channel as a platform to carry out a specific mission on giving help or educating others.
Whether you decide to use descriptive words or a tag line, they will help your channel tremendously by setting expectations for your viewers.
Part 4: How Can I Make My Channel Art Look Good?
Do: Create Consistent Branding
Since becoming a YouTuber myself, I’ve come to learn that paying attention to your branding is very important. Focus attention to what colors and fonts you use. The colors you use for your channel can influence your audience to feel a certain way. For example, using yellow can show that you’re happy and upbeat while using blue can show you’re more calm and relaxed. Whatever color you choose, make sure it’s a true representation of who you are.
Using the right font can also be important to your channel. There are many different fonts available now. When choosing a font, choose one that goes with your channel that is easy to read. You might choose a very pretty cursive font, but if your viewers can’t read it, it can be useless.
Don’t: Include Images That Have Nothing to Do with Your Channel
This simple mistake can cost you many subscribers. For example, if your channel is about Beauty videos, then your channel art shouldn’t include pictures of food or you eating a burger. Your channel art is the first thing that viewers see when clicking on your page. You want them to instantly know what your channel is all about without having to find it in the description box. If your channel is about a few different things, then include all of those images in the channel art so they still know what your channel about. Just don’t confuse your viewers as to what your channel is really about.
Don’t: Have Images and Text That Cut Off
YouTube helps YouTubers by giving them a free channel art template to use as a guide when creating channel art. The template includes 3 different perspectives on how your channel art will be viewed by people looking at mobile devices, computer screens, and TVs. Many people make the mistake of creating art on the TV perspective which then cuts off images and text for the mobile and computer views. To save you the trouble of having images that cut off, it’s best to create your channel in the mobile dimensions that way it will be seen in the computer and TV dimensions with no problem.
Joshelle is a YouTuber from Atlanta, GA. She has a YouTube channel called ElleToshea where she shows viewers how to improve their homes and spaces on an affordable budget through DIY home decor. ElleToshea features minimalist home decor styles based off popular stores such as Anthropologie and Urban Outfitters.
Now that you know how to make a good YouTube banner, what will you do next?
Touch Up YouTube Videos with Filmora
Wondershare Filmora features lots of utilities for both video and audio editing. You can change the video speed or change the aspect ratio easily. Besides, there are plentiful filters, elements, effects and overlays built, so you can use them without costing any extra fee.
Richard Bennett
Richard Bennett is a writer and a lover of all things video.
Follow @Richard Bennett
Also read:
- In 2024, Elevate Your Video Summary Aesthetics - Neons Included
- The Ultimate List of Quickly-Rising YouTube Channels Top 8 Edition
- 2024 Approved Conquer YouTube Creator Studio A Comprehensive Guide
- In 2024, Creating an Easy-to-Use Subscribe URL for Your YT Channel
- In 2024, Coordinated Titling Scheme Across Diverse Digital Platforms
- 2024 Approved Apex Media Merge Sleek PC Video & Music Harmony
- [Updated] Enhancing Your Game Time with YouTube Live Broadcasts
- [New] Composing Correspondents' Curtains
- Best Hashtags for YouTube To Get Your Views to 6 Figures
- [New] Cross-Application Title Strategy Consistent & Coherent
- 2024 Approved Academic Journey Across Time Top 10 History YouTubers
- In 2024, Beginner's Guide to Video Production Free Course Series
- In 2024, Crafting Content for Specific Youtube Subsets
- In 2024, Enlightenment in Education Top 10 History YouTube Channels
- Unlocking YouTube Profits A Comprehensive Manual
- Ultimate Guide to Choosing a Top-Tier GIF Maker
- [Updated] Discovering Video Opportunities with Google Trend Analysis
- YouTube Snippets Overview Explained
- In 2024, Elevate Your Metadata Management Unveiling the Best 7 Affordable Online Tags Extractors
- [New] Boost Traffic to Your Videos Top SEO Practices for YouTube Success
- Direct Pathway Transferring YouTube Content to Dailymotion for 2024
- From Vision to Visuals Craft Your Story with YouTube Editor
- [Updated] Enhance Engagement Select Best Fonts for Your Thumbnails
- The Ultimate Strategy Guide to Boosting View Count on YouTube Shorts
- Beyond BingeWatching The Best Non-YouTube Platforms for Videos for 2024
- [New] Champion's Tech The Ultimate Gaming Toolkit
- CarryMinati Financial Triumphs with Ajey Nagar for 2024
- Step-by-Step Approach Fine-Tuning Your YouTube Videos' Dimensions & Sizes
- [Updated] Enlightening Editing Paths to Audience-Appealing Descriptors
- In 2024, Deciphering YouTube's Processing After Uploading
- Tag Your Way to the Top YouTube's Viral Power Players
- [Updated] Epic Editing Illusions YouTube Edition
- In 2024, Cutting Edge Capture Tips for Professional Sound Recording
- [New] Bringing Dialogue to Life Writing for YouTube Videos
- [New] Essential Free Resources for YouTube Intros
- [Updated] Elevate Your Channel Ranking with These 11 SEO Secrets
- 2024 Approved Best Affordable Video Editors in the Market - 2023 Edition
- Digital Domain Decision Which Platform for Your Videos, In 2024
- Breaking Down the Most Influential YouTube Personalities
- [New] Charting the Course for Your YouTube Music Narrative
- Updated In 2024, Pushing Boundaries Incorporating Photography Into Audio Experiences Audiovisual Trends 2023
- In 2024, 5 Easy Ways to Copy Contacts from Vivo Y56 5G to iPhone 14 and 15 | Dr.fone
- Updated Best Adobe Premiere Rush Alternatives for Video Editing
- Quick Guide Capturing Your PPT Slide Show for 2024
- The Ultimate Guide to Stellar TikTok Content Through Template Utilization for 2024
- [New] In 2024, Influential Insights 30+ Biographical Ideas for Skyrocketing Followers on TikTok with Filmora
- [Updated] Dive Deep Into High-Quality Video Capture Technology for 2024
- In 2024, How to Transfer Contacts from Xiaomi Redmi Note 12 4G to iPhone XS/11 | Dr.fone
- New In 2024, How to Make a Video by Mouse with Filmora
- [Updated] In 2024, Essential Methodologies in Capturing Web Radio Audio
- In 2024, Top 4 SIM Location Trackers To Easily Find Your Lost Infinix Note 30 Device
- Updated Free Invitation Video Creator Tools Top Picks
- Harmonizing Multiple Recordings Achieving an Exclusive One-File Mix
- [New] In 2024, Top Custom Font Services for Discord on iOS/Android Devices
- [New] 2024 Approved The Ultimate Screencast Blueprint Tools & Techniques Mastery
- [New] 2024 Approved How to Watch Facebook Live on Roku
- Unlocking Potential in Snaps Maximizing Your Marketing Impact
- In 2024, Complete Fixes To Solve Apple iPhone 11 Pro Max Randomly Asking for Apple ID Password
- In 2024, 3 Ways of How to Get Someones Apple ID Off Apple iPhone 11 without Password
- Updated 2024 Approved Premium Verses in Motion AEs Ultimate Lyric Videos
- In 2024, Skype Recording Procedures - Streamlined Techniques for Windows & OS X
- 2024 Approved FrameDivider Evaluation Report
- 7 Fixes for Unfortunately, Phone Has Stopped on Tecno Spark 20 | Dr.fone
- All Must-Knows to Use Fake GPS GO Location Spoofer On Lava Blaze Curve 5G | Dr.fone
- Top 5 Tracking Apps to Track Xiaomi Redmi A2+ without Them Knowing | Dr.fone
- Synchronize Your Scenes Editing Videos in Step With the Music in Adobe Premiere Pro for 2024
- [New] Best Price-to-Performance Laptops Under $500 (Gaming Edition) for 2024
- How To Repair System Issues of Apple iPhone 6? | Dr.fone
- Updated The Perfect Harmony of Journalism and Music A Listening Collection
- The Digital Mogul's Guide to Vimeo Earnings Mastery for 2024
- [New] 2024 Approved Mastering Instagram The Ultimate Video Editing Handbook
- How To Reset the Security Questions of Your Apple ID On Your iPhone 7
- [New] 2024 Approved Overcoming Audio Glitches with OBS Enhancements
- In 2024, Will Pokémon Go Ban the Account if You Use PGSharp On Tecno Spark 10C | Dr.fone
- [New] Streamline Screen Capture on Google Chat
- [Updated] In 2024, Stream Like a Champion Top 3 Techniques for Successful LOL Gameplay Capture
- In 2024, Getting the Pokemon Go GPS Signal Not Found 11 Error in Lava Agni 2 5G | Dr.fone
- How To Unlock The iPhone 15 Pro SIM Lock 4 Easy Methods
- Title: [Updated] Accelerate Mac Youtube Video Matching Aspect Ratio
- Author: Steven
- Created at : 2024-05-25 20:43:38
- Updated at : 2024-05-26 20:43:38
- Link: https://youtube-clips.techidaily.com/updated-accelerate-mac-youtube-video-matching-aspect-ratio/
- License: This work is licensed under CC BY-NC-SA 4.0.
