
!["[Updated] A Compreehed Guide to Online Identity YouTube Account Setup"](https://www.lifewire.com/thmb/xWg1yHDU11x4ZrjNTzzLWwJyEKI=/400x300/filters:no_upscale():max_bytes(150000):strip_icc()/GettyImages-1005528904-7d476f41edcd46bb809080651f746d68.jpg)
"[Updated] A Compreehed Guide to Online Identity YouTube Account Setup"
A Compreehed Guide to Online Identity: YouTube Account Setup
How to Create a YouTube Account

Richard Bennett
Mar 27, 2024• Proven solutions
People create YouTube accounts for a lot of different reasons. Some YouTubers just love making videos and created their channels so they would have somewhere to post their work. Others have strong opinions they need a platform to share. There are a lot of people on YouTube whose main interest is in a separate website or other social media page, but they use their YouTube channels to help generate traffic. If you are considering starting your own YouTube channel then you should take a second to consider why you want to, since this will have an impact on what kind of videos you make. Your reasons for wanting to make a YouTube account do not have to be very elaborate. Maybe you just think it will be fun. Good news; it will be!
Once you know for sure that you want to create a YouTube account, and also know why you want to do it, you have already started building your channel. There are still a few important things to consider, though. This article will walk you through signing up for a YouTube account, and give you some tips about starting your channel.
Creating Your YouTube Account in 6 Steps
1. Go to YouTube.com and look at the top right corner of your screen. There will either be a blue Sign In button, or an icon representing you. YouTube accounts and Google accounts are the same, so if you are signed into your Gmail account you are already signed into YouTube as well.
2. If you see a Sign In button, click it. If you see your icon click on that, and in the window that pops up select Add Account. Either way, you will be taken into a sign in screen. Under where it asks for your email address it will say Create Account. Click on Create Account.
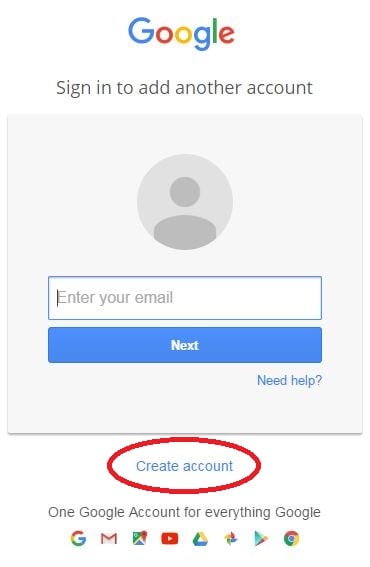
3. In the sign up page you will need to put in your name, email address, and mobile phone number as well as some other personal information. Do not enter your current Gmail address. Enter an alternate email you have created for your vlog, or click on I would like a new Gmail address. This will change your page slightly so that the email field becomes Choose a Username.


You will probably need to try a few different usernames before you find one that is not taken.
4. You will have to put in both a first and last name when you create your account, but you can change it to one name later.
5. Your password will need to be at least 8 characters long. Try to use a combination of letters or numbers, and make sure it is not something easily guessable (i.e spouses name).
6. After you finish the form click Next Step and, in the next screen, Continue to YouTube.
Tips on Starting a YouTube Channel
1. Choose a Topic you Love
When choosing a topic for your YouTube channel make sure you pick something you are passionate about. If you already have an interest or hobby which you are always researching and are extremely up-to-date on then that should probably be the theme of your vlog. If you plan to have a channel where people go to learn anything then you will need to be an authority on that topic. Whatever you make videos about it will need to be something you can realistically see yourself putting a lot of time into. If you cannot think of more than a couple ideas for videos on your topic then that is a sign that you need to choose something else to focus on.
You should check to see how much demand there is for videos on your topic. This can be done by googling your topic to see what else is out there. If not many people have addressed your topic yet it probably means that it is not something a lot of people want to know about. However, it could also mean that the people who do want to watch videos like yours have been starved for content. Your channel will flop if you do not love what you are making videos about, so do not choose something just because you think it will be popular. Follow your passion.
2. Check out the Competition
You should look for other vlogs with similar topics to yours not only to gauge how much demand there is for your videos, but to check out the competition. If there are a lot of YouTube channels dedicated to the same topic you want to vlog about then this should not discourage you from going after the same viewers. People who are excited about a topic frequently watch more than one vlog about it. It might not even be correct to think of other vloggers within your genre as ‘the competition’ since you are ultimately part of the same community. You will need to watch these people’s videos as part of keeping yourself informed and will likely become a fan – maybe even a collaborator some day – of theirs.
The main reason you want to look into YouTube channels like yours is because you do not want to be creating content that is overdone and boring. You are tackling the same topic as other people, and may even make some videos on the exact same subjects as others already have. There needs to be something unique about your videos that makes them stand out from what already exists. By looking at what other people are already doing you will be able to come up with ideas for what you can do differently.
3. Choose a Great Name
Picking a great name for your YouTube account can take a lot of effort. Chances are you will not want to use your own name, at least not in full. Although your real name can work for if you are a lifestyle vlogger in most cases you will have a more specific topic that will need to be addressed in your channel’s name. Try out your name or a nickname for yourself in combination with different words associated with the topic of your vlog. Aim to create a name that is catchy and easy to remember.
Chances are a few of your first couple picks will be unavailable. YouTube is a popular site and a lot of the best names are taken. The last thing you should ever do while naming your YouTube channel is add numbers or letters to the end of a name you like because it is taken. Names with numbers at the end are hard for viewers to remember and find again. Choosing a weak name with a trail of numbers or letters after it will make it very hard for your channel to grow. Brainstorm a long list of potential names that are actually good and keep on trying them out until you find one that’s available.
For more information on naming your YouTube channel read our post ‘How To Pick a Name for Your YouTube Channel’.
4. Make a Schedule
Maintaining a YouTube channel is a big time commitment. You need to post videos regularly or people will forget about you, and videos can take a long time to make. When you are first starting your vlog you should make yourself a schedule for when you want to upload videos. Having a schedule will help you budget your time and ensure that your vlog never gets in the way of the rest of your life.
Having a posting schedule will also help you grow your channel. Viewers like it when they know when to expect new content from vloggers they like. They are more likely to subscribe and tune in for every post if they are given a chance to anticipate when your new entry is coming.
5. Take Inventory
Think about what equipment you have that you can use for your YouTube channel. The only thing you absolutely cannot get by without is a decent camera, but there are other types of equipment that it is a good idea to have too. Lights, a tripod, an external microphone – these are all things that a lot of YouTubers find they need in order to produce great videos. If you do not have these things, or money you are prepared to invest in them, then you will need to find ways around them until your situation changes. For more information check out our post ‘The Best YouTube Equipment: What You Need to Start Your Channel’.
Read More to Get : Best Video Websites Like YouTube >>
Richard Bennett
Richard Bennett is a writer and a lover of all things video.
Follow @Richard Bennett
Richard Bennett
Mar 27, 2024• Proven solutions
People create YouTube accounts for a lot of different reasons. Some YouTubers just love making videos and created their channels so they would have somewhere to post their work. Others have strong opinions they need a platform to share. There are a lot of people on YouTube whose main interest is in a separate website or other social media page, but they use their YouTube channels to help generate traffic. If you are considering starting your own YouTube channel then you should take a second to consider why you want to, since this will have an impact on what kind of videos you make. Your reasons for wanting to make a YouTube account do not have to be very elaborate. Maybe you just think it will be fun. Good news; it will be!
Once you know for sure that you want to create a YouTube account, and also know why you want to do it, you have already started building your channel. There are still a few important things to consider, though. This article will walk you through signing up for a YouTube account, and give you some tips about starting your channel.
Creating Your YouTube Account in 6 Steps
1. Go to YouTube.com and look at the top right corner of your screen. There will either be a blue Sign In button, or an icon representing you. YouTube accounts and Google accounts are the same, so if you are signed into your Gmail account you are already signed into YouTube as well.
2. If you see a Sign In button, click it. If you see your icon click on that, and in the window that pops up select Add Account. Either way, you will be taken into a sign in screen. Under where it asks for your email address it will say Create Account. Click on Create Account.
3. In the sign up page you will need to put in your name, email address, and mobile phone number as well as some other personal information. Do not enter your current Gmail address. Enter an alternate email you have created for your vlog, or click on I would like a new Gmail address. This will change your page slightly so that the email field becomes Choose a Username.
You will probably need to try a few different usernames before you find one that is not taken.
4. You will have to put in both a first and last name when you create your account, but you can change it to one name later.
5. Your password will need to be at least 8 characters long. Try to use a combination of letters or numbers, and make sure it is not something easily guessable (i.e spouses name).
6. After you finish the form click Next Step and, in the next screen, Continue to YouTube.
Tips on Starting a YouTube Channel
1. Choose a Topic you Love
When choosing a topic for your YouTube channel make sure you pick something you are passionate about. If you already have an interest or hobby which you are always researching and are extremely up-to-date on then that should probably be the theme of your vlog. If you plan to have a channel where people go to learn anything then you will need to be an authority on that topic. Whatever you make videos about it will need to be something you can realistically see yourself putting a lot of time into. If you cannot think of more than a couple ideas for videos on your topic then that is a sign that you need to choose something else to focus on.
You should check to see how much demand there is for videos on your topic. This can be done by googling your topic to see what else is out there. If not many people have addressed your topic yet it probably means that it is not something a lot of people want to know about. However, it could also mean that the people who do want to watch videos like yours have been starved for content. Your channel will flop if you do not love what you are making videos about, so do not choose something just because you think it will be popular. Follow your passion.
2. Check out the Competition
You should look for other vlogs with similar topics to yours not only to gauge how much demand there is for your videos, but to check out the competition. If there are a lot of YouTube channels dedicated to the same topic you want to vlog about then this should not discourage you from going after the same viewers. People who are excited about a topic frequently watch more than one vlog about it. It might not even be correct to think of other vloggers within your genre as ‘the competition’ since you are ultimately part of the same community. You will need to watch these people’s videos as part of keeping yourself informed and will likely become a fan – maybe even a collaborator some day – of theirs.
The main reason you want to look into YouTube channels like yours is because you do not want to be creating content that is overdone and boring. You are tackling the same topic as other people, and may even make some videos on the exact same subjects as others already have. There needs to be something unique about your videos that makes them stand out from what already exists. By looking at what other people are already doing you will be able to come up with ideas for what you can do differently.
3. Choose a Great Name
Picking a great name for your YouTube account can take a lot of effort. Chances are you will not want to use your own name, at least not in full. Although your real name can work for if you are a lifestyle vlogger in most cases you will have a more specific topic that will need to be addressed in your channel’s name. Try out your name or a nickname for yourself in combination with different words associated with the topic of your vlog. Aim to create a name that is catchy and easy to remember.
Chances are a few of your first couple picks will be unavailable. YouTube is a popular site and a lot of the best names are taken. The last thing you should ever do while naming your YouTube channel is add numbers or letters to the end of a name you like because it is taken. Names with numbers at the end are hard for viewers to remember and find again. Choosing a weak name with a trail of numbers or letters after it will make it very hard for your channel to grow. Brainstorm a long list of potential names that are actually good and keep on trying them out until you find one that’s available.
For more information on naming your YouTube channel read our post ‘How To Pick a Name for Your YouTube Channel’.
4. Make a Schedule
Maintaining a YouTube channel is a big time commitment. You need to post videos regularly or people will forget about you, and videos can take a long time to make. When you are first starting your vlog you should make yourself a schedule for when you want to upload videos. Having a schedule will help you budget your time and ensure that your vlog never gets in the way of the rest of your life.
Having a posting schedule will also help you grow your channel. Viewers like it when they know when to expect new content from vloggers they like. They are more likely to subscribe and tune in for every post if they are given a chance to anticipate when your new entry is coming.
5. Take Inventory
Think about what equipment you have that you can use for your YouTube channel. The only thing you absolutely cannot get by without is a decent camera, but there are other types of equipment that it is a good idea to have too. Lights, a tripod, an external microphone – these are all things that a lot of YouTubers find they need in order to produce great videos. If you do not have these things, or money you are prepared to invest in them, then you will need to find ways around them until your situation changes. For more information check out our post ‘The Best YouTube Equipment: What You Need to Start Your Channel’.
Read More to Get : Best Video Websites Like YouTube >>
Richard Bennett
Richard Bennett is a writer and a lover of all things video.
Follow @Richard Bennett
How to Achieve Professional-Level Audio Quality on YouTube
How to Edit Audio on YouTube
Richard Bennett
Mar 27, 2024• Proven solutions
In this article, we are going to show you how to edit audio with YouTube Video Editor, and the tips on adding your own audio file to YouTube.
- Part 1: Add your Own Audio File to YouTube Video
- Part 2: How to Edit Audio with YouTube Video Editor
Part 1: Add your Own Audio File to YouTube Video
Tools You Are Going to Need
YouTube video editor is far from meeting the needs of people who want to have more control on their audio. On the bright side, if you are interested in learning how to edit audio on YouTube, there is a solution. There are many video editors in the market that allow you to add your own music or audio files to a video. Windows Movie Maker, iMovie, Adobe Premiere, and Magisto are some of the video editors available for you to choose from. In this guide, we recommend the Wondershare Filmora video editor. Below is a quick tutorial about how to edit audio in Filmora.
 Download Mac Version ](https://tools.techidaily.com/wondershare/filmora/download/ )
Why Should You Choose Wondershare Filmora?
There are many advantages associated with the use of Wondershare Filmora. You will see that it allows you to fully edit any audio file and gain 100% control over your files. It is an integrated solution that lacks nothing in terms of efficiency and quality standards. To be more specific, Filmora offers the following unique features:
- Built-in audio editing tools that allow you to gain full control of your audio in an easy way
- Exclusive audio track that enables you to mute, detach or even de-noise the audio from video
- All audio effects can easily be adjusted with one click only
- The built-in Equalizer is capable enough to create amazing audio effects
- Directly upload your video to YouTube, Facebook or Vimeo from Wondershare Filmora
How to add audio files to YouTube video with Wondershare Filmora
Do you want to know more about audio editing? Please read this article: How to add audio to video.
Step 1 Import Video Clips into Filmora
Filmora supports a wide range of video formats, such as MKV, MOV, AVI, WebM and MP4, you can import the video clip shot with Camera, smartphone or camcorder easily to it.
Step 2 Detach Audio
If you want to edit the original audio of the video, you can choose to split the audio file from the video by using the Audio Detach option on Wondershare Filmora. Then, the audio file will be shown in the audio track, and you can cut or trim it.

Note: If you do not want to keep the original audio file in the video, you can delete it from the audio track directly.
Step 3Add Audio Files
Wondershare Filmora offers you multiple royalty free audio effects and music in its rich audio library. What is more, you can also import your own music or audio file from your computer or iTunes. Of course, you should know that the audio should be royalty free for you to make use of. In a different situation, you cannot upload it and benefit from its quality and nature.
Step 4Edit Audio
In this step, you can adjust the audio volume and pitch, etc. There are multiple options for you to benefit from, including the Audio Equalizer, Music, Mix Audio. In this way, you can make sure that the audio is exactly like you have wanted it to be. For further information as to how you can improve the sound quality of your recorded videos, you can check out: How to improve sound quality of recorded videos.
Step 5Save Your Work and Upload on YouTube
If you are satisfied with your work on the audio file and you wish to publish it, the process is quite simple. You just hit Export and select to upload the video to YouTube. After signing in to your YouTube account, you will be ready to start uploading the audio file.

In case you wish to edit the audio from an already published video, you have to download the video first. Then, you can follow the steps above to edit the audio file in Filmora. As one of the widely used video editing software for YouTubers, Filmora is here to empower your imagination. Just download the free trial version and try it now.

Part 2: How to Edit Audio with YouTube Video Editor
Unfortunately, YouTube does not allow users to upload audio files such as MP3, WAV, etc. Instead, you can only upload audio files which are offered by YouTube in the first place. Since YouTube has got a plentiful audio library, you can find a lot of audio there. In this part, we will show you how to add and edit audio with YouTube Video Editor.
You may also like: How to Add Music to YouTube Videos >>
Note: From 20th September 2017 users will no longer be able to use the complimentary editing suite. Check the best YouTube video editor alternatives from this complete guide. In the following part, I will show you how to add audio track , replace the original audio and adjust the audio position and length as well.
- Step 1: Sign in to your YouTube account
- **Step 2:**Click your profile avatar and select Creator Studio option.
- Step 3: In the left pane, go to Video Manager and then click Videos. In the Videos list, choose the video that you want to add new audio track, and then select Audio from the Edit button.

- Step 4: Now you can add or replace the audio in your video. Here you will find that there are various songs and audio files you can choose from. Click ADD TO VIDEO and the audio track will be added to the video directly.

- Step 5: Now you will see the audio track appears at the bottom of the player. Here you can trim and drag the audio bar to adjust the audio positon and length. To Trim the audio, click the beginning or the end of the audio bar and then drag it to the left or right. After trimming, drag it to meet the target position.

Conclusion
Normally, it would be better to add and edit audio to video before updating to YouTube. In this case, Filmora is highly recommended as one of the best video editor for YouTubers , which provides some royalty free music sound in the Music Library to choose from and also the audio editing tools like remove background noise from the video, add fade in and fade out effects with ease or play the video backward or fast forward.
Richard Bennett
Richard Bennett is a writer and a lover of all things video.
Follow @Richard Bennett
Richard Bennett
Mar 27, 2024• Proven solutions
In this article, we are going to show you how to edit audio with YouTube Video Editor, and the tips on adding your own audio file to YouTube.
- Part 1: Add your Own Audio File to YouTube Video
- Part 2: How to Edit Audio with YouTube Video Editor
Part 1: Add your Own Audio File to YouTube Video
Tools You Are Going to Need
YouTube video editor is far from meeting the needs of people who want to have more control on their audio. On the bright side, if you are interested in learning how to edit audio on YouTube, there is a solution. There are many video editors in the market that allow you to add your own music or audio files to a video. Windows Movie Maker, iMovie, Adobe Premiere, and Magisto are some of the video editors available for you to choose from. In this guide, we recommend the Wondershare Filmora video editor. Below is a quick tutorial about how to edit audio in Filmora.
Download Mac Version ](https://tools.techidaily.com/wondershare/filmora/download/ )
Why Should You Choose Wondershare Filmora?
There are many advantages associated with the use of Wondershare Filmora. You will see that it allows you to fully edit any audio file and gain 100% control over your files. It is an integrated solution that lacks nothing in terms of efficiency and quality standards. To be more specific, Filmora offers the following unique features:
- Built-in audio editing tools that allow you to gain full control of your audio in an easy way
- Exclusive audio track that enables you to mute, detach or even de-noise the audio from video
- All audio effects can easily be adjusted with one click only
- The built-in Equalizer is capable enough to create amazing audio effects
- Directly upload your video to YouTube, Facebook or Vimeo from Wondershare Filmora
How to add audio files to YouTube video with Wondershare Filmora
Do you want to know more about audio editing? Please read this article: How to add audio to video.
Step 1 Import Video Clips into Filmora
Filmora supports a wide range of video formats, such as MKV, MOV, AVI, WebM and MP4, you can import the video clip shot with Camera, smartphone or camcorder easily to it.
Step 2 Detach Audio
If you want to edit the original audio of the video, you can choose to split the audio file from the video by using the Audio Detach option on Wondershare Filmora. Then, the audio file will be shown in the audio track, and you can cut or trim it.
Note: If you do not want to keep the original audio file in the video, you can delete it from the audio track directly.
Step 3Add Audio Files
Wondershare Filmora offers you multiple royalty free audio effects and music in its rich audio library. What is more, you can also import your own music or audio file from your computer or iTunes. Of course, you should know that the audio should be royalty free for you to make use of. In a different situation, you cannot upload it and benefit from its quality and nature.
Step 4Edit Audio
In this step, you can adjust the audio volume and pitch, etc. There are multiple options for you to benefit from, including the Audio Equalizer, Music, Mix Audio. In this way, you can make sure that the audio is exactly like you have wanted it to be. For further information as to how you can improve the sound quality of your recorded videos, you can check out: How to improve sound quality of recorded videos.
Step 5Save Your Work and Upload on YouTube
If you are satisfied with your work on the audio file and you wish to publish it, the process is quite simple. You just hit Export and select to upload the video to YouTube. After signing in to your YouTube account, you will be ready to start uploading the audio file.
In case you wish to edit the audio from an already published video, you have to download the video first. Then, you can follow the steps above to edit the audio file in Filmora. As one of the widely used video editing software for YouTubers, Filmora is here to empower your imagination. Just download the free trial version and try it now.
Part 2: How to Edit Audio with YouTube Video Editor
Unfortunately, YouTube does not allow users to upload audio files such as MP3, WAV, etc. Instead, you can only upload audio files which are offered by YouTube in the first place. Since YouTube has got a plentiful audio library, you can find a lot of audio there. In this part, we will show you how to add and edit audio with YouTube Video Editor.
You may also like: How to Add Music to YouTube Videos >>
Note: From 20th September 2017 users will no longer be able to use the complimentary editing suite. Check the best YouTube video editor alternatives from this complete guide. In the following part, I will show you how to add audio track , replace the original audio and adjust the audio position and length as well.
- Step 1: Sign in to your YouTube account
- **Step 2:**Click your profile avatar and select Creator Studio option.
- Step 3: In the left pane, go to Video Manager and then click Videos. In the Videos list, choose the video that you want to add new audio track, and then select Audio from the Edit button.
- Step 4: Now you can add or replace the audio in your video. Here you will find that there are various songs and audio files you can choose from. Click ADD TO VIDEO and the audio track will be added to the video directly.
- Step 5: Now you will see the audio track appears at the bottom of the player. Here you can trim and drag the audio bar to adjust the audio positon and length. To Trim the audio, click the beginning or the end of the audio bar and then drag it to the left or right. After trimming, drag it to meet the target position.
Conclusion
Normally, it would be better to add and edit audio to video before updating to YouTube. In this case, Filmora is highly recommended as one of the best video editor for YouTubers , which provides some royalty free music sound in the Music Library to choose from and also the audio editing tools like remove background noise from the video, add fade in and fade out effects with ease or play the video backward or fast forward.
Richard Bennett
Richard Bennett is a writer and a lover of all things video.
Follow @Richard Bennett
Also read:
- [New] 15+ Best iPhone/iPad Video Editing Tools in Free Market
- Navigating the World of MP4 Edits on Apple Devices
- 2024 Approved Efficient Video Marketing Incorporating Timestamps Effectively
- Harness the Full Potential of Your YouTube Content Using WMM
- Accelerated Steps to Rearrange YouTube Music Ordering
- Mastering Revenue on YouTube Shorts
- From Conference Call to YouTube Stream - How To Broadcast Google Meet
- Prime Line-Up The Best 9 Free YouTube Logo Makers Reviewed
- [New] Adding Subtitles A Step-by-Step YouTube Video Approach
- Maximize Engagement The Ultimate List of YouTube Growth Tactics
- Concluding Your Channel on YouTube - Expert Guides & Templates for 2024
- Strategies to Elevate Your Video in the Trending Topics
- Expert Recommendations Top 15 No-Cost Audiosite Collections
- [New] Deciphers for Digital Content Creators YouTube's Keyword Techniques
- Post Youtube Video on the Best Days to Get More View
- 2024 Approved Creating Stunning YouTube Openings - Best Tools List
- Is your OnePlus Ace 2V working too slow? Heres how you can hard reset it | Dr.fone
- In 2024, A Step-By-Step Journey to PC Live Streams – Master TikTok LIVE
- How PGSharp Save You from Ban While Spoofing Pokemon Go On Vivo Y27 5G? | Dr.fone
- How To Revive Your Bricked Xiaomi 14 in Minutes | Dr.fone
- [New] 2024 Approved Television Innovation Integrating FB Live Experiences
- New In 2024, Unleash Your Creativity 7 Best Animation Drawing Software for Artists
- In 2024, Achieving Economical Data Management with Cloud Services
- In 2024, FRP Hijacker by Hagard Download and Bypass your Infinix Zero 5G 2023 Turbo FRP Locks
- Life360 Circle Everything You Need to Know On Tecno Phantom V Fold | Dr.fone
- In 2024, Top Discord Recording Apps for Mobile & Desktop
- Title: "[Updated] A Compreehed Guide to Online Identity YouTube Account Setup"
- Author: Steven
- Created at : 2024-05-25 20:42:56
- Updated at : 2024-05-26 20:42:56
- Link: https://youtube-clips.techidaily.com/updated-a-compreehed-guide-to-online-identity-youtube-account-setup/
- License: This work is licensed under CC BY-NC-SA 4.0.
