
![[Updated] A Compreayer's Primer to Navigating the Online Copyright Labyrinth](https://www.lifewire.com/thmb/6snoLQ_LDr7duuZviMh6Lev3NmI=/400x300/filters:no_upscale():max_bytes(150000):strip_icc()/weatherapps-iphone-featured-5b73c68146e0fb0050215076.jpg)
[Updated] A Compreayer's Primer to Navigating the Online Copyright Labyrinth
A Compreayer’s Primer to Navigating the Online Copyright Labyrinth
The Ultimate Guide to YouTube Copyright

Richard Bennett
Nov 01, 2022• Proven solutions
One of the trickiest terrains for new YouTubers to navigate is the land of copyright rules.
We get it, it’s confusing and stressful, especially when what you want to focus on is making videos, but instead, you are worried about getting your account terminated or being sued.
Can you or can’t you use that song or that clip from the movie? That’s all you want to know.
In this article, we are going to address the key areas that YouTubers need to understand when it comes to YouTube copyright. What is okay and what isn’t? What may be considered risky or what would be worth taking a chance?
Remember that everything discussed in this article is only best practices and shouldn’t be taken as definitive legal advice.
Now that we are set, let’s dive in:
Part 1: What is Fair Use?
When we talk about YouTube copyright, we have to talk about fair use.
Without fair use, there wouldn’t be any flexibility for creators. There wouldn’t be mashups, parodies, or lip dubs. Without fair use, any video with copyright content such as music in the background or a reference to a scene from a famous movie will require approval from the content owner and can be removed. Because of fair use, you can publish a video with copyrighted material in it and not have to ask anyone.
Think of fair use as exceptions to copyright rules.
Part 2: What YouTube Considers Fair Use
There are a few aspects YouTube looks at when it comes to determining whether creators are using copyrighted content that meets the fair use exceptions.
- Is the copyrighted content being creatively or purposefully used?
- Are there more original content used than copyrighted content in the video?
- Will your video benefit the original copyrighted content?
Part 3: Types of Content That Meet Fair Use
Some acceptable styles of videos that allow you to exercise fair use are:
Critiques and Reviews: You can use clips of a movie that you review or play a chorus from a song that you are analyzing in a video and it will be okay to use because it’s serving a purpose of educating the viewer.
Tutorials and Commentary: A YouTube gamer streaming the video games and making comments throughout, that is within fair use, because it can be said that it is giving the video game exposure. Additionally, anything that can be classified as tutorials can also fall under fair use. If you have a video teaching people how to play a famous song, like The Beatles’ Let It Be , on piano, that’s fine!
Mashups: Mashups tend to be built entirely out of copyrighted material, but when done well this style of videos are very creative and often serve to promote the original work as opposed to replacing it.
There couldn’t be two more different movies than Toy Story and Fight Club, but somehow thanks the the creativity of a YouTube creator, there is a now a mashup of it. Some might call it an abomination, but this type of recycled art takes skills and planning, and it wouldn’t exist without fair use.
Parody: Imitation for comedic or dramatic effect is an artistic pursuit as long as it is done in a transformative manner. What does transformative mean? It means in some way, the original is being examined.
In this example from The Hillywood Show, we see a parody of both BBC’s Sherlock Holmes and Macklemore & Ryan Lewis’s Thrift Shop. The nuisance of the show and song recreated are there, but nobody who enjoys the originals will sit down and appreciate it in the same way. A parody is in no way trying to replace the original, but rather using the subject, structure, and style of the original as a vessel to another creative work.
Part 4: What To Do When You Get a YouTube Copyright Strike
If you are reading this, you may have already gotten a YouTube copyright strike.
This may have surprised you. Don’t be too concerned. If it was a mistake, the copyright strike merely acts as a warning, letting you know that the content in your video is copyrighted material.
However, if you were to get 3 copyright strikes in 90 days, you may be penalized by:
- Having all your accounts and videos removed
- Not being able to create a new channel
So what should you do? Here are the steps to take after you receive a copyright strike:
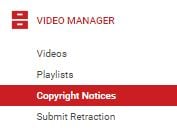
- Review the copyright strike by going into Creator Studio > Video Manager > Copyright notice
- Click on the “Copyright Strike” link beside the flagged video to see details
- Decide how to respond to the strike:
- Allow the strike to expire after 90 days and complete the YouTube’s copyright school
- Contact the person who reported your video and get the claim retracted
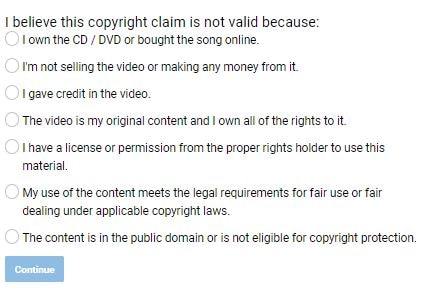
- Dispute the claim with a counter notification
Part 5: 5 Ways to Avoid Copyright Strike
It’s not always clear what YouTube deems fair use, but there are a few things you can do to improve your chances of meeting the qualification.
1. Use non-fictional copyright content instead of creative and fictional copyrighted content. You’ll have a better chance of meeting fair use if you use footages from a news broadcast than you would from a movie or television show.
The intent is clear when using non-fictional copyright content, such as in Bad Lip Reading. They aren’t trying to rebroadcast the Mark Zuckerberg integration, they are parodying it. The easier it is for the public to recognize that the content is from a source, and understand that the creator isn’t trying to take credit for it, the more likely it’ll pass the fair use qualification.
However, if Bad Lip Reading posted the content without lip dubbing, then one can argue that they are taking views away from the original news sources and that wouldn’t be fair use.
2. Make sure your video with copyrighted content isn’t replacing the original one. Only use enough of the source material to get your point across and ensure you are not negatively affecting the original through views and sales.
In this example from Screen Prism, we see scenes from Wes Anderson movies all through the video, however, it is not replacing any of the original films. In fact, you can say that because of this video, people will be motivated to go and watch a Wes Anderson movie, those benefiting the original creator.
3. The copyrighted material is essential to your video. Whether the copyrighted content is needed in order to illustrate a point or if that one moment from a well-recognized movie helps tie together the message, as long as the copyrighted material is serving the video in some significant way, then it will be consider fair use.
4. Give the original creator credit. Just because you give the original creator credit doesn’t mean you can rightfully use their content, however, it does give you a better chance at avoiding copyright strike. Most often, the original creators simply want credit for their work. If they see that you have noted that the content was made by them, it will only give them more exposure.
5. Keep it short. There is no precise number of seconds or ratio of copyrighted to original footage you should have in your video to qualify as fair use. But generally, if the copyrighted clip is short and/or broken up, then it stands a better chance at being approved by YouTube.
Part 6: What to Do When Other YouTubers Are Copying Your Content
As a new YouTuber, it’s a little freaky to think that someone is taking your content and republishing it or using your creations in their video without your permission.
If you ever notice that your content is being copied without your approval — if they have duplicated your video completely or is using your video without giving credit — and it is not benefiting your channel in any way, don’t worry, YouTube is designed to protect you.
Steps to Report Copyright Infringements on YouTube
- View the video that contains your copyrighted material.
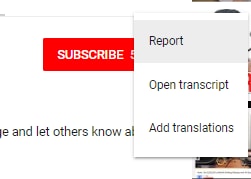
- Click on “Report”
- Select “Infringes my rights” in the pop up window and click “infringes my copyright” in the dropdown options.

- Supply additional information to the report form, including the URL of the video infringing your copyrighted content and the URL of your own video.
- Submit report and wait for an email confirmation that the infringing content has been removed.
Part 7: YouTube Copyright Match
In 2018, YouTube launched a new feature called Copyright Match Tool, which automatically finds videos that are very similar or the same as the ones you’ve created. This gives you the power to determine what to do once you know the video exist.
- You can choose to do nothing.
- You can contact the publisher.
- You can report the video to YouTube for removal.
Key Takeaways
I hope this article has clarified what you can and cannot do with copyrighted content. Here is a quick summary of what we touched on in this post:
- Avoid having 3 copyright strikes on your channel at all costs.
- When using copyrighted material, ensure it is essential to the video and you are not overdoing it.
- Make sure that the copyrighted content does not take views and sales away from the original source.
- Strive to use the copyrighted content in a transformative way, as a parody or a commentary, to educate or inform.
- Give the original creator credit or have it benefit the original by giving more publicity.
- Report any creator that is infringing on your content.
Got any questions on YouTube copyright? Leave a comment below and we’ll help you answer it.
Richard Bennett
Richard Bennett is a writer and a lover of all things video.
Follow @Richard Bennett
Richard Bennett
Nov 01, 2022• Proven solutions
One of the trickiest terrains for new YouTubers to navigate is the land of copyright rules.
We get it, it’s confusing and stressful, especially when what you want to focus on is making videos, but instead, you are worried about getting your account terminated or being sued.
Can you or can’t you use that song or that clip from the movie? That’s all you want to know.
In this article, we are going to address the key areas that YouTubers need to understand when it comes to YouTube copyright. What is okay and what isn’t? What may be considered risky or what would be worth taking a chance?
Remember that everything discussed in this article is only best practices and shouldn’t be taken as definitive legal advice.
Now that we are set, let’s dive in:
Part 1: What is Fair Use?
When we talk about YouTube copyright, we have to talk about fair use.
Without fair use, there wouldn’t be any flexibility for creators. There wouldn’t be mashups, parodies, or lip dubs. Without fair use, any video with copyright content such as music in the background or a reference to a scene from a famous movie will require approval from the content owner and can be removed. Because of fair use, you can publish a video with copyrighted material in it and not have to ask anyone.
Think of fair use as exceptions to copyright rules.
Part 2: What YouTube Considers Fair Use
There are a few aspects YouTube looks at when it comes to determining whether creators are using copyrighted content that meets the fair use exceptions.
- Is the copyrighted content being creatively or purposefully used?
- Are there more original content used than copyrighted content in the video?
- Will your video benefit the original copyrighted content?
Part 3: Types of Content That Meet Fair Use
Some acceptable styles of videos that allow you to exercise fair use are:
Critiques and Reviews: You can use clips of a movie that you review or play a chorus from a song that you are analyzing in a video and it will be okay to use because it’s serving a purpose of educating the viewer.
Tutorials and Commentary: A YouTube gamer streaming the video games and making comments throughout, that is within fair use, because it can be said that it is giving the video game exposure. Additionally, anything that can be classified as tutorials can also fall under fair use. If you have a video teaching people how to play a famous song, like The Beatles’ Let It Be , on piano, that’s fine!
Mashups: Mashups tend to be built entirely out of copyrighted material, but when done well this style of videos are very creative and often serve to promote the original work as opposed to replacing it.
There couldn’t be two more different movies than Toy Story and Fight Club, but somehow thanks the the creativity of a YouTube creator, there is a now a mashup of it. Some might call it an abomination, but this type of recycled art takes skills and planning, and it wouldn’t exist without fair use.
Parody: Imitation for comedic or dramatic effect is an artistic pursuit as long as it is done in a transformative manner. What does transformative mean? It means in some way, the original is being examined.
In this example from The Hillywood Show, we see a parody of both BBC’s Sherlock Holmes and Macklemore & Ryan Lewis’s Thrift Shop. The nuisance of the show and song recreated are there, but nobody who enjoys the originals will sit down and appreciate it in the same way. A parody is in no way trying to replace the original, but rather using the subject, structure, and style of the original as a vessel to another creative work.
Part 4: What To Do When You Get a YouTube Copyright Strike
If you are reading this, you may have already gotten a YouTube copyright strike.
This may have surprised you. Don’t be too concerned. If it was a mistake, the copyright strike merely acts as a warning, letting you know that the content in your video is copyrighted material.
However, if you were to get 3 copyright strikes in 90 days, you may be penalized by:
- Having all your accounts and videos removed
- Not being able to create a new channel
So what should you do? Here are the steps to take after you receive a copyright strike:
- Review the copyright strike by going into Creator Studio > Video Manager > Copyright notice
- Click on the “Copyright Strike” link beside the flagged video to see details
- Decide how to respond to the strike:
- Allow the strike to expire after 90 days and complete the YouTube’s copyright school
- Contact the person who reported your video and get the claim retracted
- Dispute the claim with a counter notification
Part 5: 5 Ways to Avoid Copyright Strike
It’s not always clear what YouTube deems fair use, but there are a few things you can do to improve your chances of meeting the qualification.
1. Use non-fictional copyright content instead of creative and fictional copyrighted content. You’ll have a better chance of meeting fair use if you use footages from a news broadcast than you would from a movie or television show.
The intent is clear when using non-fictional copyright content, such as in Bad Lip Reading. They aren’t trying to rebroadcast the Mark Zuckerberg integration, they are parodying it. The easier it is for the public to recognize that the content is from a source, and understand that the creator isn’t trying to take credit for it, the more likely it’ll pass the fair use qualification.
However, if Bad Lip Reading posted the content without lip dubbing, then one can argue that they are taking views away from the original news sources and that wouldn’t be fair use.
2. Make sure your video with copyrighted content isn’t replacing the original one. Only use enough of the source material to get your point across and ensure you are not negatively affecting the original through views and sales.
In this example from Screen Prism, we see scenes from Wes Anderson movies all through the video, however, it is not replacing any of the original films. In fact, you can say that because of this video, people will be motivated to go and watch a Wes Anderson movie, those benefiting the original creator.
3. The copyrighted material is essential to your video. Whether the copyrighted content is needed in order to illustrate a point or if that one moment from a well-recognized movie helps tie together the message, as long as the copyrighted material is serving the video in some significant way, then it will be consider fair use.
4. Give the original creator credit. Just because you give the original creator credit doesn’t mean you can rightfully use their content, however, it does give you a better chance at avoiding copyright strike. Most often, the original creators simply want credit for their work. If they see that you have noted that the content was made by them, it will only give them more exposure.
5. Keep it short. There is no precise number of seconds or ratio of copyrighted to original footage you should have in your video to qualify as fair use. But generally, if the copyrighted clip is short and/or broken up, then it stands a better chance at being approved by YouTube.
Part 6: What to Do When Other YouTubers Are Copying Your Content
As a new YouTuber, it’s a little freaky to think that someone is taking your content and republishing it or using your creations in their video without your permission.
If you ever notice that your content is being copied without your approval — if they have duplicated your video completely or is using your video without giving credit — and it is not benefiting your channel in any way, don’t worry, YouTube is designed to protect you.
Steps to Report Copyright Infringements on YouTube
- View the video that contains your copyrighted material.
- Click on “Report”
- Select “Infringes my rights” in the pop up window and click “infringes my copyright” in the dropdown options.
- Supply additional information to the report form, including the URL of the video infringing your copyrighted content and the URL of your own video.
- Submit report and wait for an email confirmation that the infringing content has been removed.
Part 7: YouTube Copyright Match
In 2018, YouTube launched a new feature called Copyright Match Tool, which automatically finds videos that are very similar or the same as the ones you’ve created. This gives you the power to determine what to do once you know the video exist.
- You can choose to do nothing.
- You can contact the publisher.
- You can report the video to YouTube for removal.
Key Takeaways
I hope this article has clarified what you can and cannot do with copyrighted content. Here is a quick summary of what we touched on in this post:
- Avoid having 3 copyright strikes on your channel at all costs.
- When using copyrighted material, ensure it is essential to the video and you are not overdoing it.
- Make sure that the copyrighted content does not take views and sales away from the original source.
- Strive to use the copyrighted content in a transformative way, as a parody or a commentary, to educate or inform.
- Give the original creator credit or have it benefit the original by giving more publicity.
- Report any creator that is infringing on your content.
Got any questions on YouTube copyright? Leave a comment below and we’ll help you answer it.
Richard Bennett
Richard Bennett is a writer and a lover of all things video.
Follow @Richard Bennett
Enhancing Your YouTube Content with Right Camera Gear
A Vlogger’s Guide To Camera Lenses
Richard Bennett
Nov 01, 2022• Proven solutions
The staple of any vlog is the talking headshot, a shot of the speaker talking directly to the audience. You can compose this shot with different kinds of lenses for your interchangeable lens camera.
But which kind of lens is the right lens for you as a vlogger?
In this article, I’m going to help you figure that out.
- Part 1: Three Focal Length Groups: Wide, Standard, Telephoto
- Part 2: Vlogging With Each Focal Length Group
- Part 3: Crop Factor
- Part 4: Focal Length Equivalency Table
- Part 5: Aperture
- Part 6: Vlogging With a Fast Lens
- Part 7: Optical Image Stabilization
Three Focal Length Groups: Wide, Standard, Telephoto
There are three main ranges in focal lengths that camera lenses can be categorized into wide, standard, and telephoto.
Wide-Angle Lens
Wide-angle lenses can “see more.” They allow more of your scene to fit inside your frame. Objects that are closer to the lens appear much bigger while objects that are further away appear even smaller. Perspectives are also enhanced, making close objects and people that just make it into the sides of the frame appear more stretched out. Out of all the other ranges in focal lengths, wide-angle lenses will appear the least zoomed in.
Standard Lens
With standard lenses or normal lenses, you won’t get the stretched out objects or enhanced perspectives that you get from wide-angle lenses. Instead, standard lenses are meant to see scenes as the natural human eye is meant to see them. If you shoot a scene with both a wide-angle lens and a standard lens from the same position, you’ll notice that less of the scene fits into your frame. Standard lenses will appear more zoomed-in than wide-angle lenses, but less zoomed-in than telephoto lenses.
Telephoto Lens
Out of all the other ranges in focal lengths, telephoto lenses will appear the most zoomed in. This can be beneficial for the shooter who wants to get a closer shot of a scene without having to physically be in close proximity to the scene. Objects that are further away in the background also appear larger and closer than they would appear on wide-angle or standard lenses.
Vlogging With Each Focal Length Group
You can get your talking head footage using lenses from any of the three focal length groups. Depending on how you plan to vlog most of the time, though, one of the three focal lengths might be more suitable for you.
When to vlog with a wide-angle lens
Wide-angle lenses are the most commonly used lenses for vlogging. Wide-angle lenses are great when you need to be close to your camera. This might be the case for you if your recording space is small or if you want to film yourself as you hold your camera up with your own hand.
Being close to your camera not only gives you the option to use your camera’s built-in microphone, but it also gives you the option to make use of camera-mounted shotgun microphones.
When to vlog with a standard lens
Standard lenses are great when you have more space to be further away from your camera. The perspectives in your shot will look more natural through a standard lens, making your talking head footage feel more corporate or professional. You’ll also be able to get blurrier backgrounds using a standard lens versus a wide-angle lens.
Being further away from your camera, however, means that you’ll have to use a separate microphone positioned closer to you.
When to vlog with a telephoto lens
As telephoto lenses are even more zoomed in, you’ll need to be even further away from your camera to fit yourself inside your camera frame. Why would any vlogger ever need to be that far away from their camera? One word… teleprompter. If you want or need to stick to a script, you’ll have to be far away enough from your camera that it doesn’t appear like your eyes are scanning left to right. You then close in the distance with a telephoto lens.
In the above video, Marcos Rocha compares different focal lengths for talking head videos. Which focal length range do you like the look of?
Crop Factor
Focal lengths in camera lenses are measured in millimeters. You can vlog yourself handheld with a 24mm lens on a camera with a full-frame sensor (the sensor is the piece of hardware inside your camera that turns the light it receives into a digital image). But if you use a 24mm lens on a camera with a smaller sensor, like an APS-C sensor or even smaller Micro 4/3 sensor, more of you will get cropped out (see below).

In order to make up for the cropping that occurs, you will need to use a wider lens on cameras with smaller sensors to get the same shot you’d get with a full-frame camera.
Focal Length Equivalency Table
This table shows you the focal lengths needed to achieve the same shot between cameras with different sensor sizes. In order to take a shot as wide as the shot I took of myself with the 24mm lens on my full-frame camera, I would need a 15mm lens on an APS-C sensor camera or a 12mm lens on a micro 4/3 camera.
| Focal Length / Sensor | Full Frame | APS-C | Micro 4/3 |
|---|---|---|---|
| Wide (Handheld Selfie-Safe) | 16mm | 10mm | 8mm |
| Wide (Handheld Selfie-Safe) | 18mm | 11mm | 9mm |
| Wide (Handheld Selfie-Safe) | 24mm | 15mm | 12mm |
| Wide | 35mm | 22mm | 18mm |
| Standard | 50mm | 31mm | 25mm |
| Telephoto | 70mm | 44mm | 35mm |
| Telephoto | 100mm | 63mm | 50mm |
| Telephoto | 200mm | 125mm | 100mm |
Aperture

The next thing to consider when you’re looking for a lens is the aperture, the hole (often adjustable) within the lens that lets light in. Aperture for camera lenses is measured in f-stops (f/1.4, f/1.8, f/2.0) - the smaller the f-stop number, the larger the aperture (bigger hole letting even more light in).

Because larger aperture lenses let more light in, they need a shorter time for cameras to compose an image. This is why larger aperture lenses are also called “fast” lenses.
Fast lenses are more expensive because they cost more to produce. There’s a lot more that goes into them, including larger and higher quality glass elements.
But do you even need a fast lens?
Vlogging With a Fast Lens
Pros of Vlogging With a Fast Lens
- Better low-light performance
- Better autofocus performance
- Better “bokeh” (out-of-focus areas, like your background, having that nice blurry look that you see in a lot of movies)
Cons of Vlogging With a Fast Lens
- More expensive
- Moving subjects more likely to get out of focus when shooting with a large aperture
- Better continuous autofocus performance needed when shooting moving subjects with a large aperture
Optical Image Stabilization
Finally, you’ll have to decide whether or not you want your lens to have built-in optical image stabilization (OIS).
OIS is very beneficial to have on a lens if you’re a vlogger who films mostly handheld footage. Although this technology adds to the price of your lens as well, it can greatly help you to capture smoother footage that may otherwise be shaky. Nikon calls this technology “Vibration Reduction” (VR) for their lenses.
In the above video, you can see how much OIS can help to stabilize your footage. MicBergsma simultaneously compares the footage between two GoPro Hero5 Blacks, one with OIS on and one with OIS off.
If, however, you are shooting most of your vlogs on a tripod, you won’t need a lens with OIS.
Looking for ways to set up your talking-head shot for YouTube with any of these lenses? Check out our post on 4 Ways To Set Up Your Talking-Head Shots For YouTube .
Richard Bennett
Richard Bennett is a writer and a lover of all things video.
Follow @Richard Bennett
Richard Bennett
Nov 01, 2022• Proven solutions
The staple of any vlog is the talking headshot, a shot of the speaker talking directly to the audience. You can compose this shot with different kinds of lenses for your interchangeable lens camera.
But which kind of lens is the right lens for you as a vlogger?
In this article, I’m going to help you figure that out.
- Part 1: Three Focal Length Groups: Wide, Standard, Telephoto
- Part 2: Vlogging With Each Focal Length Group
- Part 3: Crop Factor
- Part 4: Focal Length Equivalency Table
- Part 5: Aperture
- Part 6: Vlogging With a Fast Lens
- Part 7: Optical Image Stabilization
Three Focal Length Groups: Wide, Standard, Telephoto
There are three main ranges in focal lengths that camera lenses can be categorized into wide, standard, and telephoto.
Wide-Angle Lens
Wide-angle lenses can “see more.” They allow more of your scene to fit inside your frame. Objects that are closer to the lens appear much bigger while objects that are further away appear even smaller. Perspectives are also enhanced, making close objects and people that just make it into the sides of the frame appear more stretched out. Out of all the other ranges in focal lengths, wide-angle lenses will appear the least zoomed in.
Standard Lens
With standard lenses or normal lenses, you won’t get the stretched out objects or enhanced perspectives that you get from wide-angle lenses. Instead, standard lenses are meant to see scenes as the natural human eye is meant to see them. If you shoot a scene with both a wide-angle lens and a standard lens from the same position, you’ll notice that less of the scene fits into your frame. Standard lenses will appear more zoomed-in than wide-angle lenses, but less zoomed-in than telephoto lenses.
Telephoto Lens
Out of all the other ranges in focal lengths, telephoto lenses will appear the most zoomed in. This can be beneficial for the shooter who wants to get a closer shot of a scene without having to physically be in close proximity to the scene. Objects that are further away in the background also appear larger and closer than they would appear on wide-angle or standard lenses.
Vlogging With Each Focal Length Group
You can get your talking head footage using lenses from any of the three focal length groups. Depending on how you plan to vlog most of the time, though, one of the three focal lengths might be more suitable for you.
When to vlog with a wide-angle lens
Wide-angle lenses are the most commonly used lenses for vlogging. Wide-angle lenses are great when you need to be close to your camera. This might be the case for you if your recording space is small or if you want to film yourself as you hold your camera up with your own hand.
Being close to your camera not only gives you the option to use your camera’s built-in microphone, but it also gives you the option to make use of camera-mounted shotgun microphones.
When to vlog with a standard lens
Standard lenses are great when you have more space to be further away from your camera. The perspectives in your shot will look more natural through a standard lens, making your talking head footage feel more corporate or professional. You’ll also be able to get blurrier backgrounds using a standard lens versus a wide-angle lens.
Being further away from your camera, however, means that you’ll have to use a separate microphone positioned closer to you.
When to vlog with a telephoto lens
As telephoto lenses are even more zoomed in, you’ll need to be even further away from your camera to fit yourself inside your camera frame. Why would any vlogger ever need to be that far away from their camera? One word… teleprompter. If you want or need to stick to a script, you’ll have to be far away enough from your camera that it doesn’t appear like your eyes are scanning left to right. You then close in the distance with a telephoto lens.
In the above video, Marcos Rocha compares different focal lengths for talking head videos. Which focal length range do you like the look of?
Crop Factor
Focal lengths in camera lenses are measured in millimeters. You can vlog yourself handheld with a 24mm lens on a camera with a full-frame sensor (the sensor is the piece of hardware inside your camera that turns the light it receives into a digital image). But if you use a 24mm lens on a camera with a smaller sensor, like an APS-C sensor or even smaller Micro 4/3 sensor, more of you will get cropped out (see below).
In order to make up for the cropping that occurs, you will need to use a wider lens on cameras with smaller sensors to get the same shot you’d get with a full-frame camera.
Focal Length Equivalency Table
This table shows you the focal lengths needed to achieve the same shot between cameras with different sensor sizes. In order to take a shot as wide as the shot I took of myself with the 24mm lens on my full-frame camera, I would need a 15mm lens on an APS-C sensor camera or a 12mm lens on a micro 4/3 camera.
| Focal Length / Sensor | Full Frame | APS-C | Micro 4/3 |
|---|---|---|---|
| Wide (Handheld Selfie-Safe) | 16mm | 10mm | 8mm |
| Wide (Handheld Selfie-Safe) | 18mm | 11mm | 9mm |
| Wide (Handheld Selfie-Safe) | 24mm | 15mm | 12mm |
| Wide | 35mm | 22mm | 18mm |
| Standard | 50mm | 31mm | 25mm |
| Telephoto | 70mm | 44mm | 35mm |
| Telephoto | 100mm | 63mm | 50mm |
| Telephoto | 200mm | 125mm | 100mm |
Aperture
The next thing to consider when you’re looking for a lens is the aperture, the hole (often adjustable) within the lens that lets light in. Aperture for camera lenses is measured in f-stops (f/1.4, f/1.8, f/2.0) - the smaller the f-stop number, the larger the aperture (bigger hole letting even more light in).
Because larger aperture lenses let more light in, they need a shorter time for cameras to compose an image. This is why larger aperture lenses are also called “fast” lenses.
Fast lenses are more expensive because they cost more to produce. There’s a lot more that goes into them, including larger and higher quality glass elements.
But do you even need a fast lens?
Vlogging With a Fast Lens
Pros of Vlogging With a Fast Lens
- Better low-light performance
- Better autofocus performance
- Better “bokeh” (out-of-focus areas, like your background, having that nice blurry look that you see in a lot of movies)
Cons of Vlogging With a Fast Lens
- More expensive
- Moving subjects more likely to get out of focus when shooting with a large aperture
- Better continuous autofocus performance needed when shooting moving subjects with a large aperture
Optical Image Stabilization
Finally, you’ll have to decide whether or not you want your lens to have built-in optical image stabilization (OIS).
OIS is very beneficial to have on a lens if you’re a vlogger who films mostly handheld footage. Although this technology adds to the price of your lens as well, it can greatly help you to capture smoother footage that may otherwise be shaky. Nikon calls this technology “Vibration Reduction” (VR) for their lenses.
In the above video, you can see how much OIS can help to stabilize your footage. MicBergsma simultaneously compares the footage between two GoPro Hero5 Blacks, one with OIS on and one with OIS off.
If, however, you are shooting most of your vlogs on a tripod, you won’t need a lens with OIS.
Looking for ways to set up your talking-head shot for YouTube with any of these lenses? Check out our post on 4 Ways To Set Up Your Talking-Head Shots For YouTube .
Richard Bennett
Richard Bennett is a writer and a lover of all things video.
Follow @Richard Bennett
Also read:
- [Updated] A Compreayer's Guide to Monetizing Videos Critical View Figures
- In 2024, Enjoy Every Frame Best Free Download Apps for Mobile Devices
- Discover The 10 Best Yoga Platforms For Enhanced Fitness for 2024
- 2024 Approved Cultivating a Visionary Channel with Best Video Ideas
- [Updated] Discover Websites Your Gateway to YouTube Branded Content
- In 2024, Discover the Joy of Animated Journeys YouTube's Best for Everyday
- [Updated] Culinary Champions Must-Subscribe Food Bloggers
- [New] 10 Best YouTube Makeup Artists You Should Follow
- 5 Frosty Yet Inviting Backdrops for Your Vids
- Boost Your Video Impact Expert Tips on Using WM Maker
- In 2024, Charting the Course for YouTube Music Uploads
- In 2024, Enhancing Outreach with Strategic Partner Selection on YouTube
- [New] Can Subtle Strategies Trump Directly Buying Views for Content Creators?
- Streamlined Collaborations Amplifying Your Video Impact
- [Updated] Discover Device-Friendly Ways to Locate Your YT Comments
- The Smart Way to Enhance Your YouTube Presence Legally
- Elevating YouTube Performance Consistency in CC Usage
- Maximize YouTube Traction Affordable Audience Expansion
- Mastering Multitasking Sync Many YT Videos Simultaneously
- SheGames Legends YouTube's Number One Ten
- [New] Dancefloor Dynamics Top-Rated DJ Video Selections
- 2024 Approved Discover the Art of YouTube Playlist Shuffling
- 1 Choice Transcribe YouTube Videos in a Flash
- [New] Driving Engagement and Growth The Role of Brand in YouTube Success
- [Updated] Alternatives That Shine Top 27 Non-YouTube Videostreaming Sites
- [New] Enhancing Visual Impact of YouTube Thumbnails - Neon Edition
- Elevate Video Consumption Constructing an Ideal 'Watch Later' List on YouTube for 2024
- [New] 8 Essential Tools for Your YouTube-to-AVI Needs
- Harvest Cost-Free Visuals From Leading 4 YouTube Hubs
- Crafting Engaging Gamers' Banners Using Pre-Made Themes
- CarryMinati Financial Triumphs with Ajey Nagar for 2024
- In 2024, Easy-Peasy YouTube Tutorials Making Content That Works for All
- Elevate Thumbnail Imagery Fantasy Landscapes & Effects Guide
- 2024 Approved Decoding Video Thread Embellishments
- [Updated] Creative Commons Legalities Explained Simply
- [New] Avoiding Common Pitfalls in PC-Based YouTube Video Editing
- [Updated] Channel Progression Reach and Maintain 10K Viewer Threshold
- Relax, Revel and Rewind with YouTube's Best Films
- Cutting-Edge Voice Altering Apps for Vloggers for 2024
- In 2024, Elevating Video Sharing From YouTube to Insta
- In 2024, Building a Sustainable Income via YouTube and AdSense
- Advanced Strategies for YouTube Audio Editing Mastery for 2024
- [Updated] Customize and Upload Longer YouTube Content
- [Updated] Essential Guide Top 10 Free YouTube-to-MP3 Tools
- Earnings on YouTube The Crucial Number of Video Views for Money for 2024
- [Updated] A Step-by-Step Guide for Creating Channel Trailers that Convert Viewers Into Customers
- [New] Brevity in Action Shortening YouTube Video Content
- 5 Quick Methods to Bypass Vivo Y100i Power 5G FRP
- The Thread That Binds Fabric Fixing in a Feature-Rich App for 2024
- 2024 Approved Building a Vivid World with Animated Clips in Movie Maker
- How To Repair System Issues of Apple iPhone 11 Pro? | Dr.fone
- In 2024, Pokemon Go Error 12 Failed to Detect Location On Samsung Galaxy F15 5G? | Dr.fone
- Sizing Up Success How YouTube Aspect Ratios Influence Video Style and Engagement
- [New] ScreenFlow Mastery on macOS Uncovered for 2024
- New In 2024, Videopad Review Is This Video Editor Right for You?
- Updated Get Talking The Best Free Speech-to-Text Apps for Mac That Dont Require a Download for 2024
- [New] Top 6 Sustainable MC Base Designs
- Prime Low-End PC Capture Programs Reviewed for 2024
- 2024 Approved Enhance Your Recordings Noise Reduction Mastery with Adobe Audition
- Exploring Excellence 2024'S Leading Camera Lenses Ranked #1-10
- Updated The 6 Most Popular Video Editors for Windows Users for 2024
- A Peek Into VegasPro's Future
- In 2024, A Comprehensive Guide to iPhone 6s Plus Blacklist Removal Tips and Tools | Dr.fone
- In 2024, Life360 Learn How Everything Works On Infinix Note 30 5G | Dr.fone
- ZoomInnovateX7 Advanced Imagery Enlargement
- 5 Ways to Restart Lenovo ThinkPhone Without Power Button | Dr.fone
- [Updated] In 2024, MyVideoCapture Social Media Video Download
- New 2024 Approved Innovative Top 10 Applications for Switching Masculine and Feminine Vocal Traits
- Title: [Updated] A Compreayer's Primer to Navigating the Online Copyright Labyrinth
- Author: Steven
- Created at : 2024-05-25 20:42:55
- Updated at : 2024-05-26 20:42:55
- Link: https://youtube-clips.techidaily.com/updated-a-compreayers-primer-to-navigating-the-online-copyright-labyrinth/
- License: This work is licensed under CC BY-NC-SA 4.0.
