
:max_bytes(150000):strip_icc()/GettyImages-1249645232-9755e2057d9b44a089bc7086603d8f4c.jpg)
Unveiling the Top Ten YouTube Music Reaction Stars
Unveiling the Top Ten YouTube Music Reaction Stars
Create High-Quality Video - Wondershare Filmora
An easy and powerful YouTube video editor
Numerous video and audio effects to choose from
Detailed tutorials are provided by the official channel
Reaction videos are slowly taking over YouTube as the most popular type of channel. Everyone loves when someone reacts to something, and it can be anything from music, games, trending topics, or even random things like orange juice. They are so popular that people tag their friends to react to the series.
Music reaction videos are becoming increasingly more popular. Instead of a standard lyric video, music reaction videos show a fan listening and singing to their favorite album or single from start to finish. There are tons of fan-made music reaction videos on YouTube, but some get hundreds of thousands or even millions of views!
In this article
01 What is a music reaction video?
02 10 Best YouTube Music Reaction Video
03 How to make a Youtube music reaction video with Filmora
What is a music reaction video?
When you are on YouTube, you will see many music reaction videos. The music reaction video is the video that is based on the song. According to the situation, the person who uploads the video reacts to the song and does something funny or crazy. Many people enjoy watching these kinds of videos because they are funny and entertaining in many ways.
The best thing about these videos is that you can learn from them. You can learn how to react in certain situations, but these situations might arise only once in your life. So, it is good to react to these funny videos and make yourself aware of what should be done in such a situation.
You can even make your music reaction video and share it with your friends on social media platforms like Facebook, Twitter, and Instagram. People will love it and appreciate it, and you can also learn how to make these kinds of videos by watching other people’s reactions.
10 Best YouTube Music Reaction Video
#1. [BANGTAN BOMB] ‘Dynamite’ MV Reaction
In this video, a famous Korean Band named BTS reacts to many different music videos from the past. People love to see their reactions, and the video has over 25M views on Youtube.
#2. Rappers React to Rich Brian ft. Ghostface Killah, Desiigner, Tory Lanez & More
In this video, many street rappers react to many famous rappers and give their views about them. The video became quite popular on Youtube and got 23M+ views.
#3. Dixie D’Amelio’s Family and Friends React to her Be Happy Music Video
In this video, many people who are relatives of Dixie D’Amelio react to her music video. She recorded the reach of each one of them and shared it with the youtube community. The video got over 20M views on youtube.
#4. Elders React To Lil Dicky - Earth
In this video, many elders react to the Lil Dick’s Music video. Their reactions are quite amusing to the audience, and the video got over 19M views on Youtube.
#5. Kids React To Eminem
In this video, some kids react to the Eminem rap music videos and give their views about rap. Some of them are amused by the rap, and some of them find it difficult to understand. Overall their reaction is worth watching. The video got over 13M views on Youtube.
#6. Do Teens Know 90s Hip Hop?
In this video, many teens listen to ‘90s hip-hop music videos, and their reactions are recorded. They are familiar with some of the songs, and some are totally new and amusing to them. The video got over 11M Views on Youtube.
#7. Big Shaq - Mans Not Hot (Music Video)- Reaction
In this video, a couple of friends react to the Mans Not Hot Music video and record their reactions. They have reacted to the video quite funny, and their reactions are very amusing. People enjoy watching their reactions. The video has over 11M views on Youtube.
#8 BTS React To Fans Watching “Boy With Luv” Music Video For The First Time
In this video, The famous Koran Band BTS reacts to their fan’s videos, watching Boy With Luv Music video for the first time. So, in this video, you will see the reaction of BTS to the reaction of their fans. The video was a hit on Youtube, and it got over 9M views.
#9 “Don’t Forget” Minecraft FNAF Animation Music Video
This is a reaction mashup video in which a lot of creators are reacting to the Don’t forget music video. You rarely get to see soo many reactions in a single video. The video is a hit and has over 9M views on Youtube.
#10 Youtubers React To Top 10 Most Disliked Music Videos Of All Time
In this video, many YouTubers react to the top 10 most disliked music videos in Youtube’s history. Their reactions are priceless, and this video is definitely worth watching. The video has over 6M views on Youtube.
How to make a Youtube music reaction video with Filmora
Reaction videos are the latest trend in the world of YouTube. So many people want to create their own reaction videos but either doesn’t have the skills to do so or don’t know how to get started. This guide should give you everything you need to get started on creating your very next reaction video.
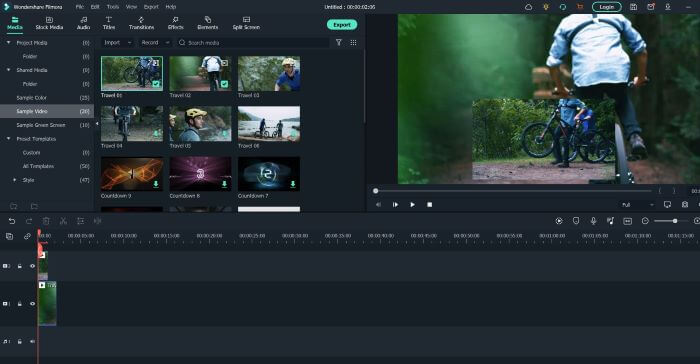
Step 1: First of all, make sure that you have downloaded and installed the latest version of Filmora on your computer. If you haven’t already downloaded it, then you can install it from their official website.
Step 2: Run the Filmora software and when a window appears on your screen, click on the new project and select the 16:9 aspect ratio of your project.
Step 3: Now first, you need to record your reaction to a music video . You can use Filmora’s Built-In screen recorder to record your reaction along with your cam. You can also record your reactions separately and then merge them with the original music video using Filmora.
Step 4: Now import the music video on which you want to react to the Filmora library along with your reaction video. You can do this by clicking on the file, import, and import media.
Step 5: Now drag the music video from the Library and drop it into the Filmora timeline.
Step 6: Now drag your reaction video and drop it above the original music video in the track.
Step 7: Decrease the size of your reaction video by using the canvas controls in the preview window and adjusting it to any side of the window.
Step 8: If you want to keep your reaction video in a big frame and your music video in a small one, you can do the opposite.
Step 9: If you want to add any effects or call-outs to your video, you can use the rich elements library of Filmora, where you can find hundreds of interactive elements.
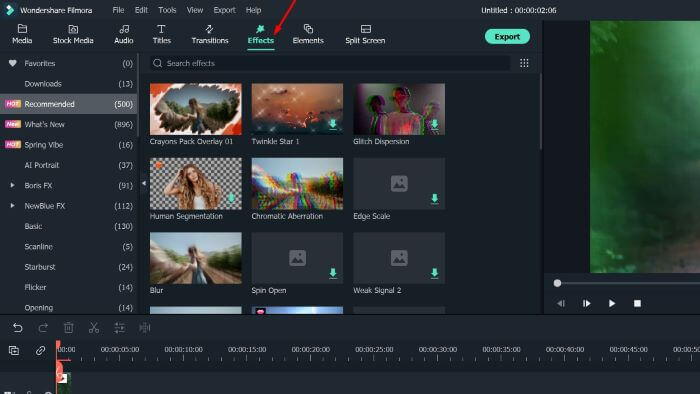
Step 10: Once you have finalized the video, click on the import button and save the video to your computer in your desired format. Once the video is imported, you can share it on Youtube with your audience.
For Win 7 or later (64-bit)
For macOS 10.12 or later
Conclusion
● By following the steps above and using Filmora, you will be able to produce a high-quality music reaction video that can be shared with family, friends, or even your favorite artists. All of the steps above may look complicated when separated into different actions, but they became much easier and quicker when completed together and practiced in order.
Reaction videos are slowly taking over YouTube as the most popular type of channel. Everyone loves when someone reacts to something, and it can be anything from music, games, trending topics, or even random things like orange juice. They are so popular that people tag their friends to react to the series.
Music reaction videos are becoming increasingly more popular. Instead of a standard lyric video, music reaction videos show a fan listening and singing to their favorite album or single from start to finish. There are tons of fan-made music reaction videos on YouTube, but some get hundreds of thousands or even millions of views!
In this article
01 What is a music reaction video?
02 10 Best YouTube Music Reaction Video
03 How to make a Youtube music reaction video with Filmora
What is a music reaction video?
When you are on YouTube, you will see many music reaction videos. The music reaction video is the video that is based on the song. According to the situation, the person who uploads the video reacts to the song and does something funny or crazy. Many people enjoy watching these kinds of videos because they are funny and entertaining in many ways.
The best thing about these videos is that you can learn from them. You can learn how to react in certain situations, but these situations might arise only once in your life. So, it is good to react to these funny videos and make yourself aware of what should be done in such a situation.
You can even make your music reaction video and share it with your friends on social media platforms like Facebook, Twitter, and Instagram. People will love it and appreciate it, and you can also learn how to make these kinds of videos by watching other people’s reactions.
10 Best YouTube Music Reaction Video
#1. [BANGTAN BOMB] ‘Dynamite’ MV Reaction
In this video, a famous Korean Band named BTS reacts to many different music videos from the past. People love to see their reactions, and the video has over 25M views on Youtube.
#2. Rappers React to Rich Brian ft. Ghostface Killah, Desiigner, Tory Lanez & More
In this video, many street rappers react to many famous rappers and give their views about them. The video became quite popular on Youtube and got 23M+ views.
#3. Dixie D’Amelio’s Family and Friends React to her Be Happy Music Video
In this video, many people who are relatives of Dixie D’Amelio react to her music video. She recorded the reach of each one of them and shared it with the youtube community. The video got over 20M views on youtube.
#4. Elders React To Lil Dicky - Earth
In this video, many elders react to the Lil Dick’s Music video. Their reactions are quite amusing to the audience, and the video got over 19M views on Youtube.
#5. Kids React To Eminem
In this video, some kids react to the Eminem rap music videos and give their views about rap. Some of them are amused by the rap, and some of them find it difficult to understand. Overall their reaction is worth watching. The video got over 13M views on Youtube.
#6. Do Teens Know 90s Hip Hop?
In this video, many teens listen to ‘90s hip-hop music videos, and their reactions are recorded. They are familiar with some of the songs, and some are totally new and amusing to them. The video got over 11M Views on Youtube.
#7. Big Shaq - Mans Not Hot (Music Video)- Reaction
In this video, a couple of friends react to the Mans Not Hot Music video and record their reactions. They have reacted to the video quite funny, and their reactions are very amusing. People enjoy watching their reactions. The video has over 11M views on Youtube.
#8 BTS React To Fans Watching “Boy With Luv” Music Video For The First Time
In this video, The famous Koran Band BTS reacts to their fan’s videos, watching Boy With Luv Music video for the first time. So, in this video, you will see the reaction of BTS to the reaction of their fans. The video was a hit on Youtube, and it got over 9M views.
#9 “Don’t Forget” Minecraft FNAF Animation Music Video
This is a reaction mashup video in which a lot of creators are reacting to the Don’t forget music video. You rarely get to see soo many reactions in a single video. The video is a hit and has over 9M views on Youtube.
#10 Youtubers React To Top 10 Most Disliked Music Videos Of All Time
In this video, many YouTubers react to the top 10 most disliked music videos in Youtube’s history. Their reactions are priceless, and this video is definitely worth watching. The video has over 6M views on Youtube.
How to make a Youtube music reaction video with Filmora
Reaction videos are the latest trend in the world of YouTube. So many people want to create their own reaction videos but either doesn’t have the skills to do so or don’t know how to get started. This guide should give you everything you need to get started on creating your very next reaction video.
Step 1: First of all, make sure that you have downloaded and installed the latest version of Filmora on your computer. If you haven’t already downloaded it, then you can install it from their official website.
Step 2: Run the Filmora software and when a window appears on your screen, click on the new project and select the 16:9 aspect ratio of your project.
Step 3: Now first, you need to record your reaction to a music video . You can use Filmora’s Built-In screen recorder to record your reaction along with your cam. You can also record your reactions separately and then merge them with the original music video using Filmora.
Step 4: Now import the music video on which you want to react to the Filmora library along with your reaction video. You can do this by clicking on the file, import, and import media.
Step 5: Now drag the music video from the Library and drop it into the Filmora timeline.
Step 6: Now drag your reaction video and drop it above the original music video in the track.
Step 7: Decrease the size of your reaction video by using the canvas controls in the preview window and adjusting it to any side of the window.
Step 8: If you want to keep your reaction video in a big frame and your music video in a small one, you can do the opposite.
Step 9: If you want to add any effects or call-outs to your video, you can use the rich elements library of Filmora, where you can find hundreds of interactive elements.
Step 10: Once you have finalized the video, click on the import button and save the video to your computer in your desired format. Once the video is imported, you can share it on Youtube with your audience.
For Win 7 or later (64-bit)
For macOS 10.12 or later
Conclusion
● By following the steps above and using Filmora, you will be able to produce a high-quality music reaction video that can be shared with family, friends, or even your favorite artists. All of the steps above may look complicated when separated into different actions, but they became much easier and quicker when completed together and practiced in order.
Adding Visual Time Indicators to Your YouTube Links
How to Add Timestamps on YouTube Video Link?

Richard Bennett
Mar 27, 2024• Proven solutions
It is a well-known fact that internet users have a short interest span, about just eight seconds. This attention span applies to all internet platforms including YouTube. YouTube is the second largest and most visited search engine after Google. It provides users with information through engaging and eye-catchy videos. However, certain videos are longer where only a particular section of the video holds the important information. Viewers tend to skip the long videos and if you do not want this to happen to you, you can link to that specific part on your video adding value for your channel viewers with a link known as the YouTube Timestamp link.
When you have a Timestamp link on your video, you can help your viewers directly reach the specific time in the video. This helps avoid the viewers from losing interest or to search for the key part in your video themselves.
Here in this article, we will explain Timestamp links, how to add Timestamp to YouTube video links, and what are the benefits of Timestamp.
- Part 1: YouTube Timestamp Links Introduction
- Part 2: Adding a Timestamp to YouTube Video Link on Desktop
- Part 3: How to Share Specific Parts of YouTube Video
- part 4: Getting YouTube Timestamp Link on Mobile
- Part 5: FAQ About YouTube Timestamps
Part 1: What is YouTube Timestamp Links
In this fast-paced world where viewers have limited time at hand, YouTube Timestamp links are extremely helpful. These links are anchor text or video hyperlinks found either in the description beneath the video or at the video link end.

The Timestamps links allow you to put a link to a key moment in your YouTube video allowing the viewers and subscribers to view the video at the precise time specified. Your YouTube video maybe half an hour long or maybe your users do not have the time now or forget to later watch your video, but when you add Timestamp to the YouTube link, you provide them ways to get to the content quickly enhancing the user experience.
In addition to this, you can even provide a reference in minutes and hours where necessary. The YouTube Timestamp link acts as a guide that directs viewers to the part of the video, which is most relevant to them without having to watch the entire video.
Part 2: How to Add a Timestamp to YouTube Video Link on Desktop?
In the following section, I will show you how to add timestamp to YouTube video link in several ways.
Use YouTube’s Share Feature
Using YouTube’s share feature is the simplest way to add Timestamp to YouTube videos. Here are easy steps to follow to do this.
- Open the YouTube video on your desktop that you want to share.
- Play the video or navigate the timeline and stop at the key moment you wish to apply the timestamp to.
- Now click on the Share button, a pop-up will appear. Under the URL, you will see a small box indicating Start at. The Timestamp is generated automatically, but you can adjust it.

- Copy the updated URL with Timestamp to share the video or click on the social sharing icons to do so.
- When your viewers click on this URL, the video will begin at the specified Timestamp.
Use the Browser URL to add Timestamp manually
You can add Timestamp manually as well. Follow the step-by-step guide below to add a Timestamp manually.
- Open your YouTube video in a browser on your desktop and then find the URL in the browser’s address bar.
- Enter the specific time you want the viewers to watch the video from at the end of the video URL.
You can add time manually in two ways depending on the URL.
?t=As or
&t=As
“youtu.be/” Format
If your YouTube video link is a youtu.be format, then just add ?t=As at the end of the video link. The A denotes the seconds at which you want the viewer to watch your video. The time can also be specified in minutes and seconds and when you want to do that just add ?t=AmBs. For instance, ?t=2m40s.
“youtube.com/” Format
When your YouTube video link has a youtube.com format, the adjustment starts with an ampersand. &t=As or &t=AmBs is what you can use. If you are looking to add the Timestamp at 2m40s, just add “&t=2m40s at the end of the video URL.
Whenever anybody uses the URL with Timestamp, the video will start from the specified time.
However, when adding a Timestamp manually, always leave include whole numbers. For example, if the time starts at 4m, use 4 and not 04.
Copy video URL at current time
You can use YouTube’s built-in feature to share the key parts of your YouTube video. Follow the steps here.
- Visit YouTube and open the video you want to add Timestamp link to.
- Play the video or navigate the timeline to reach the specific part you like to use in Timestamp.
- Now either press Ctrl + click or right-click anywhere on the video. A pop-up opens where you can see various texts, click on the Copy video URL at current time and share the link.

- Anyone who clicks on this link will be instantly transported to the exact segment of your YouTube video.
Part 3: How to Share Specific Parts of Videos with Vibby and Get YouTube Link with Timestamp
The above-mentioned methods to add and send YouTube link with timestamp are quick and easy, but they have a few limitations. If you need more control and share highlighted parts of YouTube video without cutting the video, you need to use a third-party tool known as Vibby.
Vibby allows you to not only share specific parts of videos from YouTube but other platforms as well like Vimeo and Twitch. With the tool, you can clip multiple sections of the video and share them with others.
- To get started, signup either with mail, Google, Twitter, Facebook, or Twitch account.
- Once signed in, go to Create vib at the top left corner and then paste the URL of the YouTube video you would like to share and then click on the Start button.

- Your video will load in the Vibby editor, now click on Highlight the parts to share.
- Here you will see the Start highlight button, jump 5-sec option, option to switch between HD and SD video quality, and volume control button. Navigate to the part you want to share and click on Start highlight.

- When you reach the end of the part, click on Finish highlight. Repeat the process to highlight multiple parts of the video. All the highlighted parts will appear in a list on the right side of the screen.
- Add a description to each part and format it, you have the option to preview before hitting the Save vib button.
- Name the vib and assign a category and then publish it to Vibby or make it a private vib.
- You get a dedicated link to your vib with the ability to embed it on your website or blog.
In this way, you can share the highlights of the YouTube video or Vimeo video easily.
Part 4: How to Get YouTube Timestamp Link on iPhone and Android?
Linking to specific YouTube Timestamp Link is straightforward on both iPhone and Android.
- Go to YouTube and select the video you want to share.
- Move through the progress bar of the video to reach the key part and click on the Share button.
- A pop-up menu appears, highlight the URL and click on the Copy button.
- Paste the URL and manually add the Timestamp using the steps mentioned in add a Timestamp manually.
Part 5: Is Timestamp Beneficial for your Video?
Timestamping your YouTube videos may decrease the watch time, but it enhances the user experience, and they want to see more of your videos. Apart from this, adding Timestamps to your videos make your videos discoverable through Google search. YouTube and Google will reward you for the videos in form of a high search engine ranking.
Bonus: How to Add YouTube Timestamp Link in YouTube Video Description
Adding a YouTube Timestamp link in your video description is easy. Here are the steps to do so.
- Go to your YouTube channel and select the video you want to add Timestamp to and then navigate to the description below it.
- Edit the description by clicking on the Edit Video button.
- You are redirected to the Video Details page. Here write 0:00 at the first part of the timecode, and then continue with the time of the key part of the video you want to add the Timestamp to in 2:40 format. You can add more Timestamp as well and then click on the Save button.

- Reload the video page and you will see auto-generated Timestamp Links at the specific time you provided in the description.
Note: You need to add at least three timestamps which are 10 seconds or longer in order to add timestamps successfully.
Conclusion
As much as possible YouTubers want to make videos short and to the point. However, if a video needs to be longer, you can still help users navigate through to find what is important to them by adding Timestamp to YouTube link or Timestamp the YouTube descriptions. This can help your viewers jump straight to the interesting part in the video, rather than viewing the entire video saving their time and boost user experience.
Richard Bennett
Richard Bennett is a writer and a lover of all things video.
Follow @Richard Bennett
Richard Bennett
Mar 27, 2024• Proven solutions
It is a well-known fact that internet users have a short interest span, about just eight seconds. This attention span applies to all internet platforms including YouTube. YouTube is the second largest and most visited search engine after Google. It provides users with information through engaging and eye-catchy videos. However, certain videos are longer where only a particular section of the video holds the important information. Viewers tend to skip the long videos and if you do not want this to happen to you, you can link to that specific part on your video adding value for your channel viewers with a link known as the YouTube Timestamp link.
When you have a Timestamp link on your video, you can help your viewers directly reach the specific time in the video. This helps avoid the viewers from losing interest or to search for the key part in your video themselves.
Here in this article, we will explain Timestamp links, how to add Timestamp to YouTube video links, and what are the benefits of Timestamp.
- Part 1: YouTube Timestamp Links Introduction
- Part 2: Adding a Timestamp to YouTube Video Link on Desktop
- Part 3: How to Share Specific Parts of YouTube Video
- part 4: Getting YouTube Timestamp Link on Mobile
- Part 5: FAQ About YouTube Timestamps
Part 1: What is YouTube Timestamp Links
In this fast-paced world where viewers have limited time at hand, YouTube Timestamp links are extremely helpful. These links are anchor text or video hyperlinks found either in the description beneath the video or at the video link end.
The Timestamps links allow you to put a link to a key moment in your YouTube video allowing the viewers and subscribers to view the video at the precise time specified. Your YouTube video maybe half an hour long or maybe your users do not have the time now or forget to later watch your video, but when you add Timestamp to the YouTube link, you provide them ways to get to the content quickly enhancing the user experience.
In addition to this, you can even provide a reference in minutes and hours where necessary. The YouTube Timestamp link acts as a guide that directs viewers to the part of the video, which is most relevant to them without having to watch the entire video.
Part 2: How to Add a Timestamp to YouTube Video Link on Desktop?
In the following section, I will show you how to add timestamp to YouTube video link in several ways.
Use YouTube’s Share Feature
Using YouTube’s share feature is the simplest way to add Timestamp to YouTube videos. Here are easy steps to follow to do this.
- Open the YouTube video on your desktop that you want to share.
- Play the video or navigate the timeline and stop at the key moment you wish to apply the timestamp to.
- Now click on the Share button, a pop-up will appear. Under the URL, you will see a small box indicating Start at. The Timestamp is generated automatically, but you can adjust it.
- Copy the updated URL with Timestamp to share the video or click on the social sharing icons to do so.
- When your viewers click on this URL, the video will begin at the specified Timestamp.
Use the Browser URL to add Timestamp manually
You can add Timestamp manually as well. Follow the step-by-step guide below to add a Timestamp manually.
- Open your YouTube video in a browser on your desktop and then find the URL in the browser’s address bar.
- Enter the specific time you want the viewers to watch the video from at the end of the video URL.
You can add time manually in two ways depending on the URL.
?t=As or
&t=As
“youtu.be/” Format
If your YouTube video link is a youtu.be format, then just add ?t=As at the end of the video link. The A denotes the seconds at which you want the viewer to watch your video. The time can also be specified in minutes and seconds and when you want to do that just add ?t=AmBs. For instance, ?t=2m40s.
“youtube.com/” Format
When your YouTube video link has a youtube.com format, the adjustment starts with an ampersand. &t=As or &t=AmBs is what you can use. If you are looking to add the Timestamp at 2m40s, just add “&t=2m40s at the end of the video URL.
Whenever anybody uses the URL with Timestamp, the video will start from the specified time.
However, when adding a Timestamp manually, always leave include whole numbers. For example, if the time starts at 4m, use 4 and not 04.
Copy video URL at current time
You can use YouTube’s built-in feature to share the key parts of your YouTube video. Follow the steps here.
- Visit YouTube and open the video you want to add Timestamp link to.
- Play the video or navigate the timeline to reach the specific part you like to use in Timestamp.
- Now either press Ctrl + click or right-click anywhere on the video. A pop-up opens where you can see various texts, click on the Copy video URL at current time and share the link.
- Anyone who clicks on this link will be instantly transported to the exact segment of your YouTube video.
Part 3: How to Share Specific Parts of Videos with Vibby and Get YouTube Link with Timestamp
The above-mentioned methods to add and send YouTube link with timestamp are quick and easy, but they have a few limitations. If you need more control and share highlighted parts of YouTube video without cutting the video, you need to use a third-party tool known as Vibby.
Vibby allows you to not only share specific parts of videos from YouTube but other platforms as well like Vimeo and Twitch. With the tool, you can clip multiple sections of the video and share them with others.
- To get started, signup either with mail, Google, Twitter, Facebook, or Twitch account.
- Once signed in, go to Create vib at the top left corner and then paste the URL of the YouTube video you would like to share and then click on the Start button.
- Your video will load in the Vibby editor, now click on Highlight the parts to share.
- Here you will see the Start highlight button, jump 5-sec option, option to switch between HD and SD video quality, and volume control button. Navigate to the part you want to share and click on Start highlight.
- When you reach the end of the part, click on Finish highlight. Repeat the process to highlight multiple parts of the video. All the highlighted parts will appear in a list on the right side of the screen.
- Add a description to each part and format it, you have the option to preview before hitting the Save vib button.
- Name the vib and assign a category and then publish it to Vibby or make it a private vib.
- You get a dedicated link to your vib with the ability to embed it on your website or blog.
In this way, you can share the highlights of the YouTube video or Vimeo video easily.
Part 4: How to Get YouTube Timestamp Link on iPhone and Android?
Linking to specific YouTube Timestamp Link is straightforward on both iPhone and Android.
- Go to YouTube and select the video you want to share.
- Move through the progress bar of the video to reach the key part and click on the Share button.
- A pop-up menu appears, highlight the URL and click on the Copy button.
- Paste the URL and manually add the Timestamp using the steps mentioned in add a Timestamp manually.
Part 5: Is Timestamp Beneficial for your Video?
Timestamping your YouTube videos may decrease the watch time, but it enhances the user experience, and they want to see more of your videos. Apart from this, adding Timestamps to your videos make your videos discoverable through Google search. YouTube and Google will reward you for the videos in form of a high search engine ranking.
Bonus: How to Add YouTube Timestamp Link in YouTube Video Description
Adding a YouTube Timestamp link in your video description is easy. Here are the steps to do so.
- Go to your YouTube channel and select the video you want to add Timestamp to and then navigate to the description below it.
- Edit the description by clicking on the Edit Video button.
- You are redirected to the Video Details page. Here write 0:00 at the first part of the timecode, and then continue with the time of the key part of the video you want to add the Timestamp to in 2:40 format. You can add more Timestamp as well and then click on the Save button.
- Reload the video page and you will see auto-generated Timestamp Links at the specific time you provided in the description.
Note: You need to add at least three timestamps which are 10 seconds or longer in order to add timestamps successfully.
Conclusion
As much as possible YouTubers want to make videos short and to the point. However, if a video needs to be longer, you can still help users navigate through to find what is important to them by adding Timestamp to YouTube link or Timestamp the YouTube descriptions. This can help your viewers jump straight to the interesting part in the video, rather than viewing the entire video saving their time and boost user experience.
Richard Bennett
Richard Bennett is a writer and a lover of all things video.
Follow @Richard Bennett
Also read:
- The Insider's Blueprint for Finding Hidden YouTube Files
- In 2024, Easy Ways To Get Free Views on YouTube! Alternative Methods
- Charting the Course of Knowledge Best History YT Channels for Students for 2024
- In 2024, Effortless Spotify-to-YouTube Playlist Conversion 5 Must-Have Apps
- Sustainable Traffic Growth Ethical Video Marketing Tips
- 11-Year-Old Video Sensation Unprecedented Wealth Accumulation for 2024
- [New] Adjust Privacy Settings for Secure Online Viewing
- [New] Enhancing Video Quality with Right Lighting
- [Updated] Essential GIF Creation Best Tools Reviewed & Compared
- YouTube Name Genius Mastering Branding with Generators
- The Art of YouTube Video Trailers with Filmora Software
- Unleash Your Content's Potential Organic Growth Tactics
- Deciphering Your Pathway to YouTube's Maker Land
- In 2024, Achieving Youtube Financial Goals via Viewer Statistics
- Enrich YouTube Images With Radiant Neon Effects for 2024
- 2024 Approved Cutting-Edge Methods to Reduce YouTube Video Size
- Enter the World of Online Promotion Exclusive Free YouTube Banner Access
- In 2024, Creating Impact with High-Converting YouTube Advertising Banners
- Influencer Icons The Leading Subscriber Names
- Layout Layers Elevating Your YouTube Videos
- [New] Attract 1,000 Viewers Quickly on YouTube
- [Updated] Cutting-Edge Editing A Roadmap for High-Quality YouTube Sounds
- Become a Livestream King The Best Webcams for YouTube Stars for 2024
- Unlock the Power of Sony Vegas to Enhance Your YouTube Channel
- In 2024, Amplify Engagement Utilizing YouTube Analytics Wisely
- [New] Converting Your Twitch Showcase Into a YouTube Hit
- 2024 Approved Double Down on Viewership YouTube + Twitch Strategy
- [New] Culinary Craftsmanship Innovative Naming for Food Shows
- 2024 Approved Boosting Income with Effective Youtube Short Strategies
- In 2024, Avoiding the Blank Thumbnail Scenario in Shorts
- Channel Boosting Strategies Effortless Sponsorship Securing Tips for 2024
- [Updated] Enter Virtual Realms Top 10 Immersive Videos
- 2024 Guide to Share YouTube Video on Facebook
- In 2024, Achieving Excellence in Work and Online Content
- Enhancing Engagement Through Thoughtful YouTube Tags for 2024
- [New] Create Captivating Sports Videography
- Your Step-by-Step Pathway to Efficient iDevice Video Uploads
- In 2024, The Ultimate List Top-Rated Mac MP3 Tagging Tools Revealed
- In 2024, 8 Ways to Transfer Photos from Infinix Hot 40i to iPhone Easily | Dr.fone
- How to fix iCloud lock on your Apple iPhone 15 and iPad
- In 2024, Ultimate Guide on Vivo V29 Pro FRP Bypass
- [New] Viral Velocity 15 Dynamic Steps to Skyrocketing Follower Count and Fame on Instagram
- Updated 2024 Approved The Best of the Web Vertical Video Editors
- [New] 2024 Approved Snapshots Snatcher App
- New In 2024, Best of the Best Top Webcam Recording Tools for Windows 10
- Photo Frenzy Stories of Popularity
- [Updated] 10 Ways to Make Your Own Hit TikTok Video Responses for 2024
- DVD Creator - Easy and powerful DVD Toolbox. Meet all your DVD needs.
- Prevent Cross-Site Tracking on Xiaomi Mix Fold 3 and Browser | Dr.fone
- 3 Ways to Track Oppo Reno 10 Pro+ 5G without Them Knowing | Dr.fone
- Cutting-Edge Strategies for Recording Slideshows for 2024
- Updated In 2024, Best Online Image Resizers for Perfect Proportions
- Calculating Costs in YouTube Advertising Campaigns
- Updated Elevating Your Videos Atmosphere with Exemplary Instrumental Soundscape
- In 2024, How To Change Country on App Store for Apple iPhone 8 Plus With 7 Methods | Dr.fone
- [New] Decreasing Bitrate in High-Quality OBS
- Astronomy Enthusiasts' Top Website Picklist for 2024
- In 2024, Dose Life360 Notify Me When Someone Checks My Location On Apple iPhone 7? | Dr.fone
- The Magnificent Art of Pokemon Go Streaming On Itel P55? | Dr.fone
- How To Restore a Bricked Google Pixel 8 Pro Back to Operation | Dr.fone
- Exclusive Insight Choosing Among the Top 3 Leading Web Platforms for Enhanced Media Sounds
- Lightning Timelapses on iPhone Reducing Delay
- [Updated] Knowledge Keeper's Guide 10 Top Choices for Lecture Capturers
- New Top Apple Video Editors for Creators for 2024
- Title: Unveiling the Top Ten YouTube Music Reaction Stars
- Author: Steven
- Created at : 2024-05-25 20:41:29
- Updated at : 2024-05-26 20:41:29
- Link: https://youtube-clips.techidaily.com/unveiling-the-top-ten-youtube-music-reaction-stars/
- License: This work is licensed under CC BY-NC-SA 4.0.
