
:max_bytes(150000):strip_icc()/nintendoswitch-5c45c3fcc9e77c000136b598.jpg)
"Unveiling Hidden Gems Top Purchasers of YouTube Creators"
Unveiling Hidden Gems: Top Purchasers of YouTube Creators
Building a following on a YouTube channel to monetize it can be difficult. It is even more difficult to turn it into a full-time occupation, especially if you are a beginner. So, it makes sense buying monetized YouTube channel. When you buy a monetized YouTube channel, it relieves you of the struggle of churning out high-quality content that connects with an audience. You also get a fully functional stream of generating additional income. In this article, we explore the top sites that offer monetized YouTube channel for sale, giving you an easier start on the platform.
YouTube Monetization Editor A cross-platform for editing any kind of videos and add creative effects to make them more attarctive!
Free Download Free Download Learn More

Part 1. Top 10 Sites to Buy Monetized YouTube Channels
Investing in a pre-existing, monetized YouTube channel is a great idea. It saves you time, allowing you to focus on creating quality content. However, make sure you buy a monetized YouTube channel from a reliable seller. Let’s have a look at the top sites to buy monetized YouTube channels:
1. UseViral
This is one of the best options available to buy monetize YouTube channel. They offer precious monetized YouTube channel packages. Your new channel will be ready for monetization with more than 4,000 watch time hours and a 1,000+ subscriber base.

To get your monetized channel, you will be required to fill out a brief questionnaire. Explain your ideal market and video production needs to allow the UseViral team to understand what you are looking for. They let you know what you are paying for any extras.
Price: $599
Customer Rating: 9.5/10
2. SlidesMedia
This is a well-known social media growth strategist that allows you to buy a monetized YouTube channel. The site stands out for offering assistance with growing the YouTube channel and other social media platforms.

SlidesMedia promises to use only human editors on your YouTube channel. They give you a channel with genuine content. You also get the assurance that the content is not bot-generated..
Price: $529 - $2400.
Customer Rating: 9.3/10
3. AudienceGain
AudienceGain is a popular social media marketing platform. They offer a wide range of services, including selling monetized YouTube channels.

With a proven track record, AudienceGain stands out for offering quality customer service. They support you before, during, and after the purchase. They also provide organically grown channels to make sure you are not demonetized.
Price: $ 129 - $390
Customer Rating: 9.5/10
4. Fameswap
This is a flexible marketplace for selling and buying monetized YouTube channels. The site stands out for being selective in the kind of channels it features.

Fameswap offers a safe method of communication between vendors and buyers through an internal messaging system. You can invest in a channel that you are interested in, ranging from topics like fashion and beauty to entertainment and sports.
Price: Customized pricing
Customer Rating: 8.5/10
5. Eazy Viral
Another excellent choice is to buy a monetized YouTube channel. It allows you to choose from numerous channel types. Users also specify the number of subscribers and watch times they want.

Eazy Viral promises quality content that will not infringe on the rights of others. They also make it simple to monetize your videos and safeguard your AdSense account.
Price: $249 - $1100
Customer Rating: 9/10
6. EazySMM
With EazySMM, you get a unique starting point on your YouTube journey. Choose a YouTube monetized channel for sale on a niche you are interested in at a low price to get started.

EazySMM watches over its clients to make sure they are growing organically. They promise genuine channel views and subscriptions. Their services are also quick, delivering monetized channels within 12 to 48 hours of the purchase.
Price: Custom Pricing
Customer Rating: 8/10
7. 123accs
This platform allows you to buy YouTube channels that have not yet made money. You can then monetize the channel since it has already met the YouTube Partner Program eligibility criteria.

123accs offers new and affordable PVA accounts. Therefore, you can use the service to buy a monetized YouTube channel. Available options include 5 PVA accounts, 25 UK followers, 10 US follower accounts, and more.
Price: Custom Pricing
Customer Rating: 8/10
8. PlayerUp
PlayerUp offers monetized YouTube channels for sale in its marketplace. The platform offers authentic and affordable channels that users can rely on.
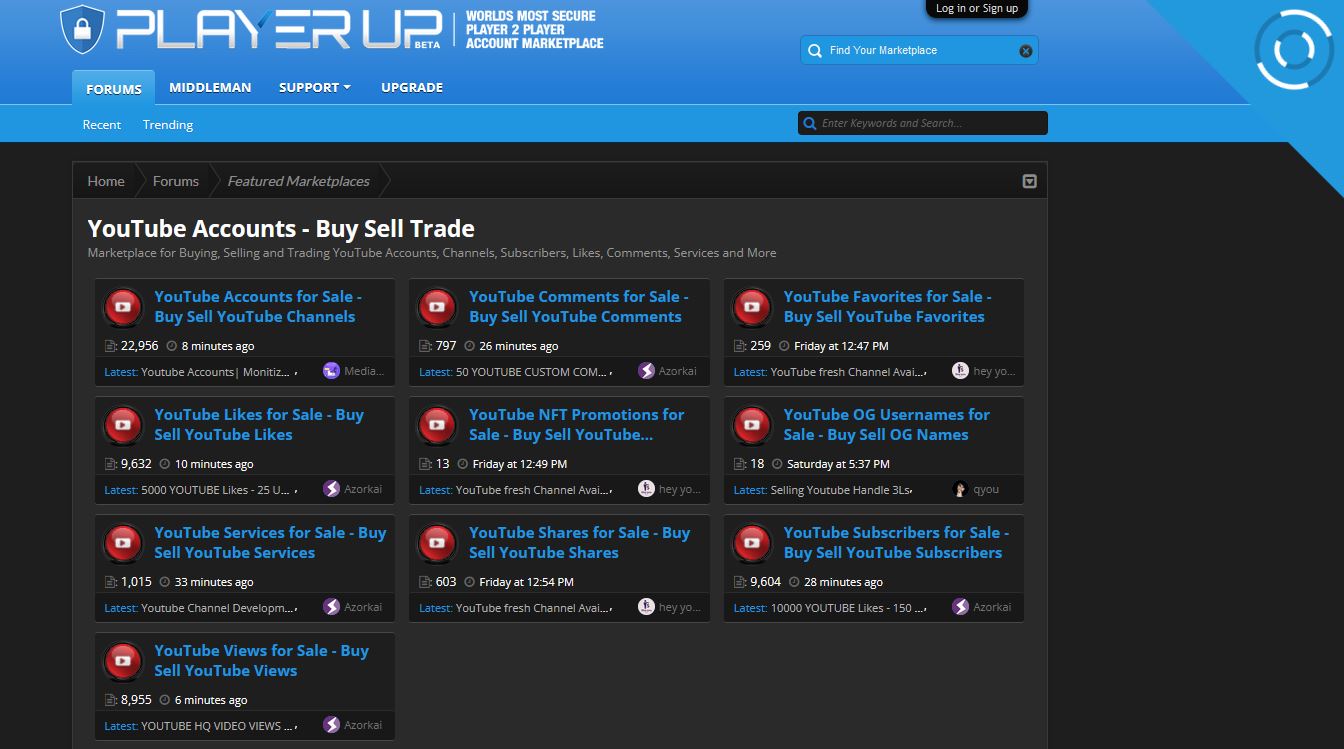
The high quality of the videos posted in the channels under sale will make them stand out in marketing campaigns. This is also a great platform for buying branded content and advanced filters.
Price: Custom Pricing
Customer Rating: 7.5/10
9. Trustiu
This is a great choice for for satisfying shopping experience. The platform makes it easy to purchase YouTube channels almost instantly.

Trustiu stands out for its affordable prices and a wide selection of choices. Users also have the freedom to choose the language they want for their channels.
Price: Custom Pricing
Customer Rating: 7.5/10
10. Accs Market
This social media marketplace allows you to buy monetized YouTube channels in a matter of few steps. Choose channels in entertainment of lifestyle niches.

Accs market offers an affordable option for any type of video genre for sellers. From TV shows to movies, Accs Market has something for you.
Part 2. Editing YouTube Videos for Monetization with Wondershare Filmora
In addition to buying a monetized YouTube channel, you will need to create quality videos to remain relevant. This requires good video editing software. With Wondershare Filmora, you can edit any kind of video and add creative effects to make it more interesting. With the option to edit on your desktop or phone on the go, the software gives you more versatility.
Free Download For Win 7 or later(64-bit)
Free Download For macOS 10.14 or later
Wondershare offers a wide range of features that make video editing fun and easy. From automation tools to video enhancement, you can do a lot to your video on the same platform. The most useful features for YouTube monetization include:
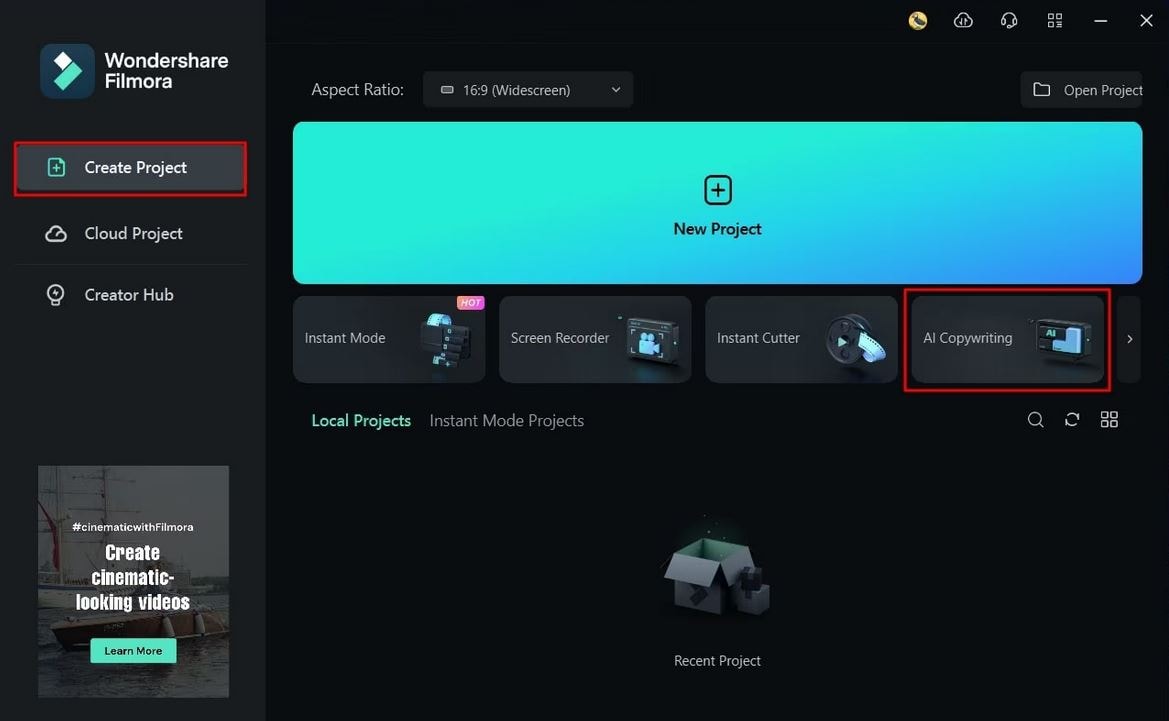
1. AI Copywriting
This feature integrates the ChatGPT API, allowing you to get inspiration through AI-generating scripts. You can also generate text during video editing, as well as YouTube Titles and Descriptions.
2. Auto Synchronization
The auto-synchronization feature allows you to effortlessly match your audio with the video. This makes it sound more clear and gives your audience a better watching experience.

3. Auto Reframe
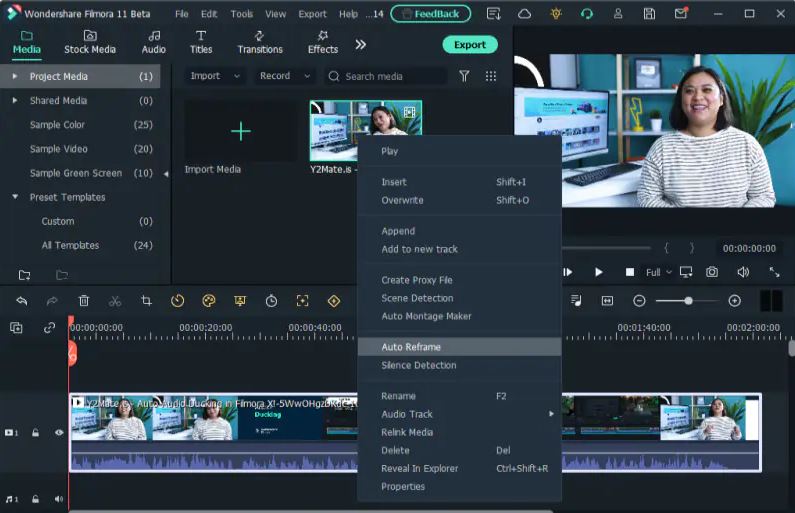
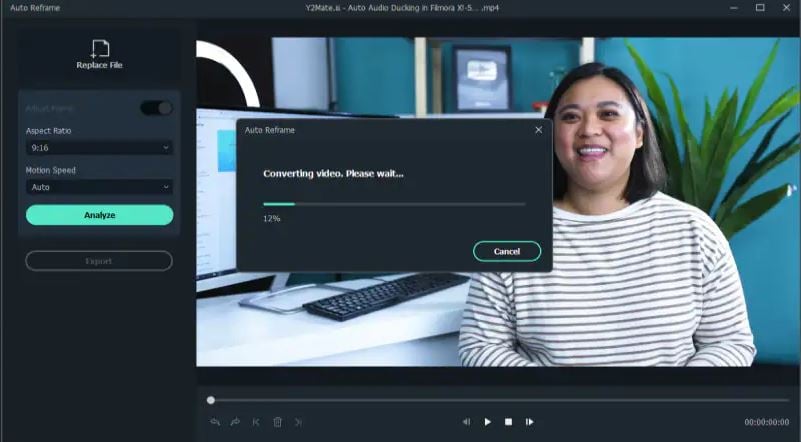
With the rise of YouTube Shorts, reframing your videos is now more of a necessity than an option. You need to appeal to both YouTube viewers and those who consume content in the vertical orientation. The Filmora Auto Reframe feature allows you to automatically resize your videos with no editing skills needed. To use this feature:
Step 1Start the Auto Reframe Feature
One of the ways is by clicking on the Auto Reframe option when you launch Filmora. The other option is to import the media and right-click on it to find the Auto Reframe feature.
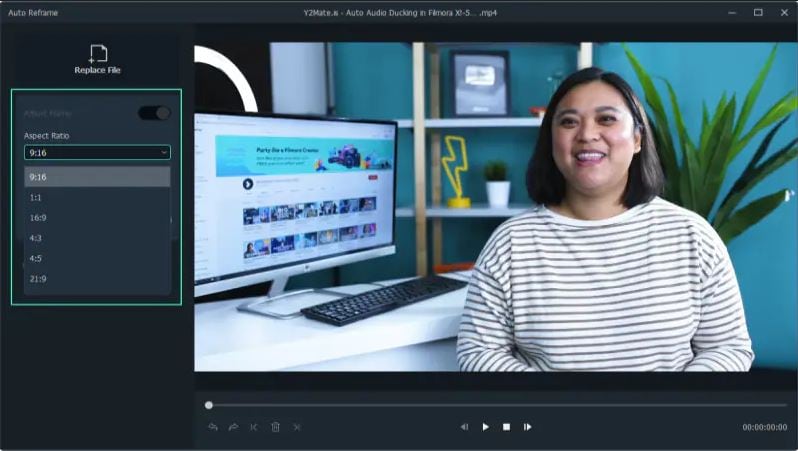
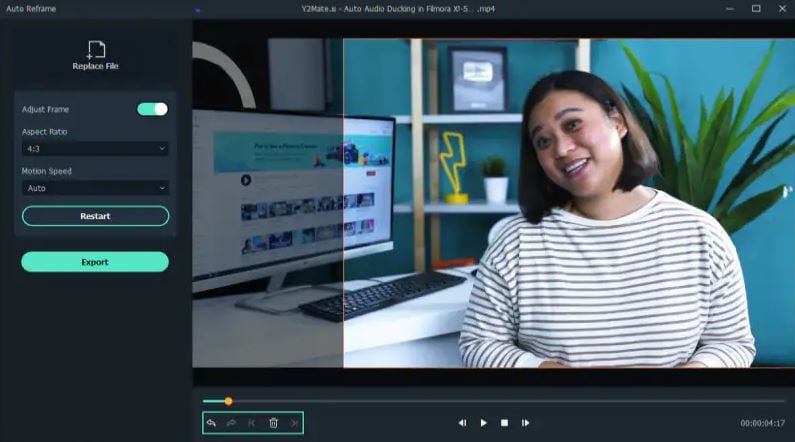
Step 2Adjust the Aspect Ratio and Motion Speed
Define the aspect ratio in the dialogue box that opens. A widescreen has an aspect ratio of 16:9 while a vertical one is 9:16.
Step 3Analyze and Auto Reframe the Video
After adjusting the settings, tap on the Analysis option. This will prompt Filmora to analyze your video for completion. The video will be automatically reframed to your specified aspect ratio and speed.
Step 4Preview and Export the Reframed Video
You can now preview the final video to make sure it runs as desired. Make any changes if necessary, and export the reframed video in MP4 format, ready for uploading to YouTube.
Conclusion
The first step to running a successful channel is to be accepted into the YouTube Partner Program. However, building a YouTube Channel from 0 views to meet the eligibility status can be difficult. That’s why buying a monetized YouTube channel is a great place to start. You will only need to focus on creating highly engaging content to continue earning and growing your channel. To ensure that the content you create is of high quality, we recommend using Wondershare Filmora. The video editing software comes with fantastic features that help you create great videos for your channel.
Free Download Free Download Learn More
Part 1. Top 10 Sites to Buy Monetized YouTube Channels
Investing in a pre-existing, monetized YouTube channel is a great idea. It saves you time, allowing you to focus on creating quality content. However, make sure you buy a monetized YouTube channel from a reliable seller. Let’s have a look at the top sites to buy monetized YouTube channels:
1. UseViral
This is one of the best options available to buy monetize YouTube channel. They offer precious monetized YouTube channel packages. Your new channel will be ready for monetization with more than 4,000 watch time hours and a 1,000+ subscriber base.
To get your monetized channel, you will be required to fill out a brief questionnaire. Explain your ideal market and video production needs to allow the UseViral team to understand what you are looking for. They let you know what you are paying for any extras.
Price: $599
Customer Rating: 9.5/10
2. SlidesMedia
This is a well-known social media growth strategist that allows you to buy a monetized YouTube channel. The site stands out for offering assistance with growing the YouTube channel and other social media platforms.
SlidesMedia promises to use only human editors on your YouTube channel. They give you a channel with genuine content. You also get the assurance that the content is not bot-generated..
Price: $529 - $2400.
Customer Rating: 9.3/10
3. AudienceGain
AudienceGain is a popular social media marketing platform. They offer a wide range of services, including selling monetized YouTube channels.
With a proven track record, AudienceGain stands out for offering quality customer service. They support you before, during, and after the purchase. They also provide organically grown channels to make sure you are not demonetized.
Price: $ 129 - $390
Customer Rating: 9.5/10
4. Fameswap
This is a flexible marketplace for selling and buying monetized YouTube channels. The site stands out for being selective in the kind of channels it features.
Fameswap offers a safe method of communication between vendors and buyers through an internal messaging system. You can invest in a channel that you are interested in, ranging from topics like fashion and beauty to entertainment and sports.
Price: Customized pricing
Customer Rating: 8.5/10
5. Eazy Viral
Another excellent choice is to buy a monetized YouTube channel. It allows you to choose from numerous channel types. Users also specify the number of subscribers and watch times they want.
Eazy Viral promises quality content that will not infringe on the rights of others. They also make it simple to monetize your videos and safeguard your AdSense account.
Price: $249 - $1100
Customer Rating: 9/10
6. EazySMM
With EazySMM, you get a unique starting point on your YouTube journey. Choose a YouTube monetized channel for sale on a niche you are interested in at a low price to get started.
EazySMM watches over its clients to make sure they are growing organically. They promise genuine channel views and subscriptions. Their services are also quick, delivering monetized channels within 12 to 48 hours of the purchase.
Price: Custom Pricing
Customer Rating: 8/10
7. 123accs
This platform allows you to buy YouTube channels that have not yet made money. You can then monetize the channel since it has already met the YouTube Partner Program eligibility criteria.
123accs offers new and affordable PVA accounts. Therefore, you can use the service to buy a monetized YouTube channel. Available options include 5 PVA accounts, 25 UK followers, 10 US follower accounts, and more.
Price: Custom Pricing
Customer Rating: 8/10
8. PlayerUp
PlayerUp offers monetized YouTube channels for sale in its marketplace. The platform offers authentic and affordable channels that users can rely on.
The high quality of the videos posted in the channels under sale will make them stand out in marketing campaigns. This is also a great platform for buying branded content and advanced filters.
Price: Custom Pricing
Customer Rating: 7.5/10
9. Trustiu
This is a great choice for for satisfying shopping experience. The platform makes it easy to purchase YouTube channels almost instantly.
Trustiu stands out for its affordable prices and a wide selection of choices. Users also have the freedom to choose the language they want for their channels.
Price: Custom Pricing
Customer Rating: 7.5/10
10. Accs Market
This social media marketplace allows you to buy monetized YouTube channels in a matter of few steps. Choose channels in entertainment of lifestyle niches.
Accs market offers an affordable option for any type of video genre for sellers. From TV shows to movies, Accs Market has something for you.
Part 2. Editing YouTube Videos for Monetization with Wondershare Filmora
In addition to buying a monetized YouTube channel, you will need to create quality videos to remain relevant. This requires good video editing software. With Wondershare Filmora, you can edit any kind of video and add creative effects to make it more interesting. With the option to edit on your desktop or phone on the go, the software gives you more versatility.
Free Download For Win 7 or later(64-bit)
Free Download For macOS 10.14 or later
Wondershare offers a wide range of features that make video editing fun and easy. From automation tools to video enhancement, you can do a lot to your video on the same platform. The most useful features for YouTube monetization include:
1. AI Copywriting
This feature integrates the ChatGPT API, allowing you to get inspiration through AI-generating scripts. You can also generate text during video editing, as well as YouTube Titles and Descriptions.
2. Auto Synchronization
The auto-synchronization feature allows you to effortlessly match your audio with the video. This makes it sound more clear and gives your audience a better watching experience.
3. Auto Reframe
With the rise of YouTube Shorts, reframing your videos is now more of a necessity than an option. You need to appeal to both YouTube viewers and those who consume content in the vertical orientation. The Filmora Auto Reframe feature allows you to automatically resize your videos with no editing skills needed. To use this feature:
Step 1Start the Auto Reframe Feature
One of the ways is by clicking on the Auto Reframe option when you launch Filmora. The other option is to import the media and right-click on it to find the Auto Reframe feature.
Step 2Adjust the Aspect Ratio and Motion Speed
Define the aspect ratio in the dialogue box that opens. A widescreen has an aspect ratio of 16:9 while a vertical one is 9:16.
Step 3Analyze and Auto Reframe the Video
After adjusting the settings, tap on the Analysis option. This will prompt Filmora to analyze your video for completion. The video will be automatically reframed to your specified aspect ratio and speed.
Step 4Preview and Export the Reframed Video
You can now preview the final video to make sure it runs as desired. Make any changes if necessary, and export the reframed video in MP4 format, ready for uploading to YouTube.
Conclusion
The first step to running a successful channel is to be accepted into the YouTube Partner Program. However, building a YouTube Channel from 0 views to meet the eligibility status can be difficult. That’s why buying a monetized YouTube channel is a great place to start. You will only need to focus on creating highly engaging content to continue earning and growing your channel. To ensure that the content you create is of high quality, we recommend using Wondershare Filmora. The video editing software comes with fantastic features that help you create great videos for your channel.
Streamlining the Editing Process: Elevating Your YouTube Content with PC
How to Edit Videos for YouTube on PC

Richard Bennett
Mar 27, 2024• Proven solutions
To create a successful YouTube video, you need to shoot the video and edit it on Windows or Mac. (You can find the whole processing of making a YouTube video if needed.) If you have always wanted to make your own videos and upload to YouTube to share, but you don’t know the best way to go about, then you shouldn’t miss this article. In the following part, I’ll share with you some best tools that you will need to edit YouTube videos and at the end of it, I’ll show you the detailed steps of how to edit YouTube videos with the video editor Filmora on computer.
- Part 1: Tools you need to edit YouTube videos on PC
- Part 2: Editing Videos for YouTube on PC [Detailed Steps]
Best Tools for Editing YouTube Videos on PC
Before editing, you need to choose a good enough video editor for YouTube video which can combine your footage clips seamlessly and export in high quality. To be honest, there are so many video editing software for YouTube available on the market and quite a number of tools used for editing YouTube videos on PC, some are paid while others are available for free. To save your time in picking the best one, we’ve listed some of the best tools for you to Edit YouTube videos.
Top 3 Recommended Video Editor Tools for Editing YouTube Videos on PC
The following are some of the most versatile video editor tools currently available for editing videos on PC
1. Wondershare Filmora – Best Video Editor for Beginners to Edit YouTube Videos
Filmora is an intuitive video editor with a wide range of advanced tools and video effects. We listed Filmora at the first spot because it is recommended by many users and reviewers as the best video editor for beginners and also provides sophisticated features.
 Download Mac Version ](https://tools.techidaily.com/wondershare/filmora/download/ )
Filmora is a simpler way for those who are serous with editing YouTube videos on PC and Mac and you don’t have to install any other editing tools. As an all in one video editor, Filmora gives you the power to edit audios and videos, record PC screen, edit audio and add custom colors and voice over with a lot of ease. The following are some of the specific benefits and features you will be entitled to when you use Wondershare Filmora to edit YouTube videos on PC and Mac. You can download the trial version to have a try and share with me about your opinion .
Why choose Wondershare Filmora
- Ability to record the screen of your PC together with the voice
- Edit all your audios with audio mixers and equalizers
- Has wonderful filters, overlays, and text effects
- Has a color turning tool to allow you correct white balances and much more
- Let you to upload videos directly to YouTube, Vimeo and Facebook
You may also like:How to Edit YouTube Videos on iPhone >>
2. Window Movie Maker –
Windows Movie Maker is a totally free video editor available for Windows7/8 users, so if you’re a YouTube beginner without no budget for video editing software, you can start with it. It is easy and intuitive to use, though it lacks some of the advanced functionalities needed for professional video editing. After being skilled in video editing, you may need some alternatives to Windows Movie Maker, in this case, check our picks of thebest free video editing software for Windows.

Windows Movie Maker Interface
3. Adobe Premiere Pro –
This is one of the professional video editors available for PC and it is not a free tool. It comes with advanced features and functionalities needed for professional video editing and for you to use it you will have to pay with about $19.99 - $74.99 per month.

Screenshot from Adobe Premiere Pro CC Release Video
Professional Screen Recorder Tools for YouTube Videos
If you are making a tutorial video, a software how-to video or a gameplay video on YouTube, you may also need a screen recording software to record what happening on your computer and show it with your viewers. In this case, we’ve picked some screen recording tools that you may need. Some of them both feature the video editing tools and screen recording tools.
1. Filmora scrn – A high quality screen recorder with editing features.
 -
- 
2. ScreenFlow –ScreenFlow has a free version you could use for high quality screen captures, but for you to get the most from it, you will have to upgrade to the paid versions.
For more information on screen recorders for Windows, kindly check our picks about best screen recorder for YouTub. .
Note: Filmora now also feature a more powerful recording features, so you can now record screen and audio and edit video in one place.
Professional Audio Editors for YouTube Videos Editing
1. Audacity
Audacity has an intuitive user interface, featuring a simple design without unnecessary features to clog things up. Its footprint is relatively small and it can run on PC nonstop. The only thing you won’t like about it is that you will only be able to get as far as bedroom recording with it.
2. WavePad
This audio editor has a fully customizable user interface that will work both for beginners as well as professionals. It is easy to use and will suffice most of your needs as far as editing YouTube videos on PC is concerned.
For more information about audio editing tools and tips, check out How to Add Audio to Video .
Professional Color Grading Tools for YouTube Videos
To adjust the brightness, white balance, tone or apply 3D LUT effects to your video, you can complete all of these in Filmora or use the following color correction software.
Adobe SpeedGrade
When you use this together with Premiere Pro, you will have the fastest color grading experience in the world. The only caveats to using it are that the tracking is not the best and the workflow when using it on Windows is not that streamlined either.
Looking for more professional color grading tools? Check Best Color Grading & Correction Software>>
Part 2: Editing videos for YouTube on PC [Detailed Steps]
Irrespective of the editing software you use, following the steps outlined below will make it is easy for you to edit videos for YouTube on PC. Assuming you already have made your mind on the editing software of choice, use the following steps to edit and export your completed work. To better demonstrate the steps of YouTube video editing, I’ll use Filmra9 video editor to edit YouTube Video.
1.Split or combine your video clips
Most of the editing programs you use will have a timeline view of your work where you can easily cut or drop your shots. Each of the shots taken is actually a separate file which you will have to combine with others to make the video. The split feature in Filmora can cut footage into parts and then you can move it to desired position or just delete the unnecessary part. You can choose any part of the video quickly with the Quick Trim feature in preview. Besides, Filmora supports almost all popular video and photo formats, so there will be no obstacle when you want to combine footage shot with different devices. You can add photos to video or audio to video.

To combine several footages into one, just place all clips in the video track in order. Form the timeline view, move the shots around, cut, trim or shorten them as you desire. You can also add transitions between shots so that your final production may have a professional look.
2. Crop, Rotate, Pan & Zoom
You can rotate the video at any angle at any direction and change the scale of video footage or other transform. If you want viewers to focus on some part of the frame, you can use try the Pan & Zoom feature.

Learn more about How to Zoom in Video After It’s Recorded or Saved?
3.Add texts, Music and other effects

Once the individual shots have been edited into a single video, it is now time for you to add the special effects. This is the time to add stuff such as texts, music and other special effect you may want to see on the video. If you are worried about doing this, just know that you don’t have to be a pro editor to do all these since most of the program will guide you through on how to add all the special effects.
4.Save and export
After you have done with adding all the special effects, choose the file format for saving your video then export it. YouTube accepts major file formats and these include MP4, AVI or WMA hence you will be okay when you use any of them.

Filmora also allows you to upload videos to YouTube platform directly since it will choose the format and frame rate or codec which suit best.
These are the basic steps you will use when you want to edit YouTube videos on PC. Just remember to use the right widescreen format and also render your files in either 1080i or 720p high definition.
YouTuber Jamie Keet from Teacher’s Tech channel has made a tutorial about how to edit videos on Filmora. This video is detailed and let us know if you think it is helpful in the comment below.

Richard Bennett
Richard Bennett is a writer and a lover of all things video.
Follow @Richard Bennett
Richard Bennett
Mar 27, 2024• Proven solutions
To create a successful YouTube video, you need to shoot the video and edit it on Windows or Mac. (You can find the whole processing of making a YouTube video if needed.) If you have always wanted to make your own videos and upload to YouTube to share, but you don’t know the best way to go about, then you shouldn’t miss this article. In the following part, I’ll share with you some best tools that you will need to edit YouTube videos and at the end of it, I’ll show you the detailed steps of how to edit YouTube videos with the video editor Filmora on computer.
- Part 1: Tools you need to edit YouTube videos on PC
- Part 2: Editing Videos for YouTube on PC [Detailed Steps]
Best Tools for Editing YouTube Videos on PC
Before editing, you need to choose a good enough video editor for YouTube video which can combine your footage clips seamlessly and export in high quality. To be honest, there are so many video editing software for YouTube available on the market and quite a number of tools used for editing YouTube videos on PC, some are paid while others are available for free. To save your time in picking the best one, we’ve listed some of the best tools for you to Edit YouTube videos.
Top 3 Recommended Video Editor Tools for Editing YouTube Videos on PC
The following are some of the most versatile video editor tools currently available for editing videos on PC
1. Wondershare Filmora – Best Video Editor for Beginners to Edit YouTube Videos
Filmora is an intuitive video editor with a wide range of advanced tools and video effects. We listed Filmora at the first spot because it is recommended by many users and reviewers as the best video editor for beginners and also provides sophisticated features.
Download Mac Version ](https://tools.techidaily.com/wondershare/filmora/download/ )
Filmora is a simpler way for those who are serous with editing YouTube videos on PC and Mac and you don’t have to install any other editing tools. As an all in one video editor, Filmora gives you the power to edit audios and videos, record PC screen, edit audio and add custom colors and voice over with a lot of ease. The following are some of the specific benefits and features you will be entitled to when you use Wondershare Filmora to edit YouTube videos on PC and Mac. You can download the trial version to have a try and share with me about your opinion .
Why choose Wondershare Filmora
- Ability to record the screen of your PC together with the voice
- Edit all your audios with audio mixers and equalizers
- Has wonderful filters, overlays, and text effects
- Has a color turning tool to allow you correct white balances and much more
- Let you to upload videos directly to YouTube, Vimeo and Facebook
You may also like:How to Edit YouTube Videos on iPhone >>
2. Window Movie Maker –
Windows Movie Maker is a totally free video editor available for Windows7/8 users, so if you’re a YouTube beginner without no budget for video editing software, you can start with it. It is easy and intuitive to use, though it lacks some of the advanced functionalities needed for professional video editing. After being skilled in video editing, you may need some alternatives to Windows Movie Maker, in this case, check our picks of thebest free video editing software for Windows.
Windows Movie Maker Interface
3. Adobe Premiere Pro –
This is one of the professional video editors available for PC and it is not a free tool. It comes with advanced features and functionalities needed for professional video editing and for you to use it you will have to pay with about $19.99 - $74.99 per month.
Screenshot from Adobe Premiere Pro CC Release Video
Professional Screen Recorder Tools for YouTube Videos
If you are making a tutorial video, a software how-to video or a gameplay video on YouTube, you may also need a screen recording software to record what happening on your computer and show it with your viewers. In this case, we’ve picked some screen recording tools that you may need. Some of them both feature the video editing tools and screen recording tools.
1. Filmora scrn – A high quality screen recorder with editing features.
-
2. ScreenFlow –ScreenFlow has a free version you could use for high quality screen captures, but for you to get the most from it, you will have to upgrade to the paid versions.
For more information on screen recorders for Windows, kindly check our picks about best screen recorder for YouTub. .
Note: Filmora now also feature a more powerful recording features, so you can now record screen and audio and edit video in one place.
Professional Audio Editors for YouTube Videos Editing
1. Audacity
Audacity has an intuitive user interface, featuring a simple design without unnecessary features to clog things up. Its footprint is relatively small and it can run on PC nonstop. The only thing you won’t like about it is that you will only be able to get as far as bedroom recording with it.
2. WavePad
This audio editor has a fully customizable user interface that will work both for beginners as well as professionals. It is easy to use and will suffice most of your needs as far as editing YouTube videos on PC is concerned.
For more information about audio editing tools and tips, check out How to Add Audio to Video .
Professional Color Grading Tools for YouTube Videos
To adjust the brightness, white balance, tone or apply 3D LUT effects to your video, you can complete all of these in Filmora or use the following color correction software.
Adobe SpeedGrade
When you use this together with Premiere Pro, you will have the fastest color grading experience in the world. The only caveats to using it are that the tracking is not the best and the workflow when using it on Windows is not that streamlined either.
Looking for more professional color grading tools? Check Best Color Grading & Correction Software>>
Part 2: Editing videos for YouTube on PC [Detailed Steps]
Irrespective of the editing software you use, following the steps outlined below will make it is easy for you to edit videos for YouTube on PC. Assuming you already have made your mind on the editing software of choice, use the following steps to edit and export your completed work. To better demonstrate the steps of YouTube video editing, I’ll use Filmra9 video editor to edit YouTube Video.
1.Split or combine your video clips
Most of the editing programs you use will have a timeline view of your work where you can easily cut or drop your shots. Each of the shots taken is actually a separate file which you will have to combine with others to make the video. The split feature in Filmora can cut footage into parts and then you can move it to desired position or just delete the unnecessary part. You can choose any part of the video quickly with the Quick Trim feature in preview. Besides, Filmora supports almost all popular video and photo formats, so there will be no obstacle when you want to combine footage shot with different devices. You can add photos to video or audio to video.
To combine several footages into one, just place all clips in the video track in order. Form the timeline view, move the shots around, cut, trim or shorten them as you desire. You can also add transitions between shots so that your final production may have a professional look.
2. Crop, Rotate, Pan & Zoom
You can rotate the video at any angle at any direction and change the scale of video footage or other transform. If you want viewers to focus on some part of the frame, you can use try the Pan & Zoom feature.
Learn more about How to Zoom in Video After It’s Recorded or Saved?
3.Add texts, Music and other effects
Once the individual shots have been edited into a single video, it is now time for you to add the special effects. This is the time to add stuff such as texts, music and other special effect you may want to see on the video. If you are worried about doing this, just know that you don’t have to be a pro editor to do all these since most of the program will guide you through on how to add all the special effects.
4.Save and export
After you have done with adding all the special effects, choose the file format for saving your video then export it. YouTube accepts major file formats and these include MP4, AVI or WMA hence you will be okay when you use any of them.
Filmora also allows you to upload videos to YouTube platform directly since it will choose the format and frame rate or codec which suit best.
These are the basic steps you will use when you want to edit YouTube videos on PC. Just remember to use the right widescreen format and also render your files in either 1080i or 720p high definition.
YouTuber Jamie Keet from Teacher’s Tech channel has made a tutorial about how to edit videos on Filmora. This video is detailed and let us know if you think it is helpful in the comment below.
Richard Bennett
Richard Bennett is a writer and a lover of all things video.
Follow @Richard Bennett
Also read:
- 2024 Approved Choosing Streaming Giants Vimeo, YouTube, or DailyMotion?
- Crafting Captivating Intros on Mobile Platforms
- Editing Engine Room
- 2024 Approved Channel Identity Constructing Memorable Templates for Gamers
- Elevating Your Earning Game with YouTube Monetization Strategies for 2024
- In 2024, Craft the Ultimate Outro with Pro Maker Advice
- [New] A Complete Guide to YouTube's Live Image Lore
- [New] Channel Command Center Masterminding Visionary Content
- Optimal Video Kick-Offs Selecting the Top 16 for More Viewers
- YouTube Video Dimensions/Size [Guide for Upload Settings]
- Enhance Video Visibility with Effective Thumbnail Scaling for 2024
- [New] Breaking Down the Elements of a YouTube Shorts Template
- [New] Affordable Methods for Video and Text Synergy
- [New] Epic Video Journeys The Fastest Hits Reaching 100M Views by '24
- Automated Subscription Link Creation for Youtube for 2024
- [New] Elevating Positivity in a Constructive Space
- In 2024, Boosting Video Quality Utilizing YouTube Studio's Features
- 2024 Approved Earn Extra Bucks Maximizing YouTube's Mobile Revenue Opportunities
- 2024 Approved A Step-by-Step Approach to Professional Video Sharing
- In 2024, Become a Viral Sensation Maximizing Your YouTube Reach
- Essential Free Editing Software Rankings
- Updated In 2024, Get Your Favorite Soundcloud Tracks in MP3 Format A Simple Guide
- [New] In 2024, Instagram Economics A Detailed Blueprint for Profit
- How To Create an Apple Developer Account From iPhone 14 Pro
- How to Unlock Apple ID From your iPhone 15 Pro Max without Security Questions?
- Bridging Music & Image in the Web for 2024
- [New] The Roadmap for Efficiently Coordinating Online Meeting Times (Google) for 2024
- This is how you can recover deleted pictures from Poco F5 5G.
- [New] Adventure Awaits in These Top 5 Samsung Gear VR Titles
- How To Fake GPS On Xiaomi Redmi K70 For Mobile Legends? | Dr.fone
- Exploring Top Viewed Tweets
- Updated Advanced Audio File Adapter Free Conversion of High-End MPA Sounds to Universal MP3 Format (2023 Version)
- LaughLab Design Suite
- Why Is My OnePlus Open Offline? Troubleshooting Guide | Dr.fone
- From Wide to Tall Adapting Your Design for Vertical Screens for 2024
- Easy Ways to Manage Your Xiaomi Redmi A2+ Location Settings | Dr.fone
- In 2024, How to Reset a Vivo V27e Phone that is Locked?
- [Updated] In 2024, Advanced Setup Setting up an Elapsed Time Display in OBS
- In 2024, How To Fix iPhone 12 mini Could Not Be Activated/Reached Issue
- Title: "Unveiling Hidden Gems Top Purchasers of YouTube Creators"
- Author: Steven
- Created at : 2024-05-25 20:41:05
- Updated at : 2024-05-26 20:41:05
- Link: https://youtube-clips.techidaily.com/unveiling-hidden-gems-top-purchasers-of-youtube-creators/
- License: This work is licensed under CC BY-NC-SA 4.0.
