
:max_bytes(150000):strip_icc()/buygamesonquest-9a47b1c4edd0425993d28e43d66a881c.jpg)
Unconventional Techniques for Rewinding Videos on YT
Unconventional Techniques for Rewinding Videos on YT
How to Reverse YouTube Video in Creative Ways

Richard Bennett
Mar 27, 2024• Proven solutions
It could be a film or a reversed meme, a boomerang video on Instagram, or a rewind effect in a playback action. The reversing results make the clip compelling and creative. At present, many video creators find YouTube as a suitable platform for such rewind effects as it has millions of diverse genre video clips. Although the mechanism behind such an act can be quite confusing, it is no more if you get to know how to reverse YouTube videos at ease. Yes, video reversers are created and developed for such a purpose, and you can read below to understand how to play YouTube videos backward.
- Part 1: How to Reverse YouTube Video in the Quickest Way?
- Part 2: Reverse YouTube Videos More Creatively
How to Reverse YouTube Video in the Quickest Way?
Let’s take a look at some online tools that can play YouTube videos backward.
2. Kapwing
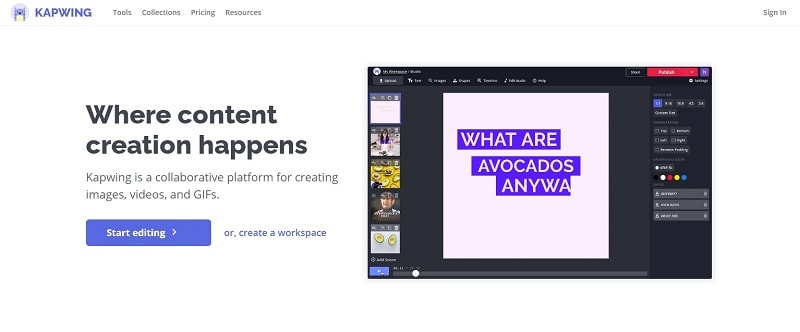
Kapwing is an online video reverser shared stage where you can create images, videos, and GIFs to share on social media. It suits to be perfect for any content that performs varied tasks with video editor tools like trimmer, resizes, studio, subtitles, and audio addition. Kapwing is an all-in-one workspace asset that is a single secure place to place over your backup safely facilitated with cross-device capability. To whatever field of interest you might belong to from a school student, professional, media, or a design team, Kapwing is the right platform ease-to-use.
3. Clideo
Like Kapwing, Clideo is an online video reverser tool that does multiple tasking like video converter, file converter, audio joiner, video maker, and a slideshow maker. We have taken up Clideo in our list as it follows a simple interface and comes up with useful tools of the loop, stops motion, and meme required in the present video creation industry. Supporting all video formats like MPG, MOV, and VOB, Clideo is a fast editor with a high-level of data protection. Developed by Softo Ltd., Clideo has got more than 4.1M users and had made up 25M videos.
Now, let’s take a simple guide to reverse a YouTube video quickly with Clideo.
Step 1: Enter the link, https://clideo.com/reverse-video on your desired web browser like Chrome or Firefox.
Now add the files from your desktop or your smartphone from the “Choose File” option or the drop-down choose your convenient option like Dropbox, Google Drive, or YouTube URL to reverse the video.
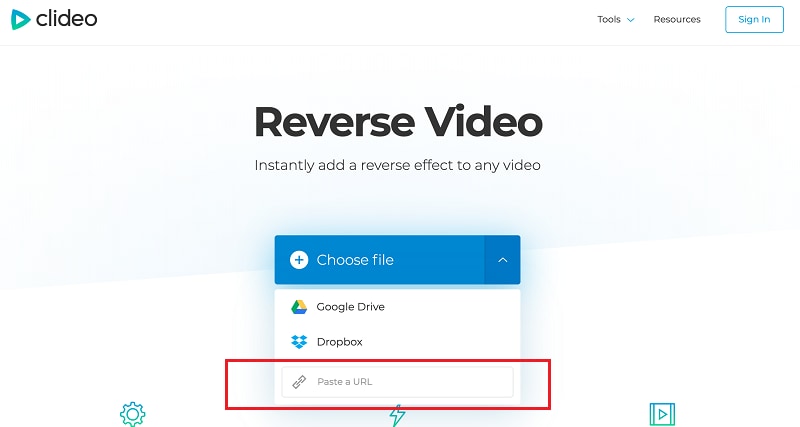
Source: clideo.com
Step 2: Paste the YouTube link on the search box, and the video will process.
Step 3: The YouTube video will now start to play from backward where you can reverse the speed by changing the levels from 0.5X to 2X.
You can make a preview by playing or pausing the timeline of the YouTube video.
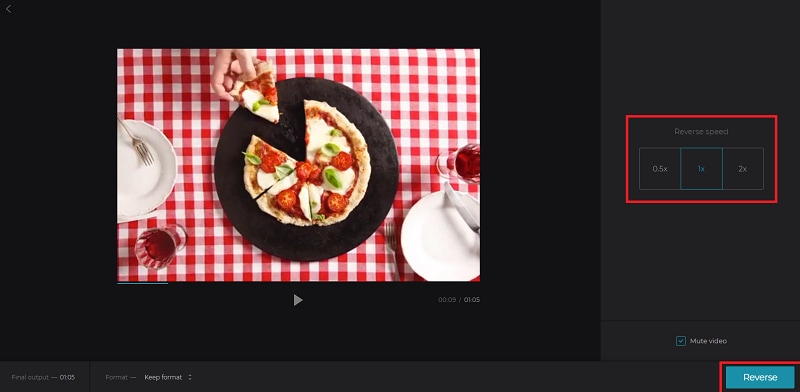
Once satisfied, hit the “Reverse” button on the right corner of the screen.
Step 4: Before downloading the revered Youtube video, you can play it once, and upon satisfaction, tap the “Download” button else you can go on with the “Back to edit” option.
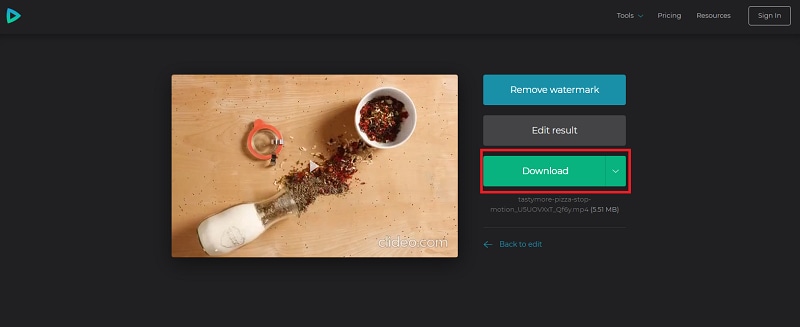
You can quickly reverse a YouTube video with Clideo in just three steps, along with a watermark removal facility.
Reverse YouTube Videos More Creatively
Want to embed more creativity in your YouTube video before reversing them? Get to know some of the YouTube video downloaders from this session.
Keepvid
Keepvid is an online video downloader that converts a video directly to MP4 & MP3. It allows you to download videos from 100+ sites, including YouTube, Facebook, Twitter, Vevo, Reddit, and BBC, irrespective of their video metadata. With Keepvid, you can listen to YouTube videos offline, save YouTube videos directly to MP3, download YouTube playlists everywhere, and anytime with the web-based lite-weight app.
YTD Video downloader
YTD video downloader has been in the market for years as a popular video downloader & converter. It is free to download software, allowing you to download video, audio, and playlist that could play offline. YTD video downloaded has gathered more than 200M users globally, supporting overall popular sites like Bing, Vimeo, TikTok, Yahoo, and Metacafe. With YTD, you can download the unlimited playlist and HD videos of 1080P at ultra-fast speed.
Want to reverse your YouTube video creatively and stunningly?
Wondershare Filmora is all you need, a complete pack of video/editing toolkit developed for the inspired that helps discover storytelling. It is a platform where you can create without limits, give life to your videos, craft fun in every clip, go beyond boundaries with endless possibilities, and make your epic story or adventure outstanding in the crowd. Filmora has a free version that allows you to access all the beautiful features like video reverse, ripple edit, trim, rotate, flip, zoom, edit, and audio ducking.
3.1How to Reverse Videos in Filmora?
Now that you have come to know about Filmora Wondershare, the best video reverser from the list, let’s directly jump over to a manual on how to reverse a YouTube video at ease.
Note: Before starting up, download and install the free version of Filmora on the device from https://filmora.wondershare.com/ .


Step 1: Open Filmora and click the “File” menu. Choose “New Project” from the drop-down.
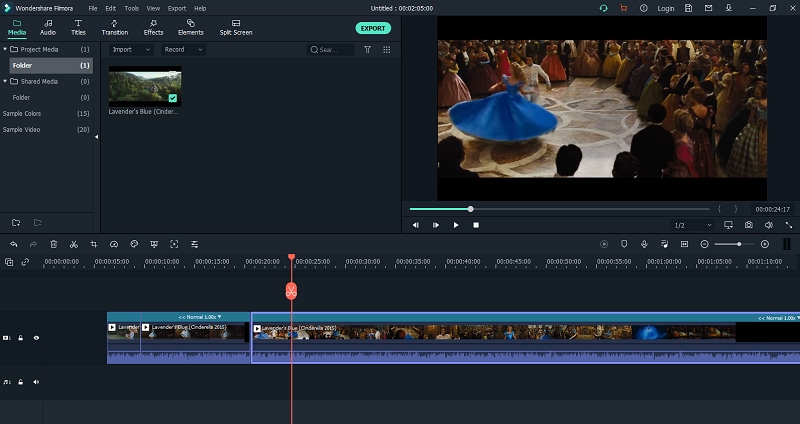
Step 2: To import the YouTube video to the workplace, choose the “Import Media” option from the file menu.
From the drop-down, you can import files or folders at your convenience.
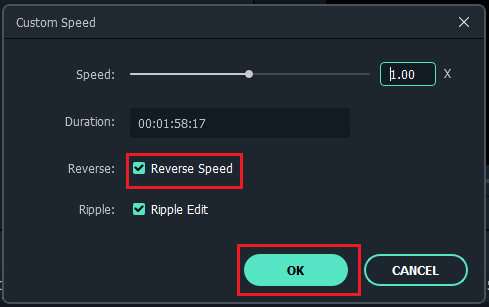
Step 3: Once the video is loaded on the media library, right-click on the track timeline and select the “Speed and Duration” option.
Tick the “Reverse Speed” checkbox and then hit the “OK” button.
Step 4: Doing so will play the YouTube video backward, and you can see the progress on the preview window.
Step 5: You can perfect your creation with filters or effects offered with Filmora.
Once done, click the “Export” option that will allow you to save the file in your destined format and export it.
You can upload the reversed YouTube video directly to your YouTube account or other social media apps with Filmora.
3.2Tips for Customizing the Reversing Videos
1. Add filters & effects: Adding filters and effects like Mosaic and Amaro can uplift your reversed video and make them attractive. Filmora has 200+ filters, utilities, overlays, and LUT.
2. Render/Perfect the audio: Audio is the backbone of the video that provokes and makes the creation sound perfect and outstanding. 76 in-built audio tracks included in Filmora consisting of tender, sentimental, folk, rock, and young categories.
3. Transform your video with transitions: While various ordinary videos crowd the Internet, make yours unique by transforming them with 3D effects and a slideshow. Filmora comes with 233 transitions like 3D, warp, dissolve & ripple slideshow, lifestyle, and still a lot more.
4. Perform video editing tricks: While trim, cut & merge, crop & flip, resize, delete, and watermark are pre-defined and traditional editing tools, why don’t you try something new like creating freeze frames, accessing sample colors, and zoom in/out timeline where Filmora has a toolkit more than what you expect.
Conclusion
Thanks to the technology behind video reversers like Clideo and Kapwing that does a great job of reversing the YouTube video online quickly. The alternatives YTD downloader and Keepvid also facilitates downloading your favorite videos from 100+ video streaming sites. However, if you aspire to become a creative & professional video creator expert in the field, Filmora from Wondershare stands as the best choice for all. Lastly, also note the tips discussed, and use Filmora today for a brighter career tomorrow.
Richard Bennett
Richard Bennett is a writer and a lover of all things video.
Follow @Richard Bennett
Richard Bennett
Mar 27, 2024• Proven solutions
It could be a film or a reversed meme, a boomerang video on Instagram, or a rewind effect in a playback action. The reversing results make the clip compelling and creative. At present, many video creators find YouTube as a suitable platform for such rewind effects as it has millions of diverse genre video clips. Although the mechanism behind such an act can be quite confusing, it is no more if you get to know how to reverse YouTube videos at ease. Yes, video reversers are created and developed for such a purpose, and you can read below to understand how to play YouTube videos backward.
- Part 1: How to Reverse YouTube Video in the Quickest Way?
- Part 2: Reverse YouTube Videos More Creatively
How to Reverse YouTube Video in the Quickest Way?
Let’s take a look at some online tools that can play YouTube videos backward.
2. Kapwing
Kapwing is an online video reverser shared stage where you can create images, videos, and GIFs to share on social media. It suits to be perfect for any content that performs varied tasks with video editor tools like trimmer, resizes, studio, subtitles, and audio addition. Kapwing is an all-in-one workspace asset that is a single secure place to place over your backup safely facilitated with cross-device capability. To whatever field of interest you might belong to from a school student, professional, media, or a design team, Kapwing is the right platform ease-to-use.
3. Clideo
Like Kapwing, Clideo is an online video reverser tool that does multiple tasking like video converter, file converter, audio joiner, video maker, and a slideshow maker. We have taken up Clideo in our list as it follows a simple interface and comes up with useful tools of the loop, stops motion, and meme required in the present video creation industry. Supporting all video formats like MPG, MOV, and VOB, Clideo is a fast editor with a high-level of data protection. Developed by Softo Ltd., Clideo has got more than 4.1M users and had made up 25M videos.
Now, let’s take a simple guide to reverse a YouTube video quickly with Clideo.
Step 1: Enter the link, https://clideo.com/reverse-video on your desired web browser like Chrome or Firefox.
Now add the files from your desktop or your smartphone from the “Choose File” option or the drop-down choose your convenient option like Dropbox, Google Drive, or YouTube URL to reverse the video.
Source: clideo.com
Step 2: Paste the YouTube link on the search box, and the video will process.
Step 3: The YouTube video will now start to play from backward where you can reverse the speed by changing the levels from 0.5X to 2X.
You can make a preview by playing or pausing the timeline of the YouTube video.
Once satisfied, hit the “Reverse” button on the right corner of the screen.
Step 4: Before downloading the revered Youtube video, you can play it once, and upon satisfaction, tap the “Download” button else you can go on with the “Back to edit” option.
You can quickly reverse a YouTube video with Clideo in just three steps, along with a watermark removal facility.
Reverse YouTube Videos More Creatively
Want to embed more creativity in your YouTube video before reversing them? Get to know some of the YouTube video downloaders from this session.
Keepvid
Keepvid is an online video downloader that converts a video directly to MP4 & MP3. It allows you to download videos from 100+ sites, including YouTube, Facebook, Twitter, Vevo, Reddit, and BBC, irrespective of their video metadata. With Keepvid, you can listen to YouTube videos offline, save YouTube videos directly to MP3, download YouTube playlists everywhere, and anytime with the web-based lite-weight app.
YTD Video downloader
YTD video downloader has been in the market for years as a popular video downloader & converter. It is free to download software, allowing you to download video, audio, and playlist that could play offline. YTD video downloaded has gathered more than 200M users globally, supporting overall popular sites like Bing, Vimeo, TikTok, Yahoo, and Metacafe. With YTD, you can download the unlimited playlist and HD videos of 1080P at ultra-fast speed.
Want to reverse your YouTube video creatively and stunningly?
Wondershare Filmora is all you need, a complete pack of video/editing toolkit developed for the inspired that helps discover storytelling. It is a platform where you can create without limits, give life to your videos, craft fun in every clip, go beyond boundaries with endless possibilities, and make your epic story or adventure outstanding in the crowd. Filmora has a free version that allows you to access all the beautiful features like video reverse, ripple edit, trim, rotate, flip, zoom, edit, and audio ducking.
3.1How to Reverse Videos in Filmora?
Now that you have come to know about Filmora Wondershare, the best video reverser from the list, let’s directly jump over to a manual on how to reverse a YouTube video at ease.
Note: Before starting up, download and install the free version of Filmora on the device from https://filmora.wondershare.com/ .
Step 1: Open Filmora and click the “File” menu. Choose “New Project” from the drop-down.
Step 2: To import the YouTube video to the workplace, choose the “Import Media” option from the file menu.
From the drop-down, you can import files or folders at your convenience.
Step 3: Once the video is loaded on the media library, right-click on the track timeline and select the “Speed and Duration” option.
Tick the “Reverse Speed” checkbox and then hit the “OK” button.
Step 4: Doing so will play the YouTube video backward, and you can see the progress on the preview window.
Step 5: You can perfect your creation with filters or effects offered with Filmora.
Once done, click the “Export” option that will allow you to save the file in your destined format and export it.
You can upload the reversed YouTube video directly to your YouTube account or other social media apps with Filmora.
3.2Tips for Customizing the Reversing Videos
1. Add filters & effects: Adding filters and effects like Mosaic and Amaro can uplift your reversed video and make them attractive. Filmora has 200+ filters, utilities, overlays, and LUT.
2. Render/Perfect the audio: Audio is the backbone of the video that provokes and makes the creation sound perfect and outstanding. 76 in-built audio tracks included in Filmora consisting of tender, sentimental, folk, rock, and young categories.
3. Transform your video with transitions: While various ordinary videos crowd the Internet, make yours unique by transforming them with 3D effects and a slideshow. Filmora comes with 233 transitions like 3D, warp, dissolve & ripple slideshow, lifestyle, and still a lot more.
4. Perform video editing tricks: While trim, cut & merge, crop & flip, resize, delete, and watermark are pre-defined and traditional editing tools, why don’t you try something new like creating freeze frames, accessing sample colors, and zoom in/out timeline where Filmora has a toolkit more than what you expect.
Conclusion
Thanks to the technology behind video reversers like Clideo and Kapwing that does a great job of reversing the YouTube video online quickly. The alternatives YTD downloader and Keepvid also facilitates downloading your favorite videos from 100+ video streaming sites. However, if you aspire to become a creative & professional video creator expert in the field, Filmora from Wondershare stands as the best choice for all. Lastly, also note the tips discussed, and use Filmora today for a brighter career tomorrow.
Richard Bennett
Richard Bennett is a writer and a lover of all things video.
Follow @Richard Bennett
Finding the Best Sound Editing Software for Video Makers
Are you looking for the best voice-changing app for your YouTube channel?
Creating a YouTube video with professional output is straightforward, but many people find it challenging because they do not have the right vlogging tools at their disposal. There are countless vlogging tools and one of them is the voice changer.
With a voice-changing app, you can create multiple voices for one video clip with complete ease. Voice changer supports several background sound effects that you can import to spice up your content before uploading it on YouTube. The app makes your videos fun and interesting to watch that then drives traffic to your channel.
Presently, there is an array of YouTube voice-changers available online. While some are top-notch, others are nothing to write about. In this article, we will share with you some top-level YouTube voice-changers recommended by experts in the industry. Without further ado, let’s dive in.
For Win 7 or later (64-bit)
For macOS 10.12 or later
Part 1. Best Voice Changers for YouTubers
Here are the top 7 YouTube voice-changing apps available on the global market today:
1. AthTek [Online & Free]
AthTek is one the world-leading voice-changing apps suitable for Windows operating systems. This simple yet powerful app is well-customized with powerful features such as pitch and speed enhancer. The app allows you to edit your audio recordings easily and quickly.
It provides you with a comprehensive user interface that lets you switch your voice without stress. Compared to other voice-changers, AthTek stands out. The app integrates perfectly with platforms like Skype, etc.
AthTek is a fantastic voice changer, however, it isn’t without its dark sides. AthTek is not a real-time voice-changing app. Hence, you can only use it with ready-made sound recordings.
How to Use AthTek YouTube Voice Changer
Follow the procedure below to use the AthTek voice changing app on your YouTube channel:
Step1 Download AthTek from the official website. Follow the on-screen instructions to install the app, and launch it. When AthTek opens, the interface below will appear on your display screen:

Locate the Browse button beside File Path, and click on it. AthTek will automatically direct you to your local storage.

Step2 Choose your desired audio file from the list available on your computer, and tap the Open button. AthTek will immediately upload the audio file on its interface. The page below will come up on your screen:

Step3 Now move to the Change Parameter section and make the necessary adjustments. Once that’s set, click on the Play button to preview the audio file. If satisfied, tap on Export, choose a destination path and click on Save.

2. Voicechanger.io
Voicechanger.io is a cloud-based program that enables you to upload and edit audio files conveniently without distorting the quality. The program also allows you to record your voice, and add effects with complete ease. It’s an easy-to-use voice changer with no operating system limitations. Aside from voice changing, Voicechanger.io supports speech-to-text. Thus, you can convert speech to text without stress.
How to Use Voicechanger.io
Step1 With the help of an internet-enabled computer system, navigate to the official webpage for Voicechanger.io. The page below will come up if all goes well:

Step2 Choose your preferred audio input method to proceed. Should you select Upload audio, you will be directed to your local drive where your recordings are stored. Choose an audio file, and click on Open.

However, should you pick the Use microphone option, you will be prompted to grant access to the mic. Click on the appropriate key to complete this step.

3. Voxal Voice Changer
Voxal Voice Changer is another quality app mostly used by Mac owners to manipulate audio recordings. It’s also suitable for editing real-time chat audio recordings. The app provides you with several preset voices that you can select from to make your sound recordings fun to listen to.
Additionally, you have the privilege to customize the background effects that you could be used at any time. Voxal Voice Changer is a simple app with zero restrictions in the free version. It also offers paid versions with additional features for professional YouTubers. Besides editing ready-made audio, the app does allow you to create voice recordings.
How to Use Voxal Voice Changer
Here is the detailed procedure to use the Voxal Voice Changer app:
Step1 From the official website for Voxal, download and install a compatible version of the app on your computer system. Wait until the installation is successful and launch the app for usage.

When the interface above appears, locate the Menu drop-down menu at the top left corner of your display screen. Select File > Import Voice. Your local storage will automatically appear.
Step2 Choose an audio recording or voice to import on the Voxal Voice Changer interface, and tap on Open. After uploading the file, select a voice effect on the left sidebar.

Step3 Now click on the green Preview button at the top menubar. Listen to the audio file with the chosen effect. If satisfied, export the file to your preferred storage path.
4. Skype Voice Changer
As the name implies, this app is built for you to conceal your voice when using Skype social media platform. It can also serve as a voice changer for YouTube content creators. This app permits you to transform your audio recordings into interesting sounds easily and quickly.
Skype Voice Changer offers free and paid services to its end-users. However, the majority of its features are locked in the paid version. The app provides a clean voice editing interface so end-users, including those who aren’t conversant with information technology, can navigate easily.
How to Use Skype Voice Changer
Here is the set of instructions to use Skype Voice Changer:
Step1 Install the Skype Voice Changer app on your PC, and launch it for operation by clicking on the appropriate button.


A window with several easy-to-use options will come up just as below:

Click on the Effects button at the top menu bar.
Step2 Select a voice effect on the left panel of the Skype Voice Changer interface. Once that is set, click on Preview at the lower right corner of your screen.
Now speak into a microphone, and listen to your voice.
5. AV Voice Changer Diamond
AV Voice Changer Diamond is another wonderful voice-changing app with several entertaining effects that you can choose from to pimp your audio recordings or voice. The app provides you with several preset options, so you have control over your output. It’s one of the most versatile apps for YouTubers.
This voice changer offers an easy-to-manage user interface so beginners in the tech space can easily find their way without involving a third party. AV Voice Changer Diamond works perfectly with all VoIP programs and social media platforms like Skype, Viber, YouTube, and more. One challenge you may experience with this app is the very long installation process.
How to Use AV Voice Changer Diamond
Go to the AV Voice Changer Diamond website to install the latest version of the app on your computer system, and follow the steps below to use it:
Step1 Open the app on your Windows or Mac operating system. You will find the interface below on your screen:

Locate the Nickvoices at the top toolbar. Click on it, and a couple of voice effect options will pop up.

Step2 Select from the list to proceed. Alternatively, you could click on Custom on the list to customize a voice effect. However, mind you, you must subscribe to a premium package to create a voice effect.
Step3 On completing the step above, locate the Record button and click on it. A new window will come up. Follow the on-screen instructions to record your voice.

6. Voice Changer HD
If you are looking for a voice-changing app that you can use to modify your YouTube audio tracks at a zero-cost fee, Voice Changer HD is the perfect tool to use. The app allows you to turn boring audio recordings into enjoyable ones with the lovely effects it supports.
In addition to the audio editing features, Voice Changer HD lets end-users create sounds from texts. Thus, it supports text-to-speech. The app comes with an easy-to-manage user interface. It has over 25 preset voices tucked into it.
How to Use Voice Changer HD
Using Voice Changer HD isn’t difficult. Apply the stepwise guide below:
Step1 Download, install, and open Voice Changer HD on your computer. Once it opens, click on the appropriate button to record your voice.
Step2 Click on the Stop button to end the recording. Voice Changer HD will automatically load an interface with several voice effects. Select one to design your recorded file.

Step3 Next, click on Share to send the file to friends and relatives.

Part 2. Best Voice Editors for YouTubers
1. Filmora

Filmora is an industry-leading audio editing software well-designed with an interactive user interface that allows you to edit YouTube recordings before uploading them on the net. This multipurpose software is customized with endless audio editing features. It supports audio ducking, audio visualizer, auto synchronization, speech-to-text, text-to-speech, and lots more.
Free Download For Win 7 or later(64-bit)
Free Download For macOS 10.14 or later
Additionally, end-users can easily detect silence in an audio or video file via the Wondershare Filmora software. Besides audio editing, this software is capable of video editing. It enables you to modify/adjust videos without compromising the quality. This software permits you to add effects, transitions, detach audio, remove background, etc.
Wondershare Filmora has all you need in a video and audio editor as it integrates with several platforms, including YouTube and other social media apps. This audio editing solution is suitable for Windows and Mac operating systems.
2. Adobe Audition

Designed by the first PDF editing platform developer, Adobe Audition is another software you can count on to edit audio tracks with quality output. It edits all audio types, including MP3, WAV, and more, with zero limitations. The software sits at the second position on our list because of the rich editing features it holds. Adobe Audition allows you to mix sounds easily and quickly- a vital reason Disc Jerkers (DJs) use the software. Another feature you stand to enjoy when using this software is the freedom to design sound effects.
Part 3. FAQs
Q1. Can I change my voice for YouTube videos?
Yes!
With voice-changing apps, you can quickly change your voice for YouTube videos. These apps come with lots of incredible sound effects that you need to pimp your audio tracks on YouTube. Some of the top-rated voice changers available in the market presently have been introduced above. Check them out.
Q2. What voice changers do YouTubers use?
As earlier stated, there are countless voice-changing apps for YouTubers. Depending on the sound effect you need, you may need to try two or more. You can select one from the ones mentioned in the article.
Conclusion
Now you have the top 7 voice changers for YouTubers, select one of them and use it in your next project. All voice-changing apps are simple to use, fast and reliable. However, we advise that you consider the pricing before investing in it. If you need an audio/video editing software program, Filmora is the right tool to use. The software is well-known for excellent results.
For Win 7 or later (64-bit)
For macOS 10.12 or later
Part 1. Best Voice Changers for YouTubers
Here are the top 7 YouTube voice-changing apps available on the global market today:
1. AthTek [Online & Free]
AthTek is one the world-leading voice-changing apps suitable for Windows operating systems. This simple yet powerful app is well-customized with powerful features such as pitch and speed enhancer. The app allows you to edit your audio recordings easily and quickly.
It provides you with a comprehensive user interface that lets you switch your voice without stress. Compared to other voice-changers, AthTek stands out. The app integrates perfectly with platforms like Skype, etc.
AthTek is a fantastic voice changer, however, it isn’t without its dark sides. AthTek is not a real-time voice-changing app. Hence, you can only use it with ready-made sound recordings.
How to Use AthTek YouTube Voice Changer
Follow the procedure below to use the AthTek voice changing app on your YouTube channel:
Step1 Download AthTek from the official website. Follow the on-screen instructions to install the app, and launch it. When AthTek opens, the interface below will appear on your display screen:
Locate the Browse button beside File Path, and click on it. AthTek will automatically direct you to your local storage.
Step2 Choose your desired audio file from the list available on your computer, and tap the Open button. AthTek will immediately upload the audio file on its interface. The page below will come up on your screen:
Step3 Now move to the Change Parameter section and make the necessary adjustments. Once that’s set, click on the Play button to preview the audio file. If satisfied, tap on Export, choose a destination path and click on Save.
2. Voicechanger.io
Voicechanger.io is a cloud-based program that enables you to upload and edit audio files conveniently without distorting the quality. The program also allows you to record your voice, and add effects with complete ease. It’s an easy-to-use voice changer with no operating system limitations. Aside from voice changing, Voicechanger.io supports speech-to-text. Thus, you can convert speech to text without stress.
How to Use Voicechanger.io
Step1 With the help of an internet-enabled computer system, navigate to the official webpage for Voicechanger.io. The page below will come up if all goes well:
Step2 Choose your preferred audio input method to proceed. Should you select Upload audio, you will be directed to your local drive where your recordings are stored. Choose an audio file, and click on Open.
However, should you pick the Use microphone option, you will be prompted to grant access to the mic. Click on the appropriate key to complete this step.
3. Voxal Voice Changer
Voxal Voice Changer is another quality app mostly used by Mac owners to manipulate audio recordings. It’s also suitable for editing real-time chat audio recordings. The app provides you with several preset voices that you can select from to make your sound recordings fun to listen to.
Additionally, you have the privilege to customize the background effects that you could be used at any time. Voxal Voice Changer is a simple app with zero restrictions in the free version. It also offers paid versions with additional features for professional YouTubers. Besides editing ready-made audio, the app does allow you to create voice recordings.
How to Use Voxal Voice Changer
Here is the detailed procedure to use the Voxal Voice Changer app:
Step1 From the official website for Voxal, download and install a compatible version of the app on your computer system. Wait until the installation is successful and launch the app for usage.
When the interface above appears, locate the Menu drop-down menu at the top left corner of your display screen. Select File > Import Voice. Your local storage will automatically appear.
Step2 Choose an audio recording or voice to import on the Voxal Voice Changer interface, and tap on Open. After uploading the file, select a voice effect on the left sidebar.
Step3 Now click on the green Preview button at the top menubar. Listen to the audio file with the chosen effect. If satisfied, export the file to your preferred storage path.
4. Skype Voice Changer
As the name implies, this app is built for you to conceal your voice when using Skype social media platform. It can also serve as a voice changer for YouTube content creators. This app permits you to transform your audio recordings into interesting sounds easily and quickly.
Skype Voice Changer offers free and paid services to its end-users. However, the majority of its features are locked in the paid version. The app provides a clean voice editing interface so end-users, including those who aren’t conversant with information technology, can navigate easily.
How to Use Skype Voice Changer
Here is the set of instructions to use Skype Voice Changer:
Step1 Install the Skype Voice Changer app on your PC, and launch it for operation by clicking on the appropriate button.
A window with several easy-to-use options will come up just as below:
Click on the Effects button at the top menu bar.
Step2 Select a voice effect on the left panel of the Skype Voice Changer interface. Once that is set, click on Preview at the lower right corner of your screen.
Now speak into a microphone, and listen to your voice.
5. AV Voice Changer Diamond
AV Voice Changer Diamond is another wonderful voice-changing app with several entertaining effects that you can choose from to pimp your audio recordings or voice. The app provides you with several preset options, so you have control over your output. It’s one of the most versatile apps for YouTubers.
This voice changer offers an easy-to-manage user interface so beginners in the tech space can easily find their way without involving a third party. AV Voice Changer Diamond works perfectly with all VoIP programs and social media platforms like Skype, Viber, YouTube, and more. One challenge you may experience with this app is the very long installation process.
How to Use AV Voice Changer Diamond
Go to the AV Voice Changer Diamond website to install the latest version of the app on your computer system, and follow the steps below to use it:
Step1 Open the app on your Windows or Mac operating system. You will find the interface below on your screen:
Locate the Nickvoices at the top toolbar. Click on it, and a couple of voice effect options will pop up.
Step2 Select from the list to proceed. Alternatively, you could click on Custom on the list to customize a voice effect. However, mind you, you must subscribe to a premium package to create a voice effect.
Step3 On completing the step above, locate the Record button and click on it. A new window will come up. Follow the on-screen instructions to record your voice.
6. Voice Changer HD
If you are looking for a voice-changing app that you can use to modify your YouTube audio tracks at a zero-cost fee, Voice Changer HD is the perfect tool to use. The app allows you to turn boring audio recordings into enjoyable ones with the lovely effects it supports.
In addition to the audio editing features, Voice Changer HD lets end-users create sounds from texts. Thus, it supports text-to-speech. The app comes with an easy-to-manage user interface. It has over 25 preset voices tucked into it.
How to Use Voice Changer HD
Using Voice Changer HD isn’t difficult. Apply the stepwise guide below:
Step1 Download, install, and open Voice Changer HD on your computer. Once it opens, click on the appropriate button to record your voice.
Step2 Click on the Stop button to end the recording. Voice Changer HD will automatically load an interface with several voice effects. Select one to design your recorded file.
Step3 Next, click on Share to send the file to friends and relatives.
Part 2. Best Voice Editors for YouTubers
1. Filmora
Filmora is an industry-leading audio editing software well-designed with an interactive user interface that allows you to edit YouTube recordings before uploading them on the net. This multipurpose software is customized with endless audio editing features. It supports audio ducking, audio visualizer, auto synchronization, speech-to-text, text-to-speech, and lots more.
Free Download For Win 7 or later(64-bit)
Free Download For macOS 10.14 or later
Additionally, end-users can easily detect silence in an audio or video file via the Wondershare Filmora software. Besides audio editing, this software is capable of video editing. It enables you to modify/adjust videos without compromising the quality. This software permits you to add effects, transitions, detach audio, remove background, etc.
Wondershare Filmora has all you need in a video and audio editor as it integrates with several platforms, including YouTube and other social media apps. This audio editing solution is suitable for Windows and Mac operating systems.
2. Adobe Audition
Designed by the first PDF editing platform developer, Adobe Audition is another software you can count on to edit audio tracks with quality output. It edits all audio types, including MP3, WAV, and more, with zero limitations. The software sits at the second position on our list because of the rich editing features it holds. Adobe Audition allows you to mix sounds easily and quickly- a vital reason Disc Jerkers (DJs) use the software. Another feature you stand to enjoy when using this software is the freedom to design sound effects.
Part 3. FAQs
Q1. Can I change my voice for YouTube videos?
Yes!
With voice-changing apps, you can quickly change your voice for YouTube videos. These apps come with lots of incredible sound effects that you need to pimp your audio tracks on YouTube. Some of the top-rated voice changers available in the market presently have been introduced above. Check them out.
Q2. What voice changers do YouTubers use?
As earlier stated, there are countless voice-changing apps for YouTubers. Depending on the sound effect you need, you may need to try two or more. You can select one from the ones mentioned in the article.
Conclusion
Now you have the top 7 voice changers for YouTubers, select one of them and use it in your next project. All voice-changing apps are simple to use, fast and reliable. However, we advise that you consider the pricing before investing in it. If you need an audio/video editing software program, Filmora is the right tool to use. The software is well-known for excellent results.
Also read:
- Ultimate List 10 Costless Video Caption Extractors
- Customizing YouTube Viewing Policies for Your Content
- [Updated] Creating Classical Cinematography A Modern Tutorial
- [New] Essential Illumination Strategies for Filming
- Subforsup's Impact Safe or Not for Increasing YouTube Loyalty?
- [New] Digital Download King Comprerante Video Acquisition Guide
- Customize Your YouTube Experience with Altered Pace
- 2024 Approved Creating Captivating Visuals with DIY Filming Methods
- Perfect Your Presentation The YT Guide to Background Softening
- [New] An Expert's Blueprint for Calculating Your Video's Impact & Income
- 2024 Approved Elevate Your Brand with AI-Enhanced Naming Solutions
- Instant Income Analysis for Creators
- Top 10 Guide to Simple Business Channel Launches on YouTube
- Navigating YouTube's Payment System
- In 2024, Easily Enable Offline Access to YouTube on iPhone/iPad
- [Updated] Creating a Personalized YouTube Auto-Subscribe Page
- Quicksilver Chords Shorts' Actor Melodies
- The Essential Guide to Efficient YouTube Follow Link Design
- Easy Steps on How To Create a New Apple ID Account On Apple iPhone 15 Pro Max
- From Shaky to Steady How to Fix Unstable Footage in After Effects
- [New] In 2024, Off-Line Disconnecting Discord Servers
- [New] 2024 Approved Remedying Pauses in Online Video Sessions (FB)
- All About Factory Reset, What Is It and What It Does to Your Vivo Y78+ (T1) Edition? | Dr.fone
- Unlocking Twitter Video Size and Aspect Ratio Secrets
- Updated 2024 Approved Learn Topaz Video Enhance AI Review and Achieve Powerful Video Conversion
- 2024 Approved Win & Apple Users Favorites Top Picks for Audio Recording Technology (MP3)
- Updated Ultimate Audio Cleaner for Videos Windows & Mac Edition
- New Leading Video Chat Services A Ranked Guide to Alternative Omegle Options for 2024
- [New] 2024 Approved The Complete Encyclopedia of TweetResponses
- 7 Solutions to Fix Error Code 963 on Google Play Of Asus ROG Phone 7 Ultimate | Dr.fone
- How To Simulate GPS Movement With Location Spoofer On Itel P40+? | Dr.fone
- 2024 Approved The Complete Beginner's Roadmap for Audacity Audio Capture
- Affordable PC Monitoring Software for 2024
- [Updated] Prime Zero-Price Point Video Capturer
- 2024 Approved The Complete Guide to Generating Profits Vimeo Monetization Mastery
- Does Life360 Notify When You Log Out On Motorola Moto G Stylus (2023)? | Dr.fone
- Title: Unconventional Techniques for Rewinding Videos on YT
- Author: Steven
- Created at : 2024-05-25 20:38:09
- Updated at : 2024-05-26 20:38:09
- Link: https://youtube-clips.techidaily.com/unconventional-techniques-for-rewinding-videos-on-yt/
- License: This work is licensed under CC BY-NC-SA 4.0.
