
:max_bytes(150000):strip_icc():format(webp)/the_room-56cc7f225f9b5879cc590941.png)
"TV-Friendly Settings for Repeated Online Videos"
TV-Friendly Settings for Repeated Online Videos
Loop is a YouTube video format that allows viewers to watch a continuous sequence of videos. Loop is similar to traditional YouTube videos, but it can be played on a TV screen like a traditional TV show. Loop is a great way to keep viewers engaged with your content. It’s like a one-stop shop for all your content needs. You can use it to promote your latest video series.
Why looping YouTube videos on a TV is a great idea? First, it can be a fun way to watch your favorite videos without having to worry about the time. Second, it can be a way to save money on your cable. By watching your favorite videos on loop, you can cut down on the number of times you need to watch them.
If you are watching a series of videos, for example, looping them can help you to remember what happened in each one. Secondly, it can help you to learn new information more easily. If you are watching a tutorial or a video about a new topic, looping can help you to remember the details better.
Free Download For Win 7 or later(64-bit)
Free Download For macOS 10.14 or later


Part 1: How to Create a Loop Video for YouTube
There is a lot of debate around whether or not creating a loop video is necessary for success on YouTube. Some people believe that it’s not necessary, while others believe that it is a must. The main benefit of creating a loop video is that it helps to keep your audience engaged. It also helps to create a sense of continuity between your videos.
Creating a loop video for your YouTube channel increases engagement because viewers can watch the video over and over again. This can lead to more clicks on your ads, which can lead to more revenue. It can also increase your subscribers and views. Maybe some people want to watch the same video multiple times in a row without having to keep pressing the play button on the remote.
Filmora is the best video loop editor:
If you need a powerful video editing tool that will let you create high-quality clips with multiple loops, look no further than Filmora . This software allows you to make various loops of your videos for use in social media, on your website or wherever desired. Plus, with Filmora, there is no limit on the number of loops you can create.
Loop video works well for corporate presentations, tutorials, explainer videos, and much more. You can create looping videos by choosing from one of Filmora’s many templates or creating your own. It’s easy to get started with looping video editing in Filmora! Some people want to watch a video while they do other things, like work on the computer.
Filmora is incredibly easy to use. You can quickly create videos by importing footage, editing and adding effects, and exporting your videos. Plus, the software has several built-in tools that let you customize your videos further. It has many features that make it an excellent choice for anyone looking to create high-quality videos quickly and easily.
How can we loop a video on Filmora? Follow these steps to create a looping video on Filmora:
Step 1 Download the Filmora and create a project
Free Download For Win 7 or later(64-bit)
Free Download For macOS 10.14 or later
You can download the Filmora for free. After installation of this software open it and click on Create New Project. Filmora is not only the video maker or editor, you can also add text and music to your videos, and share them on social media or with friends.

Step 2 Open the video and make copies
Open the video in your timeline. All you need to do is right-click on the video and click on copy. Then simply click or press Ctrl+V on your keyboard and do that for times. You can make as many copies as you want. Then you will have the same clip over and over again which creates the loop effect.
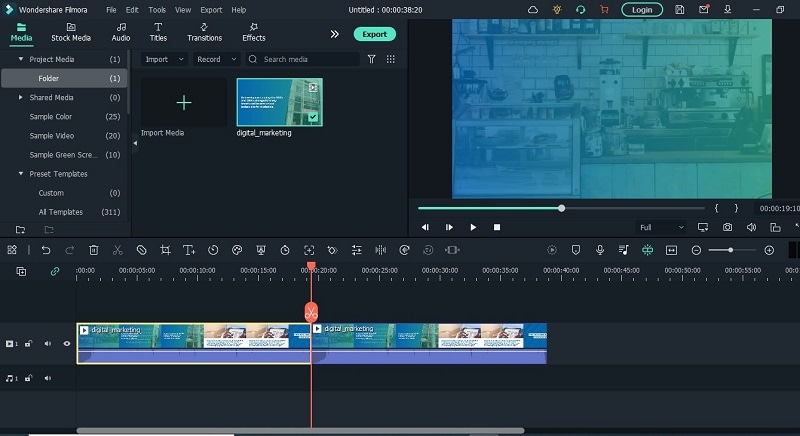
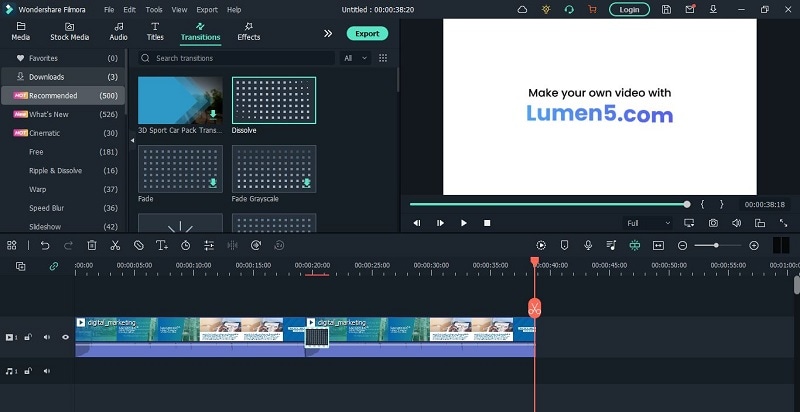
Step 3 Add Transition or any title in the video
After making copies of your video. Add some transitions in your video. Adding transitions to videos can help to keep your videos looking polished and professional. Not only do transitions add an extra layer of visual interest, but they can also help to underscore specific points in your video.
Benefits to create loop video on Filmora
There are many benefits to creating looping videos, especially when using a tool like Filmora. Loop videos are great for social media since they can be set to play on a loop and are viewable without sound. They’re also perfect for short attention spans since you can watch them over and over again without getting bored.
This can be useful for marketing purposes, as it can keep people interested in your video content. Additionally, looping can create a more engaging video experience for viewers, as it keeps them engaged by playing the same clip over and over again. You can easily add captions, and titles to your loop video.
When viewers can pause, rewind, and playback a video over and over again, they are more engaged with it. This increases the chances that they will watch the entire video, and may even share it with friends. You can create a sense of community and connection with your customers. And best of all? You can keep the magic going by adding sound effects and music!
Part 2: Loop a YouTube Video on TV from a Mobile
One of the great features of YouTube is that you can loop YouTube videos on your TV. This means that you can watch a video over and over again without having to fast forward through it. This is great for kids who are constantly asking to watch the same video over and over again. You can also use this feature to watch videos that you have missed.
There is something about relaxing music on the loop that can help to take the edge off. Whether it’s to help you wind down before bed, or to help you relax after a long day, there’s no doubt that looping YouTube on TV can be helpful. Whether you’re looking for something light and calming, or something to help you wind down after a long day, there’s sure to be something on YouTube that can fit the bill.
Let’s have a look at some steps that how to repeat YouTube videos on smart TV.
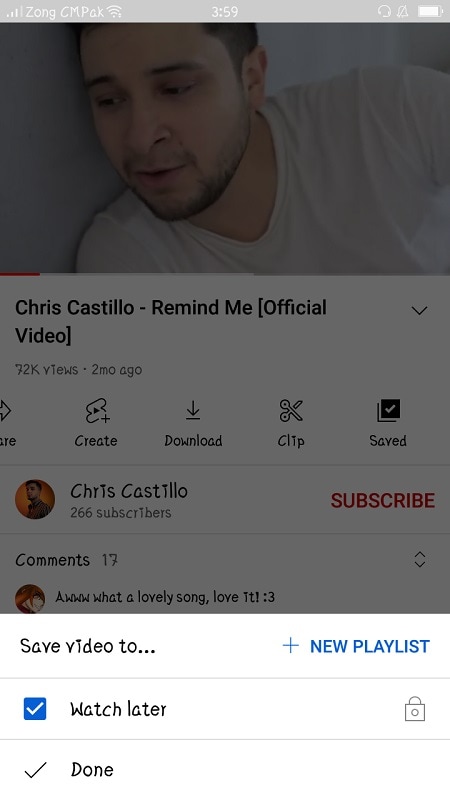
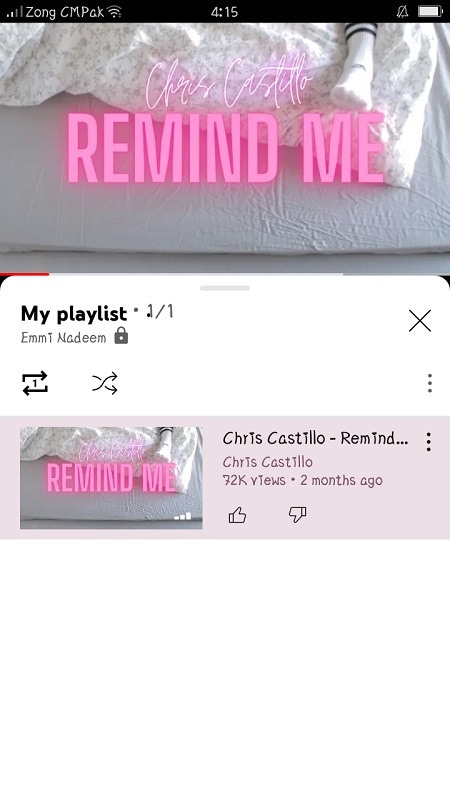
Step 1 Create a Playlist of one or multiple videos
The YouTube app is available on the google play store. You can easily download it from your mobile phones, android, etc. When you open a video on YouTube, several options will appear (like, share, subscribe). You can save the video in your existing playlist or you can create a new playlist.
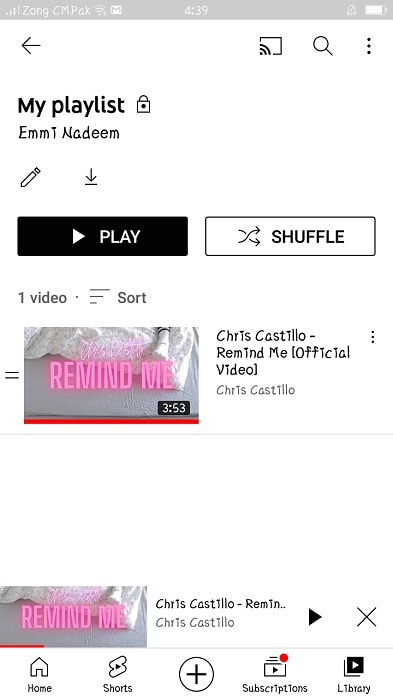
Step 2 Go to the library and select the loop symbol
Click on library this will take you to a list of libraries that have YouTube collections. This can be a great way to find new material to watch, or to find old material that you may have missed. Play back the playlist that you want to loop on the smart TV.
Step 3 Loop the playlist and send the list to the TV
Play the list and click on the loop symbol. At last, launch the YouTube video on your TV. The video will start playing in a loop. It can only be stopped from your mobile phone on which you start playing the list.
Why you might want to loop a YouTube video on a smart TV?
Some people want to watch a video over and over again without having to wait for it to load each time. Looping in a YouTube video can help you do this. Another reason to loop a YouTube video on your TV is if you want to watch it while you are doing something else. YouTube only loops the playlist.
Looping a YouTube video on your TV can also be useful if you have a lot of videos that you want to watch but don’t have enough time for. Looping YouTube videos on your television is a great way to keep your young ones entertained and engaged. Not only are they getting their daily dose of educational content, but they are also being kept enertained.
Wondershare Filmora Loop YouTube videos on PC and Mac with simple clicks.
Free Download Free Download Learn More

![]()
Conclusion
Looping YouTube videos on smart TV is an excellent way to watch the content you love, no matter where you are. While it may be true that loop YouTube videos on a smart TV are not imminent, there are some major benefits to be gained from implementing the new technology.
It’s easy to do, and it can be a great way to spend time with family members and friends. Looping YouTube videos on a smart TV is a great way to add some fun and excitement to your experience. The best part is, there are no limitations or restrictions you can loop as many videos as you want, and watch them in any order!
Free Download For Win 7 or later(64-bit)
Free Download For macOS 10.14 or later
Part 1: How to Create a Loop Video for YouTube
There is a lot of debate around whether or not creating a loop video is necessary for success on YouTube. Some people believe that it’s not necessary, while others believe that it is a must. The main benefit of creating a loop video is that it helps to keep your audience engaged. It also helps to create a sense of continuity between your videos.
Creating a loop video for your YouTube channel increases engagement because viewers can watch the video over and over again. This can lead to more clicks on your ads, which can lead to more revenue. It can also increase your subscribers and views. Maybe some people want to watch the same video multiple times in a row without having to keep pressing the play button on the remote.
Filmora is the best video loop editor:
If you need a powerful video editing tool that will let you create high-quality clips with multiple loops, look no further than Filmora . This software allows you to make various loops of your videos for use in social media, on your website or wherever desired. Plus, with Filmora, there is no limit on the number of loops you can create.
Loop video works well for corporate presentations, tutorials, explainer videos, and much more. You can create looping videos by choosing from one of Filmora’s many templates or creating your own. It’s easy to get started with looping video editing in Filmora! Some people want to watch a video while they do other things, like work on the computer.
Filmora is incredibly easy to use. You can quickly create videos by importing footage, editing and adding effects, and exporting your videos. Plus, the software has several built-in tools that let you customize your videos further. It has many features that make it an excellent choice for anyone looking to create high-quality videos quickly and easily.
How can we loop a video on Filmora? Follow these steps to create a looping video on Filmora:
Step 1 Download the Filmora and create a project
Free Download For Win 7 or later(64-bit)
Free Download For macOS 10.14 or later
You can download the Filmora for free. After installation of this software open it and click on Create New Project. Filmora is not only the video maker or editor, you can also add text and music to your videos, and share them on social media or with friends.
Step 2 Open the video and make copies
Open the video in your timeline. All you need to do is right-click on the video and click on copy. Then simply click or press Ctrl+V on your keyboard and do that for times. You can make as many copies as you want. Then you will have the same clip over and over again which creates the loop effect.
Step 3 Add Transition or any title in the video
After making copies of your video. Add some transitions in your video. Adding transitions to videos can help to keep your videos looking polished and professional. Not only do transitions add an extra layer of visual interest, but they can also help to underscore specific points in your video.
Benefits to create loop video on Filmora
There are many benefits to creating looping videos, especially when using a tool like Filmora. Loop videos are great for social media since they can be set to play on a loop and are viewable without sound. They’re also perfect for short attention spans since you can watch them over and over again without getting bored.
This can be useful for marketing purposes, as it can keep people interested in your video content. Additionally, looping can create a more engaging video experience for viewers, as it keeps them engaged by playing the same clip over and over again. You can easily add captions, and titles to your loop video.
When viewers can pause, rewind, and playback a video over and over again, they are more engaged with it. This increases the chances that they will watch the entire video, and may even share it with friends. You can create a sense of community and connection with your customers. And best of all? You can keep the magic going by adding sound effects and music!
Part 2: Loop a YouTube Video on TV from a Mobile
One of the great features of YouTube is that you can loop YouTube videos on your TV. This means that you can watch a video over and over again without having to fast forward through it. This is great for kids who are constantly asking to watch the same video over and over again. You can also use this feature to watch videos that you have missed.
There is something about relaxing music on the loop that can help to take the edge off. Whether it’s to help you wind down before bed, or to help you relax after a long day, there’s no doubt that looping YouTube on TV can be helpful. Whether you’re looking for something light and calming, or something to help you wind down after a long day, there’s sure to be something on YouTube that can fit the bill.
Let’s have a look at some steps that how to repeat YouTube videos on smart TV.
Step 1 Create a Playlist of one or multiple videos
The YouTube app is available on the google play store. You can easily download it from your mobile phones, android, etc. When you open a video on YouTube, several options will appear (like, share, subscribe). You can save the video in your existing playlist or you can create a new playlist.
Step 2 Go to the library and select the loop symbol
Click on library this will take you to a list of libraries that have YouTube collections. This can be a great way to find new material to watch, or to find old material that you may have missed. Play back the playlist that you want to loop on the smart TV.
Step 3 Loop the playlist and send the list to the TV
Play the list and click on the loop symbol. At last, launch the YouTube video on your TV. The video will start playing in a loop. It can only be stopped from your mobile phone on which you start playing the list.
Why you might want to loop a YouTube video on a smart TV?
Some people want to watch a video over and over again without having to wait for it to load each time. Looping in a YouTube video can help you do this. Another reason to loop a YouTube video on your TV is if you want to watch it while you are doing something else. YouTube only loops the playlist.
Looping a YouTube video on your TV can also be useful if you have a lot of videos that you want to watch but don’t have enough time for. Looping YouTube videos on your television is a great way to keep your young ones entertained and engaged. Not only are they getting their daily dose of educational content, but they are also being kept enertained.
Wondershare Filmora Loop YouTube videos on PC and Mac with simple clicks.
Free Download Free Download Learn More
![]()
Conclusion
Looping YouTube videos on smart TV is an excellent way to watch the content you love, no matter where you are. While it may be true that loop YouTube videos on a smart TV are not imminent, there are some major benefits to be gained from implementing the new technology.
It’s easy to do, and it can be a great way to spend time with family members and friends. Looping YouTube videos on a smart TV is a great way to add some fun and excitement to your experience. The best part is, there are no limitations or restrictions you can loop as many videos as you want, and watch them in any order!
Transform Your Media: A Curated List of the Best Free Video Editing Software (Top 9)
9 Best Free and Easy Editing Apps You Should Know

Richard Bennett
Dec 14, 2023• Proven solutions
Have you ever made a video 100% on your phone using a mobile video editing app?
If you’ve just started off on YouTube, there’s a good chance your main camera is the one in your phone. Actually, there’s a good chance of that even if you’ve been making YouTube videos for a while now.
Since you’re shooting videos on your phone, why shouldn’t you edit them there too? Here are 9 free video editing apps you can use for YouTube.
Note: This is not a ranked list. The apps will appear in alphabetical order.
- Adobe Premiere Clip (Android or iOS)
- Cameo (iOS)
- Clips (iOS)
- Filmora (Android or iOS)
- Funimate (Android or iOS)
- iMovie (iOS)
- Movie Maker Filmmaker by Alive (Android or iOS)
- PowerDirector (Android)
- Vlogit (Android or iOS)
Adobe Premiere Clip (Android or iOS )

Key Points:
- Automatic using clips. Times them to music
- Guides you with pop-up tips
- No text/title overlays
- Exports directly to YouTube
Adobe Premiere Pro is a professional-grade desktop editor, and Adobe Premiere Clip lives up to the quality standards set by its big-brother software. It is missing some features you might want for YouTube videos, like title effects, but it does have some bells and whistles. There’s a good selection of filters.

Making changes to your picture, like adjusting the exposure or the prevalence of highlights or shadows, is just a matter of sliding bars. The tools for splitting and duplicating clips are easy to find too. You just toggle between the two icons right above your video – the one that looks like a shutter and the one that looks like adjustment bars – to switch between the picture tools and the other tools.

You cannot add what you might normally think of as a title effect in Adobe Premiere Clip, so it’ll be hard to fully complete your video. You can add text cards to put in-between your video clips, but you can’t overlay the title on top of a clip.
You can share your video directly to YouTube when you export.
Cameo (iOS)

Key Points:
- Easy-to-apply themes
- Customizable titles
- Limited features
- Exports to 4K (if your clips are 4K)
Vimeo is a video sharing site with more of a ‘filmmaker’ focus than YouTube, so it isn’t a surprise that their mobile editing app Cameo can export high-quality 4K videos.
Like some of the other apps on this list, Cameo does not have a huge variety of functions. You can reorder your clips, trim them, add titles, and apply themes (essentially filter and title combos).
There are three icons on the main interface: Scissors, a Music Note, and Filters.
The Scissors will take you to the trimming screen, where you can make your clip shorter or longer.

You can also add a title in the trimming screen, but you will not be able to change the font style or color until you are in the Filter screen.
In the Filter screen (tap the overlapping filters icon on the main interface) you will be able to adjust the color of your text by tapping on the circle with the A in it. Tapping where it says ‘Font’ will change your font style.

You can also tap on Themes and choose a premade style.

Here’s what ‘Crush’ looks like applied:

My font was changed, and there’s also a filter now. In order to apply a filter, you must start with a theme.
Clips (iOS)

Key Points:
- Great selection of stickers
- Lacks some basic tools
- Simple interface
Clips is an intuitive app with a lot of options for decorating your videos. It is lacking in some of the more basic editings features you might expect (i.e. you cannot split clips or do any color correction), but it has a lot of fun features like stickers and emojis that could make up for that depending on your needs.

There are also more traditional effects, like filters and titles. There are a wide range of title options in styles that are popular on YouTube, and a fairly standard filter selection.

While you cannot split clips in this app, but trimming and reordering them is easy. For trimming, you just select the clip and then Trim to open a screen where you can drag the start and end points of the clip.
To rearrange your clips, just tap the clip you want to move and hold down. You’ll be able to drag it to a new location.
It’d be hard to rely on Clips exclusively as your YouTube video editor, but it’s well suited for Instagram or for making quick ‘on-the-go’ videos.
Filmora (Android or iOS)

Key Points:
- Export directly to YouTube
- 16:9 or 1:1 for Instagram
- Includes effects like transitions, filters, and overlays
- End-roll logo
You can make a complete video easily just by tapping and dragging in Filmora, and there are even effects like filters, transitions, and overlays you can add to make your video more polished.
After importing your media into Filmora (you can import videos and photos saved on your phone, or media which has been uploaded to a social media account like Facebook or Instagram) you can change the order of your clips by tapping one, pressing down for a moment, and then dragging your clips where you want them.
Trimming a clip is as simple as tapping on it and then Duration. You’ll get this screen where you can adjust the length easily by dragging the markers to beginning or endpoints.

Cropping and zooming are simple too.

Filmora comes with pre-made themes you can apply which include titles, filters, and other effects. These might not be ideal if you already have branding you like to use for YouTube, but in some situations, they can make video creation a lot faster.

Filmora comes loaded with music, or you can even import your own music from your phone.
Once you’re done, tap ‘save’ in the top right corner of your screen to export your video. From the save screen, you’ll be able to export your video directly to YouTube.

One potential drawback is that Filmora will add its own logo to the end of your exported video. This logo will not distract from your video content since it is added at the end and never overlaps any of your clips, but it still might not be ideal for all creators.
Funimate (Android or iOS )

Key Points:
- Easily add text and shapes
- Rainbow doodling
- Shake effects
- Small ‘Funimate’ watermark in videos from the free version
Funimate is lives up to the ‘fun’ promise in its name. It’s designed mostly for music videos/Musical.ly and while it is missing a lot of more typical editing options, there are a few free tools in Funimate that other apps just don’t have.
For example, there are shake and distortion effects available through Funimate that you usually only find in desktop software.
You can also draw rainbow designs on your video with your finger – no other app on this list can do that.
The text tool in Funimate is easy to use, and there are cool looking glow effects you can apply in the color selection screen. Those options are also available when you’re adding shapes, likes stars and sparkles.
Funimate is not built for typical editing, which is both its strength and its weakness. Trimming your clips is its own stage which you must complete before you start adding effects, and you cannot split clips or add multiple clips.
The free version of Funimate does add a small watermark to your videos in the bottom-right corner, but it is subtle enough that I almost missed it completely while reviewing the app.
iMovie (iOS)

Key Points:
- Trailer templates
- Themes
- Limited tools and resources
iMovie’s mobile app is designed for ease and includes things like ‘trailer templates’ and themes that allow you to make a video quickly and with minimal effort.
This streamlined app is limited in its features. Other apps on this list have left out color correction tools or clip splitting tools and instead loaded up on decorative features like stickers, emojis, and overlays. iMovie has left out these tools and does not have an abundance of decorative features either.
There are filters, themes, and titles, however.
The titles are simple but polished, and you’ll find all the standard types of filters.
The themes include a variety of graphics and are applied to your entire video, not individual clips. You can also apply one filter to your entire video.
iMovie also includes a decent selection of transitions, which you can apply easily by tapping the area between two clips.
Movie Maker Filmmaker by Alive (Android or iOS )

Key Points:
- Good title tool
- Stickers
- Change clip duration
- 16:9 or 1:1
Movie Maker Filmmaker (the app will be labeled ‘Alive’ in on your phone) has a lot of features that will help you put together a fun YouTube video. There’s a great selection of stickers, filters, and overlays and they’re all easy to apply. You just click on what you want and resize/reposition it in the player.

This app is missing a lot of basic editing features, however. You cannot adjust things like brightness or saturation. This won’t be a problem if you’re happy with your clips as-is, but it’s a bit odd to not have those options.
There is a text tool and while it is fairly basic, it is also flexible. There is a good selection of fonts to choose from, and you can also choose whether or not you want a colored background, and if your text should have a shadow.
Once you’ve decided on the look of your text you can drag it, resize it, and tilt it however you want in the preview screen.
A slightly odd feature of this app is that it doesn’t save your video to your phone or export it directly to YouTube. Instead, it saves it – and shares it – within the app and gives you the option of sharing it with YouTube after.
Power Director (Android)

Key Points:
- A timeline like desktop software
- All the basic editing features
- Lots of transitions
- Videos from the free version will be watermarked
The first thing you’ll notice when you open up Power Director is that the interface looks a lot like the interface of a lot of desktop editors with a very classic timeline. This familiarity could make it easy to jump into if you’re used to editing on your laptop.
However, Power Director is a bit less intuitive than most of the other apps on this list. I wouldn’t go so far as to say it’s difficult to use – it isn’t, it’s much easier than a lot of desktop software – but among mobile apps designed for streamlined efficiency it does stand out as being a bit harder to dive into.
That is partly because there’s a lot you can do with it. It has the tools you would expect in an editor. You can split and trim clips, and you have all the standard color tools including some that most mobile apps leave out.
A lot of apps have Brightness, Contrast, and Saturation, but PowerDirector also has Color Temperature and Tint.
In addition to editing tools, PowerDirector has bells and whistles like filters –
- and a ton of great transitions.
One drawback of PowerDirector is that the free version will watermark your videos. This watermark is not intrusive, but it isn’t as subtle as the Funimate one either.
You can export videos from PowerDirector directly to YouTube.
Vlogit (Android or iOS )

Key Points:
- Easy thumbnail maker
- Export directly to YouTube
- Animated stickers
Vlogit is also an app from the creators of the Filmora Video Editor. It isn’t quite as intuitive as Filmora, but the major benefit of Vlogit for YouTube creators is that it was designed with you in mind. It has features like animated stickers, emojis, and a thumbnail maker which were included specifically because YouTubers and vloggers need them.
All the usual adjustments you might want to make, like saturation or sharpness, are easy in Vlogit. So are adjustments to the length or crop of clips.
After you save your video you’ll have the option of creating a thumbnail using a screenshot from your video. You can add a colored border, text, emojis, and more!
Once you’re done, you can export directly to YouTube. Like Filmora, Vlogit does have a post-video logo roll.
Have you ever used a free mobile app to edit one of your YouTube videos? What did you use, and were you happy with the results?
Richard Bennett
Richard Bennett is a writer and a lover of all things video.
Follow @Richard Bennett
Richard Bennett
Dec 14, 2023• Proven solutions
Have you ever made a video 100% on your phone using a mobile video editing app?
If you’ve just started off on YouTube, there’s a good chance your main camera is the one in your phone. Actually, there’s a good chance of that even if you’ve been making YouTube videos for a while now.
Since you’re shooting videos on your phone, why shouldn’t you edit them there too? Here are 9 free video editing apps you can use for YouTube.
Note: This is not a ranked list. The apps will appear in alphabetical order.
- Adobe Premiere Clip (Android or iOS)
- Cameo (iOS)
- Clips (iOS)
- Filmora (Android or iOS)
- Funimate (Android or iOS)
- iMovie (iOS)
- Movie Maker Filmmaker by Alive (Android or iOS)
- PowerDirector (Android)
- Vlogit (Android or iOS)
Adobe Premiere Clip (Android or iOS )
Key Points:
- Automatic using clips. Times them to music
- Guides you with pop-up tips
- No text/title overlays
- Exports directly to YouTube
Adobe Premiere Pro is a professional-grade desktop editor, and Adobe Premiere Clip lives up to the quality standards set by its big-brother software. It is missing some features you might want for YouTube videos, like title effects, but it does have some bells and whistles. There’s a good selection of filters.
Making changes to your picture, like adjusting the exposure or the prevalence of highlights or shadows, is just a matter of sliding bars. The tools for splitting and duplicating clips are easy to find too. You just toggle between the two icons right above your video – the one that looks like a shutter and the one that looks like adjustment bars – to switch between the picture tools and the other tools.
You cannot add what you might normally think of as a title effect in Adobe Premiere Clip, so it’ll be hard to fully complete your video. You can add text cards to put in-between your video clips, but you can’t overlay the title on top of a clip.
You can share your video directly to YouTube when you export.
Cameo (iOS)
Key Points:
- Easy-to-apply themes
- Customizable titles
- Limited features
- Exports to 4K (if your clips are 4K)
Vimeo is a video sharing site with more of a ‘filmmaker’ focus than YouTube, so it isn’t a surprise that their mobile editing app Cameo can export high-quality 4K videos.
Like some of the other apps on this list, Cameo does not have a huge variety of functions. You can reorder your clips, trim them, add titles, and apply themes (essentially filter and title combos).
There are three icons on the main interface: Scissors, a Music Note, and Filters.
The Scissors will take you to the trimming screen, where you can make your clip shorter or longer.
You can also add a title in the trimming screen, but you will not be able to change the font style or color until you are in the Filter screen.
In the Filter screen (tap the overlapping filters icon on the main interface) you will be able to adjust the color of your text by tapping on the circle with the A in it. Tapping where it says ‘Font’ will change your font style.
You can also tap on Themes and choose a premade style.
Here’s what ‘Crush’ looks like applied:
My font was changed, and there’s also a filter now. In order to apply a filter, you must start with a theme.
Clips (iOS)
Key Points:
- Great selection of stickers
- Lacks some basic tools
- Simple interface
Clips is an intuitive app with a lot of options for decorating your videos. It is lacking in some of the more basic editings features you might expect (i.e. you cannot split clips or do any color correction), but it has a lot of fun features like stickers and emojis that could make up for that depending on your needs.
There are also more traditional effects, like filters and titles. There are a wide range of title options in styles that are popular on YouTube, and a fairly standard filter selection.
While you cannot split clips in this app, but trimming and reordering them is easy. For trimming, you just select the clip and then Trim to open a screen where you can drag the start and end points of the clip.
To rearrange your clips, just tap the clip you want to move and hold down. You’ll be able to drag it to a new location.
It’d be hard to rely on Clips exclusively as your YouTube video editor, but it’s well suited for Instagram or for making quick ‘on-the-go’ videos.
Filmora (Android or iOS)
Key Points:
- Export directly to YouTube
- 16:9 or 1:1 for Instagram
- Includes effects like transitions, filters, and overlays
- End-roll logo
You can make a complete video easily just by tapping and dragging in Filmora, and there are even effects like filters, transitions, and overlays you can add to make your video more polished.
After importing your media into Filmora (you can import videos and photos saved on your phone, or media which has been uploaded to a social media account like Facebook or Instagram) you can change the order of your clips by tapping one, pressing down for a moment, and then dragging your clips where you want them.
Trimming a clip is as simple as tapping on it and then Duration. You’ll get this screen where you can adjust the length easily by dragging the markers to beginning or endpoints.
Cropping and zooming are simple too.
Filmora comes with pre-made themes you can apply which include titles, filters, and other effects. These might not be ideal if you already have branding you like to use for YouTube, but in some situations, they can make video creation a lot faster.
Filmora comes loaded with music, or you can even import your own music from your phone.
Once you’re done, tap ‘save’ in the top right corner of your screen to export your video. From the save screen, you’ll be able to export your video directly to YouTube.
One potential drawback is that Filmora will add its own logo to the end of your exported video. This logo will not distract from your video content since it is added at the end and never overlaps any of your clips, but it still might not be ideal for all creators.
Funimate (Android or iOS )
Key Points:
- Easily add text and shapes
- Rainbow doodling
- Shake effects
- Small ‘Funimate’ watermark in videos from the free version
Funimate is lives up to the ‘fun’ promise in its name. It’s designed mostly for music videos/Musical.ly and while it is missing a lot of more typical editing options, there are a few free tools in Funimate that other apps just don’t have.
For example, there are shake and distortion effects available through Funimate that you usually only find in desktop software.
You can also draw rainbow designs on your video with your finger – no other app on this list can do that.
The text tool in Funimate is easy to use, and there are cool looking glow effects you can apply in the color selection screen. Those options are also available when you’re adding shapes, likes stars and sparkles.
Funimate is not built for typical editing, which is both its strength and its weakness. Trimming your clips is its own stage which you must complete before you start adding effects, and you cannot split clips or add multiple clips.
The free version of Funimate does add a small watermark to your videos in the bottom-right corner, but it is subtle enough that I almost missed it completely while reviewing the app.
iMovie (iOS)
Key Points:
- Trailer templates
- Themes
- Limited tools and resources
iMovie’s mobile app is designed for ease and includes things like ‘trailer templates’ and themes that allow you to make a video quickly and with minimal effort.
This streamlined app is limited in its features. Other apps on this list have left out color correction tools or clip splitting tools and instead loaded up on decorative features like stickers, emojis, and overlays. iMovie has left out these tools and does not have an abundance of decorative features either.
There are filters, themes, and titles, however.
The titles are simple but polished, and you’ll find all the standard types of filters.
The themes include a variety of graphics and are applied to your entire video, not individual clips. You can also apply one filter to your entire video.
iMovie also includes a decent selection of transitions, which you can apply easily by tapping the area between two clips.
Movie Maker Filmmaker by Alive (Android or iOS )
Key Points:
- Good title tool
- Stickers
- Change clip duration
- 16:9 or 1:1
Movie Maker Filmmaker (the app will be labeled ‘Alive’ in on your phone) has a lot of features that will help you put together a fun YouTube video. There’s a great selection of stickers, filters, and overlays and they’re all easy to apply. You just click on what you want and resize/reposition it in the player.
This app is missing a lot of basic editing features, however. You cannot adjust things like brightness or saturation. This won’t be a problem if you’re happy with your clips as-is, but it’s a bit odd to not have those options.
There is a text tool and while it is fairly basic, it is also flexible. There is a good selection of fonts to choose from, and you can also choose whether or not you want a colored background, and if your text should have a shadow.
Once you’ve decided on the look of your text you can drag it, resize it, and tilt it however you want in the preview screen.
A slightly odd feature of this app is that it doesn’t save your video to your phone or export it directly to YouTube. Instead, it saves it – and shares it – within the app and gives you the option of sharing it with YouTube after.
Power Director (Android)
Key Points:
- A timeline like desktop software
- All the basic editing features
- Lots of transitions
- Videos from the free version will be watermarked
The first thing you’ll notice when you open up Power Director is that the interface looks a lot like the interface of a lot of desktop editors with a very classic timeline. This familiarity could make it easy to jump into if you’re used to editing on your laptop.
However, Power Director is a bit less intuitive than most of the other apps on this list. I wouldn’t go so far as to say it’s difficult to use – it isn’t, it’s much easier than a lot of desktop software – but among mobile apps designed for streamlined efficiency it does stand out as being a bit harder to dive into.
That is partly because there’s a lot you can do with it. It has the tools you would expect in an editor. You can split and trim clips, and you have all the standard color tools including some that most mobile apps leave out.
A lot of apps have Brightness, Contrast, and Saturation, but PowerDirector also has Color Temperature and Tint.
In addition to editing tools, PowerDirector has bells and whistles like filters –
- and a ton of great transitions.
One drawback of PowerDirector is that the free version will watermark your videos. This watermark is not intrusive, but it isn’t as subtle as the Funimate one either.
You can export videos from PowerDirector directly to YouTube.
Vlogit (Android or iOS )
Key Points:
- Easy thumbnail maker
- Export directly to YouTube
- Animated stickers
Vlogit is also an app from the creators of the Filmora Video Editor. It isn’t quite as intuitive as Filmora, but the major benefit of Vlogit for YouTube creators is that it was designed with you in mind. It has features like animated stickers, emojis, and a thumbnail maker which were included specifically because YouTubers and vloggers need them.
All the usual adjustments you might want to make, like saturation or sharpness, are easy in Vlogit. So are adjustments to the length or crop of clips.
After you save your video you’ll have the option of creating a thumbnail using a screenshot from your video. You can add a colored border, text, emojis, and more!
Once you’re done, you can export directly to YouTube. Like Filmora, Vlogit does have a post-video logo roll.
Have you ever used a free mobile app to edit one of your YouTube videos? What did you use, and were you happy with the results?
Richard Bennett
Richard Bennett is a writer and a lover of all things video.
Follow @Richard Bennett
Also read:
- In 2024, Decoding Digital Dollars An Effective Way to Understand YouTube Revenue Dynamics
- 2024 Approved Earnings Analysis YouTube Views vs Financial Gain
- Video Editors Unite Adobe and YouTube Integration Tips
- Thrifty Filmmaker Best Economical Camera Lineup
- [Updated] Essential Media Makers' Software Linux Edition
- 2024 Approved Channel Combat Determining Which Earns More From Videos—Dailymotion or YouTube
- Elevating Your Channel's Ranking Simple Strategies Unveiled
- Covert Content Creation How to Invisibly Alter Videos
- Drafting Dynamic Denouements
- 2024 Approved Avoid the Backtrack Blunder with These Tips
- [New] A Treasure Trove Sifting Through the Top 10 Economical Online Art Hubs
- Cross-Application Title Guidance YTB to Fb for 2024
- How to Captivate and Expand Your Online Following with Viral YouTube Shorts
- Direct YouTube Stream of Google Meet - Step-by-Step Instructions
- Gourmet Guide Culinary Video Production
- Cinematic Delights for a Low Price - Top 10 Free Movies on YouTube
- 2024 Approved 2023'S Favorite Animated Channels on YouTube (Daytime Vibes)
- Rapid Relay Youtube Playlists to the Public
- In 2024, Digital Dominion for Techno Gamers
- [Updated] Economical Audio Devices for Vloggers on a Budget
- Achieving Pristine Video Quality on YouTube
- [New] A Comprehensive Look at YouTube Shorts Template Design
- Apex Video & Tune Constructor Studio-Quality PC Edition for 2024
- [New] Enhance Your Music Library Top 6 Free iOS Apps for Audio Conversion
- Viral Vibrancy Trending Audio Amplifying Your YT Shorts
- [New] Elevate Your Vlogs Optimizing Title, Description & Tags
- [New] Essential Tips for Locating YouTube's Content Creation Hub
- [New] Dive Deep Into Designing Dynamic YouTube Live Thumbnails
- Revealing the Secrets Accessing Forgotten YouTube Vids
- [Updated] 2024 Approved The Prime Collection of PC Screen Capture Tools (Win11)
- [New] 2024 Approved Top Tweet Talent Showdown #1-#10 Edition
- [New] 2024 Approved Master the Art of Message Interaction on Desktop/Mobile
- [Updated] Indulge in These 15 Influencer-Led TikTok Recipes That Are a Hit Online
- Apowersoft Reviewed A Guide to PC Screen Capture for 2024
- [New] Your Ultimate Selfie Validation Handbook for 2024
- How to Change your Honor 70 Lite 5G Location on Twitter | Dr.fone
- 2024 Approved Showcase Your Story Premium IG Covers for iPhone Users
- In 2024, The Ultimate Style Tutorial for Discord Messages
- [New] Cosmetics Creativity Guides
- [New] 2024 Approved Desktop Capture Showdown Select Between OBS and ShadowPlay
- 3 Effective Ways to Unlock iCloud Account Without Password From iPhone 7 Plus
- [Updated] Secrets Unlocked Banishing Instagram Video Fails for 2024
- A6400 Absent Actors Where Are the Videos?
- In 2024, How to Bypass Android Lock Screen Using Emergency Call On Nokia G22?
- How To Transfer Data From Apple iPhone 14 To Other iPhone 15 Pro Max devices? | Dr.fone
- In 2024, Superior Online Sound Devices Ranked for Recording 2023
- Optimizing Screen Recording on iPhone/iPad
- In 2024, Full Guide to Catch 100 IV Pokémon Using a Map On Honor V Purse | Dr.fone
- [Updated] Capturing Screens with Internal Recorder on Mate 10/20 & P Series (P20, P10) Smartphones.
- [New] Undead Uprising - Top 8 Unleashed in Video Game Realm for 2024
- In 2024, NextUpCameras Venturing Past MyCam
- In 2024, Best Anti Tracker Software For Samsung Galaxy F04 | Dr.fone
- How to Unlock Verizon Apple iPhone 14 Plus
- New How to Combine Videos Into One on Instagram for 2024
- In 2024, Everything You Need To Know About Unlocked Apple iPhone 6 Plus
- [New] 10 Indispensable Instagram Video Editing Apps for Marketers for 2024
- How To Restore a Bricked ZTE Blade A73 5G Back to Operation | Dr.fone
- [New] 2024 Approved How to Post a Link on Instagram Stories and Posts
- Title: "TV-Friendly Settings for Repeated Online Videos"
- Author: Steven
- Created at : 2024-05-25 20:37:36
- Updated at : 2024-05-26 20:37:36
- Link: https://youtube-clips.techidaily.com/tv-friendly-settings-for-repeated-online-videos/
- License: This work is licensed under CC BY-NC-SA 4.0.
