
"Transform Your Videos Simple Steps to Include YouTube Subtitles/CC"
Transform Your Videos: Simple Steps to Include YouTube Subtitles/CC
How to Easily Add Subtitles and Closed Captions to YouTube Video

Richard Bennett
Mar 27, 2024• Proven solutions
In this article, we are going to show you how important it is to add subtitle and closed captions in your YouTube video, and how to add them.
The best video editor for YouTubers - Wondershare Filmora , not only allows you to cut, crop, rotate, reverse videos, but also offers your advanced features like PIP, Green Screen, or audio mixing. What’s more, you can find lots of effects for Fashion, gaming, education, tutorial, sports, etc. Check this article to know more.


Why subtitle and closed captions are important for YouTube videos?
- Forced closed captions and subtitles actually help the viewers to understand the content in your video if the audio quality of your video is bad, muffled or barely audible. Reading makes it easier for them to understand.
- This also helps people with hearing impairments. People with troubled ears can still watch and understand your content.
- It’s a great aid to such videos which have been recorded in other foreign languages that you don’t understand. Hence it will increase the number of viewers all around the world.
- They both are generally added for easy accessibility to the viewers who wish to watch in sound sensitive environments.
So, here we are going to show you two ways to add subtittles to video: directly or uploading caption or transcript files
Adding subtitles and closed captions manually
To add subtitles and closed captions to your YouTube video, fisrt, you should sign in to your YouTube account. On left right below ‘Home’ you will find ‘My Channel’. It will direct you to your personal YouTube page. On the top, right next to your subscribers lays the ‘Video manager’, giving you the list of your uploaded videos.
Select the video and click on edit to get a drop down menu. Click on subtitles and CC. This will take you to the subtitling interface. To the right of video select ‘add new subtitles’ and then ‘create new subtitles’. Select the subtitle language. Play the video to listen to the content and type down in the box. Click on ‘+’ button once you are done.
This will create a subtitle timeline right beneath the video. You can manage by dragging and expanding the subtitle duration according to the audio of the video. The subtitle will appear at the bottom of the video screen. Click ‘publish’ once done.
An interruption might occur with appearing of subtitles in accordance with video. Hence a lot precision is required while doing so.
Uploading Caption or Transcript Files automatically
To upload Caption or Transcript Files to YouTube Videos you first need to create a format on a text editor. For windows use Notepad and for Mac you may use TextEdit. Create a format of putting the number of subtitle first, time stamp and then text of the subtitle. For example
1\
00:02:34:12 using a format of (hour : minute : second : millisecond)
2. *text*
This is the sample text for first subtitle at zero hours, two minutes, thirty four seconds and twelve milliseconds. Once done with this. Go to file, select ‘save as’. Write the file name with an extension of .srt and select ‘All files’ for type of file. Click encoding menu and select UTF-8. Once saved, sign in to your YouTube account.
On left right below ‘Home’ you will find ‘My Channel’. It will direct you to your personal YouTube page. On the top, right next to your subscribers lays the ‘Video manager’, giving you the list of your uploaded videos.
Select the video and click on edit to get a drop down menu. Click on subtitles and CC. Go to ‘add subtitles’ and then ‘upload a file’. A pop-up menu will appear select ‘subtitles file’. Click upload. The file will send subtitles to your video.
This will create a subtitle timeline right beneath the video. You can manage by dragging and expanding the subtitle duration according to the audio of the video. The subtitle will appear at the bottom of the video screen. Click ‘publish’ once done.
3 Best Tools for add/managing video Subtitles/CC
1. Amara
Amara is a smart video editor which helps insert captions and subtitles to videos. It also helps in transcribing the videos. It takes help of crowd sourcing to subtitle any YouTube video. They take help from viewers to subtitle the videos. By making crowd subtitling available for any YouTube creator, they are allowing them to reach more viewers in more languages
2. DIY Captions
DIY captions help you to transcribe the YouTube videos, if not in most accurate manner, then in a little easier way. All you have to do is just paste the URL of the YouTube video and it will provide you all the subtitles. These may not be accurate but will provide you major base material which can be tweaked a bit here and there and is far better than making all the subtitles starting from scratch.
3 Subtitles for YouTube
Subtitles for YouTube is a Google Chrome extension which provides subtitles for YouTube videos. For this you will have to provide a subtitle file with .srt extension. The attractive feature of this is that you won’t have to download the video and still run the subtitles on it. This is very much helpful for people who work on YouTube or watch movies without subtitles.
Richard Bennett
Richard Bennett is a writer and a lover of all things video.
Follow @Richard Bennett
Richard Bennett
Mar 27, 2024• Proven solutions
In this article, we are going to show you how important it is to add subtitle and closed captions in your YouTube video, and how to add them.
The best video editor for YouTubers - Wondershare Filmora , not only allows you to cut, crop, rotate, reverse videos, but also offers your advanced features like PIP, Green Screen, or audio mixing. What’s more, you can find lots of effects for Fashion, gaming, education, tutorial, sports, etc. Check this article to know more.
Why subtitle and closed captions are important for YouTube videos?
- Forced closed captions and subtitles actually help the viewers to understand the content in your video if the audio quality of your video is bad, muffled or barely audible. Reading makes it easier for them to understand.
- This also helps people with hearing impairments. People with troubled ears can still watch and understand your content.
- It’s a great aid to such videos which have been recorded in other foreign languages that you don’t understand. Hence it will increase the number of viewers all around the world.
- They both are generally added for easy accessibility to the viewers who wish to watch in sound sensitive environments.
So, here we are going to show you two ways to add subtittles to video: directly or uploading caption or transcript files
Adding subtitles and closed captions manually
To add subtitles and closed captions to your YouTube video, fisrt, you should sign in to your YouTube account. On left right below ‘Home’ you will find ‘My Channel’. It will direct you to your personal YouTube page. On the top, right next to your subscribers lays the ‘Video manager’, giving you the list of your uploaded videos.
Select the video and click on edit to get a drop down menu. Click on subtitles and CC. This will take you to the subtitling interface. To the right of video select ‘add new subtitles’ and then ‘create new subtitles’. Select the subtitle language. Play the video to listen to the content and type down in the box. Click on ‘+’ button once you are done.
This will create a subtitle timeline right beneath the video. You can manage by dragging and expanding the subtitle duration according to the audio of the video. The subtitle will appear at the bottom of the video screen. Click ‘publish’ once done.
An interruption might occur with appearing of subtitles in accordance with video. Hence a lot precision is required while doing so.
Uploading Caption or Transcript Files automatically
To upload Caption or Transcript Files to YouTube Videos you first need to create a format on a text editor. For windows use Notepad and for Mac you may use TextEdit. Create a format of putting the number of subtitle first, time stamp and then text of the subtitle. For example
1\
00:02:34:12 using a format of (hour : minute : second : millisecond)
2. *text*
This is the sample text for first subtitle at zero hours, two minutes, thirty four seconds and twelve milliseconds. Once done with this. Go to file, select ‘save as’. Write the file name with an extension of .srt and select ‘All files’ for type of file. Click encoding menu and select UTF-8. Once saved, sign in to your YouTube account.
On left right below ‘Home’ you will find ‘My Channel’. It will direct you to your personal YouTube page. On the top, right next to your subscribers lays the ‘Video manager’, giving you the list of your uploaded videos.
Select the video and click on edit to get a drop down menu. Click on subtitles and CC. Go to ‘add subtitles’ and then ‘upload a file’. A pop-up menu will appear select ‘subtitles file’. Click upload. The file will send subtitles to your video.
This will create a subtitle timeline right beneath the video. You can manage by dragging and expanding the subtitle duration according to the audio of the video. The subtitle will appear at the bottom of the video screen. Click ‘publish’ once done.
3 Best Tools for add/managing video Subtitles/CC
1. Amara
Amara is a smart video editor which helps insert captions and subtitles to videos. It also helps in transcribing the videos. It takes help of crowd sourcing to subtitle any YouTube video. They take help from viewers to subtitle the videos. By making crowd subtitling available for any YouTube creator, they are allowing them to reach more viewers in more languages
2. DIY Captions
DIY captions help you to transcribe the YouTube videos, if not in most accurate manner, then in a little easier way. All you have to do is just paste the URL of the YouTube video and it will provide you all the subtitles. These may not be accurate but will provide you major base material which can be tweaked a bit here and there and is far better than making all the subtitles starting from scratch.
3 Subtitles for YouTube
Subtitles for YouTube is a Google Chrome extension which provides subtitles for YouTube videos. For this you will have to provide a subtitle file with .srt extension. The attractive feature of this is that you won’t have to download the video and still run the subtitles on it. This is very much helpful for people who work on YouTube or watch movies without subtitles.
Richard Bennett
Richard Bennett is a writer and a lover of all things video.
Follow @Richard Bennett
Instant Inspiration: The Easy Guide to Building Custom YouTube Music Mixes (Web/App)
YouTube is one of the biggest video-sharing websites where you can find unlimited videos of your favorite songs in various genres for free. However, due to the thousands of channels on YouTube, remember a soundtrack you once liked.
To tackle this issue, you must create a playlist containing only those you prefer to listen to.
So, if you are looking for information on creating a YouTube music playlist on your Windows or Mac PC, Android, or iPhone web browser, read this article and follow the steps carefully.
How to Create a YouTube Music Playlist?
Are you one of those who want to listen to their favorite tracks while working out or carrying on their work-related tasks? If that’s the case, a YouTube Playlist might come in handy as you don’t have to search again and again for your songs on your device.
How To Create a YouTube Music Playlist on the Web?
If you are using a Windows or Mac computer and want to create a YouTube music playlist on a web browser, follow the below steps:
Step1 In the first step, turn on your PC, launch a web browser from the desktop or Dock, and head to theYouTube website. Next, Sign into your account with your Google email ID if you are not already logged in.

![]()
Note: It is only possible to create a YouTube music playlist by signing into your account.
Step2 When you have signed in, look for your favorite track on the YouTube live feed page or search for it in the search bar at the top of the screen. Once you have found the song, click on it to play it, click the three horizontal dots at the bottom right-hand side of the video, and select the “Save” option from the small pop-up.
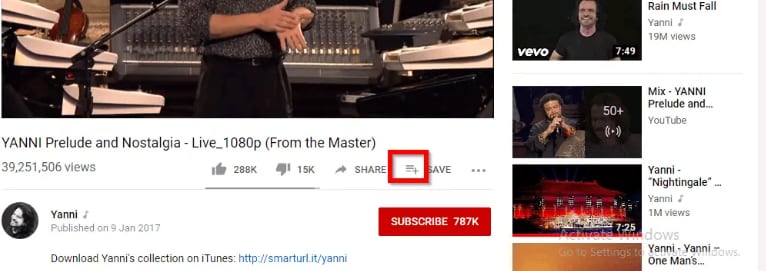
Step3
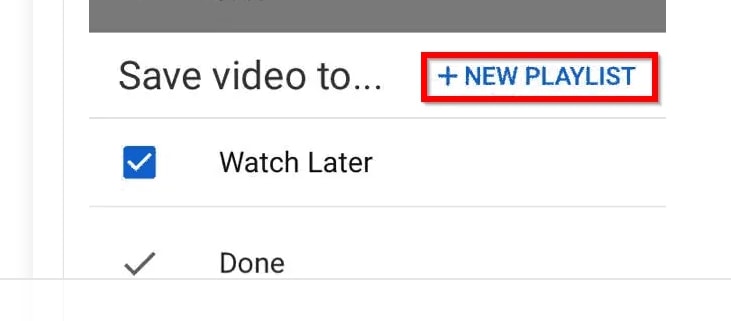
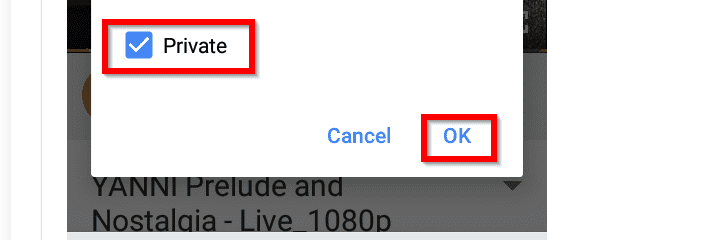
- Now, select the “Create a new playlist”
- Type in the name of your playlist.
- Choose to make it Public, Unlisted, or Private.

The differences between the three options are:
- A Public playlist is a list of videos that any random person can see, access, or use it.
- An Unlisted playlist can be shared with others by using its link to access it.
- A Private playlist cannot be seen, accessed or used by anyone except you.
Finally, click the “Create” button, and your YouTube music playlist will be saved automatically.
Step4 Repeat the second and third steps to save all the other songs you wish to add to the same playlist. Once done, head back to the main YouTube feed page, click “Library,” and scroll to the middle of the page in the right pane to access and play the music playlist at your will.

![]()
Note: You can always edit your YouTube music playlist by changing its name, privacy, and description or adding and removing any tracks. It is also possible to delete any of your playlists or create and save multiple playlists on your device’s web browser.
How to Create a YouTube Music playlist on iPhone?
To create a YouTube music playlist on your iPhone, follow these quick steps.:
Step1 Download and launch the YouTube Music app on your iPhone , sign into your account, and tap a song you want to add to your playlist. Next, tap on the music video once for the create a playlist option to pop up.

Step2 Now tap the three horizontal lines with the Plus icon, tap “+ NEW PLAYLIST” at the bottom right corner of the screen, and type in the name of the new music playlist.
Step3 In the next step, type in the name of your new playlist, select your privacy preferences, i.e., Private, Public, or unlisted, and tap “Create” to complete the process.

Finally, close the video, tap “Library” at the bottom of the screen, scroll down and see your new YouTube music playlist.
How to Create a YouTube Music playlist on Android?
YouTube Music app interface for Android is different than for iPhone, so do the following steps to create a new playlist quickly.
Step1 Download and launch the YouTube Music app on your Android , sign into your account, and tap a song to open it. Next, tap on the music video once and tap the three horizontal lines with the Plus icon.
Then, tap “Create a new playlist” at the bottom right corner of the screen, and type in the name of the new music playlist.

Step2 In the next step, choose your privacy preferences and tap “OK” to create the new YouTube music playlist.
Now tap to close the video, tap “Library” at the bottom of the screen, scroll down in the middle of the app and view your new YouTube music playlist.
![]()
Note: You may see an option to create a new channel during the YouTube music playlist process. If so, tap “Create Channel” to see the “+ NEW PLAYLIST” option on your iPhone and the “Create a new playlist” option on your Android YouTube app.
Bonus Video Tutorial: From a YouTube User to Creator - How To Make Music Video
You know how to create a YouTube playlist on the web or on your mobile. However, as you are a music lover and use YouTube frequently, are you interested in creating music videos by yourself? If yes, please watch the video below. It will show you how to make music videos with a user-friendly video editor, Filmora . We hope you can enjoy your YouTube music while exploring more creative possibilities:
Free Download For Win 7 or later(64-bit)
Free Download For macOS 10.14 or later
Conclusion
Listening to YouTube’s free music tracks is more fun when you do not have to go and forth to search for your favorite songs. You can enjoy the experience more when you have personalized playlists for situations like a long drive, studying, or working in an office.
So, in this article, we have discussed a step-by-step process for creating a YouTube music playlist on a web browser, Android, and iPhone, and hopefully, you can dance to your favorite beats without searching for them first on YouTube.
Step2 When you have signed in, look for your favorite track on the YouTube live feed page or search for it in the search bar at the top of the screen. Once you have found the song, click on it to play it, click the three horizontal dots at the bottom right-hand side of the video, and select the “Save” option from the small pop-up.
Step3
- Now, select the “Create a new playlist”
- Type in the name of your playlist.
- Choose to make it Public, Unlisted, or Private.
The differences between the three options are:
- A Public playlist is a list of videos that any random person can see, access, or use it.
- An Unlisted playlist can be shared with others by using its link to access it.
- A Private playlist cannot be seen, accessed or used by anyone except you.
Finally, click the “Create” button, and your YouTube music playlist will be saved automatically.
Step4 Repeat the second and third steps to save all the other songs you wish to add to the same playlist. Once done, head back to the main YouTube feed page, click “Library,” and scroll to the middle of the page in the right pane to access and play the music playlist at your will.
![]()
Note: You can always edit your YouTube music playlist by changing its name, privacy, and description or adding and removing any tracks. It is also possible to delete any of your playlists or create and save multiple playlists on your device’s web browser.
How to Create a YouTube Music playlist on iPhone?
To create a YouTube music playlist on your iPhone, follow these quick steps.:
Step1 Download and launch the YouTube Music app on your iPhone , sign into your account, and tap a song you want to add to your playlist. Next, tap on the music video once for the create a playlist option to pop up.
Step2 Now tap the three horizontal lines with the Plus icon, tap “+ NEW PLAYLIST” at the bottom right corner of the screen, and type in the name of the new music playlist.
Step3 In the next step, type in the name of your new playlist, select your privacy preferences, i.e., Private, Public, or unlisted, and tap “Create” to complete the process.
Finally, close the video, tap “Library” at the bottom of the screen, scroll down and see your new YouTube music playlist.
How to Create a YouTube Music playlist on Android?
YouTube Music app interface for Android is different than for iPhone, so do the following steps to create a new playlist quickly.
Step1 Download and launch the YouTube Music app on your Android , sign into your account, and tap a song to open it. Next, tap on the music video once and tap the three horizontal lines with the Plus icon.
Then, tap “Create a new playlist” at the bottom right corner of the screen, and type in the name of the new music playlist.
Step2 In the next step, choose your privacy preferences and tap “OK” to create the new YouTube music playlist.
Now tap to close the video, tap “Library” at the bottom of the screen, scroll down in the middle of the app and view your new YouTube music playlist.
![]()
Note: You may see an option to create a new channel during the YouTube music playlist process. If so, tap “Create Channel” to see the “+ NEW PLAYLIST” option on your iPhone and the “Create a new playlist” option on your Android YouTube app.
Bonus Video Tutorial: From a YouTube User to Creator - How To Make Music Video
You know how to create a YouTube playlist on the web or on your mobile. However, as you are a music lover and use YouTube frequently, are you interested in creating music videos by yourself? If yes, please watch the video below. It will show you how to make music videos with a user-friendly video editor, Filmora . We hope you can enjoy your YouTube music while exploring more creative possibilities:
Free Download For Win 7 or later(64-bit)
Free Download For macOS 10.14 or later
Conclusion
Listening to YouTube’s free music tracks is more fun when you do not have to go and forth to search for your favorite songs. You can enjoy the experience more when you have personalized playlists for situations like a long drive, studying, or working in an office.
So, in this article, we have discussed a step-by-step process for creating a YouTube music playlist on a web browser, Android, and iPhone, and hopefully, you can dance to your favorite beats without searching for them first on YouTube.
Also read:
- [New] Premier Productions First Impression for 2024
- [New] Step-by-Step Guide to Game Recording Using OBS
- Figures Unveiled! Exploring YouTube's Curious Numbers (2017)
- How do i sign a Word 2023 document electronically
- How to Make a Cool Intro for YouTube? [+Free Templates]
- How to Redo on Windows With a Hotkey
- How to Stop Dragon Age: Origins From Freezing or Crashing on Windows 10
- In 2024, Advanced Array Manipulations and Sorting Algorithms
- In 2024, Bridging Gaps Transforming Trend Data Into Video Concepts
- In 2024, Essential Tips for Digital Boards in Zoom Desktops & Mobile
- Mastering Xbox Livestreaming on Facebook Platform
- Shaman Pathways - Deathwalking | Free Book
- Title: Transform Your Videos Simple Steps to Include YouTube Subtitles/CC
- Author: Steven
- Created at : 2024-11-30 16:25:12
- Updated at : 2024-12-03 21:13:08
- Link: https://youtube-clips.techidaily.com/transform-your-videos-simple-steps-to-include-youtube-subtitlescc/
- License: This work is licensed under CC BY-NC-SA 4.0.