
:max_bytes(150000):strip_icc():format(webp)/GettyImages-1369568023-c596ac8d6b5a4f3682bda2fa0feb12bd.jpg)
Transform Your Twitch Broadcasts for YouTube Viewers
Transform Your Twitch Broadcasts for YouTube Viewers
Create High-Quality Video - Wondershare Filmora
An easy and powerful YouTube video editor
Numerous video and audio effects to choose from
Detailed tutorials provided by the official channel
Amidst many online applications is Twitch. This live streaming platform takes your experience to another level. You can use it to make crafts, play games, attract broadcasters, and many more. Twitch was launched in 2011, and since then, it has attracted millions of users, managing a database of about 4 million broadcasters by early 2020. With it, users can stream their activities as others watch in real-time. Just browse a category to find a stream.
You can also follow streamers that you like on the platform and get updates and notifications immediately after they are posted. But how do you start a career on a platform like Twitch? You need to broadcast and gather a large following. You can use built-in audiences from other platforms like Facebook. Let’s dive into the core of the matter and look at how to upload Twitch streams to YouTube and build your platform.

In this article
02 What is the benefit of uploading your Twitch Streams to YouTube
03 How to upload your Twitch Streams to YouTube
What is Twitch VOD?
Twitch Video on Demand (VOD) is a recording of previously streamed content. It provides briefings if you missed catching the Twitch live stream. Just watch the VOD from your favorite streamer and be engaged the best way possible. However, VODs don’t last forever. They are removed after two weeks of broadcast. But streamers with Partner Status can have their VODs last up to 60 days.
- How to enable Twitch VOD?
VODs are the best form to archive streams that your fans missed. Even though they are not enabled by default, you can manually enable them and not let your fans miss any important event from your channel. They’ll find it under the “Videos” tab on any Twitch channel. Follow these steps to enable VOD on your channel.
Step 1. Go to your profile icon in the top right corner of Twitch
Check in the “Channel & Video” section and locate the “Stream Key & Preferences” menu.

Step 2. Click on “Creator Dashboard”
Remember, you can enable VODs from your creator dashboard. Just go under the “Settings” tab and click on the “Stream section” of the creator dashboard. Check under the subtitle “VOD Settings” and get the option to store past broadcasts. You can also toggle the slider to store your past broadcasts.

Step 3 Click on the “Settings” tab on the left-hand side and go to Stream
You’ll get various drop-down menu options. Click on the “Settings” tab and choose the “Stream” option. The system will navigate to a new page, thus setting your preferences for VODs and clips.
Step 4. Go to “VOD Settings” and toggle on the “Store Past Broadcast.”
Ensure you have the toggle option turned ON under the “VOD Settings.” If it’s “ON,” you’ll realize the toggle will be purple, with a checkmark in it. Twitch will be confirmed to be enabled if it’s purple.

- Frequently Asked Question about Twitch VOD
These are some questions frequently asked by Twitch users.
1. How long will Twitch store my VOD
Your Twitch can either be stored for 14 or 60 days, depending on your level. For Twitch Prime, Twitch Partner or a Twitch Turbo user has their past broadcasts automatically saved for 60 days before deletion. But if you are not connected to these three options, your past broadcasts will be saved for only 14 days before deletion.
Since your past broadcasts cannot be live for more than 60 days, you have the option to download the video to your computer before the validity days expire and Twitch deletes it. You can use an External Hard drive to save the past broadcast content. Likewise, it is possible to turn your past broadcast content into Highlight and, in turn, permanently store them on Twitch.
2. What is the difference between Twitch VOD, Highlights, and Clips
Twitch VOD is a previously saved video of your live stream content. You choose to save either part or the entire content of your previously streamed content. More so, you don’t need any additional requirements to use VOD.
Highlights are short videos that have been edited from your past broadcast content. You can save them on Twitch permanently. Streamers majorly use highlights to save video game achievements. Unlike VOD Twitch that can be saved up to 60 days, Highlights usually lasts no more than 3 minutes.
- To make Highlights on Twitch, first, navigate to your Dashboard.
- Then scroll down and click on “Content” > “Video Producer.
- Next, press on “All Videos” to change them to “Past Broadcasts.”
- Now press the “Highlight” button, and Twitch will immediately open a new tab for “Twitch Highlighter Tool.”
- Then select the video part to include as “Highlight” and press the “Create Highlights” button.
- Wait a while for the process to be completed, and Voila! You have your Highlights created.
When it comes to Twitch Clip, you can capture special moments in a stream you are currently watching. On the same note, you can share clips with friends and other users on social media platforms. Such shared clips contain a link where others view the source or video from.
The clips you create will automatically be saved on the streamer’s channel on the “Clips” page, where other viewers can see them too. Nonetheless, you can download “clips” to your computer and, in turn, upload them whenever you want to. And note that you can help your stream grow via “Clips” by letting your viewers clip and share your stream moments.
- To create “Clips” on Twitch, identify which Streamers channel you wish to create a clip from.
- Then click on the “Clapper board” icon. Next, edit your clip between 5 and 60 seconds long.
- Finally, create a title and publish your Clip. You’ll also enjoy the privilege to share your clip’s link to other social media networks.
What is the benefit of uploading your Twitch Streams to YouTube
You stand to gain a lot when you upload your Twitch Streams to YouTube.
1) To enlighten your followers
Your followers will see your streams and make the best decisions. Viewers can check out your recordings and other highlights from past streams. It will help them decide whether they like what they see and probably join your live streams.
2) Twitch provides content for you to share and monetize on YouTube
Since Twitch streaming is more popular nowadays, many people throng it for content. It is not wise to rely entirely on Twitch to discover as a Twitch Streamer. Posting to YouTube will make it known within a short time. You would have announced your streams most nobly and kept your followers up to date, attracting new ones as well.
3) To keep your followers engaged even when you are offline
Even though live streaming is important, some viewers may not attend the live sessions due to different time zones or other commitments. In this regard, when uploaded to YouTube, Twitch will give them a chance to watch your content just whenever they log in. They, therefore, have the option to watch a Twitch VOD of the live stream they missed.
How to upload your Twitch Streams to YouTube
Check how to upload Twitch streams to YouTube from the Twitch website.
Step 1. Identify the little arrow next to your name on the Twitch website and click on it. Then click on the “Video Producer” to take you to a list of your Twitch videos.

Step 2. Check out and click on the “three-dots” on the video you wish to upload to YouTube. Click on the “Export” tab.
Step 3. A menu will then pop up. Here, you can fill in the description, title, and tags that you would like to appear on the YouTube video. There is an option for Twitch to split your video automatically. If you wish so, then tick the “Checkbox” to enable it. Then click on the “Start Export” option to export your Twitch streams to YouTube.

Bouns! Edit Your Twitch Video with Filmora
The quality of your video matters when it comes to uploading Twitch Streams to YouTube. Using a third-party tool to edit your video is the first step in ensuring your videos communicate meaningful content. Filmora comes in handy to bring your imaginations to life. Use it for simple creation without limits, even for beginners.
- Use it to track moving objects in video clips
- Easily match any image of the selected clip
- Its powerful tools let you edit your video by cropping, splitting, adjusting speed, etc
- The video keyframe easily indicates the beginning and end of the parameters
For Win 7 or later (64-bit)
For macOS 10.12 or later
Conclusion
● Don’t just focus on how to upload Twitch streams to YouTube but also consider the quality of video you are posting to YouTube. Remember, your video quality will speak much more of you than any other description. So, strive to produce quality videos using the best tool, Filmora. The app is easy to use and will elevate your views and imaginations through your video in the most impactful way.
Amidst many online applications is Twitch. This live streaming platform takes your experience to another level. You can use it to make crafts, play games, attract broadcasters, and many more. Twitch was launched in 2011, and since then, it has attracted millions of users, managing a database of about 4 million broadcasters by early 2020. With it, users can stream their activities as others watch in real-time. Just browse a category to find a stream.
You can also follow streamers that you like on the platform and get updates and notifications immediately after they are posted. But how do you start a career on a platform like Twitch? You need to broadcast and gather a large following. You can use built-in audiences from other platforms like Facebook. Let’s dive into the core of the matter and look at how to upload Twitch streams to YouTube and build your platform.
In this article
02 What is the benefit of uploading your Twitch Streams to YouTube
03 How to upload your Twitch Streams to YouTube
What is Twitch VOD?
Twitch Video on Demand (VOD) is a recording of previously streamed content. It provides briefings if you missed catching the Twitch live stream. Just watch the VOD from your favorite streamer and be engaged the best way possible. However, VODs don’t last forever. They are removed after two weeks of broadcast. But streamers with Partner Status can have their VODs last up to 60 days.
- How to enable Twitch VOD?
VODs are the best form to archive streams that your fans missed. Even though they are not enabled by default, you can manually enable them and not let your fans miss any important event from your channel. They’ll find it under the “Videos” tab on any Twitch channel. Follow these steps to enable VOD on your channel.
Step 1. Go to your profile icon in the top right corner of Twitch
Check in the “Channel & Video” section and locate the “Stream Key & Preferences” menu.
Step 2. Click on “Creator Dashboard”
Remember, you can enable VODs from your creator dashboard. Just go under the “Settings” tab and click on the “Stream section” of the creator dashboard. Check under the subtitle “VOD Settings” and get the option to store past broadcasts. You can also toggle the slider to store your past broadcasts.
Step 3 Click on the “Settings” tab on the left-hand side and go to Stream
You’ll get various drop-down menu options. Click on the “Settings” tab and choose the “Stream” option. The system will navigate to a new page, thus setting your preferences for VODs and clips.
Step 4. Go to “VOD Settings” and toggle on the “Store Past Broadcast.”
Ensure you have the toggle option turned ON under the “VOD Settings.” If it’s “ON,” you’ll realize the toggle will be purple, with a checkmark in it. Twitch will be confirmed to be enabled if it’s purple.
- Frequently Asked Question about Twitch VOD
These are some questions frequently asked by Twitch users.
1. How long will Twitch store my VOD
Your Twitch can either be stored for 14 or 60 days, depending on your level. For Twitch Prime, Twitch Partner or a Twitch Turbo user has their past broadcasts automatically saved for 60 days before deletion. But if you are not connected to these three options, your past broadcasts will be saved for only 14 days before deletion.
Since your past broadcasts cannot be live for more than 60 days, you have the option to download the video to your computer before the validity days expire and Twitch deletes it. You can use an External Hard drive to save the past broadcast content. Likewise, it is possible to turn your past broadcast content into Highlight and, in turn, permanently store them on Twitch.
2. What is the difference between Twitch VOD, Highlights, and Clips
Twitch VOD is a previously saved video of your live stream content. You choose to save either part or the entire content of your previously streamed content. More so, you don’t need any additional requirements to use VOD.
Highlights are short videos that have been edited from your past broadcast content. You can save them on Twitch permanently. Streamers majorly use highlights to save video game achievements. Unlike VOD Twitch that can be saved up to 60 days, Highlights usually lasts no more than 3 minutes.
- To make Highlights on Twitch, first, navigate to your Dashboard.
- Then scroll down and click on “Content” > “Video Producer.
- Next, press on “All Videos” to change them to “Past Broadcasts.”
- Now press the “Highlight” button, and Twitch will immediately open a new tab for “Twitch Highlighter Tool.”
- Then select the video part to include as “Highlight” and press the “Create Highlights” button.
- Wait a while for the process to be completed, and Voila! You have your Highlights created.
When it comes to Twitch Clip, you can capture special moments in a stream you are currently watching. On the same note, you can share clips with friends and other users on social media platforms. Such shared clips contain a link where others view the source or video from.
The clips you create will automatically be saved on the streamer’s channel on the “Clips” page, where other viewers can see them too. Nonetheless, you can download “clips” to your computer and, in turn, upload them whenever you want to. And note that you can help your stream grow via “Clips” by letting your viewers clip and share your stream moments.
- To create “Clips” on Twitch, identify which Streamers channel you wish to create a clip from.
- Then click on the “Clapper board” icon. Next, edit your clip between 5 and 60 seconds long.
- Finally, create a title and publish your Clip. You’ll also enjoy the privilege to share your clip’s link to other social media networks.
What is the benefit of uploading your Twitch Streams to YouTube
You stand to gain a lot when you upload your Twitch Streams to YouTube.
1) To enlighten your followers
Your followers will see your streams and make the best decisions. Viewers can check out your recordings and other highlights from past streams. It will help them decide whether they like what they see and probably join your live streams.
2) Twitch provides content for you to share and monetize on YouTube
Since Twitch streaming is more popular nowadays, many people throng it for content. It is not wise to rely entirely on Twitch to discover as a Twitch Streamer. Posting to YouTube will make it known within a short time. You would have announced your streams most nobly and kept your followers up to date, attracting new ones as well.
3) To keep your followers engaged even when you are offline
Even though live streaming is important, some viewers may not attend the live sessions due to different time zones or other commitments. In this regard, when uploaded to YouTube, Twitch will give them a chance to watch your content just whenever they log in. They, therefore, have the option to watch a Twitch VOD of the live stream they missed.
How to upload your Twitch Streams to YouTube
Check how to upload Twitch streams to YouTube from the Twitch website.
Step 1. Identify the little arrow next to your name on the Twitch website and click on it. Then click on the “Video Producer” to take you to a list of your Twitch videos.
Step 2. Check out and click on the “three-dots” on the video you wish to upload to YouTube. Click on the “Export” tab.
Step 3. A menu will then pop up. Here, you can fill in the description, title, and tags that you would like to appear on the YouTube video. There is an option for Twitch to split your video automatically. If you wish so, then tick the “Checkbox” to enable it. Then click on the “Start Export” option to export your Twitch streams to YouTube.
Bouns! Edit Your Twitch Video with Filmora
The quality of your video matters when it comes to uploading Twitch Streams to YouTube. Using a third-party tool to edit your video is the first step in ensuring your videos communicate meaningful content. Filmora comes in handy to bring your imaginations to life. Use it for simple creation without limits, even for beginners.
- Use it to track moving objects in video clips
- Easily match any image of the selected clip
- Its powerful tools let you edit your video by cropping, splitting, adjusting speed, etc
- The video keyframe easily indicates the beginning and end of the parameters
For Win 7 or later (64-bit)
For macOS 10.12 or later
Conclusion
● Don’t just focus on how to upload Twitch streams to YouTube but also consider the quality of video you are posting to YouTube. Remember, your video quality will speak much more of you than any other description. So, strive to produce quality videos using the best tool, Filmora. The app is easy to use and will elevate your views and imaginations through your video in the most impactful way.
Organize and Share Music: How to Make YouTube Playlists Easier
How to Make a Playlist on YouTube

Liza Brown
Mar 27, 2024• Proven solutions
Youtube is one of the largest video-sharing platforms used worldwide by different people and nations without any limitation or restriction of language, region, or interests. It contains billions of videos, and thousands of new videos are uploaded on Youtube daily. To make your channel or your brand stand out in this crowd, it is important to arrange your videos in the form of playlists. These playlists help you manage your videos and allow the viewers to find the required video easily and conveniently. In this article, we are going to show you how to make a playlist on Youtube.
Youtube playlists not only help in arranging the videos that you upload on Youtube. But you can also create a playlist of any video available on Youtube. Whether it is a song, recipe, movie, or something else, you add it into your playlist to arrange them according to your needs to access them easily when needed.
How to make a playlist on Youtube of your uploaded videos
If you are running a Youtube channel and upload videos very often, then it is important to arrange them so that the viewers can easily explore and find their relevant video in no time. The best way to do that is to make a separate playlist for each type of video you upload. To know how to make a playlist on Youtube, follow the below steps.
- Open Youtube. Click on your “Channel Icon” in the upper right corner, then click on “Your Channel”.
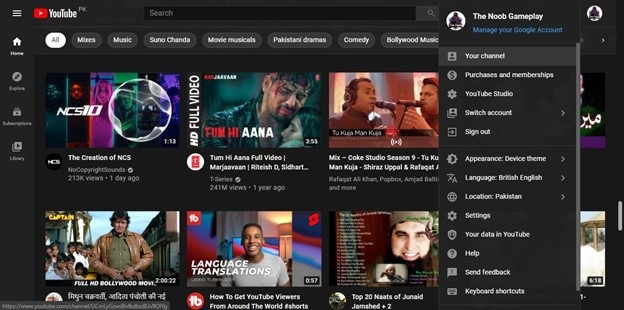
- Under Your Channel, click on the “Manage Videos” button. It will open the Youtube Studio of your Channel.

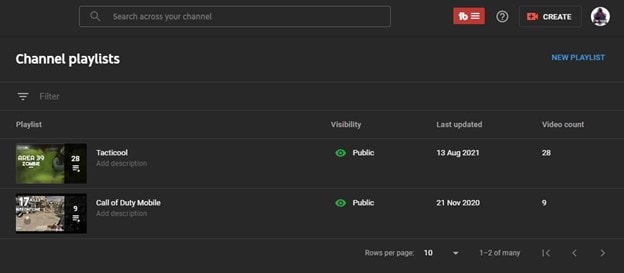
- In Youtube Studio, click on “Playlists” located on the left sidebar of the Studio.

- In this window, click on “New Playlist” located below your channel’s icon.
- Now it will ask you to enter “Playlist Title” and its “Visibility.” Name it accordingly and under Visibility, select an appropriate option according to your requirement and hit “Create.” Now your playlist is successfully created.

- Whenever you upload a new video on this channel, you can select the playlist you have created. While uploading the video, you can find a section named “Playlists” under the details tab.
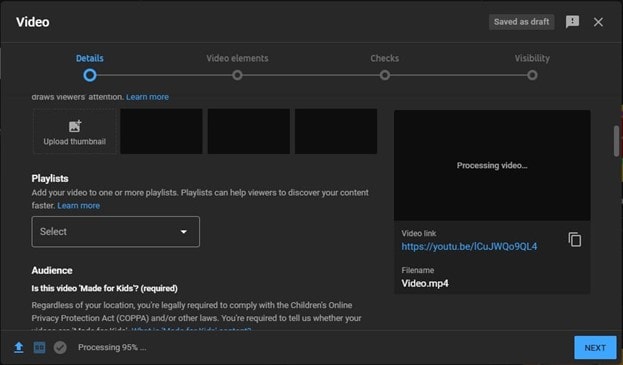
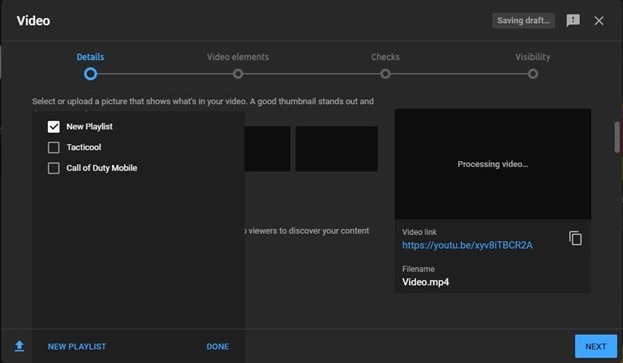
- Click on the drop-down menu to open select a playlist from the playlists that you have created. Select one and hit “Done.”
After uploading the video, it will be added to the playlist that you have selected. You can create as many playlists as you want. There is no restriction on that.
How to make a playlist on Youtube of others’ videos
Sometimes you like a video so much that you want to save it for future use or add it to your favorites. In such cases, creating a Youtube playlist is the best option. It will help you arrange the videos according to their type. To make a playlist on Youtube of others’ videos, follow the below steps.
- Open Youtube. Play a video that you want to save to a Playlist.
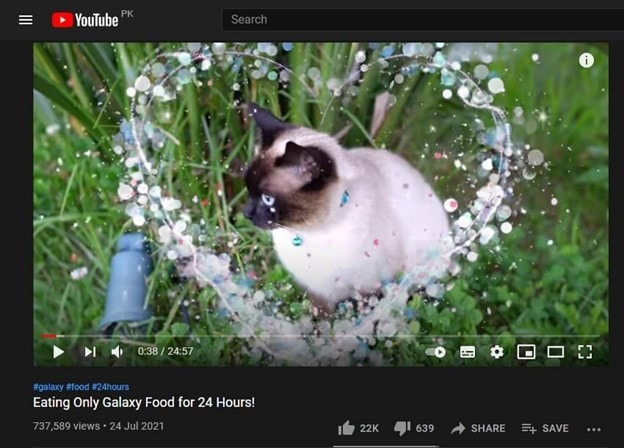
- Click on the “Save” on the right side below the video. It will open a new pop-up window that will ask you to select a playlist to add this video to it. But since you want to create a new playlist, click on the “Create a new Playlist.”
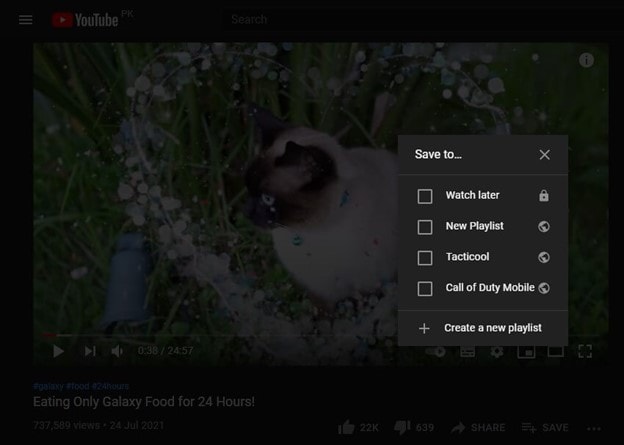
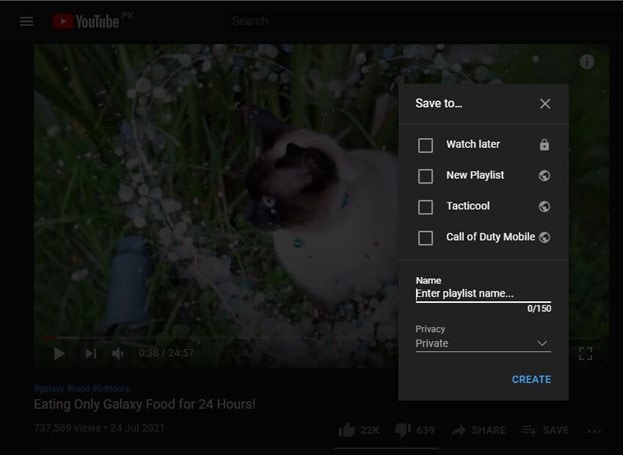
- It will ask you to enter the Name and select the privacy of the playlist. Name it and choose the privacy according to your preference and hit “Create.” Your video will be added to the new playlist.
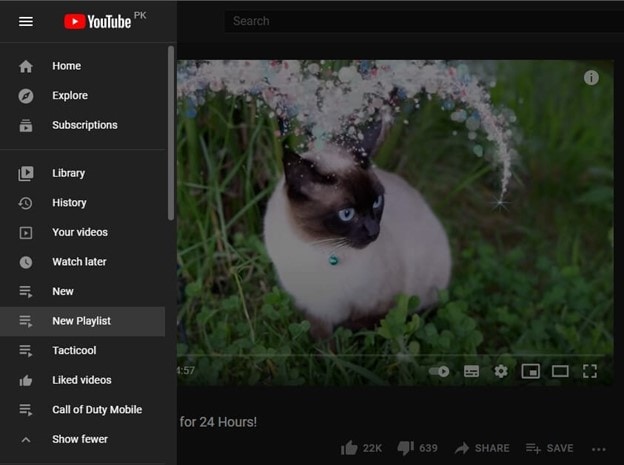
- You can easily access these playlists by clicking the three lines in the upper left corner of Youtube. Here you can find all the Playlists that you will create. Click on the playlist to access all the videos that are included in it.
Conclusion
Both of these processes of how to make a playlist on Youtube will help you whether you are a content creator or a simple Youtube user. With such a huge video database, it is difficult for users to keep their favorite videos to access them whenever they need them. Making a Youtube playlist can be very beneficial in such cases.


Liza Brown
Liza Brown is a writer and a lover of all things video.
Follow @Liza Brown
Liza Brown
Mar 27, 2024• Proven solutions
Youtube is one of the largest video-sharing platforms used worldwide by different people and nations without any limitation or restriction of language, region, or interests. It contains billions of videos, and thousands of new videos are uploaded on Youtube daily. To make your channel or your brand stand out in this crowd, it is important to arrange your videos in the form of playlists. These playlists help you manage your videos and allow the viewers to find the required video easily and conveniently. In this article, we are going to show you how to make a playlist on Youtube.
Youtube playlists not only help in arranging the videos that you upload on Youtube. But you can also create a playlist of any video available on Youtube. Whether it is a song, recipe, movie, or something else, you add it into your playlist to arrange them according to your needs to access them easily when needed.
How to make a playlist on Youtube of your uploaded videos
If you are running a Youtube channel and upload videos very often, then it is important to arrange them so that the viewers can easily explore and find their relevant video in no time. The best way to do that is to make a separate playlist for each type of video you upload. To know how to make a playlist on Youtube, follow the below steps.
- Open Youtube. Click on your “Channel Icon” in the upper right corner, then click on “Your Channel”.
- Under Your Channel, click on the “Manage Videos” button. It will open the Youtube Studio of your Channel.
- In Youtube Studio, click on “Playlists” located on the left sidebar of the Studio.
- In this window, click on “New Playlist” located below your channel’s icon.
- Now it will ask you to enter “Playlist Title” and its “Visibility.” Name it accordingly and under Visibility, select an appropriate option according to your requirement and hit “Create.” Now your playlist is successfully created.
- Whenever you upload a new video on this channel, you can select the playlist you have created. While uploading the video, you can find a section named “Playlists” under the details tab.
- Click on the drop-down menu to open select a playlist from the playlists that you have created. Select one and hit “Done.”
After uploading the video, it will be added to the playlist that you have selected. You can create as many playlists as you want. There is no restriction on that.
How to make a playlist on Youtube of others’ videos
Sometimes you like a video so much that you want to save it for future use or add it to your favorites. In such cases, creating a Youtube playlist is the best option. It will help you arrange the videos according to their type. To make a playlist on Youtube of others’ videos, follow the below steps.
- Open Youtube. Play a video that you want to save to a Playlist.
- Click on the “Save” on the right side below the video. It will open a new pop-up window that will ask you to select a playlist to add this video to it. But since you want to create a new playlist, click on the “Create a new Playlist.”
- It will ask you to enter the Name and select the privacy of the playlist. Name it and choose the privacy according to your preference and hit “Create.” Your video will be added to the new playlist.
- You can easily access these playlists by clicking the three lines in the upper left corner of Youtube. Here you can find all the Playlists that you will create. Click on the playlist to access all the videos that are included in it.
Conclusion
Both of these processes of how to make a playlist on Youtube will help you whether you are a content creator or a simple Youtube user. With such a huge video database, it is difficult for users to keep their favorite videos to access them whenever they need them. Making a Youtube playlist can be very beneficial in such cases.
Liza Brown
Liza Brown is a writer and a lover of all things video.
Follow @Liza Brown
Also read:
- [New] A Comprehensible Breakdown for YouTube Annotation and Card Implementation
- [New] Comprehensive Guide The Triad Technique for Assessing YouTube Revenue Streams
- [Updated] Boost Your Views with Premium YouTube Rank Watchers
- In 2024, Elevate Your Content with Insightful Channel Descriptions
- First Steps in Digital Content Top 10 Easy-to-Make YouTube Projects
- [Updated] Channel Cross-Promotion The Art of Collaborative Co-Stars
- Behind the Scenes Top Tactics for Consistent Vlogging for 2024
- Your Story, Your Stage YouTube Video Mastery
- Unlocking Content Potential Through YouTube Aspect Ratios
- In 2024, Discovering the Potential Apple Devices on Your YouTube Channel
- Discover Your Rhythm Assembling Tailored YouTube Playlists for the Digital Age (Web/Mobile)
- [Updated] Efficient Tagging Techniques to Boost Your Youtube Traffic
- Charting New Frontiers in YouTube Ad Craftsmanship for 2024
- In 2024, Channel-Size-Independent Strategies for Securing Sponsors
- Cerebral Channels Top Educational YT Networks for 2024
- [New] 10-Second Teasers Explained
- Maximize Learning Free Tools for Online Video Texts
- Top 5 Cozy Winter Scenes for YouTube Backdrops
- In 2024, Beat the Heat Tips for Uploading Songs to YouTube
- 2024 Approved A Convenient Compilation Finding Your YT Comments
- In 2024, Crafting a Music Career 15 Essential Video Tutorials for Artists
- Access YouTube Beats Freshly Split With This Compelling List of 17 Crackers for 2024
- Cutting-Edge Computers Notebook Recommendations for Editors for 2024
- 2024 Approved 15 Premium, Free Music Websites Every Videographer Needs
- [New] Digital Arcade Over a Hundred Game Channels
- Channel Success Infusing Personality Into Templates
- 2024 Approved Boost Your Visibility with a Cutting-Edge Set of Banners
- 2024 Approved Decoding Best Practices Navigating Through Top 9 Free Logo Creators
- Upgrade Your View Enabling YouTube's High-Quality AV1 Option
- Audit Your Channel's Financial Success
- In 2024, Bridal Bliss Filmed Alike High-Quality 8 Marriage Videos Online
- Mastering Vlog Production Top 8 Mirrorless Cameras Ranked
- Analyzing YouTube's Process for Selective Comment Showcasing
- [Updated] In 2024, Mastering Game Capture FBX Filming Techniques
- Initial Guide to Zoom Room Segregation for 2024
- Top 12 Prominent Poco X5 Pro Fingerprint Not Working Solutions
- In 2024, About Infinix Smart 8 HD FRP Bypass
- [Updated] MP4TwitterStreamer Sound Tweet Tool for 2024
- Unlock Xiaomi Redmi 13C Phone Password Without Factory Reset Full Guide Here
- [New] GameBoy Advance Mastered Android Emulator Selection for 2024
- Updated Crafting Immersive Experiences Vertical Aspect Ratio Design Principles for 2024
- [Updated] In 2024, Wistia User Introduction Size, Format, Duration
- 4 Ways to Mirror Apple iPhone 13 to Laptop via USB or Wi-Fi | Dr.fone
- [New] In 2024, Unveiling Prime 5 Chrome Tools for Facebook Vids
- Step-by-Step Guide to Optimal Screen Casting via Meet
- Updated Picture Perfect Proportions How to Calculate Ratio for 2024
- [New] VLC Player From Live Viewing to Recording for 2024
- [New] 2024 Approved Premium Mac Programming Solutions Excluded From Bandicam
- In 2024, GIF Tempo Tweakers The Best Online and Mobile Solutions
- Updated The Art of Cinematic Editing A Final Cut Pro X Tutorial
- [Updated] Synchronizing Teams Mastering Device-Agnostic Zoom Events for 2024
- How to Fake Snapchat Location without Jailbreak On Oppo A2 | Dr.fone
- In 2024, What Pokémon Evolve with A Dawn Stone For Nokia C12 Plus? | Dr.fone
- In 2024, How can I get more stardust in pokemon go On Oppo A78? | Dr.fone
- What Legendaries Are In Pokemon Platinum On Realme C33 2023? | Dr.fone
- [New] Perfecting PS3 Recorded Content Expert Insights for 2024
- New In This Article, We Will Compare Sony Vegas and Adobe Premiere About Workflow, Output and Usability, and You Will See Which One Is Better for You for 2024
- The Compreenasive Breakdown How to Use Microsoft's Movie Maker on W11
- [New] 2024 Approved Tips for Uploading Videos on Instagram
- 8 Best Plugins for Logic Pro X (Free & Paid)
- In 2024, Navigating Cross-Platform Social Media FB Vids on WhatsApp
- 2024 Approved Budget-Friendly OBS Configuration Guide
- In 2024, Achieving Soft Sound Dissolution in Audacity
- [New] In 2024, TikTok's Viral Voyagers Top 15 for Life Enhancement
- [New] 2024 Approved Perfect OBS Settings for Low-Cost Hardware
- Chrome OS Vocal Personalization Guide Review of the Best Speech Converters
- Title: Transform Your Twitch Broadcasts for YouTube Viewers
- Author: Steven
- Created at : 2024-05-25 20:36:38
- Updated at : 2024-05-26 20:36:38
- Link: https://youtube-clips.techidaily.com/transform-your-twitch-broadcasts-for-youtube-viewers/
- License: This work is licensed under CC BY-NC-SA 4.0.
