"Top 5 Ultimate Camera & Video Recording Apps IPhone/Android Edition"

Top 5 Ultimate Camera & Video Recording Apps: IPhone/Android Edition
Best Camera Apps to Shoot and Record Videos on iPhone and Andriod Phones

Richard Bennett
Oct 26, 2023• Proven solutions
Smartphone cameras, especially the newest models, are capable of recording great videos. Depending on what kind of videos you make, you might not actually need a separate camera.
The majority of phone cameras record in full HD now, and some can even manage 4K. Where things get tricky is shooting in less than ideal conditions, i.e low light. You cannot make the same adjustments and customizations to your settings with a smartphone camera as you can with a DSLR.
You don’t have the same level of control.
But don’t worry – there are 5 camera apps that will allow you to record videos and get even more creative with how you use your phone’s camera.
- Part 1: Bonus Tip-Make Your Own Video with Wondershare Filmora
- Part 2: Best 5 Camera Apps to Record Videos on iPhone and Android
Part 1: Bonus Tip-Make Your Own Video with Wondershare Filmora
Wondershare Filmora is an amazing video editor for both professional staff and beginners. Its intuitive interface, fast timeline rendering, advanced color tuning, and surprising video effects, etc will make your video stand out! Just download it and edit your smartphone videos with Wondershare Filmora!
Part 2: Best 5 Camera Apps to Record Videos on iPhone and Android
Let’s dive!
1. Open Camera – Free, Android Only

This camera app gives you control over your exposure, flash, focus, ISO, shutter speed, torch, and white balance. How much control you have is up to you. If managing all these things manually is a hassle for you, you can use its automatic or semi-manual modes instead of manual mode.
This is a great camera app to record time-lapses. It is simplistic compared to some of the other apps on this list, but it is also extremely easy to use.
2. ProShot - $4, iOS or Android
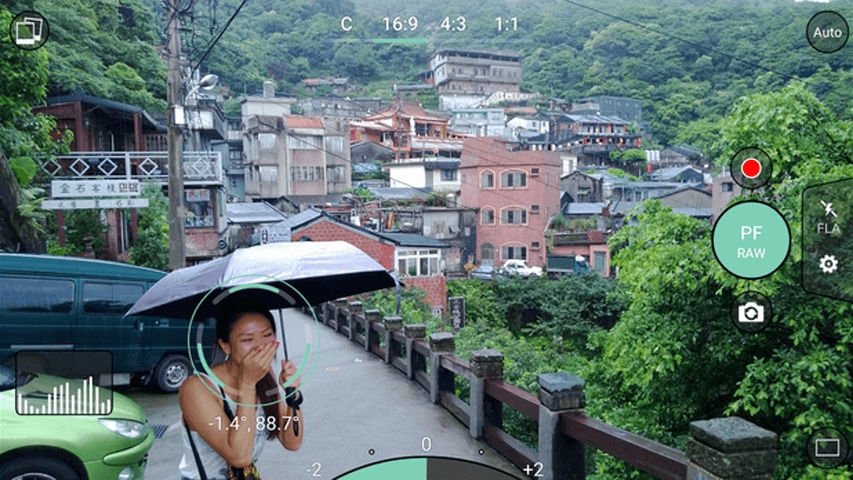
ProShot lets you adjust your frame rate, which is important if you want to shoot slow motion or time-lapse videos. You can also adjust your brightness while filming. One of the most useful features of this camera app is that it provides a real-time audio level meter, so you won’t be surprised by a poor sound recording when you watch your videos back.
3. ProCamera - $5, iOS Only
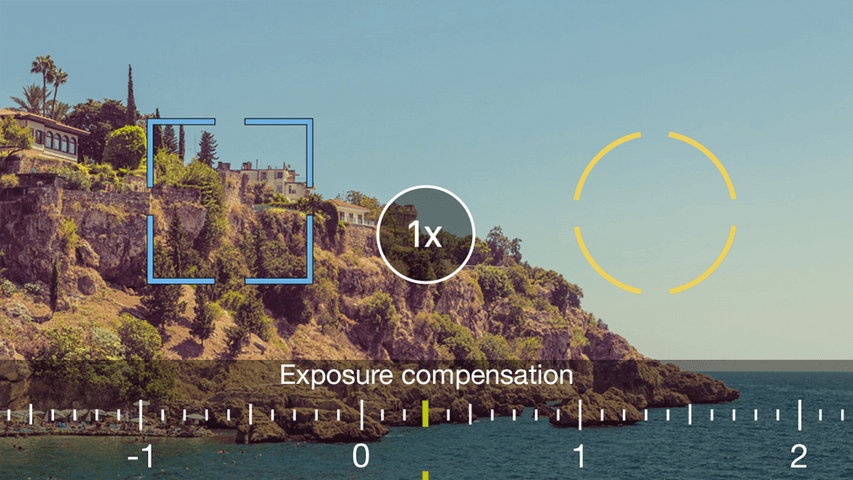
This is one of the most frequently recommended camera apps for iPhones. It makes it easy for you to adjust your focus, iOS, and exposure. You can also play with different filters and effects right in the app. One of the only downsides of this app is that some of its most useful features, like Lowlight Plus, are in-app purchases.
4. Sun Seeker - $10, iOS or Android

A lot of the time when you’re shooting with your phone, you’re shooting outside. When you’re shooting outside, the most important thing you need to keep track of is the sun. Sun Seeker is the perfect app for figuring out where the sun will be in the sky at any given time, which will tell you the best time to go out and make your video.
For more information on making videos with natural light, check out Indoor Natural Lighting Tips .
Besides just keeping track of the sun, Sun Seeker provides an augmented reality view of its path and how it will affect specific locations.
5. FiLMiC Pro - $10, iOS or Android
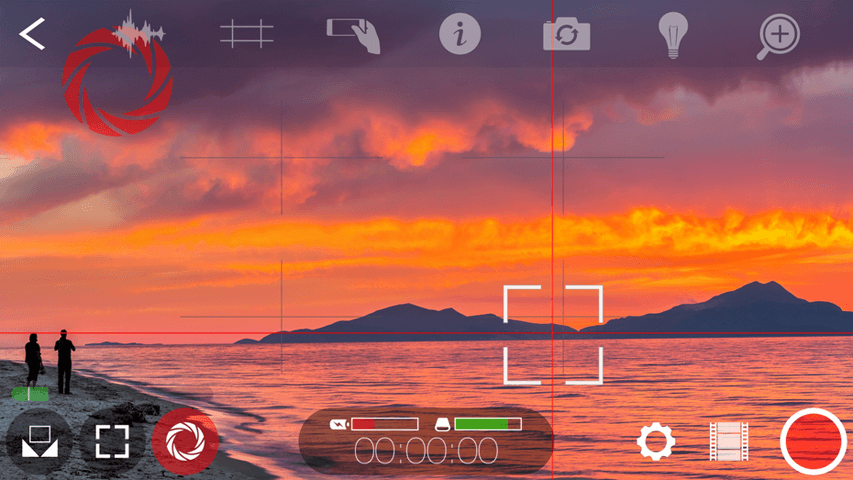
This is probably the best all-purpose camera app available. It gives you exactly the same kind of control over your smartphone camera as you would have over a DSLR. You can manually adjust your focus, exposure, ISO, shutter speed, tint, and color temperature. There are even voice processing audio filters, so you can capture better audio while you’re shooting and have less to fix in post.
Final Words
Because mobile cameras already perform so well, it can be easy to think to have more to adjust would only make things more complicated. However, there are occasions where you need to be able to make these adjustments. Are the videos you take inside at night at a lower quality than the ones you record during the day, for example? If you could set a higher ISO, you would be able to fix that.
Another example: just the other day, there was a question here about shooting green screen videos on a mobile device. One of our community members, Vivekpanwar, was having an issue with motion blur. Motion blur isn’t always distracting in normal videos, but it becomes a huge issue when you apply a Chroma key effect. The best way to avoid motion blur is to set a high shutter speed, which you can do if you download a quality camera app.

Richard Bennett
Richard Bennett is a writer and a lover of all things video.
Follow @Richard Bennett
Richard Bennett
Oct 26, 2023• Proven solutions
Smartphone cameras, especially the newest models, are capable of recording great videos. Depending on what kind of videos you make, you might not actually need a separate camera.
The majority of phone cameras record in full HD now, and some can even manage 4K. Where things get tricky is shooting in less than ideal conditions, i.e low light. You cannot make the same adjustments and customizations to your settings with a smartphone camera as you can with a DSLR.
You don’t have the same level of control.
But don’t worry – there are 5 camera apps that will allow you to record videos and get even more creative with how you use your phone’s camera.
- Part 1: Bonus Tip-Make Your Own Video with Wondershare Filmora
- Part 2: Best 5 Camera Apps to Record Videos on iPhone and Android
Part 1: Bonus Tip-Make Your Own Video with Wondershare Filmora
Wondershare Filmora is an amazing video editor for both professional staff and beginners. Its intuitive interface, fast timeline rendering, advanced color tuning, and surprising video effects, etc will make your video stand out! Just download it and edit your smartphone videos with Wondershare Filmora!
Part 2: Best 5 Camera Apps to Record Videos on iPhone and Android
Let’s dive!
1. Open Camera – Free, Android Only

This camera app gives you control over your exposure, flash, focus, ISO, shutter speed, torch, and white balance. How much control you have is up to you. If managing all these things manually is a hassle for you, you can use its automatic or semi-manual modes instead of manual mode.
This is a great camera app to record time-lapses. It is simplistic compared to some of the other apps on this list, but it is also extremely easy to use.
2. ProShot - $4, iOS or Android

ProShot lets you adjust your frame rate, which is important if you want to shoot slow motion or time-lapse videos. You can also adjust your brightness while filming. One of the most useful features of this camera app is that it provides a real-time audio level meter, so you won’t be surprised by a poor sound recording when you watch your videos back.
3. ProCamera - $5, iOS Only

This is one of the most frequently recommended camera apps for iPhones. It makes it easy for you to adjust your focus, iOS, and exposure. You can also play with different filters and effects right in the app. One of the only downsides of this app is that some of its most useful features, like Lowlight Plus, are in-app purchases.
4. Sun Seeker - $10, iOS or Android

A lot of the time when you’re shooting with your phone, you’re shooting outside. When you’re shooting outside, the most important thing you need to keep track of is the sun. Sun Seeker is the perfect app for figuring out where the sun will be in the sky at any given time, which will tell you the best time to go out and make your video.
For more information on making videos with natural light, check out Indoor Natural Lighting Tips .
Besides just keeping track of the sun, Sun Seeker provides an augmented reality view of its path and how it will affect specific locations.
5. FiLMiC Pro - $10, iOS or Android

This is probably the best all-purpose camera app available. It gives you exactly the same kind of control over your smartphone camera as you would have over a DSLR. You can manually adjust your focus, exposure, ISO, shutter speed, tint, and color temperature. There are even voice processing audio filters, so you can capture better audio while you’re shooting and have less to fix in post.
Final Words
Because mobile cameras already perform so well, it can be easy to think to have more to adjust would only make things more complicated. However, there are occasions where you need to be able to make these adjustments. Are the videos you take inside at night at a lower quality than the ones you record during the day, for example? If you could set a higher ISO, you would be able to fix that.
Another example: just the other day, there was a question here about shooting green screen videos on a mobile device. One of our community members, Vivekpanwar, was having an issue with motion blur. Motion blur isn’t always distracting in normal videos, but it becomes a huge issue when you apply a Chroma key effect. The best way to avoid motion blur is to set a high shutter speed, which you can do if you download a quality camera app.

Richard Bennett
Richard Bennett is a writer and a lover of all things video.
Follow @Richard Bennett
Richard Bennett
Oct 26, 2023• Proven solutions
Smartphone cameras, especially the newest models, are capable of recording great videos. Depending on what kind of videos you make, you might not actually need a separate camera.
The majority of phone cameras record in full HD now, and some can even manage 4K. Where things get tricky is shooting in less than ideal conditions, i.e low light. You cannot make the same adjustments and customizations to your settings with a smartphone camera as you can with a DSLR.
You don’t have the same level of control.
But don’t worry – there are 5 camera apps that will allow you to record videos and get even more creative with how you use your phone’s camera.
- Part 1: Bonus Tip-Make Your Own Video with Wondershare Filmora
- Part 2: Best 5 Camera Apps to Record Videos on iPhone and Android
Part 1: Bonus Tip-Make Your Own Video with Wondershare Filmora
Wondershare Filmora is an amazing video editor for both professional staff and beginners. Its intuitive interface, fast timeline rendering, advanced color tuning, and surprising video effects, etc will make your video stand out! Just download it and edit your smartphone videos with Wondershare Filmora!
Part 2: Best 5 Camera Apps to Record Videos on iPhone and Android
Let’s dive!
1. Open Camera – Free, Android Only

This camera app gives you control over your exposure, flash, focus, ISO, shutter speed, torch, and white balance. How much control you have is up to you. If managing all these things manually is a hassle for you, you can use its automatic or semi-manual modes instead of manual mode.
This is a great camera app to record time-lapses. It is simplistic compared to some of the other apps on this list, but it is also extremely easy to use.
2. ProShot - $4, iOS or Android

ProShot lets you adjust your frame rate, which is important if you want to shoot slow motion or time-lapse videos. You can also adjust your brightness while filming. One of the most useful features of this camera app is that it provides a real-time audio level meter, so you won’t be surprised by a poor sound recording when you watch your videos back.
3. ProCamera - $5, iOS Only

This is one of the most frequently recommended camera apps for iPhones. It makes it easy for you to adjust your focus, iOS, and exposure. You can also play with different filters and effects right in the app. One of the only downsides of this app is that some of its most useful features, like Lowlight Plus, are in-app purchases.
4. Sun Seeker - $10, iOS or Android

A lot of the time when you’re shooting with your phone, you’re shooting outside. When you’re shooting outside, the most important thing you need to keep track of is the sun. Sun Seeker is the perfect app for figuring out where the sun will be in the sky at any given time, which will tell you the best time to go out and make your video.
For more information on making videos with natural light, check out Indoor Natural Lighting Tips .
Besides just keeping track of the sun, Sun Seeker provides an augmented reality view of its path and how it will affect specific locations.
5. FiLMiC Pro - $10, iOS or Android

This is probably the best all-purpose camera app available. It gives you exactly the same kind of control over your smartphone camera as you would have over a DSLR. You can manually adjust your focus, exposure, ISO, shutter speed, tint, and color temperature. There are even voice processing audio filters, so you can capture better audio while you’re shooting and have less to fix in post.
Final Words
Because mobile cameras already perform so well, it can be easy to think to have more to adjust would only make things more complicated. However, there are occasions where you need to be able to make these adjustments. Are the videos you take inside at night at a lower quality than the ones you record during the day, for example? If you could set a higher ISO, you would be able to fix that.
Another example: just the other day, there was a question here about shooting green screen videos on a mobile device. One of our community members, Vivekpanwar, was having an issue with motion blur. Motion blur isn’t always distracting in normal videos, but it becomes a huge issue when you apply a Chroma key effect. The best way to avoid motion blur is to set a high shutter speed, which you can do if you download a quality camera app.

Richard Bennett
Richard Bennett is a writer and a lover of all things video.
Follow @Richard Bennett
Richard Bennett
Oct 26, 2023• Proven solutions
Smartphone cameras, especially the newest models, are capable of recording great videos. Depending on what kind of videos you make, you might not actually need a separate camera.
The majority of phone cameras record in full HD now, and some can even manage 4K. Where things get tricky is shooting in less than ideal conditions, i.e low light. You cannot make the same adjustments and customizations to your settings with a smartphone camera as you can with a DSLR.
You don’t have the same level of control.
But don’t worry – there are 5 camera apps that will allow you to record videos and get even more creative with how you use your phone’s camera.
- Part 1: Bonus Tip-Make Your Own Video with Wondershare Filmora
- Part 2: Best 5 Camera Apps to Record Videos on iPhone and Android
Part 1: Bonus Tip-Make Your Own Video with Wondershare Filmora
Wondershare Filmora is an amazing video editor for both professional staff and beginners. Its intuitive interface, fast timeline rendering, advanced color tuning, and surprising video effects, etc will make your video stand out! Just download it and edit your smartphone videos with Wondershare Filmora!
Part 2: Best 5 Camera Apps to Record Videos on iPhone and Android
Let’s dive!
1. Open Camera – Free, Android Only

This camera app gives you control over your exposure, flash, focus, ISO, shutter speed, torch, and white balance. How much control you have is up to you. If managing all these things manually is a hassle for you, you can use its automatic or semi-manual modes instead of manual mode.
This is a great camera app to record time-lapses. It is simplistic compared to some of the other apps on this list, but it is also extremely easy to use.
2. ProShot - $4, iOS or Android

ProShot lets you adjust your frame rate, which is important if you want to shoot slow motion or time-lapse videos. You can also adjust your brightness while filming. One of the most useful features of this camera app is that it provides a real-time audio level meter, so you won’t be surprised by a poor sound recording when you watch your videos back.
3. ProCamera - $5, iOS Only

This is one of the most frequently recommended camera apps for iPhones. It makes it easy for you to adjust your focus, iOS, and exposure. You can also play with different filters and effects right in the app. One of the only downsides of this app is that some of its most useful features, like Lowlight Plus, are in-app purchases.
4. Sun Seeker - $10, iOS or Android

A lot of the time when you’re shooting with your phone, you’re shooting outside. When you’re shooting outside, the most important thing you need to keep track of is the sun. Sun Seeker is the perfect app for figuring out where the sun will be in the sky at any given time, which will tell you the best time to go out and make your video.
For more information on making videos with natural light, check out Indoor Natural Lighting Tips .
Besides just keeping track of the sun, Sun Seeker provides an augmented reality view of its path and how it will affect specific locations.
5. FiLMiC Pro - $10, iOS or Android

This is probably the best all-purpose camera app available. It gives you exactly the same kind of control over your smartphone camera as you would have over a DSLR. You can manually adjust your focus, exposure, ISO, shutter speed, tint, and color temperature. There are even voice processing audio filters, so you can capture better audio while you’re shooting and have less to fix in post.
Final Words
Because mobile cameras already perform so well, it can be easy to think to have more to adjust would only make things more complicated. However, there are occasions where you need to be able to make these adjustments. Are the videos you take inside at night at a lower quality than the ones you record during the day, for example? If you could set a higher ISO, you would be able to fix that.
Another example: just the other day, there was a question here about shooting green screen videos on a mobile device. One of our community members, Vivekpanwar, was having an issue with motion blur. Motion blur isn’t always distracting in normal videos, but it becomes a huge issue when you apply a Chroma key effect. The best way to avoid motion blur is to set a high shutter speed, which you can do if you download a quality camera app.

Richard Bennett
Richard Bennett is a writer and a lover of all things video.
Follow @Richard Bennett
Mastering AdSense on YouTube: A Beginner’s Guide
How to Use AdSense for YouTube

Richard Bennett
Mar 27, 2024• Proven solutions
Now, since your YouTube channel has a large of subscribers and views, you start thinking to make money by using YouTube AdSense. However, do you really know YouTube AdSense very well? Or even, do you even know what it is exactly. In order to let you better understand it and make money, we have rounded up all information here to explain the basic knowledge of AdSense to you. Keeping reading to learn more!
- Part1: What is Adsense
- Part2: How to Link YouTube Account to Adsense
- Part3: How to Use AdSense for YouTube
Part 1: What is Adsense?
You might have noticed several ads displayed on the videos on various social platforms. AdSense is a part of Google that is responsible for placing such ads in the videos. You can sign in from YouTube account directly.
When you wish to place an ad, you may publish it on various media through Adsense. As an advertiser, you may publish anything in videos, images or texts on the websites and pay per impression or per click or per conversion.
Having a YouTube Adsense account or your website connected to Adsense account can help you earn money when Google places ads to your channel.
Do not worry, creating a Google Adsense account is free and when you create one, your YouTube channel or your website gets free eligibility for Google Ads. You just need to copy a code and paste it to start. The AdSense returns calculation is on pay per click or on a per-impression basis. However, if you want to receive the payment, you need to set up AdSense account first.
Part 2: How to Link YouTube Account to Adsense
Step 1: Link YouTube Account To Adsense
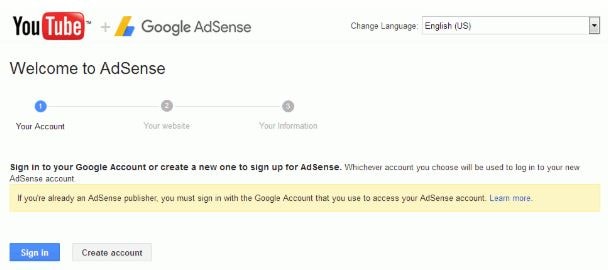
- Click on Setup YouTube AdSense or from monetization option, click on Setup Adsense option for your channel. Press Next. You are directed to Adsense sign up page.
- Select your email account, you wish to sign up with. You may also sign up with existing id or create a new one
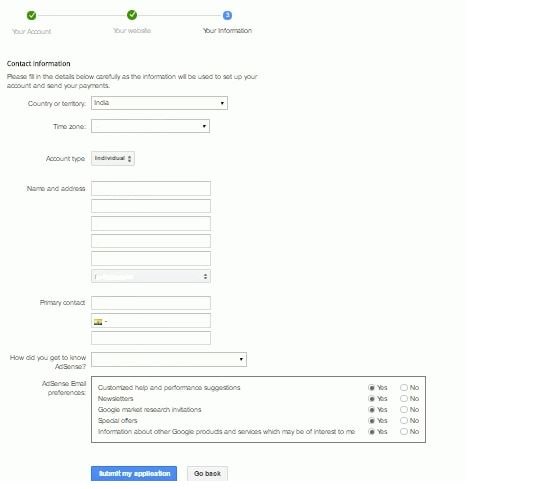
- In case, you are using your existing email, sign in to YouTube Adsense with the same id. Once signed up, fill personal details form with information like address, name, etc.
- While filling your payee name be very careful and fill exactly as in your bank account name.
- Submit the form. Your application goes under review and might be under process for 2-3 hours to a few days depending on your Google Adsense and channel quality.
Step 2: Enable Monetization
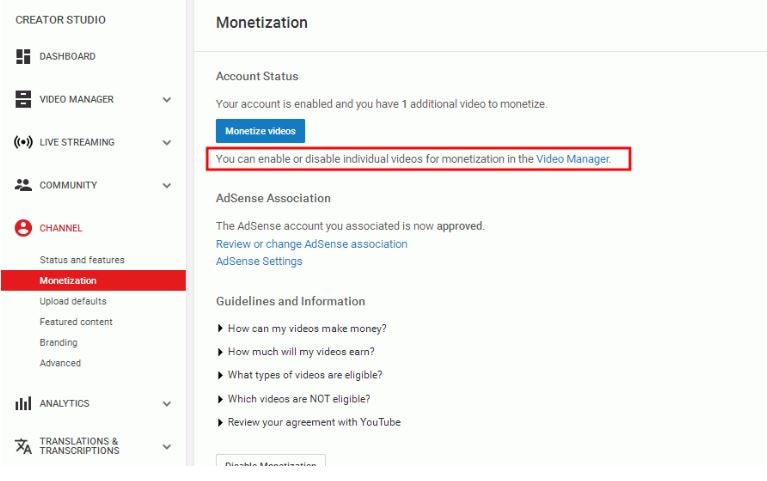
- Click on My Channel from the menu option. Next, click on monetization to monetize your videos
- From monetization, click on monetize videos option for selecting the type of ads to monetize the video content or your channel.
- You may also monetize videos individually selecting the one you like from Video Manager segment if you do not wish to monetize all videos at once.
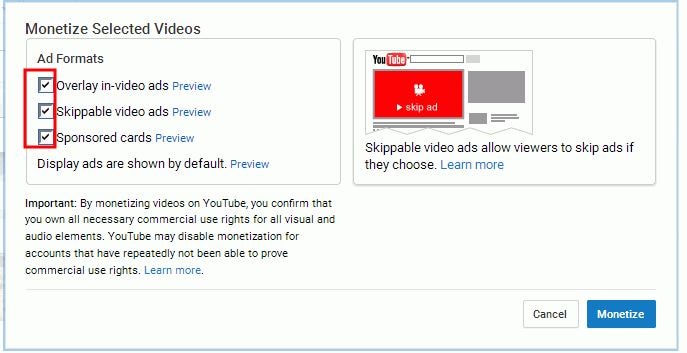
- Click monetize from the Action drop-down menu. Select ad type as per your wish. Press the monetize button.
- If you need to change monetization setting for a specific video, edit from the video manager or click on the dollar icon.
- To edit, click monetization option and select monetize with ads. Select the format of ads to monetize the particular video. Save the changes made.
Part 3: How to Use AdSense for YouTube
1. Finding Your Money in AdSense
Intuitively, many YouTube creators think that the first thing they see when they open up AdSense should be their daily earnings. This is not the case. Besides how much money you have made, AdSense keeps track of a lot of things the average YouTuber will not find useful. Getting to a report on your daily earnings actually takes a bit of navigation.
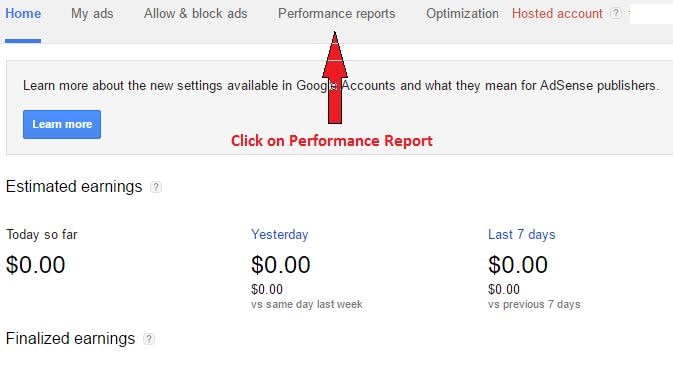
First, click on Performance Report near the top of your screen in AdSense. In the next page there will be a dropdown menu that says Days. Click on that menu and change it to Products.
In Products, scroll down until you get to a chart where there are two options: Hosted AdSense for Content and AdSense for Content. AdSense for Content relates to a personal website. For information about your YouTube channel click on Hosted AdSense for Content.
The next page is a report of how much money you have made from monetizing your YouTube channel. Your earnings will be organized by date. The money you see in this report has already had YouTube’s 45% commission deducted.
2. How are my earnings determined?
How much money you make through AdSense depends on your CPMs and EPMs. CPM is an acronym for “cost per mille” and indicates how much money and advertiser is paying for 1000 impressions of an ad. RPM is your revenue per 1000 impressions.
A lot of YouTubers new to AdSense assume that “per thousand impressions” means “per thousand views”, and that is incorrect. Besides the fact that not all views are monetized, impressions are not views. They are ad clicks. For long, skippable, video ads an “impression” is when a viewer watches the ad to the end instead of skipping it.
CPMs vary depending on the type of ad, where it is being run, and current advertising trends. Advertisers pay more for certain kinds of ads or for ad space in more popular videos. Beware of MCN scams claiming they can guarantee you a certain CPM; they cannot. Which ads are displayed in your videos is determined automatically by YouTube’s system and depends on factors like how you categorized your videos and how many views they have.
3. How do I get paid?
There are five different ways to get paid through AdSense: Check, Western Union Quick Cash, Wire Transfer, Rapida, or an Electronic Funds Transfer (EFT). Generally, AdSense will begin the process of paying you your monthly earnings on the 21st of the following month. How long it takes to get your money after that depends on your payment method.
Using Western Union Quick Cash you can pick your cash up at your Western Union branch the same day.
EFTs get your money to you within seven business days after the 21st.
Checks can take two to four weeks to arrive in the mail.
Wire Transfers and Rapida can each take up to 15 days.

In order to be paid you will have to earn enough to reach the payment threshold, which is $100. So, if you only earn $5 in a month, you should not expect to receive a payment for that month. You will receive your first payment after you earn $100.
Conclusion
Making money with YouTube Adsense is one of the best media that is reliable, easy to use, and better than any other ways of creating money. With Adsense, you can create various size and kinds of ad units to add it to your website. Those ad spaces are filled by Google with the content and traffic relevant to your site. There are also some YouTuber influencer marketing platforms such as InflueNex , which enables YouTubers to learn about their own channels, their competitors’ channels, and join the platform for establishing replationship with the brands.

Richard Bennett
Richard Bennett is a writer and a lover of all things video.
Follow @Richard Bennett
Richard Bennett
Mar 27, 2024• Proven solutions
Now, since your YouTube channel has a large of subscribers and views, you start thinking to make money by using YouTube AdSense. However, do you really know YouTube AdSense very well? Or even, do you even know what it is exactly. In order to let you better understand it and make money, we have rounded up all information here to explain the basic knowledge of AdSense to you. Keeping reading to learn more!
- Part1: What is Adsense
- Part2: How to Link YouTube Account to Adsense
- Part3: How to Use AdSense for YouTube
Part 1: What is Adsense?
You might have noticed several ads displayed on the videos on various social platforms. AdSense is a part of Google that is responsible for placing such ads in the videos. You can sign in from YouTube account directly.
When you wish to place an ad, you may publish it on various media through Adsense. As an advertiser, you may publish anything in videos, images or texts on the websites and pay per impression or per click or per conversion.
Having a YouTube Adsense account or your website connected to Adsense account can help you earn money when Google places ads to your channel.
Do not worry, creating a Google Adsense account is free and when you create one, your YouTube channel or your website gets free eligibility for Google Ads. You just need to copy a code and paste it to start. The AdSense returns calculation is on pay per click or on a per-impression basis. However, if you want to receive the payment, you need to set up AdSense account first.
Part 2: How to Link YouTube Account to Adsense
Step 1: Link YouTube Account To Adsense
- Click on Setup YouTube AdSense or from monetization option, click on Setup Adsense option for your channel. Press Next. You are directed to Adsense sign up page.
- Select your email account, you wish to sign up with. You may also sign up with existing id or create a new one
- In case, you are using your existing email, sign in to YouTube Adsense with the same id. Once signed up, fill personal details form with information like address, name, etc.
- While filling your payee name be very careful and fill exactly as in your bank account name.
- Submit the form. Your application goes under review and might be under process for 2-3 hours to a few days depending on your Google Adsense and channel quality.
Step 2: Enable Monetization
- Click on My Channel from the menu option. Next, click on monetization to monetize your videos
- From monetization, click on monetize videos option for selecting the type of ads to monetize the video content or your channel.
- You may also monetize videos individually selecting the one you like from Video Manager segment if you do not wish to monetize all videos at once.
- Click monetize from the Action drop-down menu. Select ad type as per your wish. Press the monetize button.
- If you need to change monetization setting for a specific video, edit from the video manager or click on the dollar icon.
- To edit, click monetization option and select monetize with ads. Select the format of ads to monetize the particular video. Save the changes made.
Part 3: How to Use AdSense for YouTube
1. Finding Your Money in AdSense
Intuitively, many YouTube creators think that the first thing they see when they open up AdSense should be their daily earnings. This is not the case. Besides how much money you have made, AdSense keeps track of a lot of things the average YouTuber will not find useful. Getting to a report on your daily earnings actually takes a bit of navigation.
First, click on Performance Report near the top of your screen in AdSense. In the next page there will be a dropdown menu that says Days. Click on that menu and change it to Products.
In Products, scroll down until you get to a chart where there are two options: Hosted AdSense for Content and AdSense for Content. AdSense for Content relates to a personal website. For information about your YouTube channel click on Hosted AdSense for Content.
The next page is a report of how much money you have made from monetizing your YouTube channel. Your earnings will be organized by date. The money you see in this report has already had YouTube’s 45% commission deducted.
2. How are my earnings determined?
How much money you make through AdSense depends on your CPMs and EPMs. CPM is an acronym for “cost per mille” and indicates how much money and advertiser is paying for 1000 impressions of an ad. RPM is your revenue per 1000 impressions.
A lot of YouTubers new to AdSense assume that “per thousand impressions” means “per thousand views”, and that is incorrect. Besides the fact that not all views are monetized, impressions are not views. They are ad clicks. For long, skippable, video ads an “impression” is when a viewer watches the ad to the end instead of skipping it.
CPMs vary depending on the type of ad, where it is being run, and current advertising trends. Advertisers pay more for certain kinds of ads or for ad space in more popular videos. Beware of MCN scams claiming they can guarantee you a certain CPM; they cannot. Which ads are displayed in your videos is determined automatically by YouTube’s system and depends on factors like how you categorized your videos and how many views they have.
3. How do I get paid?
There are five different ways to get paid through AdSense: Check, Western Union Quick Cash, Wire Transfer, Rapida, or an Electronic Funds Transfer (EFT). Generally, AdSense will begin the process of paying you your monthly earnings on the 21st of the following month. How long it takes to get your money after that depends on your payment method.
Using Western Union Quick Cash you can pick your cash up at your Western Union branch the same day.
EFTs get your money to you within seven business days after the 21st.
Checks can take two to four weeks to arrive in the mail.
Wire Transfers and Rapida can each take up to 15 days.

In order to be paid you will have to earn enough to reach the payment threshold, which is $100. So, if you only earn $5 in a month, you should not expect to receive a payment for that month. You will receive your first payment after you earn $100.
Conclusion
Making money with YouTube Adsense is one of the best media that is reliable, easy to use, and better than any other ways of creating money. With Adsense, you can create various size and kinds of ad units to add it to your website. Those ad spaces are filled by Google with the content and traffic relevant to your site. There are also some YouTuber influencer marketing platforms such as InflueNex , which enables YouTubers to learn about their own channels, their competitors’ channels, and join the platform for establishing replationship with the brands.

Richard Bennett
Richard Bennett is a writer and a lover of all things video.
Follow @Richard Bennett
Richard Bennett
Mar 27, 2024• Proven solutions
Now, since your YouTube channel has a large of subscribers and views, you start thinking to make money by using YouTube AdSense. However, do you really know YouTube AdSense very well? Or even, do you even know what it is exactly. In order to let you better understand it and make money, we have rounded up all information here to explain the basic knowledge of AdSense to you. Keeping reading to learn more!
- Part1: What is Adsense
- Part2: How to Link YouTube Account to Adsense
- Part3: How to Use AdSense for YouTube
Part 1: What is Adsense?
You might have noticed several ads displayed on the videos on various social platforms. AdSense is a part of Google that is responsible for placing such ads in the videos. You can sign in from YouTube account directly.
When you wish to place an ad, you may publish it on various media through Adsense. As an advertiser, you may publish anything in videos, images or texts on the websites and pay per impression or per click or per conversion.
Having a YouTube Adsense account or your website connected to Adsense account can help you earn money when Google places ads to your channel.
Do not worry, creating a Google Adsense account is free and when you create one, your YouTube channel or your website gets free eligibility for Google Ads. You just need to copy a code and paste it to start. The AdSense returns calculation is on pay per click or on a per-impression basis. However, if you want to receive the payment, you need to set up AdSense account first.
Part 2: How to Link YouTube Account to Adsense
Step 1: Link YouTube Account To Adsense
- Click on Setup YouTube AdSense or from monetization option, click on Setup Adsense option for your channel. Press Next. You are directed to Adsense sign up page.
- Select your email account, you wish to sign up with. You may also sign up with existing id or create a new one
- In case, you are using your existing email, sign in to YouTube Adsense with the same id. Once signed up, fill personal details form with information like address, name, etc.
- While filling your payee name be very careful and fill exactly as in your bank account name.
- Submit the form. Your application goes under review and might be under process for 2-3 hours to a few days depending on your Google Adsense and channel quality.
Step 2: Enable Monetization
- Click on My Channel from the menu option. Next, click on monetization to monetize your videos
- From monetization, click on monetize videos option for selecting the type of ads to monetize the video content or your channel.
- You may also monetize videos individually selecting the one you like from Video Manager segment if you do not wish to monetize all videos at once.
- Click monetize from the Action drop-down menu. Select ad type as per your wish. Press the monetize button.
- If you need to change monetization setting for a specific video, edit from the video manager or click on the dollar icon.
- To edit, click monetization option and select monetize with ads. Select the format of ads to monetize the particular video. Save the changes made.
Part 3: How to Use AdSense for YouTube
1. Finding Your Money in AdSense
Intuitively, many YouTube creators think that the first thing they see when they open up AdSense should be their daily earnings. This is not the case. Besides how much money you have made, AdSense keeps track of a lot of things the average YouTuber will not find useful. Getting to a report on your daily earnings actually takes a bit of navigation.
First, click on Performance Report near the top of your screen in AdSense. In the next page there will be a dropdown menu that says Days. Click on that menu and change it to Products.
In Products, scroll down until you get to a chart where there are two options: Hosted AdSense for Content and AdSense for Content. AdSense for Content relates to a personal website. For information about your YouTube channel click on Hosted AdSense for Content.
The next page is a report of how much money you have made from monetizing your YouTube channel. Your earnings will be organized by date. The money you see in this report has already had YouTube’s 45% commission deducted.
2. How are my earnings determined?
How much money you make through AdSense depends on your CPMs and EPMs. CPM is an acronym for “cost per mille” and indicates how much money and advertiser is paying for 1000 impressions of an ad. RPM is your revenue per 1000 impressions.
A lot of YouTubers new to AdSense assume that “per thousand impressions” means “per thousand views”, and that is incorrect. Besides the fact that not all views are monetized, impressions are not views. They are ad clicks. For long, skippable, video ads an “impression” is when a viewer watches the ad to the end instead of skipping it.
CPMs vary depending on the type of ad, where it is being run, and current advertising trends. Advertisers pay more for certain kinds of ads or for ad space in more popular videos. Beware of MCN scams claiming they can guarantee you a certain CPM; they cannot. Which ads are displayed in your videos is determined automatically by YouTube’s system and depends on factors like how you categorized your videos and how many views they have.
3. How do I get paid?
There are five different ways to get paid through AdSense: Check, Western Union Quick Cash, Wire Transfer, Rapida, or an Electronic Funds Transfer (EFT). Generally, AdSense will begin the process of paying you your monthly earnings on the 21st of the following month. How long it takes to get your money after that depends on your payment method.
Using Western Union Quick Cash you can pick your cash up at your Western Union branch the same day.
EFTs get your money to you within seven business days after the 21st.
Checks can take two to four weeks to arrive in the mail.
Wire Transfers and Rapida can each take up to 15 days.

In order to be paid you will have to earn enough to reach the payment threshold, which is $100. So, if you only earn $5 in a month, you should not expect to receive a payment for that month. You will receive your first payment after you earn $100.
Conclusion
Making money with YouTube Adsense is one of the best media that is reliable, easy to use, and better than any other ways of creating money. With Adsense, you can create various size and kinds of ad units to add it to your website. Those ad spaces are filled by Google with the content and traffic relevant to your site. There are also some YouTuber influencer marketing platforms such as InflueNex , which enables YouTubers to learn about their own channels, their competitors’ channels, and join the platform for establishing replationship with the brands.

Richard Bennett
Richard Bennett is a writer and a lover of all things video.
Follow @Richard Bennett
Richard Bennett
Mar 27, 2024• Proven solutions
Now, since your YouTube channel has a large of subscribers and views, you start thinking to make money by using YouTube AdSense. However, do you really know YouTube AdSense very well? Or even, do you even know what it is exactly. In order to let you better understand it and make money, we have rounded up all information here to explain the basic knowledge of AdSense to you. Keeping reading to learn more!
- Part1: What is Adsense
- Part2: How to Link YouTube Account to Adsense
- Part3: How to Use AdSense for YouTube
Part 1: What is Adsense?
You might have noticed several ads displayed on the videos on various social platforms. AdSense is a part of Google that is responsible for placing such ads in the videos. You can sign in from YouTube account directly.
When you wish to place an ad, you may publish it on various media through Adsense. As an advertiser, you may publish anything in videos, images or texts on the websites and pay per impression or per click or per conversion.
Having a YouTube Adsense account or your website connected to Adsense account can help you earn money when Google places ads to your channel.
Do not worry, creating a Google Adsense account is free and when you create one, your YouTube channel or your website gets free eligibility for Google Ads. You just need to copy a code and paste it to start. The AdSense returns calculation is on pay per click or on a per-impression basis. However, if you want to receive the payment, you need to set up AdSense account first.
Part 2: How to Link YouTube Account to Adsense
Step 1: Link YouTube Account To Adsense
- Click on Setup YouTube AdSense or from monetization option, click on Setup Adsense option for your channel. Press Next. You are directed to Adsense sign up page.
- Select your email account, you wish to sign up with. You may also sign up with existing id or create a new one
- In case, you are using your existing email, sign in to YouTube Adsense with the same id. Once signed up, fill personal details form with information like address, name, etc.
- While filling your payee name be very careful and fill exactly as in your bank account name.
- Submit the form. Your application goes under review and might be under process for 2-3 hours to a few days depending on your Google Adsense and channel quality.
Step 2: Enable Monetization
- Click on My Channel from the menu option. Next, click on monetization to monetize your videos
- From monetization, click on monetize videos option for selecting the type of ads to monetize the video content or your channel.
- You may also monetize videos individually selecting the one you like from Video Manager segment if you do not wish to monetize all videos at once.
- Click monetize from the Action drop-down menu. Select ad type as per your wish. Press the monetize button.
- If you need to change monetization setting for a specific video, edit from the video manager or click on the dollar icon.
- To edit, click monetization option and select monetize with ads. Select the format of ads to monetize the particular video. Save the changes made.
Part 3: How to Use AdSense for YouTube
1. Finding Your Money in AdSense
Intuitively, many YouTube creators think that the first thing they see when they open up AdSense should be their daily earnings. This is not the case. Besides how much money you have made, AdSense keeps track of a lot of things the average YouTuber will not find useful. Getting to a report on your daily earnings actually takes a bit of navigation.
First, click on Performance Report near the top of your screen in AdSense. In the next page there will be a dropdown menu that says Days. Click on that menu and change it to Products.
In Products, scroll down until you get to a chart where there are two options: Hosted AdSense for Content and AdSense for Content. AdSense for Content relates to a personal website. For information about your YouTube channel click on Hosted AdSense for Content.
The next page is a report of how much money you have made from monetizing your YouTube channel. Your earnings will be organized by date. The money you see in this report has already had YouTube’s 45% commission deducted.
2. How are my earnings determined?
How much money you make through AdSense depends on your CPMs and EPMs. CPM is an acronym for “cost per mille” and indicates how much money and advertiser is paying for 1000 impressions of an ad. RPM is your revenue per 1000 impressions.
A lot of YouTubers new to AdSense assume that “per thousand impressions” means “per thousand views”, and that is incorrect. Besides the fact that not all views are monetized, impressions are not views. They are ad clicks. For long, skippable, video ads an “impression” is when a viewer watches the ad to the end instead of skipping it.
CPMs vary depending on the type of ad, where it is being run, and current advertising trends. Advertisers pay more for certain kinds of ads or for ad space in more popular videos. Beware of MCN scams claiming they can guarantee you a certain CPM; they cannot. Which ads are displayed in your videos is determined automatically by YouTube’s system and depends on factors like how you categorized your videos and how many views they have.
3. How do I get paid?
There are five different ways to get paid through AdSense: Check, Western Union Quick Cash, Wire Transfer, Rapida, or an Electronic Funds Transfer (EFT). Generally, AdSense will begin the process of paying you your monthly earnings on the 21st of the following month. How long it takes to get your money after that depends on your payment method.
Using Western Union Quick Cash you can pick your cash up at your Western Union branch the same day.
EFTs get your money to you within seven business days after the 21st.
Checks can take two to four weeks to arrive in the mail.
Wire Transfers and Rapida can each take up to 15 days.

In order to be paid you will have to earn enough to reach the payment threshold, which is $100. So, if you only earn $5 in a month, you should not expect to receive a payment for that month. You will receive your first payment after you earn $100.
Conclusion
Making money with YouTube Adsense is one of the best media that is reliable, easy to use, and better than any other ways of creating money. With Adsense, you can create various size and kinds of ad units to add it to your website. Those ad spaces are filled by Google with the content and traffic relevant to your site. There are also some YouTuber influencer marketing platforms such as InflueNex , which enables YouTubers to learn about their own channels, their competitors’ channels, and join the platform for establishing replationship with the brands.

Richard Bennett
Richard Bennett is a writer and a lover of all things video.
Follow @Richard Bennett
Also read:
- [New] Efficiency Meets Entertainment Discover Top 10 FB Video Extractors for Android Devices
- 2024 Approved Advanced Techniques for Implementing LUTs in Creative Suite
- 2024 Approved Maximizing Video Quality in Zoom Conferences on Win11
- 2024 Approved Unveiling ITop A Screencast Game-Changer?
- Cut The Cost, Not Your Content Quality - Try These Top 8 Free Tools for 2024
- Cutting-Edge Techniques for YouTube Video Edits via WM Maker
- Dive Into iOS Screenshots A Comprehensive YouTube Guide
- Diverging Paths YouTube Licensing & Creative Commons for 2024
- Get Faster Performance: Update Targus DisplayLink Drivers for Windows 11/8/7 Now
- How to Optimally Apply a Creative Commons License
- In 2024, Best 8 Platforms for Professional Linux Editing
- In 2024, Charting a Course for Growth Precise YouTube Stats From Social Blade's Hub
- Live Fearlessly | Free Book
- Rebuild Lost Memories with Confidence: Powerful iPhone Data Recovery Systems
- Resolution Found: Windows Stopped on Nvidia Error
- Title: Top 5 Ultimate Camera & Video Recording Apps IPhone/Android Edition
- Author: Steven
- Created at : 2024-12-03 00:53:14
- Updated at : 2024-12-04 01:33:53
- Link: https://youtube-clips.techidaily.com/top-5-ultimate-camera-and-video-recording-apps-iphoneandroid-edition/
- License: This work is licensed under CC BY-NC-SA 4.0.


