
:max_bytes(150000):strip_icc():format(webp)/how-to-choose-your-ideal-phonecase-ca91460721b143b0b0ae61b5baf11b3c.jpg)
The Ultimate Guide to Closing Videos Effectively
The Ultimate Guide to Closing Videos Effectively
How Can You Make Outstanding YouTube Outro?

Max Wales
Mar 27, 2024• Proven solutions
Want to make your YouTube channel a rising sensation? Part of creating a noteworthy video is to create an outro that sticks in the viewer’s mind. It is important to leave a YouTube outro that remains memorable and impactful.
You can learn all about YouTube outros in the proceeding article and create one for your channel using Adobe After Effects. Also, discover some wonderful YouTube outro templates by Wondershare Filmora to add a creative outro to your videos.
- Part 1: What is an Outro?
- Part 2: How to Create Outstanding YouTube Outro?
- Part 3: 5 Video Effects to Help You Create a Stunning YouTube Outro
Part 1: What is an Outro?
Still, wondering what is the outro meaning? Simply put, an outro is the closing part of your video content. YouTube outros appear at the end of your video and act as a wrap-up for your content. Without a suitable outro, videos are likely to appear abrupt and rushed. Creating a proper outro helps create a clean and appropriate finishing and also helps to increase engagement with the audience.

A YouTube outro can serve other functions as well, such as prompting the viewers for certain actions. You can add a call-to-action button, links to websites, or other suggested content at the end screen of your video. Other content that can be included in a YouTube outro can be:
Suggested Videos/Playlists: A link to recommended videos or playlists.
Website Links: Links to an external website.
Subscribe Prompt: Ask the viewer to subscribe to your YouTube channel.
Channel Links: Attached link to a different channel on YouTube.
Part 2: How to Create Outstanding YouTube Outro?
Want to know how to make an outro for your YouTube video? YouTube outros can serve numerous purposes to the user when done right. Let’s look at the important elements of a perfectly comprised YouTube outro and how you can create one from scratch.
Things to Consider
Following are some important things that you might need to consider while making an outro for YouTube:
- Technical Specifications
Ideally, a YouTube outro should be in the aspect ratio of 16:9. Keep the resolution of your outro maintained at 1920x1080 pixels. Also, ensure that the outro appears on the screen for up to eight seconds or longer, depending upon the length of your video.
- Simplicity
Your YouTube outros do not need to be over the top and flowing with creative elements. Choose a simple and elegant design that does not clutter the screen.
- Empty Spaces
Like all other digital designs, make sure that your YouTube outro has plenty of white spaces so elements do not appear crowded and distracting.
- Appropriate CTAs
If you are using CTAs in your outro, remember to add links and elements that are relevant. Your call-to-action buttons should be related to the video and should make sense to the viewer.
- Consistency
Being consistent in your designs is a key ingredient to improving your brand recognition. Stick to a specific color palette or themes, so the audience can easily identify your channel.
How to Make an Outstanding YouTube Video Outro
Now it is time to learn how to make an outro for YouTube. You can create the perfect outro for YouTube using the tools from Adobe After Effects. The following steps indicate how to make an outro using After Effects:
Step 1: Pre-Process Preparation
Launch After Effects and import the files you want in your end screen, such as logos of social media platforms.
Step 2: Create a Composition
Create a new composition on After Effects. Set the resolution to 1920x1080, the duration to 10 seconds or according to your requirements, and click on “OK.”

Step 3: Create a Background Layer
Go to the “Layer” tab, tap “New,” create a black “Solid” background layer.

Step 4: Add Video Suggestion Box
Now grab the “Rectangle Tool” and create a new shape on the right side of the screen, which will serve as a video suggestion box. You can create multiple shapes if you want to add more than one video suggestion.

Step 5: Add Subscribe Button
Next, go to the shape tool again and select the “Ellipse Tool.” Deselect the current shape layer to create a new one and create a circle on the left part of the screen, which will act as your Subscribe button.

Step 6: Add Effects
Now highlight the shape layers again by shift. Right-click and add “Layer Styles” such as an “Outer Glow.” Expand the settings, and you can change the color of your glow. Also, increase the opacity and blending mode of that as well as the size and strength.

Step 7: Customize Background
From the “Effects and Preset” panel, you can add different “Animation Presets” to your background. Choose one that you like and drag it on the layer.

Step 8: Add Text and Icons
Now add text to your YouTube outros like your social media handles or any other information that you want. Grab the text tool from the top and add a text.

If you want to add other logos or PNGs like social media icons, you can drag and drop them into their layer and place them on the composition.
Step 9: Export and Upload
Go to the “Composition” tab and select “Add to Render Queue.” Press “Render.” You can attach that clip to the end of any video or project. When you upload your video to YouTube, press “Edit Video” and go to “End Screen and Annotations.” Here you can add different elements such as the subscribe button or the most recent uploads.

Extra Tips: learn how to use YouTube outro templates
You may now know the tricks about how to create a YouTube outro in After Effect. But if you want to make an outro more easily, you can try the YouTube outro templates from Wondershare Filmstock. Let’s do it by the following steps with the Filmora video editor .


Step 1: Install Filmora video editor.
Step 2: Search and download the “YouTube Pack” from Filmstock.

Step 3: Find the YouTube outro from the Filmora Titles folder. Then drag and apply to your videos.

Part 3: 5 Video Effects to Help You Create a Stunning YouTube Outro
Still, looking for an easy way to create stunning outros for YouTube? Wondershare Filmstock has just the answer for you acting as a resource library. Filmstock offers splendid video tools, including transitions, templates, stock footage, and royalty-free music. You can create professional-quality videos using Filmstock’s valuable assets.
Below are some prestigious YouTube outro templates by Filmstock, which you incorporate in your videos.
1. YouTube Subscribe Reminders
The YouTube Subscribe Reminders pack by Filmstock contains 10 title templates that can be used with Filmora’s 9.6 or later versions. Featuring the like, subscribe, and bell icons of YouTube, this set is perfect for when you need to remind your viewers to subscribe to your channel. The specially themed text animations are perfectly suited for a good YouTube outro.

2. 4K YouTube Motion Graphics Packaging
The 4K YouTube Motion Graphics Packaging contains multiple title templates from Filmstock’s library to help you create a remarkable outro for YouTube. From subscribe reminders to recommended video templates and text animations, the pack can be used at the end screen of any video. The pack is compatible with Filmora 9.6 or above versions.

3. Clean YouTube Subscribe Pack
Looking for a clean and elegant design for your YouTube outro? Filmstock’s Clean YouTube Subscribe Pack does that task for you. The pack contains 13 different title templates and elements that can be used on Filmora 9.6. The simple and modest set includes subscribing reminders on red backgrounds to help your channel grow and flourish.

4. Social Media Icons Pack
Compatible with Filmora 9.2 or above, the Social Media Icons Pack by Filmstock contains some of the best elements for different social platforms, such as YouTube or Facebook.
The Social Media Icons Pack contains all the necessary elements for when you want to communicate with your viewers. It includes bell icons, subscribes buttons, hashtags, location tags, like, share, and follows icons, and much more. With 23 elements revolving around multiple social media themes, this pack is perfectly suited for YouTube videos.
5. Social Media Lowerthird Pack
Lower thirds are a great way to add useful information in your video without taking up much screen space. With Filmstock at your service, you can incorporate lower thirds seamlessly in your YouTube videos and outros.
The Social Media Lower third Pack contains 16 text effects and templates inspired by major social platforms like Instagram and YouTube. You can use it with Filmora 9.2 or later versions to add your videos’ locations, links, and prompts. The pack also contains some meticulously crafted elements that are perfect for YouTube outros.
Closing Words
With YouTube becoming one of the most popular platforms for aspiring content creators, establishing your name there can prove to be a tough task. Lots of effort goes into crafting all the elements of the video to perfection. Creating a suitable YouTube outro is also part of the process, and it is important to learn how to get it right.
With Adobe After Effects, you can create the perfect YouTube outros for your videos. Also, remember to try Filmstock’s remarkable YouTube outro templates and make your videos stand apart from the crowd.
Max Wales
Max Wales is a writer and a lover of all things video.
Follow @Max Wales
Max Wales
Mar 27, 2024• Proven solutions
Want to make your YouTube channel a rising sensation? Part of creating a noteworthy video is to create an outro that sticks in the viewer’s mind. It is important to leave a YouTube outro that remains memorable and impactful.
You can learn all about YouTube outros in the proceeding article and create one for your channel using Adobe After Effects. Also, discover some wonderful YouTube outro templates by Wondershare Filmora to add a creative outro to your videos.
- Part 1: What is an Outro?
- Part 2: How to Create Outstanding YouTube Outro?
- Part 3: 5 Video Effects to Help You Create a Stunning YouTube Outro
Part 1: What is an Outro?
Still, wondering what is the outro meaning? Simply put, an outro is the closing part of your video content. YouTube outros appear at the end of your video and act as a wrap-up for your content. Without a suitable outro, videos are likely to appear abrupt and rushed. Creating a proper outro helps create a clean and appropriate finishing and also helps to increase engagement with the audience.
A YouTube outro can serve other functions as well, such as prompting the viewers for certain actions. You can add a call-to-action button, links to websites, or other suggested content at the end screen of your video. Other content that can be included in a YouTube outro can be:
Suggested Videos/Playlists: A link to recommended videos or playlists.
Website Links: Links to an external website.
Subscribe Prompt: Ask the viewer to subscribe to your YouTube channel.
Channel Links: Attached link to a different channel on YouTube.
Part 2: How to Create Outstanding YouTube Outro?
Want to know how to make an outro for your YouTube video? YouTube outros can serve numerous purposes to the user when done right. Let’s look at the important elements of a perfectly comprised YouTube outro and how you can create one from scratch.
Things to Consider
Following are some important things that you might need to consider while making an outro for YouTube:
- Technical Specifications
Ideally, a YouTube outro should be in the aspect ratio of 16:9. Keep the resolution of your outro maintained at 1920x1080 pixels. Also, ensure that the outro appears on the screen for up to eight seconds or longer, depending upon the length of your video.
- Simplicity
Your YouTube outros do not need to be over the top and flowing with creative elements. Choose a simple and elegant design that does not clutter the screen.
- Empty Spaces
Like all other digital designs, make sure that your YouTube outro has plenty of white spaces so elements do not appear crowded and distracting.
- Appropriate CTAs
If you are using CTAs in your outro, remember to add links and elements that are relevant. Your call-to-action buttons should be related to the video and should make sense to the viewer.
- Consistency
Being consistent in your designs is a key ingredient to improving your brand recognition. Stick to a specific color palette or themes, so the audience can easily identify your channel.
How to Make an Outstanding YouTube Video Outro
Now it is time to learn how to make an outro for YouTube. You can create the perfect outro for YouTube using the tools from Adobe After Effects. The following steps indicate how to make an outro using After Effects:
Step 1: Pre-Process Preparation
Launch After Effects and import the files you want in your end screen, such as logos of social media platforms.
Step 2: Create a Composition
Create a new composition on After Effects. Set the resolution to 1920x1080, the duration to 10 seconds or according to your requirements, and click on “OK.”
Step 3: Create a Background Layer
Go to the “Layer” tab, tap “New,” create a black “Solid” background layer.
Step 4: Add Video Suggestion Box
Now grab the “Rectangle Tool” and create a new shape on the right side of the screen, which will serve as a video suggestion box. You can create multiple shapes if you want to add more than one video suggestion.
Step 5: Add Subscribe Button
Next, go to the shape tool again and select the “Ellipse Tool.” Deselect the current shape layer to create a new one and create a circle on the left part of the screen, which will act as your Subscribe button.
Step 6: Add Effects
Now highlight the shape layers again by shift. Right-click and add “Layer Styles” such as an “Outer Glow.” Expand the settings, and you can change the color of your glow. Also, increase the opacity and blending mode of that as well as the size and strength.
Step 7: Customize Background
From the “Effects and Preset” panel, you can add different “Animation Presets” to your background. Choose one that you like and drag it on the layer.
Step 8: Add Text and Icons
Now add text to your YouTube outros like your social media handles or any other information that you want. Grab the text tool from the top and add a text.
If you want to add other logos or PNGs like social media icons, you can drag and drop them into their layer and place them on the composition.
Step 9: Export and Upload
Go to the “Composition” tab and select “Add to Render Queue.” Press “Render.” You can attach that clip to the end of any video or project. When you upload your video to YouTube, press “Edit Video” and go to “End Screen and Annotations.” Here you can add different elements such as the subscribe button or the most recent uploads.
Extra Tips: learn how to use YouTube outro templates
You may now know the tricks about how to create a YouTube outro in After Effect. But if you want to make an outro more easily, you can try the YouTube outro templates from Wondershare Filmstock. Let’s do it by the following steps with the Filmora video editor .
Step 1: Install Filmora video editor.
Step 2: Search and download the “YouTube Pack” from Filmstock.
Step 3: Find the YouTube outro from the Filmora Titles folder. Then drag and apply to your videos.
Part 3: 5 Video Effects to Help You Create a Stunning YouTube Outro
Still, looking for an easy way to create stunning outros for YouTube? Wondershare Filmstock has just the answer for you acting as a resource library. Filmstock offers splendid video tools, including transitions, templates, stock footage, and royalty-free music. You can create professional-quality videos using Filmstock’s valuable assets.
Below are some prestigious YouTube outro templates by Filmstock, which you incorporate in your videos.
1. YouTube Subscribe Reminders
The YouTube Subscribe Reminders pack by Filmstock contains 10 title templates that can be used with Filmora’s 9.6 or later versions. Featuring the like, subscribe, and bell icons of YouTube, this set is perfect for when you need to remind your viewers to subscribe to your channel. The specially themed text animations are perfectly suited for a good YouTube outro.
2. 4K YouTube Motion Graphics Packaging
The 4K YouTube Motion Graphics Packaging contains multiple title templates from Filmstock’s library to help you create a remarkable outro for YouTube. From subscribe reminders to recommended video templates and text animations, the pack can be used at the end screen of any video. The pack is compatible with Filmora 9.6 or above versions.
3. Clean YouTube Subscribe Pack
Looking for a clean and elegant design for your YouTube outro? Filmstock’s Clean YouTube Subscribe Pack does that task for you. The pack contains 13 different title templates and elements that can be used on Filmora 9.6. The simple and modest set includes subscribing reminders on red backgrounds to help your channel grow and flourish.
4. Social Media Icons Pack
Compatible with Filmora 9.2 or above, the Social Media Icons Pack by Filmstock contains some of the best elements for different social platforms, such as YouTube or Facebook.
The Social Media Icons Pack contains all the necessary elements for when you want to communicate with your viewers. It includes bell icons, subscribes buttons, hashtags, location tags, like, share, and follows icons, and much more. With 23 elements revolving around multiple social media themes, this pack is perfectly suited for YouTube videos.
5. Social Media Lowerthird Pack
Lower thirds are a great way to add useful information in your video without taking up much screen space. With Filmstock at your service, you can incorporate lower thirds seamlessly in your YouTube videos and outros.
The Social Media Lower third Pack contains 16 text effects and templates inspired by major social platforms like Instagram and YouTube. You can use it with Filmora 9.2 or later versions to add your videos’ locations, links, and prompts. The pack also contains some meticulously crafted elements that are perfect for YouTube outros.
Closing Words
With YouTube becoming one of the most popular platforms for aspiring content creators, establishing your name there can prove to be a tough task. Lots of effort goes into crafting all the elements of the video to perfection. Creating a suitable YouTube outro is also part of the process, and it is important to learn how to get it right.
With Adobe After Effects, you can create the perfect YouTube outros for your videos. Also, remember to try Filmstock’s remarkable YouTube outro templates and make your videos stand apart from the crowd.
Max Wales
Max Wales is a writer and a lover of all things video.
Follow @Max Wales
A Vlogger’s Dream: Exploring the Best 12 Video Capture Devices
Best Cameras for Vlogging

Liza Brown
Jan 10, 2024• Proven solutions
It can be challenging to make a decision on purchasing a camera when there’s just so many on the market. Camera manufacturers are racing to update their product line with all the new camera technology advancements. To simplify your search for the ultimate vlogging camera, we’ve come up with a top twelve list.
If you’re looking for a specific type of vlogging camera, check out our other posts on vlogging cameras:
Top 11 Cheap Vlogging Cameras (2024)
7 Best DSLR Cameras For Vlogging (2024)
8 Best Mirrorless Cameras For Vlogging (2024)
12 Best Vlogging Cameras With A Flip Screen (2024)
WHAT TO LOOK FOR IN A VLOGGING CAMERA
1. Fully articulated screen (flip screen)
2. Good continual autofocus while recording video
3. Good focus priority through face recognition
4. Touch to focus
5. Good low-light performance
6. external mic jack, hot/cold shoe bracket
7. optical image stabilization
8. good battery life
Check out my full list of 10 Things To Look For In A Vlogging Camera to understand the importance of these camera features.
12 BEST VLOGGING CAMERAS (2024)
| Camera | Release Date | Camera Type | Flip Screen | Mic Port | Price | |
|---|---|---|---|---|---|---|
| CanonEOSM50 |  |
February2018 | Mirrorless | Fully Articulated | Yes | $- |
| PanasonicLumixDC-GH5S | 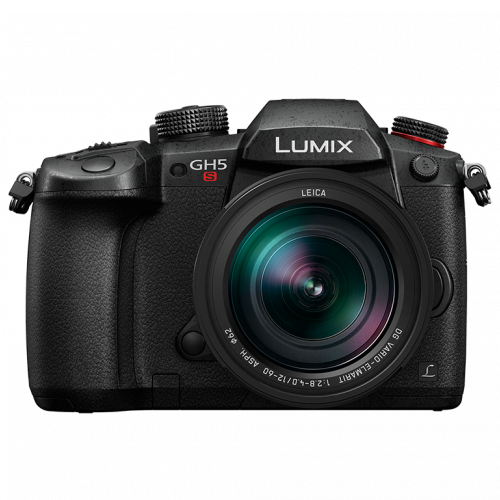 |
January2018 | Mirrorless | Fully Articulated | Yes | $$$ |
| SonyAlphaa7R III | 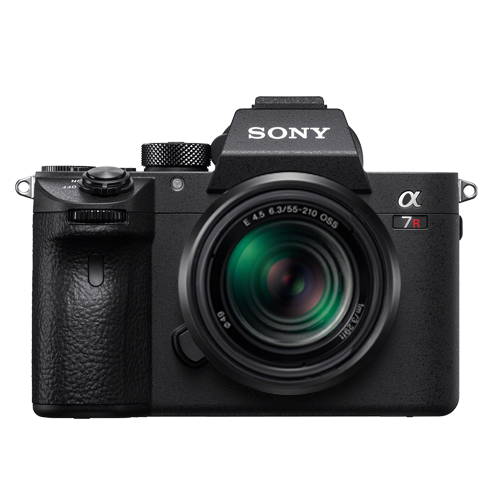 |
October2017 | Mirrorless | Tilting | Yes | $$$ |
| CanonEOSM100 | 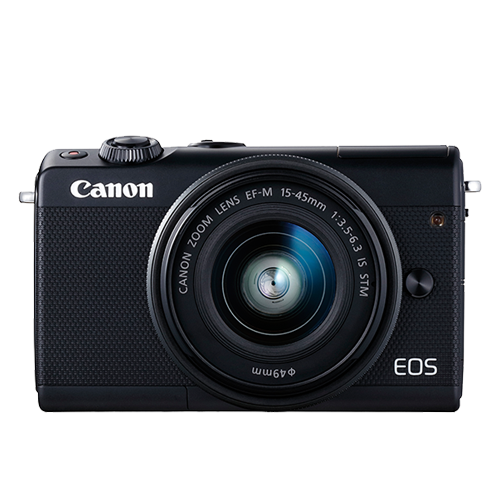 |
August2017 | Mirrorless | Flip Up | No | $ |
| CanonEOS6D Mark II | 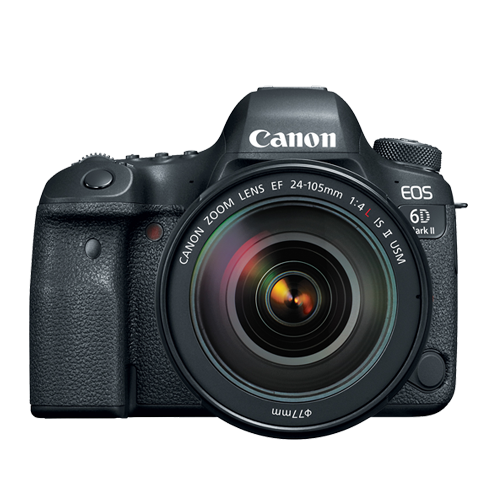 |
June2017 | Mid-size SLR | Fully Articulated | Yes | $$ |
| CanonEOS RebelSL2 | 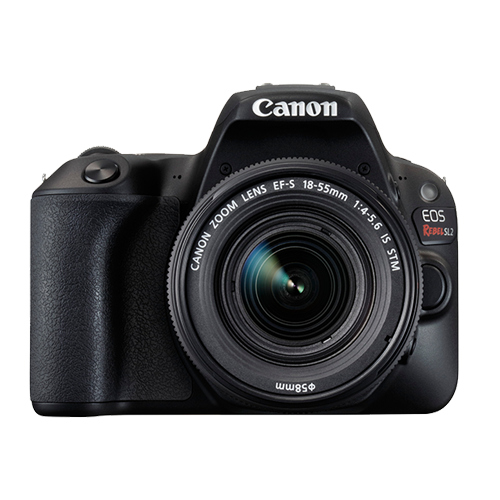 |
June2017 | Compact SLR | Fully Articulated | Yes | $ |
| CanonEOSM6 |  |
February2017 | Mirrorless | Flip Up | Yes | $ |
| SonyCyber-Shot DSCRX 100 V | 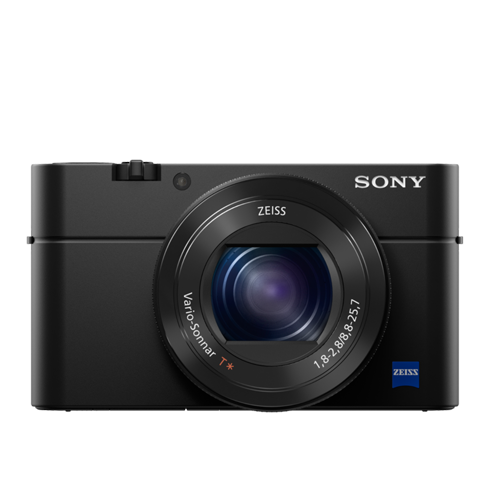 |
October2016 | Compact | Flip Up | No | $- |
| SonyAlphaa6500 |  |
October2016 | Mirrorless | Tilting | Yes | $$- |
| PanasonicLumix DMCLX10 | 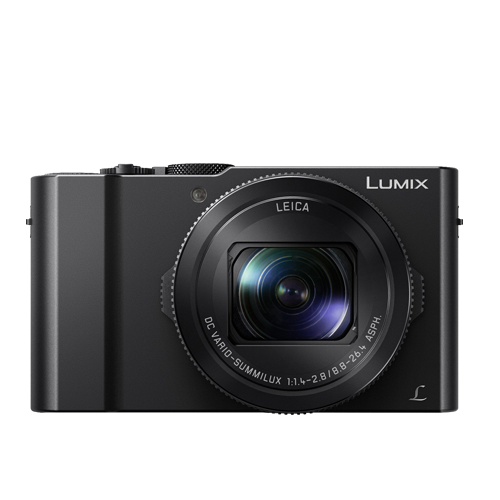 |
September2016 | Compact | Flip Up | No | $ |
| CanonEOS80D | 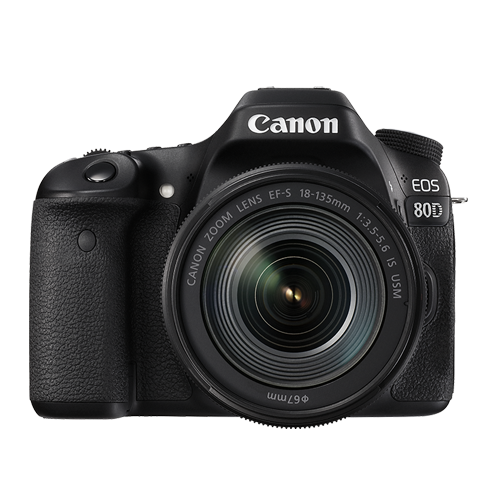 |
February2016 | Mid-size SLR | Fully Articulated | Yes | $$ |
| CanonPowerShotG7 X Mark II | 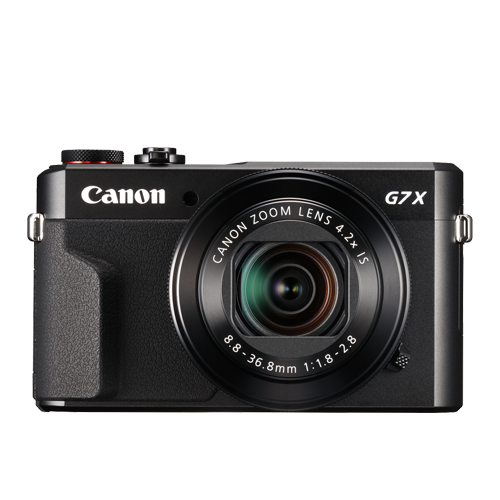 |
February2016 | Compact | Flip Up | No | $ |
At first, you can have a look at the below video.
What Gear Do Creators Actually Use | Vidcon 2023 | Sony vs Canon
|
Best daily vlogging camera: Sony Cyber-Shot DSC-RX 100 V You don’t have to be a filmmaking pro if you want to use a compact camera to record all sorts of videos. Sony’s Cyber-shot series is famous for its cutting-edge features and the DSC-RX 100 V model is not an exception. This camera is equipped with a 20.1 MP Exmor RS BSI CMOS Sensor that supports ISO sensitivities up to ISO 12800. You can record footage in UHD 4K at 30 or 24 fps, although with a five-minute limit, as well as Full HD videos at a maximum of 960 fps when recording in the HFR mode. The Sony Cyber-shot DSC-RX 100 V ships with a non-interchangeable Carl Zeiss Vario Sonnar T lens that performs well under low-light conditions and in broad daylight. The camera features a fast hybrid AF system with 315 phase-detection points and an anti-motion blur mode that allows you to keep the subjects of your vlogs in focus throughout your recording. DSC RX-100 V’s multi-functionality makes it one of the best cameras for daily vlogging, especially for vloggers who are planning on shooting vlogs in various locations. PROS - Light and easy to carry around - Produces high-res videos CONS - Short battery life - Lacking a touchscreen |
|---|---|
|
Best cheap vlogging camera: Canon EOS M100 Canon’s EOS M100 is small and powerful. This mirrorless camera produces full HD videos at 60 fps. It doesn’t, however, shoot 4K footage. The 24.2 MP APS-C CMOS sensor and the DIGIC 7 image processor ensure that your vlogs are always in focus and rich in detail. The Canon EOS M100 provides great ISO sensitivity options, offering ISO values as high as 25600, making it a great option for vloggers that often shoot their videos under difficult light conditions. The 3-inch touchscreen LCD lets you control focus points, navigate through the camera’s menu, or watch videos you’ve created. The screen can also be tilted in the upward direction to provide you a better preview of the shot you’re recording. The camera has a built-in Wi-Fi with NFC so you can transfer your videos seamlessly to a computer and have fun in the process. The Canon EOS M100 is currently one of the best entry-level cameras for daily vlogging on the market because it produces videos in great picture quality that you don’t have to spend a fortune for. PROS - Affordable - Great connectivity options CONS - Lacks advanced video recording features - No viewfinder |
|
Best entry-level mirrorless camera for vlogging: Canon EOS M100 The Canon EOS M100 wins this category as well in our books because it’s a powerful, feature-rich camera that’s also very affordable. In case you missed it, check out my review on the Canon EOS M100. |
|
Best mid-range mirrorless camera for vlogging: Canon EOS M50 The EOS M50 has been on the market for just a few months and it is already regarded as one of the best mirrorless cameras for vlogging. Its 24.1 MP APS-C CMOS sensor and DIGIC 8 Image Processor are improved versions of those in the Canon EOS M100 model. With the Canon EOS M50, you can crank up the ISO sensitivity to 51200. This camera uses the Canon EF lens mount, so you can choose the lens that best suits your needs. The Canon EOS M50 can capture UHD 4K videos at 23.98 fps, and it also lets you record 120 fps slow-motion videos at 720p. PROS - Has an external microphone port - Has a 2.36m-dot OLED electronic viewfinder CONS - No image stabilization - Battery life could be longer |
|
Best professional mirrorless camera for vlogging: Panasonic Lumix DC-GH5S The Panasonic’s GH series was made famous by the LUMIX DMC-GH4 model that will be remembered as the world’s first mirrorless interchangeable lens camera to offer the 4K video recording option. That’s why it comes as no surprise that the GH5S mirrorless micro four-thirds camera can record UHD 4K as well as DCI videos at 60 fps, and 150 Mbps. The full HD 1080p at 240 fps video recording option is also available if you want to capture slow-motion footage for your vlogs. The camera’s 10.28MP multi-aspect ratio MOS sensor enhances its low-light performance and produces high-quality videos even under very challenging lighting conditions. Recording the audio with an external microphone is one of the many advantages offered by the Lumix DC-GH5S, while the Advanced Depth-From-Focus technology is used to automatically focus the video in a fraction of a second. The GH5S’ touchscreen can be rotated in any direction, so you can clearly see your shot no matter where you are. There’s very little doubt that the GH5S is the best professional-level mirrorless camera for vlogging that will help you capture stunning vlogs. PROS - ISO sensitivity goes up to 204800 - High video bit rates CONS - Expensive - The camera body weighs about 1.5 lbs |
|
Best entry-level DSLR camera for vlogging: Canon EOS SL2 The Canon EOS Rebel SL2 is a great entry-level vlogging camera that delivers great power at a low price. The Canon EOS Rebel SL2 has a DIGIC 7 image processor and a 24.2 MP APS-C CMOS sensor that lets you extend the ISO value to 51200 and shoot your vlogs even under low light conditions. This camera can capture full HD 1080p videos at 60 fps, and it features a 9-point AF system and dual pixel CMOS AF technologies that provide precise and quick focusing even when there is not much light. The SL2 also has a microphone jack you can connect an external microphone too for better audio. PROS - Microphone jack - Wi-Fi connectivity CONS - No 4K video support - Optical image stabilizer could be better |
|
Best mid-range DSLR camera for vlogging: Canon EOS 80D The Canon EOS 80D is a feature-rich, mid-range DSLR camera great for vlogging. The 80D lets you capture full HD 1080p videos at 60 fps. It doesn’t provide support for 4K videos, though. The ISO on this camera can be set up to 25600. The 24.2 MP APS-C CMOS sensor and the DIGIC 6 image processor reduce the need for high ISO values, though, as they enable the camera to capture visually stunning footage even when the light in the shot is far from perfect. The 80D’s 45-point all cross phase detection autofocus system and its dual pixel CMOS AF system enable you to produce sharp images without having to pull-focus yourself. The various-angle 3-inch 1.04M-dot ClearView II LCD touchscreen display, as well as the pentaprism type intelligent viewfinder, let you compose shots effortlessly. PROS - Feature-rich - Continuous AF feature performs beautifully while recording high-res videos CONS - Just one SD card slot - PC sync connection features could be better |
|
Best professional DSLR camera for vlogging: Canon 6D Mark II The Canon EOS 6D Mark II is the best professional DSLR camera for vlogging. It is the only DSLR camera on the market (as of writing this review) that comes with a full-frame sensor along with a fully-articulated screen and a microphone jack. The camera’s 26.2 MP full-frame CMOS sensor can take in much more light, giving you the option to shoot with higher quality bokeh (unfocused areas appearing more blurry) and find focus much more quickly and accurately in more challenging lighting conditions. With this camera, you can shoot up to full HD 1080p videos at a maximum of 60 fps. Although the 6D Mark II comes with the same 45-point all cross-type autofocusing system as Canon’s crop sensor 80D camera, the 6D Mark II is equipped with the improved DIGIC 7 image processor unlike the 80D’s DIGIC 6 image processor. If you’re wanting to shoot your vlogs with a full-frame, The 6D Mark II is a great option. PROS - ISO sensitivity goes up to 102400 - Amazing touchscreen controls CONS - No 4K video recording option - No USB 3.0 |
Liza Brown
Liza Brown is a writer and a lover of all things video.
Follow @Liza Brown
Liza Brown
Jan 10, 2024• Proven solutions
It can be challenging to make a decision on purchasing a camera when there’s just so many on the market. Camera manufacturers are racing to update their product line with all the new camera technology advancements. To simplify your search for the ultimate vlogging camera, we’ve come up with a top twelve list.
If you’re looking for a specific type of vlogging camera, check out our other posts on vlogging cameras:
Top 11 Cheap Vlogging Cameras (2024)
7 Best DSLR Cameras For Vlogging (2024)
8 Best Mirrorless Cameras For Vlogging (2024)
12 Best Vlogging Cameras With A Flip Screen (2024)
WHAT TO LOOK FOR IN A VLOGGING CAMERA
1. Fully articulated screen (flip screen)
2. Good continual autofocus while recording video
3. Good focus priority through face recognition
4. Touch to focus
5. Good low-light performance
6. external mic jack, hot/cold shoe bracket
7. optical image stabilization
8. good battery life
Check out my full list of 10 Things To Look For In A Vlogging Camera to understand the importance of these camera features.
12 BEST VLOGGING CAMERAS (2024)
| Camera | Release Date | Camera Type | Flip Screen | Mic Port | Price | |
|---|---|---|---|---|---|---|
| CanonEOSM50 | |
February2018 | Mirrorless | Fully Articulated | Yes | $- |
| PanasonicLumixDC-GH5S | |
January2018 | Mirrorless | Fully Articulated | Yes | $$$ |
| SonyAlphaa7R III | |
October2017 | Mirrorless | Tilting | Yes | $$$ |
| CanonEOSM100 | |
August2017 | Mirrorless | Flip Up | No | $ |
| CanonEOS6D Mark II | |
June2017 | Mid-size SLR | Fully Articulated | Yes | $$ |
| CanonEOS RebelSL2 | |
June2017 | Compact SLR | Fully Articulated | Yes | $ |
| CanonEOSM6 | |
February2017 | Mirrorless | Flip Up | Yes | $ |
| SonyCyber-Shot DSCRX 100 V | |
October2016 | Compact | Flip Up | No | $- |
| SonyAlphaa6500 | |
October2016 | Mirrorless | Tilting | Yes | $$- |
| PanasonicLumix DMCLX10 | |
September2016 | Compact | Flip Up | No | $ |
| CanonEOS80D | |
February2016 | Mid-size SLR | Fully Articulated | Yes | $$ |
| CanonPowerShotG7 X Mark II | |
February2016 | Compact | Flip Up | No | $ |
At first, you can have a look at the below video.
What Gear Do Creators Actually Use | Vidcon 2023 | Sony vs Canon
|
Best daily vlogging camera: Sony Cyber-Shot DSC-RX 100 V You don’t have to be a filmmaking pro if you want to use a compact camera to record all sorts of videos. Sony’s Cyber-shot series is famous for its cutting-edge features and the DSC-RX 100 V model is not an exception. This camera is equipped with a 20.1 MP Exmor RS BSI CMOS Sensor that supports ISO sensitivities up to ISO 12800. You can record footage in UHD 4K at 30 or 24 fps, although with a five-minute limit, as well as Full HD videos at a maximum of 960 fps when recording in the HFR mode. The Sony Cyber-shot DSC-RX 100 V ships with a non-interchangeable Carl Zeiss Vario Sonnar T lens that performs well under low-light conditions and in broad daylight. The camera features a fast hybrid AF system with 315 phase-detection points and an anti-motion blur mode that allows you to keep the subjects of your vlogs in focus throughout your recording. DSC RX-100 V’s multi-functionality makes it one of the best cameras for daily vlogging, especially for vloggers who are planning on shooting vlogs in various locations. PROS - Light and easy to carry around - Produces high-res videos CONS - Short battery life - Lacking a touchscreen |
|---|---|
|
Best cheap vlogging camera: Canon EOS M100 Canon’s EOS M100 is small and powerful. This mirrorless camera produces full HD videos at 60 fps. It doesn’t, however, shoot 4K footage. The 24.2 MP APS-C CMOS sensor and the DIGIC 7 image processor ensure that your vlogs are always in focus and rich in detail. The Canon EOS M100 provides great ISO sensitivity options, offering ISO values as high as 25600, making it a great option for vloggers that often shoot their videos under difficult light conditions. The 3-inch touchscreen LCD lets you control focus points, navigate through the camera’s menu, or watch videos you’ve created. The screen can also be tilted in the upward direction to provide you a better preview of the shot you’re recording. The camera has a built-in Wi-Fi with NFC so you can transfer your videos seamlessly to a computer and have fun in the process. The Canon EOS M100 is currently one of the best entry-level cameras for daily vlogging on the market because it produces videos in great picture quality that you don’t have to spend a fortune for. PROS - Affordable - Great connectivity options CONS - Lacks advanced video recording features - No viewfinder |
|
Best entry-level mirrorless camera for vlogging: Canon EOS M100 The Canon EOS M100 wins this category as well in our books because it’s a powerful, feature-rich camera that’s also very affordable. In case you missed it, check out my review on the Canon EOS M100. |
|
Best mid-range mirrorless camera for vlogging: Canon EOS M50 The EOS M50 has been on the market for just a few months and it is already regarded as one of the best mirrorless cameras for vlogging. Its 24.1 MP APS-C CMOS sensor and DIGIC 8 Image Processor are improved versions of those in the Canon EOS M100 model. With the Canon EOS M50, you can crank up the ISO sensitivity to 51200. This camera uses the Canon EF lens mount, so you can choose the lens that best suits your needs. The Canon EOS M50 can capture UHD 4K videos at 23.98 fps, and it also lets you record 120 fps slow-motion videos at 720p. PROS - Has an external microphone port - Has a 2.36m-dot OLED electronic viewfinder CONS - No image stabilization - Battery life could be longer |
|
Best professional mirrorless camera for vlogging: Panasonic Lumix DC-GH5S The Panasonic’s GH series was made famous by the LUMIX DMC-GH4 model that will be remembered as the world’s first mirrorless interchangeable lens camera to offer the 4K video recording option. That’s why it comes as no surprise that the GH5S mirrorless micro four-thirds camera can record UHD 4K as well as DCI videos at 60 fps, and 150 Mbps. The full HD 1080p at 240 fps video recording option is also available if you want to capture slow-motion footage for your vlogs. The camera’s 10.28MP multi-aspect ratio MOS sensor enhances its low-light performance and produces high-quality videos even under very challenging lighting conditions. Recording the audio with an external microphone is one of the many advantages offered by the Lumix DC-GH5S, while the Advanced Depth-From-Focus technology is used to automatically focus the video in a fraction of a second. The GH5S’ touchscreen can be rotated in any direction, so you can clearly see your shot no matter where you are. There’s very little doubt that the GH5S is the best professional-level mirrorless camera for vlogging that will help you capture stunning vlogs. PROS - ISO sensitivity goes up to 204800 - High video bit rates CONS - Expensive - The camera body weighs about 1.5 lbs |
|
Best entry-level DSLR camera for vlogging: Canon EOS SL2 The Canon EOS Rebel SL2 is a great entry-level vlogging camera that delivers great power at a low price. The Canon EOS Rebel SL2 has a DIGIC 7 image processor and a 24.2 MP APS-C CMOS sensor that lets you extend the ISO value to 51200 and shoot your vlogs even under low light conditions. This camera can capture full HD 1080p videos at 60 fps, and it features a 9-point AF system and dual pixel CMOS AF technologies that provide precise and quick focusing even when there is not much light. The SL2 also has a microphone jack you can connect an external microphone too for better audio. PROS - Microphone jack - Wi-Fi connectivity CONS - No 4K video support - Optical image stabilizer could be better |
|
Best mid-range DSLR camera for vlogging: Canon EOS 80D The Canon EOS 80D is a feature-rich, mid-range DSLR camera great for vlogging. The 80D lets you capture full HD 1080p videos at 60 fps. It doesn’t provide support for 4K videos, though. The ISO on this camera can be set up to 25600. The 24.2 MP APS-C CMOS sensor and the DIGIC 6 image processor reduce the need for high ISO values, though, as they enable the camera to capture visually stunning footage even when the light in the shot is far from perfect. The 80D’s 45-point all cross phase detection autofocus system and its dual pixel CMOS AF system enable you to produce sharp images without having to pull-focus yourself. The various-angle 3-inch 1.04M-dot ClearView II LCD touchscreen display, as well as the pentaprism type intelligent viewfinder, let you compose shots effortlessly. PROS - Feature-rich - Continuous AF feature performs beautifully while recording high-res videos CONS - Just one SD card slot - PC sync connection features could be better |
|
Best professional DSLR camera for vlogging: Canon 6D Mark II The Canon EOS 6D Mark II is the best professional DSLR camera for vlogging. It is the only DSLR camera on the market (as of writing this review) that comes with a full-frame sensor along with a fully-articulated screen and a microphone jack. The camera’s 26.2 MP full-frame CMOS sensor can take in much more light, giving you the option to shoot with higher quality bokeh (unfocused areas appearing more blurry) and find focus much more quickly and accurately in more challenging lighting conditions. With this camera, you can shoot up to full HD 1080p videos at a maximum of 60 fps. Although the 6D Mark II comes with the same 45-point all cross-type autofocusing system as Canon’s crop sensor 80D camera, the 6D Mark II is equipped with the improved DIGIC 7 image processor unlike the 80D’s DIGIC 6 image processor. If you’re wanting to shoot your vlogs with a full-frame, The 6D Mark II is a great option. PROS - ISO sensitivity goes up to 102400 - Amazing touchscreen controls CONS - No 4K video recording option - No USB 3.0 |
Liza Brown
Liza Brown is a writer and a lover of all things video.
Follow @Liza Brown
Also read:
- Moment's Best The Leading Youtube Video Tracks
- 10 Premium Online Yoga Classrooms for Physical Transformation for 2024
- 2024 Approved Boost Visibility with a Bespoke YouTube Channel URL
- 2024 Approved Best Selection Turn Your Videos Into Text Fast
- 2024 Approved Best Practices Choosing YouTube's Most Popular Video Formats
- 2024 Approved A Guide to Homemade Film Crafting, YouTube & Beyond
- The Components That Lift You in YouTube Viewership
- Essential Free Online Music Libraries 15 Picks
- [Updated] A Social Media Perspective Dissecting IGTV versus YouTube's Features
- Enhancing Visibility and Discoverability via Targeted Tags for 2024
- 2024 Approved Elevate Your Online Presence with Captivating Haul Videos
- [Updated] 5 Tricks for Instantly Boosting YouTube Subscribers
- Amplify Content with Free Audio Samples for 2024
- YouTube's Twist Rearranging Queue From End to Beginning
- [Updated] Enhancing Narrative Flow Integrating Chapters Into Your YouTube Content
- Essential, Inexpensive Vlogging Tools Listed for 2024
- Hashtag Mastery Enhancing FreeFire Gameplay Videos
- 2024 Approved Boost Engagement and Traffic with These Top Video Marketing Moves
- AudioCut Editor Expert Video & Melody Mastery on PC
- Best Apps for 3D Video Intros on Social Platforms
- The Key to Earning on YouTube In-Depth Ad Revenue Guidebook
- [New] Conveniently Share Your Videos YouTube Shorts Mobile/Computer Tips
- Adjust Privacy Settings for Secure Online Viewing
- Protecting Integrity While Boosting Your YouTube Followers Count
- Maximize Audience Impact - Peak Viewing Hours
- [New] Boost Your YouTube Success with Free, High-Quality Audio
- [Updated] Pixel Perfection Your Guide to YouTube, Twitters, and HD for 2024
- How to Reset a Locked Motorola Edge 2023 Phone
- Updated 2024 Approved Ultimate Guide to Premium Feminine Vocalization Web Tools, Update
- [New] A Step-by-Step Process to Upgrade and Update Video Covers on Social Media for 2024
- [Updated] In 2024, Best Facebook Lite Video Downloading Software of 2023
- In 2024, How to Fix Locked Apple ID from Apple iPhone 15 Plus
- In 2024, Detailed Review of doctorSIM Unlock Service For iPhone 12 Pro Max
- 2024 Approved Unlocking TikTok The Ultimate Guide to Joining Lives
- How to Display Apple iPhone 15 Screen on PC Easily? | Dr.fone
- [New] The Complete Breakdown of Downloading Status Videos on Fb
- Boost Creativity How to Use Movie Maker on Windows 8 for 2024
- New The Ultimate Guide to Trimming Videos Online with Kapwing Editor
- Recommended Best Applications for Mirroring Your Tecno Spark 20 Pro+ Screen | Dr.fone
- [Updated] 2024 Approved Precise Speech to Text The Google Standard
- [New] In 2024, Fixing Blurred Footage in Social Media Streaming
- Mastering the Basics Essential Podcast Editing Tips for Novices
- In 2024, How to Spy on Text Messages from Computer & Nokia C22 | Dr.fone
- [Updated] Mastering the Art of Quick Pacing in TikTok
- 2024 Approved Step-by-Step Instructions for Universal Recording of YouTube Lives
- How To Remove or Bypass Knox Enrollment Service On Oppo F23 5G
- [Updated] Exploring Discord Nitro VIP Access & The Steps for Obtainment for 2024
- New The Best Video Creation Tools with Music and Audio Options for 2024
- In 2024, Planning to Use a Pokemon Go Joystick on Samsung Galaxy M54 5G? | Dr.fone
- Leveraging Live Streaming for Maximum Impact on YouTube with Limited Subscribers
- Updated The Ultimate Manual for Sonic Enhancement Using Sony Vegas Pro 2023 for 2024
- [New] The Ultimate Guide to Finding Your Ideal Recorder (MacOS) for 2024
- Title: The Ultimate Guide to Closing Videos Effectively
- Author: Steven
- Created at : 2024-05-25 20:32:37
- Updated at : 2024-05-26 20:32:37
- Link: https://youtube-clips.techidaily.com/the-ultimate-guide-to-closing-videos-effectively/
- License: This work is licensed under CC BY-NC-SA 4.0.
