
:max_bytes(150000):strip_icc()/julio-lopez-jK_oDRU_Iv4-unsplash-349bc8590cba4b83a4ea4c683f3b9f55.jpg)
The Ultimate Guide to Adobe Premiere and YouTube Uploads
The Ultimate Guide to Adobe Premiere and YouTube Uploads
How Do I Use Adobe Premiere To Upload YouTube Videos?

Benjamin Arango
Mar 27, 2024• Proven solutions
Whilst getting the editing and post work just right on any project is what we all aim for, the ultimate aim is for other people to see our creations, and the most popular way to achieve that is YouTube . Chances are, if you are producing video, you will be putting some of it on YouTube at some point, so let’s have a look at the most efficient way to get your work from Premiere to YouTube.
Check if your computer meet the Premiere System Requirements >>
This is a basic tutorial about Adobe Premiere, professional video editing software. However, if video editing is new to you, consider Wondershare Filmora , which is a powerful but easy-to-use tool for users just starting out. Download the free trial version below.
 Download Mac Version ](https://tools.techidaily.com/wondershare/filmora/download/ )
How Do I Use Adobe Premiere To Upload YouTube Videos
1. Master Copy
Before exporting your work, it is important to first create a master copy of your project that is ‘as is’, in that it reflects the settings and codecs used in the original footage.
To do this you simply select the sequence within the Timeline or in the Project Panel, and go through the menu tree via File > Export > Media to bring up the export dialogue.

To create your Master Copy, simply select the first option of ‘Match Sequence Settings’, this exports a file that is of the same quality as your original footage, essentially producing a digital copy of the work for archiving before anything else is done.
With you work safe and secure it is now time to look at ensuring the project is suitable for YouTube. With our sequence selected in the Timeline or Project Panel again, we go through the same File > Export > Media path to bring up the media export dialogue as before.
2. Container
The first option we have to consider is the file format that our finished video needs to be in. Here you should refer to YouTube for its guidelines, whilst they do accept a number of file formats, digging through the YouTube help system to find the settings for highest quality we find that they recommend MPEG4 as the container, using the codec.

We can also see further recommended settings in this screenshot that will be covered later.
The good news is that Premiere automatically selects the appropriate container for us when we select our codec, however it is worth knowing the file type YouTube is expecting just to check yourself.
3. Video Codec
So having established that YouTube recommends the MPEG4 container using the codec, the first option we need to look for in the media export dialogue is to select the appropriate Format.
This is the first drop down in the dialogue box, and in this case we simply select from the list.

Once you select you can check the ‘output name’ field and see that premiere is automatically set the output file to .mp4 which is exactly what we need.
4. Preset
The next field we come to is the ‘Preset’ dropdown menu. This is a major help to most people, as Adobe have very kindly included large numbers of presets to quickly adapt video settings to suit specific uses. They vary depending on the exact version of Premiere you are using, and each format type does have its own list of presets, as we can see has a large number for YouTube, but also has many presets for specific devices (presets for iPad, Kindle, Nook, various other tablets and phones, Vimeo and a host of others) to make getting the right settings that bit easier for us.

It is important here to select the correct preset from the various YouTube options. You want to select the resolution and frame rate that match your source file, for the best results. So, if your source file is 1080p with a frame rate of 29.97 fps then that is the YouTube setting you would select.
Once a preset is selected a summary of the settings is displayed below, normally these will be well suited to your project, however you can fine tune anything you wish by selecting the video or audio tabs at the bottom which give you the chance to adjust each parameter individually. If you do this, you can save these changes as a custom preset by clicking the button at the side of the Preset dropdown menu and simply use it on later projects by selecting it from the list the same as any other, a great time saving tool.

5. Rendering
Once you are satisfied with the settings, either from the Preset alone or if you have adjusted anything yourself, you are nearly ready to render the file and export it.
For YouTube it is recommended you select the ‘Use Maximum Render Quality’ option to maintain the best output you can, it does add time to the render process but if you value the quality of your work it is worthwhile.
Finally you can choose a suitable filename and the destination of the file by clicking on the ‘Output Name’ field.
I normally use a filename that includes the destination medium so I can differentiate between different versions of a project and know which one to upload where, in this case I include ‘youtube’, but if I were planning on uploading clips of the project to vimeo as well for instance there may be a cut of the project with ‘vimeo’ in the name too. The destination is personal preference, because I do use filenames to differentiate versions I can put the various iterations into a single project file, others have folder structures for each type of file , so all YouTube output goes into a single folder and so on, how you organize is entirely dependent on how you work.

Once those are selected clicking ‘Export’ starts the rendering process, and eventually (how long depends on the speed of your computer and the size and type of file involved), you will end up with your YouTube optimized video in the location you chose.
Here I created 4 key frames that let the ‘Animation’ object move around the ‘Demo Text’ Object and finally come to rest below it. Whilst this type of effect does look very effective on screen, such is the ease of use of After Effects it really is just a few minutes work to achieve.
Learn more details about How to add text in Premiere >>
6. Uploading
Now you have your file, the next step is to go to your YouTube account and log in if you need to.
On the top of your homepage on the right is the upload button, selecting that brings up the select file menu as below.

You can either drag your file into the window or click on it to open a standard file browser to locate the desired file, click and the upload will begin. The dropdown underneath allows you to set the video as Public, Unlisted or Private. You can change this at any time once the video is uploaded as well.
This opens the upload progress window, where you can add in a name, description and tags as well as add the video to a playlist or adjust the privacy settings as the video is uploading.

Once the upload as finished, you can do final adjustments to settings and choose a thumbnail for the video. The final step is to click the ‘Publish’ button and your video will be processed and go live.

Benjamin Arango
Benjamin Arango is a writer and a lover of all things video.
Follow @Benjamin Arango
Benjamin Arango
Mar 27, 2024• Proven solutions
Whilst getting the editing and post work just right on any project is what we all aim for, the ultimate aim is for other people to see our creations, and the most popular way to achieve that is YouTube . Chances are, if you are producing video, you will be putting some of it on YouTube at some point, so let’s have a look at the most efficient way to get your work from Premiere to YouTube.
Check if your computer meet the Premiere System Requirements >>
This is a basic tutorial about Adobe Premiere, professional video editing software. However, if video editing is new to you, consider Wondershare Filmora , which is a powerful but easy-to-use tool for users just starting out. Download the free trial version below.
Download Mac Version ](https://tools.techidaily.com/wondershare/filmora/download/ )
How Do I Use Adobe Premiere To Upload YouTube Videos
1. Master Copy
Before exporting your work, it is important to first create a master copy of your project that is ‘as is’, in that it reflects the settings and codecs used in the original footage.
To do this you simply select the sequence within the Timeline or in the Project Panel, and go through the menu tree via File > Export > Media to bring up the export dialogue.
To create your Master Copy, simply select the first option of ‘Match Sequence Settings’, this exports a file that is of the same quality as your original footage, essentially producing a digital copy of the work for archiving before anything else is done.
With you work safe and secure it is now time to look at ensuring the project is suitable for YouTube. With our sequence selected in the Timeline or Project Panel again, we go through the same File > Export > Media path to bring up the media export dialogue as before.
2. Container
The first option we have to consider is the file format that our finished video needs to be in. Here you should refer to YouTube for its guidelines, whilst they do accept a number of file formats, digging through the YouTube help system to find the settings for highest quality we find that they recommend MPEG4 as the container, using the codec.
We can also see further recommended settings in this screenshot that will be covered later.
The good news is that Premiere automatically selects the appropriate container for us when we select our codec, however it is worth knowing the file type YouTube is expecting just to check yourself.
3. Video Codec
So having established that YouTube recommends the MPEG4 container using the codec, the first option we need to look for in the media export dialogue is to select the appropriate Format.
This is the first drop down in the dialogue box, and in this case we simply select from the list.
Once you select you can check the ‘output name’ field and see that premiere is automatically set the output file to .mp4 which is exactly what we need.
4. Preset
The next field we come to is the ‘Preset’ dropdown menu. This is a major help to most people, as Adobe have very kindly included large numbers of presets to quickly adapt video settings to suit specific uses. They vary depending on the exact version of Premiere you are using, and each format type does have its own list of presets, as we can see has a large number for YouTube, but also has many presets for specific devices (presets for iPad, Kindle, Nook, various other tablets and phones, Vimeo and a host of others) to make getting the right settings that bit easier for us.
It is important here to select the correct preset from the various YouTube options. You want to select the resolution and frame rate that match your source file, for the best results. So, if your source file is 1080p with a frame rate of 29.97 fps then that is the YouTube setting you would select.
Once a preset is selected a summary of the settings is displayed below, normally these will be well suited to your project, however you can fine tune anything you wish by selecting the video or audio tabs at the bottom which give you the chance to adjust each parameter individually. If you do this, you can save these changes as a custom preset by clicking the button at the side of the Preset dropdown menu and simply use it on later projects by selecting it from the list the same as any other, a great time saving tool.
5. Rendering
Once you are satisfied with the settings, either from the Preset alone or if you have adjusted anything yourself, you are nearly ready to render the file and export it.
For YouTube it is recommended you select the ‘Use Maximum Render Quality’ option to maintain the best output you can, it does add time to the render process but if you value the quality of your work it is worthwhile.
Finally you can choose a suitable filename and the destination of the file by clicking on the ‘Output Name’ field.
I normally use a filename that includes the destination medium so I can differentiate between different versions of a project and know which one to upload where, in this case I include ‘youtube’, but if I were planning on uploading clips of the project to vimeo as well for instance there may be a cut of the project with ‘vimeo’ in the name too. The destination is personal preference, because I do use filenames to differentiate versions I can put the various iterations into a single project file, others have folder structures for each type of file , so all YouTube output goes into a single folder and so on, how you organize is entirely dependent on how you work.
Once those are selected clicking ‘Export’ starts the rendering process, and eventually (how long depends on the speed of your computer and the size and type of file involved), you will end up with your YouTube optimized video in the location you chose.
Here I created 4 key frames that let the ‘Animation’ object move around the ‘Demo Text’ Object and finally come to rest below it. Whilst this type of effect does look very effective on screen, such is the ease of use of After Effects it really is just a few minutes work to achieve.
Learn more details about How to add text in Premiere >>
6. Uploading
Now you have your file, the next step is to go to your YouTube account and log in if you need to.
On the top of your homepage on the right is the upload button, selecting that brings up the select file menu as below.
You can either drag your file into the window or click on it to open a standard file browser to locate the desired file, click and the upload will begin. The dropdown underneath allows you to set the video as Public, Unlisted or Private. You can change this at any time once the video is uploaded as well.
This opens the upload progress window, where you can add in a name, description and tags as well as add the video to a playlist or adjust the privacy settings as the video is uploading.
Once the upload as finished, you can do final adjustments to settings and choose a thumbnail for the video. The final step is to click the ‘Publish’ button and your video will be processed and go live.
Benjamin Arango
Benjamin Arango is a writer and a lover of all things video.
Follow @Benjamin Arango
Step Inside: The Ultimate List of Immersive YouTube VR Content
Versatile YouTube Video Editor - Filmora
An easy yet powerful editor
Numerous effects to choose from
Detailed tutorials provided by the official channel
The pandemic in 2020 was a significant event that disrupted everyone globally. Video calls and virtual events became the run-to for most workers. This caused a lot of people to embrace the idea of virtualization.
Viewers needed new ways to experience performances and shows. Then, new virtual reality (VR) headsets entered the market, making people amazed as they did the best of what an average standalone headset could do. VR videos give real-like visual effects that will amaze and make you feel in the same surrounding as in the video background. And with the arrival of futuristic VR video Youtubers, creative videos are coming all around. Through this article, let’s look over the best YouTube VR Videos and understand how YouTube VR 360 videos differ from each other.
In this article
01 What is a VR video on YouTube?
02 10 Best VR Videos on YouTube for 2021
03 Where to Watch VR Videos besides YouTube?
04 Choose High-Quality VR Headsets
Part 1: What is a VR video on YouTube?
Firstly, it is essential to understand a VR Video on YouTube and how it differs from 360 videos?
VR Videos YouTube – For VR Videos with the YouTube mobile app, you can watch VR videos alongside cardboard. You will have an immersive feeling while watching this as you feel present in the scene actions while having your field of vision covered with a viewing device.
Though both YouTube VR and 360 give an immersive viewing experience with 360-degree coverage, still YouTube 360 videos reflect live actions with modified cameras accessible through 360-degree video-compatible devices. YouTube 360 videos are also viewable on devices such as smartphones, computers, etc., that are compatible. However, here, video progression is not under viewers’ control.
On the other hand, VR videos with VR headsets give options to control the viewing experience, such as interacting, running, walk with the video from the viewer’s end.
Part 2: 10 Best VR Videos on YouTube for 2021
You must be eager to start your voyage to VR YouTube videos. So let’s move ahead with the below-mentioned options that cover the ten best YouTuber VR Videos.
1. 360° VR GALACTUS EVENT | The End of season Fortnite Event
The production of VR videos from the 360 worlds games is becoming a live event model, making video creators keep these incredible experiences with this end-of-season Fortnite event.
2. Around the Planet in 2 Minutes
This video offers viewers a glimpse of other travel videos on the channel while leading them to various locations worldwide.
3. Ascension by David Blaine (YouTube 360 Video)
This version of the YouTube 360 video gives viewers a view of it from the first-person point of view. This video broke YouTube records with its 22+million views within a short while.
4. Beautifully Broken by Warren Haynes and Danny Louis
In this video, Warren Haynes and Danny Louis mirrored the constraints of the moment implicitly, taking their craft outdoors.
5. China, One week before Coronavirus Lockdown
This experience gives one the view of different structures like plants, people, and nature at large.
6. The Dawn of Art; AVirtual Journey inside Chauvet Cave
This animated tour is being narrated into a cave by Daisy Ridley. The video is known for holding the best figurative cave painting in the world kept for 36,000 years.
7. Guardians of the Kingdom
This video exposes the relationship between whales and humans by the incidences between two mothers; a human and a whale.
8. HowVolcanoes Affect Earth’s Climate over Millions of Years
Here, viewers get to see how volcanoes spew carbon dioxide and other gases into the air, changing the earth’s climate through that.
9. Inside NYC’s Skinniest Supertall Skyscraper
In this video, the viewers see the views of the central park and the iconic US metropolis.
10. Lockdown Around the World | National Geographic
This video is from National Geographic. It exposes a view of crowded cities in an unprecedented period like the lockdown.
Part 3: Where to Watch VR Videos besides YouTube?
You may wonder whether there are other platforms where you can watch VR videos.
The good news is: Yes! Besides YouTube, we have platforms where viewers can watch VR videos and have an immersive experience. Read on to know them.
1. Vimeo 360
This platform allows users to upload, play, and even share their VR videos with their friends on apps like Facebook and YouTube.
2. Oculus Gear VR store
Users can watch their YouTube VR Oculus videos on this platform with apps like Samsung XR, Skybox VR video player, etc. They are also allowed to download games apps.
3. Steam Powered
Steam Powered is known for VR titles and gets support from good VR headsets.
Part 4: Choose High-Quality VR Headsets
There are quite a good number of VR Headsets, but we have the option of choosing a high-quality VR headset that should be able to deliver a wonderful experience. This is what every user wants. Let’s take a good look at a few of them.
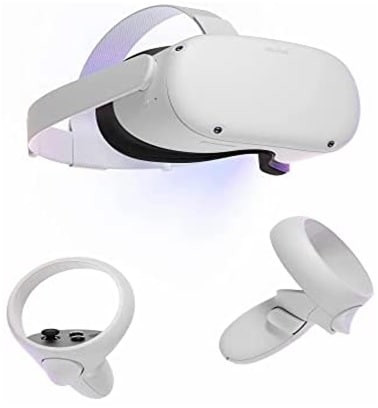
1. Oculus Quest 2
This VR headset is top-notch. Its impressive flexibility, backed by its shocking price, will make one not want to look elsewhere.
No need to worry about screen-door effects as the headset possesses a high per-eye resolution—smooth 90Hz refreshing rate just like the Rift CV1 Oculus. Based on the Qualcomm Snapdragon chipset, XR2 resulted in excellent standalone performance. It’s also capable of linking up with gaming PC for desktop experiences.
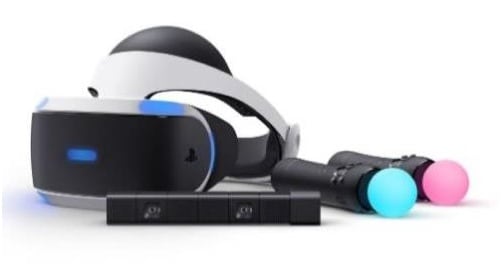
2. PlayStation VR
A lot of VR games have come out on PlayStation VR. The PlayStation VR gives PS4 users an excellent and quality experience. However, it doesn’t have the highest resolution displays and cannot go for wild, room-scale tracking.
It has a 960 x 1,080 per-eye resolution and offers a 120Hz refresh rate for quality experiences. Its 100-degree field of view, motion controllers, and separate camera are suitable for unlocking immersive gameplay. A fantastic thing about it is that although it was for the PS4 and PS4 Pro, Sony ensured it’ll also run on the PS5.
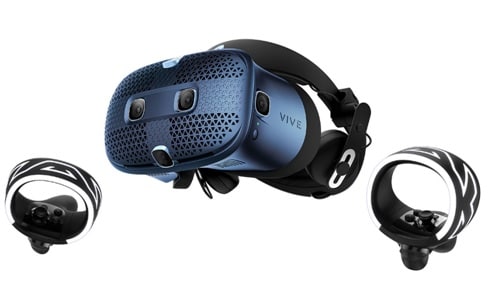
3. HTC Vive Cosmos
The HTC Vive Cosmos is the latest HTC headset in town. Overall combined 2,880 x 1,700 resolution provides optimally sharp resolution for the eyes that is 1,440 x 1,700.
This headset has an easy-to-wear halo-style headband and attached headphones for spatial audio. It’s a highly versatile headset that allows users to switch which version of the Cosmos they’re using by simply swapping out the faceplate, controllers, and any tracking base station.
Part 5: FAQs about VR Videos
Let’s take a look at some questions by VR viewers.
Who is the Most Popular VR YouTuber?
‘Nathie’ is the most popular VR YouTuber today. He is a Netherland-based content creator whose niche is VR technology. His channel has stupendous 600k subscribers.
Is VR Bad for Your Eyes?
According to research, there is evidence that wearing VR Headsets can cause the eyesight to deteriorate, causing eye strain, discomfort, and making the vision blur.
What is the Future of VR?
VR is known for giving immersive experiences in various aspects of life and career. Education, Sports events, technology, and lots more are fields where VR is in use with artificial intelligence.
Over time, it has been a lifesaver, being helpful to many in various locations worldwide and has been even more accessible than it used to be. The future of VR holds more opportunities for us as it evolves daily.
So, the end is not coming to it anytime soon.
Conclusion
In the world today, everyone has the opportunity to experience technology at its best through VR, and the good thing is that its rapid evolvement is an assurance that it’s not ending soon. Every man and business needs VR to grow as its opportunities are massive. Whether with YouTube VR Oculus or any other platform, getting the real essence of visualization creates a big difference.
The future holds more great ways and opportunities to make things easy for us with VR. Thus, through the article, you will get to know many YouTube 360 videos and VR Videos YouTube platforms so that entertainment does not end with simple videos but goes beyond expectations.
The pandemic in 2020 was a significant event that disrupted everyone globally. Video calls and virtual events became the run-to for most workers. This caused a lot of people to embrace the idea of virtualization.
Viewers needed new ways to experience performances and shows. Then, new virtual reality (VR) headsets entered the market, making people amazed as they did the best of what an average standalone headset could do. VR videos give real-like visual effects that will amaze and make you feel in the same surrounding as in the video background. And with the arrival of futuristic VR video Youtubers, creative videos are coming all around. Through this article, let’s look over the best YouTube VR Videos and understand how YouTube VR 360 videos differ from each other.
In this article
01 What is a VR video on YouTube?
02 10 Best VR Videos on YouTube for 2021
03 Where to Watch VR Videos besides YouTube?
04 Choose High-Quality VR Headsets
Part 1: What is a VR video on YouTube?
Firstly, it is essential to understand a VR Video on YouTube and how it differs from 360 videos?
VR Videos YouTube – For VR Videos with the YouTube mobile app, you can watch VR videos alongside cardboard. You will have an immersive feeling while watching this as you feel present in the scene actions while having your field of vision covered with a viewing device.
Though both YouTube VR and 360 give an immersive viewing experience with 360-degree coverage, still YouTube 360 videos reflect live actions with modified cameras accessible through 360-degree video-compatible devices. YouTube 360 videos are also viewable on devices such as smartphones, computers, etc., that are compatible. However, here, video progression is not under viewers’ control.
On the other hand, VR videos with VR headsets give options to control the viewing experience, such as interacting, running, walk with the video from the viewer’s end.
Part 2: 10 Best VR Videos on YouTube for 2021
You must be eager to start your voyage to VR YouTube videos. So let’s move ahead with the below-mentioned options that cover the ten best YouTuber VR Videos.
1. 360° VR GALACTUS EVENT | The End of season Fortnite Event
The production of VR videos from the 360 worlds games is becoming a live event model, making video creators keep these incredible experiences with this end-of-season Fortnite event.
2. Around the Planet in 2 Minutes
This video offers viewers a glimpse of other travel videos on the channel while leading them to various locations worldwide.
3. Ascension by David Blaine (YouTube 360 Video)
This version of the YouTube 360 video gives viewers a view of it from the first-person point of view. This video broke YouTube records with its 22+million views within a short while.
4. Beautifully Broken by Warren Haynes and Danny Louis
In this video, Warren Haynes and Danny Louis mirrored the constraints of the moment implicitly, taking their craft outdoors.
5. China, One week before Coronavirus Lockdown
This experience gives one the view of different structures like plants, people, and nature at large.
6. The Dawn of Art; AVirtual Journey inside Chauvet Cave
This animated tour is being narrated into a cave by Daisy Ridley. The video is known for holding the best figurative cave painting in the world kept for 36,000 years.
7. Guardians of the Kingdom
This video exposes the relationship between whales and humans by the incidences between two mothers; a human and a whale.
8. HowVolcanoes Affect Earth’s Climate over Millions of Years
Here, viewers get to see how volcanoes spew carbon dioxide and other gases into the air, changing the earth’s climate through that.
9. Inside NYC’s Skinniest Supertall Skyscraper
In this video, the viewers see the views of the central park and the iconic US metropolis.
10. Lockdown Around the World | National Geographic
This video is from National Geographic. It exposes a view of crowded cities in an unprecedented period like the lockdown.
Part 3: Where to Watch VR Videos besides YouTube?
You may wonder whether there are other platforms where you can watch VR videos.
The good news is: Yes! Besides YouTube, we have platforms where viewers can watch VR videos and have an immersive experience. Read on to know them.
1. Vimeo 360
This platform allows users to upload, play, and even share their VR videos with their friends on apps like Facebook and YouTube.
2. Oculus Gear VR store
Users can watch their YouTube VR Oculus videos on this platform with apps like Samsung XR, Skybox VR video player, etc. They are also allowed to download games apps.
3. Steam Powered
Steam Powered is known for VR titles and gets support from good VR headsets.
Part 4: Choose High-Quality VR Headsets
There are quite a good number of VR Headsets, but we have the option of choosing a high-quality VR headset that should be able to deliver a wonderful experience. This is what every user wants. Let’s take a good look at a few of them.
1. Oculus Quest 2
This VR headset is top-notch. Its impressive flexibility, backed by its shocking price, will make one not want to look elsewhere.
No need to worry about screen-door effects as the headset possesses a high per-eye resolution—smooth 90Hz refreshing rate just like the Rift CV1 Oculus. Based on the Qualcomm Snapdragon chipset, XR2 resulted in excellent standalone performance. It’s also capable of linking up with gaming PC for desktop experiences.
2. PlayStation VR
A lot of VR games have come out on PlayStation VR. The PlayStation VR gives PS4 users an excellent and quality experience. However, it doesn’t have the highest resolution displays and cannot go for wild, room-scale tracking.
It has a 960 x 1,080 per-eye resolution and offers a 120Hz refresh rate for quality experiences. Its 100-degree field of view, motion controllers, and separate camera are suitable for unlocking immersive gameplay. A fantastic thing about it is that although it was for the PS4 and PS4 Pro, Sony ensured it’ll also run on the PS5.
3. HTC Vive Cosmos
The HTC Vive Cosmos is the latest HTC headset in town. Overall combined 2,880 x 1,700 resolution provides optimally sharp resolution for the eyes that is 1,440 x 1,700.
This headset has an easy-to-wear halo-style headband and attached headphones for spatial audio. It’s a highly versatile headset that allows users to switch which version of the Cosmos they’re using by simply swapping out the faceplate, controllers, and any tracking base station.
Part 5: FAQs about VR Videos
Let’s take a look at some questions by VR viewers.
Who is the Most Popular VR YouTuber?
‘Nathie’ is the most popular VR YouTuber today. He is a Netherland-based content creator whose niche is VR technology. His channel has stupendous 600k subscribers.
Is VR Bad for Your Eyes?
According to research, there is evidence that wearing VR Headsets can cause the eyesight to deteriorate, causing eye strain, discomfort, and making the vision blur.
What is the Future of VR?
VR is known for giving immersive experiences in various aspects of life and career. Education, Sports events, technology, and lots more are fields where VR is in use with artificial intelligence.
Over time, it has been a lifesaver, being helpful to many in various locations worldwide and has been even more accessible than it used to be. The future of VR holds more opportunities for us as it evolves daily.
So, the end is not coming to it anytime soon.
Conclusion
In the world today, everyone has the opportunity to experience technology at its best through VR, and the good thing is that its rapid evolvement is an assurance that it’s not ending soon. Every man and business needs VR to grow as its opportunities are massive. Whether with YouTube VR Oculus or any other platform, getting the real essence of visualization creates a big difference.
The future holds more great ways and opportunities to make things easy for us with VR. Thus, through the article, you will get to know many YouTube 360 videos and VR Videos YouTube platforms so that entertainment does not end with simple videos but goes beyond expectations.
Also read:
- Independent Artists' Guide to Personalized Visual Tricks
- Crafting a Content Schedule The Path to Gaining Traction on YouTube for 2024
- [New] Elevating Your Video Brand Tips for Great YouTube Banners
- [New] A Journey Through the Digital Landscape Six Engaging Quizzes for Every Vlogger Admirer
- Channel Transformation Through Strategic Use of YouTube Outros
- Navigating YouTube Markets The Quest for a Targeted Niche
- In 2024, Ultimate Guide to Calculate Your YouTube Views and Money
- [New] 4 Creative Ways to Insert YouTube Content in Presentations
- Ultimate List 10 Costless Video Caption Extractors
- [New] Elevate Your Online Video Quality Mastery in FinalCut for YouTube
- Antique Cinematography in the Digital Realm for 2024
- Transforming YouTube Content Advanced Strategies to Perfect Videos After Publishing
- 2024 Approved Engineering Video Excerpts for Online Platforms
- In 2024, Channel Creation Made Simple YouTube's Top Business Channels Listed
- Expert Speaker Change Devices for YouTube Gurus
- [Updated] Boost Popularity Quickly Top 30 Hashtags Every Gamer Needs
- 2024 Approved Elite Channel Explorer Discover Prime Video Status
- Smartphone Browser Showdown YouTube App Analysis
- Strategies for Building & Managing YouTube Collaborative Projects
- Elevate Small Screen Experience with These Leading & Affordable Tools to Download YouTubes' Tiny Videos
- 2024 Approved Boldly Step Up Claim Your Set of 50 Exquisite, Cost-Free YouTube Promo Materials
- Enhance Video Appeal with Filmmaker-Friendly Subscribe Button Tutorials (Filmora) for 2024
- Permanent Deactivation The Ultimate Guide to YouTube Shorts
- Enhance Listening Pleasure Constructing a YouTube Playlist for 2024
- Finding Inner Voice How to Confidently Share Stories Online
- In 2024, Essential Techniques for Splendid Lyric Videos, Lyric Video Maker Edition
- In 2024, Boost Channels to Partner Status in Under 90 Days, Start Now
- Capture Your Best Side Tips for Effective Talking-Head Shots
- From Visionary to Victory Channel Command School
- In 2024, Easy Steps to Extract and Save Your YouTube Watch Lists
- 2024 Approved Defining Your Visual and Stylistic Identity [High Relevance]
- Mac's 2023 Update YouTube Audio to MP3 Step-by-Step
- 2024 Approved Discover 8 Trusted Platforms for Online Video Advancement
- Charting Your Course in YouTubing Dodge These Top 8 Common Missteps for 2024
- 2024 Approved Top 5 Best 3D Intro Makers for YouTube
- 2024 Approved Crafting Compelling Proposals A FameBit Guide to Channel Ads
- In 2024, Content Strategy Amplified Selective Rank Watcher Solutions
- The Stepwise Route to Discovering Elusive YouTube Footage
- 2024 Approved Audio Precision – The Foremost 4 Music Editors for Mac
- Best Fixes For Vivo Y200 Hard Reset | Dr.fone
- New S Ultimate Video Editors for Adding Music and Sound Effects
- Updated 2024 Approved How to Add Audio Fade In Effect
- In 2024, 10 Fake GPS Location Apps on Android Of your Vivo V30 | Dr.fone
- Audiovisual Harmony Adding Sounds to Instagram Clips
- How to Honor 90 Get Deleted photos Back with Ease and Safety?
- Go Big or Go Home Full-Screen FB Videos for 2024
- Full Guide to Bypass Xiaomi Civi 3 Disney 100th Anniversary Edition FRP
- [Updated] In 2024, Enhancing Classroom Learning Through Recorders
- [New] Duality in Display Rotating Videos on Instagram, One Click at a Time
- Here Are Some Reliable Ways to Get Pokemon Go Friend Codes For Nokia C32 | Dr.fone
- In 2024, Android Unlock Code Sim Unlock Your Nokia C210 Phone and Remove Locked Screen
- In 2024, Tips and Tricks for Apple ID Locked Issue On iPhone 14 Plus
- [Updated] In 2024, How to Build Circles and Spheres in Minecraft
- Title: The Ultimate Guide to Adobe Premiere and YouTube Uploads
- Author: Steven
- Created at : 2024-05-25 20:32:36
- Updated at : 2024-05-26 20:32:36
- Link: https://youtube-clips.techidaily.com/the-ultimate-guide-to-adobe-premiere-and-youtube-uploads/
- License: This work is licensed under CC BY-NC-SA 4.0.
