
:max_bytes(150000):strip_icc():format(webp)/GettyImages-1065028028-8e770c58918e4cf8b0852e81cff60ed6.jpg)
"The Reaction Guru's Playbook Crafting Unforgettable Videos in Under 5 Minutes Each"
The Reaction Guru’s Playbook: Crafting Unforgettable Videos in Under 5 Minutes Each
How to Make a YouTube Reaction Video?

Richard Bennett
Mar 27, 2024• Proven solutions
Sharing ideas and opinions on virtually any topic you can think of with millions of people around the world is arguably one of the greatest benefits YouTube gives to content creators. Even so, building your channel exclusively around reaction videos may prove to be difficult, but this doesn’t mean that you can’t use this type of video to comment on what other YouTubers are saying.
The process of making a YouTube reaction video is not overly technical, although you will have to decide which video editing technique you are going to use to make a reaction video. That is why in this article we are going to take a look at different ways to make a YouTube reaction video.
- Method 1: Making Reaction Videos with PIP feature in Filmora
- Method 2: Create YouTube Reaction Video with Split Screen Templates
- Method 3: Make A Reaction Video for YouTube with AI Portrait
How to Make a Reaction Video for Your YouTube Channel? [3 Ways]
Using the footage without the consent of the copyright owner is punishable by the law, which means that you can only include the footage in a reaction video if you have the owner’s consent. Consequently, the selection of videos you can comment on is going to be limited, since it is entirely up to the creator of the video if they are going to give you permission to use their footage in your reaction video.
You can use the following video editing techniques, once you have access to the video you would like to comment on.
Method 1: Making a reaction video with the Picture-in-Picture feature in Filmora
Video editing software, like Filmora , can also be used to create YouTube reaction videos, but you must have all the footage you would like to include in that video before you can start putting it together.
The first step is to create a new project in Filmora and then import the media assets into the editor. Besides video clips, you can also add music, pictures, or create opening titles and end credits for your reaction video.


Place the video you’re reacting to on a video track on the timeline and then add the video of your reaction to the timeline that is directly above the one to which you added the first video clip. Click on the top video in the preview window and use the handles that are positioned around the edges of the video to adjust its size.
If you would like to change the on-screen position of the overlay clip, you should simply click on it and drag it to the new location within the preview window.

Filmora offers more than sixty motion effects, hundreds of transitions, and visual effects that can make your reaction video more visually appealing to the audience.

Moreover, Filmora video editing software offers a variety of blending modes, and it lets you control the opacity of the overlay video so that you can make it more transparent. Whether or not you are going to use these options depends on the footage you’re working with and the demands of a particular project.
Pros of using the Picture in Picture feature to make reaction videos in Filmora: You can place and adjust the videos with more customizable options. Get more tips about Making a PIP video in Filmora .
Method 2: Create several reaction windows with the Split Screen feature
Besides the Picture-in-Picture option, Filmora also enables you to play two or more videos simultaneously with Split Screen templates. Drag and drop the template you want to use in your reaction video to the timeline and click on the Enable Split Screen Animation tick box if you want to use the template without animations.

Afterward, you should drag the video clips from the Media tab and drop them onto the section of the preview window where you want them to be located. Keep in mind that you cannot add more than six videos to a split-screen template.

All videos you add to a split-screen template can be edited, and you just have to click on them if you want to adjust their sizes, enhance colors, mute their audio tracks or add a new audio file to the template.
Check the details about How to make a split-screen video step by step.
Pros of using Split-screen template to make reaction video in Filmora: various templates for creating stylish video side by side easily.
Method 3: Create A YouTube Reaction Video with AI Portrait
With the human segmentation effect in AI Portrait, you can now blend the reaction video in a more natural way. The human segmentation effect will isolate people from the background, you can use any background in the video.
Note: You can use this feature after version after V 10.5 for Windows, and V 10.4 for Mac. Click the button below to get the latest version of Filmora on your desktop.
Step 1: Import the videos to the media library, and then drag the background video to the first video track, and the reaction video to the track above.

Step 2: Go to the Effects tab at the top, and click the AI Portrait category, and then you will see many effects such as Human Segmentation, Human Pixelate, Human Noise, and lighting flash. Here, drag and drop the Human segmentation effect to the reaction video.

Step 3: Select the reaction video in the timeline, and then adjust its size and position by dragging it on the preview window. See, the reaction video is fine blended with the background video.

Step 4: That’s the basic editing of making a reaction video. You can also add the neon or flashing effect to the video. If everything goes well, click Export and save the video.

You can find out more details about using the AI Portrait effect to make a reaction video .
How to Avoid Copyright Infringements While Making a YouTube Reaction Video
All videos you can find on YouTube are protected by intellectual property regulations, and you can’t use them without the copyright owner’s permission. The only way to avoid being absolutely sure that your reaction video isn’t violating the law is to contact the video creator and ask for permission to use their intellectual property. However, most YouTubers are reluctant to let others download and edit their videos unless they already have a large fan base.
In case you’re granted permission to comment on a video, you have nothing to worry about. However, if you don’t get the permission you’re all the money the reaction video generates will go to the copyright owner or you will be forced to delete the video from your channel. There are still a few things you can do, even if you don’t get permission to use the video you would like to comment on.
Muting the video’s audio or altering its pitch will make it more difficult for YouTube’s bots to detect copyright infringement, although this method may not always work. In addition, you can play a video for up to thirty seconds, then comment on that segment, and then play another segment of that video.
There is no way of saying whether any of these editing tricks are going to help you avoid a copyright claim, and you should only use them if you have no other option.
Conclusion
Anyone can master the technical aspects of making a reaction video, but the topics you react to need to be related to the general topic your channel covers. What’s more, the idea of your reaction video has to be relevant for your audience if you want to attract their attention. Which video editing techniques are you using to make a YouTube reaction video?
Download Mac Version ](https://tools.techidaily.com/wondershare/filmora/download/ )
Richard Bennett
Richard Bennett is a writer and a lover of all things video.
Follow @Richard Bennett
Richard Bennett
Mar 27, 2024• Proven solutions
Sharing ideas and opinions on virtually any topic you can think of with millions of people around the world is arguably one of the greatest benefits YouTube gives to content creators. Even so, building your channel exclusively around reaction videos may prove to be difficult, but this doesn’t mean that you can’t use this type of video to comment on what other YouTubers are saying.
The process of making a YouTube reaction video is not overly technical, although you will have to decide which video editing technique you are going to use to make a reaction video. That is why in this article we are going to take a look at different ways to make a YouTube reaction video.
- Method 1: Making Reaction Videos with PIP feature in Filmora
- Method 2: Create YouTube Reaction Video with Split Screen Templates
- Method 3: Make A Reaction Video for YouTube with AI Portrait
How to Make a Reaction Video for Your YouTube Channel? [3 Ways]
Using the footage without the consent of the copyright owner is punishable by the law, which means that you can only include the footage in a reaction video if you have the owner’s consent. Consequently, the selection of videos you can comment on is going to be limited, since it is entirely up to the creator of the video if they are going to give you permission to use their footage in your reaction video.
You can use the following video editing techniques, once you have access to the video you would like to comment on.
Method 1: Making a reaction video with the Picture-in-Picture feature in Filmora
Video editing software, like Filmora , can also be used to create YouTube reaction videos, but you must have all the footage you would like to include in that video before you can start putting it together.
The first step is to create a new project in Filmora and then import the media assets into the editor. Besides video clips, you can also add music, pictures, or create opening titles and end credits for your reaction video.
Place the video you’re reacting to on a video track on the timeline and then add the video of your reaction to the timeline that is directly above the one to which you added the first video clip. Click on the top video in the preview window and use the handles that are positioned around the edges of the video to adjust its size.
If you would like to change the on-screen position of the overlay clip, you should simply click on it and drag it to the new location within the preview window.
Filmora offers more than sixty motion effects, hundreds of transitions, and visual effects that can make your reaction video more visually appealing to the audience.
Moreover, Filmora video editing software offers a variety of blending modes, and it lets you control the opacity of the overlay video so that you can make it more transparent. Whether or not you are going to use these options depends on the footage you’re working with and the demands of a particular project.
Pros of using the Picture in Picture feature to make reaction videos in Filmora: You can place and adjust the videos with more customizable options. Get more tips about Making a PIP video in Filmora .
Method 2: Create several reaction windows with the Split Screen feature
Besides the Picture-in-Picture option, Filmora also enables you to play two or more videos simultaneously with Split Screen templates. Drag and drop the template you want to use in your reaction video to the timeline and click on the Enable Split Screen Animation tick box if you want to use the template without animations.
Afterward, you should drag the video clips from the Media tab and drop them onto the section of the preview window where you want them to be located. Keep in mind that you cannot add more than six videos to a split-screen template.
All videos you add to a split-screen template can be edited, and you just have to click on them if you want to adjust their sizes, enhance colors, mute their audio tracks or add a new audio file to the template.
Check the details about How to make a split-screen video step by step.
Pros of using Split-screen template to make reaction video in Filmora: various templates for creating stylish video side by side easily.
Method 3: Create A YouTube Reaction Video with AI Portrait
With the human segmentation effect in AI Portrait, you can now blend the reaction video in a more natural way. The human segmentation effect will isolate people from the background, you can use any background in the video.
Note: You can use this feature after version after V 10.5 for Windows, and V 10.4 for Mac. Click the button below to get the latest version of Filmora on your desktop.
Step 1: Import the videos to the media library, and then drag the background video to the first video track, and the reaction video to the track above.
Step 2: Go to the Effects tab at the top, and click the AI Portrait category, and then you will see many effects such as Human Segmentation, Human Pixelate, Human Noise, and lighting flash. Here, drag and drop the Human segmentation effect to the reaction video.
Step 3: Select the reaction video in the timeline, and then adjust its size and position by dragging it on the preview window. See, the reaction video is fine blended with the background video.
Step 4: That’s the basic editing of making a reaction video. You can also add the neon or flashing effect to the video. If everything goes well, click Export and save the video.
You can find out more details about using the AI Portrait effect to make a reaction video .
How to Avoid Copyright Infringements While Making a YouTube Reaction Video
All videos you can find on YouTube are protected by intellectual property regulations, and you can’t use them without the copyright owner’s permission. The only way to avoid being absolutely sure that your reaction video isn’t violating the law is to contact the video creator and ask for permission to use their intellectual property. However, most YouTubers are reluctant to let others download and edit their videos unless they already have a large fan base.
In case you’re granted permission to comment on a video, you have nothing to worry about. However, if you don’t get the permission you’re all the money the reaction video generates will go to the copyright owner or you will be forced to delete the video from your channel. There are still a few things you can do, even if you don’t get permission to use the video you would like to comment on.
Muting the video’s audio or altering its pitch will make it more difficult for YouTube’s bots to detect copyright infringement, although this method may not always work. In addition, you can play a video for up to thirty seconds, then comment on that segment, and then play another segment of that video.
There is no way of saying whether any of these editing tricks are going to help you avoid a copyright claim, and you should only use them if you have no other option.
Conclusion
Anyone can master the technical aspects of making a reaction video, but the topics you react to need to be related to the general topic your channel covers. What’s more, the idea of your reaction video has to be relevant for your audience if you want to attract their attention. Which video editing techniques are you using to make a YouTube reaction video?
Download Mac Version ](https://tools.techidaily.com/wondershare/filmora/download/ )
Richard Bennett
Richard Bennett is a writer and a lover of all things video.
Follow @Richard Bennett
Cutting-Edge Video Tools: Opt for Studio or Latest Beta Version
YouTube Creator Studio vs. YouTube Studio (Beta): Which One is Better?
Richard Bennett
Oct 26, 2023• Proven solutions
In 2017, YouTube revealed YouTube Studio Beta , a video management and analytics dashboard that will replace the classic Creator Studio that most YouTubers are familiar with by 2021.
In this article, we will look at the new features YouTube Studio Beta has, what we can expect from it in the future, and why YouTube will eventually phase out the older YouTube Creator Studio… and whether that change will be an improvement.
Edit YouTube Videos with Filmora
As one of the most widely used video editing software in YouTube video editing, Filmora provides lots of templates and effects with an intuitive interface, which saves much time. Download the free trial version and get started now.
Why YouTube Is Getting Rid of Classic Creator Studio?
Data-driven YouTubers have long loved the YouTube Creator Studio. It has supplied so much information that it took this comprehensive post about Analytics to highlight all the insights. So why would YouTube change it?
Change to a popular social media platform is always worrisome to content creators because it means there will be a new learning phase forced upon them. While the Classic YouTube Creator Studio has a lot of features and functionality, the data was often hard to interpret and inconvenient to find. Many creators weren’t sure where their data was located or how to use the information presented to them.
YouTube Studio was designed to be a friendly management and analysis tool. YouTube also offers more guidance, showcasing the key metrics the algorithm uses to evaluate the success of a video more prominently. Additionally, the graphs presented offer more clarity, shortening the time a creator spends finding the information they need.
Undoubtedly, YouTube updated its Creator Studio to offer a tool that enables its users to better understand their video performance and make better content that serves YouTube’s requirements.
Intro to YouTube Studio (Beta)
YouTube Studio (Beta), for many YouTubers, is now the default. However, for the time being, creators can still switch back to the Classic view (as some of the features are still being built). YouTube’s objective is to receive data of their own by understanding how creators are using the new Studio and gaining feedback to improve upon it.
If you have any feedback, simply click on this button on the bottom left menu of the YouTube Studio (Beta) and send YouTube your thoughts.
In addition to the new layout of the tools and dashboards, YouTube Studio (Beta) will also debut 3 metrics for creators:
1. Impressions: See the total reach of all your videos or each individual video. Each time your video thumbnail and title are visible to the user counts as an impression.
2. Click-through rate: Determine how click-worthy your thumbnails and titles are, by seeing the percentage of people who click into your video.
3. Unique viewers: Know how many different people have watched your videos. This data can be used to compare the size of your subscriber base to the actual number of your audience.
Tips for Using YouTube Studio Beta Features
Now that you are more familiar with the new YouTube Studio (Beta), let us dive into what you can accomplish with all the new features.
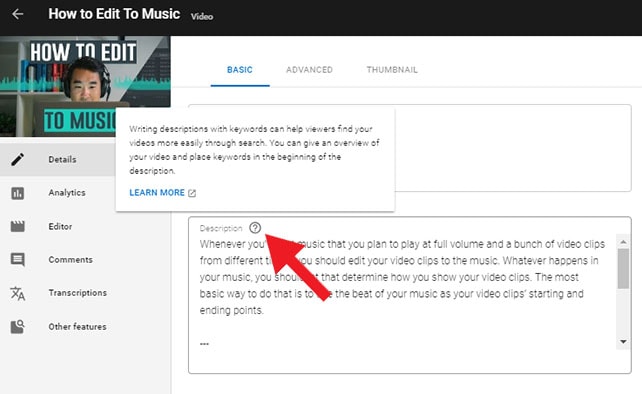
1. Optimization Tips
In the past, there has been a lot of speculations about how creators should treat their video titles and descriptions. Well, now YouTube is letting you know exactly which area to focus on. Simply hover over any “?” icon to see the advice and click “Learn More” to go to YouTube Creator Academy to get more details.
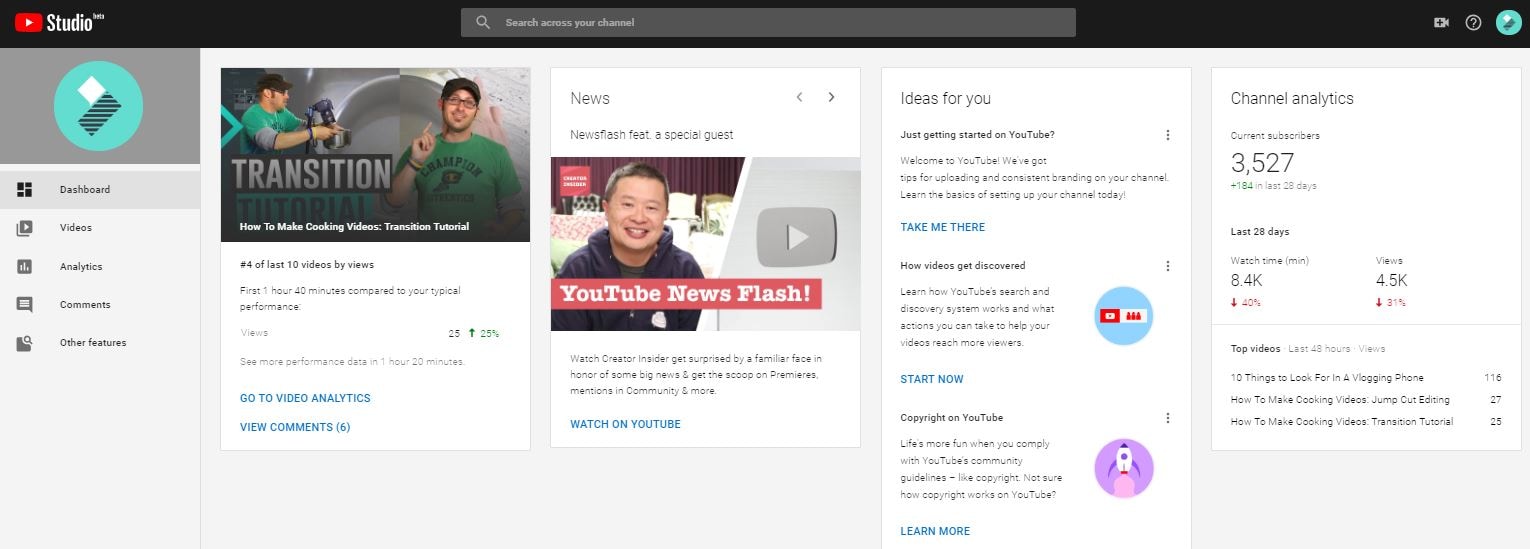
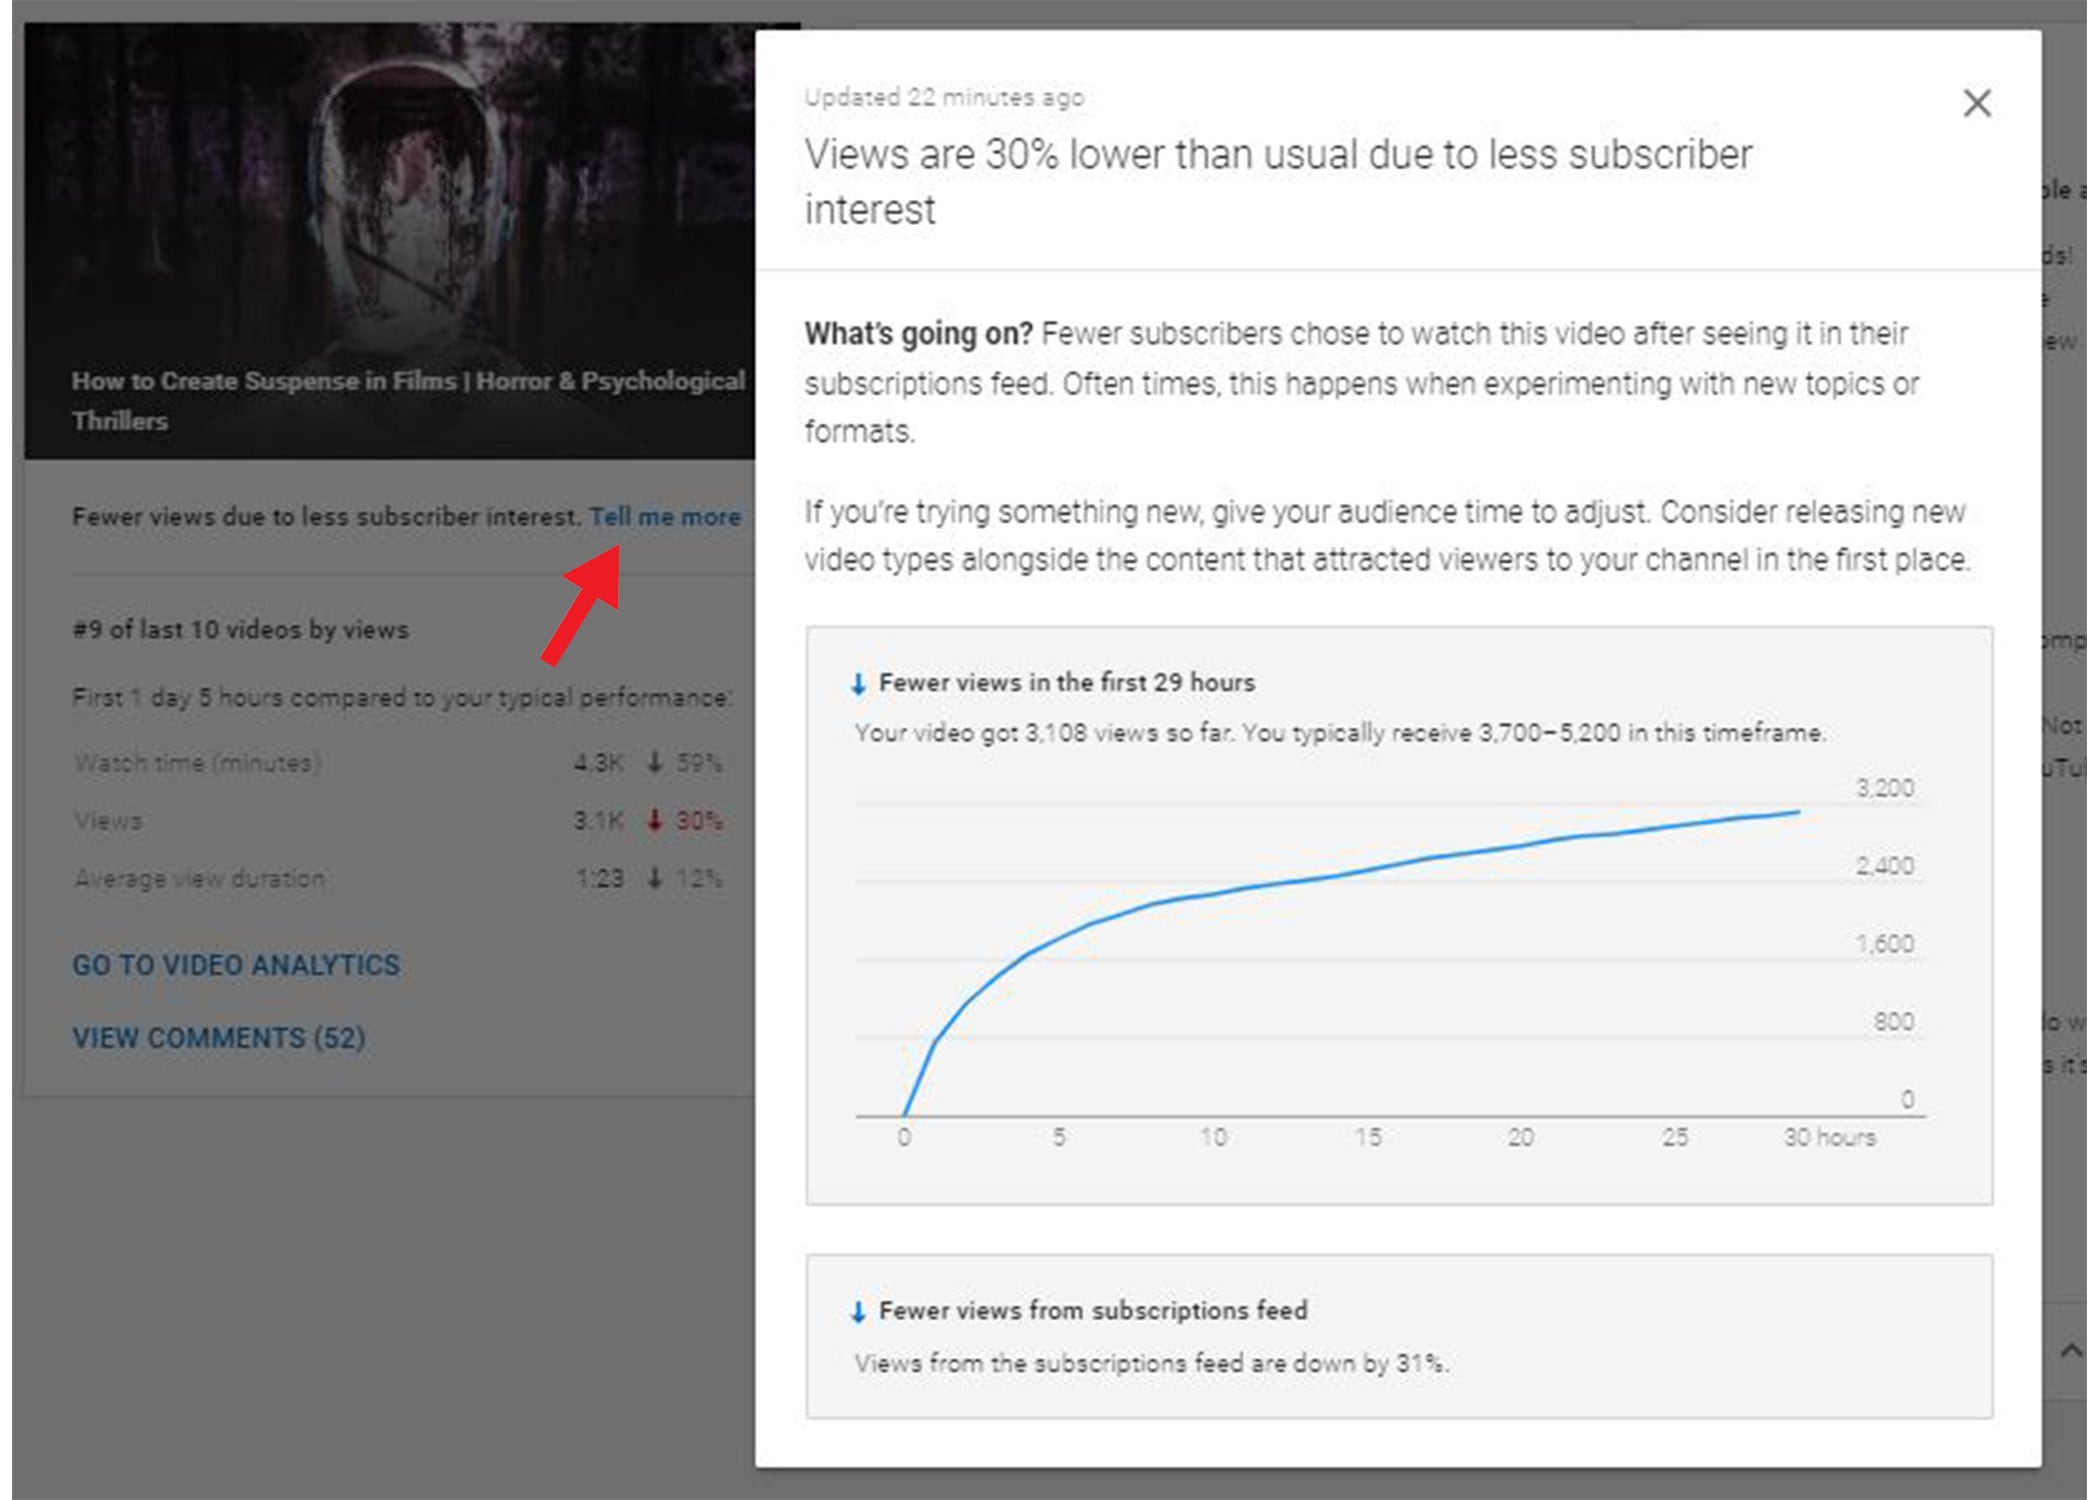
2. Recent Video Data
See data and improvement tips for your latest video. If YouTube identifies a notable issue with your video, they will help you by offering tips, which you can click “Tell Me More” to look into.
YouTube wants you to know how your videos are performing in the first few days. In order for YouTube to determine whether your content is worth sharing, it wants to know how your audience is responding to it right away. This means, the launch of your video matters.
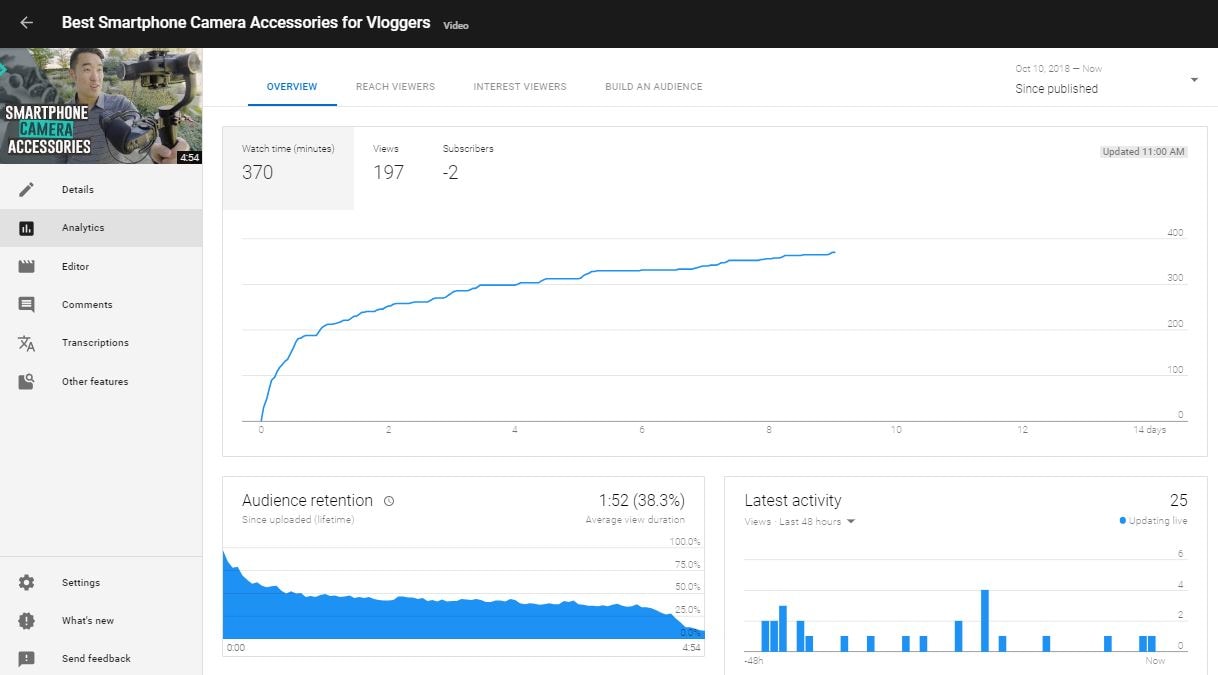
3. Video Analysis
In the Classic Creator Studio, you couldn’t get an aggregated view of all the important video data on one dashboard. You would have to click to each set of analytics individually and then dive deeper. This ate up your precious content creation time and made it hard to combine insights. Now with Studio Beta, you can see all the critical data in one spot. Right away, you can see how that video is performing through different factors. This will let you know where audience retention is dropping off or which traffic source is supplying most of the views.
4. Watch Time Funnel
The objective is to increase watch time, the metric YouTube puts the most weight on. With the new Watch Time Funnel, which you can find in the Analytics section under the Reach Viewer dashboard, you can see exactly at which level of your channel or wherein an individual video you will need to improve.
If the impression numbers are low, that means you need to improve how your video is being discovered by doing more research to understand what your viewers are searching for.
If the click-through rate (CTR) is low, then you will have to improve your thumbnail and title. This will better entice your audience to click. According to Google, half of all videos have an average CTR of 2-10%.
If the average view duration is not up to your standards, then you will have to improve your content itself. While it is most ideal to have all your viewers watch all the way to the end of all your videos, that is certainly unrealistic. However, 60-70% is a great number to aim towards.

5. Traffic Sources
YouTube now presents all the different traffic sources in one easy-to-find page in the Reach Viewer tab, so creators no longer have to click between them to analyze where their traffic is coming from. This new design is far less intimidating and messy. At a glance, you can now see where the majority of your audiences are coming from.
YouTube has always put a lot of value into its analytic tools, and with YouTube Studio Beta the features and design are continuously improving. Having better data and understanding of how an individual video or an entire channel is performing will help creators succeed on this ever more competitive platform.
Have you tried the new YouTube Studio (Beta)? What are your thoughts? Please let us know in the comments below.
Richard Bennett
Richard Bennett is a writer and a lover of all things video.
Follow @Richard Bennett
Richard Bennett
Oct 26, 2023• Proven solutions
In 2017, YouTube revealed YouTube Studio Beta , a video management and analytics dashboard that will replace the classic Creator Studio that most YouTubers are familiar with by 2021.
In this article, we will look at the new features YouTube Studio Beta has, what we can expect from it in the future, and why YouTube will eventually phase out the older YouTube Creator Studio… and whether that change will be an improvement.
Edit YouTube Videos with Filmora
As one of the most widely used video editing software in YouTube video editing, Filmora provides lots of templates and effects with an intuitive interface, which saves much time. Download the free trial version and get started now.
Why YouTube Is Getting Rid of Classic Creator Studio?
Data-driven YouTubers have long loved the YouTube Creator Studio. It has supplied so much information that it took this comprehensive post about Analytics to highlight all the insights. So why would YouTube change it?
Change to a popular social media platform is always worrisome to content creators because it means there will be a new learning phase forced upon them. While the Classic YouTube Creator Studio has a lot of features and functionality, the data was often hard to interpret and inconvenient to find. Many creators weren’t sure where their data was located or how to use the information presented to them.
YouTube Studio was designed to be a friendly management and analysis tool. YouTube also offers more guidance, showcasing the key metrics the algorithm uses to evaluate the success of a video more prominently. Additionally, the graphs presented offer more clarity, shortening the time a creator spends finding the information they need.
Undoubtedly, YouTube updated its Creator Studio to offer a tool that enables its users to better understand their video performance and make better content that serves YouTube’s requirements.
Intro to YouTube Studio (Beta)
YouTube Studio (Beta), for many YouTubers, is now the default. However, for the time being, creators can still switch back to the Classic view (as some of the features are still being built). YouTube’s objective is to receive data of their own by understanding how creators are using the new Studio and gaining feedback to improve upon it.
If you have any feedback, simply click on this button on the bottom left menu of the YouTube Studio (Beta) and send YouTube your thoughts.
In addition to the new layout of the tools and dashboards, YouTube Studio (Beta) will also debut 3 metrics for creators:
1. Impressions: See the total reach of all your videos or each individual video. Each time your video thumbnail and title are visible to the user counts as an impression.
2. Click-through rate: Determine how click-worthy your thumbnails and titles are, by seeing the percentage of people who click into your video.
3. Unique viewers: Know how many different people have watched your videos. This data can be used to compare the size of your subscriber base to the actual number of your audience.
Tips for Using YouTube Studio Beta Features
Now that you are more familiar with the new YouTube Studio (Beta), let us dive into what you can accomplish with all the new features.
1. Optimization Tips
In the past, there has been a lot of speculations about how creators should treat their video titles and descriptions. Well, now YouTube is letting you know exactly which area to focus on. Simply hover over any “?” icon to see the advice and click “Learn More” to go to YouTube Creator Academy to get more details.
2. Recent Video Data
See data and improvement tips for your latest video. If YouTube identifies a notable issue with your video, they will help you by offering tips, which you can click “Tell Me More” to look into.
YouTube wants you to know how your videos are performing in the first few days. In order for YouTube to determine whether your content is worth sharing, it wants to know how your audience is responding to it right away. This means, the launch of your video matters.
3. Video Analysis
In the Classic Creator Studio, you couldn’t get an aggregated view of all the important video data on one dashboard. You would have to click to each set of analytics individually and then dive deeper. This ate up your precious content creation time and made it hard to combine insights. Now with Studio Beta, you can see all the critical data in one spot. Right away, you can see how that video is performing through different factors. This will let you know where audience retention is dropping off or which traffic source is supplying most of the views.
4. Watch Time Funnel
The objective is to increase watch time, the metric YouTube puts the most weight on. With the new Watch Time Funnel, which you can find in the Analytics section under the Reach Viewer dashboard, you can see exactly at which level of your channel or wherein an individual video you will need to improve.
If the impression numbers are low, that means you need to improve how your video is being discovered by doing more research to understand what your viewers are searching for.
If the click-through rate (CTR) is low, then you will have to improve your thumbnail and title. This will better entice your audience to click. According to Google, half of all videos have an average CTR of 2-10%.
If the average view duration is not up to your standards, then you will have to improve your content itself. While it is most ideal to have all your viewers watch all the way to the end of all your videos, that is certainly unrealistic. However, 60-70% is a great number to aim towards.
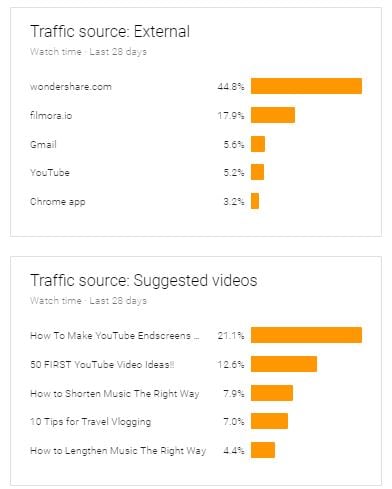
5. Traffic Sources
YouTube now presents all the different traffic sources in one easy-to-find page in the Reach Viewer tab, so creators no longer have to click between them to analyze where their traffic is coming from. This new design is far less intimidating and messy. At a glance, you can now see where the majority of your audiences are coming from.
YouTube has always put a lot of value into its analytic tools, and with YouTube Studio Beta the features and design are continuously improving. Having better data and understanding of how an individual video or an entire channel is performing will help creators succeed on this ever more competitive platform.
Have you tried the new YouTube Studio (Beta)? What are your thoughts? Please let us know in the comments below.
Richard Bennett
Richard Bennett is a writer and a lover of all things video.
Follow @Richard Bennett
Richard Bennett
Oct 26, 2023• Proven solutions
In 2017, YouTube revealed YouTube Studio Beta , a video management and analytics dashboard that will replace the classic Creator Studio that most YouTubers are familiar with by 2021.
In this article, we will look at the new features YouTube Studio Beta has, what we can expect from it in the future, and why YouTube will eventually phase out the older YouTube Creator Studio… and whether that change will be an improvement.
Edit YouTube Videos with Filmora
As one of the most widely used video editing software in YouTube video editing, Filmora provides lots of templates and effects with an intuitive interface, which saves much time. Download the free trial version and get started now.
Why YouTube Is Getting Rid of Classic Creator Studio?
Data-driven YouTubers have long loved the YouTube Creator Studio. It has supplied so much information that it took this comprehensive post about Analytics to highlight all the insights. So why would YouTube change it?
Change to a popular social media platform is always worrisome to content creators because it means there will be a new learning phase forced upon them. While the Classic YouTube Creator Studio has a lot of features and functionality, the data was often hard to interpret and inconvenient to find. Many creators weren’t sure where their data was located or how to use the information presented to them.
YouTube Studio was designed to be a friendly management and analysis tool. YouTube also offers more guidance, showcasing the key metrics the algorithm uses to evaluate the success of a video more prominently. Additionally, the graphs presented offer more clarity, shortening the time a creator spends finding the information they need.
Undoubtedly, YouTube updated its Creator Studio to offer a tool that enables its users to better understand their video performance and make better content that serves YouTube’s requirements.
Intro to YouTube Studio (Beta)
YouTube Studio (Beta), for many YouTubers, is now the default. However, for the time being, creators can still switch back to the Classic view (as some of the features are still being built). YouTube’s objective is to receive data of their own by understanding how creators are using the new Studio and gaining feedback to improve upon it.
If you have any feedback, simply click on this button on the bottom left menu of the YouTube Studio (Beta) and send YouTube your thoughts.
In addition to the new layout of the tools and dashboards, YouTube Studio (Beta) will also debut 3 metrics for creators:
1. Impressions: See the total reach of all your videos or each individual video. Each time your video thumbnail and title are visible to the user counts as an impression.
2. Click-through rate: Determine how click-worthy your thumbnails and titles are, by seeing the percentage of people who click into your video.
3. Unique viewers: Know how many different people have watched your videos. This data can be used to compare the size of your subscriber base to the actual number of your audience.
Tips for Using YouTube Studio Beta Features
Now that you are more familiar with the new YouTube Studio (Beta), let us dive into what you can accomplish with all the new features.
1. Optimization Tips
In the past, there has been a lot of speculations about how creators should treat their video titles and descriptions. Well, now YouTube is letting you know exactly which area to focus on. Simply hover over any “?” icon to see the advice and click “Learn More” to go to YouTube Creator Academy to get more details.
2. Recent Video Data
See data and improvement tips for your latest video. If YouTube identifies a notable issue with your video, they will help you by offering tips, which you can click “Tell Me More” to look into.
YouTube wants you to know how your videos are performing in the first few days. In order for YouTube to determine whether your content is worth sharing, it wants to know how your audience is responding to it right away. This means, the launch of your video matters.
3. Video Analysis
In the Classic Creator Studio, you couldn’t get an aggregated view of all the important video data on one dashboard. You would have to click to each set of analytics individually and then dive deeper. This ate up your precious content creation time and made it hard to combine insights. Now with Studio Beta, you can see all the critical data in one spot. Right away, you can see how that video is performing through different factors. This will let you know where audience retention is dropping off or which traffic source is supplying most of the views.
4. Watch Time Funnel
The objective is to increase watch time, the metric YouTube puts the most weight on. With the new Watch Time Funnel, which you can find in the Analytics section under the Reach Viewer dashboard, you can see exactly at which level of your channel or wherein an individual video you will need to improve.
If the impression numbers are low, that means you need to improve how your video is being discovered by doing more research to understand what your viewers are searching for.
If the click-through rate (CTR) is low, then you will have to improve your thumbnail and title. This will better entice your audience to click. According to Google, half of all videos have an average CTR of 2-10%.
If the average view duration is not up to your standards, then you will have to improve your content itself. While it is most ideal to have all your viewers watch all the way to the end of all your videos, that is certainly unrealistic. However, 60-70% is a great number to aim towards.
5. Traffic Sources
YouTube now presents all the different traffic sources in one easy-to-find page in the Reach Viewer tab, so creators no longer have to click between them to analyze where their traffic is coming from. This new design is far less intimidating and messy. At a glance, you can now see where the majority of your audiences are coming from.
YouTube has always put a lot of value into its analytic tools, and with YouTube Studio Beta the features and design are continuously improving. Having better data and understanding of how an individual video or an entire channel is performing will help creators succeed on this ever more competitive platform.
Have you tried the new YouTube Studio (Beta)? What are your thoughts? Please let us know in the comments below.
Richard Bennett
Richard Bennett is a writer and a lover of all things video.
Follow @Richard Bennett
Also read:
- Ace Your YouTube LIVE with These 7 Powerful Live Streaming Apps (iOS/Android OS)
- Skyrocket Subscribers and Engagement - Top 12 Video Promotion Tactics
- [New] 20 Must-Have Video Tools For New Creators
- Decoding Best Practices Navigating Through Top 9 Free Logo Creators for 2024
- Achieve Video Excellence Learn the Studio Editor Way
- In 2024, [Filmora] Best Magic Tricks of YouTube Video Editors EVER
- Skyrocket Views on YouTube in Minutes (2 Strategies)
- Enjoy a Stream of Nine Complete Christmas Capsules on YouTube
- Unlock Free YouTube Gallery Downloads Now
- Decoding YouTube's Strategic Approach to Short-Form Video Promotion for 2024
- Top 15 ASMR Content Providers
- Effortless YouTube Video to Text Conversion at No Cost
- Boosting Audio Quality in Social Media Recordings
- 2024 Approved Craft Your Study of the Past with These Top 10 Channels
- A Blur in the Timeline YouTube Videos Racing to 100 Million by Year's End for 2024
- [Updated] Access Creative Banners for Video Makers at Zero Price
- 6+ Software Choices Download YouTube Music as MP3 for iPhone Users
- [Updated] Creative Content Concepts for Vlogs
- 2024 Approved Charting the Course for YouTube Music Uploads
- 2024 Approved Enhancing Your Visual Mark Implementing Neon-Edged YouTubes
- [New] Brightening Up Your Online Videos
- Updated Final Cut Pro Unlocking Professional Color Correction
- How to Screen Mirroring Huawei P60 to PC? | Dr.fone
- [Updated] MyCam Reviewed How It Meets Expectations for Home Recorders
- In 2024, 10 Funniest Subreddits to Find Hilarious Memes (Picked)
- How To Transfer Data From iPhone 14 To Others devices? | Dr.fone
- [New] Guide to iOS Screen Recording Essentials
- [Updated] In 2024, 7 Critical Practices for Controlling Instagram TV Videosize
- In 2024, Is GSM Flasher ADB Legit? Full Review To Bypass Your Samsung Galaxy M54 5G Phone FRP Lock
- In 2024, How to Bypass Google FRP Lock from Samsung Galaxy S24+ Devices
- 2024 Approved Bridging Moments A Kinemaster Guide to Transitions
- New In 2024, Premier 3 Online Audio Amplification Apps for Maximum Volume Control
- The Right Approach to Uploading Photos From Your Device to Snapchat
- [New] In 2024, Unleash Your Videos Convert FB Content to MP4
- [Updated] Dive Into Inspiration with These Five Powerful TikTokers for 2024
- Augmenting Film Quality Integrating Letterboxing in Digital Spaces
- Funny Ringtones Where to Download Them?
- [New] In 2024, How To Access Facebook’s Just-Watched Video List
- Top 10 Essential Tools for Pro IG Video Editors for 2024
- In 2024, How can I get more stardust in pokemon go On Xiaomi 13 Ultra? | Dr.fone
- [Updated] Audio Player Insights & Critiques
- 2024 Approved The Art of Capturing Sound via Mac
- Title: "The Reaction Guru's Playbook Crafting Unforgettable Videos in Under 5 Minutes Each"
- Author: Steven
- Created at : 2024-05-25 20:31:45
- Updated at : 2024-05-26 20:31:45
- Link: https://youtube-clips.techidaily.com/the-reaction-gurus-playbook-crafting-unforgettable-videos-in-under-5-minutes-each/
- License: This work is licensed under CC BY-NC-SA 4.0.
