
:max_bytes(150000):strip_icc():format(webp)/E-reader-57b936e05f9b58cdfd3e07e1.jpg)
"The Online Monetization Mission YouTube to Your Bank"
The Online Monetization Mission: YouTube to Your Bank
How To Get Paid on YouTube - From AdSense to your Bank Account

Richard Bennett
Oct 26, 2023• Proven solutions
YouTube is more than a video sharing social network; here’s how to get paid on YouTube. Having an active YouTube channel with decent monthly views can earn you income through advertising. If your channel is set up properly, Google can place ads over your YouTube videos and you can earn money based on how many people see or click on (depends on the ad) those ads while watching your videos.
- The Requirements for YouTube Monetization
- How to Enable Monetization for Your YouTube Channel
- Linking Your Bank Account to Your AdSense Account
- Receiving Payments
Many vloggers receive direct bank deposits of their ad-based revenues every month. In this article, we’ll show you how to monetize your YouTube Channel and how to receive payments to your bank account.
Making Your YouTube Videos Better with Filmora
If you want to earn more money with YouTube videos, your video should be stand out. To achieve that, you should use a powerful video editing software as well. Here, I recommend Wondershare Filmora video editor . As one of the most widely used video editing software among YouTubers, Filmora provides lots of templates and effects which allows you to edit faster and better.


Part 1: The Requirements for YouTube Monetization
Meeting the minimum requirement for YouTube monetization is probably the hardest part of this whole process. About a month ago, you had to have 10,000 lifetime views on your YouTube channel to qualify for monetization. However, earlier this year, Google changed their eligibility requirements and made them even tougher.
As of February 20, 2018, YouTube channels need to have accumulated 4000 hours of ‘watch time’ over the past 12 months and no less than 1000 subscribers to qualify for monetization. If you do not meet these requirements you cannot join the YouTube Partner Program and monetize your YouTube channel.
So, the first step to successful monetization on YouTube is to actually grow your channel. You need to create videos that will attract viewers and engage your audience. You also need to get people to subscribe because this is really what will grow your YouTube channel over time.
Part 2: How To Enable Monetization for Your YouTube Channel
Here’s the step-by-step process for monetizing your YouTube Channel, for those who are qualified.
- Log in to your YouTube account.
- Find your account icon in the top right corner. Click it to find the ‘Creator Studio’ button.
- Click the ‘Creator Studio’ button.
- Click the ‘Channel’ option in the left side menu.
- You’ll see a drop-down menu under ‘Channel’. Click on ‘Status and Features’. This is actually the first option on the menu. It should open by default once you click the ‘Channel’ button.
- Look through the ‘Status and Features’ page and click the ‘Enable’ button beside monetization.

- Clicking the ‘Enable’ button should lead you to another page where the guidelines for monetization are explained. Take the time to read through the guidelines and understand the dos and don’ts of YouTube monetization.
- Once you’ve looked through the guidelines, click the ‘Enable my account’ button to proceed. This will lead you to a page where you’ll be prompted to join the YouTube Partner Program.
- Read through the YouTube Partner Program terms, check the appropriate boxes, and click the ‘accept’ button.
- You’ll be prompted to link an AdSense account.
- Connect an existing AdSense account if you have one or create a new one.
- Once you’re done linking an AdSense account, you’ll be redirected to YouTube. There, select the type of ads you want to run under ‘Monetization Preferences’.
- Click the submit button and wait to find out if your account is approved for monetization.
According to YouTube, it can take up to a week for a decision to be reached on your application.
YouTube will not review your monetization application until you’ve met their eligibility criteria. Even then, your application may be declined if your videos do not follow the community guidelines (i.e. channels which simply repost content from other channels will not be monetized).
Not all videos can be monetized. While there are legal ways to create videos consisting of imagery and footage belonging to others, be aware that such videos are not always eligible for monetization. YouTube will only monetize videos that you own. So, posting videos which do not belong to you or which include copyrighted content can cause your monetization application to be declined.
Part 3: Linking Your Bank Account To Your AdSense Account
AdSense offers a variety of payment options including mailed checks and Western Union transfers. However, these options may not be available to you depending on where you’re based. AdSense does make payments through electronic wire transfer (EFT – Electronic funds transfer) to virtually every country in the world, and this is the preferred payment option for most people.
To have your earnings deposited directly into your account through EFT, you’ll need to link your bank account to your AdSense account.
Here’s a step-by-step guide for linking your bank account to your AdSense account.
- Log in to AdSense via: www.google.com/adsense/start
- Click the ‘Settings’ button in the left panel menu
- Under ‘Settings’, click ‘Payments’.
- On the ‘Payments’ page, click ‘Manage payment options’.
- Click ‘Add payment method’.
- Next, you’ll be prompted to add your bank account details. In general, you will be asked to provide the following:
- Name on the account / account holder’s name
- Bank account number
- Bank name
- Bank SWIFT code
- Depending on where you are based, additional information may be required.
- Ensure that the name on your AdSense account matches the name on the bank account you provide. To edit your AdSense name, click the ‘Manage settings’ button also on the Payments page.
Part 4: Receiving Payments
To get paid by AdSense, you need to reach the $100 threshold. You may wish to set a higher threshold but as a rule, earnings below the $100 will not be processed for payment (you will still receive the money, it will just keep adding up until it gets to $100 and then you’ll be paid).
Also, bear in mind that AdSense follows a monthly payment cycle. This means that a month’s earnings (assuming they meet the threshold requirement) will be paid next month. Usually, direct deposit payments will be processed between the 21st and 26th of every month. That said, it can take up to 10 days for electronic wire payments to be received.
In addition to reaching the payment threshold, be sure that you have no payment hold on your AdSense account. A payment hold can cause your earnings to be withheld even if it has reached the payment threshold.
To avoid a payment hold, be sure to provide the necessary tax information, verify your identity and your address, make sure the bank account linked to your AdSense is verified, and make sure you have not violated any of YouTube’s guidelines and community rules.
Conclusion
Depending on your vlogging skills and the nature of your content (some types of videos get more attention than others), it can take a while for you to be eligible for monetization. And even when you’ve successfully monetized your channel, getting enough views to reach the payment threshold can be tough.
Don’t let this discourage you from working towards earning income from your YouTube channel. Just focus on creating a YouTube channel people will want to watch. That’s how to get paid on YouTube - be sticking with your channel long enough for it to grow.
Richard Bennett
Richard Bennett is a writer and a lover of all things video.
Follow @Richard Bennett
Richard Bennett
Oct 26, 2023• Proven solutions
YouTube is more than a video sharing social network; here’s how to get paid on YouTube. Having an active YouTube channel with decent monthly views can earn you income through advertising. If your channel is set up properly, Google can place ads over your YouTube videos and you can earn money based on how many people see or click on (depends on the ad) those ads while watching your videos.
- The Requirements for YouTube Monetization
- How to Enable Monetization for Your YouTube Channel
- Linking Your Bank Account to Your AdSense Account
- Receiving Payments
Many vloggers receive direct bank deposits of their ad-based revenues every month. In this article, we’ll show you how to monetize your YouTube Channel and how to receive payments to your bank account.
Making Your YouTube Videos Better with Filmora
If you want to earn more money with YouTube videos, your video should be stand out. To achieve that, you should use a powerful video editing software as well. Here, I recommend Wondershare Filmora video editor . As one of the most widely used video editing software among YouTubers, Filmora provides lots of templates and effects which allows you to edit faster and better.
Part 1: The Requirements for YouTube Monetization
Meeting the minimum requirement for YouTube monetization is probably the hardest part of this whole process. About a month ago, you had to have 10,000 lifetime views on your YouTube channel to qualify for monetization. However, earlier this year, Google changed their eligibility requirements and made them even tougher.
As of February 20, 2018, YouTube channels need to have accumulated 4000 hours of ‘watch time’ over the past 12 months and no less than 1000 subscribers to qualify for monetization. If you do not meet these requirements you cannot join the YouTube Partner Program and monetize your YouTube channel.
So, the first step to successful monetization on YouTube is to actually grow your channel. You need to create videos that will attract viewers and engage your audience. You also need to get people to subscribe because this is really what will grow your YouTube channel over time.
Part 2: How To Enable Monetization for Your YouTube Channel
Here’s the step-by-step process for monetizing your YouTube Channel, for those who are qualified.
- Log in to your YouTube account.
- Find your account icon in the top right corner. Click it to find the ‘Creator Studio’ button.
- Click the ‘Creator Studio’ button.
- Click the ‘Channel’ option in the left side menu.
- You’ll see a drop-down menu under ‘Channel’. Click on ‘Status and Features’. This is actually the first option on the menu. It should open by default once you click the ‘Channel’ button.
- Look through the ‘Status and Features’ page and click the ‘Enable’ button beside monetization.
- Clicking the ‘Enable’ button should lead you to another page where the guidelines for monetization are explained. Take the time to read through the guidelines and understand the dos and don’ts of YouTube monetization.
- Once you’ve looked through the guidelines, click the ‘Enable my account’ button to proceed. This will lead you to a page where you’ll be prompted to join the YouTube Partner Program.
- Read through the YouTube Partner Program terms, check the appropriate boxes, and click the ‘accept’ button.
- You’ll be prompted to link an AdSense account.
- Connect an existing AdSense account if you have one or create a new one.
- Once you’re done linking an AdSense account, you’ll be redirected to YouTube. There, select the type of ads you want to run under ‘Monetization Preferences’.
- Click the submit button and wait to find out if your account is approved for monetization.
According to YouTube, it can take up to a week for a decision to be reached on your application.
YouTube will not review your monetization application until you’ve met their eligibility criteria. Even then, your application may be declined if your videos do not follow the community guidelines (i.e. channels which simply repost content from other channels will not be monetized).
Not all videos can be monetized. While there are legal ways to create videos consisting of imagery and footage belonging to others, be aware that such videos are not always eligible for monetization. YouTube will only monetize videos that you own. So, posting videos which do not belong to you or which include copyrighted content can cause your monetization application to be declined.
Part 3: Linking Your Bank Account To Your AdSense Account
AdSense offers a variety of payment options including mailed checks and Western Union transfers. However, these options may not be available to you depending on where you’re based. AdSense does make payments through electronic wire transfer (EFT – Electronic funds transfer) to virtually every country in the world, and this is the preferred payment option for most people.
To have your earnings deposited directly into your account through EFT, you’ll need to link your bank account to your AdSense account.
Here’s a step-by-step guide for linking your bank account to your AdSense account.
- Log in to AdSense via: www.google.com/adsense/start
- Click the ‘Settings’ button in the left panel menu
- Under ‘Settings’, click ‘Payments’.
- On the ‘Payments’ page, click ‘Manage payment options’.
- Click ‘Add payment method’.
- Next, you’ll be prompted to add your bank account details. In general, you will be asked to provide the following:
- Name on the account / account holder’s name
- Bank account number
- Bank name
- Bank SWIFT code
- Depending on where you are based, additional information may be required.
- Ensure that the name on your AdSense account matches the name on the bank account you provide. To edit your AdSense name, click the ‘Manage settings’ button also on the Payments page.
Part 4: Receiving Payments
To get paid by AdSense, you need to reach the $100 threshold. You may wish to set a higher threshold but as a rule, earnings below the $100 will not be processed for payment (you will still receive the money, it will just keep adding up until it gets to $100 and then you’ll be paid).
Also, bear in mind that AdSense follows a monthly payment cycle. This means that a month’s earnings (assuming they meet the threshold requirement) will be paid next month. Usually, direct deposit payments will be processed between the 21st and 26th of every month. That said, it can take up to 10 days for electronic wire payments to be received.
In addition to reaching the payment threshold, be sure that you have no payment hold on your AdSense account. A payment hold can cause your earnings to be withheld even if it has reached the payment threshold.
To avoid a payment hold, be sure to provide the necessary tax information, verify your identity and your address, make sure the bank account linked to your AdSense is verified, and make sure you have not violated any of YouTube’s guidelines and community rules.
Conclusion
Depending on your vlogging skills and the nature of your content (some types of videos get more attention than others), it can take a while for you to be eligible for monetization. And even when you’ve successfully monetized your channel, getting enough views to reach the payment threshold can be tough.
Don’t let this discourage you from working towards earning income from your YouTube channel. Just focus on creating a YouTube channel people will want to watch. That’s how to get paid on YouTube - be sticking with your channel long enough for it to grow.
Richard Bennett
Richard Bennett is a writer and a lover of all things video.
Follow @Richard Bennett
Opening Doors: Creating an Account on YouTube
How to Create a YouTube Account
Richard Bennett
Mar 27, 2024• Proven solutions
People create YouTube accounts for a lot of different reasons. Some YouTubers just love making videos and created their channels so they would have somewhere to post their work. Others have strong opinions they need a platform to share. There are a lot of people on YouTube whose main interest is in a separate website or other social media page, but they use their YouTube channels to help generate traffic. If you are considering starting your own YouTube channel then you should take a second to consider why you want to, since this will have an impact on what kind of videos you make. Your reasons for wanting to make a YouTube account do not have to be very elaborate. Maybe you just think it will be fun. Good news; it will be!
Once you know for sure that you want to create a YouTube account, and also know why you want to do it, you have already started building your channel. There are still a few important things to consider, though. This article will walk you through signing up for a YouTube account, and give you some tips about starting your channel.
Creating Your YouTube Account in 6 Steps
1. Go to YouTube.com and look at the top right corner of your screen. There will either be a blue Sign In button, or an icon representing you. YouTube accounts and Google accounts are the same, so if you are signed into your Gmail account you are already signed into YouTube as well.
2. If you see a Sign In button, click it. If you see your icon click on that, and in the window that pops up select Add Account. Either way, you will be taken into a sign in screen. Under where it asks for your email address it will say Create Account. Click on Create Account.
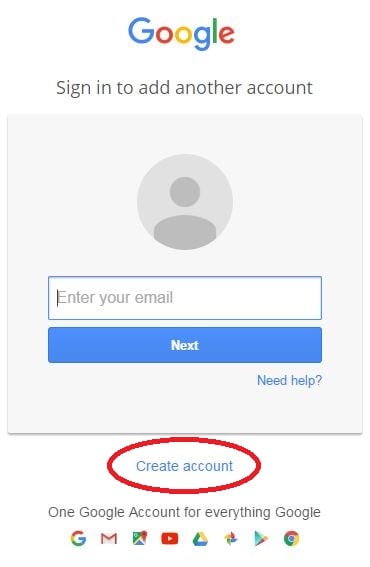
3. In the sign up page you will need to put in your name, email address, and mobile phone number as well as some other personal information. Do not enter your current Gmail address. Enter an alternate email you have created for your vlog, or click on I would like a new Gmail address. This will change your page slightly so that the email field becomes Choose a Username.


You will probably need to try a few different usernames before you find one that is not taken.
4. You will have to put in both a first and last name when you create your account, but you can change it to one name later.
5. Your password will need to be at least 8 characters long. Try to use a combination of letters or numbers, and make sure it is not something easily guessable (i.e spouses name).
6. After you finish the form click Next Step and, in the next screen, Continue to YouTube.
Tips on Starting a YouTube Channel
1. Choose a Topic you Love
When choosing a topic for your YouTube channel make sure you pick something you are passionate about. If you already have an interest or hobby which you are always researching and are extremely up-to-date on then that should probably be the theme of your vlog. If you plan to have a channel where people go to learn anything then you will need to be an authority on that topic. Whatever you make videos about it will need to be something you can realistically see yourself putting a lot of time into. If you cannot think of more than a couple ideas for videos on your topic then that is a sign that you need to choose something else to focus on.
You should check to see how much demand there is for videos on your topic. This can be done by googling your topic to see what else is out there. If not many people have addressed your topic yet it probably means that it is not something a lot of people want to know about. However, it could also mean that the people who do want to watch videos like yours have been starved for content. Your channel will flop if you do not love what you are making videos about, so do not choose something just because you think it will be popular. Follow your passion.
2. Check out the Competition
You should look for other vlogs with similar topics to yours not only to gauge how much demand there is for your videos, but to check out the competition. If there are a lot of YouTube channels dedicated to the same topic you want to vlog about then this should not discourage you from going after the same viewers. People who are excited about a topic frequently watch more than one vlog about it. It might not even be correct to think of other vloggers within your genre as ‘the competition’ since you are ultimately part of the same community. You will need to watch these people’s videos as part of keeping yourself informed and will likely become a fan – maybe even a collaborator some day – of theirs.
The main reason you want to look into YouTube channels like yours is because you do not want to be creating content that is overdone and boring. You are tackling the same topic as other people, and may even make some videos on the exact same subjects as others already have. There needs to be something unique about your videos that makes them stand out from what already exists. By looking at what other people are already doing you will be able to come up with ideas for what you can do differently.
3. Choose a Great Name
Picking a great name for your YouTube account can take a lot of effort. Chances are you will not want to use your own name, at least not in full. Although your real name can work for if you are a lifestyle vlogger in most cases you will have a more specific topic that will need to be addressed in your channel’s name. Try out your name or a nickname for yourself in combination with different words associated with the topic of your vlog. Aim to create a name that is catchy and easy to remember.
Chances are a few of your first couple picks will be unavailable. YouTube is a popular site and a lot of the best names are taken. The last thing you should ever do while naming your YouTube channel is add numbers or letters to the end of a name you like because it is taken. Names with numbers at the end are hard for viewers to remember and find again. Choosing a weak name with a trail of numbers or letters after it will make it very hard for your channel to grow. Brainstorm a long list of potential names that are actually good and keep on trying them out until you find one that’s available.
For more information on naming your YouTube channel read our post ‘How To Pick a Name for Your YouTube Channel’.
4. Make a Schedule
Maintaining a YouTube channel is a big time commitment. You need to post videos regularly or people will forget about you, and videos can take a long time to make. When you are first starting your vlog you should make yourself a schedule for when you want to upload videos. Having a schedule will help you budget your time and ensure that your vlog never gets in the way of the rest of your life.
Having a posting schedule will also help you grow your channel. Viewers like it when they know when to expect new content from vloggers they like. They are more likely to subscribe and tune in for every post if they are given a chance to anticipate when your new entry is coming.
5. Take Inventory
Think about what equipment you have that you can use for your YouTube channel. The only thing you absolutely cannot get by without is a decent camera, but there are other types of equipment that it is a good idea to have too. Lights, a tripod, an external microphone – these are all things that a lot of YouTubers find they need in order to produce great videos. If you do not have these things, or money you are prepared to invest in them, then you will need to find ways around them until your situation changes. For more information check out our post ‘The Best YouTube Equipment: What You Need to Start Your Channel’.
Read More to Get : Best Video Websites Like YouTube >>
Richard Bennett
Richard Bennett is a writer and a lover of all things video.
Follow @Richard Bennett
Richard Bennett
Mar 27, 2024• Proven solutions
People create YouTube accounts for a lot of different reasons. Some YouTubers just love making videos and created their channels so they would have somewhere to post their work. Others have strong opinions they need a platform to share. There are a lot of people on YouTube whose main interest is in a separate website or other social media page, but they use their YouTube channels to help generate traffic. If you are considering starting your own YouTube channel then you should take a second to consider why you want to, since this will have an impact on what kind of videos you make. Your reasons for wanting to make a YouTube account do not have to be very elaborate. Maybe you just think it will be fun. Good news; it will be!
Once you know for sure that you want to create a YouTube account, and also know why you want to do it, you have already started building your channel. There are still a few important things to consider, though. This article will walk you through signing up for a YouTube account, and give you some tips about starting your channel.
Creating Your YouTube Account in 6 Steps
1. Go to YouTube.com and look at the top right corner of your screen. There will either be a blue Sign In button, or an icon representing you. YouTube accounts and Google accounts are the same, so if you are signed into your Gmail account you are already signed into YouTube as well.
2. If you see a Sign In button, click it. If you see your icon click on that, and in the window that pops up select Add Account. Either way, you will be taken into a sign in screen. Under where it asks for your email address it will say Create Account. Click on Create Account.
3. In the sign up page you will need to put in your name, email address, and mobile phone number as well as some other personal information. Do not enter your current Gmail address. Enter an alternate email you have created for your vlog, or click on I would like a new Gmail address. This will change your page slightly so that the email field becomes Choose a Username.
You will probably need to try a few different usernames before you find one that is not taken.
4. You will have to put in both a first and last name when you create your account, but you can change it to one name later.
5. Your password will need to be at least 8 characters long. Try to use a combination of letters or numbers, and make sure it is not something easily guessable (i.e spouses name).
6. After you finish the form click Next Step and, in the next screen, Continue to YouTube.
Tips on Starting a YouTube Channel
1. Choose a Topic you Love
When choosing a topic for your YouTube channel make sure you pick something you are passionate about. If you already have an interest or hobby which you are always researching and are extremely up-to-date on then that should probably be the theme of your vlog. If you plan to have a channel where people go to learn anything then you will need to be an authority on that topic. Whatever you make videos about it will need to be something you can realistically see yourself putting a lot of time into. If you cannot think of more than a couple ideas for videos on your topic then that is a sign that you need to choose something else to focus on.
You should check to see how much demand there is for videos on your topic. This can be done by googling your topic to see what else is out there. If not many people have addressed your topic yet it probably means that it is not something a lot of people want to know about. However, it could also mean that the people who do want to watch videos like yours have been starved for content. Your channel will flop if you do not love what you are making videos about, so do not choose something just because you think it will be popular. Follow your passion.
2. Check out the Competition
You should look for other vlogs with similar topics to yours not only to gauge how much demand there is for your videos, but to check out the competition. If there are a lot of YouTube channels dedicated to the same topic you want to vlog about then this should not discourage you from going after the same viewers. People who are excited about a topic frequently watch more than one vlog about it. It might not even be correct to think of other vloggers within your genre as ‘the competition’ since you are ultimately part of the same community. You will need to watch these people’s videos as part of keeping yourself informed and will likely become a fan – maybe even a collaborator some day – of theirs.
The main reason you want to look into YouTube channels like yours is because you do not want to be creating content that is overdone and boring. You are tackling the same topic as other people, and may even make some videos on the exact same subjects as others already have. There needs to be something unique about your videos that makes them stand out from what already exists. By looking at what other people are already doing you will be able to come up with ideas for what you can do differently.
3. Choose a Great Name
Picking a great name for your YouTube account can take a lot of effort. Chances are you will not want to use your own name, at least not in full. Although your real name can work for if you are a lifestyle vlogger in most cases you will have a more specific topic that will need to be addressed in your channel’s name. Try out your name or a nickname for yourself in combination with different words associated with the topic of your vlog. Aim to create a name that is catchy and easy to remember.
Chances are a few of your first couple picks will be unavailable. YouTube is a popular site and a lot of the best names are taken. The last thing you should ever do while naming your YouTube channel is add numbers or letters to the end of a name you like because it is taken. Names with numbers at the end are hard for viewers to remember and find again. Choosing a weak name with a trail of numbers or letters after it will make it very hard for your channel to grow. Brainstorm a long list of potential names that are actually good and keep on trying them out until you find one that’s available.
For more information on naming your YouTube channel read our post ‘How To Pick a Name for Your YouTube Channel’.
4. Make a Schedule
Maintaining a YouTube channel is a big time commitment. You need to post videos regularly or people will forget about you, and videos can take a long time to make. When you are first starting your vlog you should make yourself a schedule for when you want to upload videos. Having a schedule will help you budget your time and ensure that your vlog never gets in the way of the rest of your life.
Having a posting schedule will also help you grow your channel. Viewers like it when they know when to expect new content from vloggers they like. They are more likely to subscribe and tune in for every post if they are given a chance to anticipate when your new entry is coming.
5. Take Inventory
Think about what equipment you have that you can use for your YouTube channel. The only thing you absolutely cannot get by without is a decent camera, but there are other types of equipment that it is a good idea to have too. Lights, a tripod, an external microphone – these are all things that a lot of YouTubers find they need in order to produce great videos. If you do not have these things, or money you are prepared to invest in them, then you will need to find ways around them until your situation changes. For more information check out our post ‘The Best YouTube Equipment: What You Need to Start Your Channel’.
Read More to Get : Best Video Websites Like YouTube >>
Richard Bennett
Richard Bennett is a writer and a lover of all things video.
Follow @Richard Bennett
Also read:
- In 2024, Cultivating a Community The Key to Surpassing 1000 Views
- Mastery in Making Compelling YouTube Videos for Brands
- Laws Governing Recording YouTube Live Streams
- [New] Elevate Your Gaming YT Presence A Hashtag-Focused Manual
- [New] Best Voice Conversion Tools for Vlogging Professionals
- [Updated] Creating Compelling Sports Content From the Ground Up
- In 2024, Discover Your Rhythm Assembling Tailored YouTube Playlists for the Digital Age (Web/Mobile)
- [New] Decoding the Mystery of YouTube Shorts
- Elevate Your Video Productions 15 Top-Tier Free Music Websites for 2024
- 7 Free Video Editing Programs That Work Flawlessly
- Elevating Channels Strategies for Stardom on YouTube
- A Beginner's Guide to YouTube SEO Keywords for 2024
- Perfect Shots Start With The Right Camera & Lens Selection
- Hire Wisdom Top 10 Recruiting Video Guide
- In 2024, Ace in the Halls Boosting YouTube Traffic
- Accelerate YT Growth Strategies for 1K+ Subscribers
- [New] Audiovisual Virtuoso Capturing Emotion in Harmony
- [Updated] Best Practices for YouTube Video Marketing
- Complete Investigation Virtual Stars' Journey Explored
- First Steps in the Youtubian Economy Building a Brand, Boosting Bank Balance
- In 2024, Cut Down Clutter How to Efficiently Handle Unwanted YouTube Content (PC/Mobile)
- Unlock Ultra HD Content with YouTube’s Advanced Video Setting
- From Visionary to Victory Channel Command School
- 2024 Approved Craft the Perfect Stream A Comprehensive Guide to YouTube’s Full-Rotation Videos
- Unlocking YouTube Success SEO Strategies for Videos
- 2024 Approved Cutting-Edge Camera Technology For YouTube Stars
- 2024 Approved Developing a Streamlined Subscription Web Address
- 2024 Approved Converting Spotify Playlist Selections for YouTube Music Service
- Bridging Platforms Loop-Ready Setups for YouTube and TV for 2024
- Tailoring Thumbnail Lengths for YouTube Audience Focus
- 2024 Approved Deciphering the Complexity of Online Content Monetization
- Enhance Productions No-Cost Sounds Available!
- Mastery of Removal Eliminating Downloaded YouTube Clips
- [New] Discover the Power of YouTube Editing A Compre Written in Code The Intricacies of JavaScript Functions
- In 2024, Effortless Techniques Crafting YouTube Shorts Images on the Fly
- [New] Essential FreeFire Hashtags to Skyrocket Video Views on YouTube
- Clearing Up Opaque Video Views on YouTube
- Create Professional Minecraft Graphics
- [New] Can a Brief Subscribe Boost Your Content Viewing?
- How to Change GPS Location on Realme Narzo N53 Easily & Safely | Dr.fone
- [New] Navigating Screen Customization A Google Meet Essentials Guide for 2024
- Undeleted lost videos from Vivo X100 Pro
- How to recover old call logs from your OnePlus Ace 2 Pro?
- Updated A Symphony of Effects Discovering Vendors for Premium Podcast Audio
- [Updated] Unlocking the Power of Visual Storytelling on Instagram
- Unboxing the Future A Review of Polaroid Cam+ Cube+
- Updated Virtualdub 2023 A Review of Its Features, Pricing, and Alternatives for 2024
- A Comprehensive Overview of Multiscreen Streaming Techniques on Social Media Platforms Like Facebook
- [New] 2024 Approved Simplified Techniques for High-Quality Webcam Videos
- 7 Solutions to Fix Chrome Crashes or Wont Open on Honor X9b | Dr.fone
- In 2024, Fake the Location to Get Around the MLB Blackouts on Oppo A78 5G | Dr.fone
- How to Unlock SIM Card on Oppo A2 online without jailbreak
- Future's Echo Top 30 Metaverse Sentiments [AR/VR]
- Nokia XR21 support - Turn Off Screen Lock.
- [Updated] 2024 Approved In-Depth Comparison of Triller's Features to TikTok (Max 156 Chars)
- In 2024, How Do You Unlock your iPhone 11 Pro? Learn All 4 Methods | Dr.fone
- [New] Jujutsu Kaisen TikTok A Step-by-Step Guide
- Three methods to recover lost data on Vivo
- In 2024, Top 12 Prominent Xiaomi 13T Pro Fingerprint Not Working Solutions
- Fake the Location to Get Around the MLB Blackouts on Lenovo ThinkPhone | Dr.fone
- In 2024, The Best Android SIM Unlock Code Generators Unlock Your Nokia G42 5G Phone Hassle-Free
- Superior 15 Camcorders for UHD Video
- 2024 Approved Android’s Animated Adventures – Top Game List
- Cross-Platform Guide Extracting Facebook Video Content for 2024
- Efficiently Remove Discord Server From PC & Mobile
- [New] Boost Your E-Commerce Strategy with These Top 15 FB Analyzers for 2024
- [New] 2024 Approved Novice Cinematographer's Initial Work Analysis & Replacements
- The Ultimate Guide to ZTE Axon 40 Lite Pattern Lock Screen Everything You Need to Know
- Elevate Your Communication Master Skype Calls Recording for 2024
- [New] 2024 Approved Elevate Your Visual Narratives with Mastered Stories Bokeh
- Updated Evaluating Acoustic Experts A Comprehensive Listening Guide
- Top 5 Lava Bypass FRP Tools for PC That Actually Work
- In 2024, How to Stream Apple iPhone XS Max Video to Computer? | Dr.fone
- How To Recover Lost Data from Apple iPhone 7 Plus? | Dr.fone
- Updated 2024 Approved Learn How to Make Architecture Animation
- How to recover deleted contacts from Sony Xperia 5 V.
- Updated In 2024, GoPro Footage Editing Made Easy Best Studio Alternatives This Year
- Title: "The Online Monetization Mission YouTube to Your Bank"
- Author: Steven
- Created at : 2024-05-25 20:31:24
- Updated at : 2024-05-26 20:31:24
- Link: https://youtube-clips.techidaily.com/the-online-monetization-mission-youtube-to-your-bank/
- License: This work is licensed under CC BY-NC-SA 4.0.
