
:max_bytes(150000):strip_icc()/185267882-56a0e1e03df78cafdaa603c6.jpg)
The Most Economical Tools for YouTube Audio Conversion
The Most Economical Tools for YouTube Audio Conversion
YouTube to WAV File: 4 Best Free Convert Solutions

Richard Bennett
Mar 27, 2024• Proven solutions
YouTube to WAV converter is a very common phenomenon. This is done by the users as they want to play the video on selected devices.
In this article, we will help you manage to convert YouTube to WAV file with ease.
You will Learn :
- What is WAV?
- How to Convert YouTube to WAV Format? (4 Options)
- Tips to Convert YouTube to WAV
- Beside WAV Other Popular Formats for YouTube Videos
What is WAV?
WAV, known as Wave Form Audio File Format and is fully supported by Windows, is a common format that was launched back in 1991, which supports most of the older devices as well.
For the users that want uncompressed and lossless quality prefer to use WAV format. It is extended from the RIFF format to the RF64 format.
How to Convert YouTube to WAV Format?
Some many ways and programs can be used as YouTube to WAV converter. All these programs are easy to use and definitive guides are also available online. Some of the best ways are mentioned below.
Option 1: Convert YouTube to WAV by Wondershare Filmora
Filmora is by far the best program that can be used to convert YouTube to WAV format. YouTube to WAV file conversion has never been as easy as it is with this program. The program is easy to use and allows the users to overcome the issues which other programs present.
Features of the Program
- It is one of the very few programs that come with split-screen functionality. It means that the video and audio can be played simultaneously on a single interface.
- The audio equalizer ensures that the tuning is done as per the requirements.
- There is an advanced functionality of text editing which allows the users to mention the text onto the converted video as well.
- The UI of the program is graphical and hence it is easy to use. The independent reviews have granted a score of 9.5 based on this functionality of the program.
- The part selection is available in the program. It means that multiple conversions can be done at the same time without losing quality.
How to Convert YouTube to WAV Using Filmora?
This YouTube WAV converter is easy to use. The best part is that it is compatible with major platforms i.e. Windows and Mac. The processes for both will be explained in detail so that you can understand the program better.
The Process to Convert YouTube to WAV:
Step 1: Download Filmora for Windows or Mac (depends on your operating system).
If you want to download the program for Windows then click below download icon:

For Mac version download click below icon:

Step 2: There are three ways to import media into the program.
Methond 1: Click File > Import Media. Choose the YouTube file that you want to convert to WAV format. If the file is on another device then you can get it from there as well.

Method 2: Click Import Media on the main interface and select the file from the window that pops up.
Method 3: You can also drag and drop the files onto the interface to make sure that they are imported.
Step 3: You now just need to export the video in the WAV format. Click the Export button and then go for the Local tab. The export formats that are currently supported by the program are WMV, MP4, AVI, MOV, F4V, MKV, TS, 3GP, MPEG-2, WEBM, GIF and MP3.

Step 4: You can then alter the settings within the settings tab. The bit rate is the main thing that defines the quality of the video. Once the settings are done press OK
Step 5: You can also export the video as per the device that you want to play it on.
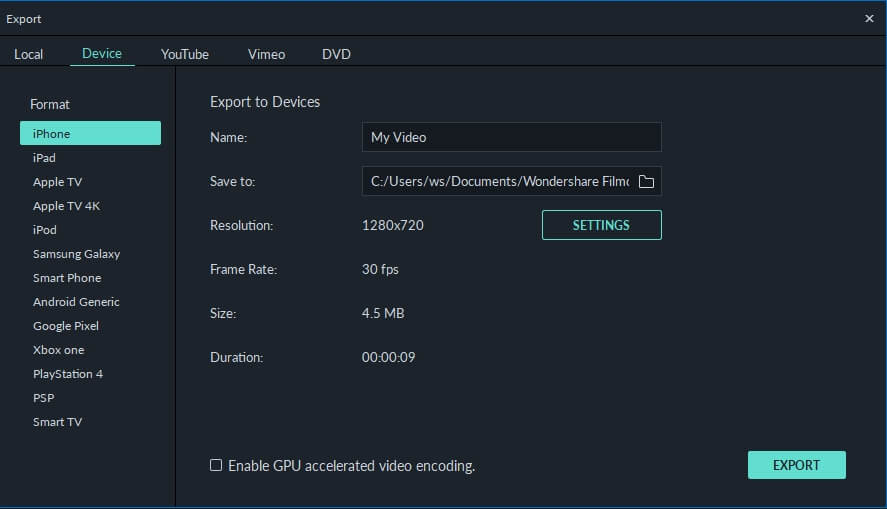
Step 6: You can also upload the video to social media platforms such as YouTube and Vimeo.
Step 7: You can also burn the converted format onto a DVD. Select the appropriate settings and press Export.
The process is explained as under. For video guides please visit Filmora 101 as it will get you the complete knowledge thoroughly.
You may also like: How to Convert YouTube to MP4 Safely? [Step by Step Guide] >>
Option 2: Other Way to Convert YouTube to WAV on Windows
5K Player is one of the best and the most used players that also work as YouTube to WAV conversion platform as well. The process is very easy to follow and is mentioned as under.
Step 1: Copy and paste the URL of the video on the desired location within the player. Click download and the process starts.

Step 2: Click “To Music” and select the WAV format from the drop-down that appears. You can also choose the bit rate, frame rate, and resolution. Once the conversion is completed you can save the file and the process ends here.
You may also like: >> How to to Convert WMV to MP4 Easily?
Option 3: Other Way to Convert YouTube to WAV on Mac
The Allavsoft is one of the best converters that can be used to convert YouTube to WAV on Mac. The process is simple and has been explained as under.
Step 1: Paste the URL of the YouTube video that you want to convert. You can also select the download quality and can access the file once the download has been completed.

Step 2: You can then select the format and once the conversion has been completed click the download button. The same has been depicted by numbers 2 and 3 in the picture below. WAV lossless quality should be selected from the dropdown to make sure that the work is done without any issue and problem.
Right format selection is important as the conversion is done instantly.
Option 4: YouTube to WAV Conversion Online
The process that you need to follow is explained as under.
Step 1: Visit https.//www.savethevideo.com/convert to access the converter.
Step 2: Paste the URL of the YouTube video that you want to convert and click the “Convert” button:

Step 3: Wait till the converter fetches the information.
Step 4: From the drop-down make sure that you select the WAV format.
Step 5: Click “Convert” once again and the process of conversion starts.
Step 6: The video then starts to download in the desired format.
Step 7: Click “Download” and save the file to the desired location. This concludes the process in full.
Tips to Convert YouTube to WAV
Below are some tips that would be useful for the users that want to convert YouTube to WAV format.
1. Always use the multipurpose software. It will allow you to download and convert the video at the same time-saving time.
2. Lossless quality is always to be selected while you are converting the format. It will make sure that the video is never compressed at all.
3. One of the best ways to convert the video is to disable the background noise. This will lead to awesome results.
4. Converting from YouTube to WAV also requires you to choose the software that is fast and reliable or else you will get the outcome which is not as per your requirements.
5. Free software programs can also get the malware to your system and therefore these are not recommended at all.
6. WAV is a format that is of high quality as the converters have loads of options so it is advised to use these carefully.
7. Make sure that the converters that are used are the ones that are highly rated and have a graphical user interface.
8. The YouTube to WAV downloader should be there on with the converter as it will make the process easy and you don’t need tons of software programs for a single purpose.
9. Always go for the program that supports the containers instead of just the format. If a program supports the containers then it is easy to convert a number of formats.
10. The conversion should be done with converters that do not cause any type of loss to enhance the quality as well.
Beside WAV Other Popular Formats for YouTube Videos
Many other video formats should be used to make sure that the best and the most advanced outcome is generated. Some of the most popular formats are as under.
- Audio Video Interleave Format, AVI
It is one of the oldest formats that are on the market. It was developed by Microsoft as a part of their video processing format for Windows. It was made publically available in 1992.
This one of the oldest formats is used universally. Many people consider it the standard to save videos. The AVI files are simple to use and are supported by almost every video player currently on the market.
It is easy to store as it takes less space than many other formats that are on the market. It will also let you transfer the files relatively faster due to the small size.
- Flash Video Format, FLV
The flash player by Adobe is one of the most common software programs on the system. This has made this video format one of the common ones on the market. The format can be played with ease as the supported plugins are there for other apps as well.
The flash content is supported by all browsers and therefore it is common to play these videos without any additional plugins. The best part of this format is the lossless quality that it provides to its users. Even if you compress these videos they remain HD as the quality remains the same.
- Apple QuickTime Movie, MOV
Among the Mac users, it is one of the most used formats. Developed by Apple it is a format that allows the users to overcome issues such as playback errors. The new version has also been launched which is known as QuickTime X.
The best part of this format is that it is available for Windows users as well. The files of the MOV format are usually of high quality. It is for the same that the size of such files is large as compared to other formats.
- Moving Pictures Expert Group 4, MP4
Introduced in 1998 it is a format that is used by the motion pictures association responsible for setting the standards. The format is widely used and is supported by various platforms as well as devices.
Even after the MP4 file is compressed it remains lossless and the quality remains the same. The HTML5 that has been launched currently also supports this format. It is compatible with almost all of the browsers that are on the market.
- 264
As the name suggests it is one of the best and the most used formats for HD videos. The compression remains lossless and even if the resolution is low the quality is maintained. The MP4 container is the one that is used to contain this format.
Most of the streaming devices, as well as the services, use this format while referring to HD video. The best part is that the format is widely accepted as industry standards for HD videos. Most of the users all over the world use this format to save their HD videos with ease.
- OGG
It is one of the most used video formats. It has been developed by the Xiph.org foundation to maintain the video as well as the audio quality on different platforms. The format is free and the documentation, as well as the configuration, can be downloaded by anyone.
- Advanced Systems Format, .ASF
If you want to stream videos then this is the format that is considered to be the best. It is still being used by the major popular streaming platforms of the world. The .ASF format is one of the best and it allows the users to overcome issues such as quality loss as well as streaming related issues.
You may also like: How to Post/Share a Video From YouTube on Instagram >>
Conclusion
If you require lossless compression then YouTube to WAV conversion is something that is required. Some many ways and means can be used to make sure that the idea is approached. The best way is to use Filmora as it is an easy and efficient operation.
The best way to get around the issue is to always use the service that is embedded with quality.
If you like this article then it is requested to comment and share it on social media. It will not only help others but will also let them have knowledgeable ideas.
Richard Bennett
Richard Bennett is a writer and a lover of all things video.
Follow @Richard Bennett
Richard Bennett
Mar 27, 2024• Proven solutions
YouTube to WAV converter is a very common phenomenon. This is done by the users as they want to play the video on selected devices.
In this article, we will help you manage to convert YouTube to WAV file with ease.
You will Learn :
- What is WAV?
- How to Convert YouTube to WAV Format? (4 Options)
- Tips to Convert YouTube to WAV
- Beside WAV Other Popular Formats for YouTube Videos
What is WAV?
WAV, known as Wave Form Audio File Format and is fully supported by Windows, is a common format that was launched back in 1991, which supports most of the older devices as well.
For the users that want uncompressed and lossless quality prefer to use WAV format. It is extended from the RIFF format to the RF64 format.
How to Convert YouTube to WAV Format?
Some many ways and programs can be used as YouTube to WAV converter. All these programs are easy to use and definitive guides are also available online. Some of the best ways are mentioned below.
Option 1: Convert YouTube to WAV by Wondershare Filmora
Filmora is by far the best program that can be used to convert YouTube to WAV format. YouTube to WAV file conversion has never been as easy as it is with this program. The program is easy to use and allows the users to overcome the issues which other programs present.
Features of the Program
- It is one of the very few programs that come with split-screen functionality. It means that the video and audio can be played simultaneously on a single interface.
- The audio equalizer ensures that the tuning is done as per the requirements.
- There is an advanced functionality of text editing which allows the users to mention the text onto the converted video as well.
- The UI of the program is graphical and hence it is easy to use. The independent reviews have granted a score of 9.5 based on this functionality of the program.
- The part selection is available in the program. It means that multiple conversions can be done at the same time without losing quality.
How to Convert YouTube to WAV Using Filmora?
This YouTube WAV converter is easy to use. The best part is that it is compatible with major platforms i.e. Windows and Mac. The processes for both will be explained in detail so that you can understand the program better.
The Process to Convert YouTube to WAV:
Step 1: Download Filmora for Windows or Mac (depends on your operating system).
If you want to download the program for Windows then click below download icon:
For Mac version download click below icon:
Step 2: There are three ways to import media into the program.
Methond 1: Click File > Import Media. Choose the YouTube file that you want to convert to WAV format. If the file is on another device then you can get it from there as well.
Method 2: Click Import Media on the main interface and select the file from the window that pops up.
Method 3: You can also drag and drop the files onto the interface to make sure that they are imported.
Step 3: You now just need to export the video in the WAV format. Click the Export button and then go for the Local tab. The export formats that are currently supported by the program are WMV, MP4, AVI, MOV, F4V, MKV, TS, 3GP, MPEG-2, WEBM, GIF and MP3.
Step 4: You can then alter the settings within the settings tab. The bit rate is the main thing that defines the quality of the video. Once the settings are done press OK
Step 5: You can also export the video as per the device that you want to play it on.
Step 6: You can also upload the video to social media platforms such as YouTube and Vimeo.
Step 7: You can also burn the converted format onto a DVD. Select the appropriate settings and press Export.
The process is explained as under. For video guides please visit Filmora 101 as it will get you the complete knowledge thoroughly.
You may also like: How to Convert YouTube to MP4 Safely? [Step by Step Guide] >>
Option 2: Other Way to Convert YouTube to WAV on Windows
5K Player is one of the best and the most used players that also work as YouTube to WAV conversion platform as well. The process is very easy to follow and is mentioned as under.
Step 1: Copy and paste the URL of the video on the desired location within the player. Click download and the process starts.
Step 2: Click “To Music” and select the WAV format from the drop-down that appears. You can also choose the bit rate, frame rate, and resolution. Once the conversion is completed you can save the file and the process ends here.
You may also like: >> How to to Convert WMV to MP4 Easily?
Option 3: Other Way to Convert YouTube to WAV on Mac
The Allavsoft is one of the best converters that can be used to convert YouTube to WAV on Mac. The process is simple and has been explained as under.
Step 1: Paste the URL of the YouTube video that you want to convert. You can also select the download quality and can access the file once the download has been completed.
Step 2: You can then select the format and once the conversion has been completed click the download button. The same has been depicted by numbers 2 and 3 in the picture below. WAV lossless quality should be selected from the dropdown to make sure that the work is done without any issue and problem.
Right format selection is important as the conversion is done instantly.
Option 4: YouTube to WAV Conversion Online
The process that you need to follow is explained as under.
Step 1: Visit https.//www.savethevideo.com/convert to access the converter.
Step 2: Paste the URL of the YouTube video that you want to convert and click the “Convert” button:
Step 3: Wait till the converter fetches the information.
Step 4: From the drop-down make sure that you select the WAV format.
Step 5: Click “Convert” once again and the process of conversion starts.
Step 6: The video then starts to download in the desired format.
Step 7: Click “Download” and save the file to the desired location. This concludes the process in full.
Tips to Convert YouTube to WAV
Below are some tips that would be useful for the users that want to convert YouTube to WAV format.
1. Always use the multipurpose software. It will allow you to download and convert the video at the same time-saving time.
2. Lossless quality is always to be selected while you are converting the format. It will make sure that the video is never compressed at all.
3. One of the best ways to convert the video is to disable the background noise. This will lead to awesome results.
4. Converting from YouTube to WAV also requires you to choose the software that is fast and reliable or else you will get the outcome which is not as per your requirements.
5. Free software programs can also get the malware to your system and therefore these are not recommended at all.
6. WAV is a format that is of high quality as the converters have loads of options so it is advised to use these carefully.
7. Make sure that the converters that are used are the ones that are highly rated and have a graphical user interface.
8. The YouTube to WAV downloader should be there on with the converter as it will make the process easy and you don’t need tons of software programs for a single purpose.
9. Always go for the program that supports the containers instead of just the format. If a program supports the containers then it is easy to convert a number of formats.
10. The conversion should be done with converters that do not cause any type of loss to enhance the quality as well.
Beside WAV Other Popular Formats for YouTube Videos
Many other video formats should be used to make sure that the best and the most advanced outcome is generated. Some of the most popular formats are as under.
- Audio Video Interleave Format, AVI
It is one of the oldest formats that are on the market. It was developed by Microsoft as a part of their video processing format for Windows. It was made publically available in 1992.
This one of the oldest formats is used universally. Many people consider it the standard to save videos. The AVI files are simple to use and are supported by almost every video player currently on the market.
It is easy to store as it takes less space than many other formats that are on the market. It will also let you transfer the files relatively faster due to the small size.
- Flash Video Format, FLV
The flash player by Adobe is one of the most common software programs on the system. This has made this video format one of the common ones on the market. The format can be played with ease as the supported plugins are there for other apps as well.
The flash content is supported by all browsers and therefore it is common to play these videos without any additional plugins. The best part of this format is the lossless quality that it provides to its users. Even if you compress these videos they remain HD as the quality remains the same.
- Apple QuickTime Movie, MOV
Among the Mac users, it is one of the most used formats. Developed by Apple it is a format that allows the users to overcome issues such as playback errors. The new version has also been launched which is known as QuickTime X.
The best part of this format is that it is available for Windows users as well. The files of the MOV format are usually of high quality. It is for the same that the size of such files is large as compared to other formats.
- Moving Pictures Expert Group 4, MP4
Introduced in 1998 it is a format that is used by the motion pictures association responsible for setting the standards. The format is widely used and is supported by various platforms as well as devices.
Even after the MP4 file is compressed it remains lossless and the quality remains the same. The HTML5 that has been launched currently also supports this format. It is compatible with almost all of the browsers that are on the market.
- 264
As the name suggests it is one of the best and the most used formats for HD videos. The compression remains lossless and even if the resolution is low the quality is maintained. The MP4 container is the one that is used to contain this format.
Most of the streaming devices, as well as the services, use this format while referring to HD video. The best part is that the format is widely accepted as industry standards for HD videos. Most of the users all over the world use this format to save their HD videos with ease.
- OGG
It is one of the most used video formats. It has been developed by the Xiph.org foundation to maintain the video as well as the audio quality on different platforms. The format is free and the documentation, as well as the configuration, can be downloaded by anyone.
- Advanced Systems Format, .ASF
If you want to stream videos then this is the format that is considered to be the best. It is still being used by the major popular streaming platforms of the world. The .ASF format is one of the best and it allows the users to overcome issues such as quality loss as well as streaming related issues.
You may also like: How to Post/Share a Video From YouTube on Instagram >>
Conclusion
If you require lossless compression then YouTube to WAV conversion is something that is required. Some many ways and means can be used to make sure that the idea is approached. The best way is to use Filmora as it is an easy and efficient operation.
The best way to get around the issue is to always use the service that is embedded with quality.
If you like this article then it is requested to comment and share it on social media. It will not only help others but will also let them have knowledgeable ideas.
Richard Bennett
Richard Bennett is a writer and a lover of all things video.
Follow @Richard Bennett
Top 9 Smartphone Gadgets for Aspiring Vloggers to Upgrade Their Craft
Smartphone Camera Accessories Vloggers Should Try to Improve Recording
Richard Bennett
Oct 26, 2023• Proven solutions
As smartphone camera technology is rapidly advancing, more and more people are using smartphones as their primary vlogging device. They’re convenient and they draw the least amount of attention. But since most smartphones weren’t made specifically for vlogging, there’s a lot of room to make them more suitable for that purpose. Here is a list of the nine best smartphone camera accessories for vloggers.
| Table of Contents 1. PORTABLE CHARGER2. TRIPOD MOUNT3. ANTI-GRAVITY CASE4. SELFIE RING LIGHT5. DIRECTIONAL MICROPHONE6. LENS SET7. FILMMAKING RIG8. FILMMAKING RIG9. GIMBAL |
|---|
1. RAVPower Portable Charger

Vlogging uses a lot more power. If you’re planning to vlog all throughout your day with your phone, you need a portable way to charge it back up. RAVPower has a great line up of portable chargers with multiple USB inputs that hold a total charge of more than 20,000 mAh. With that amount, you can fully charge your smartphone more than 6 times! I own one myself and it’s been great for me during my travels. A 22,000 mAh charger goes for about $42 USD.
2. Arkon Tripod Mount

The Arkon tripod mount is a great portable tripod option that you can get at the fair price of around $20 USD. Not only does it have bendable legs, like the more expensive Joby GorillaPod tripod, that you can wrap around all kinds of structures, but it also comes with the smartphone mount, which Joby sells separately. Another great thing about the Arkon tripod is that its smartphone mount can be rotated so that you can position your phone to film in either widescreen or portrait mode.
3. Mega Tiny Anti-Gravity Case

For all the flat surfaces that the bendable legs of the Arkon tripod mount can’t wrap around, Mega Tiny’s anti-gravity cases will do the job of holding your iPhone or Android phone in one fixed position. These cases can stick to glass, mirrors, metal, and more. They range from $20 to $30 USD.
4. FLII Selfie Ring Light

As much as smartphone camera technology has advanced, phone cameras still underperform when it comes to filming video in low-light. In low-light, your footage is very grainy because your phone is equipped with a small camera sensor, an engineering choice by the manufacturers to keep the size of the phone small. A handy accessory that you can use to get more light is the FLII selfie ring light. This ring light clamps onto your phone and emits a neutral white light. You can clamp this light to either side of your phone, depending on whether you want to use your rear-facing camera or your front-facing camera. This selfie ring light sells for around $16 USD.
5. RODE VideoMic Me

The mic that is already built into your phone is equally sensitive to the sounds that come from behind the phone as it is to the sounds that are in front of the phone. This can be problematic when you’re trying to vlog in selfie mode while there’s a loud concert on the other side. One smartphone accessory that can improve the sound that you record from your phone in these situations is the RODE VideoMic Me. This mini directional shotgun mic plugs right into your phone’s headphone jack and sells for around $60 USD. In windy conditions, the dead cat windshield that it comes with does a great job of minimizing noise from the wind. In quiet, indoor conditions where you are the only person speaking, this device performs no better than your phone’s internal microphone. Your phone will also have to be in airplane mode to prevent the Rode VideoMic Me from recording unwanted clicking noise caused by background processes performed by your phone. So you wouldn’t want to use this for livestreaming.
6. Aukey Optic 3-in-1 Smartphone Lens Set

Aukey makes a 3-in-1 lens set that you can clamp onto your smartphone so that you can vlog at different focal lengths. The 3-in-1 set comes with a wide-angle lens, a fisheye lens, and a macro lens. The clamp it comes with is long enough for these lenses to reach any camera on a smartphone, not just those of iPhones which are positioned close to the phone’s outer edge. To get the most out of these lenses, you’ll have to use them without your phone’s protective case on. Although you are free to use this lens set on either your phone’s rear-facing camera or front-facing camera, the metal housing of these lenses is likely to show up in your footage when you use them with your front-facing camera. So, instead of having your recorded image stretch to the ends of a 16:9 ratio rectangular frame, your recorded image will look as if it is contained inside a circle. This lens set sells for around $30 USD.
7. iOgrapher Go for Android and iPhone

There’s many more accessories that you can take advantage of if you don’t limit yourself to just smartphone camera accessories. Sound and lighting equipment made for stand-alone cameras perform much better too. Many of these accessories are meant to connect to the camera “shoe” (a bracket on top of the camera that accessories can be attached to). Smartphones don’t come with these kinds of shoes. So, to take advantage of these higher quality accessories, you’ll need some kind of camera rig for your smartphone that also comes with shoes. The iOgrapher Go offers this at around $60 USD. This accessory comes with three shoes.
8. Manfrotto TwistGrip System

Manfrotto’s TwistGrip System does a similar job to the above iOgrapher Go. This system also comes with three shoes. An advantage the TwistGrip System has over the iOgrapher Go is that it is much more portable. Its three connected parts can be detached to take up less space in your bag. This system sells for around $50 USD.
9. Zhiyun Smooth-Q 3-Axis Handheld Gimbal Stabilizer for Smartphones

My favorite smartphone camera accessory that I own is the Zhiyun Smooth-Q gimbal stabilizer. This gimbal is very effective in helping you record smooth video. Using the app that it comes with, you can even preset this gimbal to smoothly pan and rotate from a starting position to an ending position, giving you the opportunity to film beautiful time lapses. You can get this device at around $100 USD.
Polish Your YouTube Videos with Filmora
As one of the most widely used video editing software in YouTube video editing, Filmora provides lots of templates and effects with an intuitive interface, which saves much time. Download the free trial version and get started now.
Richard Bennett
Richard Bennett is a writer and a lover of all things video.
Follow @Richard Bennett
Richard Bennett
Oct 26, 2023• Proven solutions
As smartphone camera technology is rapidly advancing, more and more people are using smartphones as their primary vlogging device. They’re convenient and they draw the least amount of attention. But since most smartphones weren’t made specifically for vlogging, there’s a lot of room to make them more suitable for that purpose. Here is a list of the nine best smartphone camera accessories for vloggers.
| Table of Contents 1. PORTABLE CHARGER2. TRIPOD MOUNT3. ANTI-GRAVITY CASE4. SELFIE RING LIGHT5. DIRECTIONAL MICROPHONE6. LENS SET7. FILMMAKING RIG8. FILMMAKING RIG9. GIMBAL |
|---|
1. RAVPower Portable Charger
Vlogging uses a lot more power. If you’re planning to vlog all throughout your day with your phone, you need a portable way to charge it back up. RAVPower has a great line up of portable chargers with multiple USB inputs that hold a total charge of more than 20,000 mAh. With that amount, you can fully charge your smartphone more than 6 times! I own one myself and it’s been great for me during my travels. A 22,000 mAh charger goes for about $42 USD.
2. Arkon Tripod Mount
The Arkon tripod mount is a great portable tripod option that you can get at the fair price of around $20 USD. Not only does it have bendable legs, like the more expensive Joby GorillaPod tripod, that you can wrap around all kinds of structures, but it also comes with the smartphone mount, which Joby sells separately. Another great thing about the Arkon tripod is that its smartphone mount can be rotated so that you can position your phone to film in either widescreen or portrait mode.
3. Mega Tiny Anti-Gravity Case
For all the flat surfaces that the bendable legs of the Arkon tripod mount can’t wrap around, Mega Tiny’s anti-gravity cases will do the job of holding your iPhone or Android phone in one fixed position. These cases can stick to glass, mirrors, metal, and more. They range from $20 to $30 USD.
4. FLII Selfie Ring Light
As much as smartphone camera technology has advanced, phone cameras still underperform when it comes to filming video in low-light. In low-light, your footage is very grainy because your phone is equipped with a small camera sensor, an engineering choice by the manufacturers to keep the size of the phone small. A handy accessory that you can use to get more light is the FLII selfie ring light. This ring light clamps onto your phone and emits a neutral white light. You can clamp this light to either side of your phone, depending on whether you want to use your rear-facing camera or your front-facing camera. This selfie ring light sells for around $16 USD.
5. RODE VideoMic Me
The mic that is already built into your phone is equally sensitive to the sounds that come from behind the phone as it is to the sounds that are in front of the phone. This can be problematic when you’re trying to vlog in selfie mode while there’s a loud concert on the other side. One smartphone accessory that can improve the sound that you record from your phone in these situations is the RODE VideoMic Me. This mini directional shotgun mic plugs right into your phone’s headphone jack and sells for around $60 USD. In windy conditions, the dead cat windshield that it comes with does a great job of minimizing noise from the wind. In quiet, indoor conditions where you are the only person speaking, this device performs no better than your phone’s internal microphone. Your phone will also have to be in airplane mode to prevent the Rode VideoMic Me from recording unwanted clicking noise caused by background processes performed by your phone. So you wouldn’t want to use this for livestreaming.
6. Aukey Optic 3-in-1 Smartphone Lens Set
Aukey makes a 3-in-1 lens set that you can clamp onto your smartphone so that you can vlog at different focal lengths. The 3-in-1 set comes with a wide-angle lens, a fisheye lens, and a macro lens. The clamp it comes with is long enough for these lenses to reach any camera on a smartphone, not just those of iPhones which are positioned close to the phone’s outer edge. To get the most out of these lenses, you’ll have to use them without your phone’s protective case on. Although you are free to use this lens set on either your phone’s rear-facing camera or front-facing camera, the metal housing of these lenses is likely to show up in your footage when you use them with your front-facing camera. So, instead of having your recorded image stretch to the ends of a 16:9 ratio rectangular frame, your recorded image will look as if it is contained inside a circle. This lens set sells for around $30 USD.
7. iOgrapher Go for Android and iPhone
There’s many more accessories that you can take advantage of if you don’t limit yourself to just smartphone camera accessories. Sound and lighting equipment made for stand-alone cameras perform much better too. Many of these accessories are meant to connect to the camera “shoe” (a bracket on top of the camera that accessories can be attached to). Smartphones don’t come with these kinds of shoes. So, to take advantage of these higher quality accessories, you’ll need some kind of camera rig for your smartphone that also comes with shoes. The iOgrapher Go offers this at around $60 USD. This accessory comes with three shoes.
8. Manfrotto TwistGrip System
Manfrotto’s TwistGrip System does a similar job to the above iOgrapher Go. This system also comes with three shoes. An advantage the TwistGrip System has over the iOgrapher Go is that it is much more portable. Its three connected parts can be detached to take up less space in your bag. This system sells for around $50 USD.
9. Zhiyun Smooth-Q 3-Axis Handheld Gimbal Stabilizer for Smartphones
My favorite smartphone camera accessory that I own is the Zhiyun Smooth-Q gimbal stabilizer. This gimbal is very effective in helping you record smooth video. Using the app that it comes with, you can even preset this gimbal to smoothly pan and rotate from a starting position to an ending position, giving you the opportunity to film beautiful time lapses. You can get this device at around $100 USD.
Polish Your YouTube Videos with Filmora
As one of the most widely used video editing software in YouTube video editing, Filmora provides lots of templates and effects with an intuitive interface, which saves much time. Download the free trial version and get started now.
Richard Bennett
Richard Bennett is a writer and a lover of all things video.
Follow @Richard Bennett
Also read:
- 2024 Approved Amplify Your Shorts' Impact with Bespoke Thumbnails
- [Updated] How to Edit YouTube Videos in Adobe Premiere
- IMovie Essentials Making Your YouTube Openers Stand Out
- Elite Collective Photo, Music + Visual Creation Fusion
- 2024 Approved Content Kings & Queens 8 YT's Booming Stars
- 2024 Approved Elevate Your Content Strategy with Social Blade and YouTube Stats
- Learning with Legends Top History YouTube Content for Learners
- The Power List Top 10 YouTube Channels Dominating with Fans
- 2024 Approved A Comprehensive Guide to Maximizing Channels' Earnings Through Trailers
- Inside Their Secrets Top 10 YouTube Beauty Gurus You Need to See
- [Updated] Dismantling the Economics of YouTube's Ambitious Shorts Fund
- High-Quality Game Capture Apps Reviewed
- Prodigious Platform Professionals
- 2024 Approved Crafting an Inviting Subscribe Icon for YouTube Videographers
- Incorporating Brand Identity Adding Logos to YouTube Videos
- Building a Brand Through Consistently Engaging Vlogs
- In 2024, Decoding YouTube's Algorithm The Role of Keyword Optimization
- Bridging Platform Gaps YouTube Shorts to MP4 Transformation for 2024
- In 2024, Emoji Mastery for Engaging YouTube Discussions
- [Updated] 10 Ultimate Immersive VR Video Hits
- All You Need to Know Understanding Video ASPECT RATIOS on YOUTUBE
- [Updated] Diversify Your Watchlist - The Top 27 Non-YouTube Video Hubs
- Elevate Your Videography - 7 Free Sound Effects Collection for 2024
- [Updated] Choosing Your Go-To YouTube Video Downloaders on Android Platform
- In 2024, Binge on Christmas Classics Enjoy 9 Whole-Film Flicks No Charge
- [Updated] Essential Mobile Media Apps for High-Quality Photography/Videography
- 2024 Approved Elevate Engagement Posting YouTube Video on FB
- The Ultimate Guide 8 Real-World Promotion Tools for Videos
- Enhancing Presentations Adding YouTube to Google Slides
- 2024 Approved Boost Video Quality on YouTube - The Essential Webcams Guide
- In 2024, 1 Choice Transcribe YouTube Videos in a Flash
- In 2024, Decoding the Art of YouTube Playlist Recalibration
- Instantly Connect YouTube and Facebook for Viewers
- [Updated] Elevate Your Content SEO Mastery Starts Here
- [Updated] 24 Hour Heavyweights Top 10 Most Watched on YT
- A Guide to the 8 Truly Effective Youtube Marketing Methods
- 2024 Approved Crafting Unique Content to Differentiate Your Channel
- [Updated] Amplify YouTube Visibility Crafting Effective Descriptions & Tags
- Unique Video Monikers Brainstorming Insights
- Can a Brief Subscribe Boost Your Content Viewing for 2024
- Discovering and Dominating Unique Segments in YouTube for 2024
- In 2024, Convert & Edit Wonders 10 Best YouTube Tools Feat. Audio
- In 2024, Morph Your Face The Best Face Swap Apps for Mobile Phones
- How to Track Oppo Reno 11F 5G by Phone Number | Dr.fone
- 2024 Approved Basic Tongue Articulation Adjustments A Comprehensive Guide to Utilities, Policies, and Replacements
- 2024 Approved Ultimate Tutorial Customizing the Final Frame of a Vimeo Video
- [New] In 2024, Smooth Streaming – Fix Facebook's Playback Problems
- In 2024, Digging Deep Into Facebook's Short Video Shift The 2023 Scenario
- In 2024, Process of Screen Sharing Poco M6 Pro 4G to PC- Detailed Steps | Dr.fone
- [Updated] Leverage These 10 Devices for Crystal Clear Zooms
- [Updated] Unlock Insta Money Potential with Our Top 7 List
- In 2024, Is pgsharp legal when you are playing pokemon On Meizu 21 Pro? | Dr.fone
- How to Mirror Apple iPhone 14 to PC via USB? | Dr.fone
- Updated 2024 Approved Essential Guide to Combining Multi-Track Recordings Into a Single Clip
- [New] How to Retain Your Instagram Captures on iPhone for 2024
- 2024 Approved Saving YouTube Audio Made Easy A Tutorial
- New Say Goodbye to Aspect Ratio Confusion The Ultimate Facebook Video Guide
- [Updated] 55 Best TikTok Comedy Joke Threads
- How to Perform Hard Reset on Xiaomi 14 Ultra? | Dr.fone
- Mastering Mobile Audio Editing 5 Must-Have Tools for Android Users
- [New] Streamlined Methods for iPhone Screen Capture for 2024
- 4 Most-Known Ways to Find Someone on Tinder For Xiaomi Redmi Note 12 5G by Name | Dr.fone
- In 2024, Top 5 Car Locator Apps for Realme C33 2023 | Dr.fone
- Hacks to do pokemon go trainer battles For ZTE Axon 40 Lite | Dr.fone
- [New] IOS and Android A Tutorial for Saving Twitter's Animations
- 3 Facts You Need to Know about Screen Mirroring Vivo X90S | Dr.fone
- [New] Audiovisual Fusion Incorporating Songs in IG Media
- [New] 2024 Approved Virtual Producer's Showdown
- [Updated] Chrome's Edge in TikTok Video Upload & Distribution for 2024
- [Updated] In 2024, Freedom in Fun 10 Excellent Offline Gaming on Android Devices
- In 2024, How to Track Vivo S18 Pro by Phone Number | Dr.fone
- New In 2024, What Can Tell You About 12 Best Audio Converter
- 2023'S Leading Cameras for Samsung Gear 360 Successors for 2024
- [New] In 2024, Tutorial Keeping YouTube-Like Tweets in Android Cache
- In 2024, No Money Down Best Web Converters From TikTok To MP3 Ranked
- How To Change Honor Magic5 Ultimate Lock Screen Password?
- Photos App Magic Crafting Stunningly Slow-Motion Videos Online
- Title: The Most Economical Tools for YouTube Audio Conversion
- Author: Steven
- Created at : 2024-05-25 20:31:13
- Updated at : 2024-05-26 20:31:13
- Link: https://youtube-clips.techidaily.com/the-most-economical-tools-for-youtube-audio-conversion/
- License: This work is licensed under CC BY-NC-SA 4.0.
