
"The Key to Enhanced Viewership Designing Impactful YouTube Thumbnails"
The Key to Enhanced Viewership: Designing Impactful YouTube Thumbnails
How to Make Video Thumbnails for YouTube

Richard Bennett
Oct 26, 2023• Proven solutions
The video thumbnails you use for YouTube are vital to getting views and subscribers. There are a lot of things that go into making people watch your videos, but your video thumbnail might be the most important factor.
Here are 5 easy tips for creating thumbnails that get views.
- Have a Consistent Layout
- Use Your Face
- Use Graphics/Emojis That is On Topic
- Make Your Text Huge
- Keep It Clutter-Free!
Contest now closed.
Edit Your Videos Before Creating Video Thumbnails


1. Have a Consistent Layout
Your thumbnails all must look like part of the same set. You want viewers to recognize your videos like yours, and they are more likely to do that if you build up a standard layout that they can start associating with you.
An example of a standard layout could be you in the middle of the screen wearing an expression that matches the theme of your video, with your title written underneath your face. Every individual thumbnail would still be different, but you and the text would always be in the same spot.
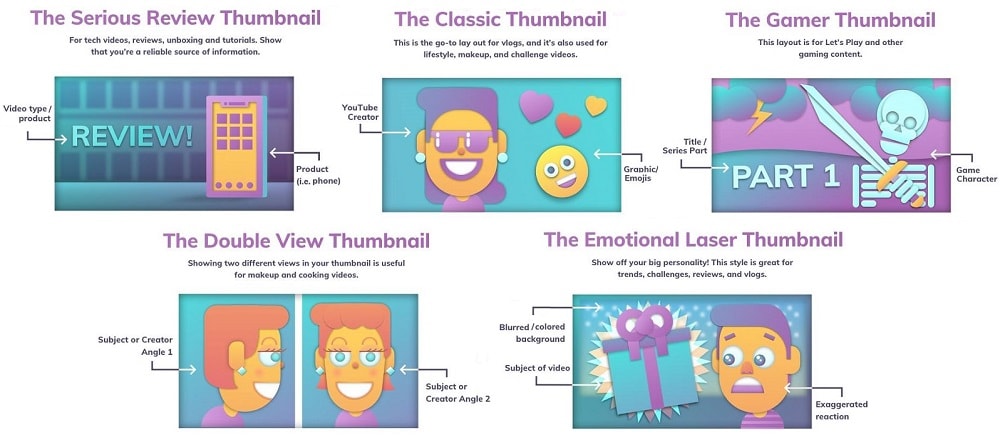
2. Use Your Face
People feel automatically connected and drawn into images that make eye contact. This makes thumbnails which feature faces more click-able than thumbnails which don’t, in most genres (i.e. if you make food videos then this may not apply – featuring the food might be more important than featuring your face). Check out more tips like this here .
Also, if somebody recognizes you in your thumbnail from a previous video of yours, that will go a long way towards making them click.
3. Use Graphics/Emojis that are On Topic
Anybody can take a screenshot of themselves in their video and use it as a thumbnail. To make your thumbnails look polished, consider using small images (like emojis or hearts) to stand out. This will add color and personality to your thumbnail.
Make sure the images you choose are relevant to the topic of your video.
4. Make Your Text Huge
If you use text in your thumbnail (you don’t have to) then it should be to add context. For example, if the main image is just you smiling then you might need some text to let viewers know the video is a makeup tutorial.
Thumbnails might look large while you’re putting them together in your image editor, but when they’re displayed on YouTube they’re a lot smaller. That goes double if a viewer is watching on their phone. So, make sure that any text you use is large enough that it can be read easily on small screens.
5. Keep it Clutter-Free
It’s great to add text and emojis to your thumbnails, but you do need to be careful not to add too much. You never want your thumbnails to look cluttered. Viewers should be able to glance at your thumbnails and know exactly what kind of video to expect – that’s difficult to do if there’s too much to process.
A good rule for text is to use only 1-3 words. That way they won’t clutter your screen, and you can make them large enough to read on small-screened devices.
For even more tips on making great YouTube thumbnails, click here .
Use these tips to make video thumbnails for YouTube, and tell us what kind of results you get!
Richard Bennett
Richard Bennett is a writer and a lover of all things video.
Follow @Richard Bennett
Richard Bennett
Oct 26, 2023• Proven solutions
The video thumbnails you use for YouTube are vital to getting views and subscribers. There are a lot of things that go into making people watch your videos, but your video thumbnail might be the most important factor.
Here are 5 easy tips for creating thumbnails that get views.
- Have a Consistent Layout
- Use Your Face
- Use Graphics/Emojis That is On Topic
- Make Your Text Huge
- Keep It Clutter-Free!
Contest now closed.
Edit Your Videos Before Creating Video Thumbnails
1. Have a Consistent Layout
Your thumbnails all must look like part of the same set. You want viewers to recognize your videos like yours, and they are more likely to do that if you build up a standard layout that they can start associating with you.
An example of a standard layout could be you in the middle of the screen wearing an expression that matches the theme of your video, with your title written underneath your face. Every individual thumbnail would still be different, but you and the text would always be in the same spot.
2. Use Your Face
People feel automatically connected and drawn into images that make eye contact. This makes thumbnails which feature faces more click-able than thumbnails which don’t, in most genres (i.e. if you make food videos then this may not apply – featuring the food might be more important than featuring your face). Check out more tips like this here .
Also, if somebody recognizes you in your thumbnail from a previous video of yours, that will go a long way towards making them click.
3. Use Graphics/Emojis that are On Topic
Anybody can take a screenshot of themselves in their video and use it as a thumbnail. To make your thumbnails look polished, consider using small images (like emojis or hearts) to stand out. This will add color and personality to your thumbnail.
Make sure the images you choose are relevant to the topic of your video.
4. Make Your Text Huge
If you use text in your thumbnail (you don’t have to) then it should be to add context. For example, if the main image is just you smiling then you might need some text to let viewers know the video is a makeup tutorial.
Thumbnails might look large while you’re putting them together in your image editor, but when they’re displayed on YouTube they’re a lot smaller. That goes double if a viewer is watching on their phone. So, make sure that any text you use is large enough that it can be read easily on small screens.
5. Keep it Clutter-Free
It’s great to add text and emojis to your thumbnails, but you do need to be careful not to add too much. You never want your thumbnails to look cluttered. Viewers should be able to glance at your thumbnails and know exactly what kind of video to expect – that’s difficult to do if there’s too much to process.
A good rule for text is to use only 1-3 words. That way they won’t clutter your screen, and you can make them large enough to read on small-screened devices.
For even more tips on making great YouTube thumbnails, click here .
Use these tips to make video thumbnails for YouTube, and tell us what kind of results you get!
Richard Bennett
Richard Bennett is a writer and a lover of all things video.
Follow @Richard Bennett
Streamlining Video Quality on YouTube – Top Formats Revealed
Best Video Format for YouTube Uploading
Richard Bennett
Feb 01, 2024• Proven solutions
Uploading your content in the best video format for YouTube can save you a lot of frustration. In this article, we will teach you about some of the best video formats and settings .
To upload a video to YouTube you have to make sure that you are using one of the video file formats that is supported by the platform itself. Here they are:
- MP4
- MOV
- AVI
- FLV
- 3GPP
- WMV
- WebM
- MPEGS
YouTube recommends uploading your videos as MP4 files. Some benefits of MP4s are that the files are not as large as AVIs, they provide better quality than FLVs, and they often display with the same quality or better as you would get watching the video on a native video player. Other file formats like 3GPP and MPEG-PS generally have resolutions too small for high-resolution tablets or desktop devices.
If your phone or video editing software does not output MP4 videos, consider getting video editing software or a conversion program that can (like Filmora Video Editor).
Filmora is an easy-to-use video editing program that can export to MP4, WMV, AVI, MOV, F4V, MKV, TS, 3GP, MPEG-2, WEBM, GIF, and MP3. You can convert a video to an MP4 simply by importing it into Filmora, dragging it into the timeline, and exporting it in the MP4 format.
The Best Upload Settings for YouTube
The best video code:
The best video format: MP4
Audio should be produced using the LC format and stereo 5.1 or standard stereo. You can upload separate MP3 audio format files for voiceovers if you need to.
The aspect ratio for a video should be 16:9 so that it won’t have black bars on the side when uploaded to YouTube. YouTube has also made it possible for 9:16 (portrait) style videos to be viewed without black bars, full screen, using their iOS app.
You should export in at least 30 frames per second. Many creators push that to 60 frames per second, which is better for most types of videos (although it may not make a noticeable difference for others).
The maximum size for quick upload and load time on YouTube is generally under 2gb. Luckily MP4 offers a great degree of compression without sacrificing too much image quality.
If you scale down the file size of the video by reducing the resolution or choosing a format with more compression, that can cause you to lose quality. If you need a smaller file, it’s always better to scale down the length of a video rather than continually compress the file or lose frames from the video.
Although a 2 GB file of a very long will easily upload to YouTube, it will probably be very low quality.
Do you agree that MP4 is the best video format for YouTube, or do you use something else?
Create Stunning Videos with a High-Quality Video Editor
Richard Bennett
Richard Bennett is a writer and a lover of all things video.
Follow @Richard Bennett
Richard Bennett
Feb 01, 2024• Proven solutions
Uploading your content in the best video format for YouTube can save you a lot of frustration. In this article, we will teach you about some of the best video formats and settings .
To upload a video to YouTube you have to make sure that you are using one of the video file formats that is supported by the platform itself. Here they are:
- MP4
- MOV
- AVI
- FLV
- 3GPP
- WMV
- WebM
- MPEGS
YouTube recommends uploading your videos as MP4 files. Some benefits of MP4s are that the files are not as large as AVIs, they provide better quality than FLVs, and they often display with the same quality or better as you would get watching the video on a native video player. Other file formats like 3GPP and MPEG-PS generally have resolutions too small for high-resolution tablets or desktop devices.
If your phone or video editing software does not output MP4 videos, consider getting video editing software or a conversion program that can (like Filmora Video Editor).
Filmora is an easy-to-use video editing program that can export to MP4, WMV, AVI, MOV, F4V, MKV, TS, 3GP, MPEG-2, WEBM, GIF, and MP3. You can convert a video to an MP4 simply by importing it into Filmora, dragging it into the timeline, and exporting it in the MP4 format.
The Best Upload Settings for YouTube
The best video code:
The best video format: MP4
Audio should be produced using the LC format and stereo 5.1 or standard stereo. You can upload separate MP3 audio format files for voiceovers if you need to.
The aspect ratio for a video should be 16:9 so that it won’t have black bars on the side when uploaded to YouTube. YouTube has also made it possible for 9:16 (portrait) style videos to be viewed without black bars, full screen, using their iOS app.
You should export in at least 30 frames per second. Many creators push that to 60 frames per second, which is better for most types of videos (although it may not make a noticeable difference for others).
The maximum size for quick upload and load time on YouTube is generally under 2gb. Luckily MP4 offers a great degree of compression without sacrificing too much image quality.
If you scale down the file size of the video by reducing the resolution or choosing a format with more compression, that can cause you to lose quality. If you need a smaller file, it’s always better to scale down the length of a video rather than continually compress the file or lose frames from the video.
Although a 2 GB file of a very long will easily upload to YouTube, it will probably be very low quality.
Do you agree that MP4 is the best video format for YouTube, or do you use something else?
Create Stunning Videos with a High-Quality Video Editor
Richard Bennett
Richard Bennett is a writer and a lover of all things video.
Follow @Richard Bennett
Also read:
- [Fix: Windows 37, Dev Driver Functional]
- [New] Unlock Your Income Potential YouTube Studio's Global Reach
- [Updated] A Compreayer's Guide to Monetizing Videos Critical View Figures
- [Updated] Complete Unpacking The World of Virtual Idols
- [Updated] Dancefloor Dynamics Free, Pristine DJ Template Videos
- 2024 Approved Captivate Audiences with Perfectly Tailored Youtube Descriptions
- FrameCraft VideoCutter
- How Do You Get Sun Stone Evolutions in Pokémon For Nubia Red Magic 8S Pro? | Dr.fone
- How To Update or Downgrade Apple iPhone 6 Plus Without Data Loss? | Dr.fone
- In 2024, Channel Your Creativity Crafting YouTube Trailers in Filmora
- In 2024, Elevate Your Content YouTube Thumbnail Artistry on Mac
- Kitchen Kings & Queens Crown Your Channel With a Name for 2024
- Music Maestro Uploading Beats to Your YouTube
- Top Four Platforms Dominating the Internet: Facebook, Twitter, Instagram & YouTube
- Troubleshoot and Tackle Epic Games Launcher Not Starting Fast Solutions
- Unleash Creativity Mastering High-Quality Slow Motion Video on Your Phone
- WinVídeo IA Tecnología Especificaciones Oficiales Explicadas Detalladamente
- Title: The Key to Enhanced Viewership Designing Impactful YouTube Thumbnails
- Author: Steven
- Created at : 2024-12-07 17:36:26
- Updated at : 2024-12-10 17:03:15
- Link: https://youtube-clips.techidaily.com/the-key-to-enhanced-viewership-designing-impactful-youtube-thumbnails/
- License: This work is licensed under CC BY-NC-SA 4.0.