
:max_bytes(150000):strip_icc()/zfold5-64c9634a900e4e3295c663e12af0e4aa.jpeg)
The Beginner's Guide to Camera Lenses in Filmmaking & Vlogging
The Beginner’s Guide to Camera Lenses in Filmmaking & Vlogging
A Vlogger’s Guide To Camera Lenses

Richard Bennett
Nov 01, 2022• Proven solutions
The staple of any vlog is the talking headshot, a shot of the speaker talking directly to the audience. You can compose this shot with different kinds of lenses for your interchangeable lens camera.
But which kind of lens is the right lens for you as a vlogger?
In this article, I’m going to help you figure that out.
- Part 1: Three Focal Length Groups: Wide, Standard, Telephoto
- Part 2: Vlogging With Each Focal Length Group
- Part 3: Crop Factor
- Part 4: Focal Length Equivalency Table
- Part 5: Aperture
- Part 6: Vlogging With a Fast Lens
- Part 7: Optical Image Stabilization
Three Focal Length Groups: Wide, Standard, Telephoto
There are three main ranges in focal lengths that camera lenses can be categorized into wide, standard, and telephoto.
Wide-Angle Lens
Wide-angle lenses can “see more.” They allow more of your scene to fit inside your frame. Objects that are closer to the lens appear much bigger while objects that are further away appear even smaller. Perspectives are also enhanced, making close objects and people that just make it into the sides of the frame appear more stretched out. Out of all the other ranges in focal lengths, wide-angle lenses will appear the least zoomed in.
Standard Lens
With standard lenses or normal lenses, you won’t get the stretched out objects or enhanced perspectives that you get from wide-angle lenses. Instead, standard lenses are meant to see scenes as the natural human eye is meant to see them. If you shoot a scene with both a wide-angle lens and a standard lens from the same position, you’ll notice that less of the scene fits into your frame. Standard lenses will appear more zoomed-in than wide-angle lenses, but less zoomed-in than telephoto lenses.
Telephoto Lens
Out of all the other ranges in focal lengths, telephoto lenses will appear the most zoomed in. This can be beneficial for the shooter who wants to get a closer shot of a scene without having to physically be in close proximity to the scene. Objects that are further away in the background also appear larger and closer than they would appear on wide-angle or standard lenses.
Vlogging With Each Focal Length Group
You can get your talking head footage using lenses from any of the three focal length groups. Depending on how you plan to vlog most of the time, though, one of the three focal lengths might be more suitable for you.
When to vlog with a wide-angle lens
Wide-angle lenses are the most commonly used lenses for vlogging. Wide-angle lenses are great when you need to be close to your camera. This might be the case for you if your recording space is small or if you want to film yourself as you hold your camera up with your own hand.
Being close to your camera not only gives you the option to use your camera’s built-in microphone, but it also gives you the option to make use of camera-mounted shotgun microphones.
When to vlog with a standard lens
Standard lenses are great when you have more space to be further away from your camera. The perspectives in your shot will look more natural through a standard lens, making your talking head footage feel more corporate or professional. You’ll also be able to get blurrier backgrounds using a standard lens versus a wide-angle lens.
Being further away from your camera, however, means that you’ll have to use a separate microphone positioned closer to you.
When to vlog with a telephoto lens
As telephoto lenses are even more zoomed in, you’ll need to be even further away from your camera to fit yourself inside your camera frame. Why would any vlogger ever need to be that far away from their camera? One word… teleprompter. If you want or need to stick to a script, you’ll have to be far away enough from your camera that it doesn’t appear like your eyes are scanning left to right. You then close in the distance with a telephoto lens.
In the above video, Marcos Rocha compares different focal lengths for talking head videos. Which focal length range do you like the look of?
Crop Factor
Focal lengths in camera lenses are measured in millimeters. You can vlog yourself handheld with a 24mm lens on a camera with a full-frame sensor (the sensor is the piece of hardware inside your camera that turns the light it receives into a digital image). But if you use a 24mm lens on a camera with a smaller sensor, like an APS-C sensor or even smaller Micro 4/3 sensor, more of you will get cropped out (see below).

In order to make up for the cropping that occurs, you will need to use a wider lens on cameras with smaller sensors to get the same shot you’d get with a full-frame camera.
Focal Length Equivalency Table
This table shows you the focal lengths needed to achieve the same shot between cameras with different sensor sizes. In order to take a shot as wide as the shot I took of myself with the 24mm lens on my full-frame camera, I would need a 15mm lens on an APS-C sensor camera or a 12mm lens on a micro 4/3 camera.
| Focal Length / Sensor | Full Frame | APS-C | Micro 4/3 |
|---|---|---|---|
| Wide (Handheld Selfie-Safe) | 16mm | 10mm | 8mm |
| Wide (Handheld Selfie-Safe) | 18mm | 11mm | 9mm |
| Wide (Handheld Selfie-Safe) | 24mm | 15mm | 12mm |
| Wide | 35mm | 22mm | 18mm |
| Standard | 50mm | 31mm | 25mm |
| Telephoto | 70mm | 44mm | 35mm |
| Telephoto | 100mm | 63mm | 50mm |
| Telephoto | 200mm | 125mm | 100mm |
Aperture

The next thing to consider when you’re looking for a lens is the aperture, the hole (often adjustable) within the lens that lets light in. Aperture for camera lenses is measured in f-stops (f/1.4, f/1.8, f/2.0) - the smaller the f-stop number, the larger the aperture (bigger hole letting even more light in).

Because larger aperture lenses let more light in, they need a shorter time for cameras to compose an image. This is why larger aperture lenses are also called “fast” lenses.
Fast lenses are more expensive because they cost more to produce. There’s a lot more that goes into them, including larger and higher quality glass elements.
But do you even need a fast lens?
Vlogging With a Fast Lens
Pros of Vlogging With a Fast Lens
- Better low-light performance
- Better autofocus performance
- Better “bokeh” (out-of-focus areas, like your background, having that nice blurry look that you see in a lot of movies)
Cons of Vlogging With a Fast Lens
- More expensive
- Moving subjects more likely to get out of focus when shooting with a large aperture
- Better continuous autofocus performance needed when shooting moving subjects with a large aperture
Optical Image Stabilization
Finally, you’ll have to decide whether or not you want your lens to have built-in optical image stabilization (OIS).
OIS is very beneficial to have on a lens if you’re a vlogger who films mostly handheld footage. Although this technology adds to the price of your lens as well, it can greatly help you to capture smoother footage that may otherwise be shaky. Nikon calls this technology “Vibration Reduction” (VR) for their lenses.
In the above video, you can see how much OIS can help to stabilize your footage. MicBergsma simultaneously compares the footage between two GoPro Hero5 Blacks, one with OIS on and one with OIS off.
If, however, you are shooting most of your vlogs on a tripod, you won’t need a lens with OIS.
Looking for ways to set up your talking-head shot for YouTube with any of these lenses? Check out our post on 4 Ways To Set Up Your Talking-Head Shots For YouTube .
Richard Bennett
Richard Bennett is a writer and a lover of all things video.
Follow @Richard Bennett
Richard Bennett
Nov 01, 2022• Proven solutions
The staple of any vlog is the talking headshot, a shot of the speaker talking directly to the audience. You can compose this shot with different kinds of lenses for your interchangeable lens camera.
But which kind of lens is the right lens for you as a vlogger?
In this article, I’m going to help you figure that out.
- Part 1: Three Focal Length Groups: Wide, Standard, Telephoto
- Part 2: Vlogging With Each Focal Length Group
- Part 3: Crop Factor
- Part 4: Focal Length Equivalency Table
- Part 5: Aperture
- Part 6: Vlogging With a Fast Lens
- Part 7: Optical Image Stabilization
Three Focal Length Groups: Wide, Standard, Telephoto
There are three main ranges in focal lengths that camera lenses can be categorized into wide, standard, and telephoto.
Wide-Angle Lens
Wide-angle lenses can “see more.” They allow more of your scene to fit inside your frame. Objects that are closer to the lens appear much bigger while objects that are further away appear even smaller. Perspectives are also enhanced, making close objects and people that just make it into the sides of the frame appear more stretched out. Out of all the other ranges in focal lengths, wide-angle lenses will appear the least zoomed in.
Standard Lens
With standard lenses or normal lenses, you won’t get the stretched out objects or enhanced perspectives that you get from wide-angle lenses. Instead, standard lenses are meant to see scenes as the natural human eye is meant to see them. If you shoot a scene with both a wide-angle lens and a standard lens from the same position, you’ll notice that less of the scene fits into your frame. Standard lenses will appear more zoomed-in than wide-angle lenses, but less zoomed-in than telephoto lenses.
Telephoto Lens
Out of all the other ranges in focal lengths, telephoto lenses will appear the most zoomed in. This can be beneficial for the shooter who wants to get a closer shot of a scene without having to physically be in close proximity to the scene. Objects that are further away in the background also appear larger and closer than they would appear on wide-angle or standard lenses.
Vlogging With Each Focal Length Group
You can get your talking head footage using lenses from any of the three focal length groups. Depending on how you plan to vlog most of the time, though, one of the three focal lengths might be more suitable for you.
When to vlog with a wide-angle lens
Wide-angle lenses are the most commonly used lenses for vlogging. Wide-angle lenses are great when you need to be close to your camera. This might be the case for you if your recording space is small or if you want to film yourself as you hold your camera up with your own hand.
Being close to your camera not only gives you the option to use your camera’s built-in microphone, but it also gives you the option to make use of camera-mounted shotgun microphones.
When to vlog with a standard lens
Standard lenses are great when you have more space to be further away from your camera. The perspectives in your shot will look more natural through a standard lens, making your talking head footage feel more corporate or professional. You’ll also be able to get blurrier backgrounds using a standard lens versus a wide-angle lens.
Being further away from your camera, however, means that you’ll have to use a separate microphone positioned closer to you.
When to vlog with a telephoto lens
As telephoto lenses are even more zoomed in, you’ll need to be even further away from your camera to fit yourself inside your camera frame. Why would any vlogger ever need to be that far away from their camera? One word… teleprompter. If you want or need to stick to a script, you’ll have to be far away enough from your camera that it doesn’t appear like your eyes are scanning left to right. You then close in the distance with a telephoto lens.
In the above video, Marcos Rocha compares different focal lengths for talking head videos. Which focal length range do you like the look of?
Crop Factor
Focal lengths in camera lenses are measured in millimeters. You can vlog yourself handheld with a 24mm lens on a camera with a full-frame sensor (the sensor is the piece of hardware inside your camera that turns the light it receives into a digital image). But if you use a 24mm lens on a camera with a smaller sensor, like an APS-C sensor or even smaller Micro 4/3 sensor, more of you will get cropped out (see below).
In order to make up for the cropping that occurs, you will need to use a wider lens on cameras with smaller sensors to get the same shot you’d get with a full-frame camera.
Focal Length Equivalency Table
This table shows you the focal lengths needed to achieve the same shot between cameras with different sensor sizes. In order to take a shot as wide as the shot I took of myself with the 24mm lens on my full-frame camera, I would need a 15mm lens on an APS-C sensor camera or a 12mm lens on a micro 4/3 camera.
| Focal Length / Sensor | Full Frame | APS-C | Micro 4/3 |
|---|---|---|---|
| Wide (Handheld Selfie-Safe) | 16mm | 10mm | 8mm |
| Wide (Handheld Selfie-Safe) | 18mm | 11mm | 9mm |
| Wide (Handheld Selfie-Safe) | 24mm | 15mm | 12mm |
| Wide | 35mm | 22mm | 18mm |
| Standard | 50mm | 31mm | 25mm |
| Telephoto | 70mm | 44mm | 35mm |
| Telephoto | 100mm | 63mm | 50mm |
| Telephoto | 200mm | 125mm | 100mm |
Aperture
The next thing to consider when you’re looking for a lens is the aperture, the hole (often adjustable) within the lens that lets light in. Aperture for camera lenses is measured in f-stops (f/1.4, f/1.8, f/2.0) - the smaller the f-stop number, the larger the aperture (bigger hole letting even more light in).
Because larger aperture lenses let more light in, they need a shorter time for cameras to compose an image. This is why larger aperture lenses are also called “fast” lenses.
Fast lenses are more expensive because they cost more to produce. There’s a lot more that goes into them, including larger and higher quality glass elements.
But do you even need a fast lens?
Vlogging With a Fast Lens
Pros of Vlogging With a Fast Lens
- Better low-light performance
- Better autofocus performance
- Better “bokeh” (out-of-focus areas, like your background, having that nice blurry look that you see in a lot of movies)
Cons of Vlogging With a Fast Lens
- More expensive
- Moving subjects more likely to get out of focus when shooting with a large aperture
- Better continuous autofocus performance needed when shooting moving subjects with a large aperture
Optical Image Stabilization
Finally, you’ll have to decide whether or not you want your lens to have built-in optical image stabilization (OIS).
OIS is very beneficial to have on a lens if you’re a vlogger who films mostly handheld footage. Although this technology adds to the price of your lens as well, it can greatly help you to capture smoother footage that may otherwise be shaky. Nikon calls this technology “Vibration Reduction” (VR) for their lenses.
In the above video, you can see how much OIS can help to stabilize your footage. MicBergsma simultaneously compares the footage between two GoPro Hero5 Blacks, one with OIS on and one with OIS off.
If, however, you are shooting most of your vlogs on a tripod, you won’t need a lens with OIS.
Looking for ways to set up your talking-head shot for YouTube with any of these lenses? Check out our post on 4 Ways To Set Up Your Talking-Head Shots For YouTube .
Richard Bennett
Richard Bennett is a writer and a lover of all things video.
Follow @Richard Bennett
Optimized Approach to Delete Unwanted YouTube Posts
Deleting YouTube Comments
Richard Bennett
Mar 27, 2024• Proven solutions
YouTube is a video platform where people share informative and entertaining content. It works in the form of channels belonging to individuals or companies. People can subscribe to these channels to show support, and YouTubers create a strong sense of community with these subscribers.
But some people comment inappropriate comments that can cause the community harm and spread hatred. Many YouTubers may want to delete such remarks. There are also times when you accidentally comment on a channel’s comment section and may wish to delete it.
So how do you delete all YouTube comments? In this how-to blog, we will show you.
- Part 1: Deleting YouTube Comments from Desktop
- Part 2: Deleting All YouTube Comments from Mobile
- Part 3: How to Delete Your Comments from YouTube?
- part 4: Delete Other People’s Comments on Others’ Channels
- Part 5: Delete All Your Posted YouTube Comments
How to Delete YouTube Comments from Desktop?
In this section, we will tell you how you can do it from your desktop.
- Go tohttps://www.youtube.com/ from your desktop browser and log in.
- Once you log in, you need to go to your channel. For this, you can select the My Channel option from the upper-left side of your YouTube home page.
- From the list of your videos, select the one you need and scroll down to reach the comment you want to delete.
- When you locate the comment, click on the three vertical dots on the right-hand side of the comment. From the drop-down list, click on Remove. The process is complete, and YouTube will remove your comment.
You also have the option to report the comment or hide the user from your channel .
How to Delete All YouTube Comments from Mobile?
The steps to deleting someone else’s YouTube comments from your mobile are similar to those from your desktop.
- Log in to your account from the YouTube app on your phone.
- On the right-hand side of your YouTube homepage, there will be a profile icon. Tap on that, and from the list, select My Channel. This will direct you to all videos on your channel.
- Select the video from where you want to delete a comment. Scroll down to reach the desired comment.
- Once you reach the target comment, click on the three vertical dots at the bottom corner. There should be an option called Remove. Tap on it.
- This will create another dialog box on the mobile app where you have to click on Remove again to delete the comment.
How Do You Delete Your Comments from YouTube?
Have you accidentally posted something on a YouTuber’s channel? Are you anxious because you cannot find the comment and delete it?
Fear not. Read on to know how to delete all comments you posted on someone else’s YouTube channel from your desktop.
- Visithttps://www.youtube.com/ from your desktop and then sign in YouTube channel.
- If your YouTube account is not open, tap on Sign in and enter your email and password to log in to your account.
- Once there, you need to access your Comment History page. To do this, you can click on the three horizontal lines at the top left corner of your YouTube homepage. Click on History. On the page that opens, click Comments from the panel on the right. It will direct you to your Comment History page. You can also access the YouTube comment history fromhere .
- When you reach the Comment History page, you will be able to find all comments you have ever posted. Scroll down to the comment you want to delete.
- Click on the three vertical dots that you see beside the target comment. You will find a Delete option. Tap on it, and confirm that you want to delete the comment. That completes the process. No more embarrassing comments!
How Do You Delete Your Comments from Your Phone?
Don’t have a desktop handy? This section will tell you how you can delete your comments you posted on your or someone else’s YouTube video from your mobile.
- Go to the YouTube app on your phone. You will need to log in to your account to delete any comment you posted.
- When the login process is complete, you need to find the video where your target comment is.
If it is someone else’s video, you can search for it by clicking on the magnifying glass at the top of the homepage or check your YouTube History to find it. To access your History, you need to click on an option called Library at the bottom of the homepage. From there, you can find the History option.
If it is your video where the comment to be removed is, you can go to My Channel from the profile icon on the right-hand side of the YouTube app’s homepage.
- Once you locate the video, you need to find the comment you want to delete. On the YouTube app, you may need to scroll down for a while to do this.
- When you reach it, click on the three vertical dots at the bottom corner of your comment. You should see an option called Delete. Click on that. You need to confirm once more that you want to delete it, and the process will be complete.
Delete Other People’s Comments on Others’ Channels
Did you see a hate comment on your favorite creator’s video? Sadly, you cannot delete the comment. But, you can report it, and YouTube will hide or take it down.
You can do this both from your desktop or your phone with some easy steps.
How to report people’s comments on YouTube?
Go to https://www.youtube.com/ from your desktop or open the YouTube app from your phone. Log in to your account if it is not open.
- The next step is to find the video where the comment is. You can search for it by tapping on the search button at the top of the YouTube homepage. Or you can locate it from your YouTube History.
To find your History from your desktop, you need to click on the three horizontal lines at the top left corner of the homepage. You will find the History option from the list. To access it from your phone, click on the Library option at the bottom of your homepage, and it will open a list where you will find the History option.
- Open the video, and scroll down to locate the comment you want to report.
- Once you find your target comment, click on the three vertical dots that appear on its right side. You will find the Report option from the pop-up menu. Click on that.
- When you tap Report, another dialogue box will appear. From the list of options, choose the most appropriate option, tap on Report at the lower right corner of the pop-up, and complete the process. YouTube will do the rest.

How to Delete All Your Posted YouTube Comments?
You can also delete all comments you ever posted on any YouTube video by hiding your channel. When you do this, you can hide your video content temporarily. But it will irreversibly erase all your comments throughout YouTube. If you are curious, read on to know how you can do it.
- You need to go to YouTube from your desktop and sign in to your account.
- Next, you can either click on the profile icon at the top right corner or the three horizontal lines beside the YouTube logo on your homepage. From the list of options, click Settings.
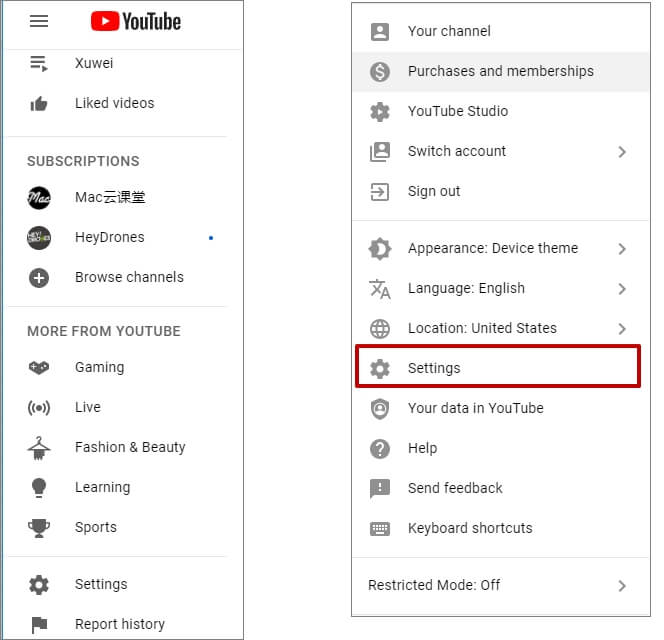
- YouTube will direct you to the Settings page of your account. Choose Advanced Settings from the list on your left. You can also access it fromhere .

- Scroll down and select Delete Channel. Clicking it will not delete your account. When you click on Delete Channel, you will get two choices – ‘I want to hide my channel’ and ‘I want to permanently delete my content’. Select the first.

- YouTube will now show you what will happen when you hide your channel. Check all the boxes to confirm that you understand, and then tap on Hide My Channel. YouTube will now delete all comments made by your account.
Final Thoughts
YouTube can be an unsafe place with unwanted comments everywhere. In this blog, we tried to show how you can get rid of comments on your and on others’ YouTube accounts. The next time you see an offensive comment or post something mistakenly, don’t forget to try our tips and make YouTube a safe platform again.
Richard Bennett
Richard Bennett is a writer and a lover of all things video.
Follow @Richard Bennett
Richard Bennett
Mar 27, 2024• Proven solutions
YouTube is a video platform where people share informative and entertaining content. It works in the form of channels belonging to individuals or companies. People can subscribe to these channels to show support, and YouTubers create a strong sense of community with these subscribers.
But some people comment inappropriate comments that can cause the community harm and spread hatred. Many YouTubers may want to delete such remarks. There are also times when you accidentally comment on a channel’s comment section and may wish to delete it.
So how do you delete all YouTube comments? In this how-to blog, we will show you.
- Part 1: Deleting YouTube Comments from Desktop
- Part 2: Deleting All YouTube Comments from Mobile
- Part 3: How to Delete Your Comments from YouTube?
- part 4: Delete Other People’s Comments on Others’ Channels
- Part 5: Delete All Your Posted YouTube Comments
How to Delete YouTube Comments from Desktop?
In this section, we will tell you how you can do it from your desktop.
- Go tohttps://www.youtube.com/ from your desktop browser and log in.
- Once you log in, you need to go to your channel. For this, you can select the My Channel option from the upper-left side of your YouTube home page.
- From the list of your videos, select the one you need and scroll down to reach the comment you want to delete.
- When you locate the comment, click on the three vertical dots on the right-hand side of the comment. From the drop-down list, click on Remove. The process is complete, and YouTube will remove your comment.
You also have the option to report the comment or hide the user from your channel .
How to Delete All YouTube Comments from Mobile?
The steps to deleting someone else’s YouTube comments from your mobile are similar to those from your desktop.
- Log in to your account from the YouTube app on your phone.
- On the right-hand side of your YouTube homepage, there will be a profile icon. Tap on that, and from the list, select My Channel. This will direct you to all videos on your channel.
- Select the video from where you want to delete a comment. Scroll down to reach the desired comment.
- Once you reach the target comment, click on the three vertical dots at the bottom corner. There should be an option called Remove. Tap on it.
- This will create another dialog box on the mobile app where you have to click on Remove again to delete the comment.
How Do You Delete Your Comments from YouTube?
Have you accidentally posted something on a YouTuber’s channel? Are you anxious because you cannot find the comment and delete it?
Fear not. Read on to know how to delete all comments you posted on someone else’s YouTube channel from your desktop.
- Visithttps://www.youtube.com/ from your desktop and then sign in YouTube channel.
- If your YouTube account is not open, tap on Sign in and enter your email and password to log in to your account.
- Once there, you need to access your Comment History page. To do this, you can click on the three horizontal lines at the top left corner of your YouTube homepage. Click on History. On the page that opens, click Comments from the panel on the right. It will direct you to your Comment History page. You can also access the YouTube comment history fromhere .
- When you reach the Comment History page, you will be able to find all comments you have ever posted. Scroll down to the comment you want to delete.
- Click on the three vertical dots that you see beside the target comment. You will find a Delete option. Tap on it, and confirm that you want to delete the comment. That completes the process. No more embarrassing comments!
How Do You Delete Your Comments from Your Phone?
Don’t have a desktop handy? This section will tell you how you can delete your comments you posted on your or someone else’s YouTube video from your mobile.
- Go to the YouTube app on your phone. You will need to log in to your account to delete any comment you posted.
- When the login process is complete, you need to find the video where your target comment is.
If it is someone else’s video, you can search for it by clicking on the magnifying glass at the top of the homepage or check your YouTube History to find it. To access your History, you need to click on an option called Library at the bottom of the homepage. From there, you can find the History option.
If it is your video where the comment to be removed is, you can go to My Channel from the profile icon on the right-hand side of the YouTube app’s homepage.
- Once you locate the video, you need to find the comment you want to delete. On the YouTube app, you may need to scroll down for a while to do this.
- When you reach it, click on the three vertical dots at the bottom corner of your comment. You should see an option called Delete. Click on that. You need to confirm once more that you want to delete it, and the process will be complete.
Delete Other People’s Comments on Others’ Channels
Did you see a hate comment on your favorite creator’s video? Sadly, you cannot delete the comment. But, you can report it, and YouTube will hide or take it down.
You can do this both from your desktop or your phone with some easy steps.
How to report people’s comments on YouTube?
Go to https://www.youtube.com/ from your desktop or open the YouTube app from your phone. Log in to your account if it is not open.
- The next step is to find the video where the comment is. You can search for it by tapping on the search button at the top of the YouTube homepage. Or you can locate it from your YouTube History.
To find your History from your desktop, you need to click on the three horizontal lines at the top left corner of the homepage. You will find the History option from the list. To access it from your phone, click on the Library option at the bottom of your homepage, and it will open a list where you will find the History option.
- Open the video, and scroll down to locate the comment you want to report.
- Once you find your target comment, click on the three vertical dots that appear on its right side. You will find the Report option from the pop-up menu. Click on that.
- When you tap Report, another dialogue box will appear. From the list of options, choose the most appropriate option, tap on Report at the lower right corner of the pop-up, and complete the process. YouTube will do the rest.
How to Delete All Your Posted YouTube Comments?
You can also delete all comments you ever posted on any YouTube video by hiding your channel. When you do this, you can hide your video content temporarily. But it will irreversibly erase all your comments throughout YouTube. If you are curious, read on to know how you can do it.
- You need to go to YouTube from your desktop and sign in to your account.
- Next, you can either click on the profile icon at the top right corner or the three horizontal lines beside the YouTube logo on your homepage. From the list of options, click Settings.
- YouTube will direct you to the Settings page of your account. Choose Advanced Settings from the list on your left. You can also access it fromhere .
- Scroll down and select Delete Channel. Clicking it will not delete your account. When you click on Delete Channel, you will get two choices – ‘I want to hide my channel’ and ‘I want to permanently delete my content’. Select the first.
- YouTube will now show you what will happen when you hide your channel. Check all the boxes to confirm that you understand, and then tap on Hide My Channel. YouTube will now delete all comments made by your account.
Final Thoughts
YouTube can be an unsafe place with unwanted comments everywhere. In this blog, we tried to show how you can get rid of comments on your and on others’ YouTube accounts. The next time you see an offensive comment or post something mistakenly, don’t forget to try our tips and make YouTube a safe platform again.
Richard Bennett
Richard Bennett is a writer and a lover of all things video.
Follow @Richard Bennett
Also read:
- [New] How to Buy 1 Million YouTube Views Safely From Trusted Providers
- In 2024, Discovering the Top 5 Smarter URL Lengtheners for YouTube
- Palette Perfection The Science of Video Chromaticity
- [New] Creating an Athletic Channel on Apple Hardware
- Crafting Success Pushing Your Video Into Top Charts
- [Updated] Crafting Content Masterpieces with These Essential YouTube Tips
- [New] Attract More Viewers Crafting Impressive Youtube Description with Custom Templates
- Boost Your Visibility with a Cutting-Edge Set of Banners
- [New] Dive Into the World of Interactive Video Features on YouTube
- Uninterrupted YouTube How to Block Ads in Popular Browsers
- 2024 Approved A Compreayer's Guide to Growth Updating YouTube Metadata
- Exclusive Guide to Affordable, Premium Video Editors
- 2024 Approved Demystifying Video SEO on YouTube as a Novice
- Dissecting Video Ranking Algorithms on YouTube
- Architects of Online Marvel Adventures for 2024
- 7 Places to Find Royalty Free Sound Effects for YouTube Videos
- [Updated] Embrace Serenity The 10 Best Online Yoga Masters Today
- Top 10 Audio Alchemy From YouTube to Mp3 Masters
- Hone Your Message Effective Use of Templates for Shorts
- 2024 Approved A Guide to Gathering Gold From Guided Goods' Gazes Online
- 2024 Approved Elevate Engagement Posting YouTube Video on FB
- Earnings Explosion How to Maximize Income on YouTube Shorts for 2024
- Leading YouTube Snack Seekers Free, Top Downloads
- [Updated] Clearer Streams YouTube Video Borderless Adjustment
- 2024 Approved Direct From Google Meet Securely Live Stream on YouTube
- In 2024, How To Remove Passcode From iPhone 11 Pro Max? Complete Guide | Dr.fone
- 2024 Approved WeVideo Your Go-To Platform for Easy Video Creation
- [Updated] 2024 Approved Maximize Your Marketing Metrics Top 8 Apps for Facebook Like Boost
- Essential Strategies for Podcast Title Success Step-by-Step & Top 50+ Idea Lists
- In 2024, Full Guide to Unlock iPhone 15 Plus with iTunes | Dr.fone
- In 2024, 9 Mind-Blowing Tricks to Hatch Eggs in Pokemon Go Without Walking On Tecno Spark 20 | Dr.fone
- New 2024 Approved Transform Your Job Search with These 4 Top Video Resume Makers Free
- In 2024, Here are Some Pro Tips for Pokemon Go PvP Battles On Sony Xperia 5 V | Dr.fone
- [New] Unveiling Google Meet's Screen Alteration Techniques
- Troubleshooting Excessive OBS Bitrate
- Updated Best Reaction Video Editing Apps for iOS and Android Users
- How to Unlock SIM Card on iPhone 11 online without jailbreak
- [New] 2024 Approved Free or Paid? The Complete Guide to Joining DiscoNitro
- [New] In 2024, SecureYourCam Top 10 Reviews for Protected Shopping
- In 2024, How Can Oppo Reno 11F 5GMirror Share to PC? | Dr.fone
- Solved Bad and Corrupt Videos that won't Play on Nubia
- [Updated] Hassle-Free Tactics Sharing IGTV in Insta Stories
- Read This Guide to Find a Reliable Alternative to Fake GPS On Poco F5 Pro 5G | Dr.fone
- Title: The Beginner's Guide to Camera Lenses in Filmmaking & Vlogging
- Author: Steven
- Created at : 2024-05-25 20:29:13
- Updated at : 2024-05-26 20:29:13
- Link: https://youtube-clips.techidaily.com/the-beginners-guide-to-camera-lenses-in-filmmaking-and-vlogging/
- License: This work is licensed under CC BY-NC-SA 4.0.
