
:max_bytes(150000):strip_icc()/copilotpp03-763a146c397e4255b6dcb549c1073474.jpg)
Take Your Smartphone Cinematography to New Heights with These 9 Accessories
Take Your Smartphone Cinematography to New Heights with These 9 Accessories
Smartphone Camera Accessories Vloggers Should Try to Improve Recording

Richard Bennett
Oct 26, 2023• Proven solutions
As smartphone camera technology is rapidly advancing, more and more people are using smartphones as their primary vlogging device. They’re convenient and they draw the least amount of attention. But since most smartphones weren’t made specifically for vlogging, there’s a lot of room to make them more suitable for that purpose. Here is a list of the nine best smartphone camera accessories for vloggers.
| Table of Contents 1. PORTABLE CHARGER2. TRIPOD MOUNT3. ANTI-GRAVITY CASE4. SELFIE RING LIGHT5. DIRECTIONAL MICROPHONE6. LENS SET7. FILMMAKING RIG8. FILMMAKING RIG9. GIMBAL |
|---|
1. RAVPower Portable Charger

Vlogging uses a lot more power. If you’re planning to vlog all throughout your day with your phone, you need a portable way to charge it back up. RAVPower has a great line up of portable chargers with multiple USB inputs that hold a total charge of more than 20,000 mAh. With that amount, you can fully charge your smartphone more than 6 times! I own one myself and it’s been great for me during my travels. A 22,000 mAh charger goes for about $42 USD.
2. Arkon Tripod Mount

The Arkon tripod mount is a great portable tripod option that you can get at the fair price of around $20 USD. Not only does it have bendable legs, like the more expensive Joby GorillaPod tripod, that you can wrap around all kinds of structures, but it also comes with the smartphone mount, which Joby sells separately. Another great thing about the Arkon tripod is that its smartphone mount can be rotated so that you can position your phone to film in either widescreen or portrait mode.
3. Mega Tiny Anti-Gravity Case

For all the flat surfaces that the bendable legs of the Arkon tripod mount can’t wrap around, Mega Tiny’s anti-gravity cases will do the job of holding your iPhone or Android phone in one fixed position. These cases can stick to glass, mirrors, metal, and more. They range from $20 to $30 USD.
4. FLII Selfie Ring Light

As much as smartphone camera technology has advanced, phone cameras still underperform when it comes to filming video in low-light. In low-light, your footage is very grainy because your phone is equipped with a small camera sensor, an engineering choice by the manufacturers to keep the size of the phone small. A handy accessory that you can use to get more light is the FLII selfie ring light. This ring light clamps onto your phone and emits a neutral white light. You can clamp this light to either side of your phone, depending on whether you want to use your rear-facing camera or your front-facing camera. This selfie ring light sells for around $16 USD.
5. RODE VideoMic Me

The mic that is already built into your phone is equally sensitive to the sounds that come from behind the phone as it is to the sounds that are in front of the phone. This can be problematic when you’re trying to vlog in selfie mode while there’s a loud concert on the other side. One smartphone accessory that can improve the sound that you record from your phone in these situations is the RODE VideoMic Me. This mini directional shotgun mic plugs right into your phone’s headphone jack and sells for around $60 USD. In windy conditions, the dead cat windshield that it comes with does a great job of minimizing noise from the wind. In quiet, indoor conditions where you are the only person speaking, this device performs no better than your phone’s internal microphone. Your phone will also have to be in airplane mode to prevent the Rode VideoMic Me from recording unwanted clicking noise caused by background processes performed by your phone. So you wouldn’t want to use this for livestreaming.
6. Aukey Optic 3-in-1 Smartphone Lens Set

Aukey makes a 3-in-1 lens set that you can clamp onto your smartphone so that you can vlog at different focal lengths. The 3-in-1 set comes with a wide-angle lens, a fisheye lens, and a macro lens. The clamp it comes with is long enough for these lenses to reach any camera on a smartphone, not just those of iPhones which are positioned close to the phone’s outer edge. To get the most out of these lenses, you’ll have to use them without your phone’s protective case on. Although you are free to use this lens set on either your phone’s rear-facing camera or front-facing camera, the metal housing of these lenses is likely to show up in your footage when you use them with your front-facing camera. So, instead of having your recorded image stretch to the ends of a 16:9 ratio rectangular frame, your recorded image will look as if it is contained inside a circle. This lens set sells for around $30 USD.
7. iOgrapher Go for Android and iPhone

There’s many more accessories that you can take advantage of if you don’t limit yourself to just smartphone camera accessories. Sound and lighting equipment made for stand-alone cameras perform much better too. Many of these accessories are meant to connect to the camera “shoe” (a bracket on top of the camera that accessories can be attached to). Smartphones don’t come with these kinds of shoes. So, to take advantage of these higher quality accessories, you’ll need some kind of camera rig for your smartphone that also comes with shoes. The iOgrapher Go offers this at around $60 USD. This accessory comes with three shoes.
8. Manfrotto TwistGrip System

Manfrotto’s TwistGrip System does a similar job to the above iOgrapher Go. This system also comes with three shoes. An advantage the TwistGrip System has over the iOgrapher Go is that it is much more portable. Its three connected parts can be detached to take up less space in your bag. This system sells for around $50 USD.
9. Zhiyun Smooth-Q 3-Axis Handheld Gimbal Stabilizer for Smartphones

My favorite smartphone camera accessory that I own is the Zhiyun Smooth-Q gimbal stabilizer. This gimbal is very effective in helping you record smooth video. Using the app that it comes with, you can even preset this gimbal to smoothly pan and rotate from a starting position to an ending position, giving you the opportunity to film beautiful time lapses. You can get this device at around $100 USD.
Polish Your YouTube Videos with Filmora
As one of the most widely used video editing software in YouTube video editing, Filmora provides lots of templates and effects with an intuitive interface, which saves much time. Download the free trial version and get started now.


Richard Bennett
Richard Bennett is a writer and a lover of all things video.
Follow @Richard Bennett
Richard Bennett
Oct 26, 2023• Proven solutions
As smartphone camera technology is rapidly advancing, more and more people are using smartphones as their primary vlogging device. They’re convenient and they draw the least amount of attention. But since most smartphones weren’t made specifically for vlogging, there’s a lot of room to make them more suitable for that purpose. Here is a list of the nine best smartphone camera accessories for vloggers.
| Table of Contents 1. PORTABLE CHARGER2. TRIPOD MOUNT3. ANTI-GRAVITY CASE4. SELFIE RING LIGHT5. DIRECTIONAL MICROPHONE6. LENS SET7. FILMMAKING RIG8. FILMMAKING RIG9. GIMBAL |
|---|
1. RAVPower Portable Charger
Vlogging uses a lot more power. If you’re planning to vlog all throughout your day with your phone, you need a portable way to charge it back up. RAVPower has a great line up of portable chargers with multiple USB inputs that hold a total charge of more than 20,000 mAh. With that amount, you can fully charge your smartphone more than 6 times! I own one myself and it’s been great for me during my travels. A 22,000 mAh charger goes for about $42 USD.
2. Arkon Tripod Mount
The Arkon tripod mount is a great portable tripod option that you can get at the fair price of around $20 USD. Not only does it have bendable legs, like the more expensive Joby GorillaPod tripod, that you can wrap around all kinds of structures, but it also comes with the smartphone mount, which Joby sells separately. Another great thing about the Arkon tripod is that its smartphone mount can be rotated so that you can position your phone to film in either widescreen or portrait mode.
3. Mega Tiny Anti-Gravity Case
For all the flat surfaces that the bendable legs of the Arkon tripod mount can’t wrap around, Mega Tiny’s anti-gravity cases will do the job of holding your iPhone or Android phone in one fixed position. These cases can stick to glass, mirrors, metal, and more. They range from $20 to $30 USD.
4. FLII Selfie Ring Light
As much as smartphone camera technology has advanced, phone cameras still underperform when it comes to filming video in low-light. In low-light, your footage is very grainy because your phone is equipped with a small camera sensor, an engineering choice by the manufacturers to keep the size of the phone small. A handy accessory that you can use to get more light is the FLII selfie ring light. This ring light clamps onto your phone and emits a neutral white light. You can clamp this light to either side of your phone, depending on whether you want to use your rear-facing camera or your front-facing camera. This selfie ring light sells for around $16 USD.
5. RODE VideoMic Me
The mic that is already built into your phone is equally sensitive to the sounds that come from behind the phone as it is to the sounds that are in front of the phone. This can be problematic when you’re trying to vlog in selfie mode while there’s a loud concert on the other side. One smartphone accessory that can improve the sound that you record from your phone in these situations is the RODE VideoMic Me. This mini directional shotgun mic plugs right into your phone’s headphone jack and sells for around $60 USD. In windy conditions, the dead cat windshield that it comes with does a great job of minimizing noise from the wind. In quiet, indoor conditions where you are the only person speaking, this device performs no better than your phone’s internal microphone. Your phone will also have to be in airplane mode to prevent the Rode VideoMic Me from recording unwanted clicking noise caused by background processes performed by your phone. So you wouldn’t want to use this for livestreaming.
6. Aukey Optic 3-in-1 Smartphone Lens Set
Aukey makes a 3-in-1 lens set that you can clamp onto your smartphone so that you can vlog at different focal lengths. The 3-in-1 set comes with a wide-angle lens, a fisheye lens, and a macro lens. The clamp it comes with is long enough for these lenses to reach any camera on a smartphone, not just those of iPhones which are positioned close to the phone’s outer edge. To get the most out of these lenses, you’ll have to use them without your phone’s protective case on. Although you are free to use this lens set on either your phone’s rear-facing camera or front-facing camera, the metal housing of these lenses is likely to show up in your footage when you use them with your front-facing camera. So, instead of having your recorded image stretch to the ends of a 16:9 ratio rectangular frame, your recorded image will look as if it is contained inside a circle. This lens set sells for around $30 USD.
7. iOgrapher Go for Android and iPhone
There’s many more accessories that you can take advantage of if you don’t limit yourself to just smartphone camera accessories. Sound and lighting equipment made for stand-alone cameras perform much better too. Many of these accessories are meant to connect to the camera “shoe” (a bracket on top of the camera that accessories can be attached to). Smartphones don’t come with these kinds of shoes. So, to take advantage of these higher quality accessories, you’ll need some kind of camera rig for your smartphone that also comes with shoes. The iOgrapher Go offers this at around $60 USD. This accessory comes with three shoes.
8. Manfrotto TwistGrip System
Manfrotto’s TwistGrip System does a similar job to the above iOgrapher Go. This system also comes with three shoes. An advantage the TwistGrip System has over the iOgrapher Go is that it is much more portable. Its three connected parts can be detached to take up less space in your bag. This system sells for around $50 USD.
9. Zhiyun Smooth-Q 3-Axis Handheld Gimbal Stabilizer for Smartphones
My favorite smartphone camera accessory that I own is the Zhiyun Smooth-Q gimbal stabilizer. This gimbal is very effective in helping you record smooth video. Using the app that it comes with, you can even preset this gimbal to smoothly pan and rotate from a starting position to an ending position, giving you the opportunity to film beautiful time lapses. You can get this device at around $100 USD.
Polish Your YouTube Videos with Filmora
As one of the most widely used video editing software in YouTube video editing, Filmora provides lots of templates and effects with an intuitive interface, which saves much time. Download the free trial version and get started now.
Richard Bennett
Richard Bennett is a writer and a lover of all things video.
Follow @Richard Bennett
Deciphering How To Find My YouTube Comments Posts
How to Find Your Comments on YouTube?
Richard Bennett
Mar 27, 2024• Proven solutions
Have you ever felt worried about any YouTube comment that you published long ago, and later you realized that it was a mistake? Or, do you want to know what comments did you post and when? If so, YouTube offers a simple way of finding your past remarks, and making any changes to them if need be.
That said, the following sections teach you how to find your YouTube comments on a desktop or laptop computer, and also on a mobile device if you are a gadget freak.
- Part 1: How to Find Comments You’ve Posted on YouTube?
- Part 2: How to Find All YouTube Comments Your Channel Has Received?
- Part 3: How to Find Someone’s YouTube Comments by User Name?
- Part 4: How to Edit and Reply to YouTube Comments?
- Part 5: How to Moderate YouTube Comments?
- Part 6: Tips for Writing Good YouTube Comments
Part 1: How to Find All the Comments You’ve Posted on YouTube?
YouTube allows you to post comments on any video only if you are signed in to your Google account while browsing the streaming platform. Because of this, the portal is able to keep a record of your activities, thus enabling you to track all your comments, and take necessary action such as deleting or modifying them as required.
You can learn how to find all the comments you have posted on YouTube while using your preferred device by following the instructions given below:
1. Find Your YouTube Comments on a Desktop or Laptop Computer
Step 1: Sign In to Your YouTube Account
Launch your favorite web browser, go to the YouTube page, click SIGN IN from the top-right corner, and follow the on-screen instructions to enter your credentials and sign in to your Google/YouTube account.
Step 2: Get to the History Page
Click the Menu button from the top-left corner of the page, and then click History from the categories available in the navigation bar in the left.

Step 3: Access/View Your Past Comments
Click Comments from the right of the History page to view all the comments that you have posted earlier.

2. Find Your YouTube Comments on an iPhone
Unfortunately, at the time of this writing, the YouTube app for iOS doesn’t have the feature to view your comments history. However, there is a workaround where you can use a web browser on your smartphone to get this done. The process that is given below explains how to view your past YouTube comments on an iPhone:
Step 1: Sign In to Your YouTube Account on an Internet Browser
Launch your favorite web browser on your iPhone (Safari, the default one, is used here for illustration), go to https://m.youtube.com , tap the profile icon from the top-right corner, tap Sign in from the menu that appears, and follow the on-screen instructions to use your Google account credentials to sign in to YouTube.
Step 2: Access the Desktop Version of YouTube
Tap the More Options icon from the top-left corner of the browser, and then tap Request Desktop Website from the menu that appears to access the desktop version of YouTube on your iPhone.

Step 3: View Your Past YouTube Comments
Tap the Menu icon from the top-left corner of the YouTube page, and tap History from the menu that appears. On the History page, tap Comments from the right pane to view/access your YouTube comments that you posted in the past.

3. Find Your YouTube Comments on an Android Smartphone
As it is with iOS, the YouTube app for Android doesn’t allow you to view your comments history either. However, the workaround of using a web browser works pretty well on Android smartphones too, but with a few tweaks. The process of doing so is given below:
Step 1: Use a Web Browser to Sign In to Your YouTube Account
Launch Google Chrome on your Android smartphone (you can use any other web browser of your choice), and go to https://m.youtube.com . Notice how the interface automatically changes to the desktop version. Note: If the desktop version of the website isn’t visible, you can tap the More button (with three vertical dots) from the top-right corner of the browser, and check the Desktop site box.
Next, tap SIGN IN from the top-right corner of the YouTube page, enter your Google account credentials in the box available on the Sign in screen, enter your password when prompted, and sign in to your YouTube account.
Step 2: Choose a Web Browser (for Confirmation)
When the confirmation box pops up at the bottom, choose your preferred web browser, and tap the frequency of its usage for accessing YouTube. For instance, choose Chrome and Just once to use Google Chrome to access YouTube only for this session.
Step 3: View/Access Your Past YouTube Comments
Once you are signed in to your account, tap the Menu icon from the top-left corner of the YouTube page, and tap History from the menu that appears. When the History page opens up, tap Comments from the right pane to view and/or access your past YouTube comments.
Part 2: How to Find All YouTube Comments Your Channel Has Received?
If you own a YouTube channel and have posted several videos there, it is likely that you also have received a decent number of comments. Usually, these remarks are pretty helpful as they tell you how to improve your production quality, and what your audience prefers to watch in the future. Therefore, it is imperative to learn how to find all the comments that your YouTube channel has received, and the process given below explains exactly that:
1. Find Your Channel’s YouTube Comments on a Desktop or Laptop Computer
You can use your favorite web browser on a PC to easily find all the comments that the videos on your YouTube channel have received as long as you are signed in to your Google account. The step-by-step instructions on how this can be done are given below:
Step 1: Go to the Your videos Page
Open your favorite Internet browser, go to https://www.youtube.com , and sign in to your YouTube account as explained in the previous sections. Next, click the Menu icon from the top-left corner of the YouTube homepage, and click Your videos from the menu that appears.

Step 2: View the Comments
Make sure that the Uploads tab is selected on the Channel content window, and check the number under the Comments column of each video to see how many comments that particular film has received. You can click the number for any video to view its comments.

Step 3: Hide or Hold a Comment for Approval
Click the More icon from the right of the comment you want to moderate, and click Hide user from channel or Always approve comments from this user to hide the comments from the selected user or keep their comments on hold until you review and approve them respectively.

Note: To view all comments received on your YouTube channel, go to the Comments tab under YouTube Studio, and you will find all Channel comments & mentions.
2. Find Your Channel’s YouTube Comments on a Mobile App
This process is comparatively simpler than the previous one as all that you need to do is download the YT Studio app, and access a central location where all the comments for all the videos can be viewed. The process is given below:
Step 1: Obtain a Mobile App
Go to App Store or Google Play Store, and search and download the YT Studio app on your iPhone or Android smartphone (iPhone X is used here for illustration).
Step 2: View/Access All the Comments
Launch the YT Studio app, and sign in to your YouTube account. Tap the Menu icon from the top-left corner of the interface, and tap Comments from the menu to view all the published comments for all the videos that you have received on your YouTube channel.
Step 3: Hide Users and View Held Comments
Tap the More button from the right of an inappropriate comment, and tap Hide user from channel from the menu that comes up. In addition, you can tap the More button next to Published from the top, and tap Held for review from the box that pops up to view the comments that are waiting for your approval.
Note: Unfortunately, you cannot hold the comments for approval using the YT Studio app. As a workaround, you can follow the procedure given earlier to access the desktop version of YouTube on your smartphone, and then use the method explained in the previous section to get this done. However, it is recommended that you do all such sensitive tasks on a laptop or desktop computer to avoid any errors.
Part 3: Find Someone’s YouTube Comments by User Name
If any of your YouTube videos has thousands of comments and you need to find a particular one from a specific user, checking each remark manually would be an extremely time-consuming and tedious task. Therefore, it is a good idea to let an efficient application do the job for you.
One program, a Google Chrome extension called YCS – YouTube Comment Search to be precise, can help you with this. All you are required to do is, install the extension, go to the video, and search the comment by the name of the user. The step-by-step instructions on how this can be done are given below:
Step 1: Install YCS – YouTube Comment Search
Launch Google Chrome on your desktop or laptop computer, search for YCS – YouTube Comment Search, click Add to Chrome, and click Add extension on the notification box that pops up to install the YCS – YouTube Comment Search extension on your instance of Google Chrome.
Step 2: Load All Comments
Go to your or any other’s YouTube video, and click Load All from the top-right corner of the YouTube Comment Search panel that is present under the description box to allow YCS to scan all the comments the video has received.

Step 3: Search Comments from a Particular User
Choose Comments from the search type drop-down list, enter the name of the user in question in the Search box, and click Search to fetch all their comments on the video.

Part 4: How to Edit and Reply to YouTube Comments?
Editing an existing YouTube comment that you have posted earlier, or replying to the one published by someone else is simple. The process is given below:
Step 1: Edit an Existing Comment
Use any of the methods explained above to locate your YouTube comment that you want to edit. Next, click the More icon from the right of the comment, click Edit from the menu, make the required changes to the text, and click SAVE.
Step 2: Reply to a Comment
Locate the comment that you want to reply to, click REPLY from under the comment, type your text in the available field, and click REPLY.

Part 5: How to Moderate YouTube Comments?
If you publish videos on YouTube that may put some impact on people’s lifestyle, you are likely to face criticism quite often. Therefore, you might want to moderate all your comments before they become visible to the audience so as not to spread negativity among the mass. Fortunately, YouTube helps you get this done easily, and the instructions that teach you the process are given below:
Step 1: Get to Your Channel’s Settings Box
Sign in to your YouTube account, click the Menu icon from the top-left corner of the homepage, and click Your videos from the menu that appears.
From the bottom of the navigation bar on the left of the YouTube Studio page, click Settings to open the channel’s Settings box.
Step 2: Moderate YouTube Comments
Go to the Community category from the left pane, and go to the Defaults tab from the right. Next, choose Hide all comments for review from the Comments on your new videos drop-down list, and click SAVE from the bottom-right corner of the box to moderate all YouTube comments that your new videos receive from this point onward.

Part 6: Tips for Writing Good YouTube Comments
While posting a comment on a YouTube video, it is imperative to keep a few things in mind. Some important tips that might come in handy in this regard are suggested below:
- Make your comment as relevant to the video as you possibly can
- Avoid using harsh language or slangs to maintain decency
- Be genuine while leaving feedback. However, make sure to choose polite words while typing a comment
- In case you want to add some suggestions, make sure to be humble
- Ignore the replies with inappropriate content
FAQs About YouTube Comments
Q1) Why can’t I see the comments I posted?
A: If you cannot see your comments, this could be because the owner or moderator has configured the channel or the video to hold all the comments for review before they are visible on YouTube.
In such a case, you are advised to wait for the authorized person to approve your remark before it is published. Another possibility is that the moderator/owner has added you to the ‘hidden users’ list due to some reason. Even in this case, your comment won’t be visible until you are removed from that list.
Q2) I have enabled ‘Notify me’ about comments and other activity on my channel or videos, but can’t see the comments on my video. Why?
A: You won’t be able to view the unpublished comments or those from the users you have added to the ‘hidden’ list. To fix this problem, you may want to disable moderation from your channel or the videos, and also unhide the users. The processes of both these configurations are explained in detail in the above sections.
Richard Bennett
Richard Bennett is a writer and a lover of all things video.
Follow @Richard Bennett
Richard Bennett
Mar 27, 2024• Proven solutions
Have you ever felt worried about any YouTube comment that you published long ago, and later you realized that it was a mistake? Or, do you want to know what comments did you post and when? If so, YouTube offers a simple way of finding your past remarks, and making any changes to them if need be.
That said, the following sections teach you how to find your YouTube comments on a desktop or laptop computer, and also on a mobile device if you are a gadget freak.
- Part 1: How to Find Comments You’ve Posted on YouTube?
- Part 2: How to Find All YouTube Comments Your Channel Has Received?
- Part 3: How to Find Someone’s YouTube Comments by User Name?
- Part 4: How to Edit and Reply to YouTube Comments?
- Part 5: How to Moderate YouTube Comments?
- Part 6: Tips for Writing Good YouTube Comments
Part 1: How to Find All the Comments You’ve Posted on YouTube?
YouTube allows you to post comments on any video only if you are signed in to your Google account while browsing the streaming platform. Because of this, the portal is able to keep a record of your activities, thus enabling you to track all your comments, and take necessary action such as deleting or modifying them as required.
You can learn how to find all the comments you have posted on YouTube while using your preferred device by following the instructions given below:
1. Find Your YouTube Comments on a Desktop or Laptop Computer
Step 1: Sign In to Your YouTube Account
Launch your favorite web browser, go to the YouTube page, click SIGN IN from the top-right corner, and follow the on-screen instructions to enter your credentials and sign in to your Google/YouTube account.
Step 2: Get to the History Page
Click the Menu button from the top-left corner of the page, and then click History from the categories available in the navigation bar in the left.
Step 3: Access/View Your Past Comments
Click Comments from the right of the History page to view all the comments that you have posted earlier.
2. Find Your YouTube Comments on an iPhone
Unfortunately, at the time of this writing, the YouTube app for iOS doesn’t have the feature to view your comments history. However, there is a workaround where you can use a web browser on your smartphone to get this done. The process that is given below explains how to view your past YouTube comments on an iPhone:
Step 1: Sign In to Your YouTube Account on an Internet Browser
Launch your favorite web browser on your iPhone (Safari, the default one, is used here for illustration), go to https://m.youtube.com , tap the profile icon from the top-right corner, tap Sign in from the menu that appears, and follow the on-screen instructions to use your Google account credentials to sign in to YouTube.
Step 2: Access the Desktop Version of YouTube
Tap the More Options icon from the top-left corner of the browser, and then tap Request Desktop Website from the menu that appears to access the desktop version of YouTube on your iPhone.
Step 3: View Your Past YouTube Comments
Tap the Menu icon from the top-left corner of the YouTube page, and tap History from the menu that appears. On the History page, tap Comments from the right pane to view/access your YouTube comments that you posted in the past.
3. Find Your YouTube Comments on an Android Smartphone
As it is with iOS, the YouTube app for Android doesn’t allow you to view your comments history either. However, the workaround of using a web browser works pretty well on Android smartphones too, but with a few tweaks. The process of doing so is given below:
Step 1: Use a Web Browser to Sign In to Your YouTube Account
Launch Google Chrome on your Android smartphone (you can use any other web browser of your choice), and go to https://m.youtube.com . Notice how the interface automatically changes to the desktop version. Note: If the desktop version of the website isn’t visible, you can tap the More button (with three vertical dots) from the top-right corner of the browser, and check the Desktop site box.
Next, tap SIGN IN from the top-right corner of the YouTube page, enter your Google account credentials in the box available on the Sign in screen, enter your password when prompted, and sign in to your YouTube account.
Step 2: Choose a Web Browser (for Confirmation)
When the confirmation box pops up at the bottom, choose your preferred web browser, and tap the frequency of its usage for accessing YouTube. For instance, choose Chrome and Just once to use Google Chrome to access YouTube only for this session.
Step 3: View/Access Your Past YouTube Comments
Once you are signed in to your account, tap the Menu icon from the top-left corner of the YouTube page, and tap History from the menu that appears. When the History page opens up, tap Comments from the right pane to view and/or access your past YouTube comments.
Part 2: How to Find All YouTube Comments Your Channel Has Received?
If you own a YouTube channel and have posted several videos there, it is likely that you also have received a decent number of comments. Usually, these remarks are pretty helpful as they tell you how to improve your production quality, and what your audience prefers to watch in the future. Therefore, it is imperative to learn how to find all the comments that your YouTube channel has received, and the process given below explains exactly that:
1. Find Your Channel’s YouTube Comments on a Desktop or Laptop Computer
You can use your favorite web browser on a PC to easily find all the comments that the videos on your YouTube channel have received as long as you are signed in to your Google account. The step-by-step instructions on how this can be done are given below:
Step 1: Go to the Your videos Page
Open your favorite Internet browser, go to https://www.youtube.com , and sign in to your YouTube account as explained in the previous sections. Next, click the Menu icon from the top-left corner of the YouTube homepage, and click Your videos from the menu that appears.
Step 2: View the Comments
Make sure that the Uploads tab is selected on the Channel content window, and check the number under the Comments column of each video to see how many comments that particular film has received. You can click the number for any video to view its comments.
Step 3: Hide or Hold a Comment for Approval
Click the More icon from the right of the comment you want to moderate, and click Hide user from channel or Always approve comments from this user to hide the comments from the selected user or keep their comments on hold until you review and approve them respectively.
Note: To view all comments received on your YouTube channel, go to the Comments tab under YouTube Studio, and you will find all Channel comments & mentions.
2. Find Your Channel’s YouTube Comments on a Mobile App
This process is comparatively simpler than the previous one as all that you need to do is download the YT Studio app, and access a central location where all the comments for all the videos can be viewed. The process is given below:
Step 1: Obtain a Mobile App
Go to App Store or Google Play Store, and search and download the YT Studio app on your iPhone or Android smartphone (iPhone X is used here for illustration).
Step 2: View/Access All the Comments
Launch the YT Studio app, and sign in to your YouTube account. Tap the Menu icon from the top-left corner of the interface, and tap Comments from the menu to view all the published comments for all the videos that you have received on your YouTube channel.
Step 3: Hide Users and View Held Comments
Tap the More button from the right of an inappropriate comment, and tap Hide user from channel from the menu that comes up. In addition, you can tap the More button next to Published from the top, and tap Held for review from the box that pops up to view the comments that are waiting for your approval.
Note: Unfortunately, you cannot hold the comments for approval using the YT Studio app. As a workaround, you can follow the procedure given earlier to access the desktop version of YouTube on your smartphone, and then use the method explained in the previous section to get this done. However, it is recommended that you do all such sensitive tasks on a laptop or desktop computer to avoid any errors.
Part 3: Find Someone’s YouTube Comments by User Name
If any of your YouTube videos has thousands of comments and you need to find a particular one from a specific user, checking each remark manually would be an extremely time-consuming and tedious task. Therefore, it is a good idea to let an efficient application do the job for you.
One program, a Google Chrome extension called YCS – YouTube Comment Search to be precise, can help you with this. All you are required to do is, install the extension, go to the video, and search the comment by the name of the user. The step-by-step instructions on how this can be done are given below:
Step 1: Install YCS – YouTube Comment Search
Launch Google Chrome on your desktop or laptop computer, search for YCS – YouTube Comment Search, click Add to Chrome, and click Add extension on the notification box that pops up to install the YCS – YouTube Comment Search extension on your instance of Google Chrome.
Step 2: Load All Comments
Go to your or any other’s YouTube video, and click Load All from the top-right corner of the YouTube Comment Search panel that is present under the description box to allow YCS to scan all the comments the video has received.
Step 3: Search Comments from a Particular User
Choose Comments from the search type drop-down list, enter the name of the user in question in the Search box, and click Search to fetch all their comments on the video.
Part 4: How to Edit and Reply to YouTube Comments?
Editing an existing YouTube comment that you have posted earlier, or replying to the one published by someone else is simple. The process is given below:
Step 1: Edit an Existing Comment
Use any of the methods explained above to locate your YouTube comment that you want to edit. Next, click the More icon from the right of the comment, click Edit from the menu, make the required changes to the text, and click SAVE.
Step 2: Reply to a Comment
Locate the comment that you want to reply to, click REPLY from under the comment, type your text in the available field, and click REPLY.
Part 5: How to Moderate YouTube Comments?
If you publish videos on YouTube that may put some impact on people’s lifestyle, you are likely to face criticism quite often. Therefore, you might want to moderate all your comments before they become visible to the audience so as not to spread negativity among the mass. Fortunately, YouTube helps you get this done easily, and the instructions that teach you the process are given below:
Step 1: Get to Your Channel’s Settings Box
Sign in to your YouTube account, click the Menu icon from the top-left corner of the homepage, and click Your videos from the menu that appears.
From the bottom of the navigation bar on the left of the YouTube Studio page, click Settings to open the channel’s Settings box.
Step 2: Moderate YouTube Comments
Go to the Community category from the left pane, and go to the Defaults tab from the right. Next, choose Hide all comments for review from the Comments on your new videos drop-down list, and click SAVE from the bottom-right corner of the box to moderate all YouTube comments that your new videos receive from this point onward.
Part 6: Tips for Writing Good YouTube Comments
While posting a comment on a YouTube video, it is imperative to keep a few things in mind. Some important tips that might come in handy in this regard are suggested below:
- Make your comment as relevant to the video as you possibly can
- Avoid using harsh language or slangs to maintain decency
- Be genuine while leaving feedback. However, make sure to choose polite words while typing a comment
- In case you want to add some suggestions, make sure to be humble
- Ignore the replies with inappropriate content
FAQs About YouTube Comments
Q1) Why can’t I see the comments I posted?
A: If you cannot see your comments, this could be because the owner or moderator has configured the channel or the video to hold all the comments for review before they are visible on YouTube.
In such a case, you are advised to wait for the authorized person to approve your remark before it is published. Another possibility is that the moderator/owner has added you to the ‘hidden users’ list due to some reason. Even in this case, your comment won’t be visible until you are removed from that list.
Q2) I have enabled ‘Notify me’ about comments and other activity on my channel or videos, but can’t see the comments on my video. Why?
A: You won’t be able to view the unpublished comments or those from the users you have added to the ‘hidden’ list. To fix this problem, you may want to disable moderation from your channel or the videos, and also unhide the users. The processes of both these configurations are explained in detail in the above sections.
Richard Bennett
Richard Bennett is a writer and a lover of all things video.
Follow @Richard Bennett
Richard Bennett
Mar 27, 2024• Proven solutions
Have you ever felt worried about any YouTube comment that you published long ago, and later you realized that it was a mistake? Or, do you want to know what comments did you post and when? If so, YouTube offers a simple way of finding your past remarks, and making any changes to them if need be.
That said, the following sections teach you how to find your YouTube comments on a desktop or laptop computer, and also on a mobile device if you are a gadget freak.
- Part 1: How to Find Comments You’ve Posted on YouTube?
- Part 2: How to Find All YouTube Comments Your Channel Has Received?
- Part 3: How to Find Someone’s YouTube Comments by User Name?
- Part 4: How to Edit and Reply to YouTube Comments?
- Part 5: How to Moderate YouTube Comments?
- Part 6: Tips for Writing Good YouTube Comments
Part 1: How to Find All the Comments You’ve Posted on YouTube?
YouTube allows you to post comments on any video only if you are signed in to your Google account while browsing the streaming platform. Because of this, the portal is able to keep a record of your activities, thus enabling you to track all your comments, and take necessary action such as deleting or modifying them as required.
You can learn how to find all the comments you have posted on YouTube while using your preferred device by following the instructions given below:
1. Find Your YouTube Comments on a Desktop or Laptop Computer
Step 1: Sign In to Your YouTube Account
Launch your favorite web browser, go to the YouTube page, click SIGN IN from the top-right corner, and follow the on-screen instructions to enter your credentials and sign in to your Google/YouTube account.
Step 2: Get to the History Page
Click the Menu button from the top-left corner of the page, and then click History from the categories available in the navigation bar in the left.
Step 3: Access/View Your Past Comments
Click Comments from the right of the History page to view all the comments that you have posted earlier.
2. Find Your YouTube Comments on an iPhone
Unfortunately, at the time of this writing, the YouTube app for iOS doesn’t have the feature to view your comments history. However, there is a workaround where you can use a web browser on your smartphone to get this done. The process that is given below explains how to view your past YouTube comments on an iPhone:
Step 1: Sign In to Your YouTube Account on an Internet Browser
Launch your favorite web browser on your iPhone (Safari, the default one, is used here for illustration), go to https://m.youtube.com , tap the profile icon from the top-right corner, tap Sign in from the menu that appears, and follow the on-screen instructions to use your Google account credentials to sign in to YouTube.
Step 2: Access the Desktop Version of YouTube
Tap the More Options icon from the top-left corner of the browser, and then tap Request Desktop Website from the menu that appears to access the desktop version of YouTube on your iPhone.
Step 3: View Your Past YouTube Comments
Tap the Menu icon from the top-left corner of the YouTube page, and tap History from the menu that appears. On the History page, tap Comments from the right pane to view/access your YouTube comments that you posted in the past.
3. Find Your YouTube Comments on an Android Smartphone
As it is with iOS, the YouTube app for Android doesn’t allow you to view your comments history either. However, the workaround of using a web browser works pretty well on Android smartphones too, but with a few tweaks. The process of doing so is given below:
Step 1: Use a Web Browser to Sign In to Your YouTube Account
Launch Google Chrome on your Android smartphone (you can use any other web browser of your choice), and go to https://m.youtube.com . Notice how the interface automatically changes to the desktop version. Note: If the desktop version of the website isn’t visible, you can tap the More button (with three vertical dots) from the top-right corner of the browser, and check the Desktop site box.
Next, tap SIGN IN from the top-right corner of the YouTube page, enter your Google account credentials in the box available on the Sign in screen, enter your password when prompted, and sign in to your YouTube account.
Step 2: Choose a Web Browser (for Confirmation)
When the confirmation box pops up at the bottom, choose your preferred web browser, and tap the frequency of its usage for accessing YouTube. For instance, choose Chrome and Just once to use Google Chrome to access YouTube only for this session.
Step 3: View/Access Your Past YouTube Comments
Once you are signed in to your account, tap the Menu icon from the top-left corner of the YouTube page, and tap History from the menu that appears. When the History page opens up, tap Comments from the right pane to view and/or access your past YouTube comments.
Part 2: How to Find All YouTube Comments Your Channel Has Received?
If you own a YouTube channel and have posted several videos there, it is likely that you also have received a decent number of comments. Usually, these remarks are pretty helpful as they tell you how to improve your production quality, and what your audience prefers to watch in the future. Therefore, it is imperative to learn how to find all the comments that your YouTube channel has received, and the process given below explains exactly that:
1. Find Your Channel’s YouTube Comments on a Desktop or Laptop Computer
You can use your favorite web browser on a PC to easily find all the comments that the videos on your YouTube channel have received as long as you are signed in to your Google account. The step-by-step instructions on how this can be done are given below:
Step 1: Go to the Your videos Page
Open your favorite Internet browser, go to https://www.youtube.com , and sign in to your YouTube account as explained in the previous sections. Next, click the Menu icon from the top-left corner of the YouTube homepage, and click Your videos from the menu that appears.
Step 2: View the Comments
Make sure that the Uploads tab is selected on the Channel content window, and check the number under the Comments column of each video to see how many comments that particular film has received. You can click the number for any video to view its comments.
Step 3: Hide or Hold a Comment for Approval
Click the More icon from the right of the comment you want to moderate, and click Hide user from channel or Always approve comments from this user to hide the comments from the selected user or keep their comments on hold until you review and approve them respectively.
Note: To view all comments received on your YouTube channel, go to the Comments tab under YouTube Studio, and you will find all Channel comments & mentions.
2. Find Your Channel’s YouTube Comments on a Mobile App
This process is comparatively simpler than the previous one as all that you need to do is download the YT Studio app, and access a central location where all the comments for all the videos can be viewed. The process is given below:
Step 1: Obtain a Mobile App
Go to App Store or Google Play Store, and search and download the YT Studio app on your iPhone or Android smartphone (iPhone X is used here for illustration).
Step 2: View/Access All the Comments
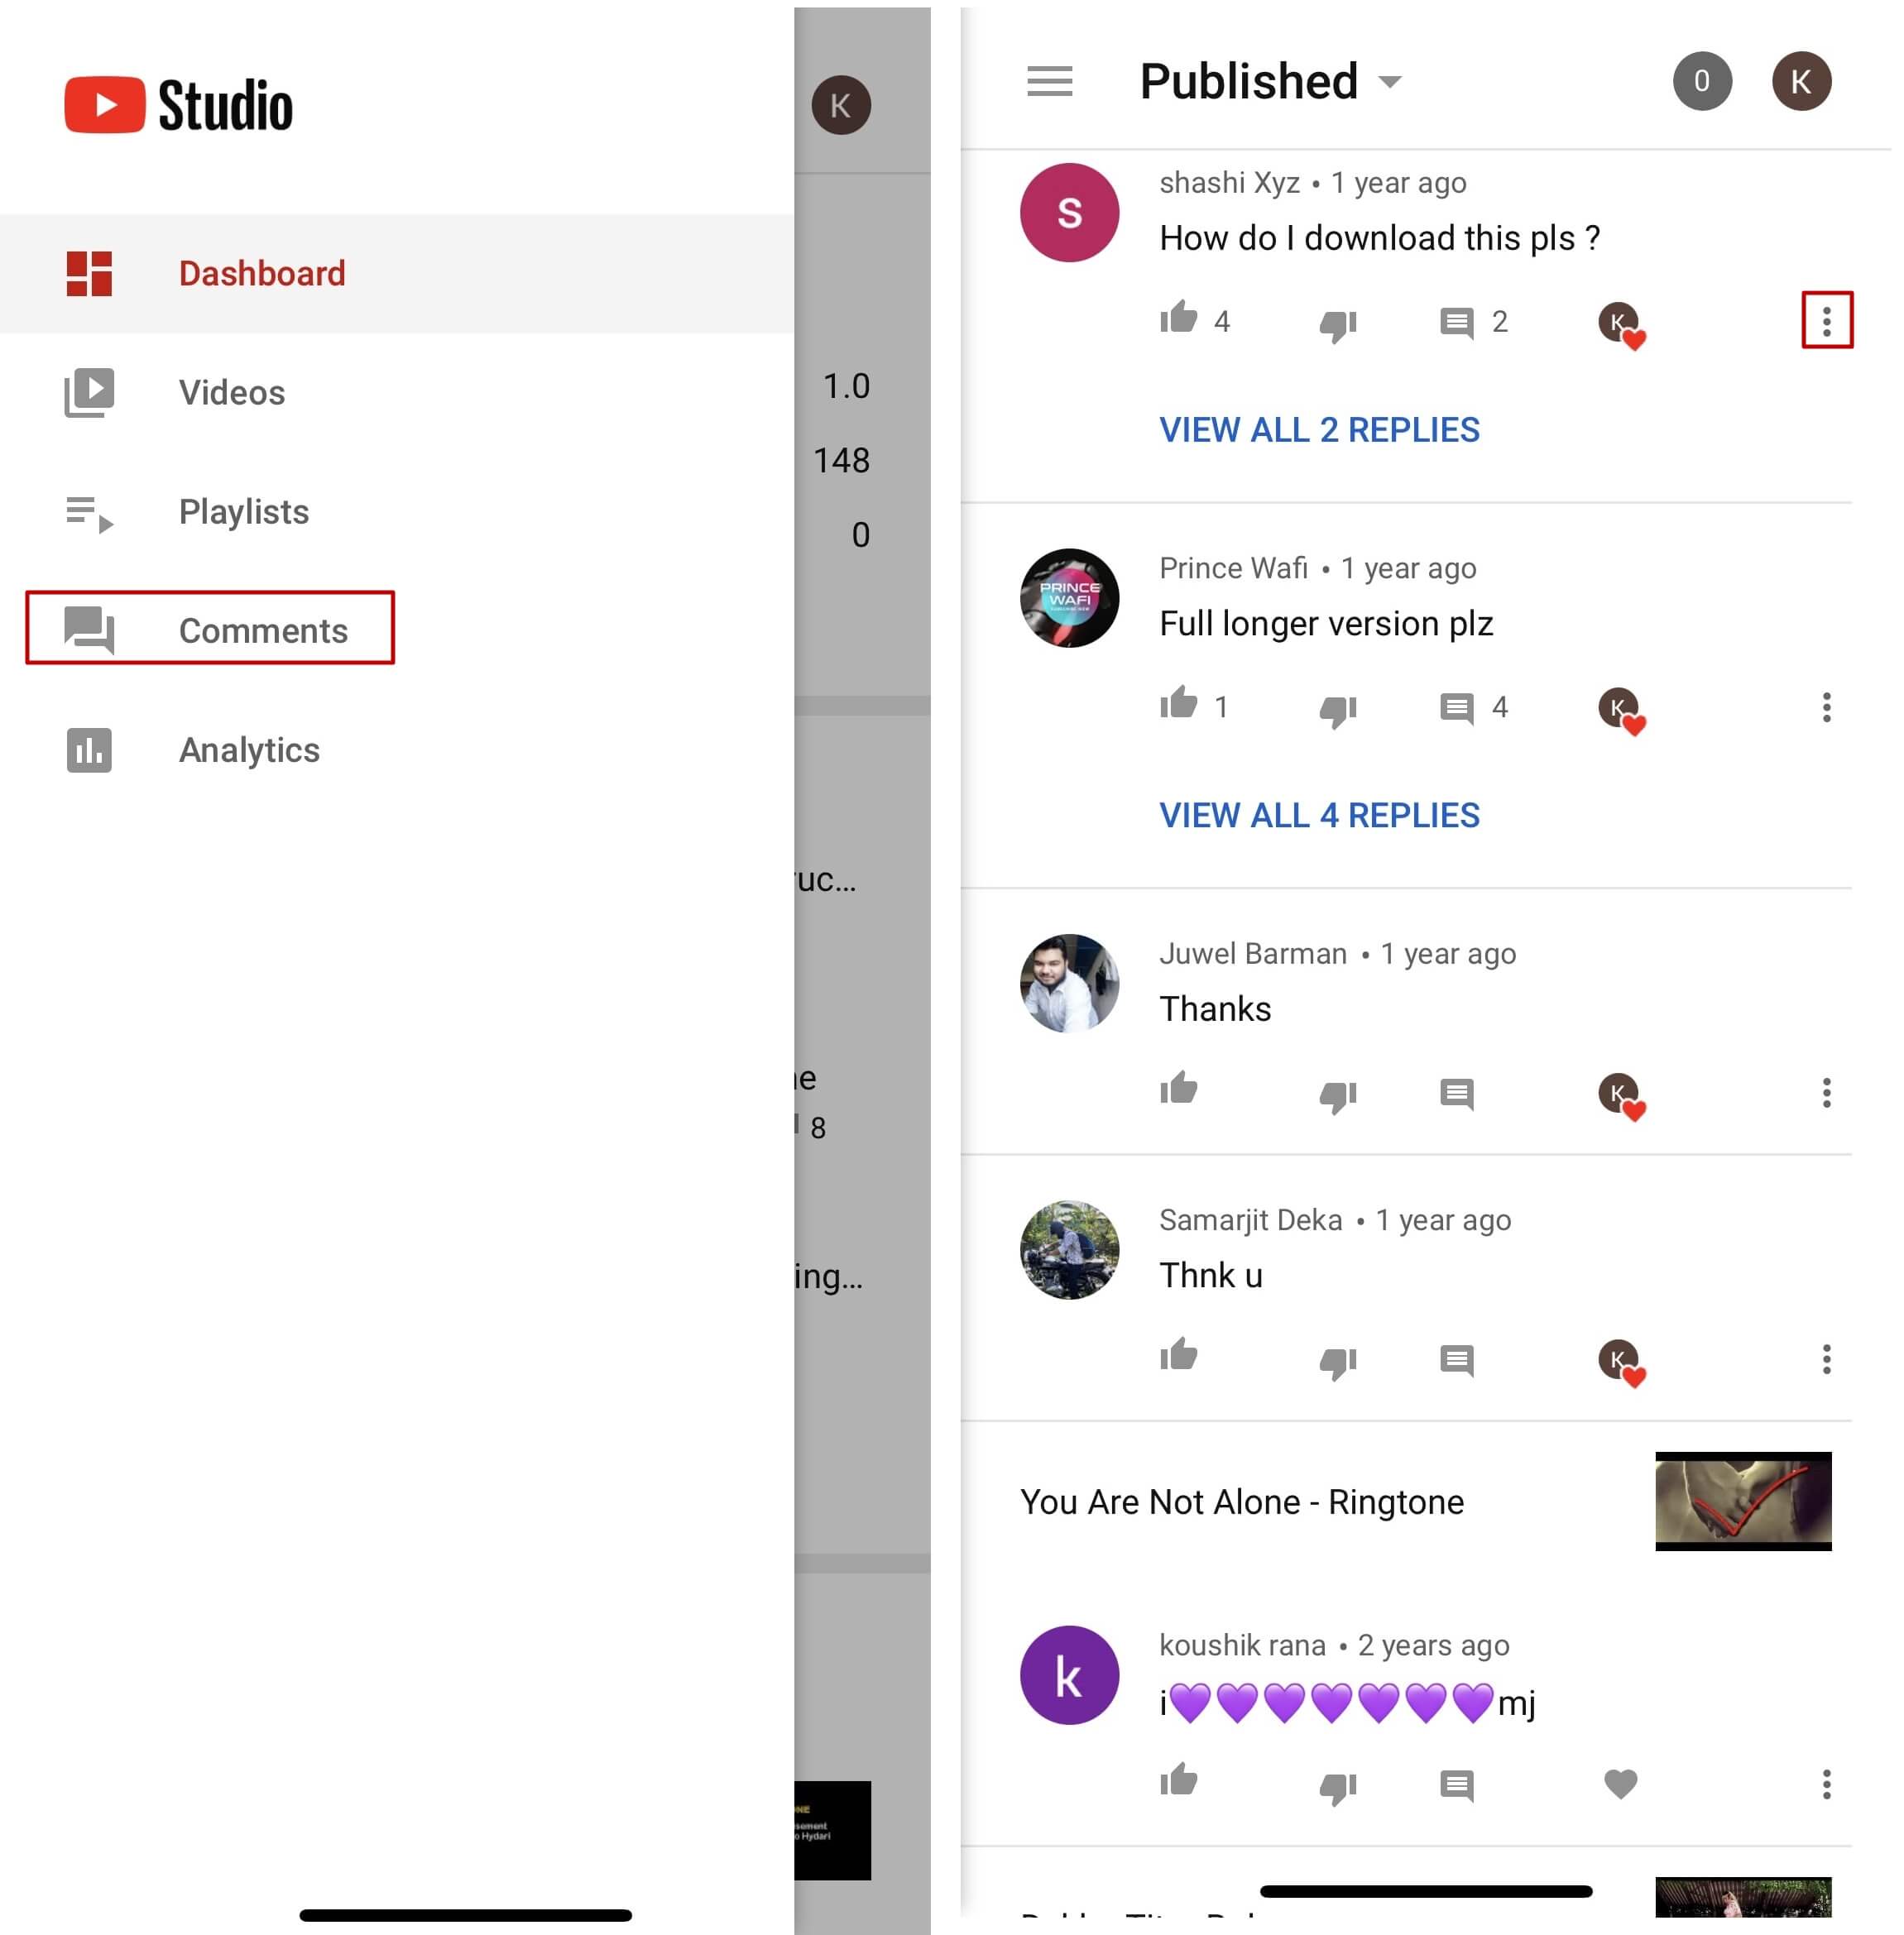
Launch the YT Studio app, and sign in to your YouTube account. Tap the Menu icon from the top-left corner of the interface, and tap Comments from the menu to view all the published comments for all the videos that you have received on your YouTube channel.
Step 3: Hide Users and View Held Comments
Tap the More button from the right of an inappropriate comment, and tap Hide user from channel from the menu that comes up. In addition, you can tap the More button next to Published from the top, and tap Held for review from the box that pops up to view the comments that are waiting for your approval.
Note: Unfortunately, you cannot hold the comments for approval using the YT Studio app. As a workaround, you can follow the procedure given earlier to access the desktop version of YouTube on your smartphone, and then use the method explained in the previous section to get this done. However, it is recommended that you do all such sensitive tasks on a laptop or desktop computer to avoid any errors.
Part 3: Find Someone’s YouTube Comments by User Name
If any of your YouTube videos has thousands of comments and you need to find a particular one from a specific user, checking each remark manually would be an extremely time-consuming and tedious task. Therefore, it is a good idea to let an efficient application do the job for you.
One program, a Google Chrome extension called YCS – YouTube Comment Search to be precise, can help you with this. All you are required to do is, install the extension, go to the video, and search the comment by the name of the user. The step-by-step instructions on how this can be done are given below:
Step 1: Install YCS – YouTube Comment Search
Launch Google Chrome on your desktop or laptop computer, search for YCS – YouTube Comment Search, click Add to Chrome, and click Add extension on the notification box that pops up to install the YCS – YouTube Comment Search extension on your instance of Google Chrome.
Step 2: Load All Comments
Go to your or any other’s YouTube video, and click Load All from the top-right corner of the YouTube Comment Search panel that is present under the description box to allow YCS to scan all the comments the video has received.
Step 3: Search Comments from a Particular User
Choose Comments from the search type drop-down list, enter the name of the user in question in the Search box, and click Search to fetch all their comments on the video.
Part 4: How to Edit and Reply to YouTube Comments?
Editing an existing YouTube comment that you have posted earlier, or replying to the one published by someone else is simple. The process is given below:
Step 1: Edit an Existing Comment
Use any of the methods explained above to locate your YouTube comment that you want to edit. Next, click the More icon from the right of the comment, click Edit from the menu, make the required changes to the text, and click SAVE.
Step 2: Reply to a Comment
Locate the comment that you want to reply to, click REPLY from under the comment, type your text in the available field, and click REPLY.
Part 5: How to Moderate YouTube Comments?
If you publish videos on YouTube that may put some impact on people’s lifestyle, you are likely to face criticism quite often. Therefore, you might want to moderate all your comments before they become visible to the audience so as not to spread negativity among the mass. Fortunately, YouTube helps you get this done easily, and the instructions that teach you the process are given below:
Step 1: Get to Your Channel’s Settings Box
Sign in to your YouTube account, click the Menu icon from the top-left corner of the homepage, and click Your videos from the menu that appears.
From the bottom of the navigation bar on the left of the YouTube Studio page, click Settings to open the channel’s Settings box.
Step 2: Moderate YouTube Comments
Go to the Community category from the left pane, and go to the Defaults tab from the right. Next, choose Hide all comments for review from the Comments on your new videos drop-down list, and click SAVE from the bottom-right corner of the box to moderate all YouTube comments that your new videos receive from this point onward.
Part 6: Tips for Writing Good YouTube Comments
While posting a comment on a YouTube video, it is imperative to keep a few things in mind. Some important tips that might come in handy in this regard are suggested below:
- Make your comment as relevant to the video as you possibly can
- Avoid using harsh language or slangs to maintain decency
- Be genuine while leaving feedback. However, make sure to choose polite words while typing a comment
- In case you want to add some suggestions, make sure to be humble
- Ignore the replies with inappropriate content
FAQs About YouTube Comments
Q1) Why can’t I see the comments I posted?
A: If you cannot see your comments, this could be because the owner or moderator has configured the channel or the video to hold all the comments for review before they are visible on YouTube.
In such a case, you are advised to wait for the authorized person to approve your remark before it is published. Another possibility is that the moderator/owner has added you to the ‘hidden users’ list due to some reason. Even in this case, your comment won’t be visible until you are removed from that list.
Q2) I have enabled ‘Notify me’ about comments and other activity on my channel or videos, but can’t see the comments on my video. Why?
A: You won’t be able to view the unpublished comments or those from the users you have added to the ‘hidden’ list. To fix this problem, you may want to disable moderation from your channel or the videos, and also unhide the users. The processes of both these configurations are explained in detail in the above sections.
Richard Bennett
Richard Bennett is a writer and a lover of all things video.
Follow @Richard Bennett
Also read:
- In 2024, Beyond Likes Understanding YouTube’s True View Metrics
- Unleash Video Potential Key Tactics for Backlink Creation
- 2024 Approved Best 5 YouTube Tag Generators & Tips to Tag Videos Properly
- Navigate the World of Tags for Superior Content Performance
- 2024 Approved Design Principles for Orderly YouTube Broadcasts
- In 2024, Daily Digest Guidelines Tips for Successful Vlogs
- Integrating Twitch Live with YouTube Channel Success
- 2024 Approved Best 12 YouTube Game Openers A Comparative Guide (No Expense)
- How to Disable/Remove YouTube Shorts Permanently?2
- Crafting a Hit on YouTube Name Generation Insights for 2024
- 2024 Approved Culinary Cinematography Step-by-Step Recipe Tutorials
- Free Custom Minecraft GIF Templates
- Empower Your Content Advanced Techniques in YouTube Editing for 2024
- Explore 8 Leading Youtube Growth Strategies
- Adobe Premiere Pro 101 for YouTube Clips and Edits
- Transform Your YouTube Presence with These Effective Tactics
- [New] Acquiring Free Music YouTube Video Edition
- In 2024, A Step-by-Step Guide How To Record, Save & Share YouTube Video for No Cost
- In 2024, Examining How YouTube Curates Its Highlighted Discussion Threads
- [New] 2024 Approved Mastering Instagram Videos for Marketing Top 10 Strategic Plans
- [New] Pros of Posting to TikTok From Your Personal Computer or MAC
- Updated Top 9 Free Online Movie Makers for 2024
- [New] 2024 Approved Chuckle Cache Unearthing Humor in Twitters Feeds
- In 2024, How Do You Get Sun Stone Evolutions in Pokémon For Honor 100 Pro? | Dr.fone
- Updated In 2024, Highlight Video Production Made Easy Top Desktop and Mobile Apps
- New In 2024, Avidemux Sound Not Working? Try These Troubleshooting Tips
- New 2 Solutions to Cut Video in VLC on Windows
- How to Mirror Your Oppo Find N3 Screen to PC with Chromecast | Dr.fone
- In 2024, Delving Into the Pros and Cons of Using ITop
- Omnipresent Overture The Virtual Cinema
- [Updated] In 2024, Updated Compilation Prime Top 10 Android Apps for Facebook Video Download
- Fix Honor X50i+ Android System Webview Crash 2024 Issue | Dr.fone
- Title: Take Your Smartphone Cinematography to New Heights with These 9 Accessories
- Author: Steven
- Created at : 2024-05-25 20:28:14
- Updated at : 2024-05-26 20:28:14
- Link: https://youtube-clips.techidaily.com/take-your-smartphone-cinematography-to-new-heights-with-these-9-accessories/
- License: This work is licensed under CC BY-NC-SA 4.0.
