
:max_bytes(150000):strip_icc():format(webp)/Race-982fb219114a48fb96b9c5a2c6f93847.jpg)
Tactics for Transforming YouTube List Layouts
Tactics for Transforming YouTube List Layouts
We often create playlists on YouTube for different moods, genres, and occasions, but you may want to change the order of the videos or songs in your list. This is where the shuffling feature can help you.
Shuffling your YouTube playlist is an excellent way to mix things up and play various videos or songs from different channels without manually selecting each one.
But if you don’t know how to use the “Shuffle” feature, we’ll show you how to shuffle YouTube playlists on PCs, phones, and TVs. So, keep reading to start randomizing your YouTube playlist to mix up your music or video collection!
How To Shuffle YouTube Playlist On PCs/Phones/TVs?
Whether it’s a mix of our favorite songs, a set of dance videos to help get us through our workout, or a compilation of cat videos that never fail to make us smile, we all have that one go-to playlist we want to listen to over and over again.
But sometimes, even our favorite playlist can feel a little stale. That’s when it’s time to shuffle things up and give the playlist a fresh new feel.
To help you with this, we’ve provided step-by-step tutorials to help you shuffle Youtube playlists on your computer, phone, or Smart TV without having much trouble.
Part 1. How to Shuffle YouTube Playlist on PC?
Here is the step-by-step guide that can help you quickly shuffle your YouTube playlist on your PC, whether it’s before playback while watching, or from the Library:
How To Shuffle the Playlist Before Playlist Playback
The following is a quick rundown of the steps you need to take to shuffle the playlist before playback:
Step 1: First, open a browser on your PC to visit the YouTubewebsite and log in to your account using your credentials.
Step 2: Now, click the “Menu” (hamburger) icon on the top left of the YouTube home page and select your playlist from the menu.

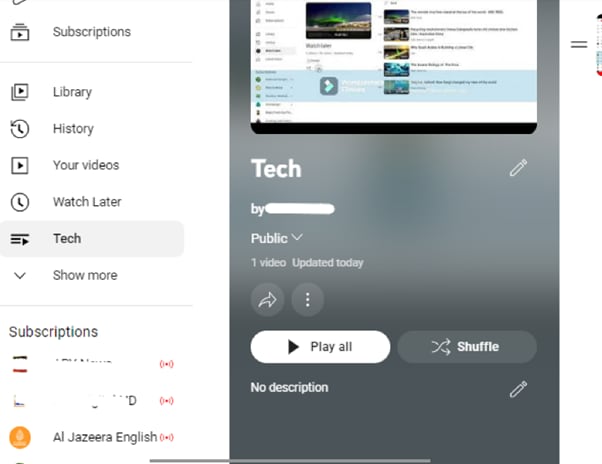
Step 3: On the next page, click the “Shuffle” button next to the “Play All” option in the playlist details section to randomize your YouTube playlist.
That’s about it! Your videos/songs will now play in random order.
How To Shuffle The Playlist While Listening
To learn how to shuffle a YouTube playlist while listening to your favorite songs, do the following steps in sequence:
Step 1: Launch your preferred browser on your PC and head to the “YouTube” homepage.
Step 2: Now, use the search icon to find your favorite song’s playlist or choose from the left “Menu” panel, and click “Play All” to listen to the music.
Step 3: When you start playing, you’ll find your playlist next to the video player. Click the crisscrossed arrows “Shuffle” icon below the playlist title, and the songs will start playing randomly instead of in proper order.

How To Shuffle The Playlist In the Library
If you want to randomize your YouTube playlist in the library section, follow these step-by-step instructions:
Step 1: In the first step, head to the YouTube website using your preferred browser on the PC and sign in to your account.
Step 2: Click the “Library” option from the left side panel on the YouTube homepage and scroll down to the “Playlists” section.
Step 3: In the next step, find your playlist and click the “View Full Playlist” option below. This will take you to the playlist page.
Step 4: Finally, on the playlist page, click the “Shuffle” option next to “Play All” in the details section. Now, when you start watching the videos in the playlist, they will play randomly.
Part 2. How To Shuffle YouTube Playlist On Handy?
It is possible to shuffle your YouTube playlist on your handy (iPhone or Android) with the following workarounds.
How To Shuffle The Playlist Before Playlist Playback/From Library
The following steps will help you shuffle your favorite playlists before playlist playback or from the Library:
Step 1: If the YouTube app is not installed on your phone, head to the “App Store “ or “GooglePlay Store “ and install the app.
Step 2: Now, launch the YouTube app on your handy and tap the “Library” option at the bottom right corner of the app’s home screen.
Step 3: Now, scroll down to the “Playlist” section and tap the playlist you want to shuffle. On the playlist screen, tap “Shuffle” next to the “Play All” option, and that’s it!

You can now enjoy your favorite videos and songs in a new order.
How To Shuffle The Playlist While Listening
To change the order of your favorite songs in the YouTube playlist while listening to it on your mobile device, do the following steps:
Step 1: First, open the “YouTube” app on your device and log into your account if you are not signed in already.
Step 2: On the app’s home screen, tap the “Search” bar, type the playlist name, and tap to open it to start listening to your favorite songs.
Step 3: You will find the playlist available under the video player. Simply tap the crisscrossed arrows “Shuffle” icon below the playlist’s title.

That’s all to it! Now you can enjoy your YouTube playlist in totally random order.
Part 3. How To Shuffle YouTube Playlist on TV?
The YouTube app is also available on smart TVs, which many people find to be a more enjoyable experience than watching YouTube videos on a small screen.
However, unfortunately, there is no way to shuffle a YouTube playlist on a Smart TV. This is a feature that is currently only available on the YouTube website and apps.
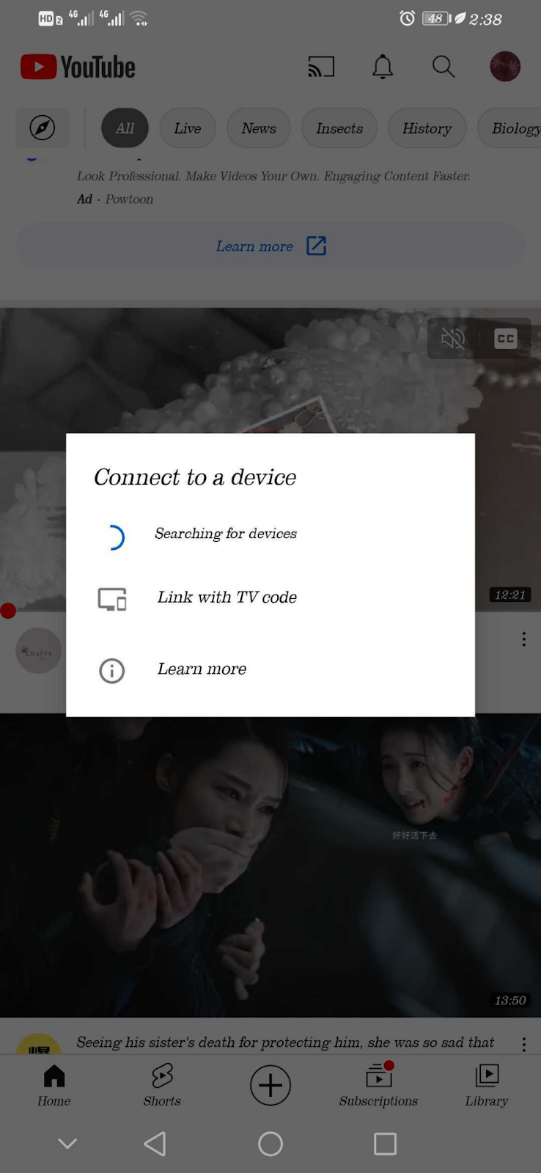
But if your Smart TV comes with a built-in Chromecast option, you can screen mirror the YouTube app on your TV and shuffle the playlist to your liking in the following way:
Step 1: In the first step, make sure your Smart TV and mobile device are connected to the same internet connection.
Step 2: In the next step, launch the YouTube app on your device, and access your playlist under the “Library” tab. Tap the “Shuffle” icon in the playlist details section and play your playlist
Step 3: In the final step, tap the “Cast” icon at the top-right of the screen and select your TV from the list to cast to.
Now you can enjoy randomly listen to your favorite songs on a more prominent display without getting bored.
Note:
You can also use other streaming devices like Firestick or Apple Airplay to cast YouTube on your Smart TV.
A Bouns Tip: How To Make a Music Video by Yourself?
We hope you have found appropriate solutions to shuffle your YouTube Playlist. Besides, supposing you are a music and YouTube lover, do you want to create videos with your favourite music? If yes, you can watch the video we have prepared for you. In this video, you will learn how to easily use a user-friendly video editor, Filmora, to make music videos!
In this comprehensive guide, we’ve provided a detailed step-by-step guide to show you how to shuffle YouTube playlists on your computer, mobile device, or Smart TV.
Hopefully, you’ve found this article informative and can now enjoy watching or listening to your favorite video/song in a random order in your YouTube playlist.
We often create playlists on YouTube for different moods, genres, and occasions, but you may want to change the order of the videos or songs in your list. This is where the shuffling feature can help you.
Shuffling your YouTube playlist is an excellent way to mix things up and play various videos or songs from different channels without manually selecting each one.
But if you don’t know how to use the “Shuffle” feature, we’ll show you how to shuffle YouTube playlists on PCs, phones, and TVs. So, keep reading to start randomizing your YouTube playlist to mix up your music or video collection!
How To Shuffle YouTube Playlist On PCs/Phones/TVs?
Whether it’s a mix of our favorite songs, a set of dance videos to help get us through our workout, or a compilation of cat videos that never fail to make us smile, we all have that one go-to playlist we want to listen to over and over again.
But sometimes, even our favorite playlist can feel a little stale. That’s when it’s time to shuffle things up and give the playlist a fresh new feel.
To help you with this, we’ve provided step-by-step tutorials to help you shuffle Youtube playlists on your computer, phone, or Smart TV without having much trouble.
Part 1. How to Shuffle YouTube Playlist on PC?
Here is the step-by-step guide that can help you quickly shuffle your YouTube playlist on your PC, whether it’s before playback while watching, or from the Library:
How To Shuffle the Playlist Before Playlist Playback
The following is a quick rundown of the steps you need to take to shuffle the playlist before playback:
Step 1: First, open a browser on your PC to visit the YouTubewebsite and log in to your account using your credentials.
Step 2: Now, click the “Menu” (hamburger) icon on the top left of the YouTube home page and select your playlist from the menu.
Step 3: On the next page, click the “Shuffle” button next to the “Play All” option in the playlist details section to randomize your YouTube playlist.
That’s about it! Your videos/songs will now play in random order.
How To Shuffle The Playlist While Listening
To learn how to shuffle a YouTube playlist while listening to your favorite songs, do the following steps in sequence:
Step 1: Launch your preferred browser on your PC and head to the “YouTube” homepage.
Step 2: Now, use the search icon to find your favorite song’s playlist or choose from the left “Menu” panel, and click “Play All” to listen to the music.
Step 3: When you start playing, you’ll find your playlist next to the video player. Click the crisscrossed arrows “Shuffle” icon below the playlist title, and the songs will start playing randomly instead of in proper order.
How To Shuffle The Playlist In the Library
If you want to randomize your YouTube playlist in the library section, follow these step-by-step instructions:
Step 1: In the first step, head to the YouTube website using your preferred browser on the PC and sign in to your account.
Step 2: Click the “Library” option from the left side panel on the YouTube homepage and scroll down to the “Playlists” section.
Step 3: In the next step, find your playlist and click the “View Full Playlist” option below. This will take you to the playlist page.
Step 4: Finally, on the playlist page, click the “Shuffle” option next to “Play All” in the details section. Now, when you start watching the videos in the playlist, they will play randomly.
Part 2. How To Shuffle YouTube Playlist On Handy?
It is possible to shuffle your YouTube playlist on your handy (iPhone or Android) with the following workarounds.
How To Shuffle The Playlist Before Playlist Playback/From Library
The following steps will help you shuffle your favorite playlists before playlist playback or from the Library:
Step 1: If the YouTube app is not installed on your phone, head to the “App Store “ or “GooglePlay Store “ and install the app.
Step 2: Now, launch the YouTube app on your handy and tap the “Library” option at the bottom right corner of the app’s home screen.
Step 3: Now, scroll down to the “Playlist” section and tap the playlist you want to shuffle. On the playlist screen, tap “Shuffle” next to the “Play All” option, and that’s it!
You can now enjoy your favorite videos and songs in a new order.
How To Shuffle The Playlist While Listening
To change the order of your favorite songs in the YouTube playlist while listening to it on your mobile device, do the following steps:
Step 1: First, open the “YouTube” app on your device and log into your account if you are not signed in already.
Step 2: On the app’s home screen, tap the “Search” bar, type the playlist name, and tap to open it to start listening to your favorite songs.
Step 3: You will find the playlist available under the video player. Simply tap the crisscrossed arrows “Shuffle” icon below the playlist’s title.
That’s all to it! Now you can enjoy your YouTube playlist in totally random order.
Part 3. How To Shuffle YouTube Playlist on TV?
The YouTube app is also available on smart TVs, which many people find to be a more enjoyable experience than watching YouTube videos on a small screen.
However, unfortunately, there is no way to shuffle a YouTube playlist on a Smart TV. This is a feature that is currently only available on the YouTube website and apps.
But if your Smart TV comes with a built-in Chromecast option, you can screen mirror the YouTube app on your TV and shuffle the playlist to your liking in the following way:
Step 1: In the first step, make sure your Smart TV and mobile device are connected to the same internet connection.
Step 2: In the next step, launch the YouTube app on your device, and access your playlist under the “Library” tab. Tap the “Shuffle” icon in the playlist details section and play your playlist
Step 3: In the final step, tap the “Cast” icon at the top-right of the screen and select your TV from the list to cast to.
Now you can enjoy randomly listen to your favorite songs on a more prominent display without getting bored.
Note:
You can also use other streaming devices like Firestick or Apple Airplay to cast YouTube on your Smart TV.
A Bouns Tip: How To Make a Music Video by Yourself?
We hope you have found appropriate solutions to shuffle your YouTube Playlist. Besides, supposing you are a music and YouTube lover, do you want to create videos with your favourite music? If yes, you can watch the video we have prepared for you. In this video, you will learn how to easily use a user-friendly video editor, Filmora, to make music videos!
In this comprehensive guide, we’ve provided a detailed step-by-step guide to show you how to shuffle YouTube playlists on your computer, mobile device, or Smart TV.
Hopefully, you’ve found this article informative and can now enjoy watching or listening to your favorite video/song in a random order in your YouTube playlist.
Creative Vanguard: Audio-Visual Convergence
People capture loads of photos of the places they visit and the events they attend for social media and future memories. If you check the online trend, users are shifting from static photos to short videos for a better visual experience. That is why you can consider creating videos out of the photos you have captured and adding suitable music in the background to make your memories visually pleasing.
All you need is a video maker with music and pictures. There is no dearth of video makers, but not all live up to the expectation. There are online video markers as well as video maker software applications available. In this article, we have picked the best video maker with photos and music and illustrated how to make a video with music and photos. We have also listed the popular video makers for your consideration.
Part 1. Best Video maker with music and pictures
We recommend Wondershare Filmora as the best video maker with photos and music. Filmora is considered one of the best video makers and editors in the world. Filmora allows you to import photos of different file formats so that you can make slideshow-like video. There are loads of transitions as well as effects available that you can place in between the photos so that the transition becomes eye-pleasing.
Similarly, you can import any audio or music file. Besides, there are stock music files available that you can apply to your slideshow video. You can even add colourful titles and graphical elements to enhance the video content. Here are the steps on how to make a video with your photos and music.
For Win 7 or later (64-bit)
For macOS 10.12 or later
Step 1: Install Filmora and Start Your Project
Download and install Wondershare Filmora as per your operating system. Filmora is available for Windows and Mac. Launch Filmora and click on New Project. Drag and drop your photos on Project Media folder.
Step 2: Import Photos and Arrange Them in Order
Drag and drop the photos on the timeline as per your sequence you want in your slideshow video. You can change the order of the photos as well as stretch durations of photos in the video from the timeline. You have to arrange the photos side by side without any gap so that there is no black screen in between the transition.

Step 3: Add Transition Effects
After arranging the photos side by side, you have to apply transition effects so that the change from one photo to another is eye-soothing. There are loads of transitions available and you can get them from Transition option located at the top bar.
Go through the different categories of transitions. Drag and drop the transition you want on to the photo after which you want the transition effect to play. Do the same for all photos except the last one. You can apply different transitions effects for different photos as per your preference.

Step 4: Add Background Music
Now it is time to add a background music to the entire video. You can drag and drop any music file from your hard drive to Filmora Project Media. Thereafter, you can drag and drop the audio file on the audio timeline below the photo timeline. You can also add audio effects from the top bar if required.

Step 5: Export Your Video
Once you are done adding photos, transitions, and music, you should play the video on Filmora and make adjustments wherever required. Thereafter, click on Export button and save the video file on your hard drive in your desired file format.

Part 2. Popular video makers with photos and music
Here is the list of the popular premium and free video maker with music and pictures that you can consider for making slideshow videos.
1. Invideo
Invideo is a popular online video maker with music and pictures along with 5000 customizable templates. These templates help users to transform photos into videos with background music in a few minutes. Besides, the platform offers a wide range of stock media files. You can create videos in more than 70 languages, and the editor is user-friendly for users of all ages.
All you need to do is select a template and customize it if required. Thereafter, you need to import the photos, add text effects, and finally add music. There are options for trimming, cropping, and adding stickers, texts and transitions. The free version lets you export 60 videos per month but with a watermark. Here are the top features of Invideo.
- 5000+ customizable templates for all video types.
- 9+ million stocks videos, photos, and audio files.
- Add transitions, stickers, animations, and texts to videos.
- Trim and crop videos and audio files.
- Add voiceover as well as fade-in and fade-out effects.
- Work in collaboration with team members.

2. Icecream slideshow maker
Icecream slideshow maker is a free video maker with music and pictures for Windows users only. The software is compatible with Windows 10, 8, 7 and XP. You can create a high-quality video from your photos with music instantly. There is no need for any prior experience to use the video maker. There are beautiful transitions available that will enhance the video quality and make your presentation stand out. The free version allows up to 10 slides per video and saving the video in Webm file format. You can upgrade to Pro version to get rid of the limitations.
You can change photo and transition duration as per requirements. The software supports various audio file formats that you can import for your video. You can also add animations to texts so that they can shine in your video. The software allows sharing the video directly to YouTube. Besides, you can save it on Google Drive and Dropbox. Here are all the features of Icecream slideshow maker that you should be aware of.
- Super intuitive user interface for all users.
- Add colourful text, transitions, and animations.
- Save and resume project work as per time availability.
- Pro version allows saving video in 4K resolution.
- Video output in MP4, AVI, MOV and WEBM formats.
- Suitable for low-end computers.

3. PhotoStage Slideshow
PhotoStage Slideshow by NCH Software is another video maker software for Windows users. The software comes with an easy and automated wizard for users to transform photos with a video instantly. There is also an image editor available to adjust different parameters of your photos before making a video out of them.
Besides, there are various transitions available to apply and you can add captions and narration as per your requirements. In fact, along with photos, you can add video clips to create the ultimate video. Moreover, there are tools available to edit your audio and music file and add different effects. Here are the top features of PhotoStage Slideshow Software.
- Supports Full HD and 4K video resolution.
- Edit and fine-tune photos and add captions.
- Wide range of eye-catching and popular transitions.
- Edit audio and music file and add different effects.
- Save video file in MOV, MP4, GIF, AVI, 3GP and more.
- Directly share on YouTube, Vimeo, Flickr, HTML5.

4. Clideo video maker
Clideo Video Maker is a free online video maker with song. All you need to do is upload photos from your hard drive and choose a preset depending on the online platform where you want to upload the video. Thereafter, add audio and trim it as per video length. Then add smooth transitions and the video will be ready to export on your hard drive or cloud storage.
The online video maker supports different video and audio file format for importing and exporting. You can use the editor on any device starting from Windows and Mac to Android and iPhone. The user interface is very simple to use and it does not store video files for more than a day. Here are all the features of Clideo video maker.
- Upload photos from hard drive, and cloud storage.
- Presets for Instagram, Stories, YouTube, and Facebook videos.
- Add different photos, audio, and video clips to make videos.
- Zoom & crop option along with image duration elongation.
- Suitable for computer and mobile phone users.

5. Movavi Slideshow Maker
Movavi Slideshow Maker is available for both Windows and Mac users. The software comes with a wizard to allow users to create video from photos. However, advanced users can create video from photos manually as well. You get to add photos, audio files and video clips of different file formats. Most importantly, there are various templates available to create professional-quality videos.
There are loads of effects, filters, titles, and stickers available to apply on your video. The free version is limited to seven days usage. The output video will have watermark on it and you can purchase the premium version to avoid all limitations. Here are the top features of Movavi Slideshow Maker.
- Slideshow wizard for fast and easy video creation.
- Manual mode for advanced users to create customized video.
- Supports different types of media file formats.
- Different types of templates for instant video making.
- Wide ranges of transitions, filters, titles, and stickers.

Conclusion
If you are making a video from your photos, you can use an online video maker with photos and music free. If you are someone who wants to make professional-quality videos from photos, a premium video maker is best for you. If you are going to upload your slideshow videos on social media and video streaming platforms, we recommend Wondershare Filmora as the best video maker with music and pictures.
For macOS 10.12 or later
Step 1: Install Filmora and Start Your Project
Download and install Wondershare Filmora as per your operating system. Filmora is available for Windows and Mac. Launch Filmora and click on New Project. Drag and drop your photos on Project Media folder.
Step 2: Import Photos and Arrange Them in Order
Drag and drop the photos on the timeline as per your sequence you want in your slideshow video. You can change the order of the photos as well as stretch durations of photos in the video from the timeline. You have to arrange the photos side by side without any gap so that there is no black screen in between the transition.
Step 3: Add Transition Effects
After arranging the photos side by side, you have to apply transition effects so that the change from one photo to another is eye-soothing. There are loads of transitions available and you can get them from Transition option located at the top bar.
Go through the different categories of transitions. Drag and drop the transition you want on to the photo after which you want the transition effect to play. Do the same for all photos except the last one. You can apply different transitions effects for different photos as per your preference.
Step 4: Add Background Music
Now it is time to add a background music to the entire video. You can drag and drop any music file from your hard drive to Filmora Project Media. Thereafter, you can drag and drop the audio file on the audio timeline below the photo timeline. You can also add audio effects from the top bar if required.
Step 5: Export Your Video
Once you are done adding photos, transitions, and music, you should play the video on Filmora and make adjustments wherever required. Thereafter, click on Export button and save the video file on your hard drive in your desired file format.
Part 2. Popular video makers with photos and music
Here is the list of the popular premium and free video maker with music and pictures that you can consider for making slideshow videos.
1. Invideo
Invideo is a popular online video maker with music and pictures along with 5000 customizable templates. These templates help users to transform photos into videos with background music in a few minutes. Besides, the platform offers a wide range of stock media files. You can create videos in more than 70 languages, and the editor is user-friendly for users of all ages.
All you need to do is select a template and customize it if required. Thereafter, you need to import the photos, add text effects, and finally add music. There are options for trimming, cropping, and adding stickers, texts and transitions. The free version lets you export 60 videos per month but with a watermark. Here are the top features of Invideo.
- 5000+ customizable templates for all video types.
- 9+ million stocks videos, photos, and audio files.
- Add transitions, stickers, animations, and texts to videos.
- Trim and crop videos and audio files.
- Add voiceover as well as fade-in and fade-out effects.
- Work in collaboration with team members.
2. Icecream slideshow maker
Icecream slideshow maker is a free video maker with music and pictures for Windows users only. The software is compatible with Windows 10, 8, 7 and XP. You can create a high-quality video from your photos with music instantly. There is no need for any prior experience to use the video maker. There are beautiful transitions available that will enhance the video quality and make your presentation stand out. The free version allows up to 10 slides per video and saving the video in Webm file format. You can upgrade to Pro version to get rid of the limitations.
You can change photo and transition duration as per requirements. The software supports various audio file formats that you can import for your video. You can also add animations to texts so that they can shine in your video. The software allows sharing the video directly to YouTube. Besides, you can save it on Google Drive and Dropbox. Here are all the features of Icecream slideshow maker that you should be aware of.
- Super intuitive user interface for all users.
- Add colourful text, transitions, and animations.
- Save and resume project work as per time availability.
- Pro version allows saving video in 4K resolution.
- Video output in MP4, AVI, MOV and WEBM formats.
- Suitable for low-end computers.
3. PhotoStage Slideshow
PhotoStage Slideshow by NCH Software is another video maker software for Windows users. The software comes with an easy and automated wizard for users to transform photos with a video instantly. There is also an image editor available to adjust different parameters of your photos before making a video out of them.
Besides, there are various transitions available to apply and you can add captions and narration as per your requirements. In fact, along with photos, you can add video clips to create the ultimate video. Moreover, there are tools available to edit your audio and music file and add different effects. Here are the top features of PhotoStage Slideshow Software.
- Supports Full HD and 4K video resolution.
- Edit and fine-tune photos and add captions.
- Wide range of eye-catching and popular transitions.
- Edit audio and music file and add different effects.
- Save video file in MOV, MP4, GIF, AVI, 3GP and more.
- Directly share on YouTube, Vimeo, Flickr, HTML5.
4. Clideo video maker
Clideo Video Maker is a free online video maker with song. All you need to do is upload photos from your hard drive and choose a preset depending on the online platform where you want to upload the video. Thereafter, add audio and trim it as per video length. Then add smooth transitions and the video will be ready to export on your hard drive or cloud storage.
The online video maker supports different video and audio file format for importing and exporting. You can use the editor on any device starting from Windows and Mac to Android and iPhone. The user interface is very simple to use and it does not store video files for more than a day. Here are all the features of Clideo video maker.
- Upload photos from hard drive, and cloud storage.
- Presets for Instagram, Stories, YouTube, and Facebook videos.
- Add different photos, audio, and video clips to make videos.
- Zoom & crop option along with image duration elongation.
- Suitable for computer and mobile phone users.
5. Movavi Slideshow Maker
Movavi Slideshow Maker is available for both Windows and Mac users. The software comes with a wizard to allow users to create video from photos. However, advanced users can create video from photos manually as well. You get to add photos, audio files and video clips of different file formats. Most importantly, there are various templates available to create professional-quality videos.
There are loads of effects, filters, titles, and stickers available to apply on your video. The free version is limited to seven days usage. The output video will have watermark on it and you can purchase the premium version to avoid all limitations. Here are the top features of Movavi Slideshow Maker.
- Slideshow wizard for fast and easy video creation.
- Manual mode for advanced users to create customized video.
- Supports different types of media file formats.
- Different types of templates for instant video making.
- Wide ranges of transitions, filters, titles, and stickers.
Conclusion
If you are making a video from your photos, you can use an online video maker with photos and music free. If you are someone who wants to make professional-quality videos from photos, a premium video maker is best for you. If you are going to upload your slideshow videos on social media and video streaming platforms, we recommend Wondershare Filmora as the best video maker with music and pictures.
Also read:
- [Updated] Download Mastery 11 Key YouTube Extractors
- Making Your Mark on YouTube – A Branding Blueprint
- 2024 Approved Essential Film Techniques on YouTube by Future Visionaries
- [Updated] 5 Simplified Steps for Sequential YouTube Video Viewing (Free)
- The Beginner's Blueprint to Free YouTube Audio to Text
- Per-View Value to YouTube Star Economy
- Essential Game Streamers for Your Watchlist for 2024
- 2024 Approved Amplify Your Channels Evading Synthetic Watchers
- Esports News and Analysis From Top Vloggers
- Video Narrative Enhancer
- [New] Boosting YouTube Engagement Top 11 SEO Strategies Revealed
- Travel Blogging Essentials Step-by-Step Path to Success
- Enhance Your Videos - Discover the Top 10 Efficient Cutter Apps
- 2024 Approved Boost Traffic with These Essential Hashtags for YouTube Gamers
- In 2024, Charting New Pathways in Art An Exclusive Look at the Top 10 Low-Cost Creator Platforms on YouTube
- [Updated] Does Recording Your Viewed YouTube Content Violate Laws?
- Transforming Live YouTube Broadcasts Into Recorded Soundtracks
- Adobe Premiere Pro 101 for YouTube Clips and Edits
- Professional Choice High-Quality Laptops for Media Workers
- 2024 Approved Essential Tips for Producing Engaging Educational Content for YouTube
- [Updated] Digital Delights Top 15 Comical Creations on YouTube Bars
- Relaxation Station YouTube's Finest Film Series, All-Access
- Visual Voyage Enhancing Videos Using YouTube Studio's Tools
- Innovators Crafting Engaging Marvel Escapades
- Can Buying Likes Improve YouTube Rankings for 2024
- [New] Elevating Youtube Prominence with Expert Use of the Hub
- In 2024, Backwards Play Mastering YouTube Video Reversals
- News Narratives' Concluding Flourishes
- Charting Your Course in the Realm of YouTube Shorts for 2024
- How to Play YouTube in Background on iPhone and Android
- YouTube Soundwaves Flow Into iMovie Effortlessly
- Instant Grooves, Lasting Stories Making Sense of Music Shorts
- 2024 Approved Best Cameras to Amplify Your YT Presence
- In 2024, 10 Quick Setup Ideas for Successful YouTube Business Ventures
- Mastering the Art of YouTube Micro Clips
- [New] Evolution of Engagement Key Post-VidCon Events
- ASMR Sound Mastery Selecting the Ideal Microphone
- Effortless Guide to Free Melodies in YouTube Productions
- [Updated] REVIEW Top 27 Alternatives to YouTube
- [New] Dive Into the World of Dynamic and Entertaining Video Shopping Content
- Maximizing Your YouTube Potential with Content Partnerships
- 2024 Approved Access YouTube Tracks Without Spending a Dime 25+ No-Cost Audio Extractors
- Exploring YouTube's Latest Revenue Guidelines
- 2024 Approved Architect of Audiovisual Brilliance
- In 2024, Ultimate Guide on Lava Yuva 3 Pro FRP Bypass
- [Updated] In 2024, Personalize Your Google Meet Experience with Fresh Backgrounds
- [New] In 2024, Mastering Lenovo Perfecting Screen Capture Techniques
- In 2024, How to Use Twixtor Effect to Create Super Slow-Motion Video?
- 2024 Approved Ranking of Top 10 Budget-Friendly Video Calls (iPhone/Android)
- [New] Conquer the Crunch How to Edit and Reduce Massive TikTok Files
- Top 6 Online Sources for Spooky Audio Tones
- 2024 Approved Transform Your Footage Expert Video Editing for Sony Camcorder Users
- [New] Advanced Tips for Capturing and Storing Desktop Content
- [Updated] In 2024, How to Climb Higher on TikTok's Rankings A Guide for More Interactions
- Here are Some of the Best Pokemon Discord Servers to Join On Vivo S18e | Dr.fone
- [New] In 2024, The Best iOS Resources for Playing Retro PSP Games #1-5
- 2024 Approved Step-by-Step Approach to Webinar Savings Mac & PC Systems
- [Updated] Social Media Strategy Optimizing Your Facebook Story for 2024
- How to Use Text to Speech on TikTok - A Complete Guide
- How to Change Netflix Location to Get More Country Version On Oppo A1x 5G | Dr.fone
- How to Unlock Apple iPhone SE (2020) Passcode without iTunes without Knowing Passcode? | Dr.fone
- How to Change/Add Location Filters on Snapchat For your Infinix Hot 30i | Dr.fone
- In 2024, 5 Ways to Transfer Music from Itel P55+ to Other Android Devices Easily | Dr.fone
- [New] Essential Methods Streaming Audio Recording Made Easy Online
- 2024 Approved Mastering Instagram Boosting Post Engagement Strategies
- Fundamentals of Online Tale Creation Methods
- 12 Leading Motion Capture Camcorders Now With Global Positioning for 2024
- How to use Pokemon Go Joystick on Apple iPhone 15 Plus? | Dr.fone
- Speech-to-Text Magic for MS Word Users
- In 2024, How to Unlock Infinix Note 30 5G Phone without Google Account?
- Title: Tactics for Transforming YouTube List Layouts
- Author: Steven
- Created at : 2024-05-25 20:27:54
- Updated at : 2024-05-26 20:27:54
- Link: https://youtube-clips.techidaily.com/tactics-for-transforming-youtube-list-layouts/
- License: This work is licensed under CC BY-NC-SA 4.0.
