
:max_bytes(150000):strip_icc()/GettyImages-1129377245-31d2afce07c34729a07592c518bd5b25.jpg)
Synchronize Content Releases with Audience Activity Cycles
Synchronize Content Releases with Audience Activity Cycles
Create High-Quality Video - Wondershare Filmora
An easy and powerful YouTube video editor
Numerous video and audio effects to choose from
Detailed tutorials provided by the official channel
Creators have one thing in mind when posting their content online. To be viewed by numerous followers and potential subscribers. For this, you need to run your channels tactfully. There are days when people throng the social media to watch upcoming content and videos. Perhaps you can make your best bets on such days. And is there any best day to post YouTube video?
Probably yes! People will settle on social media sites when they are more relaxed and off heavy duties on the weekdays. Let’s now dive into posting your videos and attaining some good leads.

In this article
01 Why is it important to post your YouTube video on the best days?
02 Best Days to Post on YouTube - General Practices
03 Best Days to Post on YouTube - Individual channel
Why is it important to post your YouTube video on the best days?
You are better off with best days to post on YouTube to increase the chances of getting more views. You want to make the biggest catch, and putting in a little effort will help you yield good results.
1) Your content never dies
The major advantage of posting on best days is that they hit the wall right from the onset of posting. You won’t need a lot of time to invest in expensive equipment. Remember, when viewers see your content immediately, they are posted, there are high chances of them sharing along with friends.
2) You’ll grow your audience worldwide
Growing a worldwide audience is every content creator’s dream. Posting your videos on the best days will open doors to new visitors who perhaps haven’t heard about you. It is even better to include captions so that people of all walks get your message deeply.
3) You’ll appear more on Google searches
Posting at the right time will help Google identify your content and make it appear on Google searches. Google uses an algorithm to check on many concepts of video posting. It means that posting your videos to YouTube on the best days will spike the graph and automatically get noticed by Google.
4) Your audience will promote you
Remember, when viewers go on searches, they look for something important to them. So, coming across your content at the right time will make an instant catch. They only want to fulfill their needs at that specific time. Hence will buy or promote you as long as what you sell is what they are looking for.
5) Increased subscribers
People want to associate themselves with new content. Anyone would be thrilled to hit the button on content that just popped up when they are online at their relaxed moments. You never know; you may just hit that 1,000 subscribers list by posting your videos on the best days.
Best Days to Post on YouTube - General Practices
How then do you know the best day to upload on YouTube? You can use general practices to pinpoint when your viewers are online or when your channel is at its peak.
- Weekday evenings
Weekdays are very busy days for everyone. People feel relaxed and ready to catch up on social media’s trending in the evening. So, posting in the evenings on weekdays may instantly help you get some increased views.
- Target Thursdays and Fridays
Depending on your YouTube content, you can target school-age children these days. If your content is about kid’s stuff and other online learning skills, then pushing it just before the weekend could give you some good visits. Kids tend to have various activities over the weekend and so, the best time for them to embark on online learning is just before the weekend kicks off.
- Weekends
Weekends will suit content that needs to sell products to the middle-class. Since they are busy the whole week with other duties, they probably find time over the weekend to chill and check out what’s happening around them and the world at large.
- End year
When it comes to the best months to post on YouTube, the end-year period tends to be the best. Usually, this is when companies and individuals are winding up on their busy schedules of the year. They want to get improvements and tips to start the next year. It is wise to spend more time online, giving the necessary tips and probably hooking up some potential customers.
Best Days to Post on YouTube - Individual channel
Stop guessing and find the facts right. Hitting on the road at the right time can get you as many viewers as possible. YouTube makes getting the facts right quite easy. Just use YouTube studio to know when your viewers are online.
First, go to YouTube Studio
Check in the “YouTube Studio” > “Analytics” > “Audience” option. Remember that your channel should have enough views for this option to give you relevant data.
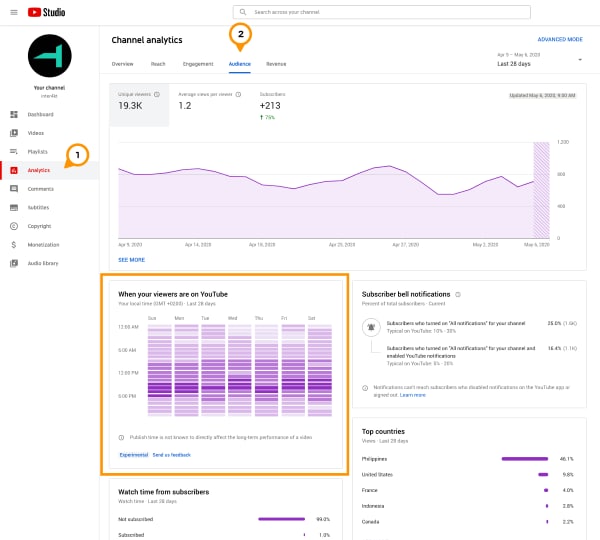
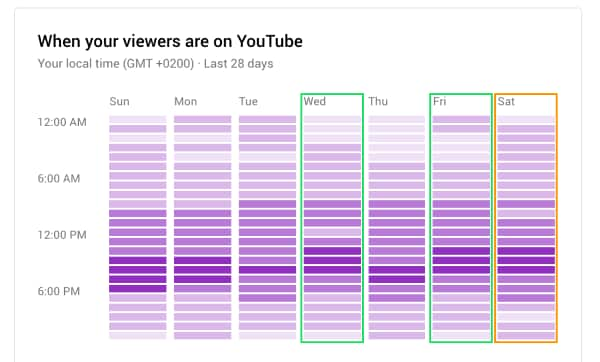
Find the hours with the darkest purple bars
You’ll realize that there are dark bars and light ones. The latter represent when few viewers are on your channel. Avoid posting during such times and focus when you have many viewers on site. Also, try to post a few hours before the peak time.

Focus on the days with the darkest bars
Apart from specific times of the day, you can focus on days of the week when your viewers are on your channel. You will mostly realize that the best days of the week to post to your channel are on weekends. It is quite typical as it’s the days when viewers are more relaxed and can find new things online. However, you can monitor your statistics and learn the number of days per week you need to emphasize more on posting your videos.
Post videos a day before the peak day
You can also dwell on the narrative; the early bird catches the worm. You can make an early catch since you know the day when your viewers will throng’ your channel, but you don’t know the time. Post videos a day before your channel goes busy. By this, you won’t leave any viewers outside your new postings.
A few hours before prime time
Another trick is to get your videos posted in good time. Once you have known the best hour of the day when viewers are likely to be active, make your video available a few hours before then. They’ll then get it rolling once they land into the channel for the newest updates. If not, you may miss out on views you would have gotten by making your video go public earlier.
Upload your videos in private a few hours before publishing
Yes, mistakes do happen, and you don’t want to be caught up in the mix of errors. You can increase perfection by uploading your videos for some hours before publishing them. It will give you a good time to check it out privately and iron out any concerns. You don’t want your video going viral with tons of mishaps.
Create High-Quality Video with Filmora to Ensure Video Engagement
Besides knowing the best days to post on YouTube, you have to give your audience quality for their time. Composing the best video is the killer for this course. Learn how to get high-quality videos with Filmora. It is a widely used video editing tool that comes in hand with lots of templates and effects. These features enable you to compose high-end videos in 4K and HD resolution. The effect of quality videos is that they’ll help you get many views because users will understand your video first. Filmora has an intuitive interface that will give you an easy time.
- Edit your videos with minimal effect. You can easily merge, crop, tilt, and perform more with Filmora.
- Easily do motion tracking from the main interface.
- It supports 4K and HD editing ability./li>
- Use the speed control feature to make your clips up to ten times faster or slower.
- Make magical moves with the Reverse feature. You can flip your videos and play them backward.
- Create stunning video colors in your video using the color tuning feature. You can adjust the white balance and the dynamic range of colors.
- Get quality sound with the noise removal feature.
For Win 7 or later (64-bit)
For macOS 10.12 or later
Conclusion
● You don’t have to guess the best days to upload to YouTube anymore. You can use YouTube algorithm Studio to calculate and give you the exact hours and days when your viewers are at bay. But again, this will only be effective if you have already gathered a substantial number of viewers. It will, therefore, not work for you if you are starting on YouTube. Usually, there isn’t enough data yet for the system to know the best time to publish, and neither know how your content performs in general.
● But all in all, you can use general practices to know when to post your content. Most likely, combine your efforts and don’t dwell on specific hours or days. Use both combined to reach as many audiences as possible.
Creators have one thing in mind when posting their content online. To be viewed by numerous followers and potential subscribers. For this, you need to run your channels tactfully. There are days when people throng the social media to watch upcoming content and videos. Perhaps you can make your best bets on such days. And is there any best day to post YouTube video?
Probably yes! People will settle on social media sites when they are more relaxed and off heavy duties on the weekdays. Let’s now dive into posting your videos and attaining some good leads.
In this article
01 Why is it important to post your YouTube video on the best days?
02 Best Days to Post on YouTube - General Practices
03 Best Days to Post on YouTube - Individual channel
Why is it important to post your YouTube video on the best days?
You are better off with best days to post on YouTube to increase the chances of getting more views. You want to make the biggest catch, and putting in a little effort will help you yield good results.
1) Your content never dies
The major advantage of posting on best days is that they hit the wall right from the onset of posting. You won’t need a lot of time to invest in expensive equipment. Remember, when viewers see your content immediately, they are posted, there are high chances of them sharing along with friends.
2) You’ll grow your audience worldwide
Growing a worldwide audience is every content creator’s dream. Posting your videos on the best days will open doors to new visitors who perhaps haven’t heard about you. It is even better to include captions so that people of all walks get your message deeply.
3) You’ll appear more on Google searches
Posting at the right time will help Google identify your content and make it appear on Google searches. Google uses an algorithm to check on many concepts of video posting. It means that posting your videos to YouTube on the best days will spike the graph and automatically get noticed by Google.
4) Your audience will promote you
Remember, when viewers go on searches, they look for something important to them. So, coming across your content at the right time will make an instant catch. They only want to fulfill their needs at that specific time. Hence will buy or promote you as long as what you sell is what they are looking for.
5) Increased subscribers
People want to associate themselves with new content. Anyone would be thrilled to hit the button on content that just popped up when they are online at their relaxed moments. You never know; you may just hit that 1,000 subscribers list by posting your videos on the best days.
Best Days to Post on YouTube - General Practices
How then do you know the best day to upload on YouTube? You can use general practices to pinpoint when your viewers are online or when your channel is at its peak.
- Weekday evenings
Weekdays are very busy days for everyone. People feel relaxed and ready to catch up on social media’s trending in the evening. So, posting in the evenings on weekdays may instantly help you get some increased views.
- Target Thursdays and Fridays
Depending on your YouTube content, you can target school-age children these days. If your content is about kid’s stuff and other online learning skills, then pushing it just before the weekend could give you some good visits. Kids tend to have various activities over the weekend and so, the best time for them to embark on online learning is just before the weekend kicks off.
- Weekends
Weekends will suit content that needs to sell products to the middle-class. Since they are busy the whole week with other duties, they probably find time over the weekend to chill and check out what’s happening around them and the world at large.
- End year
When it comes to the best months to post on YouTube, the end-year period tends to be the best. Usually, this is when companies and individuals are winding up on their busy schedules of the year. They want to get improvements and tips to start the next year. It is wise to spend more time online, giving the necessary tips and probably hooking up some potential customers.
Best Days to Post on YouTube - Individual channel
Stop guessing and find the facts right. Hitting on the road at the right time can get you as many viewers as possible. YouTube makes getting the facts right quite easy. Just use YouTube studio to know when your viewers are online.
First, go to YouTube Studio
Check in the “YouTube Studio” > “Analytics” > “Audience” option. Remember that your channel should have enough views for this option to give you relevant data.
Find the hours with the darkest purple bars
You’ll realize that there are dark bars and light ones. The latter represent when few viewers are on your channel. Avoid posting during such times and focus when you have many viewers on site. Also, try to post a few hours before the peak time.
Focus on the days with the darkest bars
Apart from specific times of the day, you can focus on days of the week when your viewers are on your channel. You will mostly realize that the best days of the week to post to your channel are on weekends. It is quite typical as it’s the days when viewers are more relaxed and can find new things online. However, you can monitor your statistics and learn the number of days per week you need to emphasize more on posting your videos.
Post videos a day before the peak day
You can also dwell on the narrative; the early bird catches the worm. You can make an early catch since you know the day when your viewers will throng’ your channel, but you don’t know the time. Post videos a day before your channel goes busy. By this, you won’t leave any viewers outside your new postings.
A few hours before prime time
Another trick is to get your videos posted in good time. Once you have known the best hour of the day when viewers are likely to be active, make your video available a few hours before then. They’ll then get it rolling once they land into the channel for the newest updates. If not, you may miss out on views you would have gotten by making your video go public earlier.
Upload your videos in private a few hours before publishing
Yes, mistakes do happen, and you don’t want to be caught up in the mix of errors. You can increase perfection by uploading your videos for some hours before publishing them. It will give you a good time to check it out privately and iron out any concerns. You don’t want your video going viral with tons of mishaps.
Create High-Quality Video with Filmora to Ensure Video Engagement
Besides knowing the best days to post on YouTube, you have to give your audience quality for their time. Composing the best video is the killer for this course. Learn how to get high-quality videos with Filmora. It is a widely used video editing tool that comes in hand with lots of templates and effects. These features enable you to compose high-end videos in 4K and HD resolution. The effect of quality videos is that they’ll help you get many views because users will understand your video first. Filmora has an intuitive interface that will give you an easy time.
- Edit your videos with minimal effect. You can easily merge, crop, tilt, and perform more with Filmora.
- Easily do motion tracking from the main interface.
- It supports 4K and HD editing ability./li>
- Use the speed control feature to make your clips up to ten times faster or slower.
- Make magical moves with the Reverse feature. You can flip your videos and play them backward.
- Create stunning video colors in your video using the color tuning feature. You can adjust the white balance and the dynamic range of colors.
- Get quality sound with the noise removal feature.
For Win 7 or later (64-bit)
For macOS 10.12 or later
Conclusion
● You don’t have to guess the best days to upload to YouTube anymore. You can use YouTube algorithm Studio to calculate and give you the exact hours and days when your viewers are at bay. But again, this will only be effective if you have already gathered a substantial number of viewers. It will, therefore, not work for you if you are starting on YouTube. Usually, there isn’t enough data yet for the system to know the best time to publish, and neither know how your content performs in general.
● But all in all, you can use general practices to know when to post your content. Most likely, combine your efforts and don’t dwell on specific hours or days. Use both combined to reach as many audiences as possible.
Crafting Timeless Videos with Historical Flair
How to Create Vintage Videos: A Comprehensive Tutorial

Richard Bennett
Mar 27, 2024• Proven solutions
“Every accomplishment starts with a decision to try.” – A Vintage Thought

Vintage videos are ultimately the retro videos you have ever imagined. The look is highly inspirational in itself. The vintage effect in photography and videos results in a must-see look that everyone wants to capture all day long. The meaning of vintage is ‘the time when something of quality was produced.’ When something is called retro, it means old, recognized, and essential. Vintage also resembles love apart from videos and photos. All in all, it’s a positive and result-oriented thing to carry on in your videos. And this is what we want to mention in this post relating to the creation of vintage videos.
Here are some vintage-style video ideas for you to have a look at.
- Part 1: What to Consider When Shooting a Vintage Video?
- Part 2: How to Create a Stunning Vintage Video?
- Part 3: Tips to Make Your Vintage Videos Stand Out
What to Consider When Shooting a Vintage Video?
Vintage videos are kind of old school vibes and must be shooting accordingly by keeping in mind the following points. These are a sort of expert tips given by photographers based on their practical experience. First of all, you have to understand that a video can be made vintage, but you can’t change the actual environment of shooting. Some editing always involves there in every project out there. Still, the tips given below will help you a lot in creating a retro look.
Use Vintage Lenses
The very first helpful tip is to use a vintage lens. They allow chromatic aberration by distorting colors around the frame. Furthermore, you can find various kinds of lenses in terms of a vintage effect.
Decrease Contrast
Do the correct color grading by reducing the contrast a little bit. You must not level the retro videos in black or white or like-new videos. You can simply add a contrasting effect and then reduce it to have that vintage look.
Keep it a little soft
If you have ever noticed, the vintage videos are a little soft and look like degraded with time. It’s a result of decreased sharpness in the camera’s menu settings. You can even add a slight blur to the final video or simply use recognized software made for video editing .
Brighten up the black levels
Lots of black points in the video are not ideal for a vintage effect. The suitable approach is to bring up black levels and make it dark gray instead of inky black. This look can be achieved either by levels effect or curves effect in your editing software.
Reduce Saturation levels
Bringing down the saturation levels is another tip to create a vintage effect. The old videos are also absent in bright colors. Don’t go too crazy about reduction as 20%-30% saturation level is more than enough.
How to Create a Stunning Vintage Video?
What you need to get started as both beginner and professional is Wondershare Filmora Video Editor. It is a highly recommended software to create vintage videos. The intuitive user interface and lots of editing functions are helpful for a video editor. It has both primary as well as advanced editing programs to check. It has various advanced color tuning tools to promote the making of original videos. It features tint, temperature, Vignette, 3D Luts, Lights, and so on.


Steps for the vintage effect to videos on Wondershare Filmora Video Editor
Step 1: Upload video & make specific changes

The very step is to add the video by clicking the + icon. We have added the three sample videos from the library of Wondershare Filmora itself. Adjust them in the timeline as per your requirements.
After doing all the essential editing functions, click on the Effects tab given at the upper-left corner. Simply type the word Old in the Search tab.
The Old Video filter will immediately appear in the list of filters. Tap the “+” icon in Old Video filter to add to the timeline. Drag its ends right or left to adjust the duration.
Step 2: Apply White & Black Filters

The second step is to apply the Black & White filters. Go to the Effects tab and explore five Black & White filters available. Each of these filters is quite different and must be applied accordingly. Check the aesthetic of your video clip before any filter application to retro videos.
Step 3: Add the Sun Kissed or Sepia Tone Rise Filters to the video clip

There are various other categories of filters you can apply, such as Retro, Sun Kissed, and Sepia Tone, etc. The features of Filmora also present several subcategories such as Faux Film or Shake.

On the other hand, the subcategory of Sepia Tone features Sun-Kissed & Rise Filters to stimulate sepia-tinted texture and recreate the old visual style. The Sun Kissed filter presents brown and red colors to give that warm image atmosphere.
Step 4: Desaturate Video Clip

Now, you need to desaturate the video clip with Ash & Willow filters. We have typed Ash in the Search bar, and you can see the filter below. These filters are essential to desaturate the video with preset contrast, brightness, or exposure values.

Then, we have combined the black & white filter with an overlay of Film Reel Horizontal. It will help you sell the effect and make the video look more authentic. However, the only application of Black & White or Ash & Willow filters is not going to make any creative thing in terms of vintage videos. You have to mix overlays with features such as Random Dust or Film Reel Horizontal.
Step 5: Apply Black & White and Old Film Color Correction Presets to the video
You can also access the Advanced color correction Tab of Filmora from the Color button. It also features Preset and Adjusts Tabs to desaturate footage. The Preset presents a variety of options, including Black & White and Old Film. You just need to right-click the particular preset and select the Apply option.

Tips to Make Your Vintage Videos Stand Out
Following the helpful tips would assist you in creating awesome retro videos.
- You can use various vintage apps such as Retro VHS, RTRO Camera, 8mm, Camcorder, VSCO, etc. Or, despite using these limited apps, you can directly use our preferred video editing software called Wondershare Filmora.
- If you use a specific vintage camera, keep it on low highlights and low contrasts. Use color grading, as we have discussed above. They help to provide the ultimate old-school effect.
- Always keep low saturation settings for shooting vintage videos. Take control over Saturation, Hue, and Luminance of video.
- Add overlays and respective filters to recreate a required vintage look. You must add things that dust, scratch, and grain the heck out from the video that you have created.
- Lower the frame rate or FPS to create an excellent vintage look. You can make it to 18 or 14 FPS depending upon the aesthetic requirements.
- Keep an eye on black and white filters you have used. It’s because more of a black and white can ruin the actual vintage experience.
Conclusion
So, this is an ultimate tutorial on the creation of vintage videos. We Hope you have admired the steps and our recommended video editing software. Vintage means grand, and thus you should make it amazing as well. It is the reason we have stated all facts regarding the vintage effect in our post above. Wondering how to add such effect in FCPX? check this article:How to Create a Vignette in Final Cut Pro X?
Surely give a read and thank us later!
Richard Bennett
Richard Bennett is a writer and a lover of all things video.
Follow @Richard Bennett
Richard Bennett
Mar 27, 2024• Proven solutions
“Every accomplishment starts with a decision to try.” – A Vintage Thought
Vintage videos are ultimately the retro videos you have ever imagined. The look is highly inspirational in itself. The vintage effect in photography and videos results in a must-see look that everyone wants to capture all day long. The meaning of vintage is ‘the time when something of quality was produced.’ When something is called retro, it means old, recognized, and essential. Vintage also resembles love apart from videos and photos. All in all, it’s a positive and result-oriented thing to carry on in your videos. And this is what we want to mention in this post relating to the creation of vintage videos.
Here are some vintage-style video ideas for you to have a look at.
- Part 1: What to Consider When Shooting a Vintage Video?
- Part 2: How to Create a Stunning Vintage Video?
- Part 3: Tips to Make Your Vintage Videos Stand Out
What to Consider When Shooting a Vintage Video?
Vintage videos are kind of old school vibes and must be shooting accordingly by keeping in mind the following points. These are a sort of expert tips given by photographers based on their practical experience. First of all, you have to understand that a video can be made vintage, but you can’t change the actual environment of shooting. Some editing always involves there in every project out there. Still, the tips given below will help you a lot in creating a retro look.
Use Vintage Lenses
The very first helpful tip is to use a vintage lens. They allow chromatic aberration by distorting colors around the frame. Furthermore, you can find various kinds of lenses in terms of a vintage effect.
Decrease Contrast
Do the correct color grading by reducing the contrast a little bit. You must not level the retro videos in black or white or like-new videos. You can simply add a contrasting effect and then reduce it to have that vintage look.
Keep it a little soft
If you have ever noticed, the vintage videos are a little soft and look like degraded with time. It’s a result of decreased sharpness in the camera’s menu settings. You can even add a slight blur to the final video or simply use recognized software made for video editing .
Brighten up the black levels
Lots of black points in the video are not ideal for a vintage effect. The suitable approach is to bring up black levels and make it dark gray instead of inky black. This look can be achieved either by levels effect or curves effect in your editing software.
Reduce Saturation levels
Bringing down the saturation levels is another tip to create a vintage effect. The old videos are also absent in bright colors. Don’t go too crazy about reduction as 20%-30% saturation level is more than enough.
How to Create a Stunning Vintage Video?
What you need to get started as both beginner and professional is Wondershare Filmora Video Editor. It is a highly recommended software to create vintage videos. The intuitive user interface and lots of editing functions are helpful for a video editor. It has both primary as well as advanced editing programs to check. It has various advanced color tuning tools to promote the making of original videos. It features tint, temperature, Vignette, 3D Luts, Lights, and so on.
Steps for the vintage effect to videos on Wondershare Filmora Video Editor
Step 1: Upload video & make specific changes
The very step is to add the video by clicking the + icon. We have added the three sample videos from the library of Wondershare Filmora itself. Adjust them in the timeline as per your requirements.
After doing all the essential editing functions, click on the Effects tab given at the upper-left corner. Simply type the word Old in the Search tab.
The Old Video filter will immediately appear in the list of filters. Tap the “+” icon in Old Video filter to add to the timeline. Drag its ends right or left to adjust the duration.
Step 2: Apply White & Black Filters
The second step is to apply the Black & White filters. Go to the Effects tab and explore five Black & White filters available. Each of these filters is quite different and must be applied accordingly. Check the aesthetic of your video clip before any filter application to retro videos.
Step 3: Add the Sun Kissed or Sepia Tone Rise Filters to the video clip
There are various other categories of filters you can apply, such as Retro, Sun Kissed, and Sepia Tone, etc. The features of Filmora also present several subcategories such as Faux Film or Shake.
On the other hand, the subcategory of Sepia Tone features Sun-Kissed & Rise Filters to stimulate sepia-tinted texture and recreate the old visual style. The Sun Kissed filter presents brown and red colors to give that warm image atmosphere.
Step 4: Desaturate Video Clip
Now, you need to desaturate the video clip with Ash & Willow filters. We have typed Ash in the Search bar, and you can see the filter below. These filters are essential to desaturate the video with preset contrast, brightness, or exposure values.
Then, we have combined the black & white filter with an overlay of Film Reel Horizontal. It will help you sell the effect and make the video look more authentic. However, the only application of Black & White or Ash & Willow filters is not going to make any creative thing in terms of vintage videos. You have to mix overlays with features such as Random Dust or Film Reel Horizontal.
Step 5: Apply Black & White and Old Film Color Correction Presets to the video
You can also access the Advanced color correction Tab of Filmora from the Color button. It also features Preset and Adjusts Tabs to desaturate footage. The Preset presents a variety of options, including Black & White and Old Film. You just need to right-click the particular preset and select the Apply option.
Tips to Make Your Vintage Videos Stand Out
Following the helpful tips would assist you in creating awesome retro videos.
- You can use various vintage apps such as Retro VHS, RTRO Camera, 8mm, Camcorder, VSCO, etc. Or, despite using these limited apps, you can directly use our preferred video editing software called Wondershare Filmora.
- If you use a specific vintage camera, keep it on low highlights and low contrasts. Use color grading, as we have discussed above. They help to provide the ultimate old-school effect.
- Always keep low saturation settings for shooting vintage videos. Take control over Saturation, Hue, and Luminance of video.
- Add overlays and respective filters to recreate a required vintage look. You must add things that dust, scratch, and grain the heck out from the video that you have created.
- Lower the frame rate or FPS to create an excellent vintage look. You can make it to 18 or 14 FPS depending upon the aesthetic requirements.
- Keep an eye on black and white filters you have used. It’s because more of a black and white can ruin the actual vintage experience.
Conclusion
So, this is an ultimate tutorial on the creation of vintage videos. We Hope you have admired the steps and our recommended video editing software. Vintage means grand, and thus you should make it amazing as well. It is the reason we have stated all facts regarding the vintage effect in our post above. Wondering how to add such effect in FCPX? check this article:How to Create a Vignette in Final Cut Pro X?
Surely give a read and thank us later!
Richard Bennett
Richard Bennett is a writer and a lover of all things video.
Follow @Richard Bennett
Also read:
- Crafting a Winning Strategy YouTube Keyword Mastery Explained
- Plotline Path to YouTube Prosperity
- How to Captivate Audiences and Gain Traction with YouTube Shorts
- 2024 Approved A Trailblazer’s Guide YouTube Studio Location Unveiled
- [New] Choosing Your Best GIF Creator A Comparative Analysis
- Boost Your Videos' Impact with Top-Ranking Software Solutions for 2024
- [New] A Filmmaker's Approach to YouTube Splitscreen Videos
- The Best Hashtags for YouTube Gaming Videos for 2024
- Essential Steps to Producing a YouTube Hit Music Reaction Video Guide
- [New] Discovering the Most Innovative Youtube Channel Names A Vlogger's Must-Have List (Maximum Length 156 Characters)
- [New] Cutting-Edge Camera & Recording Apps for Smartphones' Most Reliable Sources
- Your Music Masterpiece Awaits Step-by-Step to YouTube Playlist Perfection (Web/Mobile)
- [New] Adding Videos to Written Work A Budget-Friendly Way
- Charting a Successful Course in YouTube Keywords for 2024
- [New] Eliminate Camera Sway No Tripods, Allowed
- In 2024, Crafting Your Personal/Business YouTube Mobile Hub
- [Updated] Elevate Your Video Content with Desktop/Mobile Timestamps
- Master the Art of YouTube Outros with Pros and Resources
- Streamlining Video Dispatch to Facebook From YouTube
- Download YouTube Images with Ease Online
- The Ultimate Guide to YouTube Thumbnails
- Ahead of Tomorrow Key Youtube Gatherings (Post-VidCon) for 2024
- [Updated] Constructing Captivating Valorant YouTube Thumbnails
- In 2024, Easy OBS YouTube Live Streaming Guide
- 2024 Approved Audio Adaptation Innovations for YouTubers' Videos
- 2024 Approved Dive Into Filmora’s Certified Creative Program
- [New] How to Add Text to YouTube Video
- [New] Content Creation Crossroads IGTV Vs. YouTube - Which One Fits Best?
- In 2024, Audio Visual Synopsis Creator
- Your Ultimate Playbook to Monetize Youtube Traffic
- How to Play YouTube in Background on iPhone and Android
- [Updated] Earnings Empire Constructing a Profitable YouTube Channel
- Unpacking Online Influence Your Channel Versus Competitors' Strategies
- Elevate Thumbnails Fantasy Elements Added
- Enhance Visibility The Most Effective 30 FreeFire Tags for Video Marketing for 2024
- In 2024, Comprehensible Guide to High-Quality Audios on YouTube
- Behind the Scenes of Online Content Monetization for 2024
- In 2024, 10+ Best Free Video Editing Programs of 2023
- 2024 Approved How To Add Custom Thumbnails to Your YouTube Videos
- How to Add Timestamps to YouTube Video to Increase Views
- Continuous Streams Perfect Loops of YouTube Videos for TVs for 2024
- 6+ Software Choices Download YouTube Music as MP3 for iPhone Users
- Gaining Ground on the Groundswell of Online Viewers
- 2024 Approved Template Wizardry A Blueprint for Creating Viral TikToks
- [Updated] Unlocking Potential Discovering Hidden Streaming Tricks
- [New] In 2024, Strategies to Perfect the Last Push on Your Vimeo Videos
- [Updated] In 2024, Unlock More Views with These TikTok Text Tools of 2023
- Year's Premium Choices A Review of the Top 15 YouTube Unboxers, 2024
- New In 2024, The Ultimate Guide to Sourcing Natures Ambiance Online 2 Title Missing, Assuming a Similar Title Might Be Exploring Top Websites for Legitimate Forest and Ocean Sound Collections
- How to Ensure Consistent Frame Rates in Multi-Camera Setups for 2024
- 2024 Approved The Ultimate List of Immersive Game Worlds
- [New] Faster Vimeo Viewing Experiences
- Updated In 2024, The Ultimate Guide to Free Video Editing on 32-Bit Windows
- [New] 2024 Approved Mastering the Most Effective 7 TikTok Techniques for Fame
- [Updated] Invisible Enthusiast of Facebook Episodes for 2024
- 2024 Approved Cataloging Extensive Canine Acoustic Effects Online
- In 2024, iPhone Transfer Transfer Contact from Apple iPhone 14 Plus to iPhone without iCloud | Dr.fone
- New 20 Best Anime Movies You Cannot Miss 2024 List
- [New] Mastering Instagram Stories Your Complete Tune-Up Guide for 2024
- [New] Perpetual Screen Moments Tool for 2024
- [New] Discovering If Muted on Snapstreak for 2024
- New Elevate Your Footage Transform Ordinary Videos Into Extraordinary Movies
- In 2024, Android Unlock Code Sim Unlock Your Honor 100 Pro Phone and Remove Locked Screen
- [New] Engaging Audiences Making Popular YouTube Shorts
- [New] In 2024, Elite Fight Club Best of 10 Battle Royale Titles
- In 2024, Top 10 Best Spy Watches For your Vivo Y56 5G | Dr.fone
- Outrageous Odyssey Your Roadmap to the Funniest TikTok Challenges for 2024
- Title: Synchronize Content Releases with Audience Activity Cycles
- Author: Steven
- Created at : 2024-05-25 20:27:43
- Updated at : 2024-05-26 20:27:43
- Link: https://youtube-clips.techidaily.com/synchronize-content-releases-with-audience-activity-cycles/
- License: This work is licensed under CC BY-NC-SA 4.0.
