
Swiftly Adjust YouTube Videos to Mac Screen Ratios
Swiftly Adjust YouTube Videos to Mac Screen Ratios
Quick Resize YouTube Videos to Right Aspect Ratio on Mac

Liza Brown
Oct 26, 2023• Proven solutions
YouTube is one of the demanding platforms with more than 2.3 billion users worldwide as of 2021. And, in this digitally oriented world, you’re left with no reason not to create a YouTube channel specifically when you have the right talent to use one. Well, this guide is for those who are already into YouTube video creation and now need help on how to resize YouTube videos as per different aspect ratios. According to YouTube’s aspect ratio, it’s the right place to move forward even if you want to resize your videos present on other social media apps. We know brands and other influencers generally practice this kind of social media marketing.
So, let’s get started with our session on resizing YouTube as per the ideal aspect ratio without further ado.
Part 1: What’s the Right Aspect Ratio of YouTube Videos?
For attracting more audience and increasing engagement on YouTube videos, you have to look at each factor, along with the YouTube video quality. And, you cannot overlook the size of YouTube video among these factors to make it your perfect shot among competitors. Considering the importance of such factors, we’ve come up with this specific section on introducing you to the correct aspect ratio for YouTube videos.
It’s crucial to know the size before you start the YouTube game!
YouTube allows you to upload videos of different sizes ranging from 240p to 8K. And, the dimensions for these different sizes are as follows.
- 240p: 426x240 pixels
- 360p: 640x360 pixels
- 480p: 854x480 pixels
- 720p: 1280x720 pixels
- 1080p: 1920x1080 pixels
- 1440p: 2560x1440 pixels
- 2160p: 3840x2160 pixels
- 43200p: 7680×4320 pixels
Along with these, the aspect ratio, video size, and length of YouTube video should also be taken into consideration while uploading YouTube videos.
Thus, the ideal aspect ratio to resize YouTube video is perfect as 16:9, which we’ll diversify in the following three sections.
1. Computer
On a computer, the standard aspect ratio for YouTube video is 16:9. And, the YouTube player will automatically adjust other aspect ratios than the standard size. For instance, it may add padding of white or gray color depending upon the theme. However, it’s advisable to avoid these things like padding as they interfere with YouTube’s dynamic adjustments.
2. Android Phone
In the Android application, the scenario is quite different from YouTube videos. The app automatically adjusts the player as per the video size. The video will always fit the screen, whether it’s square, vertical, or horizontal. Ultimately, the videos will be shorter for widescreen and square for vertical.
3. iPad & iPhone
Similarly, the YouTube app for iPad and iPhone automatically adjust the video size to fit the screen. Thus, every video will fit the screen, even if it’s square, horizontal, or vertical.
Before we let you know how to resize YouTube videos, here are some tips for creating awesome YouTube videos.
- Create a strategy for YouTube video beforehand.
- Search for ideas and topics.
- Understand the use of the best equipment and gear.
- Ensure the best YouTube video editing.
- Optimize YouTube videos.
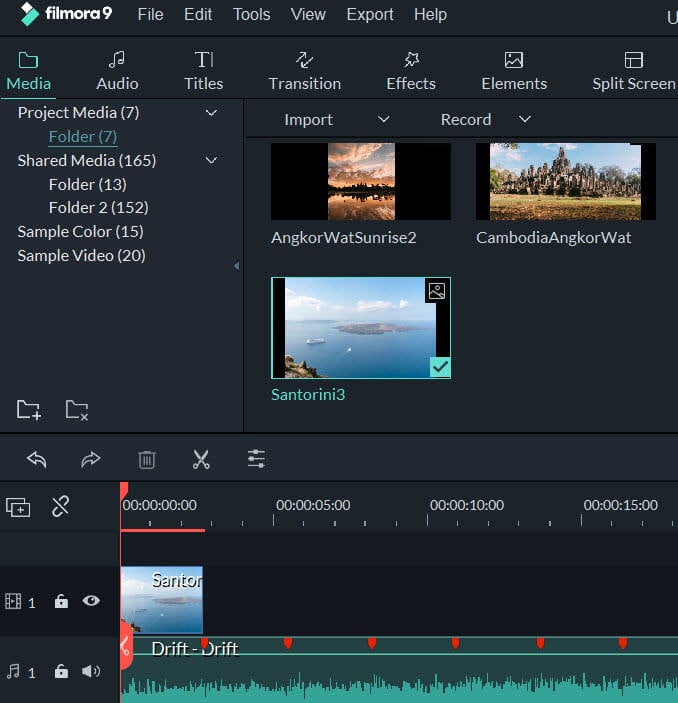
Part 2: Automatically Resize YouTube Videos to Right Aspect Ratio with Wondershare Filmora for Mac
Hopefully, you have noted the correct aspect ratio required for YouTube videos. Now, it’s time to understand the quick process on how to resize YouTube videos as per this aspect ratio via Wondershare Filmora for Mac. Yes, the Filmora Mac’s latest version, 10.2, has recently launched a competitive feature - Auto Reframe. The feature automatically adjusts your video as per the selected aspect ratio and fits the video’s motion element quite instantly.
About Wondershare Filmora for Mac
Wondershare Filmora is one of the robust video editing programs containing both primary and advanced tools such as Motion Tracking, Keyframing, Green Screen, Audio Ducking, Color Matching, Auto Reframe, and so on.


Steps to Use Auto Reframe in Wondershare Filmora for Mac to Resize YouTube Videos
Step 1. Click the “Try It Free” button to download its latest version and launch it.
Step 2. Choose the More Tools > Auto Reframe after launching the Wondershare Filmora for Mac.

Step 3. Hit the Import button to upload a YouTube video for its resizing.

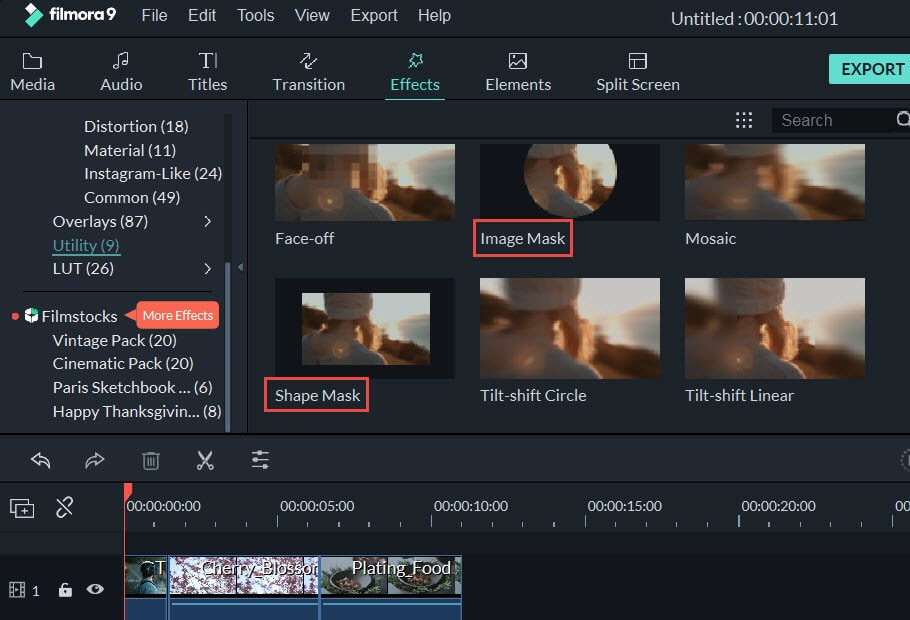
Step 4. Choose among five different aspect ratios, namely the Vertical, Square, Widescreen, Standard, and Cinema.

Tap the eye icon and preview the whole video.

Step 5. Toggle the Adjust frame tab and adjust the YouTube video screen as shown below.

It is present before the Advanced tab.
Then, adjust the Advanced settings, namely the Tracking Subject and Tracking Speed.

Step 6. Hit the Export tab to save the cropped video.

You can also upload the reframed video to Filmora for further editing.
Conclusion
So, this’s all about how to resize YouTube videos in its ideal aspect ratio. Right from the beginning, we’ve discussed the importance of creating YouTube videos in this digital transformation age and further considering the right fit of factors, including the size, length, quality, and aspect ratio of specific YouTube videos. Even though YouTube has the facility to adjust the video automatically, you have to edit in the cropped video, which is possible through integrated editing programs such as the one we’ve discussed above via Wondershare Filmora for Mac. This video editing software is quite remarkable and offers all the competitive features that both basic and advanced video editors need.
Liza Brown
Liza Brown is a writer and a lover of all things video.
Follow @Liza Brown
Liza Brown
Oct 26, 2023• Proven solutions
YouTube is one of the demanding platforms with more than 2.3 billion users worldwide as of 2021. And, in this digitally oriented world, you’re left with no reason not to create a YouTube channel specifically when you have the right talent to use one. Well, this guide is for those who are already into YouTube video creation and now need help on how to resize YouTube videos as per different aspect ratios. According to YouTube’s aspect ratio, it’s the right place to move forward even if you want to resize your videos present on other social media apps. We know brands and other influencers generally practice this kind of social media marketing.
So, let’s get started with our session on resizing YouTube as per the ideal aspect ratio without further ado.
Part 1: What’s the Right Aspect Ratio of YouTube Videos?
For attracting more audience and increasing engagement on YouTube videos, you have to look at each factor, along with the YouTube video quality. And, you cannot overlook the size of YouTube video among these factors to make it your perfect shot among competitors. Considering the importance of such factors, we’ve come up with this specific section on introducing you to the correct aspect ratio for YouTube videos.
It’s crucial to know the size before you start the YouTube game!
YouTube allows you to upload videos of different sizes ranging from 240p to 8K. And, the dimensions for these different sizes are as follows.
- 240p: 426x240 pixels
- 360p: 640x360 pixels
- 480p: 854x480 pixels
- 720p: 1280x720 pixels
- 1080p: 1920x1080 pixels
- 1440p: 2560x1440 pixels
- 2160p: 3840x2160 pixels
- 43200p: 7680×4320 pixels
Along with these, the aspect ratio, video size, and length of YouTube video should also be taken into consideration while uploading YouTube videos.
Thus, the ideal aspect ratio to resize YouTube video is perfect as 16:9, which we’ll diversify in the following three sections.
1. Computer
On a computer, the standard aspect ratio for YouTube video is 16:9. And, the YouTube player will automatically adjust other aspect ratios than the standard size. For instance, it may add padding of white or gray color depending upon the theme. However, it’s advisable to avoid these things like padding as they interfere with YouTube’s dynamic adjustments.
2. Android Phone
In the Android application, the scenario is quite different from YouTube videos. The app automatically adjusts the player as per the video size. The video will always fit the screen, whether it’s square, vertical, or horizontal. Ultimately, the videos will be shorter for widescreen and square for vertical.
3. iPad & iPhone
Similarly, the YouTube app for iPad and iPhone automatically adjust the video size to fit the screen. Thus, every video will fit the screen, even if it’s square, horizontal, or vertical.
Before we let you know how to resize YouTube videos, here are some tips for creating awesome YouTube videos.
- Create a strategy for YouTube video beforehand.
- Search for ideas and topics.
- Understand the use of the best equipment and gear.
- Ensure the best YouTube video editing.
- Optimize YouTube videos.
Part 2: Automatically Resize YouTube Videos to Right Aspect Ratio with Wondershare Filmora for Mac
Hopefully, you have noted the correct aspect ratio required for YouTube videos. Now, it’s time to understand the quick process on how to resize YouTube videos as per this aspect ratio via Wondershare Filmora for Mac. Yes, the Filmora Mac’s latest version, 10.2, has recently launched a competitive feature - Auto Reframe. The feature automatically adjusts your video as per the selected aspect ratio and fits the video’s motion element quite instantly.
About Wondershare Filmora for Mac
Wondershare Filmora is one of the robust video editing programs containing both primary and advanced tools such as Motion Tracking, Keyframing, Green Screen, Audio Ducking, Color Matching, Auto Reframe, and so on.
Steps to Use Auto Reframe in Wondershare Filmora for Mac to Resize YouTube Videos
Step 1. Click the “Try It Free” button to download its latest version and launch it.
Step 2. Choose the More Tools > Auto Reframe after launching the Wondershare Filmora for Mac.
Step 3. Hit the Import button to upload a YouTube video for its resizing.
Step 4. Choose among five different aspect ratios, namely the Vertical, Square, Widescreen, Standard, and Cinema.
Tap the eye icon and preview the whole video.
Step 5. Toggle the Adjust frame tab and adjust the YouTube video screen as shown below.
It is present before the Advanced tab.
Then, adjust the Advanced settings, namely the Tracking Subject and Tracking Speed.
Step 6. Hit the Export tab to save the cropped video.
You can also upload the reframed video to Filmora for further editing.
Conclusion
So, this’s all about how to resize YouTube videos in its ideal aspect ratio. Right from the beginning, we’ve discussed the importance of creating YouTube videos in this digital transformation age and further considering the right fit of factors, including the size, length, quality, and aspect ratio of specific YouTube videos. Even though YouTube has the facility to adjust the video automatically, you have to edit in the cropped video, which is possible through integrated editing programs such as the one we’ve discussed above via Wondershare Filmora for Mac. This video editing software is quite remarkable and offers all the competitive features that both basic and advanced video editors need.
Liza Brown
Liza Brown is a writer and a lover of all things video.
Follow @Liza Brown
MP3 to YouTube Converter: Upload MP3 to YouTube [3 Steps]
MP3 to YouTube Converter: Upload MP3 to YouTube

Richard Bennett
Mar 27, 2024• Proven solutions
Latest survey shows that Google’s video streaming site Youtube has surpassed radio, as well as CDs to be the most popular way American adolescents listen to music. Almost 91% of the music fans would listen to the samples before they purchase a song on iTunes. “Watching” music is getting more and more popular with Youtube’s arising popularity among music fans.
However, here comes the dilemma if you are trying to share your favorite music list with your friends on Youtube since Youtube is not designed to host files that are purely audio. Only video files are allowed to be uploaded to its server. Despite all this, is there a safe and easy solution to this issue? The answer if absolutely Yes! Wondershare audio converter let you upload an MP3 to Youtube by converting them to videos files first without losing any of its quality, helping you remove the barrier of uploading audio files to Youtube.
With it, you can not only add pictures to your MP3 files but also retouch them with various fantastic effects. Now follow the steps below to check out how to achieve it.
1 Import Files to Audio Converter
Before upload MP3 to YouTube, you can collect the relevant image, album cover or band picture to your music. Then run this MP3 to YouTube converter and choose 16:9 or 4:3 ratio according to your needs. After that, click “Import” to add the MP3 file and the pictures to the program. Then all the imported files will be displayed as thumbnails in the Media library.
2 Add Pictures to MP3 Files
Drag and drop your MP3 file to the music layer, and the picture to the video layer. These will be located under the timeline bar. Then choose the picture and move your mouse to expand the picture exposure time frame exactly as long as your MP3 file. If less, the remaining part will be blacked out, while too long will create silence in the overextended portions of the video.
If you want to add and show multiple pictures at a time for a single MP3 file, drag-n-drop them to the PIP layers. This MP3 to YouTube converter supports up to 10 pictures for the same MP3 file. Then adjust the position and size of each picture. You can also do more touch up to your creation. For example, you can right click and choose edit to add motion, mask and more effects as you like.
3 Directly Upload MP3s to YouTube
Watch and check the audio quality of your video. When you are satisfied, click “Create” and switch to the YouTube tab. Enter your YouTube Account, Password and related MP3 information to directly upload your works to YouTube.

Tip:
Besides uploading to YouTube, you can also save your creation to various formats and play on different devices or burn to DVD.
See, it’s easy convert MP3 to YouTube using this powerful video editing tool. Download and have a try now!
Richard Bennett
Richard Bennett is a writer and a lover of all things video.
Follow @Richard Bennett
Richard Bennett
Mar 27, 2024• Proven solutions
Latest survey shows that Google’s video streaming site Youtube has surpassed radio, as well as CDs to be the most popular way American adolescents listen to music. Almost 91% of the music fans would listen to the samples before they purchase a song on iTunes. “Watching” music is getting more and more popular with Youtube’s arising popularity among music fans.
However, here comes the dilemma if you are trying to share your favorite music list with your friends on Youtube since Youtube is not designed to host files that are purely audio. Only video files are allowed to be uploaded to its server. Despite all this, is there a safe and easy solution to this issue? The answer if absolutely Yes! Wondershare audio converter let you upload an MP3 to Youtube by converting them to videos files first without losing any of its quality, helping you remove the barrier of uploading audio files to Youtube.
With it, you can not only add pictures to your MP3 files but also retouch them with various fantastic effects. Now follow the steps below to check out how to achieve it.
1 Import Files to Audio Converter
Before upload MP3 to YouTube, you can collect the relevant image, album cover or band picture to your music. Then run this MP3 to YouTube converter and choose 16:9 or 4:3 ratio according to your needs. After that, click “Import” to add the MP3 file and the pictures to the program. Then all the imported files will be displayed as thumbnails in the Media library.
2 Add Pictures to MP3 Files
Drag and drop your MP3 file to the music layer, and the picture to the video layer. These will be located under the timeline bar. Then choose the picture and move your mouse to expand the picture exposure time frame exactly as long as your MP3 file. If less, the remaining part will be blacked out, while too long will create silence in the overextended portions of the video.
If you want to add and show multiple pictures at a time for a single MP3 file, drag-n-drop them to the PIP layers. This MP3 to YouTube converter supports up to 10 pictures for the same MP3 file. Then adjust the position and size of each picture. You can also do more touch up to your creation. For example, you can right click and choose edit to add motion, mask and more effects as you like.
3 Directly Upload MP3s to YouTube
Watch and check the audio quality of your video. When you are satisfied, click “Create” and switch to the YouTube tab. Enter your YouTube Account, Password and related MP3 information to directly upload your works to YouTube.
Tip:
Besides uploading to YouTube, you can also save your creation to various formats and play on different devices or burn to DVD.
See, it’s easy convert MP3 to YouTube using this powerful video editing tool. Download and have a try now!
Richard Bennett
Richard Bennett is a writer and a lover of all things video.
Follow @Richard Bennett
Also read:
- [New] Amplify Watcher Count Simplified Tactics Exposed
- [New] Defending Your Videos Against YouTube Copyright Strikes
- [New] Effortless Repetition Replay Your YouTube Videos via TV Connection
- [New] Prime Panzoid Layout Libraries
- [Updated] 2024 Approved Capture the Ocean's Majesty Best Action Cameras Reviewed
- 2024 Approved A Step-by-Step Strategy to Design Engaging YouTube Teasers
- 2024 Approved Channel Connectivity Made Simple Easy-to-Use YouTube Buttons
- 2024 Approved Top-Tier Digital Workshop Title Maker
- Captivate Audiences Quickly Shortcuts for YouTube Trailers with Filmora
- Comprehensive Tips for Remedying LCD/OLED Screen Burn In Problems
- Enhancing Income Through the Science of YouTube Trailer Creation for 2024
- Exporting Chat History: A Detailed Tutorial for ChatGPT Users
- Get Your Free H.265 HEVC Encoder to Enhance 4K & 8K Video Experience
- In 2024, Crafting Prime Valorant Video Thumbnails on YouTube
- In 2024, Discovering the Most Engaging Facebook Vids
- In 2024, How To Pause Life360 Location Sharing For Tecno Spark 20 | Dr.fone
- Stuck at Android System Recovery Of Oppo A1x 5G ? Fix It Easily | Dr.fone
- Title: Swiftly Adjust YouTube Videos to Mac Screen Ratios
- Author: Steven
- Created at : 2024-12-08 17:13:58
- Updated at : 2024-12-10 17:43:58
- Link: https://youtube-clips.techidaily.com/swiftly-adjust-youtube-videos-to-mac-screen-ratios/
- License: This work is licensed under CC BY-NC-SA 4.0.